Chapter 4 - Revelation Accounting
Chapter 4 - Revelation Accounting
Chapter 4 - Revelation Accounting

Create successful ePaper yourself
Turn your PDF publications into a flip-book with our unique Google optimized e-Paper software.
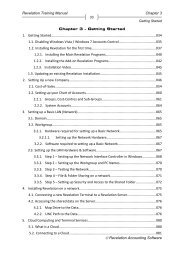
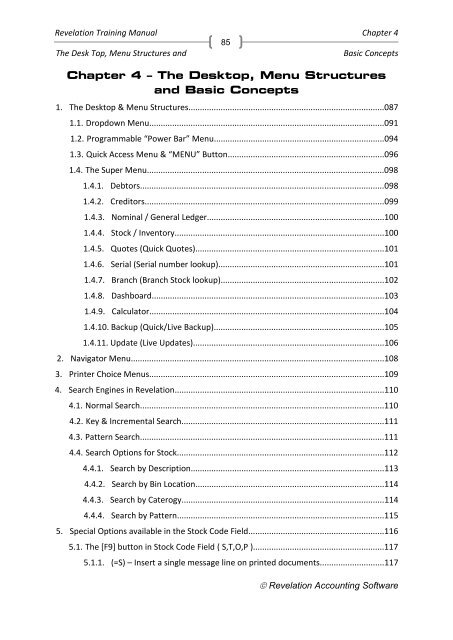
<strong>Revelation</strong> Training Manual <strong>Chapter</strong> 488The Desk Top, Menu Structures andBasic Concepts6) “Exit”. Leave the selection screen.On entering <strong>Revelation</strong>, you will be presented with the Desktop. You may use the Desktop indifferent ways.One of the most Amazing features of the Desktop is the fact that you may Customise the Desktop. Inorder to do this, you simply need to copy the desired backgroud orWallpaper into the <strong>Revelation</strong> directory. Make sure that the size of thebackgroud picture is appropriate. A reasonable size would be 1024 x768. Any lower and the screen will look pixelated.Pixelated ScreenTo change the Background look and feel, from the Dropdown menu, click on the [ChangeBackground picture] option.Tip: The Wallpaper should autorotate among the 10different default wallpapers in <strong>Revelation</strong>. If a User wants touse their own picture or still prefers the Spacemanbackground, they can go to Setup > User Preferences >[General] tab and tick the 'Disable auto backgroundwallpaper update' box in the 'Colour Preferences' frame. <strong>Revelation</strong> <strong>Accounting</strong> Software
<strong>Revelation</strong> Training Manual <strong>Chapter</strong> 489The Desk Top, Menu Structures andBasic ConceptsThis will allow you to change the background picture on this screen to a picture of your choice. Tocontinue, click on the [change] button.<strong>Revelation</strong> will now display a list of all the picture files available in the <strong>Revelation</strong> Directory. You mayscroll up and down the list with you arrow keys or mouse and the choose the [Select] screen.A preview of the selected picture file will be displayed. You may either choose to [Select] or ignorethe selection by pressing [Exit]. <strong>Revelation</strong> <strong>Accounting</strong> Software
<strong>Revelation</strong> Training Manual <strong>Chapter</strong> 490The Desk Top, Menu Structures andBasic ConceptsSome Examples of Picture files. You may also customise the Desktop in you Company Colours. Askyour Graphics Designer to provide you with an appropriate background Picture.Once you have setup the <strong>Revelation</strong> Desktop “look and feel” to your requirements, you may startworking on it. It is important to know that <strong>Revelation</strong> has various options available to navigate to therequired section of the program that you would like to use.1) “The Dropdown Menu”. This menu structure is in line with modern programmingtrends. The entire program is driven from Dropdown Menus via the Master Toolbar.2) “Programmable Power Bar Menu”. This is a unique menu that can be programmedby the user. This menu allows for a high level of customisation.3) “The Menu Button”. Pressing this button activates the traditional <strong>Revelation</strong> “QuickAccess Menu. This menu can also be permanently activated or Replaced by aNavigator Menu.4) “The Super Menu”. This Menu allows the user to have access to alternateinformation whilst busy with <strong>Accounting</strong> tasks. <strong>Revelation</strong> <strong>Accounting</strong> Software
<strong>Revelation</strong> Training Manual <strong>Chapter</strong> 492The Desk Top, Menu Structures andBasic Concepts5) “Postings” – From here you may Post Debtors and Creditors Payments as well asprocess Inter –Account Journals.6) “Reports” – All Ledger and System Reports may be printed from here.7) “Month-End” – Once a Month, the system has to be aged. This is known asMonth-end. <strong>Revelation</strong> <strong>Accounting</strong> Software
<strong>Revelation</strong> Training Manual <strong>Chapter</strong> 493The Desk Top, Menu Structures andBasic Concepts8) “Tools” – From time to time Maintenance needs to be performed on the<strong>Accounting</strong> system. “Tools” assist the user in this process.9) “Add-ons” – Access any additional <strong>Revelation</strong> programmes from this menu.10) “Help” – This option may be used when users need assistance with <strong>Revelation</strong>.A powerful search engine is also available. <strong>Revelation</strong> <strong>Accounting</strong> Software
<strong>Revelation</strong> Training Manual <strong>Chapter</strong> 494The Desk Top, Menu Structures andBasic Concepts1.2 Power Bar MenuThis unique Menu allows the user to Program their own Shortcut Toolbar Options. You may populatethis toolbar with any of the available options that you use often. A good example would be the Tillbelow. This option will shortcut the user to the Invoicing Screen.To program the features on this Toolbar, simply click on the yellow Question Sign. This will bring upthe Entire selection of options available to place on the Bar Menu.The Bottom Left will indicate your current Selection.To add a Shortcut button, simply click on the option that you require (Left Menu) and then click onthe [ADD] button. You may also add a Separator or Blank Space on the toolbar in order to tidy upyour toolbar. You may also [Remove] existing icons from here.Once you have made your selection, it will be moved to the active list (Right). <strong>Revelation</strong> <strong>Accounting</strong> Software
<strong>Revelation</strong> Training Manual <strong>Chapter</strong> 495The Desk Top, Menu Structures andBasic ConceptsYou may now choose a new icon for the application, by clicking on the application on the right andthen clicking on the [Select Icon image...] at the button. This will display a list of all the availableicons.Make your selection by clicking on the required Icon.To save the Application into the toolbar, click the [OK] button.The new Icon will now appear on the Power Bar Menu <strong>Revelation</strong> <strong>Accounting</strong> Software
<strong>Revelation</strong> Training Manual <strong>Chapter</strong> 496The Desk Top, Menu Structures andBasic Concepts1.3 Quick Access Menu (“Menu” Button)The Quick Access Menu is based on the DOS version of <strong>Revelation</strong>. Many users arefamiliar with and prefer this menu type. To stay in touch with modern trends, wehave opted to hide the quick access menu in order to display the background image. (The trend is todisplay our company logo as the main background). In order to activate the Quick Access menu, youmay press the [MENU] button or you may switch the Quick access menu on permanently by going toSetup and System Maintenance>>User Preference>>General.You may either choose to use the [Menu] button or to permanently display the quick access menu,by selecting the “Quick Access” option.The Quick access menu has been split up in seven main Sections: <strong>Revelation</strong> <strong>Accounting</strong> Software
<strong>Revelation</strong> Training Manual <strong>Chapter</strong> 497The Desk Top, Menu Structures andBasic Concepts1.3.1 Daily OptionsUse the Daily options menu (Also known as the circle ofBusiness) to access the daily operations’ associated withmost business accounting task such as Invoicing, GoodsReceiving, Orders & Quotes.Tip: Use the POWER BAR to shortcut some or all of these Functions.1.3.2 Branch Optionsas Branch and Warehouse Orders.1.3.3 Frequent ReportsThe Branch Options house the Inter-Branch and (Ifenabled) the Warehousing Transfer Options. This includesmoving stock to and from Branches or Warehouses as wellReporting is a Key component to any business accountingoperations’. All the major group reports are all housedtogether under this section. You may print reports toScreen, Draft or Laser Quality Printouts, PDF and Excel.Most Reports have a drilldown function in order toaccess the supporting ledger of a reported transaction.Simply print the report to screen and then click on the lineitem. You will be informed if no drilldowns are available.You may also design and print your own Custom reports.1.3.4 Monthly Options<strong>Revelation</strong> is a Firm believer that every business shouldhave a very definite Transaction cut-off period. Throughexperience, we have established that it is a good practiceto report monthly figures to management. In order tomake sure these figures are accurate, it is important tohave a definite Month-endThis option houses all the tools required in order toaccomplish that. This includes Bank Recon’s, Interest,Recurring or Auto billing, VAT and VAT Reporting as well as the actual Month-end Procedures.1.3.5 System Setup OptionsSystem Options allow you to setup the way the<strong>Accounting</strong> Software operates as well as how a particularuser and his Computer should function. <strong>Revelation</strong> <strong>Accounting</strong> Software
<strong>Revelation</strong> Training Manual <strong>Chapter</strong> 498The Desk Top, Menu Structures andBasic Concepts1.3.6 Miscellaneous Options<strong>Revelation</strong> has a large variety of Add-on modules available.These add-on options are very industry specific. Whenever aCustom or Add-on module is bought and installed, you mayaccess them from the Miscellaneous Options Menu. As partof your SLA Agreement with <strong>Revelation</strong>, you are also entitled to regular updates to the system. Findout more about these updates under the “Latest Additions and Updates” menu.1.3.7 Exit Options1.4 The Super MenuThis menu option allows you to either load another<strong>Revelation</strong> Company or to exit out of <strong>Revelation</strong>.The Super Menu is another unique feature in <strong>Revelation</strong> <strong>Accounting</strong>. Thisinnovative menu allows true windows functionality in that it allows you access toany of your ledger account whist still busy with Transactions. You may be busywith an invoice only to realise that the stock item you are invoicing has not beencreated on the System as yet. Instead of cancelling the invoice, you simply clickon the Stock Super menu button and then add the item as required. This feature,combined with the ability to allow multiple Sub-Modules, makes <strong>Revelation</strong><strong>Accounting</strong> one of the few, if not only, TRUE Windows capable <strong>Accounting</strong>packages on the market.The following Modules can be accessed via the Super Menu. Debtors, Creditors,General Ledger, Stock, Quick Quotes, Serial Number Tracking, Branch Stocklookup, Dashboard Information, Calculators (Both Microsoft and Cash upCalculators), Quick Backups as well as Live updates via the internet.1.4.1 DebtorsThe Debtors Button allows you to call up any of your client information. Thisbutton will allow you access to Transaction History, Balance owing, Type ofaccount, e-mail address, Contact details as well as full transactional Data for up to 9 years. Also usethis button to [Add] new clients or [Edit] existing details like change of address and Contact Details.The System works on the old “Cardex” type system. Click on any page group to display the pageinformation. (More about this in the next chapter) <strong>Revelation</strong> <strong>Accounting</strong> Software
<strong>Revelation</strong> Training Manual <strong>Chapter</strong> 499The Desk Top, Menu Structures andBasic Concepts1.4.2 CreditorsThe Creditors Button functions in exactly the same way as the Debtors button inthat you may call up existing Suppliers information add new Suppliers and viewSuppliers Transactions and History from here. This module is explained in more detail later whendiscussing how to open a new Creditors Account. (More about this in the next chapter) <strong>Revelation</strong> <strong>Accounting</strong> Software
<strong>Revelation</strong> Training Manual <strong>Chapter</strong> 4100The Desk Top, Menu Structures andBasic Concepts1.4.3 Nominal / General LedgerUse this button to Lookup General Ledger account Balances and Transactionentries. Compare them to the budgets and last year’s figures as well as analyse thefigures by viewing history and Transactional Details. You may also add new Ledger Accounts fromhere or link existing accounts to Departments, Groups and Sub-Groups for reporting purposes. AlsoDisplay/Print Charts on Ledger Accounts from here. (More about this in the next chapter)1.4.4 Stock / InventoryFrom here you may call-up full stock Information like movements, comparatives,Charts, Suppliers Data and other stock information. You may also Setup Stockbudgets and Stock levels. You may also edit stock information like descriptions, notes and updatedsupplier’s information. If warehousing is switched on, you may check the other warehouses stockholdings. Use this option to Add new Stock, Service or Odd items.As with Debtors and Creditors, you may flip through the different pages to view and Edit Controldetails like Debtors prices and specials (More about this in the next <strong>Chapter</strong>). <strong>Revelation</strong> <strong>Accounting</strong> Software
<strong>Revelation</strong> Training Manual <strong>Chapter</strong> 4101The Desk Top, Menu Structures andBasic Concepts1.4.5 Quotes (Quick Quotes)Use Quick quotes to create a one item “On-the-Fly” quote. This is a very handyoption in Counter and Telesales operations were clients need pricing on a singleitem. If the stock item has a picture attached, you may e-mail the quote as well as a picture of theitem to the client. You will have an option to add the quote to a client account record. Choosebetween Account or COD quotes.1.4.6 Serial (Serial number lookup)Use this option to track the movement of serialise stock that you have bought orsold. Simply insert the serial number in the space provided.<strong>Revelation</strong> will now display the full history of the serialise item. From here you may track when andto how the serialised item was sold to, as well as the remaining warranty period on the item. Youmay also track the purchase history of the serialise item from your supplier. This will include the dateand invoice number of your purchase. <strong>Revelation</strong> <strong>Accounting</strong> Software
<strong>Revelation</strong> Training Manual <strong>Chapter</strong> 4102The Desk Top, Menu Structures andBasic Concepts1.4.7 Branch (Stock lookup)Use the Branch button to check the stock holdings in other Companies that arehoused on the Same Server. This option allows you to check if the otherCompanies in your group have stock of a particular item. This option assumes that the “BranchLookup option” has been enabled as well as the particular stock item has the same code in all thecompanies.The idea is for the other branches in the group to log onto the main server using Microsoft’sTerminal Services via the Remote Desktop Connection option available as default on most MicrosoftWindows packages. (See <strong>Chapter</strong> 3: Cloud Computing and Terminal Services).To enable this option in <strong>Revelation</strong>, go to “System Preferences”.Now select the “Stock” tab. <strong>Revelation</strong> <strong>Accounting</strong> Software
<strong>Revelation</strong> Training Manual <strong>Chapter</strong> 4103The Desk Top, Menu Structures andBasic ConceptsFrom here you may enable the Branch lookup option on the right, as well as select the range ofcompanies that should be included in the Branch lookup, on the left.1.4.8 DashboardThe Dashboard functions in the same way as an aeroplanes instruments, in that itgives vital information to the controller about the state of the company. Companyowners and decision makers may compare sales, cost-of-sales and profit for the month to last monthas well as compare the current year’s figures with last year.You may also keep track of Purchases in the same way. Toadd the purchase option, simply click on the [Setup]button. Select the tick box options of the items that youwould like to add to the Dashboard. In the same way, youmay delete those options that you would not like to bedisplayed.Tip: Remove this option from users that should notbe privy to this information via the [System access] option under the “User Preferences”. <strong>Revelation</strong> <strong>Accounting</strong> Software
<strong>Revelation</strong> Training Manual <strong>Chapter</strong> 4104The Desk Top, Menu Structures andBasic ConceptsOther vital information on the Dashboard includes the Debtors and Creditors age analysis as well asa list of your top performers. You may choose from the following:Tip: Although this list refers to the ‘Top Ten” items, you may choose any amount of items to beincluded in your lists.Tip: Use the [Recalculate] button to allow the system to verify figures fromtime to time.1.4.9 CalculatorTwo type of calculator are available here.Option one will call up the normal Microsoft calculator. Youmay use this calculator anywhere in <strong>Revelation</strong>. All the normalFunctions of the Microsoft calculator are available.Option two is a special “Cash-up” Calculator. This option wasintroduced in order for users that work with petty cash, mayhave the same functionality as with Till Cash-up’s.Simply insert the amount of any cash unit into thecorresponding block, and <strong>Revelation</strong> will work out the Cashholding for you. <strong>Revelation</strong> <strong>Accounting</strong> Software
<strong>Revelation</strong> Training Manual <strong>Chapter</strong> 4105The Desk Top, Menu Structures andBasic Concepts1.4.10 Backup (Quick/Live Backup)Backups are extremely important in today’s volatile IT world (computer theft,Viruses etc.). We believe that you cannot ever be over zealous with the amountand frequency that backups are performed. However, the biggest problem with “live” backups isthat a database that is currently in use does not like to be backed up. The reason for this is obvious:the integrity of the backup file cannot be guaranteed whilst in use due to the fact that informationmay be changing as the backup is in progress. Up to now, all other users had to be out of <strong>Revelation</strong>before the last remaining user could make a backup. The problem with this however, is that mostusers are usually busy with <strong>Revelation</strong> all day. In an attempt to resolve this issue, we have built inthe Quick backup under the Super menu that can perform a “Live” backup.WARNING: THIS BACKUP IS NOT MEANT TO REPLACE YOUR NORMAL DAY-END QUICK BACKUPAND EXTERNAL BACKUP, BUT RATHER GIVE YOU AN ADDITIONAL FALLBACK POSITION.Remember that busy environments, where a backup happens to be performed while everyone’sposting invoices etc., may have integrity issues. This is due to the fact that a volatile flag may be inplace on a file being backed up. In this event, when restoring from a backup in this state, you may ormay not be forced to run a fix (to reset the volatile flag) once the restore has taken place.To perform a live backup, any user may simply click on the Green Backup button. Note that thisshould preferably be done during quiet intervals. Once the backup is complete, a message tellingyou that the backup was successful will be displayed. You will also be informed to which of theavailable Quick Backup folders the backup was sent to.Hot Tip: As a matter of interest, a backup in <strong>Revelation</strong> is simply the PROWIN.mdb data file thatis copied to a sub-folder under the company directory.The Prowin.mdb file is first copied to the allocated Quick Backup folder (BU1 to BU9) and thenrenamed to Backup.mdb. You will notice that the size of the Backup.mdb is exactly the same as theProwin.mdb. The two files are identical. <strong>Revelation</strong> <strong>Accounting</strong> Software
<strong>Revelation</strong> Training Manual <strong>Chapter</strong> 4106The Desk Top, Menu Structures andBasic Concepts<strong>Revelation</strong> will automatically rotate to the next BU folder in the list when performing the next QuickBackup.We recommend, if you are going to be using the quick backup method, that you set your quickbackup settings to keep as many backups as possible (Make sure you have enough space on yourhard drive for this). <strong>Revelation</strong> allows for up to 9 quick backups to be kept at any given time. Tomake sure that you have the maximum available quick backups turned on, from the quick accessmenu, go to Setup and System Maintenance.On the popup menu, select the “System Preferences” Icon.Under the “General” Tab, look for the “Maintain how many Quick-Backup Nodes” option and clickon the down arrow.Now select the desired number of quick backup nodes that you require. Again, remember to checkthat you have space on your hard drive as the database can grow very large.While you are here, check out the other backup settings, and change them to the required numberof backups. It is far cheaper to increase your hard drive space than to recapture lost work.1.4.11 Update (Live Updates)As part of your SLA Agreement, you are entitled to regular program updates.Other than most of our opposition, we do not resell you the program every coupleof years (with slight changes to the look and feel of the package). Rather, we make every newfeature in <strong>Revelation</strong> available to you on a Regular basis. <strong>Revelation</strong> <strong>Accounting</strong> Software
<strong>Revelation</strong> Training Manual <strong>Chapter</strong> 4107The Desk Top, Menu Structures andBasic ConceptsAs the package develops, you are entitled to those developments. Simply click on the [Update]button and <strong>Revelation</strong> will update you to the latest available version.Only one workstation has to update to the latest version. Once completed, the system will promptthe user with the option to update the main computers or Server. From then on, each workstationthat logs unto the Server will be updated in turn.Not all the updates are enhancements. Due to the nature of programming, bugs and errors maycreep in when developing the system. As and when the problems are reported, they are fixed andsubsequent updates are posted on the web.Once the updates have been installed, it is up to the user to familiarise themselves with the relevantupdates. To obtain a list of updates, go to the Miscellaneous Menu and then select the following:Tip: We highly recommend that a single dedicated user checks for updates, at least once aweek.2 Navigator MenuDue to the high volume of users that are migrating from other accounting packages to <strong>Revelation</strong>,we have found that a lot of them are used to a Navigator menu. To accommodate those users, wehave allowed this option in <strong>Revelation</strong>. Although not exactly the same, the navigator follows a verysimilar pattern as Navigator Menus in other popular packages on the market.To activate the navigator menu, from the User Preferences, Select “Navigator” under the Generaluser tab.When you next log onto <strong>Revelation</strong>, the Navigator Menu will appear.The Navigator menu has two distinct components. On the top, first select the “Group” that youwould like to work in (Like Clients or Suppliers) and then select the Function on the Left that youwould like to perform (Like Daily Operations and Report). You may then select the correct menubutton on the Right to activate the Functionality required. <strong>Revelation</strong> <strong>Accounting</strong> Software
<strong>Revelation</strong> Training Manual <strong>Chapter</strong> 4108The Desk Top, Menu Structures andBasic ConceptsIn order to maintain a clean desktop, the Navigator screen disappears whenever you click thedesktop anywhere other than the Navigator. To recall the Navigator screen, click on the [ShowNavigator Menu].3 Printer Choice MenusThe Printer Choice menu is a result of the flexibility that <strong>Revelation</strong>s strives to offer their users. In allour main modules like quote, orders and invoicing, a Printer selection option will be presented. Thereason for this menu is to offer the user flexibility when producing documents. The default settingcan be changed under the Terminal Preferences. <strong>Revelation</strong> <strong>Accounting</strong> Software
<strong>Revelation</strong> Training Manual <strong>Chapter</strong> 4109The Desk Top, Menu Structures andBasic Concepts1. When printing this document, the results will be printed to the Report Printer. Thelayout will then correspond with the Report type layout.2. When printing this document, the results will be printed to the Invoice Printer. Thelayout will then change to suit the Invoice layout.3. If this option is selected, you will be prompted to select any other printer available inthe printer selection as stipulated in the Microsoft Printer list. Tip: to print to a PDFdocument type, select NovaPDF in the printer list.4. This option is seldom used these days due to the inclusion of PDF and e-mail. Ifhowever you require a file to be produced instead of a printout, you will beprompted to select the location and file type to be produced. A good example wouldbe to produce a .txt file type.5. This option causes <strong>Revelation</strong> NOT to produce a printed document (In order to savepaper). Usually you will have an option screen that will allow you to produce aDuplicate Document after the document has been completed. Once you select that,a printed document will be produced. <strong>Revelation</strong> <strong>Accounting</strong> Software
<strong>Revelation</strong> Training Manual <strong>Chapter</strong> 4110The Desk Top, Menu Structures andBasic Concepts6. From here you may select a different layout type. The selection is a TemporarySelection though.7-14. Options 7 to 14 are information options only that indicate Printer and layoutselections.15. Due to the large amount of users that can work on some <strong>Revelation</strong> packages at anygiven time (up to between 140 and 250), the system does not allocate a documentnumber beforehand. The reason is obvious. If a user does not complete thetransaction, the numbering sequence will have gaps. For this reason we simply statethe next available (Possible) document number. Once the document is completed,the number will be allocated. In smaller environments the number will almostalways be the same as the indicated number.4 Search engines in <strong>Revelation</strong>One of the unique features of <strong>Revelation</strong> is the many search facilities within the package. You maychoose from a:Normal SearchKey & Incremental SearchesPattern SearchThese options are available in all ledgers throughout the package4.1 Normal SearchThe normal search option is the standard option that will always be presented on the selection ofany of the ledgers. You may simply insert your search criteria and <strong>Revelation</strong> will then call up thatcriteria. A good example of this would be where you are searching for a stock item via the SuperMenu. Simply click on the Stockbutton and then type in therequired Stock code.To change the default values of thestandard search, go to Userpreferences>>General. This willallow you to change the defaultsearch index. <strong>Revelation</strong> <strong>Accounting</strong> Software
<strong>Revelation</strong> Training Manual <strong>Chapter</strong> 4111The Desk Top, Menu Structures andBasic Concepts4.2 Search by a Specified Key &Incremental SearchUnder the User Settings, you may specify the Default search key that you would like <strong>Revelation</strong> tosearch the existing accounts by:Once you have made the default selection, <strong>Revelation</strong> will always search by this search key bydefault. In our example “Name” is the default. You may simply insert the name (or part their-of) andpress enter. If you have only inserted part of the name e.g. “B” when looking for the account name“Branch”, you may then press enter and continue with an incremental search by simply typing therest of the account name. As you type, the incremental search will narrow you search until thedesired account is found.4.2.1 Changing the default search Key, before initiating the searchThis option allows you to first change the default search key withouthaving to visit the user settings. You may, for instance, not know theaccount name of the Debtor that you are looking for, but are familiarwith the “Account Number”. Once you have changed the defaultsearch key, you may revisit the search window to continue yournewly specified search.4.3 Pattern SearchThis gem will assist you in searching every single character within the specified field. If you knowthat your client has the word “ Sales” in its name, simply select the pattern search field e.g. “AccountName” and type the word “Sales” and enter. All accounts with the word “Sales” in the name will bedisplayed. <strong>Revelation</strong> <strong>Accounting</strong> Software
<strong>Revelation</strong> Training Manual <strong>Chapter</strong> 4112The Desk Top, Menu Structures andBasic Concepts4.4 Search Options for StockWhen producing documents like quote and invoices, where stock is involved, you maychoose the different ways in which stock is searched for. Under the stockcode prompt, youmay simply type the stock code or part thereof and then press enter.Only use the [F5] optionwhen your default settinghas been changed toanother search type.The stock item will either be displayed on the screen or an additional search and information screenwill appear in the case of a half entered stock code.From this screen, you may either start typing the rest of the item to evoke an Incremental search,that is, the stock codes that no longer adhere to the criteria of the search will fall away.TIP: You may also access additionalinformation of the stock items pertainingto the customer you are busy with. Clickon the [Resent] button to view a list ofall the transactions for this stock item tothis client. To use one of the optionspresented, simply double click on thatitem line.You may also search for stock using one of the following options instead of the normal stockcodesearch engine. <strong>Revelation</strong> <strong>Accounting</strong> Software
<strong>Revelation</strong> Training Manual <strong>Chapter</strong> 4113The Desk Top, Menu Structures andBasic Concepts4.4.1 Search by DescriptionIf you do not know the stockcode for an item, but you do have the Description, simplyenter the description or part thereof and then press the [F4] button. In the case of ourexample, the Description “Multi” will be used. (This is the Description for a Multi Adaptorwith the Stock Code “Adaptor-01”).Tip: You may also enable permanent Description Search under the User SettingsOnce the [F4] button is pressed, the following will appear on the document line.Tip: If you do not know the Description of the item, first press the [F4] button. This will switchthe system into “Increment” search mode. A complete stock list will appear. As you start typing, theitems that no longer conform to the search criteria will “fall away” until only the required itemremains.Start typing in “BEEF” in order to locate the Beef Burger on the Description list. <strong>Revelation</strong> <strong>Accounting</strong> Software
<strong>Revelation</strong> Training Manual <strong>Chapter</strong> 4114The Desk Top, Menu Structures andBasic Concepts4.4.2 Search by Bin + StockcodeIn the same way as Description Search, you may search for an item using the Bin Location.Simply enter the Required Bin location and the press [F2]. All the stock in the selected binlocation will be displayed according to Stockcode order.TIP: To do an “Incremental” search, simply press [F2]. All the stock on record will now bedisplayed. As you start typing in a Bin location, the items that no longer conform to the charactersentered will start falling away until only the desired items remain. In our example below, we usedthe Bin code “A1”.4.4.3 Search by Category + StockcodeIf only the Category Code is known, you may type in the Category Code into the spaceprovided for the stock code and then press the [F3] button. The items belonging to thatCode will appear. You may now start typing the Description of the items to reduce thesearch criteria. The Category Results will be displayed by stockcode order.Tip: Create a Category wall chart in order to assist in [F3] lookups <strong>Revelation</strong> <strong>Accounting</strong> Software
<strong>Revelation</strong> Training Manual <strong>Chapter</strong> 4115The Desk Top, Menu Structures andBasic ConceptsAs with Bin and Description Search, you may also initialise an “Incremental” search by first pressingthe [F3] button followed by the category code. As you start typing the undesired categories will fallaway.Tip: Use the [Backspace] button to recall removed categories in order to quick start anothercategory search.4.4.4 Search by PatternA Stock pattern search is a very powerful way in searching for stock when the stockcode is notobvious. A customer might have your suppliers stock code available (as it may be a market leaderand well known to the public), but your stock code is unique for that item.A Pattern search is able to lookup ANY pattern in the required field. An example of this is where thedescription has the pattern “DAP” in the Description for “MULTI ADAPTOR”. <strong>Revelation</strong> will be ableto search ALL the Descriptions that have “DAP” in the body of the Description.To start the Pattern Search, simply click on the down arrow next to the stockcode prompt.A list of available stock items will now be displayed.To activate the Pattern Search, click on the [Another Search] button. <strong>Revelation</strong> <strong>Accounting</strong> Software
<strong>Revelation</strong> Training Manual <strong>Chapter</strong> 4116The Desk Top, Menu Structures andBasic ConceptsThe normal Search engine will now be displayed.Click on the [Pattern Search] button to evoke the search.A list of all the available patter Search options will now be displayed.You may now choose any of the available fields by clicking on one of them, and then typing in part ofthe pattern that you would like to search for in that field. Remember that you do not have to enterthe entire matching characters; the pattern will look at all the relevant matches.IMPORTANT: In order to increase the accuracy of any stock search, it is vital that you fill in asmuch information into the available fields when creating a new stock item. The more you fill in themore information available.5 Special Options available in the Stock Code FieldWhen processing Transaction documents like invoices, <strong>Revelation</strong> has some amazing special optionsavailable other than just entering the stock codes and descriptions. You may want to better describea product, or give the client an explanation as to how to better utilise the product just purchased byfor instance adding a message line above or below the item line. There are several of these“Shortcut” lines available throughout most of the document engines in <strong>Revelation</strong>. <strong>Revelation</strong> <strong>Accounting</strong> Software
<strong>Revelation</strong> Training Manual <strong>Chapter</strong> 4117The Desk Top, Menu Structures andBasic Concepts5.1 The [F9] button in Stock Code Field (S. T. O. P.)To view a list of these special options, from the body of the document that you areprocessing, you may simply press the [F9] button in order to display a list containing theshortcuts. Some of the items available would be the creation of unique message lines asdescribed above as well as importing Quotes and Orders.For advanced users, we have also built in some shortcut keys to facilitate these options. All of theshortcut keys are evoked by first pressing the [ = ] sign (as you may have stock codes that start withsimilar letters as the shortcut keys).The four most popular shortcut keys are =S, =T, =O, and =P. (Remember the word STOP).In order to use the shortcut keys, your curser has to be on the Stockcode field in the body of thedocument that you are processing. Type in = followed by the required shortcut followed by the[Enter] key (example =S then [Enter]).5.1.1 (=S) – Insert a single message line on printed documentsUsing “=S” will allow you to insert a free hand message anywhere in the document thatyou are busy with.Note: That the “Quick” or Freehand message will NOT be saved in the message file. <strong>Revelation</strong> <strong>Accounting</strong> Software
<strong>Revelation</strong> Training Manual <strong>Chapter</strong> 4118The Desk Top, Menu Structures andBasic Concepts5.1.2 (=T) – Insert a Pre-Saved message lines to insert in a documentThis option will call up a list of messages that have been saved on the Message file. Simplyhighlight the message that you would like to use and then press the [Select] button.You may also add new messages by pressing the [New Msg] option and then entering your 70character message.Tip: You may add onto existing messages by first selecting them onto the document and thento double click on the message line on the document. This will turn a =T message into a =S message.You may have an =T message called “Order checked by:“. By following the above method, you mayadd the word “John” after the colon. Your =S message will now read: “Order checked by: John”5.1.3 (=O) – Insert and Odd/non-stock line into a printed documentOdd or non-stock items are those items that you would like to buy or sell that is not partof your usual stock (and it is highly unlikely that they ever will be). A simple example ofthis is where someone would like to purchase a PEN from a company that suppliescomputer equipment. The pen was bought and booked into the system via a GRN also using =O (notstock). On the GRN the nominal or Ledger used was “Stationary and Supplies”. It stands to reasonthat when selling the pen, either use the Ledger account Stationary and Supplies again (in order toreduce the expense “Stationary and Supplies”) or use the default account “General Sales” <strong>Revelation</strong> <strong>Accounting</strong> Software
<strong>Revelation</strong> Training Manual <strong>Chapter</strong> 4119The Desk Top, Menu Structures andBasic ConceptsIt is highly recommended that Odd or Non-Stock items are only used to Sell and Purchase Servicessuch as Electricity and Stationary or when you are really selling non-stock items such as oldequipment.Tip: Rather create “Service Items” when selling Labour or other Services. The reasoning here isthat Odd items do not log onto the Stock Audit trial as with Stock and Service items.5.1.4 (=P) – Allow price change on a stock item on a printed documentIt is possible to set the user setting in such a way that certain user will always beprompted for the Selling price when processing sales documents. This however is bothdangerous in the wrong hands and boils down to an extra step when speed is of the essence. Tofacilitate the option to do a price change, a user may simply type in [=P] followed by the stockcode inorder to stop at the Selling price. If the Supervisor password is switched on, you will be prompted forthis before you may change the selling price.Tip: Make sure that all the users have the user setting setup in such a way that they are limitedto the amount that they may alter the selling price. Some users can be limited to only insert HIGHERselling prices.Tip: Rather allow users the option to give discount, than changing selling prices.5.1.5 (=A) – Assembly InvoiceThis option is only available if you are using the Assembly invoice Module (Available from<strong>Revelation</strong>). When used, it allows you to Manufacture a Bill-of-Materials (BOM) on-the-fly.Simply put, you may take several stock items and combine them into a final product thatcan be sold without showing the components of the final product. A good example would be wherean engineering shop is building a Jungle Gym out of different part numbers in stock.Note: This option does NOT cater for Serial stock items.5.1.6 (=B) – Inserting a Sales Backorder into a Purchase Order or InvoiceWhen stock was reserved by using a Sales order or when stock was placed on backorder, itis possible to import such orders into an invoice without the need to re-enter the detailsof the order. Simply type [=B] in order to choose from a list of orders available for import. <strong>Revelation</strong> <strong>Accounting</strong> Software
<strong>Revelation</strong> Training Manual <strong>Chapter</strong> 4120The Desk Top, Menu Structures andBasic ConceptsTo view an order before importing it into an invoice, highlight the order and then press the [DisplayOrder] Button.Tip: If switched on, click on the [Profit] button to view Total Cost, Selling and Profit pecentageon the order. (Switch on under User Preferences>>Invoice>>Display Items Cost & Margin...).5.1.7 (=Q) – Insert a Quote into an Order or InvoiceUse this option to import quotes into Sales Orders, Invoices, Purchase Orders or evenother Sales Quotes. <strong>Revelation</strong> <strong>Accounting</strong> Software
<strong>Revelation</strong> Training Manual <strong>Chapter</strong> 4121The Desk Top, Menu Structures andBasic ConceptsAs with Sales Orders, you may call up a list of all the outstanding Sales Quotes for this client and thenclick on [Select] to import the quote.Click on the [Display Quote] button in order to first view the quote and Profit before importing theQuote.Tip: If the quote was converted to a Sales Order, it will be displayed in RED.Tip: Never Amend a Quote, rather use =Q to import the old quote and then amend it on thenew quote.5.1.8 (=R) – Insert a KIT/Recipe on a Printed documentKits and recipes are only available in the <strong>Revelation</strong> Enterprise and Empire Builder. Thebasis for all of them is the Manufacturing module bundled with Enterprise & Empire. (SeeManufacturing for more details on how to setup a manufactured item).On a Sales Document, simply type in =R under the Stockcode field. This will call up a list of all theavailable Recipe items that can be sold under this option. <strong>Revelation</strong> <strong>Accounting</strong> Software
<strong>Revelation</strong> Training Manual <strong>Chapter</strong> 4122The Desk Top, Menu Structures andBasic ConceptsTip: Tick the option to [Amend] the Recipe. This will allow you to change the components of theRecipe or kit On-the-Fly. Press [Ctrl] + [Delete] to remove a line itemPlease note: These changes will NOT be saved on the actual Recipe as it is meant for a “Per-Invoice” option, not an amendment tool.5.1.8.1 Option 1 (On-the-fly Manufacturing)A kit in this option is a group of items that you would like to sell together as a single unit and at asingle unit price, but you usually stock them as loose items. Only when a kit is sold, would you makeit up. A good example would be in the motor industry. They have what is called a “Zola Kit”. Itconsists of 5 Litres of oil, oil filter, air filter and fuel filter for one of the more popular brands ofminibus taxis. Individually, the items would cost far more separately than if they are sold in the “ZolaKit”. This brings customers into the door.When you want to sell a kit, you need to have a stockcode for the kit that you would like to sell. Inour example the kit stockcode will be “ZOLA KIT”. Then create a recipe in the manufacturing modulefor the “ZOLA KIT” item that contains all the loose components for the kit.Insert the components of the kit to be manufactured. <strong>Revelation</strong> <strong>Accounting</strong> Software
<strong>Revelation</strong> Training Manual <strong>Chapter</strong> 4123The Desk Top, Menu Structures andBasic ConceptsWhen using a kit item on a Document, the Kit components could or could not be displayed on thedocument underneath the Kit item.Tip: Change this option under User Preferences>>Invoice to see how it changes on thedocument..Now, on Sales Orders and Invoicing, when selling a Kit, the following message will appear. This willinform you that you do not have stock of the item being sold, but that you have a Recipe that couldcreate the item for you “On-the-Fly”..5.1.8.2 Option 2 – Using a Recipe to Call-up items onto a DocumentA kit could also be items grouped together that would make sense selling together with the itemthat the client is requesting.In this example, the supplier of garage doors sells wooden panels to an installer that collects themand then leaves. Half an hour later, the red faced installer is back, because you never offered himthe hinges and springs that he requires in order to complete the job. Using the [=R] function willsolve this problem. <strong>Revelation</strong> <strong>Accounting</strong> Software
<strong>Revelation</strong> Training Manual <strong>Chapter</strong> 4124The Desk Top, Menu Structures andBasic ConceptsThis option will call up a kit/recipe item and then populate the sales document with all the itemsthat belong in the kit. You may then simply remove the items that are not required by the client.5.2 Inserting a Blank Line in the body of a DocumentIf you would like to “Insert” a line message or leave a gap between any two stockcodes, simply movethe cursor to the line that you would like to move down.Hold down the [Shift] key and then press the [Insert] keys on your keyboard.You will notice that the line moved down. Repeat this option until the required amount of lines hasbeen created.5.3 Deleting a Line in the body of a DocumentTo remove a line item or blank space, move the cursor to the line or gap that you would like todelete.Hold down the [Shift] key again and then hit the [Delete] button. The line will be deleted6 Report Features6.1 Report parametersThroughout <strong>Revelation</strong>, whenever a report is printed, you will be prompted with a “Report SelectionFeature” screen. This option may differ slightly on each report, depending on the type of Report isbeing produced. <strong>Revelation</strong> <strong>Accounting</strong> Software
<strong>Revelation</strong> Training Manual <strong>Chapter</strong> 4125The Desk Top, Menu Structures andBasic Concepts6.1.1 Date SelectionOne of the features of <strong>Revelation</strong> is that you are allowed to work in two months at any given time.The reason for this is to allow the sales team to carry on in the new month while the back officefinish off month-end procedures like Statements and Bank Recon’s. When this happens, <strong>Revelation</strong>will give you a date selector on ALL the reports. This selector will ask you what months reports youwould like to print. In our example the operator is working in both May 2009 and June 2009. Byticking the option ”As at Today’s Date” all the data from the 1 st of May right up to the current data inJune will be included into the report.If you select the option “As at the End of Current Period (31 May 2009)”, only the data up to end ofMay will be included. The data for June 2009 will be EXCLUDED.6.1.2 Sequence SelectorDepending on what type of report you are printing, this option will give you a choice as to whatsequence you would like the report to read. This option will then arrange the report according to theSequence selected.In our example, we are printing a Debtors age analysis. You may choose from the followingSequence selections. A Stock report might have thefollowing Sequence range <strong>Revelation</strong> <strong>Accounting</strong> Software
<strong>Revelation</strong> Training Manual <strong>Chapter</strong> 4126The Desk Top, Menu Structures andBasic Concepts6.1.3 Category/Other SelectorsThis is one of the most important features in the <strong>Revelation</strong> Reporting System. It allows you todefine a report by utilizing custom criteria. These criteria can be anything that you have set up ineither the Debtors or Creditors master file.A good example is the Good, the Bad and the Ugly Report. You may have a Million Rand to come inaccording to the Master Debtors Report, but a third of the Money is not going to ever see the bankdue to a Recession. You may change the Category Status of a client from “G” to “U”.<strong>Revelation</strong> will now only print the Clients records that match the Category field that you haveselected. In our Example, only debtors accounts matching the category “G”, indicating the Goodpaying clients.In the same way, you may select other defining criteria what will define your Report. In stock forinstance, you may only select items that is linked to a certain Supplier or that belongs to a selectedstock category.6.1.4 Range SelectorA Range Selector could be anything in the report Range that can limit the information on the Report.You may want to print Sales for a Certain Rep or Clients that belong to a certain area. <strong>Revelation</strong> <strong>Accounting</strong> Software
<strong>Revelation</strong> Training Manual <strong>Chapter</strong> 4127The Desk Top, Menu Structures andBasic Concepts6.1.5 Defining Selection CriteriaMost report have very specific selectors that will further define your Report. Usually you simply haveto tick the appropriate selection but in some cases have to define to options by filling in someinformation.6.2 Report Output OptionsOnce you have selected the criteria required to define your report, you will now have to select theOutput Device. An output device is usually a printer but could also be a program like Microsoft Excelor an E-mail.Tip: Select Letter quality and then select NovaPDF to print to a PDF file. To view the dataonscreen, select the “Screen” option.Tip: To increase the size of the screen report, click on the Fontsize slider bar. Keep the mousebutton in and the move the bar right and left. <strong>Revelation</strong> <strong>Accounting</strong> Software
<strong>Revelation</strong> Training Manual <strong>Chapter</strong> 4128The Desk Top, Menu Structures andBasic ConceptsTip: You may also find information on reports. Simply click on the [Find] buttonType in the information that you are searching for. In our example we are looking for the word“Branch”.All the matching words or numbers will be highlighted.To continue looking for other items on the same report, simply click on the [Find Next] button.HOT TIP: In order to find out more information on any item on the report, simply click on therequired item. <strong>Revelation</strong> <strong>Accounting</strong> Software
<strong>Revelation</strong> Training Manual <strong>Chapter</strong> 4129The Desk Top, Menu Structures andBasic ConceptsIf Drilldown information is available, the backing information will be displayed.If no Drilldown information is availible, the following information screen will be displayed.6.3 Custom ReportsAll Ledger Reports have a Custom Report Option. This option allows you to create a Report that suitsyour specific requirements. Once the Custom Report has been created, it will be available to all theusers on the system.6.3.1 Creating a Custom ReportTo create a Custom Report, simply go to the [Custom] section on the Reports toolbar.Now click on the [Create a New Report] Button.Give the Report a name that will best suit the report criteria. <strong>Revelation</strong> <strong>Accounting</strong> Software
<strong>Revelation</strong> Training Manual <strong>Chapter</strong> 4130The Desk Top, Menu Structures andBasic ConceptsDepending on the type of printer availble, you may either create a 130 (80 column) or 250 (132column) character Report.You will now have to select the items from the left “List of available fields” by clicking on therequired item on the list.Move the item from the left passive list onto theRight-hand active list, by clicking on the [Add toSelected List] button.You may also remove items from the active list onthe Right by clicking on the item and then clickingon the [Remove from Selected List] button. <strong>Revelation</strong> <strong>Accounting</strong> Software
<strong>Revelation</strong> Training Manual <strong>Chapter</strong> 4131The Desk Top, Menu Structures andBasic ConceptsIf the result on the custom report needs to be added up into a total, then click on the tick box“Total” next to the active list. This will telly up the required line into a Sub-Total at the end of theReport.Report results will show a “Totals” sections at the bottom of the report.6.3.2 Printing a Custom ReportIn order to print a Custom Report, select the [Print a Custom Report] from the Report toolbar.Click on the name of the report that you have created. In order to identify the correct report, checkthe user number (Your user number will be next to your report).You may now choose to print a standard Custom Report or you may print a SQL Query Report.6.3.2.1 Normal Custom ReportTo print the Custom Report with the Normal parameter settings, select the first option <strong>Revelation</strong> <strong>Accounting</strong> Software
<strong>Revelation</strong> Training Manual <strong>Chapter</strong> 4132The Desk Top, Menu Structures andBasic ConceptsThe report you have set up under the Custom Report will now be printed.6.3.2.2 SQL Custom ReportAn SQL Query gives the user an option to further define the Custom Report details. You may havesetup a Custom Report that only shows Clients age analysis for 30 day accounts, but you now wantto see the details on the report for only one of your Reps on your staff. If setup correctly, an SQLQuery will achieve this goal.Basically an SQL Query is nothing else but basic programming. <strong>Revelation</strong> will assist you in showingyou all the options that you may utilize in order to create your query. To see a list of availableoptions click on the [Display Field Names]. <strong>Revelation</strong> <strong>Accounting</strong> Software
<strong>Revelation</strong> Training Manual <strong>Chapter</strong> 4133The Desk Top, Menu Structures andBasic ConceptsA list of all the available programming options will now be display.You may choose from this list for your query. It is important tonote that it is not the aim of this manual to teach programming.We are mainly aiming to introduce you to SQL Query’s, however,we encourage you to play around with the concept. In ourexample we will be teaching you how to setup a report that onlyshows the outstanding balances for 30 days balance clientsbelonging to RepCode 0002.The SQL ‘Select’ construct can NOT be changed. Its is generated by the system to indicate whatReport you are working from to create the SQL Query. IN the “WHERE” option though, you may now“Program” your query. In this case, the query starts with the Repcode indicating that the resultsshould be for a particular Rep. Now follow the word that you selected from the [Display FieldNames] with an ‘=’ sign. This will tell the system that what is to follow after is the required result.Now type the rep number that you require on the Report. In this case “0002”. The query should nowread “ RepCode=’0002’ ”. You may add other defining options. Use an AND to indicate that you areadding other options to the equasion.You may also setup the Order of the Report Results. In this case we want the “Balance” on theReport to be “Descending”.To find an example while setting up the Query, Simply hit the [SQL Example] button. <strong>Revelation</strong> <strong>Accounting</strong> Software
<strong>Revelation</strong> Training Manual <strong>Chapter</strong> 4134The Desk Top, Menu Structures andBasic ConceptsYou may have to change the Query a couple of times until you achieve the required results. Onceyou have mastered this Query, you will have one of the most powerful tools in the industry.6.4 ExportsIn order for data to be exported successfully, the PC you are working from will have to have a Copyof Microsoft Excel installed on it (Excel 97 or above).From the Export button on the Toolbar, select the type of export required. Depending on whatLedger you are working on, different options will be available.In our example, we will be exporting from the Debtors Ledger Master file. Once selected, you will bepresented with a list of available export field on the left. You may move the export from the left‘available list’ to the active list on the Right, by clicking on the [Add to Selected List]. <strong>Revelation</strong> <strong>Accounting</strong> Software
<strong>Revelation</strong> Training Manual <strong>Chapter</strong> 4135The Desk Top, Menu Structures andBasic ConceptsNow select the engine that you would like to export to. You may choose from a Text or from an ExcelExport.Under the Test Export you will have several options to define your export. You may also choose theexport file location by clicking on the [Browns] button.The export will open Excel directly with the choice data already inserted into the appropriate cells. <strong>Revelation</strong> <strong>Accounting</strong> Software
<strong>Revelation</strong> Training Manual <strong>Chapter</strong> 4136The Desk Top, Menu Structures andBasic Concepts <strong>Revelation</strong> <strong>Accounting</strong> Software
<strong>Revelation</strong> Training Manual <strong>Chapter</strong> 4137The Desk Top, Menu Structures andBasic Concepts7 Review1. To Access <strong>Revelation</strong> you need to (Double/Single) click on the Desktop_________.2. You (may/may not) create a new company from the <strong>Revelation</strong> Startup Screen.3. The <strong>Revelation</strong>___________ houses the four menu structures. They are the _____________,________________, _____________, and _____________.4. The (Dropdown/Droptype) menu houses the (modern/old) style menu structure that allowsMenu Selections.5. You (may/may not) alter the Desktop picture on <strong>Revelation</strong>.6. The (Power tool/Power Drill/ Power Bar) menu (can/can not) be programed by the user.7. The (Quick Enter/Quick Deployment/Quick Access) menu can (be activated/not be activated) bythe (Green/Yellow/Purple) Menu button.8. The (Super Menu/ Master Menu) is the menu on the (Left/Right/Middle) of the Desktop thatallows access to (3/4/5) master type menus.9. The Dashboard is an (<strong>Accounting</strong> / Management) tool that gives you Daily Monthly and Yearly_________, Cost-of-Sales and __________.10. The __________button allows you to backup your data to a ___________Folder.11. The _________Choice Menu allows you to choose different _________and allows a change of(Layouts/Forms/Defaults) as well as give you Printer information.12. What type of traditional filing system format does <strong>Revelation</strong> use to show the different Masterledgers in the Super Menu (Cardex / Cardio / Carib).13. What four Ledgers is available from the Super menu.13.1. _____________________13.2. _____________________13.3. _____________________13.4. _____________________ <strong>Revelation</strong> <strong>Accounting</strong> Software
<strong>Revelation</strong> Training Manual <strong>Chapter</strong> 4138The Desk Top, Menu Structures andBasic Concepts14. F2 does a Stock____________Search15. F3 does a Stock____________Search16. F4 does a Stock____________Search17. F5 does a Stock____________Search18. =R imports a (Kit/Recipe) into an invoice.19. =Q Imports a (Order/Quote)20. =B Imports a (Order/Quote)21. =S Allows a (Temp/Permanent) Message Line in to document.22. =T Allows a (Temp/Permanent) Message Line in to document.23. =O Allows a ________item to be created. <strong>Revelation</strong> <strong>Accounting</strong> Software
<strong>Revelation</strong> Training Manual <strong>Chapter</strong> 4139The Desk Top, Menu Structures andBasic ConceptsNotes <strong>Revelation</strong> <strong>Accounting</strong> Software
<strong>Revelation</strong> Training Manual <strong>Chapter</strong> 4140The Desk Top, Menu Structures andBasic Concepts <strong>Revelation</strong> <strong>Accounting</strong> Software