1 to 1 Standalone Hard Drive Duplicator and Eraser - StarTech.com
1 to 1 Standalone Hard Drive Duplicator and Eraser - StarTech.com
1 to 1 Standalone Hard Drive Duplicator and Eraser - StarTech.com
Create successful ePaper yourself
Turn your PDF publications into a flip-book with our unique Google optimized e-Paper software.
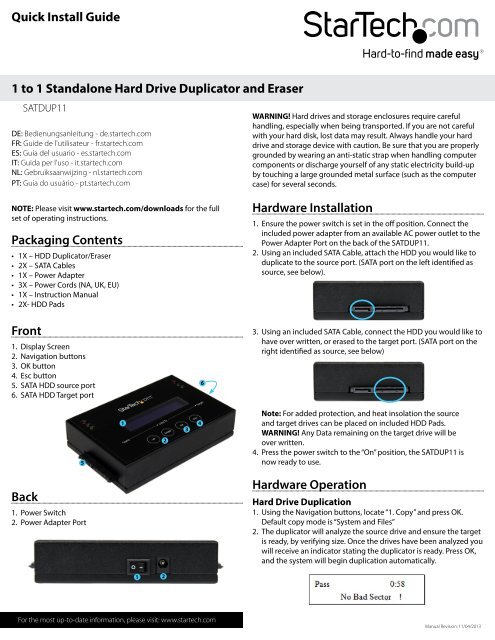
Quick Install Guide1 <strong>to</strong> 1 <strong>St<strong>and</strong>alone</strong> <strong>Hard</strong> <strong>Drive</strong> Duplica<strong>to</strong>r <strong>and</strong> <strong>Eraser</strong>SATDUP11DE: Bedienungsanleitung - de.startech.<strong>com</strong>FR: Guide de l'utilisateur - fr.startech.<strong>com</strong>ES: Guía del usuario - es.startech.<strong>com</strong>IT: Guida per l'uso - it.startech.<strong>com</strong>NL: Gebruiksaanwijzing - nl.startech.<strong>com</strong>PT: Guia do usuário - pt.startech.<strong>com</strong>WARNING! <strong>Hard</strong> drives <strong>and</strong> s<strong>to</strong>rage enclosures require carefulh<strong>and</strong>ling, especially when being transported. If you are not carefulwith your hard disk, lost data may result. Always h<strong>and</strong>le your harddrive <strong>and</strong> s<strong>to</strong>rage device with caution. Be sure that you are properlygrounded by wearing an anti-static strap when h<strong>and</strong>ling <strong>com</strong>puter<strong>com</strong>ponents or discharge yourself of any static electricity build-upby <strong>to</strong>uching a large grounded metal surface (such as the <strong>com</strong>putercase) for several seconds.NOTE: Please visit www.startech.<strong>com</strong>/downloads for the fullset of operating instructions.Packaging Contents• 1X – HDD Duplica<strong>to</strong>r/<strong>Eraser</strong>• 2X – SATA Cables• 1X – Power Adapter• 3X – Power Cords (NA, UK, EU)• 1X – Instruction Manual• 2X- HDD PadsFront1. Display Screen2. Navigation but<strong>to</strong>ns3. OK but<strong>to</strong>n4. Esc but<strong>to</strong>n5. SATA HDD source port6. SATA HDD Target portBack1. Power Switch2. Power Adapter Port1<strong>Hard</strong>ware Installation1. Ensure the power switch is set in the off position. Connect theincluded power adapter from an available AC power outlet <strong>to</strong> thePower Adapter Port on the back of the SATDUP11.2. Using an included SATA Cable, attach the HDD you would like <strong>to</strong>duplicate <strong>to</strong> the source port. (SATA port on the left identified assource, see below).3. Using an included SATA Cable, connect the HDD you would like <strong>to</strong>have over written, or erased <strong>to</strong> the target port. (SATA port on theright identified as source, see below)Note: For added protection, <strong>and</strong> heat insolation the source<strong>and</strong> target drives can be placed on included HDD Pads.WARNING! Any Data remaining on the target drive will beover written.4. Press the power switch <strong>to</strong> the “On” position, the SATDUP11 isnow ready <strong>to</strong> use.<strong>Hard</strong>ware Operation<strong>Hard</strong> <strong>Drive</strong> Duplication1. Using the Navigation but<strong>to</strong>ns, locate “1. Copy” <strong>and</strong> press OK.Default copy mode is “System <strong>and</strong> Files”2. The duplica<strong>to</strong>r will analyze the source drive <strong>and</strong> ensure the targetis ready, by verifying size. Once the drives have been analyzed youwill receive an indica<strong>to</strong>r stating the duplica<strong>to</strong>r is ready. Press OK,<strong>and</strong> the system will begin duplication au<strong>to</strong>matically.1For the most up-<strong>to</strong>-date information, please visit: www.startech.<strong>com</strong>Manual Revision: 11/04/2013
3. Duplication will <strong>com</strong>plete when the % indica<strong>to</strong>r reaches 100%.The destination drives now contain identical data <strong>to</strong> the sourcedrive.Note: If the destination drives are larger than the source drive,a single partition the size of the source drive will be on thedestination drive.<strong>Hard</strong> <strong>Drive</strong> <strong>Eraser</strong>1. Using the Navigation but<strong>to</strong>ns, locate “4. Erase” <strong>and</strong> press OK2. The erase function is used <strong>to</strong> delete the data in your HDD. Pleasechoose the appropriate erase method from the list below usingthe navigation but<strong>to</strong>ns then press OK.DoD Erase Compust like DoD erase, this function will also execute a <strong>com</strong>pare functionthat ensures r<strong>and</strong>om bit was correctly written. This function eraseseach sec<strong>to</strong>r of the HDD three times: the first time with zeros (0x00),second time with 0xFF <strong>and</strong> the third time with r<strong>and</strong>om characters,<strong>and</strong> then performs a bit by bit check <strong>to</strong> see if data is <strong>com</strong>pletelyerased. It will damage the data on the HDD, please backup up allimportant data before using this function.3. Press OK <strong>to</strong> begin erasing process.Quick EraseThe function will ONLY erase the index of the HDD, which is thequickest way <strong>to</strong> erase it. Quick Erase will damage the data on theHDD, so please make sure you have backed up all important databefore using this function.Full EraseThe function will erase the whole drive by overwriting each sec<strong>to</strong>ron the target HDD <strong>and</strong> will take longer than quick erase. Full Erasewill damage the data on the HDD, so please make sure you havebacked up all important data before using this function.DoD EraseDoD Erase is an erasing method that <strong>com</strong>plies with the U.S.A.Department of Defense (DoD) st<strong>and</strong>ard. It can guarantee the datawas fully deleted by erasing the HDD bit for bit three times. DoDErase will damage the data on the HDD, so please make sure youhave backed up all important data before using this function.4. Once the erase has <strong>com</strong>pleted the result will be displayed.FCC Compliance StatementThis equipment has been tested <strong>and</strong> found <strong>to</strong> <strong>com</strong>ply with the limits for a Class B digital device, pursuant <strong>to</strong> part 15 of the FCC Rules. These limits are designed <strong>to</strong> provide reasonable protection againstharmful interference in a residential installation. This equipment generates, uses <strong>and</strong> can radiate radio frequency energy <strong>and</strong>, if not installed <strong>and</strong> used in accordance with the instructions, may causeharmful interference <strong>to</strong> radio <strong>com</strong>munications. However, there is no guarantee that interference will not occur in a particular installation. If this equipment does cause harmful interference <strong>to</strong> radio ortelevision reception, which can be determined by turning the equipment off <strong>and</strong> on, the user is encouraged <strong>to</strong> try <strong>to</strong> correct the interference by one or more of the following measures:• Reorient or relocate the receiving antenna.• Increase the separation between the equipment <strong>and</strong> receiver.• Connect the equipment in<strong>to</strong> an outlet on a circuit different from that <strong>to</strong> which the receiver is connected.• Consult the dealer or an experienced radio/TV technician for help.Use of Trademarks, Registered Trademarks, <strong>and</strong> other Protected Names <strong>and</strong> SymbolsThis manual may make reference <strong>to</strong> trademarks, registered trademarks, <strong>and</strong> other protected names <strong>and</strong>/or symbols of third-party <strong>com</strong>panies not related in any way <strong>to</strong><strong>StarTech</strong>.<strong>com</strong>. Where they occur these references are for illustrative purposes only <strong>and</strong> do not represent an endorsement of a product or service by <strong>StarTech</strong>.<strong>com</strong>, or an endorsement of the product(s)<strong>to</strong> which this manual applies by the third-party <strong>com</strong>pany in question. Regardless of any direct acknowledgement elsewhere in the body of this document, <strong>StarTech</strong>.<strong>com</strong> hereby acknowledges that alltrademarks, registered trademarks, service marks, <strong>and</strong> other protected names <strong>and</strong>/or symbols contained in this manual <strong>and</strong> related documents are the property of their respective holders.Technical Support<strong>StarTech</strong>.<strong>com</strong>’s lifetime technical support is an integral part of our <strong>com</strong>mitment <strong>to</strong> provide industry-leading solutions. If you ever need help with your product, visit www.startech.<strong>com</strong>/support <strong>and</strong> accessour <strong>com</strong>prehensive selection of online <strong>to</strong>ols, documentation, <strong>and</strong> downloads.For the latest drivers/software, please visit www.startech.<strong>com</strong>/downloadsWarranty InformationThis product is backed by a two year warranty.In addition, <strong>StarTech</strong>.<strong>com</strong> warrants its products against defects in materials <strong>and</strong> workmanship for the periods noted, following the initial date of purchase. During this period, the products may be returnedfor repair, or replacement with equivalent products at our discretion. The warranty covers parts <strong>and</strong> labor costs only. <strong>StarTech</strong>.<strong>com</strong> does not warrant its products from defects or damages arising frommisuse, abuse, alteration, or normal wear <strong>and</strong> tear.Limitation of LiabilityIn no event shall the liability of <strong>StarTech</strong>.<strong>com</strong> Ltd. <strong>and</strong> <strong>StarTech</strong>.<strong>com</strong> USA LLP (or their officers, direc<strong>to</strong>rs, employees or agents) for any damages (whether direct or indirect, special, punitive, incidental,consequential, or otherwise), loss of profits, loss of business, or any pecuniary loss, arising out of or related <strong>to</strong> the use of the product exceed the actual price paid for the product. Some states do not allowthe exclusion or limitation of incidental or consequential damages. If such laws apply, the limitations or exclusions contained in this statement may not apply <strong>to</strong> you.


