
Create successful ePaper yourself
Turn your PDF publications into a flip-book with our unique Google optimized e-Paper software.
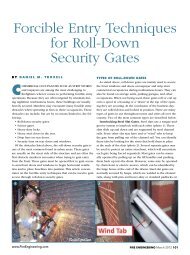
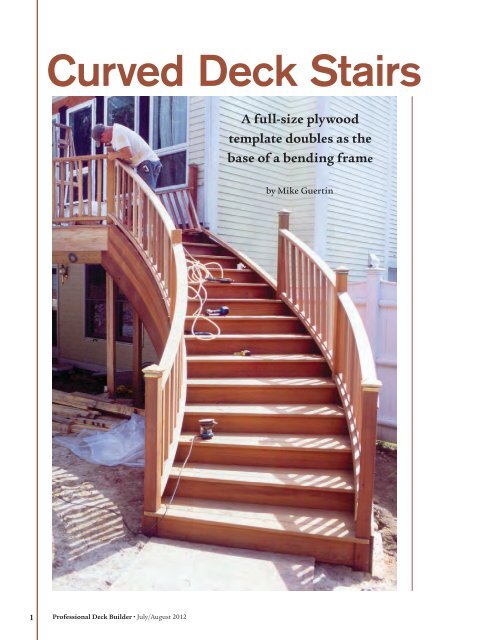
<strong>Curved</strong> <strong>Deck</strong> <strong>Stairs</strong>A full-size plywoodtemplate doubles as thebase of a bending frameby Mike Guertin1 Professional <strong>Deck</strong> Builder • July/August 2012
<strong>Curved</strong> stairs add interest to a deck, solve design issues,differentiate your work, and wow clients. They can alsobe a profitable upsell, and they’re not that hard to build; afteryou’ve done one or two, the process becomes ingrained andgoes quickly.My method of building curved stairs breaks down intofour basic steps: layout, stringer assembly, tread and riserassembly, and finish work. None require specialized tools orjigs and all can be done on site. Key to my process is a set oftemporary curved stud walls that I build to use as a layouttool, a form for laminating plywood for the curved stringers,and an assembly template.If you’re working on a sloping grade, the rough staircasecan be built elsewhere on the site or even inside, using thesame process, and then carried into position.Like any other stairs, curved ones have to meet code. Themain section in the 2012 IRC that covers curved stairs isR311.7.5.2.1, Winder Treads, but other sections also apply. Ingeneral, the requirements are the same as for straight stairs,with a few additions that address the different shape of thetreads. On curved stairs, the minimum depth of the treads attheir narrow end is 6 inches, and the minimum depth at the“walkline” is 10 inches. The walkline is measured 12 inchesin from the narrowest part of the treads and follows an arcFigure 1. Lay out the inner and outer arcs of the stair ona temporary floor made from a double layer of plywood.that’s concentric to the one at the inner stair edge. Thoughthe code doesn’t specify a maximum depth, keep in mindthat extra-deep treads — more than 14 inches or so — canmake stairs uncomfortable to climb. Your local code mayhave different requirements, so be sure to check.Lay Out and Build a Bending FrameI calculate the number of risers and treads as I would withstraight stairs. General layout includes locating where thestairs will leave the deck, picking a curve for the stairs, andtargeting an area for the bottom landing. To rough out thestair’s arc, I walk heel-toe-heel-toe in the imaginary centerof the stairs, starting at the deck and curving in the directionof the planned landing. This establishes the approximateradius and the location of the bottom riser within afoot or two.Bending-frame base. Next, I lay out and assemble the framefor bending the stringers. For the base, which will serve as atemplate and as a bottom plate for the frame walls, I lay twolayers of plywood sheets over an area about a foot wider thanthe stairs will cover. The joints should overlap at least 6 inchesand be screwed together at 2- to 3-foot intervals.Template layout. Mark arcs on the plywood at the radii ofthe inside and outside stringers and walkline (Figure 1). Tofind the center of the arcs — a pointequidistant from the top and bottomof the stairs — first plumb downfrom the middle of where the stairswill land on the deck, and mark theplywood base below. Next, mark theplywood at the middle of the plannedbottom-riser location. Then pull tapemeasures from these two marks, keepingthe tape from the first mark parallelwith the deck edge and sliding theother tape along it. When the measurementsmatch up, you’ve found the centerof the stair arc.Drive a stake at that point. Hooka tape measure to it and swing threearcs on the plywood, from the deckedge to the bottom landing area.The first arc defines the inside of thecurve, the second arc — 12 inches outfrom the first — marks the walkline,and the third defines the outside edgeof the stairs.2 Professional <strong>Deck</strong> Builder • July/August 2012
<strong>Curved</strong> <strong>Deck</strong> <strong>Stairs</strong>Figure 2. After laying out the inner and outer radii andthe radius of the walkline, mark the tread locations onthe latter at 10-inch-minimum intervals.Figure 3. Snap chalk lines between the centerpoint and two adjacent walkline tread marksto outline a tread. Verify that the minimumtread width is at least 6 inches.Step off the treads at the walkline with equally spaced tickmarks10 inches (code minimum) or more apart (Figure 2).I generally limit tread depth at the walkline to 12 inches forcomfort. The final tread/riser mark pinpoints the bottomlanding. Pull a string from the radius stake to the outer stairFigure 4. Outline every tread on the stair by snapping lines betweenthe center and the walkline marks.line at the last tread/riser to see if you like how the angle ofthe bottom riser relates to your plans for a bottom landing.If the last tread doesn’t land where you expected it to, youcan make adjustments by increasing or decreasing the riserheight to change the number of treads; by changing the treadmeasurement at the walkline to extend orcontract the bottom tread; or by changingthe radius of the stairs to make the arcstighter or broader. These are all easy changesto make before you start building.Check that the minimum tread depth isat least 6 inches by snapping two chalk linesfrom the radius stake through two successivetread marks at the walkline arc. The distancebetween the points where the chalklines cross the inner arc is the dimension ofthe narrow end of the treads (Figure 3).Once you’re happy with the geometry ofthe stair, pull a chalk line from the radiusstake all the way across the outer stair-edgearc and snap lines on the plywood at eachtread mark along the walkline to define thestair treads (Figure 4).Plywood top. For the top of the bendingframe, make a second plywood assembly thatmirrors the base — complete with the stairlayout, though there’s no need to mark thewalkline arc. Trim the edges 3 1 ⁄2 inches wide3 Professional <strong>Deck</strong> Builder • July/August 2012
<strong>Curved</strong> <strong>Deck</strong> <strong>Stairs</strong>Figure 11. Mark therisers on the stringerby plumbing down.Figure 12. Notch the stringerswith a circular saw, but don’t overcutthe corners. Finish the cuts witha reciprocating saw.To lay out the riser and tread cuts on the stringers, holda straightedge against the faces of matching studs on theinside and outside frame walls and mark across the tops ofthe stringers. The point where the line crosses the edge ofthe stringer is the outside corner of the riser and tread cutlines. Draw a plumb line down from the mark for the risercut and a level line for the tread cut, only as far as the intersectionwith the tread or riser lines for the adjacent stepsbelow and above (Figure 11).Figure 13. Make a template for the structural treads fromcardboard or thin plywood.It’s best to wait a day or two for the adhesive to cure beforecutting the stringers. Set the bevel on a circular saw to matchthe slight angle the risers will make where they’ll meet thestringers. The tread cuts will be flat — no bevel. So you don’tovercut at the inside corner, use a reciprocating or hand sawto finish out the cut (Figure 12).Structural Treads and Risers Hold theAssembly TogetherStructural treads of pressure-treated 2-by combine withstructural risers made from two layers of pressure-treatedplywood to tie the stringers together and provide a solidbase for finishes. Make a tread pattern from cardboard orthin plywood using the arc lines and tread chalk lines on theframe base as a guide (Figure 13).The wide end of the treads will usually be wider than a2x12, so it will need to be laminated. I cut blanks an inch ortwo longer than needed and rip the taper. Then I glue andpocket-screw the fall-off from the taper cut to the blank. Afinal rip trims the excess off the filler. The tread ends areslightly curved but can usually be cut with a circular saw.The risers stabilize the stringers and support the treads, souse a minimum of 1 ⁄2-inch plywood. Rip the riser stock thesame width as the riser height. The length equals the outsidedimension of the stairs, but rather than accounting for theslight bevel, I cut the risers square and 1 ⁄8 inch short. Thewidth of the bottom and top riser boards will be differentfrom the rest.6 Professional <strong>Deck</strong> Builder • July/August 2012
<strong>Curved</strong> <strong>Deck</strong> <strong>Stairs</strong>Figure 14. Laminate therisers from two layersof plywood to create anotch that will supportthe front of the structuraltread.The inner riser layer is attached tothe stringers first, using screws andconstruction adhesive. Then the treadbelow is installed, and the inner riseris screwed to its back. The inner risersalso bear the front edge of the treadsabove (Figure 14). Run a bead of constructionadhesive along the top of theriser before installing the tread. Usescrews and construction adhesive tosecure the tread to the stringers. Thesecond riser layer laps the front of theupper tread, and is screwed and gluedto it. This helps to keep the treads fromwarping (Figure 15).Eventually the top of the bending frame will interfere withtread installation. At that point, just install the risers; waituntil the frame is dismantled to install the treads.Install the FinishesWait a day or two to let the riser and tread adhesive curebefore removing the frame. The rough staircase emergesfrom the frame ready for intermediate support posts and thefinishes — skirts, risers, treads, and railings — though sometimesyou’ll find a screw tip poking through a stringer facethat needs to be filed or ground off flush. On large staircases,the outside stringer needs to be supported before thestuds are removed, which you can do by cutting and fasteninga couple of 2x4s and setting them on blocks until permanentposts and footings are placed (Figure 16). Finally,install the top treads and risers (Figure 17, page 8).Figure 15. Offsetting the riserlayers allows them to support boththe front and rear of the treads. In thisconfiguration, the risers act like beamsto transfer the loads from the treads to theinner and outer stringers, eliminating the needfor middle stringers on most stairs.Figure 16. Support the stringers with postsplaced on footings.7 Professional <strong>Deck</strong> Builder • July/August 2012
<strong>Curved</strong> <strong>Deck</strong> <strong>Stairs</strong>Figure 17. Once the frameis removed and the stringerssupported, finishinstalling the last treadsand risers.Figure 18.Intermediateguardrail postscan simply beextensions ofsupport posts.Figure 19. Use fascia material for the finished skirtboards, and decking for the treads.<strong>Curved</strong> stair stringers need intermediate supports, whichI extend upward to double as guardrail posts. I space postsalong the arcs at equal intervals — between 4 feet and 6 feetapart — and set them on footings (Figure 18).It usually takes as long to apply the finishes as it does tobuild the curved stair frame — and may take longer, dependingon the details. Skirt boards can be mitered into the risersor closed. Closed skirt boards require less work and look betterover time. Clamp, glue, and screw synthetic or rot-resistant-woodskirts alongside the stringers, shimming whereneeded to maintain a fair curve (Figure 19).Water that gets beneath the treads needs a way to drain,so bore a few 3 ⁄4-inch holes through the structural treads.Lay 1 ⁄2-inch or thicker wood strips over the rough treads asspacers for the finish tread decking. I rip the finish deckingstrips on a taper and ease the edges. This looks much betterthan having a couple of straight decking strips and a wedgeshapedclosing piece meeting the riser at the back of thetread. This approach won’t work with capped decking, however,because easing the edges of the tapered pieces wouldexpose the capped decking’s substrate. Space the finish riserboards 1 ⁄4 inch from the structural risers for drainage.Bending and laminating curved rails is an article in itself.Done correctly, a curved rail needs the same helical shape asthe stringers. One workaround is to cut rails out of wide 2-bystock to match the curve of the stair, but this only works ifthe intermediate posts are less than 4 feet apart. Rails donethis way will have a slightly odd slope as the rail turns. ❖Mike Guertin is a builder in East Greenwich, R.I., and a regular presenterat <strong>Deck</strong>Expo.8 Professional <strong>Deck</strong> Builder • July/August 2012