You also want an ePaper? Increase the reach of your titles
YUMPU automatically turns print PDFs into web optimized ePapers that Google loves.
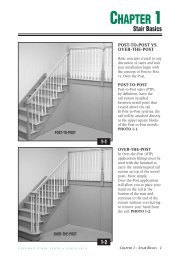
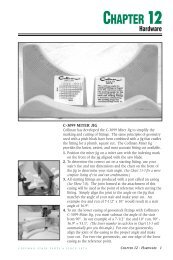
OPTIONAL USE OFSKIRTBOARDLAYOUT TEMPLATEAn optional method ofmarking the closed andopen side skirtboards is withthe use of a skirtboardlayout template. Thesetemplates are easily made atthe job site and will accountfor rough carriages that donot contain exact rise andrun dimensions throughoutthe length of the carriage.For closed side skirtboards,create a short templateusing angle gauges and aframing square set to therise and run of your stair tomake a first floor cut, a wallcut, and a second floor cut(See <strong>Chapter</strong> 4, Pages 2-3). Areference line should beplaced at the top of thetemplate in the center of theboard. PHOTO 4-13.Place the template on thespacer behind the roughcarriage at the bottom of thestair and place a mark onthe wall at the referenceline. Next note any angleadjustments that need to bemade. PHOTO 4-14.Lay the template on theskirtboard, scribe the firstfloor cut line, adjust by thedistance just noted, andtransfer the reference line tothe top of the skirtboard.PHOTO 4-15.SECOND FLOOR CUTWALL CUTNOTE NECESSARYADJUSTMENTSREFERENCE MARKFIRST FLOOR CUTMARK WALL4-134-14TOP EDGETRANSFER MARKSCRIBE FIRST FLOOR CUT4-156 CHAPTER 4 - <strong>STAIR</strong> <strong>BODY</strong>C O F F M A N S T A I R P A R T S • S I N C E 1 8 7 4