Wacom Tablet Instructions - Symbolic Sound Kyma
Wacom Tablet Instructions - Symbolic Sound Kyma
Wacom Tablet Instructions - Symbolic Sound Kyma

Create successful ePaper yourself
Turn your PDF publications into a flip-book with our unique Google optimized e-Paper software.
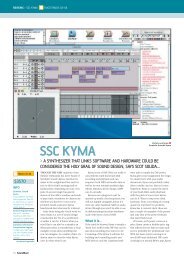
<strong>Instructions</strong> for Using the <strong>Wacom</strong> Graphire or Intuos with <strong>Kyma</strong> X.1If you have a Graphire or Intuos tablet (connected by USB) and are using either Macintosh OS-X or WindowsXP, you can use the Pen as a multi-dimensional controller for <strong>Kyma</strong> <strong>Sound</strong>s.Note that <strong>Kyma</strong> can work with the tablet only when using Macintosh OS-X or Windows XP.Initial <strong>Tablet</strong> SetupFollow the instructions supplied with the <strong>Wacom</strong> tablet to install the drivers needed to use the tabletmouse and pen to control the computer’s cursor. Double check that you have the latest driver software(4.8.4 or later). If not, you can download the newest driver from <strong>Wacom</strong>'s website.After you install or update the tablet driver, before you use <strong>Kyma</strong>, please:• Restart your computer• Use each pen or mouse at least once on the tabletPreferences for the Pen <strong>Tablet</strong>In the System Preferences (Macintosh) or the Control Panels (Windows) for the tablet itself (distinct fromthe preferences within <strong>Kyma</strong>):• Pen should have the buttons Disabled or Ignored• Eraser should be set to EraseGraphic templatesWe recommend the use of a template as a guide for locating pitches and X and Y values when using thetablet as a controller. Templates for several Graphire and Intuos models are included as PDF files in the<strong>Tablet</strong> templates folder in the Other files folder in your <strong>Kyma</strong> folder. Print out the appropriate file (preferably on acolor printer) and insert it beneath the transparent overlay of your Graphire3 or tape it to the surface ofyour Intuos3.The templates show X and Y axes, a unit circle (reference for !PenRadius and !PenAngle), and a "keyboard"with a white line for each white key, a black line for each black key, a red line for each C and ablue line for each F.If you purchased an Intuos3 4x5 tablet from <strong>Symbolic</strong> <strong>Sound</strong>, you were provided with a template to usewith your tablet. To install the template, first remove the old blank template (use a piece of tape to lift upthe bottom-left corner of the template and gently peel the template off the tablet), remove the strips coveringthe adhesive on the new template, and carefully place the template into the recess on the tablet.<strong>Kyma</strong> SetupBy default, <strong>Kyma</strong> will use the <strong>Wacom</strong> tablet as a <strong>Kyma</strong> <strong>Sound</strong> parameter controller. To change how <strong>Kyma</strong>works with the tablet, choose Preferences from the Edit menu and click the <strong>Wacom</strong> <strong>Tablet</strong> button:
<strong>Tablet</strong> Pen ControlsUnder <strong>Tablet</strong> Pen Controls, select whether you would like to use your tablet Pen to control <strong>Sound</strong> parametersor whether you prefer to use it to control the cursor.Only the tablet Pen is used for <strong>Sound</strong> control. You can continue to control the cursor with the <strong>Wacom</strong>Mouse on the tablet even when you have elected to control <strong>Sound</strong> parameters with the Pen. For example,you can alternate between using the Mouse on the tablet for editing parameter fields, play the <strong>Sound</strong>,then set the Mouse aside and take up the Pen to control the <strong>Sound</strong>'s parameters.Note that once you have selected <strong>Sound</strong>, <strong>Kyma</strong> controls the tablet even when <strong>Kyma</strong> is not the frontmostapplication. For example, as long as <strong>Kyma</strong> is running, you can bring ProTools or your sequencer to thefront and continue to use the Pen as a <strong>Sound</strong> parameter controller.Source of Keyboard EventsOne end of the Pen sends controller values, and the other end sends keyboard events. Select either thePen or the Eraser as the source of keyboard events (the other end of the Pen will then be the source ofcontinuous controller events). Under Source of Keyboard Events select Eraser if you'd like the eraserend to act as a keyboard; select Pen if you'd rather use the pointy end as the keyboard and the blunt endas your continuous controller.Pen Button 1To control the cursor in <strong>Kyma</strong> or any other application while <strong>Kyma</strong> is running, you can continue to use theMouse on the tablet or any other mouse connected to your computer. In addition, if you choose Holddown for mouse, you can use the Pen to control the cursor by lifting the Pen from the tablet surface,and pressing and holding the lower Pen button. The Pen continues to control the cursor until the Pen buttonis released.
Pen Button 2Normally, the upper Pen button sends the !PenButton2 event. If you choose Selects rounding mode,each time you press the upper pen button, the pitch rounding mode will be changed (in order): None,Initial pitch, All pitches, None, etc.Remaining Preference OptionsThe remaining options control the center pitch of the tablet, the range of pitches, and how the pitch isrounded.Continuous Controllers and GatesA Graphire or Intuos Pen sends <strong>Kyma</strong> the following continuous controllers in rectangular coordinates:Name Range Description!PenX 0,1 left to right!PenY 0,1 back to front!PenZ 0,1 pressure (up to down)and the following polar coordinates!PenRadius 0,2 center outwards!PenAngle 0,2 hard left, around the circle clockwise, ending at hard left againIt also sends the following gates:!PenDown 0 or 1 when !PenZ exceeds a threshold!PenButton1 0 or 1 the lower rocker button on the pen!PenButton2 0 or 1 upper rocker button on the penAn Intuos Pen also sends additional controllers:!PenTiltX -1,1 degree to which top of pen slants left or right!PenTiltY -1,1 degree to which top of pen slants backward or forward!PenTiltRadius 0,2 degree to which top of pen slants in any direction!PenTiltAngle 0,2 direction to which top of pen slantsAn Intuos Air Brush also sends one additional controller:!PenWheel 0,1 the wheel position on the pen (0 when wheel rotated towards the tip)An Intuos Art Pen also sends one additional controller:!PenRotation 0,2 the rotation of the pen axis (0 when pen axis rotated hard left)You can use these hot event values directly in <strong>Sound</strong> parameter fields. Alternatively, you can remap existinghot values (for example !Amp) to be controlled by one of the Pen controls. To quickly map a <strong>Sound</strong>parameter to one of the pen controls:1. Play the <strong>Sound</strong>2. Click the pen icon at the top of the VCS (towards the right) to open the Pen Status window3. In the Pen Status window click the Auto button for a quick, arbitrary mappingOR3. Select one of the Pen aspects from the menu at the center bottom of the window4. Then select the corresponding VCS control from the menu to the right of list of Pen aspectsFor full details, see the Pen Status window description below.
Keyboard modeIn keyboard mode, your Pen sends note events to <strong>Kyma</strong> <strong>Sound</strong>s:!KeyDown!KeyPitch!KeyVelocity!KeyTimbrethreshold exceeded in the Z directionleft-to-right corresponds to low-to-high pitchpressure in the up/down direction (Z)back-to-front corresponds to (0,1) for controlling any parameter in <strong>Kyma</strong>Now the good news for Continuum Fingerboard fans! The same <strong>Sound</strong>s that you design using monophonicPen control can be also controlled polyphonically using your fingers on the Continuum Fingerboard (seehttp://www.hakenaudio.com). That will translate into a much larger library of Continuum patches contributedby <strong>Kyma</strong> users all over the world (even the ones who don't have a Continuum yet).In the preferences, you can set the keyboard range and center pitch. And you also have a choice of howequal tempered you would like the pitches to be. In the preferences under Rounding, select:All pitchesInitial pitchNonealways quantize pitch to the nearest halfstepinitially quantize pitch to the nearest halfstep, but allow the pitch to bend afterwardscontinuous pitch with no quantizationIf you are designing a <strong>Sound</strong> to be controlled by a MIDI keyboard or sequencer, you probably want toround All pitches to the nearest half step. If you are designing a <strong>Sound</strong> to be played on the ContinuumFingerboard, you should set it to Initial pitch or None. If you are using the tablet to control a creaturevoice or a sound effect, you probably want the None mode so you can get speech-like glides betweenpitches.For real-time control over the rounding mode, choose Selects rounding mode under the PenButton2label in the preferences.PolyphonyIf you have more than one of the same kind of tablet connected to your computer and/or are using anIntuos tablet with multiple Pens, you can have more than one Pen control. As <strong>Kyma</strong> detects Pens, it identifiesthem (in the order in which they are brought into proximity with a tablet) as !Pen, !Pen2, !Pen3,etc. You can use these control names directly in <strong>Sound</strong> parameter fields, for example: !Pen2X,!Pen2Radius, or you can remap them in the VCS by selecting a different MIDI channel number for eachPen and then calling the control simply !PenX, !PenY, etc.In Keyboard mode, multiple Pens appear as multiple voices on the same MIDI channel (or like multiplefingers playing on the same keyboard).<strong>Sound</strong> examplesSome pen-controlled example <strong>Sound</strong>s are included in the file called Pen Examples.kym in the December 04 <strong>Kyma</strong>X.1 Examples folder in the <strong>Kyma</strong> <strong>Sound</strong> Library.Pen Status WindowTo open the Pen Status window, play a <strong>Sound</strong> that has controllable parameters; then click the Pen icon atthe top of the VCS:
In the Pen Status window, you can quickly link VCS controls with Pen controls. For example, in the filecalled An Overview.kym in the <strong>Kyma</strong> <strong>Sound</strong> Library, play Granular classic no spectrum display and click the Penicon found at the top of the VCS (on the right side). You can see the mapping of Pen control to VCS controlat the bottom of the Pen Status window.Above the row of buttons at the bottom of the window is a list of the controls available on the most recentlyused pen.Click the Auto button for a quick, default mapping of Pen controls to VCS controls.Choose the pen channel from the menu just to the right of Auto. Pen channel is used when you havemore than one active pen and/or more than one tablet. <strong>Kyma</strong> will automatically show you the pen channelfor the most recent pen. You can choose Reset Pens in this menu to force <strong>Kyma</strong> to renumber the pens:the next pen brought into proximity will be on channel 1, and each successive pen will be assigned thenext channel number.The next menu controls whether the Pen end or the Eraser end of pen sends Pen controls.Use the next menu (labeled Pen X in the image above) to select a Pen control for remapping. (Or click thePen control name in the list above). Then select the corresponding VCS control from the menu on theright.As you move the pen, the aspects you have mapped to <strong>Sound</strong> parameters are displayed in the upper portionof the Pen Status window. Only the mapped pen controls are displayed. For example, if you havePen X and Pen Y mapped to controls, the value of Pen X is displayed as a bright line across the bottomof the view and Pen Y is a bright line from the bottom to the top of the view. Pen Z is displayed as thecolor of a dot at the XY position of the pen.If you have mapped Pen Radius and Pen Angle, they are displayed as the length of a line radiating outfrom the center of the view and as a bright arc on a circle starting from hard left.
On an Intuos, you can also map aspects of the Pen's tilt to VCS parameters. Pen Tilt X and Pen Tilt Yare shown as lines (similar to Pen X and Pen Y but with the pen point as the center. Pen Tilt Radius andPen Tilt Angle are shown similarly to Pen Radius and Pen Angle (but centered on the pen point).Changes made in the Pen Status window are like changes made in the VCS: They are not saved until yousave the <strong>Sound</strong>.