The Kyma Language for Sound Design, Version 4.5
The Kyma Language for Sound Design, Version 4.5
The Kyma Language for Sound Design, Version 4.5

You also want an ePaper? Increase the reach of your titles
YUMPU automatically turns print PDFs into web optimized ePapers that Google loves.
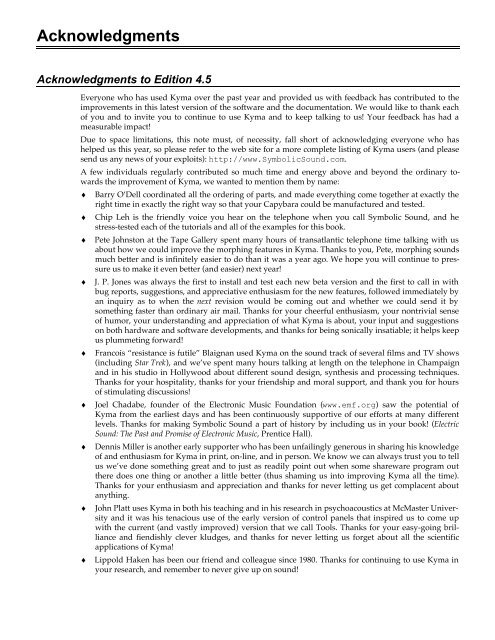
Acknowledgments<br />
Acknowledgments to Edition <strong>4.5</strong><br />
Everyone who has used <strong>Kyma</strong> over the past year and provided us with feedback has contributed to the<br />
improvements in this latest version of the software and the documentation. We would like to thank each<br />
of you and to invite you to continue to use <strong>Kyma</strong> and to keep talking to us! Your feedback has had a<br />
measurable impact!<br />
Due to space limitations, this note must, of necessity, fall short of acknowledging everyone who has<br />
helped us this year, so please refer to the web site <strong>for</strong> a more complete listing of <strong>Kyma</strong> users (and please<br />
send us any news of your exploits): http://www.Symbolic<strong>Sound</strong>.com.<br />
A few individuals regularly contributed so much time and energy above and beyond the ordinary towards<br />
the improvement of <strong>Kyma</strong>, we wanted to mention them by name:<br />
♦ Barry O’Dell coordinated all the ordering of parts, and made everything come together at exactly the<br />
right time in exactly the right way so that your Capybara could be manufactured and tested.<br />
♦ Chip Leh is the friendly voice you hear on the telephone when you call Symbolic <strong>Sound</strong>, and he<br />
stress-tested each of the tutorials and all of the examples <strong>for</strong> this book.<br />
♦ Pete Johnston at the Tape Gallery spent many hours of transatlantic telephone time talking with us<br />
about how we could improve the morphing features in <strong>Kyma</strong>. Thanks to you, Pete, morphing sounds<br />
much better and is infinitely easier to do than it was a year ago. We hope you will continue to pressure<br />
us to make it even better (and easier) next year!<br />
♦ J. P. Jones was always the first to install and test each new beta version and the first to call in with<br />
bug reports, suggestions, and appreciative enthusiasm <strong>for</strong> the new features, followed immediately by<br />
an inquiry as to when the next revision would be coming out and whether we could send it by<br />
something faster than ordinary air mail. Thanks <strong>for</strong> your cheerful enthusiasm, your nontrivial sense<br />
of humor, your understanding and appreciation of what <strong>Kyma</strong> is about, your input and suggestions<br />
on both hardware and software developments, and thanks <strong>for</strong> being sonically insatiable; it helps keep<br />
us plummeting <strong>for</strong>ward!<br />
♦ Francois “resistance is futile” Blaignan used <strong>Kyma</strong> on the sound track of several films and TV shows<br />
(including Star Trek), and we’ve spent many hours talking at length on the telephone in Champaign<br />
and in his studio in Hollywood about different sound design, synthesis and processing techniques.<br />
Thanks <strong>for</strong> your hospitality, thanks <strong>for</strong> your friendship and moral support, and thank you <strong>for</strong> hours<br />
of stimulating discussions!<br />
♦ Joel Chadabe, founder of the Electronic Music Foundation (www.emf.org) saw the potential of<br />
<strong>Kyma</strong> from the earliest days and has been continuously supportive of our ef<strong>for</strong>ts at many different<br />
levels. Thanks <strong>for</strong> making Symbolic <strong>Sound</strong> a part of history by including us in your book! (Electric<br />
<strong>Sound</strong>: <strong>The</strong> Past and Promise of Electronic Music, Prentice Hall).<br />
♦ Dennis Miller is another early supporter who has been unfailingly generous in sharing his knowledge<br />
of and enthusiasm <strong>for</strong> <strong>Kyma</strong> in print, on-line, and in person. We know we can always trust you to tell<br />
us we’ve done something great and to just as readily point out when some shareware program out<br />
there does one thing or another a little better (thus shaming us into improving <strong>Kyma</strong> all the time).<br />
Thanks <strong>for</strong> your enthusiasm and appreciation and thanks <strong>for</strong> never letting us get complacent about<br />
anything.<br />
♦ John Platt uses <strong>Kyma</strong> in both his teaching and in his research in psychoacoustics at McMaster University<br />
and it was his tenacious use of the early version of control panels that inspired us to come up<br />
with the current (and vastly improved) version that we call Tools. Thanks <strong>for</strong> your easy-going brilliance<br />
and fiendishly clever kludges, and thanks <strong>for</strong> never letting us <strong>for</strong>get about all the scientific<br />
applications of <strong>Kyma</strong>!<br />
♦ Lippold Haken has been our friend and colleague since 1980. Thanks <strong>for</strong> continuing to use <strong>Kyma</strong> in<br />
your research, and remember to never give up on sound!
♦ Bill Rust posted several (unsolicited) endorsements on the Internet that sounded as if they could have<br />
come from our marketing department — actually they were even better and more enthusiastic than<br />
the marketing copy we generate. Thanks, Bill!<br />
♦ Thanks to a few weeks of low level, late night hacking, emailing, and phone calling between Mark<br />
Gorlinsky and Kurt Hebel, all Power Mac users can now run <strong>Kyma</strong> with or without virtual memory<br />
(so why can’t all your other music software run with virtual memory turned on like <strong>Kyma</strong> can?)<br />
♦ Agostino Di Scipio has probably used <strong>Kyma</strong> in more live per<strong>for</strong>mances than any other individual.<br />
Thanks <strong>for</strong> pushing this aspect of <strong>Kyma</strong>!<br />
♦ Marcus Hobbs has pushed the development of the real-time evaluator and tools through his intensive<br />
and creative application of these features to implement xenharmonic tunings with colleagues Stephen<br />
Taylor and Erv Wilson.<br />
♦ Fred Szymanski made suggestions <strong>for</strong> how to “fatten” the emulated analog sounds and engaged us<br />
in stimulating discussions of nested control and controller feedback.<br />
Thanks to all the <strong>Kyma</strong> <strong>4.5</strong> beta testers <strong>for</strong> living on the edge and providing essential feedback and suggestions:<br />
Francois Blaignan, Robert DeFord, Agostino Di Scipio, Larry Fritts, Vance Galloway, Lippold<br />
Haken, Marcus Hobbs, Pete Johnston, J. P. Jones, Chip Leh, Eric Lyon, John Mantegna, American McGee,<br />
Kelvin Russell, Bill Rust, Fred Szymanski, Lance Massey, John Platt, Andy Todd, and Yasushi Yoshida.<br />
Everyone who attended the summer immersion weekends interacted with us in a hot house atmosphere<br />
where ideas were being exchanged so fast it was hard to tell who came up with what. <strong>The</strong> one thing that<br />
was certain was that <strong>Kyma</strong> was always a little bit better after each of the workshops. Thanks to all those<br />
who came through Champaign <strong>for</strong> workshops or consulting:<br />
Dennis Miller, Chip Leh, Jeff Stolet, Karlheinz Essl, Bruno Liberda, Francois Blaignan, J. P. Jones, Agostino<br />
DiScipio, Nadine Miner, John Platt, Antonio Barata, Brian Belet, David Mooney, Pete Johnston, Larry Fritts,<br />
Mike Radentz, Bill Sequeira, Fred Szymanski, Will Chesser, Todd Watkins, Dragana Barac-Cikoja, Chris<br />
Czopnik, Marcus Hobbs, Laura Tedeschini-Lalli, Roberto D’Autilia, Greg Hunter, and Eugenio Giordani.<br />
Thanks to Kevin Jones, Godric Wilke, Jason Edge, Joran Rudi, Adelhard Roidinger, and Bruno Liberda <strong>for</strong><br />
inviting us to give workshops in Europe, thanks to Frank Serafine <strong>for</strong> letting us use his studios <strong>for</strong> a miniworkshop<br />
in L.A., and, to Lloyd Billing, thanks <strong>for</strong> letting us use the studios at Tape Gallery <strong>for</strong> a miniworkshop<br />
in London (and thanks <strong>for</strong> exploring those smaller, out-of-the-way booths at the AES show in<br />
New York).<br />
And to our parents, thank you <strong>for</strong> understanding why we care so much about <strong>Kyma</strong> and Symbolic<br />
<strong>Sound</strong>, and thank you <strong>for</strong> always having believed in us, irrespective of the whims of <strong>for</strong>tune, politics, or<br />
popular opinion.<br />
Carla Scaletti and Kurt Hebel<br />
August, 1997<br />
Acknowledgments to Edition 4.1<br />
Addendum 4.1 of the Reference Manual was written by Carla Scaletti and Kurt Hebel.<br />
Thanks to Lippold Haken, Barry O’Dell, and Chip Leh <strong>for</strong> their contributions to <strong>Kyma</strong> 4.1 and the Capybara-33.<br />
Feedback from <strong>Kyma</strong> users was invaluable in shaping this new software release. We’d like to thank, in<br />
particular, Pete Johnston, John Platt, Agostino Di Scipio, Jonathan MacKenzie, Ron Kuivila, Fred Szymanski,<br />
John Dunn and Robert Austin, and all the others, too many to enumerate here, who had an influence<br />
on the shape and content of this release.<br />
We would like to dedicate our work on this software release to our friend and colleague — Salvatore<br />
Martirano. † Whenever we had a new break-through we used to go over to Sal’s studio to show it to him,<br />
† Salvatore Martirano, composer, teacher, and friend, died on the night of November 17, 1995 from complications due<br />
to ALS (Lou Gehrig's disease). Throughout this difficult illness, he never lost his fantastic, unfettered musical<br />
imagination, his generous spirit, or his ironic sense of humor.<br />
2
knowing that he would understand and appreciate all of its implications (as well as how much work had<br />
gone into it). It’s hard to get used to the idea that we can’t do that anymore. We miss you, Sal.<br />
Acknowledgments to Edition 4.0<br />
<strong>Version</strong> 4.0 of the Reference Manual was written by Jon D’Errico, Carla Scaletti wrote the Introduction,<br />
Tutorials, and Prototype Reference, and Kurt J. Hebel brought it all together through many hours of<br />
proofreading, rewriting, editing, and test-driving of the entire manual. We take full responsibility <strong>for</strong> any<br />
errors, so please report them to us so that they can be corrected in version 4.1.<br />
Special thanks to Lippold Haken, Mark Smart, and Bryan Holloway <strong>for</strong> their contributions to <strong>Kyma</strong> 4.0<br />
and the Capybara-33.<br />
All of our encounters and experiences with <strong>Kyma</strong> users have contributed towards the improvements<br />
found in <strong>Kyma</strong> 4.0. We invite you to continue to interact with us and with each other, so that future versions<br />
will be even closer to your ideal system. In particular, we would like to acknowledge the help of our<br />
life-on-the-edge beta testers: Salvatore Martirano, Frank Tveor Nordensten, Jeff Stolet (and his students at<br />
the University of Oregon), Joel Chadabe, and Nathaniel Reichman. <strong>The</strong>re are others, too numerous to<br />
name here, who have helped us get to the final release version of <strong>Kyma</strong> 4.0; to you we say, “Thanks!”,<br />
and we hope to get your name in here <strong>for</strong> the next version!<br />
Acknowledgments To Edition 2.05<br />
Many thanks to Jon D’Errico <strong>for</strong> helping complete this edition of the manual. <strong>The</strong> first edition was written<br />
by Carla Scaletti; Kurt Hebel joined her in revising the second edition.<br />
Acknowledgments to the Second Edition<br />
Dick Robinson provided valuable, detailed feedback on the first edition of the manual. Thanks to Frank<br />
Nordensten, John Mantegna, Mark Smart, and Paul Christensen who tried out all of the new tutorials.<br />
Thanks to all of the participants in the Intensive Workshop in <strong>Sound</strong> Computation who also contributed<br />
many ideas <strong>for</strong> this second edition. And thanks to all of the <strong>Kyma</strong> users who have provided us with feedback,<br />
suggestions, and encouragement over the years.<br />
Acknowledgments to the First Edition<br />
Mark Lentczner provided a large number of insightful suggestions particularly with regard to the user<br />
interface. His enthusiasm, positive outlook and quick grasp of the system made him a pleasure to work<br />
with. Brian Belet and Antonio Barata read through the entire manual suggesting several clarifications and<br />
penciling in some amusing comments. Bill Walker suffered through the very first version of this manuscript<br />
and some of the earliest versions of the program. Kelly Fitz has been a consistent and intelligent<br />
user of the more advanced features of <strong>Kyma</strong> and has contributed to their development. Jon Sigurjonsson,<br />
Alec McLane, Insook Choi, Ben Cox, and Robin Bargar all took part in the first summer workshop on<br />
<strong>Kyma</strong> and were among the first composers to complete compositions and studies using the system.<br />
Lippold Haken developed the Platypus, the first signal processor that enabled <strong>Kyma</strong> to do software synthesis<br />
in real time.<br />
3
Introduction<br />
What’s in a Manual<br />
Question: What do you call someone who reads manuals from cover-to-cover?<br />
Answer: Power user or Guru.<br />
If you set aside a few minutes each day — over breakfast, at the end of the workday, on a long trip, as a<br />
com<strong>for</strong>ting bedtime story — and read the overview and work through the tutorials, you will become the<br />
envy of your colleagues and an idol to your friends. And as an extra added side-benefit, you will also be<br />
making more powerful and effective use of <strong>Kyma</strong> in your work.<br />
You can think of this manual as three separate references:<br />
Overview and Tutorials Everyone should read through the overview to see how all of the parts of the<br />
system relate to each other, and work through the tutorials to get an idea of what examples came with the<br />
system.<br />
Quick Reference and Prototypes Reference Keep this manual next to your computer and opened to this<br />
section to quickly refresh your memory on what you can do in each of the editors.<br />
Reference Manual and Appendices Most people will probably prefer to look things up in this section as<br />
needed, rather than reading straight through it.<br />
Introduction and Overview<br />
<strong>The</strong> overview is intended to give an overall sense of what <strong>Kyma</strong> is, what it contains, and how it all works<br />
together. Hidden within it is Tutorial 0, a tutorial on the basics of getting around in <strong>Kyma</strong>’s graphic user<br />
interface. Reading the introduction and overview will give you an outline of the extent of <strong>Kyma</strong>, so it will<br />
give you an overall sense <strong>for</strong> what is available be<strong>for</strong>e you begin focusing on the details.<br />
Tutorials: <strong>Kyma</strong> in 24 Hours!<br />
Examples<br />
Reference<br />
<strong>The</strong> tutorials are intended as an orientation to <strong>Kyma</strong> and its user interface, and they give you a chance to<br />
explore <strong>Kyma</strong> with a little tutor at your elbow explaining everything and giving you hints along the way.<br />
<strong>The</strong> tutorials are intended as a starting point <strong>for</strong> your own creative work, so don’t feel that you have to<br />
stick with them diligently to the end; ideally, they should be just enough to get you started on your own<br />
explorations through the environment. On the other hand, if you systematically complete one tutorial per<br />
day, you will be completely conversant in <strong>Kyma</strong> in just one month! (You can even take every seventh day<br />
off to rest, putting aside the manual to play in <strong>Kyma</strong>).<br />
When you first start to use <strong>Kyma</strong> in your own work and anytime you begin a new project using <strong>Kyma</strong>,<br />
set aside some time to look through the example <strong>Sound</strong>s provided in the Examples folder; this has two<br />
benefits: the first is that you can use many of these synthesis and processing <strong>Sound</strong>s exactly as is, with<br />
minor tweaking, or as starting points <strong>for</strong> your own designs; the second benefit is that studying other people’s<br />
<strong>Sound</strong>s is an excellent way to get new ideas and to learn new <strong>Kyma</strong> tricks that you can apply to<br />
your own sound designs.<br />
<strong>The</strong> <strong>Kyma</strong> Quick Reference (starting on page 206), the Prototypes Reference (starting on page 218) and<br />
the main Reference (starting on page 417) are intended to serve, as their names imply, as reference books.<br />
In other words, if a question comes up as you are working, you should be able to quickly locate the answer<br />
on one of these references by using the Index or the Table of Contents. §<br />
§ By the way, if you can’t find an answer to a simple question in the index, then please let us know about it so that we<br />
can fix it in the next edition of this manual (symsound@Symbolic<strong>Sound</strong>.com).
<strong>The</strong>se sections tend to be graphical summaries, tables, and extremely concise descriptions, which is exactly<br />
what you want out of a reference, though they don’t necessarily make <strong>for</strong> the most entertaining<br />
straight-through reading. (However, if you do read through these sections, your reward is that you will<br />
be a POWER USER, and we may have a job <strong>for</strong> you on our support staff. So if you sit down and read<br />
through the entire book, let us know!)<br />
<strong>Kyma</strong> Users’ Group<br />
When you do have questions about <strong>Kyma</strong>, don’t overlook one of the best resources of all: the collective<br />
experience and intelligence of your fellow <strong>Kyma</strong>-ites. When you write a note to<br />
kyma@Symbolic<strong>Sound</strong>.com, you can access the collective knowledge of not only the entire Symbolic<br />
<strong>Sound</strong> staff, but an international network of <strong>Kyma</strong> users who have been using <strong>Kyma</strong> to make music and<br />
sounds since 1990 (even earlier, if you include the developers).<br />
Teaching <strong>Kyma</strong> to Others<br />
If you are using <strong>Kyma</strong> in a one-semester beginning course in sound synthesis algorithms or electroacoustic<br />
music, you could use the tutorials as part of the homework assignments (about two per week, in<br />
whatever ordering that makes sense with your lecture topics).<br />
If it is an advanced course in which <strong>Kyma</strong> is to be used as the language, you could spend the first two to<br />
four weeks of class lecturing on the material in the overview and assign one tutorial per day <strong>for</strong> the students<br />
to complete during studio or lab time. After this intensive introduction to <strong>Kyma</strong>, the rest of the<br />
semester could be devoted to higher-level topics and <strong>Kyma</strong> could be used <strong>for</strong> in-class demonstrations,<br />
projects, labs, and assignments.<br />
5
Peeling Back the Layers of <strong>Kyma</strong><br />
<strong>Kyma</strong> is a deep program that you can access in layers: at the highest level, immediately producing complex<br />
and interesting sounds using the examples found in the Examples folder, and by using the Tools; at<br />
the next level, by designing new sounds using the graphical <strong>Sound</strong> editor, wave editor, spectrum editor,<br />
and file organizer. ‡<br />
Whether and when you decide to proceed from one level to the next is entirely up to you. You can make a<br />
large variety of interesting and effective sounds simply by familiarizing yourself with the “factory presets”<br />
of <strong>Kyma</strong> — the processing and synthesis examples found in the Examples folder, and the <strong>Sound</strong>s<br />
at the FTP site contributed by your colleagues. You may find that you need never even use the <strong>Sound</strong><br />
editor except to substitute your own source material.<br />
Everyone who uses <strong>Kyma</strong> will use the top layer. For many, the top layer is all they will ever need. For<br />
others, the top layer is the introduction to the programming layer. <strong>The</strong>re is no better way to learn about<br />
sound design than by studying the designs of others and tweaking them in small ways until you understand<br />
the effect of each parameter. Once you start designing new sounds, you can add them to the<br />
examples at the top layer, building and expanding your own personal sound library. You may even want<br />
to take a few of your less-proprietary examples and put them up at the Symbolic <strong>Sound</strong> FTP site <strong>for</strong> your<br />
<strong>Kyma</strong> colleagues to use (while saving the best sounds <strong>for</strong> yourself of course!)<br />
Inevitably, though, you will find yourself tweaking a parameter here and there, even on the preset examples.<br />
This is the first step down the path to programming your own <strong>Sound</strong>s, a delightful addiction from<br />
which you may never recover (if you’re not already hopelessly addicted due to earlier experiences with<br />
modular synthesizers and software synthesis). This is the layer at which the real power of <strong>Kyma</strong> becomes<br />
apparent. <strong>Kyma</strong> is extremely open-ended and modular. In this respect it is both liberating and at times<br />
even slightly intimidating.<br />
<strong>Kyma</strong> is definitely a program <strong>for</strong> consenting adults. Once you start getting into sound programming,<br />
there are so many possibilities, so many decisions, so many choices to make, that it requires you to set<br />
your own guidelines and your own constraints. In that respect it is like facing the empty page just be<strong>for</strong>e<br />
starting to compose music, write a paper, or work on any creative project.<br />
Be<strong>for</strong>e You Get Started<br />
As you read through the introduction and tutorials, there are suggestions that you try out certain examples.<br />
Many of these examples assume that you have a microphone connected to the left audio input<br />
channel of your Capybara and that you have some kind of MIDI input device or controller hooked up to<br />
the MIDI input on the back of the Capybara. Some examples require a MIDI synthesizer to be connected<br />
to the MIDI output.<br />
‡ <strong>The</strong>re is an even lower level to <strong>Kyma</strong>, and that is the third-party development level. By creating sound libraries and<br />
placing them at the FTP site, you are already acting as a third party developer in the community of <strong>Kyma</strong> users. It<br />
is also possible to program new Tools and to write new assembly language modules <strong>for</strong> <strong>Kyma</strong>. To do this, you will<br />
need the developers’ kit. In order to get the developers’ kit you must apply to become a third party developer at<br />
either the Tool level (Smalltalk programming) or the DSP assembly language level. Of necessity, we have to limit<br />
the number of people in the developers program, because Smalltalk and DSP programming require intensive support<br />
and training. One of the requirements <strong>for</strong> being accepted is experience programming in Smalltalk (<strong>for</strong> Tools)<br />
or in 56002 assembly language (<strong>for</strong> new modules). If you have this kind of experience and are interested in developing<br />
<strong>for</strong> <strong>Kyma</strong> and the Capybara, send us electronic mail at info-kyma@Symbolic<strong>Sound</strong>.com describing your<br />
experience and plans.<br />
6
Go ahead and set this up now, so that you will be ready to try the examples as they come up.<br />
Keyboard<br />
MIDI Faders<br />
Synthesizer<br />
MIDI<br />
Computer<br />
Capybara<br />
7<br />
audio<br />
Pre-amp<br />
Amplifier<br />
Your studio may have audio and MIDI patchbays to make it more easily reconfigured. If you connect the<br />
Capybara up to the patchbays, you can make this configuration by moving patch cords at the patchbay,<br />
rather than moving cables at the back of your equipment. If your patchbay is computer controlled, use the<br />
software <strong>for</strong> the patchbay to make sure it is configured correctly.
<strong>Kyma</strong>: a <strong>Language</strong> <strong>for</strong> Creating and Manipulating <strong>Sound</strong><br />
A language is a set of words and a set of rules <strong>for</strong> combining those words into expressions. Despite the<br />
fact that both the set of words and the set of rules are finite, the number of expressions you can generate<br />
by combining the words is infinite. In English, <strong>for</strong> example, the set of words can be enumerated in a book<br />
called a dictionary (which, while it is a very large book, is not infinitely large), and the set of rules <strong>for</strong><br />
combining those words can be found in a smaller book on English grammar. In actual practice, we rarely<br />
need refer to these books, using an even smaller working set of words and rules in our heads, to produce<br />
a seemingly endless stream of written and spoken expression.<br />
<strong>Kyma</strong>, too, is a language — a language <strong>for</strong> creating and manipulating sound. It provides a vocabulary (a<br />
set of basic modules or <strong>Sound</strong>s)<br />
and a means <strong>for</strong> combining those elementary modules into an infinite number of arbitrarily complex<br />
<strong>Sound</strong>s<br />
<strong>Language</strong>s vs. Devices<br />
Of the many programs you use daily on your computer, some function more as “devices” and some<br />
function more as “languages”.<br />
A software “device” is typically a complex, high-level program that does a specific and limited set of<br />
tasks <strong>for</strong> you (and if it’s a good program, it does these tasks quickly, easily, and repetitively, and probably<br />
throws in a flashy color interface <strong>for</strong> your aesthetic edification). It does not let you get inside the device,<br />
modify it, and use it to do some other set of tasks.<br />
A language, on the other hand, is a set of elementary modules and some means <strong>for</strong> combining the modules.<br />
Unlike a device, a language doesn’t do anything by itself. It waits, only hinting at its mysterious<br />
promise and potential; it waits <strong>for</strong> you. §<br />
A language doesn’t do anything by itself. But what you say in a language is your own.<br />
§ One of the many myths surrounding technology is the idea that, using a computer, anyone can be a composer or<br />
sound designer or audio researcher, without having to invest any time or energy in their own education. If you<br />
buy into this myth, then <strong>Kyma</strong> is not <strong>for</strong> you. We assume that our users are serious about sound, that it is either<br />
their profession or their intense avocation, and that they are voracious auto-didacts.<br />
8
First, <strong>Kyma</strong> asks you to invest some time in learning the language. Your reward will be a fluency <strong>for</strong> creating<br />
an infinite variety of new sounds that no one has ever heard be<strong>for</strong>e! Once you learn the basic<br />
vocabulary of <strong>Sound</strong>s and the few simple rules <strong>for</strong> combining them, you will achieve a kind of critical<br />
mass when your knowledge and facility in the language will start increasing at an exponential rate.<br />
At some point, you will find yourself thinking in <strong>Kyma</strong>, dreaming in <strong>Kyma</strong>, designing all of your sounds<br />
in <strong>Kyma</strong>, wondering how you ever got along without it, wondering why your friends are agonizing over<br />
how to do things that you would find simple to whip up in <strong>Kyma</strong>.<br />
<strong>Sound</strong> on the Computer<br />
What is the domain of this language? What exactly are we synthesizing and manipulating in <strong>Kyma</strong>?<br />
9<br />
Analog-to-Digital<br />
Converter .<br />
01001100<br />
11101111<br />
10001010<br />
.<br />
Digital-to-Analog<br />
Converter<br />
Sample Storage<br />
and/or<br />
Signal Processing<br />
.<br />
01001100<br />
11101111<br />
10001010<br />
.<br />
Digital audio can be thought of as a symmetric process of turning acoustic air pressure variations into a<br />
voltage signal, into a stream of numbers, and then reversing the process to get from the stream of numbers,<br />
to a voltage signal, and back into a changing air pressure.<br />
♦ Physical sound is a variation in air pressure. You can detect these changes in air pressure using a<br />
transducer like a microphone which has a diaphragm inside that moves back and <strong>for</strong>th in response to<br />
changes in air pressure and translates this variation in air pressure into a continuously varying voltage.<br />
♦ You can use an analog-to-digital converter to measure (or “sample”) the value of this continuously<br />
varying voltage at evenly spaced time intervals to produce a stream of numbers corresponding to the<br />
instantaneous amplitudes of that sound at those points in time.<br />
♦ As you convert the continuous voltage into a stream of discrete numbers, you can save them onto a<br />
hard disk or a CD.<br />
♦ Later, you can read those numbers off the CD in the same order, feed them to a digital-to-analog converter<br />
which filters or interpolates between the discrete values, turning them back into a continuously<br />
varying voltage.<br />
♦ You can feed this voltage to a speaker which translates the voltage changes into movements of a diaphragm<br />
which pushes the air around, thus recreating the air pressure variations.<br />
This entire process is, by now, ubiquitous and familiar to everyone as the process of digital recording.<br />
However, once you have converted the acoustic sound into a stream of numbers, you open up all kinds of<br />
possibilities <strong>for</strong> manipulating that stream of numbers on the computer.
You can do arithmetic on the numbers be<strong>for</strong>e sending them to the digital-to-analog converter to be turned<br />
back into sound again. This is what is meant by digital signal processing or digital effects processing.<br />
From there, it is only a small leap of faith to just drop the entire top half of our diagram, and generate the<br />
stream of numbers ourselves. This is what is meant by software sound synthesis.<br />
For that matter, we could take the stream of numbers from some other sources, say, the result of a scientific<br />
experiment or the position of someone’s head in a virtual environment, and use that stream of<br />
numbers to generate sound or to control other parameters of the sound. This is the idea behind an<br />
emerging application of computer-generated sound called data-driven sound.<br />
<strong>Kyma</strong> seeks to provide a single, uni<strong>for</strong>m framework <strong>for</strong> dealing with all of these aspects of sound on the<br />
computer: sampling, processing, and synthesis, together with composition and per<strong>for</strong>mance.<br />
<strong>Kyma</strong>’s <strong>Sound</strong> Object<br />
<strong>Kyma</strong> is based on elements called <strong>Sound</strong> objects. You see evidence of these <strong>Sound</strong>s everywhere in the<br />
<strong>Kyma</strong> user interface in the <strong>for</strong>m of graphic icons.<br />
A <strong>Sound</strong> represents a stream of numbers like the streams of instantaneous amplitude values we talked<br />
about in the previous section. That stream of numbers could come from a digital recording read from the<br />
disk, or it might be purely synthesized, or it could be the result of modifying another stream of numbers.<br />
Another way to think of a <strong>Sound</strong> is that it represents an algorithm or a program. <strong>The</strong> algorithm might<br />
describe a procedure <strong>for</strong> synthesizing the stream of numbers, or it might describe the process <strong>for</strong> reading<br />
the stream off of the disk, or it might describe some arithmetic to per<strong>for</strong>m on an input stream.<br />
Yet another way to think of a <strong>Sound</strong> is as a virtual module, analogous to the modules like oscillators, delay<br />
lines, or filters that you might find in a synthesizer or effects processor, but implemented entirely in<br />
software, rather than hardware.<br />
<strong>The</strong> Words<br />
Take a quick look through the Prototypes Reference in this manual beginning on page 218. This is the<br />
“dictionary” of “words” (that is, the <strong>Sound</strong>s) in the <strong>Kyma</strong> language. <strong>The</strong>y are arranged in alphabetical<br />
order and list the name of the <strong>Sound</strong> followed by a definition. All of these <strong>Sound</strong>s are also found in the<br />
palette called Prototypes that appears across the top of the screen in <strong>Kyma</strong>:<br />
<strong>The</strong> <strong>Sound</strong>s are categorized in order to make them easier to find. Select one of the category names from<br />
the list on the left, and all the <strong>Sound</strong>s in that category appear as icons on the right. To get at the definition<br />
of a <strong>Sound</strong> on-line, select the <strong>Sound</strong> icon in the prototypes window, and choose Describe sound from the<br />
Info menu. To search <strong>for</strong> a <strong>Sound</strong> by name, use Find prototype from the Action menu, and enter part of<br />
the name of the <strong>Sound</strong> when prompted.<br />
<strong>The</strong>re is nothing special about the <strong>Sound</strong>s in the prototypes window, by the way. <strong>The</strong> prototypes window<br />
is just a collection of <strong>Sound</strong>s: one example of each type of <strong>Sound</strong> in <strong>Kyma</strong>. It is convenient to have one of<br />
each <strong>Sound</strong> type available in a palette like this, but wherever the manual talks about dragging a <strong>Sound</strong><br />
from the prototypes, you should know that any other <strong>Sound</strong> (from the <strong>Sound</strong> file window or even from<br />
another open <strong>Sound</strong> editor) would serve as well.<br />
10
Grammar<br />
<strong>Kyma</strong> “sentences” are constructed in the <strong>Sound</strong> editor window:<br />
<strong>The</strong> basic rule <strong>for</strong> creating complex <strong>Sound</strong>s out of simpler ones is contained in the definition <strong>for</strong> the <strong>Kyma</strong><br />
<strong>Sound</strong> Object.<br />
A <strong>Sound</strong> is:<br />
♦ a source of sound, or<br />
♦ a modifier or processor of sound, or<br />
♦ a combiner of several sounds<br />
A <strong>Sound</strong> with no inputs is a source of sound. Noise, Oscillator, GenericSource, FormantBankOscillator,<br />
SumOfSines, DiskPlayer, and Sample are all examples of synthetic or sampled sound sources in <strong>Kyma</strong>.<br />
11
A <strong>Sound</strong> with a single input is a modifier or processor of the sound that comes from its input. In the<br />
<strong>Sound</strong> editor, the input is always shown to the left of the <strong>Sound</strong> that modifies it. You can think of the signal<br />
as flowing from the left to the right.<br />
This is by far the largest category of <strong>Sound</strong>s in <strong>Kyma</strong>, and includes <strong>Sound</strong>s like Filter, Vocoder, Delay-<br />
WithFeedback, DiskRecorder, TimeFrequencyScaler, and others.<br />
A <strong>Sound</strong> with several inputs is a combiner. Two special examples of combiners are the Mixer (which<br />
causes all of its Inputs to occur simultaneously) and the Concatenation (which causes its Inputs to<br />
occur one after another in a sequence).<br />
A combiner can also have more complex specifications <strong>for</strong> how its inputs come together; in a Script, <strong>for</strong><br />
example, you write a script specifying when and how all the inputs are to occur with respect to one another.<br />
If the <strong>Sound</strong> objects are the words, then, in some sense, the <strong>Kyma</strong> language contains only nouns. <strong>The</strong><br />
sound sources are like objects (oscillator, noise generator), the sound modifiers are also objects (filter, delay<br />
line), and even the combiners function as objects (mixer, concatenation).<br />
A <strong>Sound</strong> is a <strong>Sound</strong> is a <strong>Sound</strong>…<br />
So why do we insist on calling everything a <strong>Sound</strong> (even things like filters and delay lines)? We do it in<br />
order to underscore the idea that <strong>Sound</strong>s are completely interchangeable and infinitely chainable.<br />
12
A <strong>Sound</strong>, no matter how complex, can always serve as the input to another <strong>Sound</strong>. Think of <strong>Sound</strong>s as<br />
something like highly abstracted audio Tinker Toys. Once you have constructed one hub and spoke<br />
you can plug that construction into another hub, and that one, in turn, into yet another, ad infinitum:<br />
At any point you could also fan out and connect several spokes<br />
No matter how complex a sub-construction of Tinker Toys you have made, you can always plug it in at<br />
the end of a spoke, just the same as if it were a single hub.<br />
<strong>The</strong> same is true <strong>for</strong> <strong>Sound</strong>s. Anywhere you can use a sound source, you could also use a modifier of a<br />
source or a combiner of a source; <strong>Sound</strong>s are uni<strong>for</strong>m and interchangeable. Even a <strong>Sound</strong> that contains a<br />
complex script that functions as a score or reads a standard MIDI file can be used as the input to another<br />
chain of modifiers and combiners. This is one of the things that makes <strong>Kyma</strong> different from most other<br />
music software: a “score” or an algorithm <strong>for</strong> generating events is part of the <strong>Sound</strong> object and is not necessarily<br />
at the “top level” of the hierarchy; there can be several “scores” distributed throughout a complex<br />
signal flow diagram. (And by the way, the entire signal flow diagram is itself a <strong>Sound</strong>).<br />
We call all of these objects <strong>Sound</strong>s in order to emphasize the uni<strong>for</strong>mity and interchangeability of <strong>Sound</strong><br />
objects. But having said all that, we can now relax a bit and sometimes use the word module to describe<br />
<strong>Sound</strong>s.<br />
<strong>Sound</strong> Parameters<br />
All <strong>Sound</strong>s, whether they are sources, modifiers, or combiners, also have parameters or settings. <strong>The</strong>se<br />
have nothing to do with the signal flow, but are local adjustments made to that <strong>Sound</strong> alone and affecting<br />
the way that <strong>Sound</strong> does its generating or processing or combining of other <strong>Sound</strong>s.<br />
<strong>Sound</strong> parameters can be:<br />
♦ Constants (<strong>for</strong> example, numbers, strings, or sample names)<br />
♦ Functions of time (<strong>for</strong> example, ramp functions or triggers from a metronome)<br />
♦ Hot controls (supplied externally from a MIDI controller or internally from <strong>Kyma</strong>)<br />
♦ <strong>Sound</strong>s (<strong>for</strong> example, using an Oscillator to control the parameter of another <strong>Sound</strong>)<br />
♦ Arithmetic expressions involving any combination of the above<br />
13
Structure<br />
To restate the definition of <strong>Sound</strong> in a slightly different way, a <strong>Sound</strong> is<br />
♦ a <strong>Sound</strong>, or<br />
♦ a collection of <strong>Sound</strong>s that functions as a single entity<br />
This is a familiar idea in the multitrack recording studio where you might have one or more microphones<br />
on each per<strong>for</strong>mer, each recorded on a separate track.<br />
Sometimes you want to treat the tracks independently, giving each its own processing or position in the<br />
stereo field. At other points, you might want to take a “submix” (say, all of the backing vocals) and treat it<br />
as a single entity, routing it through its own effects chain and EQ. And other times, you might want to<br />
treat the entire mix as one object, putting it through an effects processor to simulate room ambiance.<br />
Percussion<br />
Kick Tom Snare Cymbals<br />
Mix<br />
Rhythm Harmony Vocals<br />
14<br />
Bass Guitar<br />
Backing Vocals<br />
Voice<br />
To use traditional musical terminology, you could think of a composition as a sequence of notes, but in<br />
reality, the notes are grouped into meaningful motives, the motives into phrases, etc. Sometimes you may<br />
want to treat a note as an independent entity, sometimes you treat a phrase as one entity (subjecting the<br />
entire phrase to transposition or augmentation), and sometimes you want to go even deeper than the note<br />
level, modifying the attack and decay time or the timbre of an individual note.<br />
Composition<br />
Movement1 …<br />
Section1 …<br />
Phrase1 …<br />
Motive1 …<br />
Note1 …<br />
Attack1 Decay1
Whether you are composing or designing sound, you are constantly popping up and down to these different<br />
organizational levels, without even having to be consciously aware that you are organizing sound<br />
on several different time scales and submixes almost simultaneously.<br />
<strong>Kyma</strong>’s <strong>Sound</strong> object is meant to facilitate this kind of work — to make time-scale-switching and subgrouping<br />
natural and visually apparent.<br />
In a <strong>Kyma</strong> <strong>Sound</strong> structure you might have a mix of<br />
♦ a noise generator feeding through some highly tuned filters, the resonance of which you are controlling<br />
from a MIDI keyboard,<br />
♦ some oscillators resynthesizing vocal sounds from an analysis and repeating an algorithmically generated<br />
harmonic pattern in an alternate tuning (the algorithm <strong>for</strong> generating the pattern being part of<br />
the MIDIVoice module),<br />
♦ and a sequence of different filters, processing, and modulation on a GenericSource, so that you can<br />
speak or sing into the microphone and the processing will be different at different times.<br />
Synthesis/Processing Techniques<br />
Despite the fact that <strong>Kyma</strong> provides modules covering a wide range of synthesis and processing techniques,<br />
that in itself is not half as exciting as the fact that you can combine these algorithms in entirely<br />
new ways in order to create your own synthesis and processing algorithms. In <strong>Kyma</strong> you will be using a<br />
direct manipulation iconic interface to do, almost as a matter of routine, what others labor over <strong>for</strong><br />
months: come up with new, never-be<strong>for</strong>e-heard synthesis and processing algorithms!<br />
Synthesis algorithms in <strong>Kyma</strong> range from sample and disk recording/playback to oscillators and envelope<br />
generators, to nonlinear distortion like waveshaping, ring modulation and frequency modulation, to<br />
wavetable synthesis, to full-blown additive synthesis, to noise generators and a variety of filters <strong>for</strong> subtractive<br />
synthesis, cross synthesis using either RE filters or the vocoder, resynthesis and spectral warping<br />
using the SumOfSines or the GA oscillators, plus combinations of any of the above. Processing, while difficult<br />
to truly separate from synthesis, includes delay, modulation, reverberation elements, distortion,<br />
filtering, compression/expansion, vocoding, manipulations to the spectrum (in the spectrum editor), and<br />
whatever brilliantly twisted new combinations of all of the above that you can dream up!<br />
Current Implementation<br />
<strong>Kyma</strong> is a language, and there have been several implementations of that language in software and in<br />
software-augmented-by-hardware-accelerators.<br />
In the current implementation, the graphic interface, structural manipulations, and reading from/writing<br />
to disk are handled by the host computer — at this point, either a Macintosh or a Windows PC. <strong>Sound</strong><br />
synthesis and processing takes place on the Capybara, a multiprocessor sound computation engine designed<br />
and built by Symbolic <strong>Sound</strong>. <strong>The</strong> Capybara is a general-purpose computing engine, so in reality<br />
“the software is the synthesizer”. You program the Capybara to behave as a synthesizer, sampler, effects<br />
processor, or combination of all, but the programming is all done graphically, by connecting modules to<br />
each other on the screen of your Macintosh or PC.<br />
Brief History<br />
<strong>The</strong> first version of <strong>Kyma</strong> was a software-only version designed and written by Carla Scaletti in the fall of<br />
1986. It was written in Apple Smalltalk and ran on a Macintosh 512 K. In 1987, she extended <strong>Kyma</strong> to<br />
make use of the CERL <strong>Sound</strong> Group’s Platypus (a discrete-component DSP developed by Lippold Haken<br />
and Kurt Hebel in 1983) <strong>for</strong> real-time sound synthesis.<br />
<strong>The</strong> real time version of <strong>Kyma</strong> was shown at the International Computer Music Conference in the summer<br />
of 1987, and <strong>Kyma</strong> (along with the Motorola DSP56000, granular synthesis, and physical modeling)<br />
was identified by Bob Moog as one of the technologies-to-watch in an article he wrote on that conference<br />
<strong>for</strong> Keyboard magazine (December 1987 issue).<br />
By 1990, the sound-generation and processing part of <strong>Kyma</strong> had been ported to the multiprocessor Capybara,<br />
then to the Capybara-33 in 1995, and to the Capybara-66 in 1996.<br />
15
In 1992, the graphic interface was ported to Windows computers. In 1996, <strong>Kyma</strong> and the Capybara hardware<br />
was extended to include the PCI-bus Macintoshes and PCs. Similarly, PC-Card (also called<br />
PCMCIA card) support was added in 1997.<br />
<strong>The</strong> software has been rewritten several times in order to increase the speed and add new features, tools<br />
and algorithms. In 1995, version 4.0 was twice the speed of the previous version and provided hot parameters<br />
<strong>for</strong> the first time. <strong>Version</strong> 4.1 in 1996 added MIDI scripts, GA synthesis, and RE synthesis. In<br />
1997, <strong>Version</strong> <strong>4.5</strong> added the spectrum editor, the file organizer, the tools, the vocoder, and several new<br />
sound synthesis/processing algorithms.<br />
<strong>The</strong> point of all this is to give you an idea of the rate at which <strong>Kyma</strong> is evolving, so you can see that you<br />
have invested in something that will continue to evolve and improve with time.<br />
<strong>Kyma</strong> Evolves<br />
Why and how does <strong>Kyma</strong> evolve over time? In our minds, we have an ideal <strong>Kyma</strong>, and we try to realize<br />
this ideal with the technology available to us at the time. In the process of implementing the ideas and<br />
using the language, we learn more about the ideas and we refine our ideal.<br />
By putting <strong>Kyma</strong> into the hands of others and listening to what they have to say about it, we further refine<br />
and expand upon the ideal, and this feeds back into the next implementation. So, it is important <strong>for</strong><br />
you, as a <strong>Kyma</strong> user, to interact with us; we rely on your feedback in this continual process of implementation<br />
and refinement.<br />
How is <strong>Kyma</strong> Being Used?<br />
Music<br />
Teaching<br />
<strong>Sound</strong> <strong>Design</strong><br />
Research<br />
As a <strong>Kyma</strong> user, you are part of an international community of progressive musicians, sound designers,<br />
and researchers. You can read about some of their activities in the Eighth Nerve, the on-line <strong>Kyma</strong> newsletter<br />
that you can access from our web site (http://www.Symbolic<strong>Sound</strong>.com). Incidentally, if you<br />
haven’t sent us your biography yet, please avail yourself of this opportunity to have a presence on the<br />
world wide web (or a link from our site to your own).<br />
<strong>Kyma</strong> is being used in all kinds of music, from live per<strong>for</strong>mances to the sound tracks <strong>for</strong> music videos, to<br />
tape music and musique concrete, and including installations and per<strong>for</strong>mance art. See the web site <strong>for</strong><br />
up to date news on specific artists, upcoming events, and references to books, CDs, and videos.<br />
<strong>Kyma</strong>’s graphical representation of the signal flow and its highly interactive interface lend themselves to<br />
classroom demonstrations and the real time exploration of what-if scenarios. So it is not surprising that<br />
<strong>Kyma</strong> is used extensively in teaching about sound in universities all over the world and in courses ranging<br />
from psychoacoustics to music composition.<br />
<strong>Kyma</strong> was created as a language <strong>for</strong> sound design, and it is being used by sound designers <strong>for</strong> film, television,<br />
advertising, radio, and music as part of the international entertainment industry including<br />
Hollywood, New York, St. Louis, London, Toronto, Tokyo, and elsewhere.<br />
Electrical engineers, computer scientists, and psychoacoustics and speech researchers are using <strong>Kyma</strong> <strong>for</strong><br />
algorithm development, <strong>for</strong> generating stimuli <strong>for</strong> perception experiments, and <strong>for</strong> other research projects.<br />
16
Data-driven <strong>Sound</strong><br />
Patterns in experimental data or in data generated by models and simulations can often be made immediately<br />
apparent when you map that data into sound. Engineers and researchers are exploring the idea of<br />
using sound to help uncover patterns in data that might otherwise go unnoticed if represented visually.<br />
Related to this idea of data-driven sound is the idea of complete virtual environments, both in research<br />
and in the entertainment industry. Game developers and virtual environment creators are beginning to<br />
realize that simply triggering samples is not enough. Immersive environments require sound-generating<br />
models that are more interactive and parameterized so that they can respond to the actions of the<br />
viewer/player.<br />
17
Overview of the Interface<br />
<strong>Kyma</strong> <strong>Sound</strong>s are abstract objects in the memory of the computer, but you interact with these objects in a<br />
fairly concrete way by manipulating graphics on the computer screen using the computer keyboard and<br />
mouse. <strong>The</strong> graphic interface of <strong>Kyma</strong> has several components:<br />
Production and Per<strong>for</strong>mance<br />
During live per<strong>for</strong>mance or when working under a production deadline, you can draw upon the previously-designed<br />
library of <strong>Sound</strong>s — including <strong>Sound</strong>s you have designed yourself, <strong>Sound</strong>s provided by<br />
Symbolic <strong>Sound</strong>, and <strong>Sound</strong>s contributed to the FTP site by your fellow users.<br />
Editors and windows in support of per<strong>for</strong>mance and production include:<br />
♦ <strong>The</strong> virtual control surface that pops up automatically whenever you have specified hot parameters<br />
in one of your <strong>Sound</strong>s (we will talk more about hot parameters later in this introduction). This serves<br />
two purposes: one is to let you know the names and values of any hot parameters in your <strong>Sound</strong>, and<br />
the other is to provide graphical controls like faders and buttons so you can adjust the values of the<br />
hot parameters while the <strong>Sound</strong> is playing. Alternatively, you can control these hot parameters from<br />
a MIDI sequencer or using MIDI controllers.<br />
♦ <strong>The</strong> compiled <strong>Sound</strong> grid provides a way to quickly download precompiled <strong>Sound</strong>s in response to a<br />
MIDI program change message, a mouse click, or by tabbing into one of the squares of the grid. This<br />
can be useful in live per<strong>for</strong>mances or other presentations of <strong>Sound</strong>s that you have designed earlier<br />
and precompiled <strong>for</strong> the per<strong>for</strong>mance.<br />
18
Preproduction<br />
<strong>The</strong> items in the Tools menu provide support <strong>for</strong> sound design and development. A Tool could be described<br />
as a cross between a virtual-device front panel, a plug-in, and a “wizard”, the step-by-step guides<br />
provided in Microsoft programs. Any item in the Tools folder shows up as a choice in the Tools menu,<br />
so the tools can be updated by visiting the FTP site and downloading the latest set.<br />
<strong>The</strong> Tape Recorder tool, <strong>for</strong> example, provides a quick means <strong>for</strong> sampling the Capybara input and storing<br />
the results in a sample file on the disk of your host processor.<br />
In pre-production exploratory phases, or whenever you are between projects, you can be developing your<br />
own <strong>Kyma</strong> <strong>Sound</strong>s, organizing them into <strong>Sound</strong> files, setting up precompiled <strong>Sound</strong> grids, trying out<br />
new synthesis and processing ideas, creating the sounds that no one has heard be<strong>for</strong>e. <strong>The</strong> purpose of<br />
<strong>Kyma</strong> is to provide tools <strong>for</strong> creative sound design, so quite a few of the tools and editors support of this<br />
activity:<br />
♦ <strong>The</strong> <strong>Sound</strong> file window serves as a workspace when you are using <strong>Kyma</strong>, and provides a way to<br />
group <strong>Sound</strong>s from the same project or <strong>Sound</strong>s of a similar nature in a single disk file.<br />
19
♦ <strong>The</strong> <strong>Sound</strong> editor is where you design the signal flow and edit the parameters of individual modules.<br />
♦ <strong>The</strong> system prototypes (“the prototype strip”) serves as a convenient source of template <strong>Sound</strong>s<br />
when you are constructing a complex signal flow diagram in the <strong>Sound</strong> editor. It contains one example<br />
of each type of <strong>Sound</strong> that comes with the system.<br />
In addition to the <strong>Sound</strong> editor, there are four specialized editors, the file organizer, and two status windows:<br />
♦ <strong>The</strong> sample editor is a standard wave<strong>for</strong>m editor, offering cut/copy/paste editing <strong>for</strong> digital recordings<br />
or “samples” as well as templates <strong>for</strong> generating your own wavetables algorithmically.<br />
20
♦ <strong>The</strong> spectrum editor is a two-dimensional editor <strong>for</strong> the amplitude and frequency envelopes of each<br />
sinusoidal partial of a sound that has been analyzed using <strong>Kyma</strong>’s Spectral Analysis tool or the<br />
shareware Lemur program. ‡<br />
♦ <strong>The</strong> global map editor is a text editor <strong>for</strong> specifying the mapping between the names of hot parameters<br />
and MIDI controller numbers.<br />
♦ <strong>The</strong> text editor is a simple editor <strong>for</strong> entering or modifying text. For example, you could use this to<br />
create text files to be read and interpreted by <strong>Kyma</strong> <strong>Sound</strong>s or to test out a Smalltalk expression by<br />
typing the expression, selecting it, and choosing Evaluate from the Edit menu.<br />
‡ Available from the CERL <strong>Sound</strong> Group web site at http://datura.cerl.uiuc.edu.<br />
21
♦ <strong>The</strong> file organizer provides a color-coded list of all files that <strong>Kyma</strong> can work with, including samples,<br />
spectra, GA analyses, RE analyses, and MIDI files. You can select a file name and use Ctrl+Space<br />
Bar to hear the file, press Enter to open an editor on the file, or drag the file name into a <strong>Sound</strong> file<br />
window, <strong>Sound</strong> editor, or parameter field.<br />
♦ <strong>The</strong>re are two status windows: one <strong>for</strong> monitoring or changing the status of the Capybara, and the<br />
other <strong>for</strong> monitoring the MIDI input and <strong>for</strong> monitoring and recycling memory on your computer.<br />
A particularly important <strong>Sound</strong> <strong>for</strong> design and development is the Annotation. This is actually a <strong>Sound</strong><br />
rather than an editor (found in the system prototypes under Variables and Annotations). <strong>The</strong> purpose of<br />
an Annotation is to provide a brief explanation or reminder of what its input does. If you take some time<br />
to write a brief explanation of your <strong>Sound</strong> as you develop it, you will be able to remind yourself, six<br />
months in the future, just exactly what it was that you were doing.<br />
22
<strong>Sound</strong>, <strong>Sound</strong> File, and <strong>Sound</strong> Editor<br />
Now let’s go back and revisit the concepts of <strong>Sound</strong>, signal flow, and parameter setting, this time in the<br />
context of how to actually manipulate these things using the graphic interface. (If you are near your computer,<br />
you might want to try out some of these things as we go along.)<br />
This is an example of a <strong>Sound</strong> file window, your workspace or “desk” while inside <strong>Kyma</strong>. Each icon in<br />
the workspace represents a <strong>Sound</strong>.<br />
One way to think of a <strong>Sound</strong> is that it is a program <strong>for</strong> the Capybara. To run the program, select the icon,<br />
go to the Action menu, and choose Compile, load, start. True to its name, this menu selection compiles<br />
the program <strong>for</strong> the Capybara, loads it into the Capybara, and then runs the program. Technically, this is<br />
what occurs each time you select Compile, load, start from the Action menu.<br />
<strong>The</strong> result, though, is that you hear the sound, so from now on, we will refer to this as playing the <strong>Sound</strong><br />
and give you a shortcut method <strong>for</strong> doing it: holding down the Control or Command key § and pressing<br />
the Space Bar. Another essential shortcut, perhaps even more urgently required than the shortcut to<br />
play a <strong>Sound</strong>, is the shortcut <strong>for</strong> stopping the sound. Memorize this one so you can instinctively hit it by<br />
reflex alone, even if your <strong>for</strong>ebrain activity is being jammed by a full amplitude 8 khz sine wave; remember<br />
Ctrl+K <strong>for</strong> “Kill that sound!”.<br />
To edit a <strong>Sound</strong>, double-click on its icon. This opens a <strong>Sound</strong> editor and shows the signal flow <strong>for</strong> this<br />
<strong>Sound</strong>. In this example, there isn’t much signal flow to see: the GenericSource is feeding into the D/A<br />
output. Below the signal flow path, you can see the parameter settings <strong>for</strong> the <strong>Sound</strong>.<br />
§ On the Macintosh, you can use either the Control or Command key; however, Windows computers do not have a<br />
Command key, so you must use the Control key. To avoid sounding repetitious, we will abbreviate “hold down<br />
the Control or Command key while pressing the R key” as “use Ctrl+R”.<br />
24
For example, in a GenericSource, you can choose whether the source of sound is the Live input from the<br />
A/D or digital input, whether it is to be read from the RAM of the Capybara, or whether it is to be read<br />
from the host computer’s Disk. If you put a check in the Ask box, <strong>Kyma</strong> will ask <strong>for</strong> the source each time<br />
you play this <strong>Sound</strong>, making it ideal <strong>for</strong> developing processing algorithms using a sample or disk recording<br />
typical of what you want to process and then switching to the live inputs once you are happy<br />
with the sound of the sampled input.<br />
Notice that, in addition to the other parameters, you have to supply this <strong>Sound</strong> with a duration. In this<br />
example, the duration is set to ON, so it will run <strong>for</strong>ever, ‡ or until you kill it (Ctrl+K) or load a different<br />
<strong>Sound</strong>.<br />
As we said be<strong>for</strong>e, to play a <strong>Sound</strong> in the <strong>Sound</strong> editor (actually to play any <strong>Sound</strong> anywhere in <strong>Kyma</strong>),<br />
select it and press Ctrl+Space Bar.<br />
<strong>The</strong> Prototype Strip<br />
<strong>The</strong> prototype strip is the window across the top of the screen. It contains an example of each of the different<br />
kinds of <strong>Sound</strong> modules in <strong>Kyma</strong>.<br />
Since each <strong>Sound</strong> in the prototype strip is an example of how to use that particular kind of <strong>Sound</strong>, you<br />
can study a <strong>Sound</strong> in the prototype strip to get some idea of how to use it.<br />
A <strong>Sound</strong> in the prototype strip can’t be edited (unless you drag a copy of it into a <strong>Sound</strong> file window and<br />
edit that copy), but you can listen to it directly in the prototype strip. Press Ctrl+Space Bar to play the<br />
selected <strong>Sound</strong> in the prototype strip.<br />
Some of the <strong>Sound</strong>s in the prototype strip may not make sound when you try them out. This could be<br />
because:<br />
♦ the <strong>Sound</strong> is triggered by MIDI note events (and will make sound if you play the MIDI keyboard)<br />
♦ the <strong>Sound</strong> is subaudio and intended to be used as an envelope (view it with Full wave<strong>for</strong>m from the<br />
Info menu)<br />
♦ the <strong>Sound</strong> outputs a spectral control envelope (use it in the Spectrum field of an OscillatorBank)<br />
♦ the <strong>Sound</strong> outputs MIDI (connect the Capybara MIDI output to a synthesizer to hear it)<br />
You can use the <strong>Sound</strong>s in the prototype strip, along with the examples provided with <strong>Kyma</strong>, as a source<br />
of modules to insert or add to the signal flow diagram in the <strong>Sound</strong> editor.<br />
Finding <strong>Sound</strong>s in the Prototype Strip<br />
To quickly locate a <strong>Sound</strong> in the prototype strip, scroll down through the list of categories on the left until<br />
you find the category containing the <strong>Sound</strong> (the categories are in alphabetical order), click on it to select<br />
it, and then use the scroll bar across the bottom to browse through the <strong>Sound</strong> icons (also arranged in alphabetical<br />
order by name) in that category until you find the one you are looking <strong>for</strong>.<br />
Alternatively, you can go up to the Action menu and choose Find prototype… (or simply use Ctrl+B <strong>for</strong><br />
“befuddled”) and type in part of the name of the <strong>Sound</strong> you are looking <strong>for</strong>, and then click OK or press<br />
Enter. This will come up with a list of <strong>Sound</strong>s whose names contain the partial name you entered. To<br />
select one of these <strong>Sound</strong>s, hold down the mouse in the downward arrow button, move the mouse down<br />
to the name of the <strong>Sound</strong> you want, and release the mouse button. <strong>The</strong>n click OK or press Enter. This<br />
will take you immediately to the right place in the prototypes with the desired icon selected.<br />
‡ Well, actually, ON is about two years, but in computer years that’s virtually <strong>for</strong>ever.<br />
25
Help and In<strong>for</strong>mation<br />
For on-line help on a class of <strong>Sound</strong> modules, select a module of that type, and choose Describe sound<br />
from the Info menu. This gives you a description of how a module of this type behaves and provides a<br />
description of each of the module’s parameters. <strong>The</strong>se are the characteristics shared by all <strong>Sound</strong>s of this<br />
type.<br />
Get info (Ctrl+I) from the Info menu provides in<strong>for</strong>mation on one particular instances of that type of<br />
module. It lists the values assigned to each of the <strong>Sound</strong>’s parameters, the names of any inputs, the memory<br />
and computational resources it requires, and its duration. <strong>The</strong>se are the parameters of one particular<br />
<strong>Sound</strong>.<br />
Both Describe sound and Get info work on any <strong>Sound</strong>, not just on the <strong>Sound</strong>s in the prototypes palette.<br />
Editing the Signal Flow Diagram<br />
You use the signal flow diagram in the upper half of the <strong>Sound</strong> editor to connect the different synthesis<br />
and processing modules in your sound design.<br />
<strong>The</strong> signal flow diagram lets you:<br />
♦ insert a module between two other modules<br />
♦ replace a module with a different module<br />
♦ delete a module from the middle of a chain of modules<br />
♦ add or remove modules to <strong>Sound</strong>s that can use multiple inputs<br />
♦ listen to the audio signal at any point in the signal flow<br />
♦ change the name of a module<br />
Insert<br />
To insert a new module B between two other modules C and A, drag B into the <strong>Sound</strong> editor, and drop it<br />
onto the line between the two modules C and A<br />
26
Be<strong>for</strong>e After<br />
or between the module A and the speaker icon.<br />
Be<strong>for</strong>e After<br />
For example, say you wanted to feed the GenericSource through the HarmonicResonator filter be<strong>for</strong>e<br />
sending it to the output. First, find the HarmonicResonator filter in the prototypes. Select the Filters category<br />
in the list on the left and then scroll the icons until HarmonicResonator becomes visible (both the<br />
categories and the <strong>Sound</strong>s are arranged in alphabetical order).<br />
Drag the HarmonicResonator from the prototypes into the <strong>Sound</strong> editor and drop it on the line between<br />
the GenericSource and the output speaker icon (touch the cursor arrow tip to the line connecting the GenericSource<br />
and the speaker icon).<br />
After the insertion, you should see the HarmonicResonator with a little tab attached to its left side.<br />
Whenever you see a tab, it indicates that there are more <strong>Sound</strong>s to the left but that they may not being<br />
showing. Click on the tab hide the input. Click it again to show the hidden input. This ability to show or<br />
hide inputs becomes especially useful when you have a complex signal flow diagram and would like to<br />
concentrate on one section of it at a time.<br />
While constructing new <strong>Sound</strong>s, you can typically drag all the modules you need from the prototypes<br />
palette into the <strong>Sound</strong> editor since the prototypes include one of each kind of <strong>Sound</strong> available in the sys-<br />
27
tem. However, you can drag a <strong>Sound</strong> module from anywhere in the user interface (the <strong>Sound</strong> file window,<br />
another open <strong>Sound</strong> editor, a MIDI grid, etc.) and place it into the signal flow path.<br />
Probing, Prisms, and History<br />
You can listen to the sound at any point along the signal flow path by selecting an icon and using<br />
Ctrl+Space Bar. For example, if you select and play the GenericSource in the example we’re constructing,<br />
you will hear the unprocessed A/D input. If you select the HarmonicResonator, you will hear the<br />
GenericSource as processed through the resonator. In a sense, when you select and play an icon, you hear<br />
that <strong>Sound</strong> and everything to the left of that <strong>Sound</strong>. You are listening to the chain of processing up to the<br />
point that you have selected.<br />
In other words, the modifiers in <strong>Kyma</strong> are nondestructive. You can always go back and listen to the unmodified<br />
sound just prior to where the signal enters a modifier. A modifier is like a sonic analogy to a<br />
prism or a lens: when you look at an object through a lens, you observe a systematic distortion of the object<br />
that tells you something about the structure of the lens, but the lens does not change the object itself<br />
— just the way you see the object when looking through the lens.<br />
One side-effect of nondestructive modification is that each signal flow diagram becomes a history of the<br />
steps you took in order to create it. As you work on a sound, you are leaving a trace of all the operations<br />
you applied in order to reach the end result. This means you can apply the same process to another<br />
sound source later, simply by substituting the new sound source <strong>for</strong> the old in the signal flow diagram.<br />
Replace<br />
To replace <strong>Sound</strong> A with <strong>Sound</strong> B, drag B into the <strong>Sound</strong> editor, and drop it on top of <strong>Sound</strong> A. Alternatively,<br />
you can select and copy <strong>Sound</strong> B, select <strong>Sound</strong> A, and then paste.<br />
Be<strong>for</strong>e After<br />
For example, say we wanted to replace the GenericSource with a recording read from the disk. Find the<br />
DiskPlayer module in the Disk category of the prototypes, drag it from the prototypes into the <strong>Sound</strong><br />
editor, and drop it on top of the GenericSource icon. (If you are in front of your computer, try this out.)<br />
Advisory Dialogs<br />
If you are replacing one <strong>Sound</strong> source with another, a dialog asks you to confirm that you want to complete<br />
the action:<br />
28
But what if the <strong>Sound</strong> you are about to replace and the <strong>Sound</strong> you are about to replace it with both have<br />
inputs? In that case, you have a choice of replacing the old <strong>Sound</strong> but retaining its inputs or of replacing<br />
both the old <strong>Sound</strong> and its old inputs.<br />
For example, say you have a HarmonicResonator filtering a GenericSource, and you decide that you<br />
would like to try a low-pass filter instead. You would drag the Filter module from the prototypes and<br />
drop it on the HarmonicResonator. <strong>The</strong> dialog gives you the choice of replacing the HarmonicResonator<br />
only (Replace) or of replacing both the HarmonicResonator and the GenericSource (Replace all).<br />
<strong>The</strong> result of Replace would be the same GenericSource, but feeding into a Filter rather than the HarmonicResonator:<br />
<strong>The</strong> result of Replace all would be a Filter with its default input (the Granulation). <strong>The</strong> original Generic-<br />
Source would be lost:<br />
Try these things out on your computer to see more clearly the difference between Replace and Replace<br />
all.<br />
29
Delete<br />
To remove <strong>Sound</strong> A from the signal path (where <strong>Sound</strong> C is its input), select <strong>Sound</strong> A and press the Delete<br />
or Backspace key. <strong>Sound</strong> C will then replace <strong>Sound</strong> A in the signal flow path.<br />
Be<strong>for</strong>e After<br />
For example, say we have the GenericSource feeding through the HarmonicResonator and we want to get<br />
rid of the HarmonicResonator. Select HarmonicResonator, and press the Delete or Backspace key.<br />
<strong>Kyma</strong> will ask you to verify that you want to replace the HarmonicResonator with the GenericSource<br />
(since this is how the delete operation is actually accomplished — by replacing a <strong>Sound</strong> with its input).<br />
No Dangling Cables…<br />
What if you had decided to delete the GenericSource? Sorry, but you can’t delete the first <strong>Sound</strong> in the<br />
signal flow chain, because it would leave the HarmonicResonator without an input and thus unable to<br />
produce sound. You can substitute a new <strong>Sound</strong> source <strong>for</strong> the old one, but you cannot leave a <strong>Sound</strong> only<br />
partially defined.<br />
30
Add<br />
To add an additional input called E to a multi-input <strong>Sound</strong> called D, drag <strong>Sound</strong> E into the Inputs parameter<br />
field of <strong>Sound</strong> D.<br />
Be<strong>for</strong>e After<br />
Let’s say that we wanted to mix the output of a DiskPlayer with the output of a Sample. Drag a Mixer<br />
from the Mixers & Attenuators category of the prototypes into the <strong>Sound</strong> editor, and drop it on the line<br />
between the DiskPlayer and the output icon.<br />
<strong>Kyma</strong> gives you a list of <strong>Sound</strong>s and a choice of whether you would like to add the DiskPlayer to this list<br />
of <strong>Sound</strong>s or use the DiskPlayer to replace one of the two <strong>Sound</strong>s already in the Mixer.<br />
Why does the Mixer already have inputs? <strong>The</strong>se are the default inputs. Keep in mind that every prototype<br />
is an example <strong>Sound</strong>, ready to play. In the case of the prototype Mixer, it already has two input<br />
<strong>Sound</strong>s. So when you say that you want to use the DiskPlayer as an input to the Mixer, you also have to<br />
decide whether you want to add it to the <strong>Sound</strong>s that are already there or whether you would like to replace<br />
one of the existing inputs.<br />
Click the Add button to add the DiskPlayer to the collection of Mixer inputs. Double-click on the Mixer<br />
in the <strong>Sound</strong> editor in order to see its parameters. One of the Mixer’s parameters is called Inputs. <strong>The</strong><br />
same <strong>Sound</strong>s that are feeding into the Mixer in the signal flow diagram are also shown in the Inputs<br />
parameter. (If the Mixer’s inputs are not visible in the signal flow diagram, click the tab on the left side of<br />
the Mixer icon to show its inputs). Drag the Sample from the Sampling category of the prototypes and<br />
drop it into the Inputs field of the Mixer.<br />
To update the signal flow diagram, double-click in a white area. Once you do this, you should see the<br />
Sample as one of the inputs to the Mixer.<br />
31
Whenever you want to make sure that a signal flow diagram reflects the most recent changes, doubleclick<br />
in a white area in the diagram and it will display with the latest changes.<br />
At this point, we have the DiskPlayer and the Sample as inputs to the Mixer, but we also have some other<br />
<strong>Sound</strong>s in there that we don’t want… which leads us into the next topic, how to remove inputs from a<br />
multi-input <strong>Sound</strong>.<br />
Remove<br />
To remove an input C from a multi-input <strong>Sound</strong> called D, select the <strong>Sound</strong> called C in the Inputs parameter<br />
field of <strong>Sound</strong> D, and press Delete or Backspace.<br />
Be<strong>for</strong>e After<br />
32
In our example case, draw a selection box around Crossfade and Concatenation (or simply select one and<br />
shift-select the other to add it to the selection), and press Delete or Backspace. <strong>Kyma</strong> will verify that<br />
you really want to get rid of these <strong>Sound</strong>s. You can click Yes to remove one of them at a time with verification<br />
on each removal, or click Remove all to delete all of the selected <strong>Sound</strong>s at once.<br />
Remember to double-click in the white space to update the signal flow diagram!<br />
Name<br />
As you make changes to the signal flow and the <strong>Sound</strong> parameters, it can be helpful to rename some of<br />
the <strong>Sound</strong>s from their default names to something more memorable that indicates how this <strong>Sound</strong> differs<br />
from others of the same type.<br />
To rename, select the icon, press Enter or Return, and type in a new name <strong>for</strong> the <strong>Sound</strong>.<br />
Copies and Identities<br />
You have probably noticed by now that when you drag a <strong>Sound</strong> from the prototypes, a number is appended<br />
to the end of its name. This indicates that the <strong>Sound</strong> is a copy of the prototype and not the same<br />
<strong>Sound</strong>.<br />
Whenever you drag a <strong>Sound</strong> icon from one window to another, <strong>Kyma</strong> gives you a copy of the old <strong>Sound</strong><br />
to drag to the new location. This means that you can freely change the parameters of the dragged <strong>Sound</strong><br />
without having to worry about altering the old <strong>Sound</strong>.<br />
33
Parameters<br />
Suppose you wanted to drag the same <strong>Sound</strong> into two different input fields. For instance, say you wanted<br />
to route one disk recording through three different processing modules, and you didn’t want use up disk<br />
bandwidth reading the same disk file three times.<br />
Within the <strong>Sound</strong> editor, you can drag the same <strong>Sound</strong> (not a copy), by holding down the Control or Option<br />
key when you start dragging. Alternatively, you can copy the <strong>Sound</strong>, and use Paste special… from<br />
the Edit menu in order to paste the <strong>Sound</strong> rather than a copy of the <strong>Sound</strong>.<br />
Notice that you need a Mixer as the last module in the signal flow diagram in order to mix the three different<br />
processing paths.<br />
Save<br />
When you click in the close box of the <strong>Sound</strong> editor, <strong>Kyma</strong> will ask whether you want to keep all the<br />
changes you’ve just made to the <strong>Sound</strong>. If you choose Yes, the changes will be retained. But you have not<br />
yet saved the <strong>Sound</strong> to the disk! This does not happen until you save the entire <strong>Sound</strong> file window.<br />
<strong>The</strong>re are two ways to save the changes you are making to a <strong>Sound</strong> in the <strong>Sound</strong> editor:<br />
♦ <strong>The</strong> simplest way is to choose Save ( Ctrl+S) from the File menu when in the <strong>Sound</strong> editor. This will<br />
cause the <strong>Sound</strong> to be saved to the <strong>Sound</strong> file window, and then the <strong>Sound</strong> file window to be saved<br />
to the disk.<br />
♦ Alternatively, you can close the <strong>Sound</strong> editor, confirm that you want to save the changes, then choose<br />
Save (Ctrl+S) or Save as… from the File menu of the <strong>Sound</strong> file window.<br />
<strong>The</strong> parameters of a <strong>Sound</strong> can be constants, hot parameters, functions of time, <strong>Sound</strong>s, or arithmetic<br />
combinations of these things. On-line help on any of the parameters of a specific <strong>Sound</strong> is available by<br />
clicking on the name of the parameter in the <strong>Sound</strong> editor.<br />
To illustrate each of these parameter types, let’s look again at our concrete example <strong>Sound</strong>: a Generic-<br />
Source feeding into a HarmonicResonator.<br />
34
To see the parameters of the GenericSource, double-click on its icon in the signal flow diagram. Play this<br />
<strong>Sound</strong> to hear what it sounds like be<strong>for</strong>e we start modifying its parameters.<br />
To edit a parameter, first place the cursor in that parameter field, then select the current contents of the<br />
field, and type in a new value <strong>for</strong> that field.<br />
To get the cursor into a parameter field, click in that field or use the Tab key to cycle through each of the<br />
parameter fields one by one until you reach the one you want.<br />
By default, the contents of the field should already be selected when you Tab into it or click in it. If not,<br />
then position the cursor to the right or left of the current contents and click twice in order to select all (or<br />
choose Select all from the Edit menu).<br />
Once the cursor is positioned in a parameter field and the current contents are selected, any new numbers<br />
or text that you type will replace the current contents of the field.<br />
Whenever you change a parameter, you have to use Ctrl+Space Bar if you want to hear the results of<br />
the change. To put it in terms of <strong>Sound</strong>s as programs <strong>for</strong> the Capybara, when you make a change to a<br />
program, you have to recompile it be<strong>for</strong>e you can hear the results of that change.<br />
Constants<br />
A constant parameter is, true to its name, one that does not change while the <strong>Sound</strong> is playing. Some parameters<br />
must be constant over the course of the <strong>Sound</strong> (these are indicated by parameter fields with<br />
white backgrounds) while others can be either constant or dynamic (indicated by parameter fields that<br />
have cyan-colored backgrounds).<br />
To enter a new constant parameter value, select the contents of a parameter field, and type in the new<br />
value.<br />
For example, to change the file read by this GenericSource, tab into the Sample field and type<br />
nothing2<br />
Use Ctrl+Space Bar to compile and hear the results of this change.<br />
If you don’t remember the name of the file, you can click the disk button to the right of the Sample field<br />
to choose from a file list. Try clicking on the disk button and find one of the Celtic harp samples like<br />
Celthrp2a in the Musical Instruments folder of the Samples folder of the Wavetables folder.<br />
Next, try changing the value of Scale by tabbing into the Scale field and typing the value<br />
0.1<br />
35
to replace the old value. §<br />
<strong>The</strong>n use Ctrl+Space Bar to hear the results of your change.<br />
Frequency & Duration Fields<br />
Frequency, Duration or Time parameter fields require that you specify the units of frequency or time.<br />
Frequency can be specified in units of hz (<strong>for</strong> hertz), or nn (<strong>for</strong> note number) or specified as an octave<br />
number followed by the lettername of the pitch class (<strong>for</strong> example 4 c is middle C or MIDI note number<br />
60). Time and duration can be specified in units of s (seconds), ms (milliseconds), usec (microseconds),<br />
or longer durations like days. You can also type the word on (with no units) into a Duration field if you<br />
want the <strong>Sound</strong> to stay on <strong>for</strong>ever (actually, just 2 years). See Specifying Units in Parameter Fields on<br />
page 210 <strong>for</strong> a complete list of units.<br />
Any <strong>Sound</strong> that reads a file from disk (<strong>for</strong> example, a GenericSource, DiskPlayer, SumOfSines) can also<br />
read the “natural” or original duration of that file from the file header, so you can use some shortcuts in<br />
the Duration or Frequency fields.<br />
In these <strong>Sound</strong>s, you can use the word Default in either the Frequency or Duration fields (no units<br />
are required because Default is automatically in units of seconds <strong>for</strong> times or durations and units of<br />
hertz <strong>for</strong> frequencies). ‡ This specifies that the originally recorded frequency or duration should be used.<br />
§ It is one of the quirks of Smalltalk that you must include the leading zero whenever you type a fractional number. Try<br />
getting rid of the leading zero and recompiling the <strong>Sound</strong>. <strong>Kyma</strong> will put the error message Nothing more expected-><br />
into the parameter field. This is because Smalltalk interprets the decimal point as the period at the end<br />
of a statement, and it does not expect to see anything beyond the end of the statement.<br />
‡ Alternatively, you can use 0 s instead of Default in Duration fields, and 0 hz instead of Default in Fre-<br />
quency fields.<br />
36
In GenericSource, <strong>for</strong> instance, you can get the original duration of the sample file by typing Default<br />
and the GenericSource will play the sample at its original, recorded frequency if you type Default into<br />
the Frequency field.<br />
<strong>The</strong> advantage of using the word Default is that you can do arithmetic on the duration or frequency<br />
without having to know or care exactly what it is. For example, if you know you want to lower the frequency<br />
by an octave, you can simply use<br />
Default * 0.5<br />
<strong>for</strong> the Frequency.<br />
Default is in units of hz <strong>for</strong> the Frequency, so if you want to add to it (to transpose it), you must first<br />
convert the frequency to note numbers and then add a value in units of note numbers. For example, to<br />
raise the pitch by a perfect fifth (7 half steps), you would type<br />
Default nn + 7 nn<br />
As it stands now, our example will play through the GenericSource once and then it will go out of existence.<br />
Let’s modify it such that the GenericSource stays permanently loaded in the Capybara (until we<br />
load a different <strong>Sound</strong>). To do this, type the word on in the Duration field, and play the <strong>Sound</strong>.<br />
37
Event Values<br />
Even though the GenericSource program is permanently running on the Capybara, we still only hear the<br />
sample once because the Trigger is an unchanging constant. § How can we control the value of Trigger?<br />
One way would be <strong>for</strong> <strong>Kyma</strong> to watch <strong>for</strong> incoming MIDI keyboard events, setting the value of<br />
Trigger to 1 when the key is down and 0 when the key goes up. ‡<br />
To specify that the Trigger should come from MIDI key down:<br />
1. Click or Tab into the Trigger field<br />
2. Press the Escape key on your computer keyboard (the cursor changes to a little fader)<br />
3. Play two keys at once on your MIDI keyboard<br />
Play the GenericSource and try triggering it with the MIDI keyboard. Try changing the ReleaseTime to<br />
50 ms, play the GenericSource, and play the keyboard again. AttackTime and ReleaseTime provide a<br />
simple amplitude envelope on the GenericSource to avoid on/off clicks.<br />
A red name that starts with an exclamation point (like !KeyDown, above) is called an Event Value. An<br />
Event Value is not a constant, like an ordinary number. Instead, it relies on external events <strong>for</strong> its value.<br />
<strong>The</strong>se external events include: pressing a MIDI keyboard key, moving a MIDI fader, sending out MIDI<br />
events from a software sequencer, moving a fader in <strong>Kyma</strong>’s virtual control surface, generating events<br />
algorithmically using the MIDIVoice or AnalogSequencer <strong>Sound</strong>s, or even writing your own C programs<br />
to set these Event Values as if they were variables in your program.<br />
An Event Value can change while the <strong>Sound</strong> is playing, unlike a constant value which is set once when<br />
the <strong>Sound</strong> first starts up.<br />
Playing this monotone harp GenericSource begs the question, how can you control Frequency from the<br />
keyboard? <strong>The</strong> steps are almost the same:<br />
1. Click or tab into the Frequency field<br />
2. Press Escape once (do not hold it down)<br />
3. Play a single key on the MIDI keyboard<br />
§ <strong>Sound</strong>s that have Trigger fields are triggered whenever the Trigger becomes positive. To trigger the <strong>Sound</strong><br />
again, the Trigger has to become zero or negative, then positive again.<br />
‡ If you haven’t already done so, now is the time to connect the output of your MIDI keyboard and/or other controllers<br />
directly to the MIDI in jack on the back of the Capybara. To make sure that you are receiving MIDI, use<br />
Configure MIDI… (found under the DSP menu); it has an option to display all incoming MIDI events.<br />
38
While we are at it, we might as well Tab into the Scale field, hit Escape and play three keys simultaneously<br />
in order to control the amplitude of the GenericSource with key velocity. Play the GenericSource<br />
again and play the MIDI keyboard.<br />
At this point, the Gate field has the word !KeyDown, the Frequency field says !Pitch, and the Scale<br />
field contains the word !KeyVelocity.<br />
You could also have typed these names directly into parameter fields. Actually any word preceded by an<br />
exclamation mark will turn red in the user interface and be interpreted as an Event Value, that is, a parameter<br />
that can be changed while the <strong>Sound</strong> is running on the Capybara. If the name that you enter<br />
happens to be in your global map, then you can control it from a MIDI device, but even if it is not in the<br />
map, you can still control it from the virtual control surface — more about that in the upcoming section<br />
on MIDI continuous controllers.<br />
You could, alternatively, have pasted these Event Values into the fields using the Paste hot… option in<br />
the Edit menu (Ctrl+H). Ctrl+H opens a list of all the Event Value names in your global map (more on<br />
global maps coming up on page 47). Scroll down the list, or simply begin typing the first few letters of the<br />
desired name to jump to proper position in the list. <strong>The</strong>n hit Enter to paste the name into the field. At the<br />
top of the list are some commonly used expressions that you can paste directly into the parameter field in<br />
order to save yourself some typing.<br />
39
Status<br />
Whenever you play a <strong>Sound</strong> that requires some kind of real time input (such as hitting a MIDI key,<br />
moving a virtual fader, or singing into the microphone) the Status window will display a list of the expected<br />
sources of input. This is especially helpful in<strong>for</strong>mation when you play a <strong>Sound</strong> and don’t hear<br />
anything because the <strong>Sound</strong> is waiting <strong>for</strong> input from the A/D or waiting <strong>for</strong> a !KeyDown trigger.<br />
<strong>The</strong> Status also displays the current global map (the mapping from memorable names in <strong>Kyma</strong> to actual<br />
MIDI controller numbers), the MIDI channel or channels on which it is expecting MIDI input events, the<br />
word Keyboard (if it expects MIDI key events), and a list of all continuous controller names.<br />
Across the top is a horizontal thermometer display giving an indication of how much memory is available<br />
on your host computer (not to be confused with the memory on the Capybara). As memory is<br />
dynamically used up and then recycled, § you will notice the thermometer growing redder or bluer and<br />
also growing further towards the right and shrinking towards the left. Smalltalk does periodic recycling,<br />
but you can <strong>for</strong>ce it to recycle memory immediately by clicking the Recycle button. You should leave this<br />
Status window open at all times, because it monitors the available memory and does automatic recycling<br />
<strong>for</strong> you.<br />
Polyphony<br />
Controlling parameters from a MIDI keyboard immediately suggests the idea of polyphony. To make a<br />
<strong>Kyma</strong> <strong>Sound</strong> polyphonic, make it the input to a MIDIVoice module; this defines the <strong>Sound</strong> as a MIDI<br />
voice, assigns it a channel, gives it a polyphony value, and specifies a range of MIDI pitches that it should<br />
pay attention to.<br />
For example, to increase the polyphony on the MIDI-controlled GenericSource from the previous section,<br />
drag a MIDIVoice from the MIDI In category of the prototypes, and drop it on the line between the GenericSource<br />
and the HarmonicResonator. Double-click on the MIDIVoice to take a look at its default<br />
parameter settings.<br />
§ <strong>Kyma</strong> is written in Smalltalk, a programming language that dynamically allocates memory; whenever an object in<br />
<strong>Kyma</strong> is no longer in use, Smalltalk can recycle the memory previously needed by that object.<br />
40
<strong>The</strong> MIDI channel is set to 0, so it will default to the MIDI channel specified in Configure MIDI… under<br />
the DSP menu. Change the Polyphony to 4, select the MIDIVoice, and play it. Now you should be able<br />
to hold down four notes at a time on the MIDI keyboard.<br />
To specify that there should be several different timbres, each on its own MIDI channel, feed each of the<br />
<strong>Sound</strong>’s (timbres) into its own MIDIVoice, assign it its own channel, and then feed all of those MIDI-<br />
Voices into a Mixer.<br />
To implement a “keyboard split”, where one range of note numbers triggers one timbre and another<br />
range of note numbers triggers another, create a Mixer of two or more MIDIVoices. Set the LowPitch<br />
and HighPitch of each MIDIVoice to the range of note numbers that should trigger the timbre associated<br />
with that particular voice.<br />
If your timbres are all samples or disk files, take a look at MultiFileDiskPlayer, and KeyMappedMultisample.<br />
<strong>The</strong>se provide convenient ways to quickly map samples or disk files to MIDI note numbers or<br />
other events.<br />
MIDI Continuous Controllers and the Virtual Control Surface<br />
Let’s extend this example so that we can control the attack time of the envelope as well.<br />
1. Tab into the AttackTime field<br />
2. Press Escape once (do not hold down the key) and move a MIDI fader<br />
3. Press the Space Bar and the letter s (to add units of seconds to the value from the MIDI fader)<br />
41
<strong>Kyma</strong> will make an association between the fader you just moved and this parameter. When you play the<br />
GenericSource, the virtual control surface will pop to the front, showing the name of the continuous controller<br />
that now controls the attack time. You can adjust the attack time using either the MIDI fader or the<br />
virtual fader on the screen.<br />
You can also enter values by typing into the small field at the top of the fader. When the virtual control<br />
surface is in front, you can hit the Tab key to select the number in the numeric field at the top of the<br />
fader. Type a new number between 0 and 1 ‡ (remember to include a leading zero be<strong>for</strong>e the decimal<br />
point), and press Enter or Return. <strong>The</strong> fader will jump to the new setting.<br />
‡ Inside <strong>Kyma</strong>, the value of a continuous controller is in the range of 0 to 1. If the controller is a MIDI controller, you<br />
are probably accustomed to thinking of its range as 0 to 127, but inside <strong>Kyma</strong> this range is scaled to lie between 0<br />
and 1. This makes it easy to do arithmetic with controllers and to predict the results of multiplying a controller by<br />
a constant. For example, if you have a controller called !Frequency, and its range is 0 to 1, you can easily change<br />
its range to 750 hz to 1000 hz by typing:<br />
!Frequency * 250 hz + 750 hz<br />
in the Frequency field. When the controller value is 0, the value of the expression is 750 hz, and when the controller<br />
value is 1, the expression value is 1000 hz. Changing the range of a controller comes up often, so it is worth<br />
remembering the general <strong>for</strong>m <strong>for</strong> this expression:<br />
!controller * (maximum - minimum) + minimum<br />
42
If you don’t have any MIDI faders, you can still type in a name preceded by an exclamation mark into a<br />
parameter field, and it will show up in the virtual control surface where you can control it. § Alternatively,<br />
you can use Ctrl+H or Paste hot… from the Edit menu to paste a name chosen from a list of names.<br />
Continuing with our example, let’s add a continuously variable offset to the !Pitch supplied from the<br />
MIDI keyboard:<br />
!Pitch + !Frequency nn<br />
Notice that the continuous controller !Frequency must have units of pitch or frequency, in this case, nn<br />
<strong>for</strong> note number.<br />
Select the GenericSource, use Ctrl+Space Bar to compile, load, start the <strong>Sound</strong>, and try playing the keyboard<br />
while moving the !Frequency fader on the virtual control surface.<br />
Saving Event Value Settings<br />
After you have developed a <strong>Sound</strong> that uses Event Values and have fine-tuned the Event Values, it<br />
would be nice to save the settings. To do this, drag the Preset <strong>Sound</strong> (from the MIDI In category of the<br />
prototypes) on to the line connecting the right-most <strong>Sound</strong> to the speaker icon:<br />
Click on the Set to current event values button to capture the current settings of the Event Values. Now,<br />
every time you play the Preset <strong>Sound</strong>, all Event Values will jump to those settings at the beginning of the<br />
<strong>Sound</strong> (but you can still adjust them as the <strong>Sound</strong> is playing).<br />
<strong>The</strong> Heartbreak of Numeri-phobia?<br />
For many of you, the kind of arithmetic you do in parameter fields comes as naturally as everyday conversation.<br />
If you fit this category, then you can skip over this section.<br />
We realize, though, that <strong>for</strong> some of you, the sight of arithmetic operators may bring back memories of<br />
that apathetic (or even sadistic) algebra teacher who managed to convince you that math was boring and<br />
impenetrable (despite the fact that, as a musician, you have a natural predisposition <strong>for</strong> mathematical<br />
thinking… if only they had not insisted on boring it right out of you). In the event that you were un<strong>for</strong>tunate<br />
enough to have encountered bad math teachers in your earlier years, have no fear. <strong>Kyma</strong> can bring<br />
back your natural love of patterns and algorithms and rediscover your inner mathematician!<br />
Here are a couple of tips <strong>for</strong> breezing through the arithmetic in <strong>Kyma</strong> parameter fields.<br />
§ <strong>Kyma</strong> defines some built-in Event Values with different appearances in the virtual control surface. !cc00 through<br />
!cc127 are faders that correspond to the MIDI continuous controllers on the default MIDI channel, !bt00<br />
through !bt127 are momentary buttons on the same controllers, and !sw00 through !sw127 are check boxes on<br />
the same controllers.<br />
You can customize the appearance of the virtual control surface in the global map, see Virtual Control Surface and<br />
Mappings on page 483.<br />
43
Scale and Offset<br />
90% of all arithmetic that you will need in parameter fields will fit the same basic pattern. Most of the<br />
time, we want to change the range of a fader to be something other than 0 to 1. So most of our expressions<br />
will look something like this:<br />
!Fader * range + minimum<br />
To change the range of a fader that goes from 0 to 1, multiply it by the range you really want. For example,<br />
if you want your frequencies to have a range of one octave, you could multiply (or scale) the<br />
!Frequency fader by 12 half steps:<br />
!Frequency * 12 nn<br />
That would give you a range of note numbers from 0 to 12. Note number 0 is pretty low, so you probably<br />
would want to give it a different minimum note number. To set the minimum, you could add to (or<br />
offset) your value:<br />
!Frequency * 12 nn + 60 nn<br />
Now your !Frequency fader covers the range from middle C (note number 60) to one octave higher<br />
(note number 72).<br />
Sometimes multiplying is called scaling, because it retains the shape of the function, and just scales its<br />
size:<br />
⇒<br />
And sometimes adding a constant number is called adding an “offset”, because it doesn’t change the<br />
shape or the size of the function, it just shifts the whole thing up or down — setting it off from the original<br />
axis. You may have encountered this terminology be<strong>for</strong>e in the <strong>for</strong>m of “DC offset”, when some<br />
constant voltage is added to your audio signal, shifting it up or down with respect to zero.<br />
⇒<br />
In some of the <strong>Kyma</strong> documentation and nomenclature, you will see the words, scale, offset or<br />
ScaleAndOffset to mean multiply and add.<br />
Minus 1<br />
One version of the scale and offset that comes up fairly often in <strong>Kyma</strong> is the one that takes you from the<br />
range of (0,1) to the range (-1,1). Since the range of a <strong>Sound</strong>’s output is typically (-1,1) and the<br />
44
ange of a continuous controller output is (0,1), ‡ you will encounter situations in which one range must<br />
be converted to the other.<br />
To convert from (0,1) to (-1,1) you can use<br />
!Fader * 2 - 1<br />
First, you multiply by 2 because (-1,1) is twice as large a range as (0,1). But then you end up with the<br />
range (0,2). So you have to shift it down by subtracting 1 so that you end up with (-1,1).<br />
If you have pasted a <strong>Sound</strong> into a parameter field § and want to scale its range of (-1,1) to a range of<br />
(0,1), you can use<br />
a<strong>Sound</strong> L * 0.5 + 0.5<br />
In other words, you first scale the range to half its size, and then add 0.5 to the result to shift it to the<br />
range of (0,1).<br />
Nyquist<br />
Even more common than the scale and offset is to scale a number without adding an offset. For example,<br />
if you have a controller or a <strong>Sound</strong> that is giving you a function in the range of (0,1) and you want to<br />
use that function to control the frequency of another <strong>Sound</strong>, you can scale (0,1) to the range of usable<br />
frequencies by using the following expression:<br />
!Fader * SignalProcessor sampleRate * 0.5 hz<br />
Why? Because in digital audio, the highest frequency you can represent is half the sample rate of the<br />
Capybara. You can get at the current sample rate by sending a message to the SignalProcessor. <strong>The</strong>n<br />
you can multiply it by 0.5 to get half the sample rate and append the units of hz on the end.<br />
Note Numbers<br />
While all MIDI continuous controllers are scaled in <strong>Kyma</strong> to the range of (0,1), <strong>Kyma</strong> leaves the range<br />
of !Pitch and !KeyNumber to be (0,127), where 60 is middle C. So if you intend to use a continuous<br />
controller as a pitch, you will have to scale it to the desired range of note numbers. For example<br />
!Fader1 * 6 nn + 4 c<br />
first scales the (0,1) range of !Fader1 to the range of (0,6), then gives it units of nn <strong>for</strong> note number,<br />
and finally adds it to the octave-pitch-class designation <strong>for</strong> middle C.<br />
Flipping Time on its Head<br />
Here is another relationship that comes in handy fairly often: frequency and duration are the inverses of<br />
each other. Another way to say this is that the period of a signal (a duration) is the inverse of its frequency.<br />
This becomes clearer when you recall that hertz really stands <strong>for</strong> cycles per second. If you flip<br />
cycles per second, you end up with seconds per cycle or the number of seconds it takes to get through one<br />
cycle of the wave<strong>for</strong>m.<br />
In other words, if you evaluate<br />
441.0 hz inverse<br />
in <strong>Kyma</strong>, you will get the duration of one cycle of a 441 hz signal. If you translate that to samples, you can<br />
see how many samples that is; <strong>for</strong> example if the sample rate is 44.1 khz,<br />
441.0 hz inverse samp<br />
is 100 samples.<br />
‡ All continuous controllers have a range of 0 to 1, corresponding to the MIDI controller values of 0 to 127. Pitch bend<br />
(!PitchBend), however, has a range of -1 to 1, corresponding to the MIDI pitch bend range of 0 to 16383.<br />
§ We are getting a little ahead of ourselves here. Using <strong>Sound</strong>s in parameter fields is explained in detail in Using<br />
<strong>Sound</strong>s as “Control Voltages” starting on page 52.<br />
45
So if you see a parameter field that asks <strong>for</strong> a duration (e.g. Period, HoldTime or Delay) and you<br />
would like to specify the duration that corresponds to one cycle of some particular frequency, you can<br />
enter the desired frequency and take the inverse of it.<br />
Likewise, in a Frequency parameter, you can enter a duration and take its inverse in order to get a frequency<br />
in hertz. For example, if you are using an Oscillator as a repeating envelope and prefer to specify<br />
the duration of each pass through the envelope wave<strong>for</strong>m, you can put the inverse of that duration in<br />
seconds into the Frequency field of the Oscillator.<br />
Avoiding Carpal Tunnel<br />
Many of these expressions are available in a list of hot expressions. Choose Paste hot… from the Edit<br />
menu or use Ctrl+H to paste one of these expressions into a parameter field, saving yourself some typing.<br />
Fun<br />
You now have the bits and pieces to do most of the arithmetic you will need <strong>for</strong> <strong>Kyma</strong>. Given this, you<br />
can figure out everything else by puzzling through it, piecing together subexpressions that you have figured<br />
out be<strong>for</strong>e, drawing a few little sketches and trying a few things out. (Everyone does it like that, so<br />
there’s no reason to feel inhibited about drawing a sketch or trying out a few test values in order to experiment).<br />
And the little secret your high school teachers may just have <strong>for</strong>gotten to tell you is that it is<br />
kind of fun to puzzle this stuff out — especially when the result is sound (and not just numbers scratched<br />
in pencil on a blue-ruled sheet of paper).<br />
<strong>The</strong> Real-time Evaluator<br />
<strong>The</strong> arithmetic and other operations that you per<strong>for</strong>m on <strong>Sound</strong>s or Event Values (the red names preceded<br />
by exclamation points) in parameter fields may look like a cross between ordinary arithmetic and<br />
the Smalltalk programming language. In fact, these expressions are evaluated in real time by an eventdriven<br />
evaluator that runs on the Capybara. In other words, the expressions involving Event Values or<br />
<strong>Sound</strong>s that you write in <strong>Kyma</strong> parameter fields are not evaluated on the host PC or Macintosh. <strong>The</strong>y are<br />
evaluated in real time on the Capybara; this means that the timing is unaffected by the other tasks being<br />
per<strong>for</strong>med by your computer (such as running your sequencer, wave editor, and operating system).<br />
For a list of all functions understood by the real-time evaluator, along with an explanation and example<br />
of how to use each one, see Real-Time Expressions in Parameter Fields on page 211.<br />
Making More Room in the Parameter Fields<br />
Once you start doing arithmetic in the parameter fields, you can run out of room pretty quickly. To enlarge<br />
a parameter field to the full screen size, use Ctrl+L (<strong>for</strong> large window). You can also use the mouse<br />
to pull up the center line that separates the signal flow graph from the parameter fields in the <strong>Sound</strong> editor,<br />
thus giving more room to the parameters:<br />
46
Physical MIDI Faders and Global & Local MIDI Maps<br />
How does <strong>Kyma</strong> make the connection between a red Event Value in one of the parameter fields and an<br />
actual, external MIDI controller? Behind the scenes, there is a global map that takes a set of memorable<br />
names (like !Frequency or !Pan) and associates them with (less memorable) MIDI controller numbers<br />
(like `MIDIController18 or `MIDIController23). To see the current global map, choose Open…<br />
from the File menu, and select Global map as the file type. <strong>The</strong>n find and open the file named Default<br />
in the Global Maps folder.<br />
<strong>The</strong> syntax <strong>for</strong> setting up an association between a (red) memorable name and one of the standard set of<br />
MIDI events and controllers (shown in blue) is<br />
!MemorableName is: `MIDIControllerNbr.<br />
<strong>The</strong> blue name (the one preceded by a back quote) is called the Event Source and the red name (preceded<br />
by an exclamation point) is called an Event Value.<br />
You can also specify how you would like the controller to display in the virtual control surface. A #gate<br />
shows up as a button, a #toggle shows up as check box, a #fader shows up as a fader with a field at<br />
the top displaying the numeric value, and a #smallFader shows up as a numeric field (which you can<br />
still increment and decrement as if it were a fader by holding down the Control or Option key while<br />
moving the mouse up and down).<br />
Here is an excerpt from the Default map showing the syntax <strong>for</strong> specifying how the controllers should<br />
appear in the virtual control surface:<br />
!DamperPedal is: (`MIDIController64 displayAs: #gate).<br />
!DetuneDepth is: (`MIDIController94 displayAs: #fader).<br />
!EffectControl1 is: (`MIDIController12 displayAs: #fader).<br />
!EffectControl2 is: (`MIDIController13 displayAs: #fader).<br />
!ExpressionController is: (`MIDIController11 displayAs: #fader).<br />
!ExternalEffectsDepth is: (`MIDIController91 displayAs: #fader).<br />
!FootController is: (`MIDIController04 displayAs: #fader).<br />
!HarmonicContent is: (`MIDIController71 displayAs: #fader).<br />
!Hold2 is: (`MIDIController69 displayAs: #toggle).<br />
<strong>The</strong> following examples illustrate how you can associate a name with a controller on a specific channel<br />
(while that same controller number on a different channel is associated with another name).<br />
!Length is: (`MIDIController07 channel: 16).<br />
!Depth is: (`MIDIController07 channel: 15).<br />
47
Automation<br />
To prevent a controller from ever showing up in the virtual control surface, tell it to display as<br />
#nothing:<br />
!Harm is: (`MIDIController71 displayAs: #nothing).<br />
<strong>The</strong> global map is always there, invisibly associating Event Values with your external MIDI devices.<br />
When you first get <strong>Kyma</strong>, the Default map is selected as your global map. To select a different global<br />
map, use Choose global map… in the File menu. ‡<br />
Whatever your current global map may be, you can always temporarily add to it or override portions of it<br />
in a local map. <strong>The</strong> MIDIMapper <strong>Sound</strong> has a Map parameter where you can enter the associations that<br />
differ from the global map. <strong>The</strong>se associations apply only to those <strong>Sound</strong>s to the left of the MIDIMapper<br />
in the signal flow diagram. Anything not overridden in the local map will be specified in the global map.<br />
You can also use a local map to specify controllers that will show up in the virtual control surface only,<br />
without being connected to any external controller. This is especially useful when you have some specific<br />
names that you would like to give the controllers <strong>for</strong> one specific <strong>Sound</strong>, but when those controller names<br />
are not generally useful enough to warrant adding them to the global map.<br />
To specify a named controller that will show up in the virtual control surface only (and not be controllable<br />
with physical faders), use the same name <strong>for</strong> both the Event Value and the Event Source, e.g.<br />
!Freq is: `Freq.<br />
Local maps are also handy <strong>for</strong> displaying the true value of a fader. In other words, instead of taking the<br />
(0,1) controller and multiplying it by the desired range in the parameter field, you can change the range<br />
of the controller to whatever minimum and maximum value you like. Typically, this is not something<br />
you would want to do in the global map, because the desired range is probably going to be different <strong>for</strong><br />
each <strong>Sound</strong>. So, although you can specify a different range in the global map, it is most often done in a<br />
MIDIMapper.<br />
To specify a range of values <strong>for</strong> a MIDI controller, use a statement like the following:<br />
!Frequency is: (`MIDIController18 min: 100 max: 1000).<br />
This gives you a fader called !Frequency whose minimum value is 100 and whose maximum value is<br />
1000 controlled by MIDI continuous controller number 18 on the default MIDI channel.<br />
<strong>The</strong> extra tags specifying channel, range, etc. are not limited to use in local maps. <strong>The</strong>y can also be used in<br />
any new global maps that you design or modify.<br />
In some situations, you might want to automate parameter changes, rather than controlling them by hand<br />
with a MIDI fader or the virtual control surface. <strong>The</strong>re are several ways to accomplish this:<br />
♦ Use a software sequencer to draw the continuous controller functions, and then control the Capybara<br />
from the sequencer.<br />
♦ Use the sequencer to draw the time-varying behavior of each controller, export the sequence as a<br />
standard MIDI file, and read the MIDI file in <strong>Kyma</strong>.<br />
♦ Use the time functions built in to <strong>Kyma</strong>.<br />
♦ Use a <strong>Sound</strong> to control the way the parameter changes over time (in the same way that you might use<br />
an LFO to control a parameter in a modular analog synthesizer).<br />
♦ Use the Script parameter of a MIDIVoice to algorithmically specify how the controller value<br />
changes over time.<br />
♦ Use the AnalogSequencer <strong>Sound</strong> to generate sequences of note events and controller values.<br />
‡ When you opened the Default map, you may have noticed that there were a couple of other maps in the Global<br />
Maps folder as well. You can make a copy of the Default map, and customize it <strong>for</strong> whatever MIDI devices you<br />
have in your studio. For example, the PC1600 map is one that we have set up <strong>for</strong> the Peavey PC 1600 MIDI controller,<br />
and the Lightning map was designed to map the horizontal and vertical movements of the left and right<br />
wands of a Buchla Lightning controller.<br />
48
Automating Controllers using a Software Sequencer<br />
Type or paste a controller number into a <strong>Kyma</strong> parameter field that matches the name (or number) of a<br />
controller in your sequencing program. For example, you could use the following in a Frequency field:<br />
!cc120 § * 12 nn + 4 c<br />
Use Ctrl+Space Bar to play the <strong>Sound</strong>, and then start up (or switch to) your software sequencer. Once in<br />
the sequencer, you can record any keyboard events or controller moves. Most sequencing programs also<br />
let you edit or draw the controller moves graphically.<br />
Once you have used Ctrl+Space Bar to load your <strong>Sound</strong> into the Capybara, the <strong>Kyma</strong> software does not<br />
have to do much other than updating its status displays, so you can bring the sequencer (or other MIDIevent<br />
generating software) to the front. Once the <strong>Sound</strong> has been loaded into the Capybara, you can think<br />
of the Capybara just as you would any other external sound module, at least in terms of how you would<br />
control it from the sequencer. ‡<br />
MIDI Files<br />
Once you have recorded and/or adjusted the time-varying controller functions to your liking in the sequencer,<br />
you can (optionally) export the sequence as a standard MIDI file and then use a MIDIVoice or<br />
MIDIMapper to read that file and use it to control a <strong>Kyma</strong> <strong>Sound</strong>.<br />
In the <strong>Kyma</strong> <strong>Sound</strong>s MIDIVoice and MIDIMapper, you can choose the source of control <strong>for</strong> the input<br />
<strong>Sound</strong>. <strong>The</strong> first choice, MIDIInput, indicates that the <strong>Sound</strong> will be controlled by the live MIDI input,<br />
whether that comes from a MIDI controller, a sequencer, or some other software that outputs MIDI to the<br />
Capybara. <strong>The</strong> second choice, MIDIFile, indicates that the control will come from the file named in the<br />
MIDIFile parameter field. <strong>The</strong> third choice, Script, indicates that the events will be generated algorithmically<br />
by a program you have written the Script field (more on this later).<br />
Each time you play the MIDIVoice with MIDIFile selected as the source, it reads up all of the events on<br />
the specified channel of the specified MIDI file and then sends those MIDI events to its input <strong>Sound</strong>.<br />
§ <strong>The</strong> default global map defines !cc120 as MIDI continuous controller 120 on the default MIDI channel.<br />
‡ For reasons of speed and universal compatibility, <strong>Kyma</strong> requires that you send MIDI directly to the Capybara via<br />
the MIDI input on its back panel. If you are generating the MIDI events in software, you have to send them out of<br />
the computer via a MIDI interface and connect the output of that MIDI interface to the Capybara. In other words,<br />
treat the Capybara as you would any other external sound module, even if <strong>Kyma</strong> and your MIDI event-generating<br />
software happen to be running on the same computer at the same time.<br />
49
To read several channels, create several MIDIVoices, each assigned to its own channel but reading the<br />
same MIDI file, and place all of them into a Mixer:<br />
By saving the controller movements in a MIDI file and reading them with the MIDIVoice, you can combine<br />
the <strong>Sound</strong> and the means <strong>for</strong> controlling the <strong>Sound</strong> into one package — another manifestation of the<br />
ubiquitous “sound object”!<br />
Time Functions<br />
Among the functions that the <strong>Kyma</strong> real-time evaluator can understand are functions that change over<br />
time. Examples include !LocalTime whose value is simply the current time in seconds since the <strong>Sound</strong><br />
started playing, or repeatingRamp: which generates a ramp or sawtooth-shaped function that changes<br />
linearly from 0 up to 1 and then repeats.<br />
Suppose you had a GenericSource that was set to read a sample from RAM and that you wanted its frequency<br />
to increase gradually over time. You could enter the following expression into the Frequency<br />
parameter field:<br />
4 c + !LocalTime nn<br />
This would result in a sample whose pitch would increase continuously at the rate of one half step per<br />
second. Alternatively, you might use something like<br />
(!KeyDown ramp: 0.1 s) * 3 nn + !Pitch<br />
This would give you the pitch from the keyboard plus a pitch bend from zero to three half steps over the<br />
course of a tenth of a second. Or, if you didn’t want to rely on any keyboard input at all, you could use<br />
something like<br />
(1 repeatingRamp: 3 s) * 440 hz + 440 hz<br />
which would result in a frequency that would glide from 440 hz up an octave to 880 hz over the course<br />
of three seconds, and then repeat the process over and over <strong>for</strong> the duration of the <strong>Sound</strong>.<br />
To trigger a <strong>Sound</strong> periodically, you can use the bpm: (beats-per-minute) function. For example, if you<br />
put the following into the Trigger field of the GenericSource:<br />
1 bpm: 60<br />
it would be triggered once per second. To effectively “loop” a disk file that is 3.5 seconds in duration, you<br />
could type the following into the Trigger field:<br />
1 bpm: (60 / 3.5)<br />
This would trigger the disk playback once every 3.5 seconds.<br />
50
Random Variation<br />
To add randomness to any parameter, you can use the random and nextRandom functions. Each of these<br />
functions generates random numbers between -1 and 1. To generate a new random number every 2 seconds,<br />
you would use:<br />
2 s random<br />
To get a new random number each time there is a trigger like !KeyDown, you would use<br />
!KeyDown nextRandom<br />
or to trigger a new random number 240 beats per minute, you would use<br />
(1 bpm: 240) nextRandom<br />
In the GenericSource, <strong>for</strong> example, if you choose celtHrp2a as the Sample, !KeyDown as the Trigger,<br />
and you enter the following expression <strong>for</strong> the Frequency parameter<br />
!KeyDown nextRandom * 12 nn + 48 nn<br />
you will get a different pitch (between 2 c and 4 c) each time you press a MIDI key.<br />
To limit the choices to a specific list of note numbers, you pick them at random from an array. For example<br />
if you type the following into the Frequency field<br />
(!KeyDown nextRandom abs * 5 of: #(53 50 48 45 43)) nn<br />
you will get a different pitch each time you press the key, but the pitches will be chosen from the list of<br />
MIDI note numbers #(53 50 48 45 43). In this example we are using the random number as an index<br />
into an array of note numbers. Let’s take it apart and look at it step by step:<br />
1. First we generate a random number every time a key goes down:<br />
!KeyDown nextRandom<br />
This gives a number between -1 and 1.<br />
2. But we can’t use a negative number to mean a position within the array. So we take the absolute<br />
value, <strong>for</strong>cing all the numbers to be positive:<br />
!KeyDown nextRandom abs<br />
This gives us a number between 0 and 1.<br />
3. In order to have a chance of selecting any position in the array, we next multiply by the size of the<br />
array:<br />
!KeyDown nextRandom abs * 5<br />
This gives us a number between 0 and 5. §<br />
4. <strong>The</strong> next step is to use this number as an index into the array. To do this, we type of: followed by<br />
the array<br />
!KeyDown nextRandom abs * 5 of: #(53 50 48 45 43)<br />
5. And finally, we have to add the units. So we put parentheses around the entire expression and add<br />
the units of note number to the end:<br />
(!KeyDown nextRandom abs * 5 of: #(53 50 48 45 43)) nn<br />
<strong>The</strong> following expression in the Frequency field of our GenericSource example adds a random interval<br />
to the pitch from the keyboard. A new interval is chosen at random every 0.125 seconds:<br />
!Pitch + ((0.125 s random abs * 5 of: #(10 7 5 2 0)) nn)<br />
If you hold the key down, you can hear the pitches changing once every eighth of a second, but the sample<br />
is not being triggered during that time, so you hear the sequence of pitches trailing off in amplitude as<br />
the natural amplitude of the sample dies away.<br />
§ Note that if an array index has a fractional part, it is always truncated be<strong>for</strong>e the index is interpreted as a position<br />
within the array. That is why we have to multiply by 5, because numbers like 4.999 will be truncated and give us 4,<br />
the last position in the array.<br />
51
Smoothing Things Over<br />
To filter or smooth out the changes between one Event Value and the next, you can use the smoothed or<br />
the smooth: functions. When you smooth an Event Value, it changes from one value to the next gradually,<br />
rather than jumping instantly to the new setting. When applied to pitch, it is something like<br />
“portamento” or “slew rate”, but you can apply this smoothing to any parameter.<br />
For example, you can add smoothing to the Frequency field of the previous example as follows:<br />
(!Pitch + (0.125 s random abs * 5 of: #(10 7 5 2 0)) nn) smoothed<br />
<strong>The</strong> default rate of change from one value to the next is 100 milliseconds. To jump more quickly or more<br />
slowly between parameter values, specify the time it should take as smooth: aTime, <strong>for</strong> example:<br />
(!Pitch + (0.125 s random abs * 5 of: #(10 7 5 2 0)) nn) smooth: 0.5 s<br />
SMPTE or MIDI Time Code Synchronization<br />
To trigger <strong>Sound</strong>s in <strong>Kyma</strong> from an external source of MIDI time code, use the triggerAtTimeCode or<br />
the gateOnAtTimeCodeForDuration: messages. <strong>The</strong> Capybara has MIDI inputs only, so you will<br />
need to use a device to translate SMPTE time code into MIDI time code.<br />
For example, to generate a trigger at the time code of 1 minute and 12 seconds, you would type<br />
00:01:12.00 SMPTE triggerAtTimeCode<br />
into the Trigger or Gate fields of your <strong>Sound</strong>. To trigger different <strong>Sound</strong>s at different times, put all of<br />
them into a Mixer, and set each of their trigger fields to the appropriate start time.<br />
To generate a gate that stays on <strong>for</strong> a specific duration (rather than a trigger which turns on and stays on<br />
indefinitely), use<br />
20 s gateOnAtTimeCodeForDuration: 1 s<br />
where the first part indicates the time at which the gate should turn on and 1 s indicates how long it<br />
should stay on. Notice that you can specify the time in ordinary units, or you can use the SMPTE <strong>for</strong>mat<br />
showing hours, minutes, seconds, and frames followed by the word SMPTE:<br />
hh:mm:ss.ff SMPTE<br />
Using <strong>Sound</strong>s as “Control Voltages”<br />
You can also use one <strong>Sound</strong> to control a parameter of another <strong>Sound</strong> (similar to controlling one module<br />
with the output of another module in a voltage-controlled analog synthesizer). A <strong>Sound</strong> that is used as a<br />
control signal appears in a parameter field as the name of the <strong>Sound</strong> enclosed in a box.<br />
To place a <strong>Sound</strong> into another <strong>Sound</strong>’s parameter field:<br />
1. Select the “control” <strong>Sound</strong>.<br />
2. Copy it (using Copy from the Edit menu or Ctrl+C).<br />
3. Activate the parameter field by clicking in the field.<br />
4. Paste the <strong>Sound</strong> into the field (using Paste from the Edit menu or Ctrl+V).<br />
For example, suppose you wanted to slowly shift the frequency of the prototype FormantBankOscillator.<br />
Drag the prototype FormantBankOscillator into your <strong>Sound</strong> file window and open it. Select the Oscillator<br />
prototype and copy it using Ctrl+C. <strong>The</strong>n click in the Frequency field of the FormantBank-<br />
Oscillator, and paste (Ctrl+V) the Oscillator into the Frequency field of the FormantBankOscillator.<br />
52
When you paste a <strong>Sound</strong> into a parameter field, you see its name enclosed within a box to indicate that it<br />
is a control signal.<br />
At this point, the Frequency of the FormantBankOscillator is the output of the Oscillator. <strong>The</strong> output<br />
of a <strong>Sound</strong> is a kind of “stereo pair” that carries both the left and the right channel output. ‡ To indicate<br />
the right channel, use an R (<strong>for</strong> right) instead. To indicate a mix of the two channels, use an M (<strong>for</strong> mix).<br />
<strong>Sound</strong> outputs are in the range from -1 to 1, so we are requesting a frequency that ranges between MIDI<br />
note number -1 and MIDI note number 1. This does not make much sense, so let’s add a base pitch and<br />
use the variation between -1 and 1 as a deviation from that central pitch. To set the central pitch to second<br />
octave C, you could use:<br />
Oscillator1 L nn + 2 c<br />
Double-click in a white area of the signal flow editor to <strong>for</strong>ce an update. Now double-click the Oscillator,<br />
and change its frequency to a low value like 1 hz. (Note that the default wavetable <strong>for</strong> the Oscillator is<br />
Sine).<br />
Now select and play the FormantBankOscillator. You will hear its frequency vary in the shape of a sine<br />
wave between a half step below 2 c and a half step above.<br />
Draw<br />
What if you want to draw a shape, rather than rely on the shape of the Sine <strong>for</strong> your frequency deviation?<br />
Replace the Oscillator with a GraphicalEnvelope (from the Envelopes category of the prototypes).<br />
Double-click on it to see its parameters. In the Envelope field, use shift-click to add several more points<br />
and create an envelope that jogs up and down a few times. (Notice that the prototype GraphicalEnvelope<br />
is triggered by !KeyDown).<br />
‡ By default, the <strong>Sound</strong> name is followed by an L (<strong>for</strong> left), indicating that only the left channel should be used as a<br />
control signal.<br />
53
Now select and play the FormantBankOscillator. Each time you press a key on the MIDI keyboard, it<br />
will trigger the envelope, and you will hear the frequency vary according to the shape you drew in the<br />
GraphicalEnvelope.<br />
To make the deviation more extreme, multiply the effect of the GraphicalEnvelope by 12 nn. This gives<br />
you a frequency deviation of one octave (12 half steps):<br />
I just want to sing<br />
GraphicalEnvelope1 L * 12 nn + 2 c<br />
Some of the <strong>Sound</strong>s in <strong>Kyma</strong> extract parameters from their inputs, <strong>for</strong> example, the AmplitudeFollower<br />
or the FrequencyTracker extract the amplitude and frequency, respectively. If you apply one of these<br />
modules to the ADInput, you can use your own voice (or an instrument) to control parameter values of<br />
<strong>Kyma</strong> <strong>Sound</strong>s.<br />
Drag an AmplitudeFollower from the Analysis category of the prototypes, and drop it on top of the<br />
GraphicalEnvelope.<br />
Select and play the FormantBankOscillator and then sing into the microphone. <strong>The</strong> louder you sing (or<br />
yell) into the microphone, the more pitch deviation in the FormantBankOscillator. This is one <strong>for</strong>m of<br />
“cross synthesis”, controlling the parameter of one <strong>Sound</strong> with a different parameter extracted from another<br />
<strong>Sound</strong>.<br />
Treating MIDI Events as Audio Signals<br />
By pasting <strong>Sound</strong>s into parameter fields, you can, in a slightly twisted way, treat MIDI events as if they<br />
were audio signals or create shared expressions. <strong>The</strong> trick is to use the Constant <strong>Sound</strong>.<br />
<strong>The</strong> Constant is used to indicate a value that remains constant instead of varying over time the way most<br />
signals do. Paradoxically enough, you can put Event Values into the Constant’s Value field so that the<br />
value changes in response to events coming in from MIDI or other sources—in other words, it becomes a<br />
“time-varying constant”.<br />
Suppose that you wanted to treat the MIDI pitch as a signal, subjecting it to signal processing operations<br />
like delay, attenuation, or filtering be<strong>for</strong>e using it to control the pitch of an oscillator. To turn MIDI pitch<br />
into a signal, enter<br />
!KeyNumber / 127<br />
into the Value field of a Constant. Why divide by 127? Because a Constant’s value must be between -1<br />
and 1, and a key number is between 0 and 127.<br />
Now you can feed the Constant into a DelayWithFeedback, a HarmonicResonator, a PeakDetector, or<br />
some other chain of processing <strong>Sound</strong>s, and then paste the chain into the Frequency field of the Oscilla-<br />
54
tor. Since the value has been scaled to the range of -1 to 1, we have to scale it back to the range of MIDI<br />
note numbers and give it some units:<br />
FilteredConstant L * 127 nn<br />
Another situation in which you might want to use a “time-varying constant” is one in which you have a<br />
relatively complicated Event Value expression that is used in several parameter fields, and you would<br />
like to treat it as a “global” expression; in other words, if you change it in one place you would like all of<br />
the other instances of it to be changed in the same way. To do this, you would enter the expression into<br />
the Value field of a Constant, and then paste the Constant into each of the parameter fields to be controlled<br />
by the expression.<br />
Update Rate<br />
A parameter that contains a <strong>Sound</strong> is updated at a rate of once per millisecond (1 khz). If the parameter<br />
field contains an arithmetic expression that depends on the value of the pasted <strong>Sound</strong>, the entire expression<br />
will be re-evaluated once every millisecond. If this is faster than necessary, you have the option of<br />
slowing down the update rate. After the channel indication, type a colon and the number of milliseconds<br />
between parameter value updates. For example to update once every 5 milliseconds, type<br />
Oscillator L: 5<br />
If you are doing arithmetic with this value, you should parenthesize it to show that the 5 belongs with the<br />
Oscillator, <strong>for</strong> example:<br />
( Oscillator L: 5) * 12 nn + 4 c<br />
<strong>Sound</strong>s that are used as inputs (rather than controls pasted into parameter fields) are of course updated at<br />
the full sample rate (which is 44.1 khz by default, but which can be changed using the DSP Status window,<br />
described later in this section).<br />
Algorithmically Generated Events<br />
MIDIMapper and MIDIVoice can read Event Values from one of three possible sources:<br />
♦ real-time MIDI input (from a MIDI controller, sequencer, or other software),<br />
♦ a MIDI file, or<br />
♦ a script<br />
If you select the last option, Script, then all Event Values to the left of the MIDIVoice or MIDIMapper will<br />
be controlled by events that you generate algorithmically using a program in the Script field. This section<br />
gives you a little taste of how you can control parameters algorithmically, if you get really interested<br />
in this aspect of <strong>Kyma</strong>, you should study the examples in the file called MIDIVoice Scripts and read<br />
the section called MIDI Scripts beginning on page 522.<br />
Within the Script field, you can refer to the MIDIVoice or MIDIMapper as self. <strong>The</strong>n you can tell it to<br />
generate note events or controller value updates.<br />
Virtual Keyboard Events<br />
To generate a note event, specify when the (virtual) key should go down, how long it should be held<br />
down, and what its pitch and velocity values are. For example:<br />
self keyDownAt: 0.5 s duration: 0.125 s frequency: 60.5 nn velocity: 1.<br />
Notice that the pitches do not have to be integer note numbers. You can type in any note number or any<br />
frequency you like (which could come in handy if you are interested in alternate tunings).<br />
If you leave off any of the tags, that parameter will take on a default value. So you need only specify the<br />
parameters you care about.<br />
Controller Events<br />
<strong>The</strong>re are also methods <strong>for</strong> setting a controller to a specific value at a specific time and <strong>for</strong> updating a<br />
controller’s value over some period of time.<br />
55
For example, to set controller number 7 to the value 0.5 at time 0, you would type:<br />
self controller: !cc07 setTo: 0.5 atTime: 0 s.<br />
To cause a gradual increase in its value from 0.5 up to 1 by the time 5 seconds has been reached, you<br />
would type:<br />
self controller: !cc07 slideTo: 1.0 byTime: 5 s.<br />
If you want to make sure that the transition sounds smooth and continuous, you can control the size of<br />
the individual steps. For example,<br />
self controller: !Frequency slideTo: 1.0 stepSize: 0.1 byTime: 10 s.<br />
would use steps of one tenth of a hertz if !Frequency were in units of hertz.<br />
Alternatively, you can specify the number of steps it should take to get from one value to the other. For<br />
example,<br />
self controller: !Morph slideTo: 1.0 steps: 100 byTime: 3 s.<br />
would send 100 updates to the value of !Morph over the course of 3 seconds.<br />
Although it might initially seem that you should always send a huge number of steps or set the step-<br />
Size to a very small value, there is a tradeoff to consider. If you are using many controllers and each<br />
controller is sending many updates, you can start loading down the Capybara with too many events. If<br />
the load gets too heavy, it could start interfering with the actual sound generation. So in algorithmic<br />
events, as in all things, use moderation.<br />
<strong>The</strong> Power of Programming<br />
You might well ask yourself at this point, “Why type all that stuff when I can just play the same thing on<br />
the keyboard and record it in my MIDI sequencer?” Good question! Because if all you did in the MIDI-<br />
Voice or MIDIMapper Script was to type each individual event, then you would be much better off<br />
using sequencing software instead.<br />
<strong>The</strong> real power of the script begins to emerge when you embed these event-generators in some programming<br />
control structures. To really see how to do this, you should read about MIDI Scripts on page<br />
522. But just to give you a little appetizer, consider this. If you put a single keyboard event into a loop,<br />
and change its settings each time through the loop, you can generate hundreds of events with just a few<br />
lines of code. For example, here is a script that will generate 500 random notes:<br />
| r t |<br />
r := Random newFor<strong>Kyma</strong>WithSeed: 52.<br />
t := 0.<br />
500 timesRepeat: [<br />
self<br />
keyDownAt: t s<br />
duration: (r next + 1) s<br />
frequency: 3 c + (r next * 36 nn)<br />
velocity: r next.<br />
t := t + r next].<br />
and to generate 1000 notes, you would just change the 500 to 1000 (or whatever number you like!)<br />
EventCollections<br />
For many kinds of music, it makes more sense to think in terms of notation than in terms of times in seconds.<br />
EventCollections provide a way to specify notes and rests, rather than start times in seconds. For<br />
the full story, see MIDI Scripts on page 522.<br />
56
Analog-style Sequencer<br />
<strong>The</strong>re is more to the “analog sound” than just oscillators, filters and envelopes. Part of that characteristically<br />
analog sound emerges from the concept of voltage control and from the kind of sequencers used to<br />
send sequences of control voltages to the oscillators, envelopes, and filters.<br />
<strong>Kyma</strong>’s AnalogSequencer <strong>Sound</strong> generates a sequence of pitches, velocities, durations, duty cycles, plus<br />
any number of other sequences of Event Values <strong>for</strong> controlling the parameters of its input. You can also<br />
loop a sequence, go through it backwards, and move the loop points around as the sequence is playing.<br />
Any or all of the values in the sequence can be Event Values, meaning that you can alter them from the<br />
virtual control surface, MIDI faders, or from another AnalogSequencer while the sequence is going.<br />
Like any other <strong>Kyma</strong> <strong>Sound</strong>, an AnalogSequencer can be mixed with other <strong>Sound</strong>s or used as an input to<br />
another <strong>Sound</strong> (<strong>for</strong> example a MIDIVoice or another AnalogSequencer). Once you start nesting and mixing<br />
sequencers, you can quickly end up with complex sequences that, while they do have a pattern to<br />
them, also contain a few surprises that can be difficult to predict.<br />
How do I control thee? Let me enumerate the ways…<br />
MIDI Output<br />
To summarize, you can control the parameters of a <strong>Sound</strong> in any of the following ways:<br />
♦ From the virtual control surface, saving the settings in a Preset <strong>Sound</strong><br />
♦ Using MIDI faders, keyboard or other controllers (using the global map and/or MIDIMapper <strong>Sound</strong><br />
to map memorable names to MIDI devices)<br />
♦ From a MIDI sequencer or other software that outputs MIDI (running on the same computer as <strong>Kyma</strong><br />
or on another computer connected to the MIDI input of the Capybara)<br />
♦ From a MIDI file exported from a sequencer<br />
♦ From a script in a MIDIVoice <strong>Sound</strong><br />
♦ From the AnalogSequencer <strong>Sound</strong><br />
Up to this point, we have been obsessed with control — or at least with how to use MIDI input to control<br />
the parameters of <strong>Kyma</strong> <strong>Sound</strong>s. <strong>Kyma</strong> can also be a source of MIDI events, and if you hook up your<br />
synthesizer or sampler to the MIDI output of the Capybara, you can control it in some unusual ways using<br />
<strong>Kyma</strong> <strong>Sound</strong>s.<br />
57
MIDI Controllers<br />
<strong>The</strong> output of any <strong>Kyma</strong> <strong>Sound</strong> can be used as a MIDI continuous controller output. In other words, its<br />
stream of instantaneous amplitudes can be sent out as changes to a continuous controller (at the maximum<br />
MIDI rate of 1 khz and with the maximum MIDI controller resolution of 7 bits).<br />
If both the Capybara and your synthesizer are patched into a mixer, you can listen to both at once. Otherwise,<br />
you will need to send the output of the synthesizer into the Capybara’s audio input. <strong>The</strong>n you use<br />
one of the <strong>Kyma</strong> software Mixers to mix the ADInput (which will be monitoring the synthesizer) with the<br />
<strong>Kyma</strong> <strong>Sound</strong> that is sending out the MIDI controller data. §<br />
Here is a typical configuration <strong>for</strong> listening to the output of a synthesizer that you are controlling using a<br />
<strong>Kyma</strong> <strong>Sound</strong>:<br />
MIDI Keyboard Events<br />
To generate a MIDI keyboard event, you have to supply a pitch, a velocity, and a trigger (which indicates<br />
when to send this in<strong>for</strong>mation as a MIDI note event). As a trivial example, suppose you had a MIDIOutputEvent<br />
whose Frequency was set to !Pitch, whose Amplitude was set to !KeyVelocity, and<br />
whose Gate came from !KeyDown.<br />
§ Anytime you want <strong>Sound</strong>s to play simultaneously in <strong>Kyma</strong>, you have to put them into a Mixer — even if one of the<br />
<strong>Sound</strong>s (in this case the MIDIOutputController) is not actually producing an audio signal that you can hear. Even<br />
though its output is going to the MIDI output rather than becoming part of the audio stream, its program does<br />
have to be loaded in the Capybara at the same time as the program <strong>for</strong> reading the ADInput. You can read more<br />
about this in Combining <strong>Sound</strong>s on page 70.<br />
58
This would read the pitch and the velocity from the Capybara’s MIDI input, and, each time you pressed a<br />
key, would output a MIDI note event so it could be read from the Capybara’s MIDI output and could<br />
control another synthesizer.<br />
All in all a pretty pointless exercise, since you could have just connected your keyboard directly to the<br />
synthesizer in the first place. But let’s suppose that you want to control both <strong>Kyma</strong> and an external synthesizer<br />
or sampler at the same time, such that they are doubling each other.<br />
Anytime you want two or more <strong>Sound</strong>s to happen at the same time in <strong>Kyma</strong>, you put those <strong>Sound</strong>s into a<br />
Mixer. So you could put a Sample in a Mixer with this MIDIOutputEvent, and edit the Sample such that<br />
it is triggered by !KeyDown and that its Frequency comes from !Pitch. <strong>The</strong>n whatever you play on<br />
the <strong>Kyma</strong> Sample will be doubled by any external modules that are connected to the Capybara’s MIDI<br />
output.<br />
Bringing Audio from an External Module into <strong>Kyma</strong><br />
If you have both the Capybara audio output and the external module’s output going to your mixing desk,<br />
you can listen to both at once. But even if you don’t have a mixing desk, you can bring the sound of the<br />
external module into <strong>Kyma</strong> by plugging it into the Capybara’s audio input jacks and using a <strong>Kyma</strong> Mixer<br />
to mix the sound of the external module with the sounds produced by <strong>Kyma</strong>. Just drag an ADInput module<br />
(found under the Sampling category in the prototypes) into the Mixer that already has the<br />
MIDIOutputEvent and Sample as inputs:<br />
59
Cross-mapping Parameters<br />
<strong>The</strong>re is nothing to prevent you from using !KeyVelocity in the Frequency field or !Morph in the<br />
Amplitude field of the MIDIOutputEvent. And the fact that you can paste any <strong>Kyma</strong> <strong>Sound</strong> into any of<br />
the cyan-colored parameter fields means that you can use any <strong>Kyma</strong> <strong>Sound</strong> to control MIDI output parameters<br />
as well.<br />
Here, <strong>for</strong> example, an AmplitudeFollower on the ADInput is controlling the MIDIOutputEvent’s Frequency,<br />
‡ and the MIDIOutputEvent is being triggered at a regular rate by a PulseTrain.<br />
If you want to send a system-exclusive message to an external MIDI module, you can use the OutputEventInBytes<br />
<strong>Sound</strong>.<br />
‡ Values in the Frequency field of the MIDIOutputEvent are not limited to equal-tempered pitches. Any deviation<br />
above or below an equal-tempered pitch will be sent as the closest equal-tempered pitch plus a pitch bend. If you<br />
set up your synthesizer or sampler to have a pitch bend range of plus or minus one octave, then the MIDIOutputEvents<br />
that you send from <strong>Kyma</strong> can specify the “notes-between-the-keys”, allowing <strong>for</strong> continuous pitch<br />
changes and/or alternate tunings.<br />
60
Other Editors & Info Windows<br />
File Organizer<br />
So far, we have been concentrating on the <strong>Sound</strong> editor, the prototypes, and the <strong>Sound</strong> file window.<br />
While these are the central editors <strong>for</strong> sound design, there are some other, ancillary editors that can be of<br />
assistance in designing your own <strong>Kyma</strong> <strong>Sound</strong>s.<br />
<strong>The</strong> file organizer helps you use, organize, and keep track of all the sound-producing <strong>Kyma</strong> files on your<br />
disk.<br />
<strong>The</strong> file organizer is useful <strong>for</strong> cleaning up your disk, getting rid of redundant or otherwise unwanted<br />
files, and getting your <strong>Kyma</strong> files organized <strong>for</strong> easy access and searching. You may just want to keep it<br />
open all the time, so you can quickly create <strong>Sound</strong>s based on the files by dragging the files into a <strong>Sound</strong><br />
file window, rather than starting from a prototype. It is also handy to be able to see the file in<strong>for</strong>mation<br />
and to be able to open an editor by double-clicking on the file name rather than opening an editor from<br />
the File menu.<br />
Opening and Navigating<br />
Open it by selecting File Organizer from the File menu. <strong>The</strong> file organizer gives you a list of all of the<br />
files on your disks, color-coded according to whether they are samples, spectra, GA, RE, or MIDI files.<br />
<strong>The</strong> color conventions are:<br />
Item Color<br />
Unopened disk or folder gray<br />
Open disk or folder black underlined<br />
Sample, EX turquoise<br />
Spectrum purple<br />
GA red-brown<br />
RE yellow-orange<br />
MIDI green<br />
Double-click on a disk or folder name to hide or show the names of its subfolders or files displayed beneath<br />
it, indented according to how deeply nested they are within folders. You can use the arrow keys<br />
and the page-up and page-down keys to move around in the list.<br />
62
Sample Editor<br />
Getting In<strong>for</strong>mation on the File<br />
To display the in<strong>for</strong>mation stored in the header of the file, click on the file name in the organizer (or use<br />
the up/down arrow keys to select the name of the file). This will display in<strong>for</strong>mation specific to the file<br />
type in the bottom portion of the organizer, including the time and date of last modification and the full<br />
path name <strong>for</strong> the file.<br />
Editing the Files<br />
To edit the selected file, press Enter or double-click on the file name. This will open the appropriate<br />
<strong>Kyma</strong> editor or, if you have specified an external editor <strong>for</strong> this file type, § it will open your preferred program<br />
<strong>for</strong> editing files of this type.<br />
Hearing the Files<br />
To hear the selected file, use Ctrl+Space Bar. <strong>Kyma</strong> plays sample files directly. For analysis files<br />
(spectrum, GA, or RE), <strong>Kyma</strong> uses the analysis to synthesize the sound. For MIDI files, <strong>Kyma</strong> constructs a<br />
minimal “orchestra” and plays the notes of the MIDI file on those simple “instruments”.<br />
Using the Files in <strong>Sound</strong>s<br />
To create a <strong>Sound</strong> based on a file, drag the file name from the file organizer into a <strong>Sound</strong> file window. For<br />
example, if you drag a samples file from the file organizer into a <strong>Sound</strong> file, it will turn into a DiskPlayer<br />
whose file name is set to that file. If you drag a spectrum, it will turn into a SumOfSines whose Analysis0<br />
field is set to that file and whose Duration and OnDuration fields are set to the duration of the<br />
spectrum file. Similarly <strong>for</strong> an RE file, <strong>Kyma</strong> creates an RE resonators <strong>Sound</strong>. For a MIDI file, <strong>Kyma</strong> will<br />
create a Mixer of several MIDIVoices, one <strong>for</strong> each channel of the MIDI file. Each of these voices has a<br />
minimal “instrument” in it, so you can modify it to “orchestrate” the MIDI file score.<br />
To set the value of any parameter field in the <strong>Sound</strong> editor, you can drag a file name from the file organizer<br />
into the parameter field. If it is a parameter that makes sense <strong>for</strong> the file, the file will paste its value<br />
<strong>for</strong> that parameter into the field. For example, if you drag a spectrum file into a Duration field, it will set<br />
the duration of the edited <strong>Sound</strong> to be the same as the original duration of that spectrum file.<br />
<strong>Kyma</strong> has a basic sample and wave<strong>for</strong>m editor that you can access from the File menu using either<br />
New… or Open… (and setting the file type to Sample file). In addition to the usual cut, copy, and paste<br />
operations on samples, you can use this editor to generate single cycles of periodic wave<strong>for</strong>ms (<strong>for</strong> use in<br />
oscillators), envelope functions (which can be accessed via the FunctionGenerator module), and arbitrary<br />
tables of numbers (which you can index into via the Waveshaper module).<br />
§ See File Editors on page 68 <strong>for</strong> more in<strong>for</strong>mation.<br />
63
Attic<br />
<strong>The</strong> very top of the sample editor is an overview of the entire file. Drag the mouse across this overview to<br />
draw a gray box around any subpart of the file. <strong>The</strong> region enclosed in the gray box is what you see in the<br />
larger wave<strong>for</strong>m display below the line of buttons.<br />
Upstairs<br />
<strong>The</strong> large wave<strong>for</strong>m view is where you can select, copy, cut, paste, and trim sample files. It shows the familiar<br />
representation of a signal as amplitude versus time. To select the entire file, use Select all from the<br />
Edit menu (Ctrl+A). Select a sub-section by dragging the mouse across the desired portion of the wave<strong>for</strong>m<br />
(selections are shown within large red brackets). If you simply click on one point in time within the<br />
wave<strong>for</strong>m, it will mark an insertion point, rather than sweeping out a selection. An insertion point is indicated<br />
by a single, vertical red line that blinks like the insertion cursor in a text editor.<br />
Each of the buttons refers to the current, red-bracketed selection or insertion point.<br />
<strong>The</strong> left and right arrows will jump the display left or right by the size of the selection. <strong>The</strong> play button<br />
plays the selection. <strong>The</strong> disk button will replace the selection with the contents of a sample file that you<br />
select using a file dialog (or, if you have an insertion point rather than a selection, it will insert the entire<br />
contents of the other file at that point in this file). <strong>The</strong> magnifying glass button causes the current selection<br />
to fill the window in both the horizontal and vertical direction. All of the buttons with little<br />
wave<strong>for</strong>ms and arrows on them either stretch or compress the wave<strong>for</strong>m in the direction of the black arrows.<br />
And the ellipsis or et cetera button (…) handles some miscellaneous functions. One of the<br />
miscellaneous options is to inspect and/or edit the header in<strong>for</strong>mation in the sample file. <strong>The</strong> other is a<br />
button rather cryptically labeled as Display Lissajous which will display the wave<strong>for</strong>m in horizontal direction<br />
versus the same wave<strong>for</strong>m delayed by a specified number of samples in the vertical direction.<br />
Downstairs<br />
Spectrum Editor<br />
<strong>The</strong> lowest portion of the sample editor contains templates <strong>for</strong> generating wave<strong>for</strong>ms or functions. Select a<br />
template from the pop up list on the left. When you click the Insert button, the selected algorithm will<br />
generate a wave<strong>for</strong>m based upon the parameters that you have entered in the template, and if you have a<br />
selection in the wave<strong>for</strong>m view it will replace that selection with the newly generated wave<strong>for</strong>m.<br />
<strong>The</strong> Fourier template, <strong>for</strong> example, has fields <strong>for</strong> the duration of the wave<strong>for</strong>m, <strong>for</strong> the number of the<br />
harmonics that you would like to add together to create the wave<strong>for</strong>m, <strong>for</strong> the relative amplitudes and<br />
phases of each of the harmonics, and <strong>for</strong> an overall gain on the entire wave<strong>for</strong>m. To try it, first make sure<br />
the entire wave<strong>for</strong>m is selected in the wave<strong>for</strong>m window by clicking in the wave<strong>for</strong>m area and per<strong>for</strong>ming<br />
Select all (Ctrl+A), and then click the Insert button.<br />
And in the Basement…<br />
By now some of you are probably wondering how to write your own programs to generate arbitrary tables<br />
and store them as <strong>Kyma</strong> wavetables that can be indexed using the Waveshaper module. <strong>The</strong> answer<br />
lies deep at the bottom of the list of the templates where it says Programs. Here you can find a Smalltalk<br />
program corresponding to each of the template wave<strong>for</strong>m generators. Find the program closest to the one<br />
you would like to write, and alter it to do exactly what it is that you need. (If you have never programmed<br />
in Smalltalk be<strong>for</strong>e, you should first read <strong>The</strong> Smalltalk-80 <strong>Language</strong> on page 513.)<br />
One way to display a sound visually is as amplitude versus time as in the sample editor. Another is to<br />
display it as frequency and amplitude versus time as in the spectrum editor.<br />
Creating and Opening a Spectrum File<br />
Be<strong>for</strong>e you can display a <strong>Sound</strong> in the frequency domain, you must first create an analysis of the timedomain<br />
wave<strong>for</strong>m. <strong>The</strong> result of this analysis is a spectrum file which you can open and edit in the spec-<br />
64
trum editor. <strong>The</strong> analysis can be done in <strong>Kyma</strong>’s Spectral Analysis tool (invoked from the Tools menu,<br />
see Tools menu: Spectral Analysis on page 443), or using the CERL <strong>Sound</strong> Group’s Lemur program. ‡<br />
Open the spectrum editor on a file from the File menu or by double-clicking a spectrum file in the file organizer.<br />
(This display looks a lot better in color on the computer screen than it does on the page here.)<br />
<strong>The</strong> band across the top is reserved <strong>for</strong> showing marker positions and track in<strong>for</strong>mation. <strong>The</strong> large color<br />
center area is <strong>for</strong> displaying the spectrum. <strong>The</strong> row of buttons across the bottom are <strong>for</strong> editing and display<br />
operations. <strong>The</strong>y are grouped to correspond with the F-keys on your computer keyboard.<br />
This section is intended to be an overview of the spectrum editor. See Spectrum Editor on page 487 <strong>for</strong> a<br />
detailed description of all of the features of the spectrum editor.<br />
Spectrum In<strong>for</strong>mation<br />
Time is shown from left to right, frequency from bottom to top, and amplitude is mapped to color (the<br />
bright colors like yellow and green are the largest amplitude, then the blues and purples, with red (and<br />
black) showing the smallest amplitudes. § <strong>The</strong> horizontal lines are referred to as “tracks”. Each track corresponds<br />
to the output of a narrow bandpass filter, and you can think of a track as a measure of the amount<br />
of energy present in the signal in that one band of frequency over time.<br />
In order to understand how this representation of the spectrum can be used to resynthesize the original<br />
sound, think of each of the horizontal lines as representing a “frequency envelope” <strong>for</strong> a single sine wave<br />
oscillator. <strong>The</strong> change in the color of a track as you trace it from left-to-right corresponds to an amplitude<br />
envelope on that oscillator. When you apply each of these frequency and amplitude envelopes to a different<br />
oscillator and then put all of these oscillators into a mixer in order to add their results, you will hear<br />
something very close to the original signal.<br />
Using the Editor<br />
To display in<strong>for</strong>mation on a particular track, place the mouse over that track (without clicking down).<br />
You will see the track number and the time in seconds corresponding to the mouse location, the amplitude<br />
in dB (where 0 dB is the maximum), and the frequency in hertz.<br />
Selecting<br />
To select a single track, click on it. You will hear that track and its color will become brighter to indicate<br />
that it is selected. To extend the selection, hold the Shift key down while making another selection. To<br />
‡ Lemur was written by Kelly Fitz, Bryan Holloway, Bill Walker and Lippold Haken, and is available from<br />
http://datura.cerl.uiuc.edu.<br />
§ <strong>The</strong>re is a button that lets you switch to showing amplitudes on the vertical axis rather than the frequency envelopes,<br />
primarily <strong>for</strong> editing the amplitude envelopes.<br />
65
select a region that includes several tracks, use the mouse to draw a box around the region. You can extend<br />
boxed selections in the same way that you extend single track selections, by holding the Shift key<br />
down when you make the new selection. You can also make selections based on a number of amplitude<br />
or frequency criteria.<br />
Playing and Scrubbing<br />
Anytime you make a selection, the selected tracks or portions of tracks are immediately played so you<br />
can hear what you just selected. <strong>The</strong>re are also buttons to play the entire spectrum file, the part of the file<br />
that is selected, and the part of the file between the start and end markers.<br />
To hear different sections of the file, use the mouse to drag the vertical yellow scrub bar over the regions<br />
you would like to hear. You can also use MIDI pitch bend to “scrub” (from the old practice of controlling<br />
the speed at which analog tape passed by the playback heads by turning both reels with your hands). You<br />
can step the scrub bar one frame to the left or one frame to the right (and hear the spectrum at that one<br />
frame of time) by using the left and right arrow keys.<br />
Clearing and Deleting<br />
<strong>The</strong>re are two ways to “remove” material from the spectrum. One is to simply set the amplitude of the<br />
track to zero <strong>for</strong> all or part of its duration. This effectively removes it from the mix so it has no effect on<br />
the resynthesis during those times when its amplitude is zero. <strong>The</strong> other is to actually delete it from the<br />
analysis file.<br />
In the spectrum editor, zeroing the amplitude is called “clearing”, and removing entire time segments is<br />
called “deleting”. Clearing is used to zero the amplitude of all or part of a track’s duration, and deleting is<br />
used purely in the same sense that it has in a wave<strong>for</strong>m editor — that of deleting a segment of time from<br />
the file.<br />
Extracting Portions of a Spectrum File<br />
You can copy a region and paste it into a <strong>Sound</strong> file window, where it will show up as a SumOfSines. You<br />
can then time-stretch and/or frequency-scale that region of the spectrum and end up with a complex<br />
timbre that does not necessarily sound anything like the original analysis from which it was extracted. By<br />
putting several of these SumOfSines into a Mixer, you can construct dense textures from bits and pieces<br />
of several spectra.<br />
Modifying<br />
<strong>The</strong> amplitude and frequency envelopes associated with each track can be modified by redrawing them<br />
or by applying a “filter” or algorithm to all tracks within the selected region.<br />
66
Text<br />
Preferences<br />
<strong>The</strong>re is not that much to say about the text file editor other than it exists and it is a typical text editor,<br />
and you can create or edit text files by choosing New… or Open… from the File menu and selecting the<br />
file type named Text.<br />
You can use the text file editor to create sets of data to be read by the TextFileInterpreter, which can map<br />
datasets to <strong>Sound</strong> parameters. You can also use a text file window to test out Smalltalk expressions; type<br />
in the expression, select it, and use Ctrl+Y to evaluate the expression.<br />
You can set some interface preferences by selecting Preferences from the Edit menu. <strong>The</strong>se are decisions<br />
about the appearance or per<strong>for</strong>mance of various aspects of the user interface that, once set, will be saved<br />
in a file called <strong>Kyma</strong> Preferences or kyma.pre. Because they are saved in a file, <strong>Kyma</strong> will remember<br />
them each time you start up the program, so you won’t have to reset them each time. §<br />
Multi-user Systems<br />
When more than one person is using a single <strong>Kyma</strong> system, <strong>for</strong> example in a school, or a large studio or<br />
lab, each person can have a unique preferences file.<br />
When you are setting up the system <strong>for</strong> multiple users, locate the <strong>Kyma</strong> Preferences or kyma.pre file<br />
(automatically created the first time you quit <strong>Kyma</strong>). Create a folder <strong>for</strong> each <strong>Kyma</strong> user, and drag a copy<br />
of the preferences file into each folder. Instruct the users that they should start <strong>Kyma</strong> by double-clicking<br />
the preferences file in their own folders. From then on, any changes that individual users make in their<br />
preferences will be saved only in their preferences file and will not alter the system <strong>for</strong> everyone else.<br />
Appearance<br />
You can decide whether you would like the default icon size in a parameter field to be small or large,<br />
whether you would like to display full file path names in parameter fields, and whether you would like<br />
to show all the digits of any floating point double-precision numbers.<br />
Per<strong>for</strong>mance<br />
Disk Recording/playback and the Graphic Interface<br />
Icon Size<br />
Double float digits<br />
Full path names<br />
To be able to stop disk playbacks the same way you stop other <strong>Sound</strong>s (Ctrl+K), you should check the<br />
box labeled Update display during disk operations in the per<strong>for</strong>mance preferences.<br />
§ If your system seems to suddenly start acting strangely, the first thing you should try is to throw away your preferences<br />
file, and restart <strong>Kyma</strong>. <strong>The</strong> preferences file contains in<strong>for</strong>mation about the basic state of your system, so if<br />
that file should happen to have an error in it, it will cause problems in <strong>Kyma</strong>. Don’t worry about throwing away a<br />
preferences file, because <strong>Kyma</strong> will generate a new one <strong>for</strong> you the next time you quit the program.<br />
67
When checked this control also means that other “animated” parts of the user interface, like the DSP<br />
status window, the virtual control surface, the oscilloscope, and the spectrum analyzer will continuously<br />
update even during disk recording and playback.<br />
<strong>The</strong> only reason you might have <strong>for</strong> not checking this option is if you experience problems (like clicks or<br />
stuttering) in your disk recordings. By not checking the box, you are telling the host computer to devote<br />
its full attention to the disk and not to bother with periodic updates to the interface.<br />
Timecode Frames per Second<br />
<strong>The</strong> Timecode frames per second value is used to convert any times you specify in units of SMPTE into<br />
seconds. 24 fps is the film industry standard, 25 fps is <strong>for</strong> PAL (used in most of Europe) and SECAM<br />
(used in France and the <strong>for</strong>mer Soviet Union) video, and 30 fps is associated with NTSC video (the standard<br />
in the Americas and Asia).<br />
This frame rate is used only <strong>for</strong> converting SMPTE to seconds in the user interface. <strong>The</strong> Capybara, when it<br />
receives MIDI time code, actually keeps track of time in half-frames so it can also do the drop-frame standard<br />
associated with color video.<br />
Optimize Sample RAM<br />
If this box is unchecked, each sample requested by your <strong>Sound</strong>s will be loaded onto all the expansion<br />
cards. In effect, this is the same as saying that you only have as much sample RAM as you have on a single<br />
expansion card.<br />
If you check the box, it <strong>for</strong>ces <strong>Kyma</strong> to load each sample only into the memory of the expansion cards that<br />
use that sample. So by checking the box, you effectively multiply the amount of sample RAM available by<br />
the number of expansion cards in your Capybara.<br />
<strong>The</strong> only reason you might have <strong>for</strong> not checking this box is that optimizing the use of the sample RAM<br />
can slow down the compile step when you Compile, load, start a <strong>Sound</strong> that has samples in it. If you use<br />
samples only rarely, you may not have any need to check this box, but otherwise, you should leave it<br />
checked.<br />
Virtual Control Surface<br />
By default, a virtual control surface will automatically open any time you play a <strong>Sound</strong> that uses Event<br />
Values. If you do not check this box, the virtual control surface will open only if you request it from the<br />
File menu.<br />
File Editors<br />
If you have a favorite external editor that you would prefer to use <strong>for</strong> particular file types, check those file<br />
types here. For example, if you would prefer to edit SD-II files in your favorite wave editor rather than<br />
using the wave editor that comes with <strong>Kyma</strong>, you would check the SD-II box. <strong>The</strong> next time you try to<br />
edit an SD-II file, <strong>Kyma</strong> will ask you to find the application. From that point onward, <strong>Kyma</strong> will remember<br />
that it should find and start up your external application every time you edit a file of type SD-II.<br />
Frequently Used Folders<br />
Use this dialog to locate the folder(s) <strong>Kyma</strong> should search when locating files requested by your <strong>Sound</strong>s.<br />
68
Select the folders in the top list (using Open to see inside a folder) and add them to the list below using<br />
the Add button.<br />
If you are frequently seeing the dialog that says <strong>Kyma</strong> could not yet locate a file, come here and make<br />
certain that the samples, MIDI files, and other external files that you frequently use are in folders in this<br />
list of frequently used folders. That should speed up the process of searching <strong>for</strong> these files when you<br />
compile <strong>Sound</strong>s that refer to them.<br />
Spectrum Analyzer<br />
Use this to set the window length and window type <strong>for</strong> the spectrum analyzer that you can invoke from<br />
the Info menu. Note that this does not have any affect on the LiveSpectralAnalysis <strong>Sound</strong>, the SpectrumAnalyzerDisplay<br />
<strong>Sound</strong>, the FFT <strong>Sound</strong>, or the Spectral Analysis Tool.<br />
Miscellaneous<br />
When you start up <strong>Kyma</strong> as a new user, there is a help window telling you how to get some sound out of<br />
the system right away (in case you might have been a little too eager to fire up the system and hadn’t<br />
read the manual yet). After the third or fourth time of seeing this window, the astute user may decide<br />
that it is no longer necessary to read this message. As part of your reward <strong>for</strong> reading this far into the<br />
manual, you now know that you should uncheck the box that says Show Help on startup.<br />
By default, <strong>Kyma</strong> will open an untitled <strong>Sound</strong> file window each time it starts, giving you a workspace <strong>for</strong><br />
creating and saving <strong>Sound</strong>s. If you prefer to use existing <strong>Sound</strong> files as starting points, and find yourself<br />
always closing the untitled window to get it out of the way, you should uncheck Show untitled window<br />
on startup.<br />
If you run into a problem, and you call the support team at Symbolic <strong>Sound</strong>, we may ask you to check the<br />
box that says Allow stack traces. This option gives you more verbose (though most likely impenetrable)<br />
error messages that may help us help you track down the problem. Most of the time, though, you really<br />
don’t want to see this cryptic, low-level stuff, so you should leave it turned off.<br />
69
Combining <strong>Sound</strong>s<br />
If you want several different <strong>Sound</strong>s to occur one after another, assign each of them a finite duration, and<br />
put them into a Concatenation (concatenate means “chain with”). This is something like splicing together<br />
<strong>Sound</strong> objects on tape or in a hard disk editor.<br />
Owl Gun Shot Splash<br />
0 5 10 15 20 25 30<br />
If you want two or more <strong>Sound</strong>s to happen simultaneously, put them into a Mixer. A Mixer adds its inputs<br />
together, just like a physical mixing console, and just as the sound waves from different sources add<br />
in the air. <strong>The</strong>re are several flavors of Mixer in <strong>Kyma</strong>: EndTogetherMixer <strong>for</strong>ces its inputs to end at the<br />
same time, CenteringMixer lines up the midpoints of all its inputs, and OverlappingMixer is like a Concatenation<br />
except that it overlaps the end of one <strong>Sound</strong> with the beginning of the next by a specified<br />
amount of time.<br />
Mixer<br />
Gun Shot<br />
Owl<br />
Splash<br />
0 5 10 15 20 25 30<br />
EndTogetherMixer<br />
Splash<br />
Owl<br />
Gun Shot<br />
0 5 10 15 20 25 30<br />
CenteringMixer<br />
Owl<br />
Gun Shot<br />
Splash<br />
0 5 10 15 20 25 30<br />
OverlappingMixer<br />
Owl<br />
Gun Shot<br />
70<br />
Splash<br />
0 5 10 15 20 25 30<br />
If you want the <strong>Sound</strong>s to overlap with each other in time but want some of the <strong>Sound</strong>s to start later than<br />
others, you can use a TimeOffset to delay the start time of each <strong>Sound</strong>. <strong>The</strong> TimeOffset delays the start of<br />
a <strong>Sound</strong> by whatever amount of time you specify in the SilentTime field.
Algorithmic Splicing and Mixing<br />
Scripts<br />
To algorithmically specify when <strong>Sound</strong>s should start and how they should overlap in time, use the Script<br />
<strong>Sound</strong>, found in the Algorithms category of the prototypes. <strong>The</strong> Script algorithmically constructs a Mixer<br />
of <strong>Sound</strong>s within TimeOffsets according to a script. Each line of the script has the <strong>for</strong>mat<br />
soundName start: aTime.<br />
In other words, you type the name of an input, the word start:, and a time when a copy of the <strong>Sound</strong><br />
should start. Each of the inputs is used as a kind of model or template <strong>for</strong> creating a copy, so you can create<br />
any number of copies of each input, each one starting at a different time and even overlapping with<br />
each other in time.<br />
For example, the script,<br />
s1 start: 0 s.<br />
s2 start: 1 s.<br />
s1 start: 3 s.<br />
would result in the following timeline:<br />
s1<br />
s2<br />
0 1 2 3 4 5 6<br />
You can extend the idea of templates even further by making some of the parameters of the input <strong>Sound</strong>s<br />
variables instead of fixed constants. A variable is a word preceded by a question mark (and shows up in<br />
green in the user interface). <strong>The</strong>n you can set the values of the variable parameters from the script. <strong>The</strong><br />
<strong>for</strong>mat <strong>for</strong> setting a variable parameter from the script is:<br />
soundName start: aTime varName1: value1 … varNameN: valueN.<br />
In other words, after assigning the <strong>Sound</strong> a start time, list the name of each variable followed by a colon<br />
and the specific value that you would like to assign to that variable. For example, suppose you had a<br />
<strong>Sound</strong> whose Frequency field was ?freq and whose Gain field was ?amp. You could use the following<br />
line in a script to create a copy of that <strong>Sound</strong> whose frequency was 443 hertz, amplitude was one half, and<br />
start time was 3.2 seconds:<br />
a<strong>Sound</strong> start: 3.2 s freq: 443 hz amp: 0.5.<br />
As it turns out, these scripts are actually programs in the Smalltalk programming language. This can<br />
come in very handy in cases where you have some systematic description of the <strong>Sound</strong> you want to create.<br />
For example, say that you wanted to construct some new, strange kind of reverberation based on the<br />
HarmonicResonator. You decide that you would like to create a Mixer of six of these resonators, each<br />
with a slightly different resonant frequency. You could get a Mixer from the prototypes, open it up and<br />
drag six copies of the HarmonicResonator one-by-one from the prototypes into the Mixer, then alter each<br />
of the six Frequency fields one-by-one. <strong>The</strong>n if you wanted to adjust those settings, you would have to<br />
open each of the six one-by-one in order to test out a different set of Frequency values. Or you could<br />
instead leverage the power of programming and create those six copies in a loop:<br />
1 to: 6 do: [ :i |<br />
res<br />
start: 0 s<br />
freq: (0.5 * i + 25) hz].<br />
<strong>The</strong>n you could change the number of resonators simply by changing the 6 to a 10 (or whatever). And<br />
you could change the relationship between the frequencies, simply by changing the expression following<br />
the freq: message.<br />
71<br />
s1
If you are excited by the prospect of creating <strong>Sound</strong>s algorithmically, see Scripts and FileInterpreters on<br />
page 525, and <strong>The</strong> Smalltalk-80 <strong>Language</strong> on page 513.<br />
<strong>Sound</strong>s vs. Events<br />
It is important, at this point, to make a clear distinction between the Script <strong>Sound</strong> and the script parameter<br />
of a MIDIVoice or MIDIMapper.<br />
In the case of the MIDIVoice, you have a single <strong>Sound</strong> that is loaded on the Capybara, and the script is<br />
generating Event Values that will update parameters of that <strong>Sound</strong>. It is like playing notes on a single<br />
instrument.<br />
<strong>The</strong> Script <strong>Sound</strong>, on the other hand, creates a new <strong>Sound</strong> — a Mixer with several inputs (each of which<br />
may be optionally time-offset). Once this mixer <strong>Sound</strong> has been created, it is then loaded into the Capybara.<br />
<strong>The</strong> Script is a way to algorithmically construct <strong>Sound</strong>s, similar to the kinds of things you do in the<br />
graphic user interface: dragging new <strong>Sound</strong>s into a Mixer, setting their values, putting a TimeOffset on<br />
each one to delay its start time relative to the others, etc.<br />
A Script in a MIDIVoice is like sending MIDI events to a patch on your synthesizer, whereas a Script is<br />
like actually creating a new synthesizer. In fact, it makes perfect sense to have a Script as an input to a<br />
MIDIVoice. <strong>The</strong> Script would create a <strong>Sound</strong> and could even place Event Values in some of the parameter<br />
fields algorithmically. <strong>The</strong> MIDIVoice would supply events that would change those Event Values<br />
over time.<br />
In other words, the idea of the MIDIVoice is to supply parameter value updates to an existing architecture,<br />
while the idea of the Script <strong>Sound</strong> is to algorithmically create a new architecture. It would not be a<br />
very good use of the Script to treat it like a “score”, generating hundreds of note-events <strong>for</strong> the same<br />
“instrument”, because the Script would actually create hundreds of copies of the instrument, each set up<br />
to play one single note — like a bell choir. <strong>The</strong> idea of hundreds of notes played on a single instrument<br />
fits the MIDIVoice model much better — one instrument, lots of notes. (This is not to say that you cannot<br />
use the Script as a score — only that it is not as efficient as doing the same thing with a MIDIVoice). On<br />
the other hand, if you want to create something that changes from a sampler, to a synthesizer, to a disk<br />
playback, or if you wanted to create some music in, say, three large sections each with a different set of<br />
“instruments”, then the Script would be the most appropriate way to implement it.<br />
Specialized Algorithmic <strong>Sound</strong>s<br />
In addition to the Script, there are several <strong>Sound</strong>s in the Algorithmic category that implement specific<br />
algorithms <strong>for</strong> putting together new <strong>Sound</strong>s:<br />
♦ CellularAutomata<br />
♦ ContextFreeGrammar<br />
♦ RandomSelection<br />
♦ Repetition<br />
♦ Substitution<br />
Any one of these could have been written instead as a script <strong>for</strong> the Script <strong>Sound</strong>. <strong>The</strong> Script is the most<br />
general solution <strong>for</strong> constructing <strong>Sound</strong>s algorithmically, but in some instances it is easier to use one of<br />
these more specialized <strong>Sound</strong>s. See Prototypes Reference beginning on page 218 <strong>for</strong> details on how to use<br />
each of these algorithmic “sound constructors”.<br />
Live green, see red, feel blue<br />
At this point, it is probably worth reiterating what the different colors mean when you see them in parameter<br />
fields or in global or local maps.<br />
?Green Variable<br />
This is used as a kind of place holder or variable in a parameter field of a <strong>Sound</strong>. It always begins with a<br />
question mark and a letter and can be followed by any number of letters or numbers. It must be associated<br />
with an actual value at some point be<strong>for</strong>e the <strong>Sound</strong> is loaded into the Capybara. If you do not set<br />
72
Who’s on top?<br />
the value of a variable in a Script <strong>Sound</strong> somewhere to the right of a <strong>Sound</strong> that uses the variable, then<br />
<strong>Kyma</strong> will ask you to supply a value <strong>for</strong> the variable when you try to play it. You can also use green variables<br />
to indicate which parameters should be visible when you encapsulate a complex <strong>Sound</strong>. See <strong>The</strong><br />
Class Editor on page 536 <strong>for</strong> more in<strong>for</strong>mation on how to create new <strong>Sound</strong> classes.<br />
`Blue Event Source<br />
You will come across the blue Event Sources only in the context of the global map or MIDIMapper. <strong>The</strong>se<br />
names represent the sources of Event Values, not the values themselves. In other words, `MIDI-<br />
Controller07 would represent a source of input; whereas !Volume represents the current value of that<br />
input.<br />
!Red Event Value<br />
<strong>The</strong> red Event Values are the memorable names that correspond to the blue Event Sources. You use the<br />
Event Values in parameter fields to indicate values that are to be controlled in real time.<br />
<strong>The</strong> source of the Event Value is defined in global map or local MIDIMapper; its value is supplied from<br />
MIDI, the virtual control surface, Tools, or any of the <strong>Sound</strong>s in the Event Sources category. When the<br />
value of an Event Value changes, it causes updates to any <strong>Sound</strong> parameters that use it.<br />
One of the things that makes <strong>Kyma</strong> different from other languages is that, because <strong>Kyma</strong> is based on the<br />
notion of “sound objects”, rather than on the model of “notes” played on an “instrument”, there is no<br />
strictly en<strong>for</strong>ced hierarchy with a master-score or sequencer up at the top controlling everything below it.<br />
<strong>The</strong>re are several “score-like” modules, that is, modules that can generate events or that can create<br />
<strong>Sound</strong>s that are offset from each other in time, but these modules are <strong>Sound</strong>s that can be used in place of<br />
any other <strong>Sound</strong>.<br />
Even the score-like modules can be concatenated or mixed with each other or nested within each other. In<br />
other words, <strong>Kyma</strong> does nothing to prevent you from using one score to set and control the parameters of<br />
another score or even of several other scores. So you can create a <strong>Sound</strong> where the “score” is distributed<br />
in modules throughout the signal flow diagram.<br />
This does not mean that there is anything in <strong>Kyma</strong> to prevent you from constructing a straight<strong>for</strong>ward<br />
model that perfectly mimics the behavior of more familiar paradigms.<br />
<strong>The</strong> subtly powerful thing about <strong>Kyma</strong> is that it encompasses those familiar paradigms while still leaving<br />
a door open <strong>for</strong> you to experiment with new paradigms — with new ways of thinking about sound and<br />
structuring sound, ways that could only be possible (or at least practical) because you are using a computer.<br />
As an artist and/or researcher you are familiar with the process of dancing on that edge between tradition<br />
and innovation, and know that new ideas can be introduced as extensions to familiar or proven<br />
concepts. So, we invite you to push at the edges of what is known or what is commonly accepted! And let<br />
us know where <strong>Kyma</strong> helps or hinders you in that regard.<br />
Well, enough of this little philosophical interlude, now let’s take a look at the nuts and bolts of how your<br />
<strong>Kyma</strong> system turns graphic signal flow diagrams into actual sound that you can hear.<br />
Dynamic <strong>Sound</strong> Objects<br />
You may have been wondering why so many of the <strong>Sound</strong>s in <strong>Kyma</strong> have Duration parameters, especially<br />
since, in most of the examples, we have been setting the Duration to on. It turns out that if you<br />
know in advance when you want a <strong>Sound</strong> to be available and when you no longer intend to use it, <strong>Kyma</strong><br />
can use this in<strong>for</strong>mation to optimize the use of the processing power of the Capybara. In other words,<br />
you can, in effect, describe a piece of hardware that changes over time.<br />
Suppose <strong>for</strong> example that you wanted the Capybara to process your voice <strong>for</strong> 10 seconds, and that you<br />
wanted to begin playing a synthesizer along with the voice during the last 5 seconds. <strong>The</strong>n you wanted to<br />
73
continue playing the synthesizer from your MIDI keyboard and have it gradually cross fade with some<br />
sampled sounds of flamingos squawking.<br />
In effect, you would like the Capybara to change from an effects processor, to an analog synthesizer, and<br />
finally into a sampler at the end, and you would like these hardware phases to overlap in time. Here is a<br />
time line sketch of the same thing:<br />
A/D Processing<br />
Analog Synthesis<br />
74<br />
Sampler<br />
0 5 10 15 20 25 30<br />
If you specify this as a Mixer with TimeOffsets on the synthesizer and the sampler, and you give each<br />
section a finite duration, then <strong>Kyma</strong> can schedule the use of resources on the Capybara in a more optimal<br />
way:<br />
Time <strong>Sound</strong><br />
0 - 5 s A/D Processing<br />
5 - 10 s Mixer ( A/D Processing, Analog Synthesis )<br />
10 - 15 s Analog Synthesis<br />
15 - 20 s Mixer ( Analog Synthesis, Sampler )<br />
20 - 30 s Sampler<br />
We should reiterate that this is analogous to the hardware itself evolving over time; it is not analogous to<br />
sequencing or to the notes of music notation. It is saying that the synthesizer does not exist be<strong>for</strong>e it is<br />
time <strong>for</strong> you to begin playing it, that it exists <strong>for</strong> 15 seconds, and then goes out of existence once you have<br />
finished playing it.<br />
This is part of the power of software synthesis — that it allows you to reallocate computing cycles and<br />
allocate them toward whatever algorithm you like. You can (literally in the space of one tick of the sample<br />
rate clock) switch from using all of the Capybara’s resources as an effects processor to using all of the resources<br />
to implement a polyphonic subtractive-synthesis synthesizer. <strong>The</strong> resources are generic; they are<br />
things like how much memory is available and how many multiplications and additions can be done in<br />
one sample clock (22 microseconds). <strong>Kyma</strong> can just as easily use the memory and the arithmetic unit to<br />
implement a filter as it can to implement an oscillator or read a sample stored on the hard disk.<br />
Part of the beauty of software is that everything is reconfigurable and modular, and by manipulating<br />
symbols and graphic icons, you are actually manipulating electrons flitting across metal pathways at<br />
nearly the speed of light, not physical masses that require manufacturing, materials, and space. <strong>The</strong> fact<br />
that it all ends up producing sound in the air is a little bit astounding when you stop to consider it. But<br />
we can’t spend too much time feeling astounded by computers and software, since you are probably getting<br />
anxious to get to work and there are still a few more things to cover in this overview — like how can<br />
we control time?<br />
Time flies like a banana<br />
<strong>The</strong> Capybara would not be able to implement the time-varying hardware example from the last section<br />
if it were not keeping track of time; that is how it knows when it is time to stop one <strong>Sound</strong> and begin<br />
computing the next one.<br />
<strong>The</strong>re are three <strong>Kyma</strong> modules that allow you to take some control over time on the Capybara: Time-<br />
Controller, TimeStopper, and WaitUntil.<br />
<strong>The</strong> input to a TimeStopper module is loaded into the Capybara, but the time clock is stopped until the<br />
value of the Resume parameter becomes positive. For example, even if the input to the TimeStopper had<br />
a duration of 1 samp (the shortest duration possible), it would last <strong>for</strong>ever unless the value of Resume<br />
changed from 0 to 1 at some point.
TimeController is a little less extreme; it merely changes the rate at which time passes on the Capybara. If<br />
you set the Rate to 0, however, it too will stop time.<br />
<strong>The</strong> input to a WaitUntil module will not be loaded into the Capybara until Resume is triggered; then the<br />
input plays through at its normal rate and <strong>for</strong> its normal duration.<br />
<strong>The</strong>se modules affect the time-counter that the Capybara uses in order to determine when to start/stop<br />
<strong>Sound</strong>s and when to issue events. ‡ Thus, they have an effect on things like Concatenations and TimeOffsets,<br />
and MIDI files or scripts in the MIDIVoice. <strong>The</strong>y do not have any effect on the sampling rate. For<br />
example, a TimeController would have no effect on the speed of playback of a DiskPlayer, but if that<br />
DiskPlayer were concatenated with an Oscillator, a TimeController could delay the time at which the<br />
DiskPlayer ended and the Oscillator began.<br />
Suppose you have a situation (say a live, musical per<strong>for</strong>mance or a psychoacoustical experiment) where<br />
you know the ordering of the <strong>Sound</strong>s, but you would like to give the per<strong>for</strong>mer (or the subject) control<br />
over exactly when the Capybara switches from one <strong>Sound</strong> to the next. If you put each of the <strong>Sound</strong>s into<br />
a WaitUntil, and then feed all of them into a Concatenation, you can control the exact time at which each<br />
<strong>Sound</strong> is loaded into the Capybara, according to the conditions you place in the Resume field. <strong>The</strong> change<br />
from one <strong>Sound</strong> to the next is instantaneous (to within a single sample-tick), because all of the <strong>Sound</strong>s<br />
have already been compiled and loaded into the memory of the Capybara and are just waiting <strong>for</strong> their<br />
chance to get loaded and start playing!<br />
For example, say you had three sections, each with a different kind of processing on the ADInput. You<br />
would like the per<strong>for</strong>mer to have control over when to start and when to move on to each succeeding<br />
section. <strong>The</strong> first WaitUntil’s Resume field might have a MIDI switch in it, so the per<strong>for</strong>mer could start<br />
things by depressing a foot-switch or by pressing a button on a controller. <strong>The</strong> next WaitUntil might<br />
have a test on the output of a FrequencyTracker on the ADInput so that the next section would not begin<br />
until the per<strong>for</strong>mer sustained a 5 c. <strong>The</strong> last WaitUntil might have a test weighing the strength of the<br />
higher partials relative to the strength of the lower ones in order to detect when the per<strong>for</strong>mer speaks an<br />
“s” (or to detect an attack transient of a musical instrument).<br />
Time (and time again)<br />
When we speak of time in <strong>Kyma</strong>, there are actually several different time scales that we could be talking<br />
about:<br />
♦ <strong>The</strong> rate at which the structure is changing.<br />
♦ <strong>The</strong> asynchronous Event Values that could be coming from MIDI or generated internally.<br />
♦ <strong>The</strong> rate of <strong>Sound</strong>s pasted into parameter fields as control signals.<br />
♦ <strong>The</strong> sampling rate, the rate at which the audio signals are computed.<br />
<strong>The</strong> structure-changing rate is the rate at which old <strong>Sound</strong>s may expire and new ones take their place due<br />
to Concatenations or TimeOffsets. <strong>The</strong>se changes take place “between the samples”, that is, there is no<br />
delay between terminating one <strong>Sound</strong> and loading/starting the next. In order <strong>for</strong> this to work, though, all<br />
of the changes must be specified in advance.<br />
Event Values are asynchronous updates to the parameter values of the <strong>Sound</strong> that is currently loaded on<br />
the Capybara. <strong>The</strong>se could be coming in live from MIDI devices, a MIDI sequencer, generated by the<br />
AnalogSequencer, or they could be read from a stored sequence like a MIDI file or the sequence generated<br />
by a script in a MIDIVoice. In all cases, though, the input is not necessarily periodic and it is not always<br />
known in advance when an event might come in. <strong>The</strong> maximum rate of change <strong>for</strong> these asynchronous<br />
events is once per millisecond, corresponding with the maximum rate of transmission <strong>for</strong> the MIDI interface.<br />
<strong>Sound</strong>s pasted into parameter fields are often used in expressions that include Event Values, so the<br />
maximum rate of LFO-like control updates is also set at once per millisecond (or 1 khz).<br />
‡ <strong>The</strong> Event Values called !Time (time in seconds since the start of the entire <strong>Sound</strong>) and !LocalTime (time in seconds<br />
since the start of the <strong>Sound</strong> referencing !LocalTime) are also affected by these modules. !RealTime (time in<br />
seconds since the start of the entire <strong>Sound</strong>) is not. <strong>The</strong>se Event Values can be read only, not written.<br />
75
<strong>The</strong> sampling rate can be set to 48, 44.1, 24, 22.050, or 11.025 khz using the DSP Status window. This is the<br />
rate at which audio signals are updated on the Capybara.<br />
Randomly Accessing <strong>Sound</strong>s<br />
Suppose that you have several different <strong>Sound</strong>s and that you would like to be able to start and stop them<br />
at will, in any order? For example, you might be accompanying a live per<strong>for</strong>mer, in which case you<br />
would want to be able to synchronize the start and end times of synthesized sounds, samples, and/or<br />
processing of the live input. Or you might be setting up a psychoacoustic experiment in which you want<br />
to randomize the order in which the stimuli are presented to a subject.<br />
<strong>The</strong>re are two approaches to solving this problem, depending on the amount of processing time you have<br />
available, how quickly the transitions must be between <strong>Sound</strong>s, and whether you require cross-fading<br />
between the <strong>Sound</strong>s.<br />
Mixer model<br />
If you would like any possible succession of <strong>Sound</strong>s with cross-fading between them, you must put an<br />
amplitude envelope on each of the <strong>Sound</strong>s, and place all of them into a single Mixer. If you assign each<br />
<strong>Sound</strong> a unique trigger, you will be able to trigger any <strong>Sound</strong> at any time and they will overlap by the<br />
duration of the decay of the first one and the attack time on the second. This presupposes that you have<br />
enough computing power to compute all of these <strong>Sound</strong>s simultaneously.<br />
<strong>The</strong> Special Case of Samples and Disk Recordings<br />
If all of the <strong>Sound</strong>s that you want to trigger happen to be either disk tracks or samples, there is an alternate<br />
solution. Using a KeyMappedMultisample, you can trigger any of several disk files (or samples) as<br />
long as they are all stored in the same folder on your disk. Using a MIDIVoice or MIDIMapper to define<br />
polyphony, you can specify the number of disk files that could be sounding at one time. If all you want is<br />
a simple crossfade between disk files, <strong>for</strong> example, you can get by with a polyphony of 2.<br />
Compiled <strong>Sound</strong> Grid<br />
If you do not have to crossfade between <strong>Sound</strong>s, you can use a compiled <strong>Sound</strong> grid <strong>for</strong> the purpose of<br />
randomly accessing <strong>Sound</strong>s. <strong>The</strong> idea behind the compiled <strong>Sound</strong> grid is that you do the first step of the<br />
Compile, load, start process — the compile step — to all <strong>Sound</strong>s in the grid at once, and save the results<br />
on disk. <strong>The</strong>n you can do the final two steps — loading and starting — at the moment you want to actually<br />
play the <strong>Sound</strong>. Because you have done the most time consuming part of the processing ahead of<br />
time, you can load and start arbitrary <strong>Sound</strong>s in an arbitrary order much more quickly.<br />
76
To play a compiled <strong>Sound</strong>, tab into or click in its box. Alternatively, you can send the MIDI program<br />
change number corresponding to the number in the upper left corner of the <strong>Sound</strong>’s box.<br />
<strong>The</strong> compiled <strong>Sound</strong> grid is useful when you can af<strong>for</strong>d a little bit of silence between downloading different<br />
<strong>Sound</strong>s. For example, if each <strong>Sound</strong> corresponds to one section of a musical per<strong>for</strong>mance or one set of<br />
psychoacoustic stimuli. Downloading is fast but it is not instantaneous, and you cannot crossfade between<br />
the currently loaded <strong>Sound</strong> and the new one you are loading.<br />
<strong>The</strong> Special Case of Sequential Ordering<br />
If you know the order of <strong>Sound</strong>s ahead of time and would like to control the time at which one <strong>Sound</strong><br />
ends and the next one begins, you can use a Concatenation in which each <strong>Sound</strong> is nested within a WaitUntil<br />
or TimeStopper <strong>Sound</strong>. In this configuration, each new <strong>Sound</strong> is loaded instantly, with no delay,<br />
since the <strong>Sound</strong>s in the Concatenation are stored in the RAM of the Capybara.<br />
77
Compile, load, start<br />
Compile<br />
Load<br />
Start<br />
How does <strong>Kyma</strong> take the graphical representation of the signal flow (a <strong>Sound</strong> with an uppercase “S”) and<br />
turn that into actual sound (lowercase “s”) that you can hear? When you select Compile, load, start from<br />
the Action menu (or, more expediently, use the key equivalent of Ctrl+Space Bar), <strong>Kyma</strong> compiles the<br />
<strong>Sound</strong>, loads it into the Capybara, and tells the Capybara to start its time-counter.<br />
First, <strong>Kyma</strong> rewrites the graphical representation of signal flow into a sequence of time-tagged instructions<br />
to the Capybara. At the same time, it also compiles any parameter field expressions, so that they can<br />
be evaluated in real-time by the real-time expression evaluator on the Capybara. Also at the same time,<br />
<strong>Kyma</strong> is deciding how it should split up your signal flow diagram into subparts that can be assigned to<br />
different expansion cards on your Capybara (remember that you have at least two expansion cards in<br />
your Capybara and may have as many as eight of them). In other words, <strong>Kyma</strong> keeps track of how much<br />
sample RAM is left on each card and how much processing each card is being asked to do and uses this<br />
in<strong>for</strong>mation to decide where to schedule each part of your <strong>Sound</strong>.<br />
During the compile step, you will see cursor change to a watch, and you may be asked to help locate<br />
samples, MIDI files, or other external files needed by your <strong>Sound</strong>. <strong>Kyma</strong> will search <strong>for</strong> a file <strong>for</strong> some<br />
amount of time and then put up a dialog asking whether you prefer to locate it yourself or whether <strong>Kyma</strong><br />
should keep looking; if you know exactly where the file is, it can be quicker to find it yourself; otherwise,<br />
just hit Enter and <strong>Kyma</strong> will eventually find it. ‡<br />
Once the time-tagged sequence of instructions has been divided up among the processors, <strong>Kyma</strong> sends<br />
the in<strong>for</strong>mation to the Capybara. During this step, the cursor changes to an animated icon of a host computer<br />
downloading in<strong>for</strong>mation to the Capybara.<br />
During this time, <strong>Kyma</strong> will also download any samples or wavetables required by the <strong>Sound</strong> from the<br />
hard disk of your host computer into the sample memory on your Capybara. Whenever a sample is being<br />
loaded into the Capybara, the cursor changes to a picture of a wave<strong>for</strong>m being downloaded into the<br />
Capybara.<br />
Once enough of this in<strong>for</strong>mation has been loaded, <strong>Kyma</strong> tells the Capybara to start the time-counter. You<br />
can always tell when the <strong>Sound</strong> is playing (even if it is silent) because the cursor turns hollow; the Capybara<br />
will tell the host computer when the duration of that <strong>Sound</strong> has expired, so the cursor will be filled<br />
in again at the termination of that <strong>Sound</strong>.<br />
‡ Your <strong>Sound</strong>s often require “external” files such as samples, wavetables, MIDI files, text files, analysis files, etc. To<br />
speed up the process of compiling you should specify the folders or directories containing these files as your Frequently<br />
Used Folders in the Preferences (accessed from the Edit menu). For example, you might keep all of your<br />
wave<strong>for</strong>ms in one folder, all of your samples in subfolders of a samples folder, all of your MIDI files in another. Or<br />
you might prefer to keep all of the files used in a particular project in subdirectories of a single directory associated<br />
with that project. However you choose to organize your files, specifying them in the Frequently Used Folders will<br />
allow <strong>Kyma</strong> to locate them more quickly as it compiles your <strong>Sound</strong>s.<br />
78
Compile, load<br />
You may notice that sometimes the <strong>Sound</strong> will start to play be<strong>for</strong>e <strong>Kyma</strong> has finished downloading it to<br />
the Capybara. In these cases, <strong>Kyma</strong> has calculated that enough time-tagged events have been loaded that<br />
it can af<strong>for</strong>d to let the Capybara start playing while <strong>Kyma</strong> continues to load the remaining events.<br />
To compile and load a <strong>Sound</strong> without actually starting it, use Compile & load from the Action menu.<br />
<strong>The</strong>n you can control when the <strong>Sound</strong> starts by using Ctrl+R or Restart from the DSP menu (which always<br />
restarts whatever <strong>Sound</strong> is currently loaded in the Capybara).<br />
This can be useful in a per<strong>for</strong>mance or in any other situation where you want to start a <strong>Sound</strong> without<br />
waiting <strong>for</strong> it to first compile and load.<br />
Scheduling on Multiple Processors<br />
DSP Status Panel<br />
<strong>The</strong>re are two constraints that <strong>Kyma</strong> has to satisfy when dividing up your <strong>Sound</strong> among the multiple<br />
processors: one is that the processor has enough memory and computing time available to handle that<br />
subpart, and the other is that a <strong>Sound</strong>’s input must be scheduled on the same processor as the <strong>Sound</strong> it is<br />
feeding into or on a processor to the “left” of the <strong>Sound</strong> it feeds into.<br />
1 2 3 4 5 6<br />
Example of scheduling on a six-card Capybara<br />
To get a graphical indication of how much computing time your <strong>Sound</strong> is taking up on each of the processors<br />
in your Capybara, use the DSP status window (choose Status from the DSP menu).<br />
This window gives you a picture of the state-of-the-Capybara. In the upper left you can see the time that<br />
has elapsed since the start of the currently loaded <strong>Sound</strong>. This time is reset each time you play the <strong>Sound</strong><br />
or use Ctrl+R to restart the currently loaded <strong>Sound</strong>.<br />
79
Sample Rate<br />
To change the sampling rate, choose from one of the rates listed below the Sample Rate label. <strong>The</strong> input<br />
and output low pass filters will be adjusted accordingly (so as to block out any frequencies above half the<br />
sampling rate).<br />
Interface<br />
If you have digital I/O installed in your Capybara, you can use this list to switch between using the<br />
Analog inputs (the built-in converters), or the Digital inputs, in which case the Capybara expects a digital<br />
signal in either the AES/EBU or S/PDIF <strong>for</strong>mats. You can have digital inputs and outputs or analog inputs<br />
and outputs, but you cannot have a mixture of both (e.g. digital in and analog out). Also, make sure<br />
that the digital signal path does not <strong>for</strong>m a loop; in other words, the digital output of the Capybara<br />
should not be fed through several boxes and fed back in to the Capybara at the end, because the Capybara<br />
will not be able to tell where it should be finding its clock — whether it should pay attention to the<br />
incoming clock or whether it should pay attention to its own internally generated clock.<br />
When you switch to digital I/O, it will appear as if one entire expansion card is always fully loaded, but<br />
don’t worry about this; although it does take up a little extra processing on your last card to use the digital<br />
I/O, it is not really taking up as much time on that processor as the status display indicates.<br />
VU meters<br />
From left to right, the first two meters are VU meters showing the left and right input levels. <strong>The</strong> next two<br />
give the left and right output levels.<br />
Computation Used on Each Expansion Card<br />
<strong>The</strong> next grouping has a meter <strong>for</strong> each expansion card in your Capybara. Although they are numbered<br />
from high to low, <strong>Kyma</strong> will begin scheduling <strong>Sound</strong>s on the leftmost (highest numbered) expansion<br />
card, then, if it runs out of time on that one, will spill over onto the next expansion card and so on. For<br />
<strong>Sound</strong>s that have Concatenations or TimeOffsets, you may be able to see how the amount of processing<br />
required on each card changes over time as some <strong>Sound</strong>s stop and different ones start up.<br />
80
Strategies <strong>for</strong> Non-real-time<br />
In some situations, after the <strong>Sound</strong> has been loaded, you may see a warning in<strong>for</strong>ming you that your<br />
Capybara is close to the limit on computation time. If this happens, go ahead and listen to the <strong>Sound</strong><br />
anyway. <strong>Kyma</strong> is set to be slightly conservative on this warning, so it could be that the Capybara is still<br />
able to keep up with real time. If you have given the Capybara more than it can consistently do in real<br />
time, you will hear digital clicks and breakup in the sound. In general, the further it is from being able to<br />
compute in real time, the more clicks and pops you will hear; you may also hear something that sounds<br />
like granular time-stretching. But don’t despair! <strong>The</strong>re are still quite a few tricks you can employ in order<br />
to get around this.<br />
What Influences the Real-time Capabilities?<br />
Using DSP Status<br />
Record to Disk<br />
Disk Caching<br />
Whether a particular <strong>Sound</strong> can be realized in real time or not depends on several factors:<br />
♦ What kinds of modules are in the <strong>Sound</strong> (some of them require more computing time than others)<br />
♦ How many modules are in the chain (the more modules, the more computing time required)<br />
♦ <strong>The</strong> polyphony setting on any MIDIVoices, MIDIMappers, or AnalogSequencers in the <strong>Sound</strong> (the<br />
number of modules in the chain to the left of a MIDIVoice will be multiplied by the amount of polyphony<br />
that you request)<br />
♦ <strong>The</strong> number of expansion cards in your Capybara (if <strong>Kyma</strong> can split the computation among several<br />
cards rather than having to schedule all of the modules on a single card, then the Capybara can do<br />
more real-time computation).<br />
Take a look at the DSP status window while you are playing your <strong>Sound</strong>. If the usage bar <strong>for</strong> the last<br />
(rightmost) card is fully in the red, ‡ it is usually a sign that you are requesting something beyond what<br />
your Capybara can compute in real time; it indicates that <strong>Kyma</strong> tried to find resources <strong>for</strong> the <strong>Sound</strong> on<br />
the first card, second card, etc., and when it couldn’t find enough resources anywhere else, it just tried to<br />
schedule it on the last card because there were no other choices left.<br />
<strong>The</strong> quickest solution is to select the <strong>Sound</strong>, go to the Action menu, and select Record to disk…. This will<br />
record your <strong>Sound</strong> to the disk (don’t worry if it still sounds like it is sputtering; it will really record it onto<br />
the disk without the breaks). From then on, you can play the digital recording using a DiskPlayer, Sample,<br />
or GenericSource.<br />
This is the quick and easy solution <strong>for</strong> <strong>Sound</strong>s that do not require any live interaction from MIDI or the<br />
audio inputs. Even if your <strong>Sound</strong> is being driven from a sequencer, you can export the sequence as a<br />
standard MIDI file, check the box that says to read MIDI from a file rather than from the live inputs, and<br />
then record the <strong>Sound</strong> to disk.<br />
But what if you are per<strong>for</strong>ming one of the parts live from a MIDI keyboard, controlling some of the faders<br />
in real time, or using the microphone inputs as sound sources? Or, barring all of that, what if you don’t<br />
really want to record the entire <strong>Sound</strong> to disk just because it would take up too much disk space? <strong>The</strong>re<br />
are some alternate solutions!<br />
One approach is to record sub-branches of your <strong>Sound</strong> on the hard disk, and read the samples from the<br />
disk from then on, thus freeing up time on the Capybara to compute the rest of the <strong>Sound</strong> in real time.<br />
Place a DiskCache just to the right of the branch that you have decided to record to disk. <strong>The</strong>n play the<br />
‡ When the digital interface is selected <strong>for</strong> audio input and output, the rightmost bar in the DSP status window will<br />
always be in the red, regardless of the actual usage on that card.<br />
82
DiskCache. It will record everything to its left into a disk file. When it has finished recording, remove the<br />
check from the Record box in the DiskCache parameters. From this point <strong>for</strong>ward, that entire branch<br />
will be read from the disk rather than computed in real time.<br />
<strong>The</strong> advantage of using a DiskCache over simply recording to disk is that, with the DiskCache, you never<br />
lose track of what you did to create that disk recording. Everything that you used to generate the recording<br />
is still there, to the left of the DiskCache in the signal flow graph. This makes it easy to make changes<br />
to the original <strong>Sound</strong> and re-cache the results. No more trying to remember exactly how you created a<br />
particular track or where the disk recording of a particular <strong>Sound</strong> might be. <strong>The</strong> <strong>Sound</strong> and its recording<br />
are linked together in the <strong>Sound</strong> structure.<br />
In some cases, disk-caching is something like multi-tracking, where different “layers” of sound are recorded,<br />
one at a time, in a hard disk recorder. In the case of <strong>Kyma</strong> <strong>Sound</strong>s, though, the “tracks” might<br />
occur anywhere within the <strong>Sound</strong> structure; they are not necessarily all inputs to one Mixer.<br />
<strong>The</strong>re are several different strategies <strong>for</strong> choosing which part of the <strong>Sound</strong> to cache on the disk. You<br />
might choose the most computationally expensive branch in order to free up the most time. Or you might<br />
be <strong>for</strong>ced to choose only those parts that do not rely on live input — the fixed or sequenced parts of your<br />
<strong>Sound</strong> that do not change from playing to playing. It does not make sense to have nested DiskCaches,<br />
because that is like storing the same thing on the disk twice.<br />
Optimizing your <strong>Sound</strong>s<br />
Sometimes you can optimize your <strong>Sound</strong>s in such a way that the sonic result is exactly the same but the<br />
entire <strong>Sound</strong> requires less processing time.<br />
Get a Baseline<br />
Use Get info from the Info menu to get a measure of the complexity of your <strong>Sound</strong> in terms of a rough<br />
estimate of the percentage of your Capybara that it requires in order to run in real time. Jot down this<br />
percentage be<strong>for</strong>e you start simplifying so that you can see which things have an impact.<br />
Look <strong>for</strong> Common Inputs<br />
If you can identify two identical <strong>Sound</strong>s that are being processed in different ways, you can copy one of<br />
them, select the other one, and choose Paste special… from the Edit menu. This will cause them to be<br />
identical. That way, the Capybara can compute this <strong>Sound</strong> once and feed the result to two different places<br />
(rather than recomputing it <strong>for</strong> each branch).<br />
Check Polyphony<br />
If you have any MIDIVoices, MIDIMappers and/or AnalogSequencers, check that you haven’t requested<br />
more polyphony than you had intended. When you request 10 voices of polyphony, <strong>Kyma</strong> makes 10<br />
copies of the <strong>Sound</strong>, so you should request exactly the polyphony that you need, not more.<br />
83
Remove Redundancy<br />
<strong>The</strong> most common source of redundancy is in amplitude scaling. For example, if you have a Sample<br />
feeding into an Attenuator, feeding into a Mixer, there are potentially three places where you could be<br />
scaling the amplitude.<br />
Often you can combine these amplitude scales to simplify your <strong>Sound</strong>. In this example, you could specify<br />
the level in the Scale field of the Sample, and delete the Attenuator. <strong>The</strong>n you could take the scale factor<br />
in the Mixer and multiply it by the value in the Scale field of the Sample, making it possible to change<br />
the Mixer scale factors to 1.0.<br />
Other <strong>Sound</strong>s that have potentially redundant scale factors include the MIDIVoice, MIDIMapper, and<br />
Oscillator (which you can scale by putting a constant into its Envelope field or by setting the Scale<br />
parameter in its AR or ADSR envelope).<br />
Anything that you could simplify in an algebraic expression, you can probably also simplify in a <strong>Kyma</strong><br />
<strong>Sound</strong>. For example, if you have several inputs to a Mixer, and each of them is going through its own Attenuator,<br />
and all Attenuators are set to the same value, you can eliminate the Attenuators and do all the<br />
scaling in the Mixer. That is like saying<br />
Downsample Control <strong>Sound</strong>s<br />
a × x + a × y + a ×z = a × x + y + z<br />
84<br />
( )<br />
If you have some <strong>Sound</strong>s pasted into parameter fields, you can experiment with updating them at a<br />
slower rate to see if it has any negative impact on the sound. Recall that you can specify the number of<br />
milliseconds between updates, as <strong>for</strong> example<br />
Oscillator L: 5<br />
would mean to read the value of the Oscillator every 5 milliseconds and use that to set the value of the<br />
parameter. For many parameters, you can get by with update rates slower than once per millisecond and<br />
this will reduce the amount of computation required by your <strong>Sound</strong>.<br />
Use Equivalent <strong>Sound</strong>s that are Less Complex<br />
<strong>The</strong>re may be a module that will do exactly what you need but which is less complex than a module you<br />
are using to do the same things. For example, you might be using an Oscillator to play once through a<br />
function where a FunctionGenerator could be used to do that more efficiently. You might be using an exponential<br />
envelope in a situation where a linear one would do as well. You may be using a<br />
FunctionGenerator with a Ramp wave<strong>for</strong>m where you could use the expression 1 ramp: 2 s to accomplish<br />
the same results using less computing power. Use Get info to compare the relative complexity of<br />
different <strong>Sound</strong>s that can be used to accomplish the same results.
Poor Scheduling<br />
If it appears that only one of your expansion cards is being overloaded and that there are cards to the<br />
right of that one that are completely free, you should probably contact us and send us a copy of the<br />
<strong>Sound</strong> (either by email, via our FTP site, or on a floppy), because we would like to have a look at it so we<br />
can improve the scheduling algorithm.<br />
Sample Rate<br />
If all else fails, you could lower the sample rate. This is not a satisfactory solution in the long term, because<br />
it will also cut off the high frequencies of your output. However, it can be a good way to work with your<br />
<strong>Sound</strong> in real time until you get it adjusted the way you like it, at which point you can set the sample rate<br />
back up again and record the <strong>Sound</strong> to disk.<br />
Throwing More Hardware at the Problem<br />
If you find yourself running out of real-time computation power all the time, you might consider adding<br />
some more expansion cards to your Capybara. In general, the more expansion cards in your Capybara,<br />
the more polyphony and complexity you can squeeze out of it in real time.<br />
Never Give Up<br />
Never fear, between all of these strategies, you will be able to find some combination that will get around<br />
any temporary “out of real time” messages.<br />
85
Learning <strong>Kyma</strong><br />
When people tell us their experiences in learning <strong>Kyma</strong> they describe three stages: first, the excitement of<br />
looking around, trying out all the examples, hearing the sounds, and being able to manipulate them in<br />
real time with MIDI, plus an exhilarating sense of learning many new things at a very fast pace.<br />
At some point they report reaching a plateau where they may feel frustrated, as though they can’t seem to<br />
make <strong>Kyma</strong> do what they want anymore. But what is really going on is that they are starting to move<br />
from the first layer (using and tweaking the existing <strong>Sound</strong> examples) into a deeper layer where they are<br />
starting to create their own <strong>Sound</strong>s and getting into programming. It’s not that <strong>Kyma</strong> has suddenly gotten<br />
harder, it’s that they are trying to do more difficult and complex things with <strong>Kyma</strong>.<br />
However, once they have worked their way through this plateau, they have reached a point when they<br />
have suddenly felt truly fluent in <strong>Kyma</strong>. Once you make it through this plateau period, <strong>Kyma</strong> becomes<br />
your own environment, your own language that you can customize and use to do anything you like.<br />
You may experience these same three stages or you may experience something entirely different. In any<br />
case, we would like to hear from you about your experiences in learning <strong>Kyma</strong>, both because we can use<br />
your experiences to make <strong>Kyma</strong> more intuitive and because we may be able to use your experience to<br />
help other people learn <strong>Kyma</strong> more effectively.<br />
Congratulations!<br />
If you have read this far, you have what it takes to become a <strong>Kyma</strong> guru, sought after and admired by<br />
your friends who will be constantly bothering you <strong>for</strong> your expert advice and assistance.<br />
But that is not why you’re reading this book; you’re reading the book because you want to use <strong>Kyma</strong> in<br />
your own work. So, it is time to press on; do the rest of the tutorials and soon you will be fluently creating<br />
and tweaking sounds in an intense feedback loop between you and your machine (and feeling something<br />
along the lines of what a gambler feels at the handle of a slot machine).<br />
Your interest in <strong>Kyma</strong> indicates that you have an intellect and a curiosity beyond the ordinary, that you<br />
are still driven by the same insatiable and joyfully persistent drive to learn and understand the world that<br />
you had as a child.<br />
<strong>The</strong> easy way out would have been to take the standard, off-the-shelf sounds, the ones that everyone else<br />
has, the ones that would identify you as one of the crowd. But you have a need to get inside the sound, to<br />
control it, to truly understand what you are doing, and to break new ground, to create new sounds that<br />
have not been done be<strong>for</strong>e. Since you’ve been this way all of your life, you already know that it’s not the<br />
easiest way to be. But it is the most satisfying. So congratulations <strong>for</strong> refusing to lower your standards.<br />
And we hope you will stay in touch with us, because it is stimulating <strong>for</strong> us to get to talk with people like<br />
you.<br />
OK, time to order out <strong>for</strong> a pizza, unplug the telephone, turn the page and start in on the tutorials. (But<br />
don’t hesitate to plug the phone back in and call Symbolic <strong>Sound</strong> if you run into any questions!)<br />
86
Tutorials<br />
Learn <strong>Kyma</strong> in 24 Hours!<br />
♦ One month, one hour per day, taking every 7th day off or<br />
♦ Two hours a day <strong>for</strong> two 6-day weeks or<br />
♦ Four hours a day <strong>for</strong> six days or<br />
♦ In 24 hours straight! (not recommended)<br />
Part I: A Tour through the Examples<br />
Building your own <strong>Sound</strong> library<br />
<strong>The</strong> Itinerary<br />
One of the best ways of learning how to design your own <strong>Sound</strong>s in <strong>Kyma</strong> is to start by examining and<br />
modifying the <strong>Sound</strong>s that other people have made. Whenever you make a modification that sounds interesting,<br />
you can rename the <strong>Sound</strong>, add a short annotation to it (so that later you remember what it<br />
does), and save it in a new <strong>Sound</strong> file. This is a great way to start gradually building up your own customized<br />
<strong>Sound</strong> library that you will be able to draw upon in the heat of creative passion. Once you<br />
become familiar with the examples that came with <strong>Kyma</strong> and have extended that set with your own examples,<br />
it will be a rare situation in which you would not be able to recall a <strong>Sound</strong> that is close to what<br />
you need and begin modifying that (rather than having to start from scratch each time).<br />
This “tour” through the examples is a tutorial is intended to give you an overall sense <strong>for</strong> what kinds of<br />
things are possible in <strong>Kyma</strong> and to help you get started building your own <strong>Sound</strong> library. We’ll do this<br />
by looking at each of the example <strong>Sound</strong> files, getting an idea of what kinds of <strong>Sound</strong>s it contains, dissecting<br />
some of the <strong>Sound</strong>s from that file in detail, and experimenting with modifying parameters of<br />
some <strong>Sound</strong>s to get a feel <strong>for</strong> which parameters have what effects.<br />
By the way, this tutorial is not intended as an introduction to sound synthesis, just an introduction to the<br />
example <strong>Sound</strong> library in <strong>Kyma</strong>. If you find that you need an introduction to sound synthesis, we suggest<br />
that you check the local library or bookstore <strong>for</strong> a copy of one of the books listed in the Background Materials<br />
Appendix, call Symbolic <strong>Sound</strong> to find out about attending one of the intensive <strong>Kyma</strong> Immersion<br />
weekends, and/or check to see whether an educational institution near you might offer an introductory<br />
course on electronic or computer music (you may even be reading this book as part of a course right<br />
now).<br />
In general though, you should continue to plunge <strong>for</strong>ward through this tutorial even if you happen to<br />
encounter a few terms or concepts along the way that are not completely familiar. Most of the concepts<br />
and terminology will become clear once you start listening and experimenting, and any remaining questions<br />
can be easily cleared up by a text book or a course. And if you do take a course, the intuitive<br />
understanding that you will have acquired by working with these concepts in <strong>Kyma</strong> will put you far<br />
ahead of all of your classmates (so please be kind to them and don’t gloat too much when you discover<br />
how much better you understand everything).<br />
Keyboard<br />
MIDI Faders<br />
Synthesizer<br />
MIDI<br />
Computer<br />
Capybara<br />
audio<br />
Pre-amp<br />
Amplifier
You will get the most out of this “tour” through the examples if you take a moment right now to make<br />
sure that you have everything connected and set up as follows:<br />
♦ <strong>The</strong> Capybara analog outputs should be connected to an amplifier and speakers or to a headphone<br />
amplifier and headphones. Alternatively, if you are using the digital I/O, the digital out should be<br />
feeding into a digital-to-analog converter such as a DAT, and the DAT outputs should be connected<br />
to the amplifier or headphone amplifier.<br />
♦ If you have a microphone, feed it into a preamplifier to bring it up to line level (your mixer may have<br />
a input that does this), and connect it to the left channel input of the Capybara. If you are using digital<br />
I/O, then the microphone must be connected to an analog to digital converter (say, another DAT<br />
machine), and the output of that DAT should be connected to the digital input of the Capybara. If<br />
you do not have a microphone or if you prefer to use a musical instrument, synthesizer, sampler,<br />
DAT or CD as a source, simply connect the line-level (or digital) outputs of your source to the audio<br />
inputs of the Capybara.<br />
♦ If you have a MIDI keyboard and/or MIDI controller, connect the MIDI output of the controller to<br />
the MIDI input on the back of the Capybara. If you would like to use both a keyboard and a controller,<br />
connect the MIDI output of the keyboard to the MIDI input of the controller. <strong>The</strong>n connect the<br />
MIDI output of the controller to the MIDI input of the Capybara.<br />
♦ If you would prefer to use your software sequencer as a source of MIDI note events and MIDI controllers,<br />
connect the MIDI output from your computer’s MIDI interface to the MIDI input on the back<br />
of the Capybara. <strong>The</strong>n, connect the MIDI output from the Capybara to one of the MIDI inputs on<br />
your computer’s MIDI interface.<br />
♦ If you have an external sound module that you would like to control from <strong>Kyma</strong>, connect the MIDI<br />
output from the Capybara to the MIDI input on the back of the external sound module.<br />
To check that you are getting audio input, find ADInput in the system prototypes under the Sampling<br />
category. Select it and use Ctrl+Space Bar to play it. Choose Status from the DSP menu. Start making<br />
noise into the microphone and make sure that one or both of the input level bars are jumping. If not, then<br />
it means that the audio input is not properly connected to the Capybara.<br />
To check that you are getting MIDI input, choose Configure MIDI… from the DSP menu. Click the<br />
Show MIDI messages button. Play a few keys on the MIDI keyboard and move a few faders on your<br />
MIDI controller. <strong>The</strong> values in the window should change while you do this. It will also tell you what<br />
MIDI channel(s) it is receiving MIDI messages on. If you do not see the values changing in this window,<br />
it means that the Capybara is not receiving MIDI input. Click the mouse to exit this window, and check<br />
your MIDI connections again and make sure that your keyboard and controller are both switched on. If<br />
you are using something like MIDI patchbay or other MIDI routing program, you may have to make sure<br />
that the input is routed directly to the output.<br />
<strong>The</strong> examples provided with <strong>Kyma</strong> are set up to use MIDI channel 1 <strong>for</strong> input. You should set your MIDI<br />
devices to output on MIDI channel 1. If this is not possible, may need to change the default MIDI channel<br />
(see DSP menu: Configure MIDI… on page 435) or modify the global map (see Global and Local Maps on<br />
page 482).<br />
Once you have everything set up and verified, it is time to start having fun!<br />
In each of the <strong>Sound</strong> files in the Examples folder, you will find examples of different kinds of sound<br />
synthesis and processing. <strong>The</strong> examples in each file are described in the section in this chapter with the<br />
same name as the <strong>Sound</strong> file.<br />
For many examples, there are two alternate versions provided: the different versions achieve similar<br />
(although not exact) sound synthesis or processing results, but use different amounts of Capybara processing<br />
and memory resources. <strong>The</strong>se example <strong>Sound</strong>s are labeled with the minimum number of<br />
Capybara expansion cards that are needed <strong>for</strong> real-time operation at 44.1 khz sample rate. For example,<br />
there are two versions of glottal chopped: glottal chopped (5) <strong>for</strong> Capybaras with five or more expansion<br />
cards, and glottal chopped (2) <strong>for</strong> Capybaras with two or more expansion cards.<br />
88
Analog<br />
Dissection<br />
Start by choosing Open… from the File menu, make sure the file type is <strong>Sound</strong> file, and open the file<br />
called analog from the Examples folder which you should find in the <strong>Kyma</strong> folder.<br />
Select and play RomeTaxiRadio to get an idea of the kinds of <strong>Sound</strong>s contained in this file. <strong>The</strong>se are all<br />
emulations of the kinds of sounds you could get from the old modular analog synthesizers. Use the virtual<br />
control surface to change !Rate from 1 to 0 and back to 1 again. Change !NN8 and !NN7 to modify<br />
the last two pitches in the sequence. Experiment with the other faders and take note of what effect each of<br />
them has on the sound. To set a fader to a precise value, click in the small text box at the top of the fader,<br />
type in the value you want, and press Enter or Return. <strong>The</strong> fader will jump to that new value. When you<br />
have had enough, use Ctrl+K to stop the <strong>Sound</strong>.<br />
Select and play the <strong>Sound</strong> named delayed saws. Play the MIDI keyboard and experiment with each of the<br />
faders in the virtual control surface, listening to how each affects the sound.<br />
Double-click on delayed saws to take a look at how the <strong>Sound</strong> is put together. Let’s dissect this <strong>Sound</strong>,<br />
starting with the leftmost module (the output) and moving rightwards.<br />
<strong>The</strong> rightmost module is a StereoMix2. Double-click it so you can see its parameters displayed in the<br />
lower half of the <strong>Sound</strong> editor. <strong>The</strong>re are two inputs to the mixer: 3 filtered saws and delayed filtered<br />
saws. Pan1 is set to zero, meaning that it is panned hard left, and Pan2 is set to one meaning that In2 is<br />
entirely in the right channel. In1 is attenuated a little bit, since Scale1 is set to 0.75. In2 is at full amplitude<br />
since Scale2 is set to one.<br />
Following the lower branch first, double-click on delayed filtered saws to view its parameters. This<br />
branch takes 3 filtered saws as its input and delays it by one second.<br />
Now double-click 3 filtered saws. This is called a Preset <strong>Sound</strong>. It gives you a way to save the current<br />
settings of faders in the virtual control surface so that the next time you play the <strong>Sound</strong>, they will start out<br />
at those settings. Notice that the EventValues parameter has a setting <strong>for</strong> each of the faders you saw in<br />
the virtual control surface:<br />
!Atk channel: 1; initialValue: 1.0.<br />
!CutOff channel: 1; initialValue: 0.75.<br />
!Detune1 channel: 1; initialValue: 0.0750853.<br />
!Detune2 channel: 1; initialValue: 0.0511945.<br />
!Feedback channel: 1; initialValue: 0.665529.<br />
!Rel channel: 1; initialValue: 1.0.<br />
!Volume channel: 1; initialValue: 0.156997.<br />
89
You can read these settings, but you can’t modify the text, at least not by typing. <strong>The</strong> only way to alter<br />
this parameter is to change the settings of the faders in the virtual control surface, and to then press the<br />
button labeled Set to current event values found just below the EventValues parameter field.<br />
Proceeding ever leftward, let’s next double-click the module called LPF. If you don’t see a module to the<br />
left of 3 filtered saws, click on the small tab attached to the center of the left edge of the 3 filtered saws<br />
icon. This little tab with a right-pointing arrow in it indicates that a <strong>Sound</strong> has hidden. Click on the tab to<br />
show the <strong>Sound</strong>’s immediate inputs. Click again to hide the inputs of a <strong>Sound</strong>. To display all of the inputs<br />
of a <strong>Sound</strong> (i.e. all of its immediate inputs, the inputs to those inputs, etc.), click the tab while holding<br />
down the Control or Command key. You can use these tabs to keep your signal flow graphs uncluttered<br />
and easy to read, while still being able to edit any part of the graph when necessary. (See Editing the Signal<br />
Flow Diagram beginning on page 26 <strong>for</strong> more in<strong>for</strong>mation about using the signal flow diagram.)<br />
Here we get our first glimpse of some of the red Event Values we were controlling from the virtual control<br />
surface. This is a generic filter that you can set to lowpass, highpass, or allpass. This particular filter is<br />
set to lowpass, so it will tend to attenuate all frequencies in its input that are above the value in the Frequency<br />
field. <strong>The</strong> other parameters tell us that this is a fourth order filter and that an Event Value called<br />
!Feedback controls a parameter similar to the “resonance” control of analog filters. When you were experimenting<br />
with the faders in the virtual control surface you probably noticed that you could make the<br />
filter ring or even blow up by increasing the value of !Feedback.<br />
<strong>The</strong> expression in the Frequency field<br />
filter cutoff L * (!Cutoff * 11050 hz + 200 hz)<br />
indicates that, depending on the setting of !Cutoff, the maximum Frequency value will be between<br />
200 hz and 11250 hz. This maximum value is in turn multiplied by a <strong>Sound</strong> called filter cutoff that generates<br />
an envelope shape.<br />
To see how the envelope shape controlling the filter cutoff is generated, double-click the icon named filter<br />
cutoff. This is an ADSR (Attack time, initial Decay time, Sustain level, Release time) envelope generator.<br />
From the parameters we can tell that when the envelope generator is triggered by a MIDI key-down<br />
event, it goes from 0 to maximum amplitude with 10 milliseconds, drops to 75% of its maximum amplitude<br />
in the next 10 milliseconds, where it remains <strong>for</strong> as long as the key is held down, after which it drops<br />
back to zero in 5 seconds starting from when the key is released. So, as you already heard when you were<br />
experimenting earlier, each time you press a MIDI key, the filter opens up to allow more high frequencies<br />
to pass through, and when you release the key, the filter closes back down again.<br />
What input is LPF filtering? Double-click the icon called phatness. This is a Gain module that is set to<br />
multiply the amplitude of its input by ten. In this case, since the input is already a full-amplitude signal,<br />
the effect of the Gain will be to distort the signal by clipping it, turning it from a sawtooth-like wave<strong>for</strong>m<br />
into more of a square-shaped wave<strong>for</strong>m, and as a result, changing the timbre from something with all<br />
harmonics to something with only the odd harmonics.<br />
To see and hear this <strong>for</strong> yourself, select phatness and choose Oscilloscope from the Info menu. Leave all<br />
the other faders at zero, and type 0.01 into the field above the !Volume fader (and hit Enter). <strong>The</strong>n play<br />
some low pitches on the keyboard. Gradually increase !Volume using the fader until you see and hear<br />
the wave<strong>for</strong>m flatten out at the top and bottom because it hits the maximum amplitude. Notice that<br />
changing !Volume changes not just the loudness, but the timbre as well.<br />
To see how the spectrum is affected, make sure phatness is still selected, and choose Spectrum analyzer<br />
from the Info menu. ‡ Hold down C 6 on your keyboard (two octaves above middle C), and alternate the<br />
position of the !Volume fader between almost zero and almost one by clicking with the mouse towards<br />
the bottom and then towards the top of the fader. Notice how every other spectral line disappears when<br />
the signal is clipped? Try this a few times, listening to the change in timbre that accompanies this change<br />
in the spectrum. <strong>The</strong>re is another, more subtle effect you can observe on the spectrum: as soon as the<br />
wave<strong>for</strong>m is clipped, it has an infinitely sharp corner on it, and infinitely sharp corners have an infinite<br />
number of harmonics, so some of the short lines you see clustered around the harmonics are actually ali-<br />
‡ By the way, this explanation is not essential to understanding and using <strong>Kyma</strong> — it is just an interesting aside.<br />
90
ases of those higher harmonics, artifacts of one of the basic facts of life in the digital domain: you cannot<br />
represent any frequencies above half of the sampling frequency.<br />
Next let’s see how the sawtooth is created be<strong>for</strong>e it is distorted by the Gain module. Double-click the icon<br />
named 3 key-mapped saws. This is a Mixer with three inputs: saw1, saw2, and saw3. <strong>The</strong> Mixer adds the<br />
outputs of all three of these <strong>Sound</strong>s and then multiplies the sum by the current value of !Volume. Since<br />
the Gain subsequently multiplies that result by ten and the value of !Volume can range from zero to one,<br />
the end result is that the sum can be multiplied by a number in the range of zero to ten, depending on<br />
where you set the value of !Volume.<br />
So far all we’ve seen is adding, filtering, enveloping, and distortion. When do actually get to the part that<br />
generates sound? Funny you should ask (did you?), because that is what we finally get to with this next<br />
and final level; double-click on saw1 to see its parameters. A KeyMappedMultisample uses an entire<br />
folder full of samples as its source material and uses the policy described in the Mapping parameter to<br />
map different samples to different MIDI key numbers or ranges of key numbers. In saw1, each sample<br />
from the folder is mapped to the range of pitches specified in the header of the samples file. Why use different<br />
samples <strong>for</strong> different pitch ranges? Because of that fundamental law of the digital domain: you<br />
can’t represent any frequencies above half the sampling rate. So the higher the fundamental pitch, the<br />
fewer harmonics its wave<strong>for</strong>m can have, because those harmonics, being at frequencies that are multiples<br />
of the fundamental, can quickly get high enough to exceed the half sample rate limit. That’s why saw1<br />
uses wave<strong>for</strong>ms with many harmonics <strong>for</strong> the bass notes, and wave<strong>for</strong>ms with only a few harmonics <strong>for</strong><br />
the really high frequencies.<br />
Take a look at the Frequency of saw1 and compare it to the same parameter field in saw2 and in saw3.<br />
If it is difficult to read everything that is in the Frequency field, position the cursor on the center line<br />
dividing the signal flow graph from the parameter fields until the cursor turns into a double-arrow<br />
pointing up and down. <strong>The</strong>n use the mouse to drag that center line upwards, making all the parameter<br />
fields larger so you can read their contents.<br />
Notice that the Frequency values differ by the value of !Detune1 and !Detune2. By making these<br />
three “oscillators” slightly out of tune with each other, you can get them to sometimes rein<strong>for</strong>ce each<br />
other, sometimes cancel each other, and generally get a more dynamic, evolving timbre than you would<br />
be able to get out of fixed frequency oscillators. Try this out right now. Select 3 key-mapped saws (the mix<br />
of the three sawtooth oscillators) and choose Oscilloscope from the Info menu. Experiment with different<br />
values <strong>for</strong> !Detune1 and !Detune2.<br />
Now, what about this expression in the Frequency field?<br />
!KeyNumber smoothed nn + !Detune1 nn<br />
This is saying that the frequency is the MIDI key number in units of note number (nn) plus some fraction<br />
of a half step that depends on the value of !Detune1. <strong>The</strong> smoothed means that when you change from<br />
one note number to another, it will take 100 milliseconds to make the transition, rather than making it<br />
instantaneously.<br />
Modifying the Example<br />
Now it’s time to start mutating the <strong>Sound</strong> in order to both gain a deeper understanding of how it is put<br />
together and to start building your own <strong>Sound</strong> library. First, close the <strong>Sound</strong> editor, and make a duplicate<br />
of delayed saws so you can retain the original <strong>Sound</strong> and make your changes to the duplicate. (Do this by<br />
selecting the icon and using Ctrl+D <strong>for</strong> duplicate). To change the name of your new <strong>Sound</strong>, make sure<br />
DuplicateOfDelayed saws is still selected, and hit Enter. This gives you a dialog where you can enter a<br />
new name <strong>for</strong> the <strong>Sound</strong>; you might as well call it ‘my saws’, just to be stunningly original.<br />
In order to keep track of which <strong>Sound</strong>s came with the system and which ones you design yourself, you<br />
can create a new <strong>Sound</strong> file (by typing Ctrl+N and selecting <strong>Sound</strong> file as the file type) and drag the my<br />
saws icon into this new window. Save it on the disk, creating a new folder <strong>for</strong> the purpose called my examples<br />
and giving the file itself a memorable name like my analog.<br />
At this early stage, this may seem like just an exercise, but in fact, it is a good idea to start using <strong>Sound</strong><br />
files to categorize and organize your new <strong>Sound</strong> designs from the very beginning. As soon as you start<br />
tweaking <strong>Sound</strong>s, you start hearing things you’ve never heard be<strong>for</strong>e, and even if you are diligently fol-<br />
91
lowing the tutorials step-by-step, you might make a <strong>for</strong>tuitous mistake that leads to some fantastic result<br />
that you will want to save <strong>for</strong> future reference. § <strong>The</strong> idea is to save your <strong>Sound</strong> in a file along with other,<br />
similar <strong>Sound</strong>s and to give the <strong>Sound</strong> file a name that will lead you back to that file weeks or months later<br />
when you might be searching <strong>for</strong> examples of analog-like sounds.<br />
Double-click my saws so you can start editing and making it your own. As a first step, increase the polyphony<br />
using a MIDIVoice (found in the MIDI In category of the prototypes, or by searching the<br />
prototypes using Ctrl+B and typing a partial word like midi into the dialog box). Where should the<br />
MIDIVoice go in the signal flow graph? If we want all the voices to share the same delay, we should put<br />
the MIDIVoice be<strong>for</strong>e the DelayLine. It also makes sense that the Preset should apply to all the voices at<br />
once, so let’s place it on the line between 3 filtered saws and LPF.<br />
Leave all the MIDIVoice parameters at their default values, and select my saws again so you can use<br />
Ctrl+Space Bar to compile and load the new <strong>Sound</strong>. Once the <strong>Sound</strong> is loaded, experiment with playing<br />
two-voice polyphony on the MIDI keyboard.<br />
<strong>The</strong> constant, 1 second delay is getting a little tedious, so let’s control the delay with a MIDI fader or onscreen<br />
controller. Double-click delayed filtered saws, hit the Tab key until you get to the DelayScale<br />
field, hit Escape on the computer keyboard, and move one of your MIDI faders. (If you don’t have any<br />
MIDI faders, use Ctrl+H to get a list of hot parameters; start typing the word delay, and then hit Return<br />
so that the Event Value !Delay is pasted into the DelayScale field). Select and play my saws again.<br />
Hold down some MIDI keys and move !Delay from zero up to its maximum value (using either a MIDI<br />
fader or the virtual control surface). You can’t fail to notice that the delay has the interesting side effect of<br />
changing frequency as you change the length of the delay. After letting the extreme change die down,<br />
experiment with very subtle changes to !Delay.<br />
Experiment with all the Event Values in the virtual control surface until you have the settings to your<br />
taste. <strong>The</strong>n double-click 3 filtered saws, and press the button named Set to current event values. This<br />
will save your current settings along with the <strong>Sound</strong>.<br />
Add an Annotation as the rightmost module in the signal flow (found under Variables and Annotation<br />
in the prototypes). Select the Annotation and press Enter, so you can give your <strong>Sound</strong> a descriptive<br />
name that will help you locate it later. Double-click the Annotation, and type a brief description of this<br />
<strong>Sound</strong> in the Text field. Sure, right now this seems like a lot of annoying extra work, but in a few weeks,<br />
when you revisit this <strong>Sound</strong> and try to remember exactly how it works, you will be glad you left yourself<br />
a little reminder note. Once you have finished with your annotation, close the editor, and close your new<br />
<strong>Sound</strong> file, saving the changes you made.<br />
§ <strong>Kyma</strong> was specifically designed to tempt you off the path of diligently following directions and lead you down the<br />
path of experimentation, so don’t expect that you won’t be fooling around with developing some additional<br />
<strong>Sound</strong>s on the side, even as you diligently and systematically work your way through the tutorials!<br />
92
Take a few moments now to listen to some of the other <strong>Sound</strong>s in the analog file, so you will know what<br />
is available here and can come back to draw upon these as you need them.<br />
93
Audio Demonstrations<br />
<strong>The</strong>se examples are set up as mini-laboratories to demonstrate different synthesis techniques or psychoacoustic<br />
phenomena. Use them to demonstrate these concepts to your students and/or to yourself!<br />
Using the Additive Synthesis Lab<br />
For example, use Ctrl+Space Bar to compile, load, start the <strong>Sound</strong> called Additive. In the virtual control<br />
surface, you can increase or decrease the amplitude of 16 sine wave harmonics, and see the effect this has<br />
on the wave<strong>for</strong>m in the small oscilloscope display.<br />
Click in the numeric field above the F02 fader; this should select the contents of that field. Type in a 0 to<br />
set the fader value to its smallest value. <strong>The</strong>n press the Tab key. This selects the next fader to the right.<br />
Type in a 0 here as well. Continue to tab over and enter zeroes, observing the change in the wave<strong>for</strong>m as<br />
you remove each harmonic up through F16 and you only hear (and see) the first harmonic or the fundamental.<br />
Now go back and add a very small amount of each harmonic back in. If you see the wave<strong>for</strong>m clipping or<br />
hear it distorting, you may have to reduce the !Volume.<br />
How the Additive Synthesis Lab Works<br />
Close the virtual control surface, and double-click on the icon called Additive to see how this <strong>Sound</strong> was<br />
put together.<br />
<strong>The</strong> rightmost sound is a Preset. Double-click on it so that its parameters are displayed in the lower half<br />
of the <strong>Sound</strong> editor. <strong>The</strong> Preset is used to set all the Event Values to reasonable values when you first<br />
play the <strong>Sound</strong>. For example, you would not want the initial value of !Volume to be zero, because it<br />
might confuse the person using the virtual control surface if they don’t hear any sound.<br />
Position your cursor over the line dividing the signal flow graph from the parameter fields. When you see<br />
it change to an up/down arrow, click down and drag the dividing line up, until you can see all of the settings<br />
in the Event Values parameter field. You cannot edit these values, but you can reset them to the<br />
current settings of your virtual control surface by clicking on the button labeled Set to current event values.<br />
Drag the dividing line back down so you can see the signal flow graph again.<br />
Double-click on the next module, the one called explanation. An Annotation does not affect the sound at<br />
all; it is more like a comment in a program — you can read it, but it doesn’t affect the result (other than to<br />
make you feel extremely happy to find it there if you are trying to understand the program!) Whatever is<br />
written in an Annotation anywhere within the signal flow graph will be displayed in the virtual control<br />
surface when you play the <strong>Sound</strong>. This comes in handy when you want to include a word or two of explanation<br />
<strong>for</strong> the person using the virtual control surface.<br />
94
Next is a module named wave<strong>for</strong>m. This is a OscilloscopeDisplay, and it is another type of <strong>Sound</strong> that<br />
does not have any affect on what you hear — just on what you see in the virtual control surface. It shows<br />
the wave<strong>for</strong>m of its Input as if you were feeding the Input into an oscilloscope, and uses the name of<br />
the <strong>Sound</strong> (in this example wave<strong>for</strong>m) as the name of the oscilloscope display in the virtual control surface.<br />
Imagine a kind of virtual oscilloscope screen inside the Capybara. <strong>The</strong> OscilloscopeDisplay writes<br />
its Input on this virtual screen from left to right, until it receives a trigger. Each time it receives a trigger<br />
it starts over again at the left and continues writing the wave<strong>for</strong>m that it gets from its input. As quickly as<br />
it can (but still on trigger boundaries), the host computer reads the virtual display and plots the entire<br />
thing on the computer screen all at once. ‡<br />
So the Trigger input to the OscilloscopeDisplay should be something periodic, something that puts out<br />
a one at the beginning of each cycle in the Input wave<strong>for</strong>m; that way you will always get a picture of<br />
complete cycles of the input wave<strong>for</strong>m and the wave<strong>for</strong>m will not appear to “drift” across the screen to<br />
the right or left because it is out of synchronization with the trigger. <strong>The</strong> best <strong>Sound</strong> to do this job is the<br />
PulseTrain, because it puts out a one once per period and is zero at all other times.<br />
Double-click the <strong>Sound</strong> called trigger to see its parameters. <strong>The</strong> period of repetition is set to 256 samp.<br />
You can optionally vary the “duty-cycle”, or the amount time during each cycle when the wave<strong>for</strong>m<br />
value is above zero. Try this out right now by checking the VariableDutyCycle box, typing !Duty<br />
into the DutyCycle field, selecting the trigger <strong>Sound</strong> and choosing Oscilloscope from the Info menu. As<br />
you slowly move !Duty from 0 up to 1, you can see that the width of the “pulse” gets wider and wider.<br />
At the two extremes of 0 and 1, you don’t hear anything, because the value isn’t changing, and sound<br />
does not exist without change. Remove the check from the VariableDutyCycle box be<strong>for</strong>e proceeding.<br />
Double-click OscillatorBank74. § This generates a bank of 16 sine wave oscillators. <strong>The</strong> frequencies and<br />
amplitudes of those sine wave oscillators are supplied from SyntheticSpectrumFromArray18. Doubleclick<br />
on that <strong>Sound</strong> to see how the amplitudes and frequencies are specified.<br />
A SyntheticSpectrumFromArray takes an array of frequencies and an array of associated amplitudes and<br />
puts them together to create a spectrum <strong>for</strong> controlling an OscillatorBank or a FormantBankOscillator.<br />
You can optionally associate an array of bandwidths with the spectrum <strong>for</strong> <strong>Sound</strong>s like FormantBank-<br />
Oscillator which make use of bandwidth; in this case, though, we have left SendBandwidths<br />
unchecked because an OscillatorBank does not use bandwidth in<strong>for</strong>mation.<br />
Envelope puts an overall amplitude envelope on all partials; in this case, the overall amplitude is controlled<br />
by !Volume. <strong>The</strong> value of NbrPartials is arbitrary, but you should generally use a number at<br />
least as large as the value of NbrOscillators in the OscillatorBank; in this example, we are generating<br />
amplitude and frequency values <strong>for</strong> 16 sine wave oscillators.<br />
Amplitudes, Frequencies, Bandwidths, and Envelope are all hot parameters (indicated by the light<br />
cyan background color in the parameter fields), meaning that you can use Event Values and <strong>Sound</strong>s as<br />
elements of the array. For example, the value of Amplitudes is:<br />
!F01 !F02 !F03 !F04 !F05 !F06 !F07 !F08 !F09 !F10 !F11 !F12 !F13 !F14 !F15 !F16<br />
an array of amplitudes, each controlled by a fader in the virtual control surface.<br />
‡ Note that although both the right and the left channels of the input are written to the virtual oscilloscope display on<br />
the Capybara, only the left channel is read and displayed on the host computer. You will be able to display both<br />
channels in a future update of the software.<br />
§ By the way, if you are wondering how it got a name like that, here’s the explanation: whenever you drag a <strong>Sound</strong><br />
from the prototypes into a <strong>Sound</strong> editor or <strong>Sound</strong> file window, <strong>Kyma</strong> makes a copy of the prototype. When <strong>Kyma</strong><br />
makes a copy of the prototype, it appends a number onto the end of the prototype’s name; <strong>for</strong> example, the third<br />
time you drag an OscillatorBank from the prototype strip, it will be named OscillatorBank3. <strong>The</strong> current<br />
number <strong>for</strong> each prototype is stored in the preferences, so it will continue giving you consecutive numbers <strong>for</strong> as<br />
long as you keep the same preferences file. So, in this particular case, this was the 74th OscillatorBank used by the<br />
person who created this <strong>Sound</strong>. <strong>Kyma</strong> tacks the number onto the end of the name to help you distinguish between<br />
this <strong>Sound</strong> and others of the same class without having to immediately rename it as you are constructing the<br />
<strong>Sound</strong>. However, you should select the <strong>Sound</strong> and hit Enter to give it a more mnemonic name as soon as possible.<br />
95
Now examine the value of Frequencies:<br />
{256 samp inverse} {256 samp inverse * 2} {256 samp inverse * 3} {256 samp inverse<br />
* 4} {256 samp inverse * 5} {256 samp inverse * 6} {256 samp inverse * 7}<br />
{256 samp inverse * 8} {256 samp inverse * 9} {256 samp inverse * 10} {256 samp<br />
inverse * 11} {256 samp inverse * 12} {256 samp inverse * 13} {256 samp inverse<br />
* 14} {256 samp inverse * 15} {256 samp inverse * 16}<br />
<strong>The</strong> first value<br />
256 samp inverse<br />
is a frequency whose period is 256 samples long. ‡ <strong>The</strong> next element in the array is twice the first, the next<br />
is three times the first, the next is four times the first and so on. In other words, these are integer multiples<br />
of the first frequency, otherwise known as harmonics of the first frequency which is otherwise known as<br />
the fundamental.<br />
But why the curly braces? Because you have to give <strong>Kyma</strong> some indication of what constitutes a single<br />
element of the array. If you had not enclosed each expression within curly braces, then <strong>Kyma</strong> would have<br />
interpreted each subpart of the expression as one element in the array; in other words, 256, samp, and<br />
inverse would have been interpreted as individual elements of the array. But when you enclose it<br />
within curly braces, the expression is evaluated first and then used as a value in the array.<br />
To evaluate {256 samp inverse} or <strong>for</strong> that matter, any other expression in a parameter field, place the<br />
mouse between the open brace and 256 and click twice; this should select the entire expression within the<br />
curly braces. <strong>The</strong>n use Ctrl+Y (or Evaluate from the Edit menu) to evaluate the expression and print out<br />
its value:<br />
172.265625d hz<br />
or approximately 172.3 hz. § Once you have seen the result, hit Delete to erase the still-selected number. ‡<br />
All of the prototypes in the Spectral Sources category (including the SyntheticSpectrumFromArray) generate<br />
spectra in the same <strong>for</strong>mat. Do the following to get an idea of this <strong>for</strong>mat:<br />
♦ Turn down the gain of your amplifier (because the sound you are about to hear is not pleasant!).<br />
♦ Select the SyntheticSpectrumFromArray, and choose Oscilloscope from the Info menu. You should<br />
see the virtual control surface with 16 faders on it and a flat-line wave<strong>for</strong>m display.<br />
♦ Set the !Volume fader up to its maximum value of 1.<br />
‡ Recall that frequency is the inverse of period. <strong>The</strong> easy way to remember this is to recall that frequency is cycles-persecond<br />
(cycles/second) and that the period of a signal is the number of seconds-per-cycle (seconds/cycle).<br />
§ <strong>The</strong> “d” at the end of the number indicates that this is a double-precision floating point number, where doubleprecision<br />
gives you 12 significant digits instead of the normal 6 significant digits you get with a regular floating<br />
point number.<br />
‡ Since you can evaluate expressions in <strong>Kyma</strong>, you can use it as a calculator. Create a new text file using New… from<br />
the File menu, and select Text as the file type. Save the file on your disk as kymacalc.txt or kyma calculator.<br />
Now type in the expression:<br />
51.75 * 0.07<br />
select it, and use Ctrl+Y to evaluate it. If you have some <strong>for</strong>mulae that you use a lot, enclose them within doublequotes<br />
so you can keep them around in this file and be able to evaluate just one of them at a time. For example,<br />
enter<br />
“(9.0/5.0) * 100.0 + 32.0”<br />
and click twice between the open-quote and the open parenthesis to select everything within the double-quotes.<br />
<strong>The</strong>n use Ctrl+Y to evaluate the expression. By substituting the current temperature in Celsius <strong>for</strong> 100.0, you can<br />
use this expression to tell us how cold or hot it is where you are in terms of Fahrenheit.<br />
So now you have a little <strong>Kyma</strong>-calculator to do quick arithmetic calculations on the side as you need them, do your<br />
accounting, compute your income taxes, compute the phase of the moon, or whatever…<br />
96
Now, try the following:<br />
♦ Bring up !F1, the amplitude of the first harmonic to about half way. (You should see periodically<br />
spaced vertical lines)<br />
♦ Bring up the amplitude of !F8, the 8th harmonic to about 3/4 of the way up.<br />
♦ Set !F4 to about 1/4 of the way up.<br />
♦ Set !F12 to its full amplitude of 1.<br />
What you see is a picture of the spectrum repeated 32 times across the width of the oscilloscope display.<br />
In fact, you should be able to create a kind of “shape” using the fader settings and see it repeated in the 32<br />
spectra. Try this right now. Set !F1 to its maximum value, !F2 to just slightly less than that, !F3 to<br />
slightly less, and so on until !F15 is just above zero and !F16 is set to zero. You should see a kind of<br />
sawtooth shape repeated 32 times in the oscilloscope display.<br />
Cautiously bring up the gain on your amplifier (not too fast or your ears will be very sorry). You should<br />
hear a very high pitch. How high? Well, the period is 16 samples long. So this seems like the perfect opportunity<br />
to employ your <strong>Kyma</strong>-calculator text file. Enter the expression:<br />
16 samp inverse<br />
select it, and use Ctrl+Y to evaluate it and see what the frequency is in hertz.<br />
<strong>The</strong> output of the left channel of the SyntheticSpectrumFromArray is:<br />
amplitude1, amplitude2, ... amplitude16<br />
repeated every 16 samples. <strong>The</strong> right channel (not shown on the oscilloscope) is:<br />
frequency1, frequency2, ... frequency16<br />
We take a closer look at this kind of spectrum <strong>for</strong>mat later on, in the section called Live Analysis, Resynthesis<br />
on page 131.<br />
But <strong>for</strong> now, take a moment to try out the other audio demonstrations (or make a note to come back to try<br />
these later, once you have finished the rest of these tutorials). For some of the examples, you may need to<br />
click the grow box on the virtual control surface in order to be able to read all of the text and have more<br />
detailed control of the virtual faders.<br />
97
Backgrounds, Textures<br />
<strong>Sound</strong>s in this file are useful <strong>for</strong> generating dense, evolving, and spectrally rich textures.<br />
For example, select and play the <strong>Sound</strong> called tornado sirens. Using the virtual control surface, try making<br />
gradual adjustments to the following parameters, and jot down what effect changes to that parameter<br />
have. Return each parameter to its approximate original position be<strong>for</strong>e proceeding to adjust the next parameter,<br />
so you can hear their individual effects:<br />
!Pan<br />
!Density<br />
!Frequency<br />
!Cycles<br />
!FrJitter<br />
!PanJitter<br />
!DurJitter<br />
SampleCloud Example<br />
Play the <strong>Sound</strong> called emerging intelligibility and double-click on it to open an editor. Open the entire<br />
signal flow graph by holding down the Command or Control key and clicking the tab on the left side of<br />
the rightmost <strong>Sound</strong>:<br />
If you double-click the rightmost <strong>Sound</strong>, you’ll see that this is a Mixer of two SampleClouds bearing the<br />
strikingly original names cloud1 and cloud2.<br />
Double-click cloud1 to have a look at its parameters. This SampleCloud is going to operate on a sample<br />
called virtual DEF granulating it by applying the sample called gaussian as the envelope on each<br />
individual grain.<br />
<strong>The</strong> SampleCloud picks short segments of GrainDur duration from the sample file indicated in the Sample<br />
field at the position indicated by TimeIndex. To each of these grains, it applies an amplitude<br />
envelope whose shape is indicated by GrainEnv. <strong>The</strong> number of grains that can be playing at any one<br />
time is controlled by Density up to the maximum indicated in MaxGrains. Pan controls the stereo position<br />
of the grains, and Amplitude gives an overall amplitude <strong>for</strong> the entire cloud of grains. Time-<br />
Index, GrainDur, and Pan can each be assigned some amount of random jitter in their values, so there<br />
can be some variation in where each grain is taken from the sample, how long each grain lasts, and where<br />
it is placed in the stereo field.<br />
98
TimeIndex controls the location where grains will be chosen within the sample called virtual DEF,<br />
with -1 marking the beginning of the sample, 0 marking the middle, and 1 marking the end. In this example,<br />
TimeIndex is set to:<br />
1 repeatingFullRamp: (10 s)<br />
which means that it changes from -1 to 1 over the course of 10 seconds and then repeats. <strong>The</strong> effect of<br />
this is to move in normal time order through the sample from beginning to end and then to wrap around<br />
to the beginning again.<br />
However, this nice orderly progression through the sample is interfered with by the TimeIndexJitter<br />
parameter, controlled here by another <strong>Sound</strong> called expDown. TimeIndexJitter is the amount of random<br />
jitter added to the position given by TimeIndex. In other words, its value is an indication of how<br />
much variation there should be in exactly where the grains are chosen from the sample.<br />
Let’s take a look at expDown, but first, in the interest of saving your speakers, turn your gain on you amplifier<br />
all the way down. <strong>The</strong>n select expDown in the signal flow graph, and plot its shape by choosing<br />
Full wave<strong>for</strong>m from the Info menu. Un<strong>for</strong>tunately expDown lasts <strong>for</strong> 60 seconds, so you can run and get<br />
yourself something to drink while it plays and plots its full wave<strong>for</strong>m on the screen. When you get back<br />
from your break, you can see from the full wave<strong>for</strong>m of expDown that the amount of random jitter in the<br />
TimeIndex starts out high and decreases exponentially over the course of 60 seconds until it is almost<br />
zero. In other words, at the beginning of this <strong>Sound</strong>, grains could be taken from anywhere within the<br />
sample (because the jitter amount is large), but by the time 60 seconds have gone by all the grains are being<br />
chosen from around the current value of TimeIndex.<br />
expDown also controls the random variation in grain duration, so initially, there will be a lot of different<br />
duration grains, but by the end, all the grains should be about 0.1 seconds long. Similarly <strong>for</strong> Pan: the<br />
grains could start out anywhere in the stereo field, but by the end, they are all being placed about a<br />
quarter of the way towards the left speaker.<br />
Density, on the other hand, is controlled by a <strong>Sound</strong> called expUp, so we can make a reasoned guess<br />
that the density of grains per second is going to exponentially increase over the duration of this <strong>Sound</strong>,<br />
with the density starting out very sparse and ending up almost continuous.<br />
Flip back and <strong>for</strong>th between cloud1 and cloud2 to see if you can detect how the parameters differ. (Hint:<br />
one of them is a parameter we haven’t discussed yet…)<br />
Seed is used to “seed” or start the random number generator. By giving each of these two SampleClouds<br />
a different seed, we can ensure that they will not be exact duplicates of each other, because the stream of<br />
random numbers used <strong>for</strong> parameter jitter will be unique <strong>for</strong> each cloud. Thus, by adding them together<br />
in the Mixer, we can get a higher maximum density of grains at any one time (in this case 50 at a time).<br />
<strong>The</strong> other parameter that is different between the two clouds is Pan, meaning that one of the clouds will<br />
tend to be toward the left and the other will tend to be towards the right in the stereo field.<br />
Modifying the SampleCloud<br />
Close this <strong>Sound</strong>, create a new <strong>Sound</strong> file window , drag a copy of emerging intelligibility into the new<br />
window, and double-click on it to edit. Any time you drag a <strong>Sound</strong> from one window to another<br />
(including from the prototypes or the <strong>Sound</strong> editor) you are automatically dragging a copy of that <strong>Sound</strong>,<br />
not the original. So you can modify this new one without concern that you might also be changing the<br />
original.<br />
99
Edit cloud1, setting the parameters as follows:<br />
Parameter Value<br />
Duration on<br />
Amplitude !Amp<br />
TimeIndex 1 repeatingFullRamp: ((!Rate * 100) s)<br />
TimeIndexJitter !TJitter<br />
GrainDur !GrainDur s<br />
Density !Density<br />
Play cloud1 and adjust the parameters in the virtual control surface. Try the following initial settings:<br />
Fader Value<br />
!Amp 0.3<br />
!Density 0.4<br />
!GrainDur 0.1<br />
!Rate 0.6<br />
!Tjitter 0.0<br />
Experiment with adjusting each of these parameters, one at a time. !Rate controls the speed at which the<br />
TimeIndex moves from -1 to 1 using the repeatingFullRamp function. <strong>The</strong> maximum amount of<br />
time it takes is 100 seconds, and the minimum is 0 seconds (i.e. as fast as possible).<br />
Double-click on cloud2 and set all of its parameters to the same values as the parameter values in cloud1.<br />
<strong>The</strong> quick way to do this is to drag the cloud1 icon into each of the parameter fields of cloud2, one by one.<br />
(You can use this little trick with any two <strong>Sound</strong>s that have parameter names in common).<br />
Change the Sample parameter of both cloud1 and cloud2 to Violin (or to one of your own samples).<br />
Play the mix of cloud1 and cloud2 and adjust the parameters to your liking. To save these settings, drag a<br />
Preset from the MIDI In category of the prototypes onto the line between the Mixer and the output<br />
speaker icon. Double-click the Preset and press the button called Set to current event values. From now<br />
on, when you play the Preset, it will set all of your parameters to those initial values.<br />
With Preset selected, press Enter, and enter a descriptive name <strong>for</strong> the modified <strong>Sound</strong>. <strong>The</strong>n close the<br />
<strong>Sound</strong> editor, and save the <strong>Sound</strong> file window in the folder with your other <strong>Sound</strong> file.<br />
100
Compression, Expansion<br />
Compression<br />
Expansion<br />
Other Effects<br />
<strong>The</strong> <strong>Sound</strong>s in this file are examples of using the DynamicRangeController (DRC) module to compress or<br />
expand the dynamic range of another <strong>Sound</strong>. <strong>The</strong> DRC per<strong>for</strong>ms a time-varying attenuation on its Input<br />
based upon the amplitude envelope of the <strong>Sound</strong> used as its side chain input.<br />
<strong>The</strong> idea of compression is to take the full range of amplitudes and compress them into a narrower range<br />
by attenuating the larger amplitudes, and then optionally scaling all of the amplitudes up so that the low<br />
amplitude parts of the signal become much louder relative to the maximum.<br />
By way of analogy, if you were listening to music through speakers and kept your hand on the volume<br />
knob of the amplifier, and turned it down whenever it got loud and turned it back up again whenever the<br />
music got soft, you would be acting as a compressor. Of course since there would be some amount of delay<br />
between when you heard the music get loud and when your reflexes actually managed to turn down<br />
the volume, this would work better if you could listen to the music directly over headphones and could<br />
delay the output through the speakers by some small amount. For the same reason, there is a delay parameter<br />
on the DRC, so that there is time <strong>for</strong> the DRC to attenuate sudden changes in the amplitude<br />
envelope.<br />
You can use a compressor to prevent an input from ever getting too loud; <strong>for</strong> an example select orig,<br />
limiter (Info-Full wave<strong>for</strong>m), and choose Full wave<strong>for</strong>m from the Info menu. Another application of<br />
compressors is removing unwanted amplitude variations, caused, <strong>for</strong> example, by per<strong>for</strong>mers moving<br />
around with respect to the microphone (plot the full wave<strong>for</strong>m of orig, smoothed out (Info-Full wave<strong>for</strong>m)<br />
as an example).<br />
<strong>The</strong>re is also a characteristic timbre to compressed sounds, and it can make percussive and plucked string<br />
sounds seem, psychoacoustically, louder or “punchier” by reducing the difference between their sharp<br />
attacks and quick decays — in effect stretching out the decay time so that the sound stays louder <strong>for</strong> a<br />
longer period of time.<br />
For an explanation of the DRC parameters, find the DynamicRangeController in the Dynamics category<br />
of the prototypes. Select it, and then choose Describe <strong>Sound</strong> from the Info menu. Leave that window<br />
open, and play the <strong>Sound</strong> called Compressor w/hot controls in the compression, expansion <strong>Sound</strong><br />
file window. <strong>The</strong>n you can experiment with different parameter settings.<br />
Expansion (not too surprisingly) is like the opposite of compression; it takes amplitudes that might have<br />
been very close together in the original amplitude envelope, and spreads them further apart in the amplitude<br />
envelope of the output. For example, you might want to take all amplitudes below some noise<br />
floor and specify that they should be mapped to zero amplitude (or close to zero amplitude), creating a<br />
kind of “noise gate” to remove unwanted background noise when it is softer than the desired signal. Examine<br />
the <strong>Sound</strong> called noise gate to see an example of this.<br />
Experiment with the <strong>Sound</strong> called Expander w/hot controls to hear the effect of different parameter settings.<br />
By using different <strong>Sound</strong>s at the side chain and the input, you can create other effects like ducking, gating,<br />
or de-essing.<br />
Take a look at the <strong>Sound</strong> called Ducking. It is set up as a compressor with a speaking voice as the side<br />
chain and a violin sample as the Input. Whenever the speaking voice is triggered, the violin sample<br />
“ducks” behind it into the background.<br />
use voice to gate another sound is similar except that it is set to expand instead of compress, so when the<br />
voice is triggered, it opens the gate on the Noise input, and when the voice is silent, the gate is closed.<br />
101
In pick out unvoiced the EX version of a sample is used as the side chain and the original sample is used<br />
as the Input to an expander. Since EX files emphasize the high end of the spectrum, only the highs open<br />
the gate. As a result, only the consonants make it through the gate, the vowels are blocked out. In virtual<br />
lisp, pick out unvoiced is used as the side chain, and the original sample is used as the Input to a compressor.<br />
As a result, the consonants are suppressed and the vowels pass through unattenuated.<br />
Live lisper uses a LiveSpectralAnalysis to pick out the unvoiced parts of a GenericSource and uses that as<br />
the side chain to a compressor with the same GenericSource as Input. Try this out on the default speech<br />
sample, and then try playing it again, this time choosing the live input, so you can try removing the consonants<br />
from your own voice.<br />
102
Cross Synthesis<br />
<strong>The</strong> idea of cross synthesis is to track a parameter of one sound and use it to control that same parameter<br />
or a different parameter in another sound. <strong>The</strong> result is the superimposition of some of the characteristics<br />
of one sound onto another.<br />
Simple Cross Synthesis<br />
Double-click track freq & amp and open the signal flow graph completely by holding down the Command<br />
or Control key while clicking on the arrow tab on the left edge of the rightmost <strong>Sound</strong>. To make it<br />
clearer, drag the GenericSource further to the left, and position 0 cascade and spectrum <strong>for</strong> fmnt oscils so<br />
they are not on top of each other.<br />
Select GenericSource25 and play it. <strong>The</strong>n select track freq & amp and play it. Can you tell what is going<br />
on (especially given that preface in the first paragraph)?<br />
<strong>The</strong> rightmost <strong>Sound</strong> is a VCA since it imitates a “voltage-controlled amplifier” (actually more like a 4quadrant<br />
multiplier). In actuality, all it does is multiply its two inputs — synthetic ah and boost amp env.<br />
Follow the boost amp env thread. boost amp env itself is a Gain that boosts its input by eight times. Its<br />
input, amp fol is an AmplitudeFollower. Double-click it to see its parameters. To read a description of<br />
how this kind of <strong>Sound</strong> works, click on the italicized label Amplitude Follower in the lower right corner<br />
of the parameter fields. This opens a help window containing a description of the <strong>Sound</strong> and each of its<br />
parameters.<br />
After you have read the description of what the AmplitudeFollower does, select the GenericSource25, and<br />
use Full wave<strong>for</strong>m from the Info menu to see how the amplitude changes over time. Leave that window<br />
open, select amp fol, and plot its full wave<strong>for</strong>m. Line up the two windows, one below the other to compare<br />
them.<br />
Because of the absolute value, the output of the AmplitudeFollower is all above zero. Because of the averaging,<br />
it is a little sluggish in its reaction time. For example, at around 0.7 seconds, there is a big spike in<br />
the unprocessed wave<strong>for</strong>m (the “tch” in “virtue”), but in the amplitude envelope, this spike never gets<br />
very large, because the AmplitudeFollower is averaging over 0.1 seconds. Try changing the TimeConstant<br />
to one tenth of its value: 0.01 s. <strong>The</strong>n plot the output of the AmplitudeFollower and compare the<br />
size of the spike. By decreasing the TimeConstant, you can make the envelope respond to shorter features<br />
in the wave<strong>for</strong>m. Take note of the minimum and maximum values written at the top of the<br />
wave<strong>for</strong>m window. That should explain why we needed to feed the output of the AmplitudeFollower<br />
into a Gain be<strong>for</strong>e using it as an amplitude envelope on synthetic ah.<br />
103
Go back and double-click on synthetic ah now to follow that thread. This is a FormantBankOscillator<br />
whose Frequency is<br />
freqTrk L * SignalProcessor sampleRate * 0.5 hz<br />
<strong>The</strong> frequency seems to be coming from the <strong>Sound</strong> called freqTrk … but what does the rest of that line<br />
mean? Recall that the output of a <strong>Sound</strong> is always in the range of (-1,1), and in the case of the FrequencyTracker<br />
it is within an even narrower range of (0,1). But frequencies are in a larger range: 0 hz to half<br />
of the sampling rate. (Remember, this is a digital system, so the highest representable frequency is half of<br />
the sampling rate). By multiplying by half of the sampling rate, we assure that whenever freqTrk is at its<br />
maximum value of 1, the frequency will be half of the sampling rate:<br />
SignalProcessor sampleRate * 0.5<br />
This little expression is so handy that we put it in the list of hot parameters, so you can simply paste it<br />
into a parameter field rather than having to type it. Try it now by doing a Ctrl+H (hot paste). <strong>The</strong> second<br />
item on the list is Half the sampling rate.<br />
Double-click freqTrk now. This <strong>Sound</strong> is trying to track the fundamental frequency of its input. <strong>The</strong> more<br />
you know about the frequency range of the Input, the better it can do at tracking the fundamental frequency.<br />
In this case, we know the Input is within the range of 3a to 4c, so entering those as the Min-<br />
Frequency and MaxFrequency respectively, helps the frequency tracker avoid octave errors. As far as<br />
all the other parameters, it is best to leave those at their default values.<br />
This is a synthesized sound whose frequency and amplitude envelopes come from a sampled sound — a<br />
simple example of cross synthesis.<br />
More Amplitude Followers!<br />
Imagine taking the GenericSource and feeding it into a bank of 3 filters, so that one filter covers the low<br />
frequencies, one passes the midrange, and the last one’s covers the high frequencies.<br />
Source<br />
104<br />
LPF<br />
BPF<br />
HPF<br />
Now imagine putting an amplitude follower on the output of each of those filters. That way, the first envelope<br />
would show how much energy was in the lower frequencies, the second would show how much<br />
energy was in the midrange, and the last one would show how much energy was in the high frequencies,<br />
each one showing how that energy was changing over time.<br />
Source<br />
LPF<br />
BPF<br />
HPF<br />
Amp Follow<br />
Amp Follow<br />
Amp Follow<br />
And finally, imagine multiplying each of those envelopes by a synthesized signal, just as we did with the<br />
synthetic ah. Instead of a FormantBankOscillator though, imagine multiplying by the output of three<br />
different filters (independent of the first three filters, but with the same settings) with a mix of white noise<br />
and a harmonically-rich buzz oscillator as their input.
Classic Vocoder<br />
As a final step, imagine adding the outputs from all three filters together using a mixer:<br />
Source<br />
Noise+Buzz<br />
LPF<br />
BPF<br />
HPF<br />
LPF<br />
BPF<br />
HPF<br />
105<br />
Amp Follow<br />
Amp Follow<br />
Amp Follow<br />
Now play Traditional vocoder-22 bands, which is pretty much what we have just described except that<br />
there are 22 pairs of bandpass filters, not just three filters as shown above.<br />
Use !Frequency to change the frequency of the buzz oscillator. !Noise crossfades between the noise<br />
and the buzz oscillator inputs so that it is purely noise at the top and purely the buzz oscillator when it is<br />
at zero.<br />
!TimeConst is the same as the TimeConstant in the AmplitudeFollower of the previous example. It<br />
controls how quickly the 22 amplitude followers will respond to changes in the filters’ outputs. Higher<br />
values will give a reverberated quality, while very small values will make the speech more intelligible.<br />
!Bandwidth is a control on the bandwidths of all 22 bandpass filters. Set the !Noise fader all the way to<br />
the top, and then gradually decrease the value of !Bandwidth, making the filters ring more and more<br />
until they are almost pure sine waves (because that is all that can fit in such a narrow band). You may<br />
have to boost !InLevel, the level of the noise input, <strong>for</strong> very narrow bandwidths because less of the signal<br />
can get through when you make the pass band so narrow.<br />
Finally, set the !Live fader all the way to one, and try speaking into the microphone. At this setting, you<br />
control the filters with your voice.<br />
This is an example of imposing the amplitude and spectral content of human speech onto some synthetic<br />
sources like noise or an oscillator. You can use the same concept to impose characteristics of human<br />
speech onto the sound made by an animal or machine. For example, try out AD-mr dophin, selecting Live<br />
when the GenericSource asks <strong>for</strong> the source. Now is your chance to tell off the smart dolphin from the<br />
first example.<br />
Now Add Frequency Deviation<br />
You, the ever astute reader are no doubt asking “Aha, but what about the frequency tracking?” remembering<br />
that the original example had a frequency tracker along with the amplitude follower. It turns out<br />
that if you add frequency tracking within the band of each of the bandpass filters in the previous section,<br />
you end up with the algorithm used by the LiveSpectralAnalysis <strong>Sound</strong> and the Spectral Analysis Tool<br />
(which we will cover in depth in subsequent tutorials). <strong>The</strong> result is a set of amplitude envelopes just as<br />
be<strong>for</strong>e, along with a set of corresponding frequency envelopes. Each amplitude and frequency envelope is<br />
used to control the amplitude and frequency of a single oscillator. <strong>The</strong>n all of the oscillators are added<br />
together <strong>for</strong> the final output.<br />
Try playing piano man. This is an example of resynthesis using the frequency envelopes from one analysis<br />
and the amplitude envelopes from another. More accurately, the amplitude envelopes are gradually<br />
cross-faded from one analysis to the other.
FFT cross synth<br />
RE Analysis Tool<br />
Try playing talking <strong>for</strong>ced air heater. This <strong>Sound</strong> takes the spectral envelope of the GenericSource called<br />
modulator (take spect env of this) and, in the frequency domain, multiplies it by the spectrum of input<br />
(apply spect env *to* this). <strong>The</strong>n it applies the FFT again to bring the product back into the time domain<br />
where you can hear it as the basic sound of the input (in this case the sound of a <strong>for</strong>ced-air heater) with<br />
the <strong>for</strong>mants of the modulator (in this case the sound of speech). fft cross voice and harp is another example<br />
of this particular flavor of cross synthesis.<br />
RE, or resonator-exciter analysis, is another variation on the theme of crossing the <strong>for</strong>mant characteristics<br />
of one sound with the basic spectral content of another. <strong>The</strong> idea is to start with a sample or digital recording,<br />
and to break it down into two parts: a time-varying filter and an input signal <strong>for</strong> that filter. Once<br />
you have broken the original sound into those two components, you can begin mixing and matching<br />
components — feeding the input signal from one into the time-varying signal of another, or feeding samples<br />
or even synthetic signals into the filter.<br />
“Oh really, Mr Dolphin?”<br />
To hear an example of this kind of synthesis, play smart dolphin, and smoothly change !Index from 0 to<br />
1. Keep trying until you hear what the dolphin is saying (the trick is to move the !Index fader smoothly<br />
and to take about 1.5 to 2 seconds to get from 0 up to 1).<br />
This example is a looped dolphin sample being fed into an RE filter. As you move !Index you are<br />
changing the coefficients <strong>for</strong> the filter — controlling the rate at which this filter changes over time<br />
(somewhat analogous to controlling the rate at which you change the shape of your mouth and position<br />
of your tongue when you speak).<br />
Grain Man<br />
granulation into RE filter is an example of feeding a synthetic signal through an RE filter. Trigger the<br />
time-varying filter using the MIDI keyboard. Control the rate of the grains using !Rate on the virtual<br />
control surface. Try setting !Rate to 1, triggering the filter, and then moving !Rate to a smaller number<br />
while the filter is playing. This sounds like the audio counterpart to the graphic special effect that looks<br />
like someone turning into lots of tiny spheres and disintegrating.<br />
Wielding your Tools<br />
Let’s try creating one of these filters using the RE analysis tool:<br />
1. From the Tools menu, select RE Analysis. It opens an analysis window with several parameters.<br />
2. Use the Browse… button to choose the sample Virtual DEF from the Speech folder of the Samples<br />
folder of the Wavetables folder. It will play back once <strong>for</strong> verification.<br />
3. Leave the settings <strong>for</strong> Filter order, Update rate, and Averaging time at their default settings. <strong>The</strong> filter<br />
order corresponds to twice the maximum possible number of resonances in the final filter (some<br />
of the resonances may simply rein<strong>for</strong>ce each other rather than being at different frequencies). Later,<br />
you can try analyzing again with 64 as the order number to hear if it makes a difference.<br />
4. Click the button named Create RE only, indicate that you want to save the file in the RE folder of the<br />
Wavetables folder, and wait until the thermometer display indicates that the analysis is complete.<br />
At the completion of the analysis step, <strong>Kyma</strong> will create and play an example <strong>Sound</strong> based on the RE file<br />
just created. This is the RE filter with noise as the input.<br />
Double-click on the <strong>Sound</strong> to edit it. Change the parameters of time index <strong>Sound</strong> as follows:<br />
Parameter Value<br />
Duration on<br />
Trigger !KeyDown<br />
OnDuration 6.02 s * (1 - !Rate) * 2<br />
106
Next, edit the Noise module, changing its Duration to on.<br />
Play this edited version of the <strong>Sound</strong>, adjusting !Rate to go through the sequence of filter coefficients<br />
more slowly or more quickly.<br />
Find the <strong>Sound</strong> called alternate input to RE filter in the <strong>Sound</strong> file window. Substitute this <strong>Sound</strong> <strong>for</strong><br />
noise input in the <strong>Sound</strong> editor on Virtual DEF RE. You can do this as follows:<br />
♦ Select alternate input to RE filter<br />
♦ Copy it<br />
♦ Return to the <strong>Sound</strong> editor and select noise input<br />
♦ Paste<br />
Play the newly altered version of Virtual DEF RE. This example imposes the <strong>for</strong>mants of the speech onto<br />
the basic material of the harp gliss.<br />
Experiment with substituting some of your own, broadband samples <strong>for</strong> the harp gliss in the Generic-<br />
Source when it asks. In general, the best kinds of inputs are those which are continuous, have a narrow<br />
dynamic range, and a rich spectral content (i.e. the closer they are to continuous white noise, the better the<br />
results).<br />
107
Delays, Chorusing, Reverb<br />
Delays<br />
Chorusing<br />
Think <strong>for</strong> a moment about how an echo occurs. You shout or clap your hands, sending out a sound wave<br />
that propagates out in all directions, a growing sphere emanating from your hands or mouth. It takes<br />
some time <strong>for</strong> the sound to travel (around 600 meters per second) until it reaches a cliff wall or the flat<br />
side of a building, where, like light on a mirror, it reflects back to you (having lost a little bit of its energy<br />
to friction with air molecules on its way there and back and also when it ran into the wall which absorbed<br />
some of the energy). To say the same thing diagrammatically:<br />
Source<br />
Delay Attenuate<br />
108<br />
+<br />
Your Ear<br />
In other words, you would hear the clap directly at your ear (after a negligible delay), and then again<br />
with attenuation after it had bounced off the building.<br />
Double-click on pete’s dual delay. To see the entire structure, click the tab on the left edge of the Annotation<br />
while holding down the Control or Command key. Now, to make the structure more clear, drag the<br />
GenericSource downwards and to the left until it is clear that the GenericSource flows directly into the<br />
Mixer called direct + delays as well as into two different DelayWithFeedback modules.<br />
If you double-click each delay, you can see that the upper delay (feeding into the left channel) is 3 seconds<br />
and the lower delay (feeding into the right channel) is half that long. Try playing pete’s dual delay<br />
with the default source. First you hear the direct source, then the left echo, and then the right echo. Play it<br />
again, this time choosing Live as the source. Sing your favorite round (e.g. “Row, Row, Row Your Boat”,<br />
your favorite Bach canon, or whatever). By fitting each phrase of the round into 3 seconds, you can get<br />
the canon effect with direct sound and the two delays. Experiment with singing (or playing) arpeggiated<br />
chords into the microphone.<br />
Open up chorusing using random , and use Ctrl+click to display the entire signal flow diagram. This<br />
<strong>Sound</strong>, like pete’s dual delay has the direct source added to some delayed versions of the source. But in<br />
this case, the delays are much shorter than the 3 second and 1.5 second delays of the previous example.
Reverberation<br />
Select the GenericSource, and play it by itself. This is a recording of Pete Johnston singing his own favorite<br />
canon into pete’s dual delay. § Now compare it to the chorused version by selecting and playing<br />
chorusing using random. In the virtual control surface, type in a value of 0 <strong>for</strong> the !Delay, and hit Enter<br />
or Return. This is the source with no chorusing. <strong>The</strong>n type in a 1 and hit Enter or Return. This is the<br />
maximum chorusing.<br />
How is it that we can almost always tell the difference between one person singing and several people<br />
singing in unison? One factor is that different sound sources are different distances from your ear, so<br />
there should be slightly different delays on each per<strong>for</strong>mer. Another is that the per<strong>for</strong>mers may be<br />
slightly out of tune with each other. Both of these effects can be modeled using a DelayWithFeedback<br />
with a variable delay time.<br />
Look at the parameters of 10-25 ms. <strong>The</strong> Delay is set to 25 ms and the DelayScale (the proportion of<br />
Delay that is actually used) is<br />
0.7 + ( randLFO1 L abs * !Delay * 0.3)<br />
In other words, the maximum delay time of 25 ms is multiplied by a number that varies between 1 (0.7 +<br />
0.3) and 0.4 (0.7 - 0.3), depending on the value of !Delay and of the low frequency oscillator.<br />
<strong>The</strong> low frequency oscillator is a sine wave oscillator with a subaudio, random frequency. Take a look at<br />
randLFO1, in particular, its Frequency parameter:<br />
0.37 hz + 1 s random hz<br />
This looks a little confusing because there is a time value in a frequency field, but the time just refers to<br />
how often a new random number should be generated. <strong>The</strong> expression<br />
1 s random hz<br />
generates a random frequency between -1 hz and 1 hz and changes to a new random frequency once per<br />
second. When added to 0.37 hz, it gives the LFO a frequency range of -0.63 to 1.37 hz. A negative frequency<br />
tells the Oscillator to read through its wavetable backwards. In the sine wave case, a negative<br />
frequency sounds the same but is 180 degrees out of phase from the same frequency without the minus<br />
sign.<br />
Take a look at some of the output of randLFO1 by selecting it, choosing Full wave<strong>for</strong>m from the Info<br />
menu, and asking it to plot 10 seconds of the output. (Because the Oscillator’s duration is on, you must<br />
specify the amount of time to plot). This signal is controlling the delay, so the delay times will vary<br />
smoothly above and below some fixed delay but at a random rate.<br />
When a sound wave propagates within an enclosed space, it takes some amount of time to get from the<br />
sound source out to the edges of the enclosure where it runs into a wall; some of the energy is absorbed<br />
by the wall, and some of it gets reflected back into the room, taking some additional time to get to your<br />
ear.<br />
§ Besides being the Technical Director and <strong>Kyma</strong> guru at Tape Gallery in London, Pete does a pretty good imitation<br />
of Freddie Mercury in this recording (though he says he can do even better when he is not out of practice).<br />
109
So you could model a sound source in an enclosed space as:<br />
Delay Attenuate<br />
Source + Your Ear<br />
Delay Attenuate<br />
<strong>The</strong> delays model the amount of time it takes <strong>for</strong> the sound to get from the source to your ear, or from the<br />
source to the wall, bounce off the wall and get back to your ear. <strong>The</strong> attenuators represent how much of<br />
the sound is absorbed by wall or lost to friction in the air be<strong>for</strong>e it gets to your ear. To model a real room,<br />
you would need to add the effects of many of these delays with attenuation, and essentially that is what<br />
reverberation models are — combinations of delays and attenuators. Of course, finding just the right<br />
combination of delays and attenuators is both a science and an art.<br />
Now you, too, can dabble in the art of reverberation using some basic elements found in <strong>Kyma</strong>, especially<br />
the DelayWithFeedback, the HarmonicResonator, the ReverbSection, the filters, and one or more mixers.<br />
Several classic reverberation models are based on allpass and comb filters combined in parallel (in a<br />
mixer) or in series (one feeding into the next). For example, open the <strong>Sound</strong> example named hal chamberlin<br />
reverb, and Ctrl+click the tab on the left side of settings, so you can see the entire structure. Drag<br />
the GenericSource down and to the left until it is clear that the GenericSource feeds directly into direct+reverb<br />
and through two different networks of delays to the nested allpass filters, with the final<br />
stages of the left and the right channels going through slightly different chains.<br />
Play hal chamberlin reverb and adjust the faders in the virtual control surface. Double-click on one of the<br />
DelayWithFeedback modules to look at its parameters. You can use the DelayWithFeedback to implement<br />
either an allpass or a comb filter by selecting the appropriate filter type. Check the Prezero box so<br />
that the delay line is filled with zero when it starts up, so that you don’t hear whatever happens to be left<br />
in the delay lines from the last time. By setting Feedback to some nonzero value, you can generate many<br />
attenuated echoes in a single module, rather than having to add each delay and attenuation one-by-one.<br />
Next, take a look at homemade reverb. This is an example of HarmonicResonators used in parallel with<br />
each other. Play it first and experiment with different settings in the virtual control surface. <strong>The</strong>n doubleclick<br />
it to have a look inside. This is an example of creating a <strong>Sound</strong> structure algorithmically, using a<br />
Script.<br />
Double click DIY reverb, and look at its script:<br />
1 to: 7 do: [ :i | res start: 0 s freq: (25 + (0.5 * i )) hz].<br />
monks start: 0 s.<br />
110
This script creates seven copies of the HarmonicResonator called res, each with a slightly different value<br />
<strong>for</strong> the Frequency parameter, and one copy of monks. It feeds all eight of these <strong>Sound</strong>s (the seven reverberated<br />
and one direct copy of monks) into a mixer. To see the result of the Script, select DIY reverb, and<br />
choose Expand from the Action menu. You will see a warning that you cannot recover the original <strong>Sound</strong><br />
if you replace it with its expansion, but just ignore that <strong>for</strong> now, because we don’t have to save the<br />
changed version. You should see a Mixer with lots of res inputs:<br />
Take a look at the parameters of the res modules. Each one has a slightly different value <strong>for</strong> Frequency.<br />
You have probably also noticed that the red Event Values have changed to blue Event Sources. <strong>The</strong>se are<br />
system names <strong>for</strong> the actual MIDI controllers that the red Event Values are mapped to in the global map.<br />
In other words, the red names are just mnemonic (i.e. easier to remember) names <strong>for</strong> the system MIDI<br />
controller names. Close the <strong>Sound</strong> editor but do not keep the changes to homemade reverb.<br />
Play Euverb and experiment with the parameters in the virtual control surface. This reverberation model,<br />
contributed by Eugenio Giordani, is constructed from comb filters, allpass filters, lowpass filters, and<br />
harmonic resonators combined in series and in parallel. Open it up to study how it was created. You may<br />
want to open up one signal path at a time, because it is fairly complex. On the other hand, if you’re feeling<br />
courageous, it is a pretty impressive sight when you use Ctrl+click to open the whole thing at once!<br />
111
Disk Recording, Playback<br />
Playback<br />
Recording<br />
In <strong>Kyma</strong>, you can record to the disk and play back from the disk under the control of MIDI triggers or<br />
other triggers that depend on the audio signal (such as exceeding a threshold amplitude).<br />
For example, select 8 disk files, 3 at a time and use Ctrl+Space Bar to play it. Once it is downloaded, try<br />
playing the MIDI keyboard. § This <strong>Sound</strong> maps each of several sound effects stored on disk to a key on the<br />
MIDI keyboard. Since there are more keys than there are recordings, the key-assignment pattern repeats<br />
every 8 half steps on the keyboard. <strong>The</strong> MIDIVoice is used to specify how many of the disk files can be<br />
sounding at the same time. Unlike Samples, which must fit in the Capybara’s sample RAM, the only<br />
limitation on the duration of disk recordings is the amount of free space you have on your hard disk(s).<br />
On the other hand, you can get more polyphony using samples, and you can play through samples in<br />
reverse.<br />
Looping<br />
In theory, you cannot loop the files that you play directly from the hard disk. But you are a power user<br />
(we know because you have read this far in the tutorials)! So here is the secret: put a metronome trigger in<br />
the Trigger field. For example, take a look at pseudo looping a disk file. Its Trigger field is set to<br />
1 bpm: (60.0/2.57211)<br />
Where did this strange tempo come from? <strong>The</strong> metronome expects to see the number of beats per minute.<br />
So a setting of 60 would give us one trigger per second. If you divide that number by the duration of the<br />
recording in seconds, then the tempo will slow down <strong>for</strong> durations longer than one second and speed up<br />
<strong>for</strong> durations shorter than one second.<br />
But how can you know the duration of the recording? One way is to open the file organizer (choose File<br />
organizer from the File menu), and select the name of the file in the list. All the in<strong>for</strong>mation on the file is<br />
displayed at the bottom of the file organizer. Another quick way to get the duration is to set the Duration<br />
parameter of the DiskPlayer to 0 s. <strong>The</strong>n select the icon and choose Get info from the Info menu.<br />
Among other things, this will list the duration of the recording. In both the file organizer and the info<br />
window, you can select the duration (without the units), copy it, and paste it directly into the Trigger<br />
field as the divisor.<br />
To see an example of how to loop a section from the middle of a disk file, open looping 3 s from middle of<br />
Disk file (don’t you just love these names?).<br />
You can record any <strong>Kyma</strong> <strong>Sound</strong> to disk, including the ADInput, other DiskPlayers, <strong>Sound</strong>s that are too<br />
complex to be rendered in real time, and individual <strong>Sound</strong>s buried within a signal flow graph.<br />
Tape Recorder Tool<br />
<strong>The</strong> quickest way to record an external input to the hard disk to use the Tape Recorder Tool.<br />
Try using it now to record your voice through the microphone. Choose Tape Recorder from the Tools<br />
menu. This opens a graphic interface mimicking the control panel of a typical tape recorder.<br />
§ You can stop a disk file playback or recording the same way you interrupt the playback of any other <strong>Sound</strong>: using<br />
Ctrl+K. If you ever find yourself in a situation where Ctrl+K fails to stop the <strong>Sound</strong>, the most likely reason is that<br />
the preferences have been set to disable user interface operations whenever a disk operation is taking place. Even<br />
when this preference item has been set, there is still one other way to stop the disk playback: by holding down the<br />
Shift key and clicking the mouse. Under most circumstances, you should use Preferences from the Edit menu to<br />
set the appearance preferences to Update display during disk operations. If you are doing a critical recording and<br />
find that user interface updates are interfering with recording, then you can switch off this preference item temporarily,<br />
and remember to use shift-click if you want to interrupt the recording. Once the recording is done,<br />
remember to switch the preference back so that <strong>Sound</strong>s that access disk recordings will not behave differently from<br />
other <strong>Sound</strong>s.<br />
112
Click Filename to choose the <strong>for</strong>mat of the recording (set it to AIFF, 16-bit, mono, <strong>for</strong> example), and to<br />
choose where it should be saved on the disk.<br />
Press the red record button (symbolized by a red circle on the button face) to put the tape recorder into<br />
monitor mode. This automatically presses the pause button and monitors the input. It won’t start recording<br />
until you press the play button or unclick the pause button.<br />
In monitor mode, test the input levels. Max(L) and Max(R) show the maximum levels seen so far at the<br />
input. Click Reset to reset those to zero. Attenuate the input using the two faders on the right.<br />
When you are ready to record, press the play button (symbolized by the large rightwards pointing arrow),<br />
and start speaking.<br />
To stop recording, press the stop button on the left (symbolized by a black square at the center of the<br />
button).<br />
To listen to the recording, press the play button.<br />
When you are done, click in the close box of the window.<br />
Action-Record to disk... and File-Play<br />
This <strong>Sound</strong> file also contains examples of other variants on the record-to-disk theme. For example, you<br />
can record any <strong>Kyma</strong> <strong>Sound</strong> to the disk; you are not limited to recording the ADInput only.<br />
Try recording the Concatenation example in the prototypes (Algorithms category). To record any <strong>Sound</strong><br />
to disk, select its icon, and choose Record to disk… from the Action menu. Give this a try with the Concatenation<br />
in the prototypes. Record a 16-bit mono AIFF <strong>for</strong>mat file to your desktop, giving it a name like<br />
deleteMe so you can get rid of later and keep from cluttering up your disk. To play the recording, select<br />
Play… from the File menu, and locate deleteMe in the file dialog. This is a quick way to play disk files<br />
when you don’t need to edit them.<br />
Listen Wet, Record Dry<br />
<strong>The</strong> Action menu option is fine <strong>for</strong> recording a complete <strong>Sound</strong> to the disk, but what if you want to have<br />
the disk recording operation occur as one sub-part of a larger <strong>Sound</strong> structure?<br />
<strong>The</strong>n your best bet is to us the <strong>Sound</strong> called DiskRecorder (found in the Disk category of the prototypes).<br />
Double-click on record dry, listen processed to see how it is put together. This <strong>Sound</strong> takes a Generic-<br />
Source, feeds it into a DiskRecorder, and then processes the output of the DiskRecorder. A structure like<br />
113
Multi-tracking<br />
this could be used to let a per<strong>for</strong>mer listen and adapt to the way the sound is being processed, while<br />
capturing the dry, unprocessed per<strong>for</strong>mance on disk. This leaves you with more flexibility <strong>for</strong> editing the<br />
dry per<strong>for</strong>mance or changing something about the processing later.<br />
Double-click record dry input to see its parameters. A CaptureDuration of 0 s indicates that the entire<br />
duration of the Input should be captured. If you want to capture a specific amount of time, then enter<br />
that amount of time in this field. You may be tempted to type on here, but if you do, <strong>Kyma</strong> will warn you<br />
that your disk is not large enough to store a 2 year recording (unless you have a very, very, very large<br />
hard disk).<br />
FileName is the name of the file that you want to record into. If you don’t provide a full pathname <strong>for</strong><br />
the file name, <strong>Kyma</strong> will automatically place the file into the Program folder of the <strong>Kyma</strong> folder. To record<br />
the sound elsewhere on your disk, change the appearances preferences (click on the Appearances<br />
button after choosing Preferences from the Edit menu) to display the full path name of files. <strong>The</strong>n go<br />
back to the RecordToDisk, use the disk button next to the File parameter field to select a different file in<br />
the target folder, and replace the file name part of the full pathname, leaving the rest of the pathname unchanged.<br />
Trigger is set to 1, meaning that the recording is triggered immediately, as soon as you load this <strong>Sound</strong>.<br />
If you are recording from the microphone, though, there is one more level of protection be<strong>for</strong>e it actually<br />
starts recording to disk. <strong>Kyma</strong> will give you a metronome count-off just be<strong>for</strong>e the recording starts.<br />
<strong>The</strong> remaining parameters have to do with the <strong>for</strong>mat of the disk recording: WordSize is the number of<br />
bits-per-sample (the resolution), Format is one of the standard sample <strong>for</strong>mats, and you can choose<br />
whether you want to record two independent channels or a mono mix of the two channels of the Input.<br />
Leave this <strong>Sound</strong> editor open, so you can modify the <strong>Sound</strong> in the next section.<br />
Triggered Recordings<br />
You can probably guess from looking at the parameter names how one might go about triggering a recording<br />
rather than always having the recording start as soon as the <strong>Sound</strong> is loaded.<br />
Modify the DiskRecorder in the record dry, listen processed example as follows:<br />
♦ Set Trigger to !KeyDown (by pressing Escape and then two simultaneous keys on the keyboard)<br />
♦ Set CaptureDuration to 3 s<br />
Once the <strong>Sound</strong> starts playing, you can monitor the processed input continuously, but it will not start<br />
recording to disk until you press a MIDI key.<br />
Select and play record dry, listen processed. When it asks <strong>for</strong> a source, choose the sample called virtual<br />
DEF. <strong>Kyma</strong> may ask if you want to record over the file named deleteMe which, of course, you do.<br />
Once you hear the processed voice, hit a MIDI key. At that point it will record <strong>for</strong> 3 seconds and then<br />
stop.<br />
Check the results by holding down the Control or Command key, and clicking on the disk button next to<br />
the FileName. This is a handy way to open the wave<strong>for</strong>m editor on the file named in that field.<br />
Click in the wave<strong>for</strong>m part of the editor, select-all (Ctrl+A), and press the play button to hear what you<br />
have recorded. It should be three seconds of the unprocessed voice.<br />
Close record dry, listen processed without saving the modifications that you have just made.<br />
Recording a New Track in Synchronization to an Old One<br />
Suppose you would like to synchronize a new track to one that you recorded previously. Double-click on<br />
listen Trk1, record Trk2 to see an example of how to do this.<br />
This is a Mixer with a DiskRecorder and a DiskPlayer as its inputs, so it plays back one disk file while<br />
recording a new one. You can use this kind of structure to make a new recording while listening to the<br />
old one over headphones, <strong>for</strong> example.<br />
114
Caching<br />
Mixing Two Disk Files Down to One<br />
Double-click mix 2 files down to 1 to see how it works. <strong>The</strong> rightmost <strong>Sound</strong> is a DiskRecorder, so it does<br />
the recording of the two other files.<br />
Next is a Preset. This saves the last position of the faders, so they don’t start out at zero.<br />
Feeding into that is a StereoMix2 with hot parameters controlling the level and the pan position of each<br />
input. Each of the inputs is a DiskPlayer. So the output of the StereoMix2 is a mix of the two input files as<br />
controlled in real time by the faders in the virtual control surface.<br />
Select mix 2 files down to 1, and instead of playing it normally using Compile, load, start…, select the<br />
next option lower in the Action menu: Compile & load. This will compile the diagram and load it in the<br />
Capybara but will not start playing the <strong>Sound</strong> until you are ready.<br />
Next, click in the virtual control surface so that it comes to the front; this way you will be able to control<br />
the faders while the <strong>Sound</strong> is being recorded.<br />
Once you are ready to start recording, use Ctrl+R to “replay” the <strong>Sound</strong> that is currently loaded in the<br />
Capybara. Click the mouse at different fader levels during the recording.<br />
To audition the result, control-click on the disk button next to the FileName field in the DiskRecorder.<br />
Select-all, and use the play button to listen to the recording.<br />
Reading an Old Track, Processing it, Recording into a New Track<br />
Double-click oldtrk->processing->newtrk. Control-click the tab of the rightmost <strong>Sound</strong> to completely<br />
open up the signal flow diagram. This is an example of a DiskPlayer that is fed into some processing, and<br />
then fed into a DiskRecorder to record the processed track as a new track.<br />
Try playing this <strong>Sound</strong>, recording into our old standby, the deleteMe file. Have you been noticing that<br />
the cursor has a black dot inside during disk operations? As soon as the cursor changes back to normal,<br />
use control-click on the disk button if you would like to check the results.<br />
Caching is related to multi-tracking, but with a few useful twists. A cache is a place <strong>for</strong> storing something<br />
where you can pick it up quickly at some later point. In this case, the idea is to compute some sound<br />
ahead of time and store it somewhere on the disk where you can read it exactly when you need it. You<br />
can use DiskCaches to record the fixed, unchanging parts of your <strong>Sound</strong> to disk and free up additional<br />
processing time and sample RAM resources <strong>for</strong> the parts of the <strong>Sound</strong> that are per<strong>for</strong>med in real time.<br />
A DiskCache module can be placed anywhere within a <strong>Sound</strong> structure, and it serves as a storage place<br />
<strong>for</strong> everything to its left in the signal flow diagram. Double-click disk caching example to see an example.<br />
Double-click cache the crystals. If you play the <strong>Sound</strong> when Record is checked, it will record everything<br />
to its left into its cache. If you play it with Record unchecked, it will play back from its cache. Play it<br />
now, in order to store crystals & aliens hum tunes into the cache.<br />
Now, remove the check from Record, and play it again. From now on, it will read from the recorded<br />
cache. If you ever want to make a change to crystals & aliens hum tunes, just check the Record box to<br />
record the changed version into the cache. By using a DiskCache to save the recording, you never lose<br />
track of exactly which <strong>Sound</strong> is recorded in which file; it is always the <strong>Sound</strong> directly to the left of the<br />
DiskCache that is recorded into the file named in the FileName parameter field of the DiskCache.<br />
Play disk caching example and play along with the ice crystals on the MIDI keyboard. Any <strong>Sound</strong> that<br />
requires live input can be cached, but keep in mind that once you cache it, it is just like making a recording<br />
of your per<strong>for</strong>mance. Every time you play it back from the cache it will be the same. Sometimes this is<br />
exactly what you want — to be able to record a per<strong>for</strong>mance so that you can add other layers to it in realtime<br />
when you play it back.<br />
115
Distortion<br />
Waveshaping<br />
Clipping<br />
By applying some nonlinear processing to your <strong>Sound</strong>s, you can add extra harmonics to the output,<br />
making it spectrally richer. This is the technique behind things like frequency modulation, ring modulation,<br />
waveshaping, and even cranking your guitar amp beyond the range where it has a linear response<br />
— all in an ef<strong>for</strong>t to broaden the spectrum and avoid those pure, yet boring, sine waves.<br />
<strong>The</strong> key to producing distortion in a signal is to process it in a nonlinear way. Demonstrate this to yourself<br />
right now by opening up WS distortion. A Waveshaper uses the value of its Input as the index into the<br />
wavetable named in ShapingFunction.<br />
Try out a linear shaping function by setting the ShapingFunction parameter to FullRamp. FullRamp<br />
is a straight line from -1 up to 1. To see FullRamp, hold down the Command or Control key and click<br />
the disk button next to the ShapingFunction field; FullRamp looks like a straight line. Now select WS<br />
distortion, and choose Oscilloscope from the Info menu. Use a MIDI keyboard to play the harp sample<br />
and look at the wave<strong>for</strong>m.<br />
Next, try changing the ShapingFunction to WinSine4. Hold down the Command or Control key and<br />
click the disk button in order to see what the WinSine4 wavetable looks like; this is definitely not a<br />
straight line. <strong>The</strong>n select WS distortion and choose Oscilloscope from the Info menu. Play some low<br />
notes on the MIDI keyboard and look at the difference in the shape of the wave<strong>for</strong>m being displayed on<br />
the oscilloscope.<br />
Waveshapers are not the only way to apply a nonlinear process to a signal. One really simple way is to<br />
simply turn it up too loud. This clips the signal, and introduces sharp edges (and thus new harmonics) in<br />
the wave<strong>for</strong>m where be<strong>for</strong>e there were only smooth curves.<br />
Take a look at sub-fundamental distortion. Notice that your sound here is fed into a Gain and that the<br />
Gain is set to 10. Select the Gain, choose Oscilloscope from the Info menu, and watch what happens to<br />
the shape of the wave<strong>for</strong>m as you increase the !Volume fader. This clipped signal is fed into LPF which<br />
filters out all but the lowest frequencies. Try playing sub-fundamental distortion and adjusting !Volume.<br />
For complex signals, clipping introduces distortion products that are below the fundamental as well as<br />
above the fundamental of the signal.<br />
Frequency Modulation<br />
<strong>The</strong> reason that frequency modulation (FM) can be used to synthesize complex tones is that it, too, is a<br />
nonlinear process and adds extra harmonics where there were none be<strong>for</strong>e. In <strong>Kyma</strong>, you can use any<br />
<strong>Sound</strong> as an FM modulator, including samples or the live input. Try playing Harp FM; this uses a Celtic<br />
harp sample as the modulator on a sine wave oscillator. <strong>The</strong> higher the modulation index, the more harmonic<br />
distortion is introduced.<br />
116
EQ<br />
GraphicEQ<br />
In general, the idea of EQ (equalization) is to use filters and dynamic range control to attenuate or emphasize<br />
different ranges of a <strong>Sound</strong>’s spectrum. <strong>The</strong> original idea was to emphasize a different frequency<br />
band on each track so that when you mixed them all together, they would fall into different critical bands<br />
<strong>for</strong> the listener and would not mask each other or lose apparent loudness. It goes beyond that though,<br />
because some of the side-effects and artifacts of these techniques have become a desirable part of the<br />
overall timbre. This processing has become identified with certain styles in recorded music — additional<br />
evidence in support of one of the basic concepts behind <strong>Kyma</strong>: that sound is sound; there really is no hard<br />
and fast division between synthesis, recording, effects, mixing, EQ. At every step along the way, you are<br />
generating, shaping and sculpting the sound.<br />
All of the EQ examples have one thing in common: they split the spectrum up into separate bands and<br />
then do something different to each frequency band.<br />
It could be as simple as giving a different amplitude scale to each of the bands, <strong>for</strong> an example, play the<br />
<strong>Sound</strong> called graphic eq. This is noise being fed into the GraphicEQ <strong>Sound</strong>. Use the virtual control surface<br />
or your MIDI faders to adjust each of the faders in turn so you can hear what each frequency band sounds<br />
like.<br />
Emphasizing the Highs<br />
Now try the <strong>Sound</strong> called brittle2. After experimenting with the parameters, double-click on it to see how<br />
it works.<br />
A GenericSource is fed into a highpass filter, a bandpass filter, and a lowpass filter. <strong>The</strong> higher frequencies<br />
are compressed using the DynamicRangeController. <strong>The</strong> mid-range frequencies are delayed by<br />
!DelayMid * 10 ms, and the low end is delayed by !DelayLow * 10 ms. <strong>The</strong>n the three frequency<br />
bands are all added back together <strong>for</strong> the result.<br />
Notice that the GenericSource is also fed straight into an Attenuator called original. Take a look at the<br />
parameters of original. <strong>The</strong> GenericSource is at full amplitude whenever the !Bypass button is held<br />
117
down. At all other times, the amplitude of the unprocessed original is set to zero, so it won’t contribute to<br />
the result at all.<br />
Double-click on mid, and look at its Scale parameter:<br />
!Mid * (1 - !Bypass)<br />
This is what allows you to control the contribution of the midrange to the overall mix using the !Mid<br />
fader. Whenever the !Bypass button is held down, its value is 1; otherwise it is 0. So when !Bypass is<br />
held down, the amplitude of mid is zero, so it contributes nothing to the final result. This is a little trick<br />
that you can probably find other uses <strong>for</strong> in other circumstances. If you want an either-or condition, scale<br />
one <strong>Sound</strong>’s amplitude by !aGate and scale the other one’s amplitude by (1 - !aGate).<br />
create bypass button is a MIDIMapper used, in this case, to make !Bypass show up as a momentary<br />
button on the virtual control surface (rather than as the default fader controller). <strong>The</strong> syntax is:<br />
!Bypass is: (`Bypass type: #gate)<br />
It’s called a gate, because it stays at a value of 1 <strong>for</strong> as long as you hold it open; it doesn’t just send out a<br />
single 1 as a trigger and then return immediately to 0.<br />
Double-click the module called hi to see its parameters. This is a DynamicRangeController set up to act as<br />
a compressor. <strong>The</strong> idea is to compress the dynamic range of the signal so that there is less of a difference<br />
between the smallest and the largest parts of the amplitude envelope. It does this by tracking the amplitude<br />
envelope of the SideChain, and attenuating the Input whenever the amplitude envelope exceeds<br />
the Threshold. It is not a uni<strong>for</strong>m attenuation, however. It uses the Ratio to determine how much it<br />
should attenuate the Input.<br />
This particular Ratio value of 4/1, means that <strong>for</strong> every 4 dB increase in the amplitude envelope, attenuate<br />
the Input so that it will only increase by 1 dB. AttackTime and ReleaseTime control the<br />
responsiveness of the envelope follower on the SideChain: AttackTime the responsiveness to increases<br />
in the amplitude of the SideChain, and ReleaseTime, the speed with which the envelope<br />
follower reacts to decreases in the amplitude of the Input. <strong>The</strong> envelope follower introduces a small delay<br />
in the SideChain relative to the Input. You compensate <strong>for</strong> this by delaying the Input by the time<br />
specified in the Delay field; that way the attenuation will kick in at the right time, and not just after a<br />
change in the Input amplitude.<br />
Although it may seem counterintuitive that attenuating the strongest parts of the signal can make the signal<br />
sound louder, that is just because we haven’t gotten to the last parameter yet: Gain. Once you have<br />
compressed the range of the amplitudes, you can then apply a gain to all of the amplitudes. You can put a<br />
lot more gain on the signal without having to worry about clipping, because the largest amplitudes have<br />
been attenuated. <strong>The</strong> quieter parts of the signal are now louder relative to what they could have been be<strong>for</strong>e,<br />
which explains why the compressor emphasizes background noise, breathing, mouth clicks, etc. For<br />
percussive sounds, a compressor can effectively lengthen the amount of time that the sound is at a high<br />
amplitude be<strong>for</strong>e it decays into the background, giving the ear and the auditory system more time to<br />
register it as being loud, hence the “punchier” sound of drums or plucked strings when you put them<br />
through a compressor.<br />
Experiment with different settings on the DynamicRangeController by setting the following parameters<br />
to the following values:<br />
Parameter Value<br />
Threshold !Thresh * 0.1<br />
AttackTime !Attack * 0.1 s<br />
ReleaseTime !Rel * 0.1 s<br />
Delay !Del * 0.1 s<br />
Play the DynamicRangeController, and experiment by adjusting the faders on the virtual control surface.<br />
If you find a setting that you like, double-click on Brittle2 (the Preset module), and click on the button<br />
labeled Set to current event values. This will recall the current settings each time you play Brittle2.<br />
118
Now take a look at the input to mid, the two cascaded filters called >150 and
Envelopes<br />
In general usage, the word “envelope” is used to mean some kind of wrapper or enclosing cover around<br />
something else. In some sense, you can think of an amplitude envelope as enclosing or defining a sonic<br />
“event” or discrete “object”.<br />
First, in the interest of preserving your speakers <strong>for</strong> a little while longer, turn the gain on your amplifier<br />
down. Once your speakers are protected, play the <strong>Sound</strong> called endless sine. This is the kind of sound<br />
that is quickly relegated to the background. It sounds as if it could be the hum of a machine or a distant<br />
motor; it isn’t changing, so it seems safe to ignore it, and it almost disappears after a while. Putting an<br />
amplitude envelope on the endless sine will give it “closure”, and make it seem like a single “event” or<br />
“object”.<br />
FunctionGenerator<br />
AR and ADSR<br />
To apply an amplitude envelope to any <strong>Sound</strong>, the method is the same: multiply the <strong>Sound</strong> by the envelope.<br />
To see an example of this, double-click on apply shape of env to oscil amp. Select Function-<br />
Generator17, and choose Full wave<strong>for</strong>m from the Info menu. A FunctionGenerator reads through its<br />
wavetable exactly once each time it is triggered, so what you see in the full wave<strong>for</strong>m display is a picture<br />
of the Gaussian wavetable.<br />
Leave that full wave<strong>for</strong>m window open, and return to apply shape of env to oscil amp; this is a Product<br />
module. Select it, and choose Full wave<strong>for</strong>m from the Info menu. What you see is the shape of the Gaussian<br />
wavetable applied to the amplitude of the sine wave oscillator. (Actually, it looks more like the<br />
Gaussian shape mirrored across the zero axis, because the sine wave is both positive and negative, and<br />
when you multiply the positive value from the Gaussian curve by a negative value from the sine wave,<br />
you end up with a negative number).<br />
Double-click on a different shape. As you can see, this is the same configuration: a Product with two inputs:<br />
sine wave and ADSR env. Select ADSR env , and choose Full wave<strong>for</strong>m from the Info menu. <strong>The</strong>n<br />
double-click ADSR env to see its parameters.<br />
An ADSR envelope is based on the idea of an envelope that will be controlled by a trigger. You specify<br />
how long it should take to reach the maximum amplitude when the trigger is first “attacked”, how far it<br />
should “decay” after that initial attack and how long it should take to decay that far, what its amplitude<br />
should be while the trigger is “sustained”, and what the envelope behavior should be when the trigger is<br />
finally “released”. You can see the different parts of the envelope clearly in the full wave<strong>for</strong>m display: the<br />
attack of 0.2 seconds, an initial decay down to 0.75 of the full amplitude over the course of 0.1 seconds, a<br />
flat sustain portion, and finally a release that takes 0.5 seconds.<br />
In this example, the envelope is triggered once and has a finite duration, so the sustain is computed by<br />
<strong>Kyma</strong> as the total duration minus the sum of the attack, decay, and release durations.<br />
GraphicalEnvelope<br />
Play the <strong>Sound</strong> called graphic env chopper, and use the MIDI keyboard to select different pitches and get<br />
a feel <strong>for</strong> how it behaves. Double-click on it to see how it is put together. Notice that there is a configuration<br />
that looks a lot like the last <strong>Sound</strong> we looked at; it’s a Product with 3 detuned GA saws and<br />
GraphicalEnvelope14 as its Inputs.<br />
Double-click GraphicEnvelope14 to see how it got its name. This <strong>Sound</strong> has a rubber-band style editor <strong>for</strong><br />
drawing the desired envelope shape. When you click in the Envelope field, you should see two little red<br />
arrows. <strong>The</strong>se mark the beginning and ending of a loop. Count the number of spikes or ridges between<br />
the red arrows. Make sure the original <strong>Sound</strong> is still playing, and hold down a key on the MIDI keyboard.<br />
When you press a key, it goes through the entire envelope up to the left arrow once, then loops between<br />
the arrows as long as you hold the key down, and finally when you release the key, it will go through the<br />
segment after the end-loop arrow. What it stores is not the absolute amplitudes, but the slope of each<br />
120
segment, so it will take whatever amplitude it happens to be when you release it and use the slopes of the<br />
segments following the end loop to do the “release”.<br />
Generalizing the Idea of Envelope…<br />
In <strong>Kyma</strong>, an envelope is a time-varying function that can control any of the parameters of another <strong>Sound</strong>.<br />
To control a parameter by an envelope, copy the envelope <strong>Sound</strong> (Ctrl+C), click in the parameter field,<br />
and paste the envelope <strong>Sound</strong> into the parameter field (using Ctrl+V). Actually, any <strong>Sound</strong> can be used<br />
as an envelope, because any <strong>Sound</strong> can be pasted into the parameter field to control that parameter.<br />
Look, <strong>for</strong> example, in the Frequency field of the low pass filter in graphic env chopper:<br />
lfo L * 5000 hz + 5200 hz<br />
This is using an oscillator as a kind of “frequency envelope”. Double-click on lfo to see its parameters. Its<br />
Wavetable is Buzz and its Frequency is<br />
9 s inverse<br />
If you ever want a repeating envelope, you can set the Wavetable of an Oscillator to the envelope function,<br />
and then set its Frequency to the inverse of how long it should take to go through the envelope<br />
once. Why? Because that is the number of seconds per cycle. And frequency is the number of cycles per<br />
second.<br />
121
Formants<br />
Picture a sine wave added to a delayed version of itself. If the delay time is equal to the amount of time it<br />
takes to complete one cycle of the sine wave, the delayed sine wave will rein<strong>for</strong>ce the original sine wave.<br />
If the delay time is one-half of one cycle, adding them together will completely cancel them out. To prove<br />
this to yourself, play a delay is a filter, and experiment with different delay times. <strong>The</strong>n play different<br />
delays cancel different freqs to see how different frequencies are affected by the same delay time.<br />
Now picture lots of sine waves bouncing around inside a violin or inside your vocal cavity. Because the<br />
reflections are delayed and then added back to the original source, the same thing happens inside your<br />
head as happens in the delayed sine waves experiment we just did: some frequencies are boosted and<br />
others are attenuated. <strong>The</strong>se characteristic boosts and attenuations in the spectrum are called <strong>for</strong>mants,<br />
and they tend to be independent of the fundamental frequency of the sound, acting more as a fixed filter<br />
on the basic glottal pulse (which can change wildly in frequency).<br />
In general, someone with a large head (an alien giant, <strong>for</strong> example) will have lower frequency <strong>for</strong>mants,<br />
and someone with a tiny head (say, a munchkin) will have higher frequency <strong>for</strong>mants. So, if you move<br />
the <strong>for</strong>mants without changing the fundamental frequency, you can make a voice more menacing and<br />
dangerous-sounding by lowering its <strong>for</strong>mants or make it more cute and less dangerous by raising its<br />
<strong>for</strong>mant frequencies. Prove this to yourself by playing low menacing (SID6.7) § and munchkin and talking<br />
into the microphone. You feel like saying different things through the low menacing voice than you do<br />
through the munchkin voice.<br />
Play shift <strong>for</strong>mants and experiment with the !Formants fader. <strong>The</strong> <strong>Sound</strong> called female shift <strong>for</strong>mants<br />
does a similar thing but to a live input. In both cases, this technique per<strong>for</strong>ms a spectral analysis of the<br />
voice, uses the SpectrumFrequencyScale to raise or lower the frequencies while leaving the <strong>for</strong>mants in<br />
the same place, and then uses a ScaleAndOffset to scale both the frequencies and the <strong>for</strong>mants back up to<br />
the original fundamental frequency.<br />
Next try ring mod voice. This one also works on live input and uses single sideband ring modulation to<br />
accomplish a similar result.<br />
Yet another way to accomplish a similar result is use the Vocoder. Try shift <strong>for</strong>mnts (vocoder). Like the<br />
other examples, this one shifts the <strong>for</strong>mants without changing the fundamental pitch, but in this case the<br />
pitch is a monotone, because it is supplied by a sawtooth oscillator.<br />
Synthesizing Formants<br />
You can also synthesize <strong>for</strong>mants (rather than shifting around the ones that are already there) using the<br />
TwoFormantElement or the FormantBankOscillator. Try playing crossfade <strong>for</strong>mant filter params, and<br />
experiment with the !Vowel fader. Double-click on crossfade <strong>for</strong>mant filter params to see how it is constructed.<br />
<strong>The</strong> idea behind it is that a spectrally rich signal is fed into two filters which are combined in<br />
parallel. More specifically, in this <strong>Sound</strong>, a sawtooth oscillator feeds into two TwoFormantElements<br />
named <strong>for</strong>mants 1 & 2 and <strong>for</strong>mants 3 & 4. <strong>The</strong> outputs from these two <strong>for</strong>mant filters are added together<br />
in a Mixer called 4 <strong>for</strong>mants. <strong>The</strong>n the Mixer is fed into a MIDIMapper in which !Vowel is mapped to<br />
the range of 0 to 7 and a grid size or step size of 1.<br />
Double-click on <strong>for</strong>mants 3 & 4 to see how its parameters are controlled. <strong>The</strong> frequency of Formant1 is<br />
((!Vowel of: #(2450 2300 2450 2550 2400 2200 2150 2200)) smooth: 0.25 s) hz<br />
and its amplitude is<br />
((!Vowel of: #(-12 -8 -16 -26 -29 -16 -12 -19)) smooth: 0.25 s) dB<br />
§ This example was used by Francois Blaignan to process the voice of SID 6.7 in Paramount Picture's Virtuosity while<br />
Francois was still at Serafine <strong>Sound</strong> <strong>Design</strong>. Francois has since gone on to start his own sound design studio and<br />
has become the cross-synthesis guru of Hollywood.<br />
122
In both of these expressions, !Vowel is used as an index into an array of possible frequencies and amplitudes.<br />
‡ For example, if !Vowel is 0, the <strong>for</strong>mant frequency is 2450 hz and its amplitude is -12 dB (the<br />
values <strong>for</strong> the vowel A). If !Vowel is 7, the <strong>for</strong>mant frequency will be 2200 hz and its amplitude will be<br />
-19 dB.<br />
When a new frequency and amplitude are selected, they are approached smoothly over the course of 0.25<br />
seconds, rather than jumping immediately to their new values (this is due to the<br />
smooth: 0.25 s<br />
following each array.<br />
Next, play the <strong>Sound</strong> called wow, and play some low notes on a MIDI keyboard. This is a FormantBank-<br />
Oscillator synthesizing the vowels OO and A. If you open wow, you will see that it is a Formant-<br />
BankOscillator whose Spectrum comes from two, interpolated SyntheticSpectrumFromArrays: one<br />
containing the frequencies, amplitudes and bandwidths <strong>for</strong> an A, and the other containing the same in<strong>for</strong>mation<br />
<strong>for</strong> an OO. A FunctionGenerator on a Gaussian wavetable, triggered by !KeyDown, controls<br />
the interpolation between the parameters <strong>for</strong> OO and A, making a smooth transition between the two.<br />
‡ <strong>The</strong> <strong>for</strong>mant amplitudes and frequencies <strong>for</strong> these examples were found in Computer Music, written by Charles<br />
Dodge and Thomas Jerse, published by Shirmer Books.<br />
123
Frequency Scaling<br />
One of the most common modifications to apply to a sound is to change its pitch or frequency. <strong>The</strong>re are<br />
several techniques <strong>for</strong> frequency scaling, and, depending on the model you are using to synthesize the<br />
sound, each has its own set of side-effects or artifacts.<br />
DiskPlayers and Samples<br />
Granular<br />
One of the simplest and most direct techniques <strong>for</strong> modeling an acoustic sound is to put a microphone<br />
near the sound source and to record how the air pressure changes over time. This stream of air pressure<br />
measurements (known as a wave<strong>for</strong>m, a sample, a digital recording , or a disk track) is recorded in a disk file<br />
where it can later be read, value-by-value to recreate the original sound (at least the original sound as it<br />
was recorded at the one point in space where you placed the microphone).<br />
If we define the frequency of a sound (very loosely) as the rate at which the wave<strong>for</strong>m is wiggling up and<br />
down, then it follows that the faster we read the wave<strong>for</strong>m, the faster the wiggling, and thus the higher<br />
the frequency. <strong>The</strong> slower the rate at which we read the wave<strong>for</strong>m, the slower the changes in the wave<strong>for</strong>m<br />
and the lower the frequency. It also follows that the faster we read through a recording, the less time<br />
it takes to get through the whole thing; in other words, using the simple “sampling” model, you cannot<br />
change the frequency of a sound without also changing its duration.<br />
Try playing the <strong>Sound</strong> called frequency scaled disk and adjust the !Rate parameter. When you lower the<br />
Rate parameter of a DiskPlayer, you lower all the frequencies of that sound. If the original sound source<br />
had some <strong>for</strong>mants (resonant characteristics that boost the amplitudes of some frequencies and attenuate<br />
the amplitudes of others) then the <strong>for</strong>mants will effectively be lowered in frequency too. Through years of<br />
experience in listening, we associate low frequency <strong>for</strong>mants with large resonant cavities and high frequency<br />
<strong>for</strong>mants with tiny resonant cavities. That’s why a sped-up recording tends to sound like a<br />
chipmunk or some other tiny animal and a slowed-down recording tends to sound like a giant or some<br />
threateningly large animal. You can use this effect to play upon ancient instincts and associations, <strong>for</strong> example,<br />
by lowering the frequency when you want to create an ominous atmosphere or a dangerous and<br />
powerful voice, and by raising the frequency to create a sense of lightness or a “cute”, childlike voice.<br />
<strong>The</strong>re are other situations, a sampling keyboard imitating an acoustic instrument <strong>for</strong> example, in which<br />
changing the duration of the sound and changing the apparent size of the sound source are undesirable<br />
side-effects. Try the <strong>Sound</strong> called freq scaled sample. This is a single recording of a harp tone whose frequency<br />
is controlled using the MIDI keyboard pitch. Try playing the lowest note on your keyboard and<br />
then the highest. <strong>The</strong> difference in duration is pretty noticeable. One way to minimize the duration differences<br />
and timbre changes is to use several different samples, taken from different frequency ranges of the<br />
original instrument, and map them to keys or ranges of keys on the MIDI keyboard. This doesn’t get rid<br />
of the side-effects, but since any single sample is not being distorted very much, it reduces the effects.<br />
Select trb from RAM and do a Compile, load, start. <strong>The</strong>n play a scale from the bottom to the top of your<br />
MIDI keyboard. You can hear where the different trombone samples have been mapped to different key<br />
ranges. (For more detail on the KeyMappedMultiSample, see Sampling on page 161).<br />
Compare the last <strong>Sound</strong> you played to granular trb shift. Compile, load, start granular trb shift and then<br />
play a scale across the full range of the MIDI keyboard.<br />
124
Now double-click on the <strong>Sound</strong> to see how it is put together.<br />
A GenericSource is fed into a FrequencyScale <strong>Sound</strong> and a FrequencyTracker. Look at the parameters of<br />
the FrequencyScale. It takes the GenericSource and an estimate of the frequency of the GenericSource as<br />
inputs. <strong>The</strong>n it scales the frequency of the GenericSource by<br />
!Pitch hz / 4 d sharp hz<br />
which is the ratio of the frequency as supplied from the MIDI keyboard to the original frequency of the<br />
sample. Notice that both !Pitch and 4 d sharp are not frequencies but pitches, so they have to be converted<br />
into units of frequency in hertz. <strong>The</strong> ratio between two MIDI note numbers is quite different from<br />
the ratio of the two note numbers expressed in hertz; <strong>for</strong> example the ratio between 4 a and 3 a would be<br />
69/57 (about 1.2) in note numbers but 440/220 (exactly 2) in hertz. You can convert between most<br />
units of frequency or duration by typing the name of the desired units after the value in the original units.<br />
In MaxScale, enter the largest frequency ratio required. In this case it is 8/1 or a maximum shift of 3<br />
octaves up.<br />
For Window, select a wavetable that can serve as a nice, smooth granular amplitude envelope. In this case<br />
we have chosen Hann <strong>for</strong> a Hanning window. To see the shape of the grain envelope, hold down the<br />
Control or Command key and click on the disk button to the right of the Window parameter field. Any<br />
smooth up and down shape like this can be used as the Window, <strong>for</strong> example, you can try Gaussian, and<br />
even LinearEnvelope out to hear how they might affect the sound.<br />
How is Window function used? Take a look at the wave<strong>for</strong>m of the trombone.<br />
125
It looks very much like a series of impulse responses (as we saw in the earlier tutorial on filtering).<br />
<strong>The</strong> FrequencyScale works best on sounds that can be modeled as a source of impulses hitting a resonant<br />
filter, <strong>for</strong> example the trombone (flapping lips generate an impulse that is fed into the filter of the body of<br />
the instrument) or the human voice (glottal pulses passing through the resonant cavity of the mouth and<br />
lips). <strong>The</strong> FrequencyScaler looks <strong>for</strong> what it thinks are individual impulse responses in the wave<strong>for</strong>m and<br />
creates little grains by putting an amplitude envelope (shaped like the Window function) on each one.<br />
<strong>The</strong>n, to lower the frequency, it stretches these grains further apart so they occur less often. And to raise<br />
the frequency, it pushes the grains closer together so that they occur at a faster rate. This is the same as<br />
decreasing or increasing the rate of the impulses without changing the impulse response of the filter. If the<br />
impulse-into-filter model is a good match <strong>for</strong> the way the sound was originally produced, then the FrequencyScaler<br />
will do a good job of changing the frequency without changing the duration or moving the<br />
<strong>for</strong>mants around. Why? Because the <strong>for</strong>mant structure is inherent in the filter or the resonator and can be<br />
inferred from the way it responds to a single impulse. Since this method does not change the shape of the<br />
impulse response, it does not change the <strong>for</strong>mants.<br />
<strong>The</strong> FreqTracker input is used to get an idea of where to find the impulses in the Input. <strong>The</strong> Delay is<br />
to compensate <strong>for</strong> the delay through the FrequencyTracker; it delays the Input by the same delay introduced<br />
by the FrequencyTracker, so that the frequency estimate lines up with the current Input. <strong>The</strong><br />
minimum delay you should use is 256 samp and the maximum is 20 ms. Within those boundaries you<br />
should use something close to the period of the lowest frequency you expect to see in the input. Remember<br />
that to convert a frequency to a period, type the frequency in hertz followed by the word “inverse”,<br />
<strong>for</strong> example<br />
4 d sharp hz inverse<br />
<strong>The</strong> quality of the frequency scaled sound depends on the quality of the frequency estimate, so it is important<br />
to start with the best possible frequency estimate. Double-click the FrequencyTracker to see its<br />
parameters. <strong>The</strong> most important parameters to adjust are MinFrequency (the lowest frequency you expect<br />
to see in the Input) and MaxFrequency (the highest frequency). <strong>The</strong> narrower you can make this<br />
range, the better your frequency tracking will be. In this case, we know that the original frequency of the<br />
single trombone tone was 4 d sharp, so the range of 4 d to 4 f is pretty safe!<br />
All of the other parameters are pretty nonlinear (in that tiny changes in these parameters can destroy the<br />
frequency tracking), so it is recommended that you do not change these. You can experiment with more<br />
or fewer Detectors, with the caveat that more is not necessarily better in terms of the effect this will<br />
have on the tracking.<br />
This technique has one more advantage (even beyond the fact that it does not affect the duration or the<br />
<strong>for</strong>mant structure), because it can work in real time on live input. For example, play the <strong>Sound</strong> called<br />
scale w/Frequency and try various settings of the !Frequency fader. If you put !Frequency low<br />
enough, you will hear the individual grains. Play it again, this time choosing live input in the Generic-<br />
Source dialog, and try frequency scaling your own voice in real time. You may have to edit the <strong>Sound</strong> to<br />
adjust the MinFrequency and MaxFrequency parameters of the FrequencyTracker to more closely<br />
match your own range.<br />
Wavetable Synthesis<br />
If you model a sound as oscillators reading from wavetables, then you can select durations and frequencies<br />
independently of one another; frequency is controlled by the size of the increment you use in<br />
stepping through the wavetable, and duration is simply how long the oscillator is left on.<br />
For example, wavetable frequency scale uses a GA resynthesis of three different trombone tones mapped<br />
to two different ranges of keys. <strong>The</strong> lower range has 2 c at its low end, 3 c sharp at its high end, and fills<br />
in the intermediate timbres by continuously morphing between those two endpoints. <strong>The</strong> higher range<br />
has 3 c sharp as its low endpoint, 4 d sharp as its high end and, similarly, morphs between the two to<br />
get the intermediate wave<strong>for</strong>ms and envelopes.<br />
See Wavetable Synthesis on page 185 to see how to create a GA analysis/resynthesis from the Tools<br />
menu.<br />
126
Additive Synthesis<br />
If you resynthesize from an analysis file by adding together many sine wave oscillators, then you can<br />
scale the frequency by simply scaling the oscillator frequencies up or down. <strong>The</strong> rate at which you read<br />
through the amplitude and pitch deviation envelopes is independent of the frequency of the oscillators,<br />
so you can scale the frequency without affecting the duration.<br />
Try additive synth freq scale as an example of reading an analysis from RAM and using it to control sine<br />
wave oscillators whose frequency you can scale up and down.<br />
<strong>The</strong> analysis does not have to be read from the disk, it can be generated in real time from a live input. Try,<br />
<strong>for</strong> example, live analysis/resynth & freq scale first with the default Virtue sample, and the second<br />
time, choosing live input <strong>for</strong> the GenericSource and trying it on your own voice.<br />
Double-click live analysis/resynth & freq scale to see how it is put together.<br />
A GenericSource feeds into a LiveSpectralAnalysis which controls an OscillatorBank. Double-click the<br />
LiveSpectralAnalysis to view its parameters. It is set <strong>for</strong> fundamental frequencies above 2 f (or 87 hertz)<br />
and BetterFreq. <strong>The</strong> LiveSpectralAnalysis uses a bank of bandpass filters to analyze the input, and<br />
Response is a control on the bandwidth of those filters: BestFreq is the narrowest bandwidth, then<br />
BetterFreq, etc., with BestTime being the widest bandwidth. <strong>The</strong> FrequencyScale is set to<br />
!Frequency * 1.5 + 0.5<br />
which means it ranges from one octave below the original pitch (0.5) to one octave above (2), depending<br />
upon the value of !Frequency. Since Harmonic is not checked, this is not doing an harmonic analysis,<br />
so none of the rest of the parameters are used.<br />
As you can hear, this method does not affect the duration, but it still suffers from the “chipmunk” syndrome,<br />
since it scales all oscillators without changing their amplitude (and thus effectively shifts the<br />
apparent <strong>for</strong>mants up or down along with the fundamental frequency).<br />
Fixed Formants<br />
If you have a high voice, play live resynth w/freq scale, fixed <strong>for</strong>mants next. If you have a low voice, try<br />
low freq live input, fixed <strong>for</strong>m instead. <strong>The</strong> first time you play it, use the default input, and then play it<br />
again, this time choosing the live input <strong>for</strong> the GenericSource and then singing or speaking into the microphone<br />
to frequency scale your own voice. Adjust !HighestPch and !LowestPch to the range of<br />
MIDI note numbers covered by your singing or speaking voice (where 60 is middle C).<br />
127
RE Synthesis<br />
Surrealism<br />
Double-click the <strong>Sound</strong> to see how it differs from the moving <strong>for</strong>mants version.<br />
<strong>The</strong> signal flow is similar to the last <strong>Sound</strong> we looked at except that the LiveSpectralAnalysis feeds into a<br />
SpectrumScaler be<strong>for</strong>e it goes to the OscillatorBank. If you take a look at the SpectrumScaler parameters,<br />
you will see that the frequency scaling expression has moved from the LiveSpectralAnalysis to here. <strong>The</strong><br />
SpectrumScaler scales the frequencies of the oscillators but keeps the apparent <strong>for</strong>mants in the same<br />
place.<br />
In order <strong>for</strong> the SpectrumScaler to work, you must feed it an harmonic analysis. Take a look at the parameters<br />
of the LiveSpectralAnalysis, and you will see that Harmonic is, indeed, checked. <strong>The</strong> LowFreq<br />
and HighFreq parameters are the lowest and highest fundamental frequencies that you expect from the<br />
Input. To be completely truthful, they specify the range of frequencies you expect from the harmonic<br />
number given in the field called TrackedHarmonic. In this example, the TrackedHarmonic is set to 1,<br />
so the LowFreq and HighFreq refer to the first harmonic (the fundamental). <strong>The</strong> AmpScale is set to<br />
!Frequency * 1.5 + 0.5<br />
only because scaling down the frequency ordinarily makes the resynthesis louder, so this is here to try to<br />
compensate by scaling down the amplitude as you scale down the frequency — no deep hidden meaning.<br />
If you slow down the EX file feeding into an RE filter, you get something that sounds lower in frequency<br />
and has a longer duration, but which keeps some of the original <strong>for</strong>mant structure. Try the <strong>Sound</strong> called<br />
RE w/ slower & lower EX input. You will, most likely, have to adjust !Atten as you adjust !Rate, since<br />
some rates will cause the filter to overflow.<br />
Open this <strong>Sound</strong> <strong>for</strong> editing, and take a look at the parameters of the FunctionGenerator called timeIndex.<br />
Notice that it is triggered by !KeyDown and that its OnDuration is<br />
6.01422 s * (1.0/!Rate)<br />
6.01422 seconds is the duration of the original sample. Whenever !Rate is increased, we want to go<br />
through the RE filter faster, and, because we are scaling the duration by the inverse of !Rate, faster rates<br />
mean smaller durations. Likewise, !Rate less than one will give us longer durations (which is exactly<br />
what we want, since going through the EX file at a slower rate should give it a longer duration).<br />
For more details on how to create an RE analysis using the Tools menu, see Cross Synthesis on page 103.<br />
In the <strong>Sound</strong> collection called surrealistic scaling you can find some great alien voices as well as some<br />
additional techniques <strong>for</strong> scaling the frequency.<br />
128
Monotony<br />
For example, open and try out the <strong>Sound</strong> called timewarp alien , which sounds like an alien having problems<br />
with echo-suppression on a trans-galactic phone call. In the signal flow graph, find the module<br />
named SingleSideBandRM7 and play it. Like straight ring modulation, single sideband ring modulation<br />
gives you the sum and the difference frequencies of its input and a sine wave — except that, in singlesideband<br />
modulation, one of the sidebands is canceled out, leaving only the sum frequency. Click on the<br />
name SingleSideBandRM (in the lower right corner of the parameter fields) to read a description of<br />
how this works. <strong>The</strong>n click on the parameter names <strong>for</strong> Frequency and FreqScale. This <strong>Sound</strong> is set<br />
up so that, at 1000 hz, it does single sideband modulation, and the further the input frequencies are from<br />
1000 hz, the more they are like ordinary ring modulation — so different parts of the input spectrum are<br />
being modulated differently. Frequency components of the input that are close to 1000 hz will be scaled<br />
down by the FreqScale ratio 0.75.<br />
Try replacing FreqScale with<br />
!Scale * 2<br />
and the Frequency parameter with<br />
!Frequency * 2000 hz<br />
and experiment with different combinations of the two parameters. As you can hear, while this method<br />
does not give as predictable and clean results as some of the frequency scaling methods discussed earlier,<br />
it does have some unique properties that you can use in designing new kinds of processing.<br />
Next, play watery harp and then double-click on it to see how it works. It turns out that when you change<br />
the length of the delay in a DelayWithFeedback (by changing DelayScale) you will, as a side-effect,<br />
change the frequency of whatever sound is currently in the delay line. So, although you might not guess<br />
it from its name, the DelayWithFeedback is yet another <strong>Sound</strong> you can use to scale the frequency of its<br />
input.<br />
So far we have spoken only of scaling the frequency while still maintaining the original contour of the<br />
melody or the prosody. But how about removing all that annoying melodic content in order to achieve a<br />
completely monotonous melody or phrase? Yes, with <strong>Kyma</strong> you can do it!<br />
Try playing you are monotonous and sing into the microphone. (If you're at a loss <strong>for</strong> what to sing, try<br />
your national anthem). If you have a low voice, you might find that Low voice monotony will work better<br />
<strong>for</strong> you. Next try playing along with what you are singing on the MIDI keyboard, and listen to what happens<br />
when what you play on the keyboard diverges from what you are singing. Try to sing flat, and then<br />
use the keyboard to correct the pitch of your voice.<br />
<strong>The</strong>re are several different techniques <strong>for</strong> monotonizing but the basic idea is this: Whenever the frequency<br />
of the input goes up, scale it down with the frequency scaler. Whenever the frequency of the input<br />
goes down, scale it up by the same amount in the frequency scaler. <strong>The</strong> result is a melody or prosody that<br />
never varies from one pitch.<br />
In order to do this, you need some way to scale the frequency up or down, and you need some way of<br />
tracking the input’s frequency so you know how to cancel it out. For example, look at you are monotonous<br />
(kbd). This is an ADInput going into a FrequencyScaler and a FrequencyTracker. Take a look at the<br />
parameters of the FrequencyScaler. Note that its FrequencyScale parameter is set to:<br />
!Pitch hz / ( freqTrak L * 22050.0 hz)<br />
Let’s “deconstruct” this expression in order to understand its effect. First of all, notice that it is a ratio of<br />
two frequencies — the frequency from the keyboard and the frequency of the input signal.<br />
<strong>The</strong> frequency of the input is in the denominator, so whenever the frequency of the input gets larger, the<br />
ratio of the keyboard frequency to the input frequency gets smaller and vice versa. (For example, the ratio<br />
1/6 is smaller than the ratio 1/3). This is exactly the behavior we were looking <strong>for</strong> in order to cancel out<br />
the changes in the input frequency.<br />
Now to explain a few of the details. <strong>The</strong> FrequencyTracker is multiplied by 22050 hz. Why? Because the<br />
output of the FrequencyTracker is in the range of (0,1). In order to scale that to the range of possible<br />
129
F13<br />
frequencies, we have to multiply by the largest possible frequency value, which, in digital audio, is always<br />
one half of the sampling frequency. So this expression is assuming a sampling rate of 44.1 khz. To modify<br />
this expression to work at any sampling rate, change it to:<br />
freqTrak L * SignalProcessor sampleRate * 0.5 hz<br />
<strong>The</strong> other detail to notice is that !Pitch from the keyboard must be converted to frequency in hertz be<strong>for</strong>e<br />
taking the ratio of the two frequencies. Ratios of note numbers are not the same as the ratios of the<br />
equivalent values in hertz! As a quick proof by example, consider the ratio of 4 a to 3 a. In note numbers,<br />
this would be 69 / 57 or about 1.2, whereas, in hertz, the ratio would be 440.0 / 220.0 or exactly 2.<br />
Try out you are monotonous (kbd), singing into the microphone, and playing either the same pitches or<br />
different pitches on the keyboard. If you have a particularly low voice, you may want to try Low voice<br />
monotony instead.<br />
<strong>The</strong> other examples in this collection are all examples of live “monotonization” using various different<br />
techniques. Try each of them out, so you can get an idea of the strengths and weaknesses of each approach.<br />
If you don’t have to monotonize an audio signal in real time, you can monotonize an analysis of the signal<br />
using the Spectrum editor. First analyze the recording using the spectral analysis tool. <strong>The</strong>n open the<br />
analysis in the Spectrum editor. Select the lowest 8 tracks, and push the filter button (third from the right<br />
in the row of buttons across the bottom of the editor) <strong>for</strong> a list of modifications that can be per<strong>for</strong>med on<br />
the selected tracks. Choose replaceFrequencyWithAverage, and wait <strong>for</strong> it to compute and replot. Experiment<br />
with selecting and monotonizing different combinations of harmonics.<br />
130
Live Analysis, Resynthesis<br />
Using the LiveSpectralAnalysis module, you can analyze any <strong>Kyma</strong> <strong>Sound</strong> in real time and resynthesize<br />
the sound at the same time, using an OscillatorBank.<br />
Resynthesis with Frequency Scaling<br />
For example, play the <strong>Sound</strong> called live analysis/resynthesis, and hit Enter when the GenericSource asks<br />
what input to use. What you are hearing is not the sample but a bank of sine wave oscillators. <strong>The</strong> oscillator<br />
frequencies are tied to the MIDI keyboard (try playing it right now to verify this).<br />
Compile, load, start live analysis/resynthesis again, but this time choose the live input as the Generic-<br />
Source. Speak, sing, or otherwise per<strong>for</strong>m into the microphone while playing the keyboard to create<br />
changes in the frequency of the output.<br />
Intercepting and Modifying Selected Tracks<br />
We didn’t come up with a way to separate the live input into hundreds of sine wave oscillators just so we<br />
could add them all back up together again and reproduce the original sound. No, like all good sound designers,<br />
we want to warp, mangle, mutate, transmogrify, and otherwise mess around with the sound<br />
be<strong>for</strong>e resynthesizing it.<br />
One way to do that is with SpectrumModifier. Despite its deceptively simple-sounding name, this is the<br />
mangler/transmogrifier you’ve been looking <strong>for</strong>. <strong>The</strong> <strong>Sound</strong> has two stages: selecting (or rejecting) tracks<br />
based on some criteria, and then modifying the amplitudes or frequencies of the selected tracks.<br />
Frequency Domain Filters<br />
Let’s start with something simple: creating a pseudo-bandpass-filter effect by rejecting tracks (oscillators)<br />
whose frequencies fall outside a given range. Play pseudo bandpass and try adjusting !HiCutoff and<br />
!LoCutoff in the virtual control surface.<br />
Double-click on pseudo bandpass. Notice that it has a LiveSpectralAnalysis feeding into a Spectrum-<br />
Modifier. Double-click the SpectrumModifier to look at its parameter settings, in particular, the following:<br />
Parameter Setting<br />
LoFreq !LoCutoff hz<br />
HiFreq !HiCutoff hz<br />
FreqHysteresis 1 hz<br />
HearAll unchecked<br />
By having HearAll unchecked, we are specifying that we want to hear only those tracks which meet the<br />
criteria. Tracks satisfying the criteria in this case are those whose frequencies are above !LoCutoff hz<br />
and below !HiCutoff hz. By setting the FreqHysteresis to 1 hz, we can avoid tracks popping in and<br />
out because some small deviation (like vibrato) is taking it in and out of the specified range.<br />
Track-dependent Frequency Scale & Offset<br />
Next try playing subwoofer-ize, and try different settings <strong>for</strong> !LoTrack, !InHarm, and !Scale.<br />
Open it up and take a look at the parameter settings <strong>for</strong> the SpectrumModifier named scale freqs of tracks<br />
below LoTrack, in particular:<br />
131
Parameter Setting<br />
Select unchecked<br />
LoTrack !LoTrack<br />
HiTrack 1000<br />
FreqScale !Scale<br />
FreqOffset !InHarm<br />
LoAmp 0<br />
HiAmp 0.2<br />
AmpHysteresis 0.1<br />
HearAll checked<br />
In this example, Select is not checked. This indicates that the criteria describe the tracks that should be<br />
rejected, not selected. In other words, whatever the list of conditions are <strong>for</strong> selection, you should add a<br />
“NOT” to the end of the list. So in this case, it is saying “select only the tracks above !LoTrack, NOT!” In<br />
other words, select only the tracks below !LoTrack.<br />
But notice that it also has the HearAll box checked. What does it mean to select some tracks if you are<br />
still going to let all of them through? This is where FreqScale and FreqOffset come into the picture.<br />
<strong>The</strong> selected tracks will have their frequencies multiplied by !Scale and then have !InHarm added to<br />
them.<br />
In short, this is a strange kind of “filter” where the “pass band” is defined by track (or oscillator) number<br />
rather than frequency and where the tracks within the pass band have their frequencies scaled and offset.<br />
Reducing Background Noise<br />
Play reduce background hiss, and experiment with different settings <strong>for</strong> !LowAmp. Open it up to examine<br />
the parameter settings of reject amps below !LowAmp, in particular:<br />
Parameter Setting<br />
Select checked<br />
LoAmp !LowAmp<br />
HiAmp 0.2<br />
AmpHysteresis !LowAmp * 0.5<br />
HearAll unchecked<br />
In this example, there is some background hiss that was present in the original recording and is faithfully<br />
reproduced in the resynthesis. <strong>The</strong> SpectrumModifier is being used to filter out tracks based on their amplitudes.<br />
If the noise in the original recording is consistently of lower amplitude than the desired signal,<br />
then you can use this method to reduce or remove the noise from the resynthesis.<br />
Probabilistic Resynthesis<br />
Next try the <strong>Sound</strong> called spectral granulation, experimenting with different settings <strong>for</strong> the veryscientifically<br />
named !Burbliness parameter.<br />
<strong>The</strong> important parameter settings in this SpectrumModifier are:<br />
Parameter Setting<br />
Select checked<br />
Probability 1 - !Burbliness<br />
Seed -0.2<br />
HearAll unchecked<br />
Once a track has passed through all the other criteria, it still has one more test to pass be<strong>for</strong>e it is selected,<br />
and, in a case of art-imitating-life, this last test is completely arbitrary, and, in fact, random. As a final<br />
132
criterion <strong>for</strong> selection, you can assign a likelihood that any given track will be selected on any given<br />
frame. If you set the Probability to 1, then this last test will have no effect, because any tracks that<br />
have satisfied the other criteria have a likelihood of one — in other words, a 100% chance of being selected.<br />
If you set Probability to 0, then you won’t hear anything, because all tracks have zero chance<br />
of being selected. In this case, we have set it to 1 - !Burbliness, so the larger the value of !Burbliness,<br />
the less often a track will be selected when it is tested. This explains why the sound breaks up more<br />
and more as you increase the value of !Burbliness.<br />
Try changing the setting of Probability to<br />
TrackNumber / 512<br />
This weights the higher tracks more than the lower numbered tracks, giving a kind of probabilistic high<br />
pass filter effect, since the higher tracks are selected so much more often than the lower ones. (!Burbliness<br />
still shows up in the virtual control surface because it also has an affect on the AmpScale in the<br />
LiveSpectralAnalysis. Don’t worry about it, because it doesn’t have too much of an effect other than to<br />
change the overall amplitude slightly).<br />
On occasion, though, a low bloop still gets through, because the lower tracks still have a nonzero likelihood<br />
of occurring. To remedy that, try changing the Probability to<br />
TrackNumber - 32 / 512<br />
This makes the probability of the first 32 tracks negative (effectively zero), and weights the remaining<br />
tracks according to track number.<br />
Skipping Harmonics<br />
<strong>The</strong> final example in this file is called split spectrum.<br />
Notice that the LiveSpectralAnalysis feeding into the SpectrumModifier in this example has the Harmonic<br />
box checked. That means that, in this case, track number is synonymous with harmonic number.<br />
(This was not true <strong>for</strong> the previous examples which did not have Harmonic checked).<br />
Take a look at the parameters of the SpectrumModifier in this example, in particular:<br />
Parameter Setting<br />
FreqScale !Frequency<br />
Probability TrackNumber rem: 3<br />
Seed -0.2<br />
HearAll checked<br />
<strong>The</strong> message rem: is short <strong>for</strong> “remainder,” so this is another way of saying the remainder left over after<br />
dividing TrackNumber by three.<br />
In other words, the probability of the first harmonic being on is 1, <strong>for</strong> the second 2 (but the maximum<br />
probability is 1, so anything greater than 1 is just the same as 1), <strong>for</strong> the third harmonic 0 (because the remainder<br />
is zero), and so on. In other words, the pattern is two harmonics on, next harmonic off, two<br />
harmonics on, next harmonic off.<br />
<strong>The</strong> selected harmonics are frequency scaled, so you can split apart the spectrum of the input as it is<br />
playing, with some harmonics going down in frequency and others continuing as they were.<br />
Uncharted Territory<br />
It hasn’t been possible to do this sort of thing in real time until fairly recently, so anything you develop<br />
with these <strong>Sound</strong>s has a high probability of being something that no one has heard be<strong>for</strong>e. So experiment<br />
and have fun!<br />
133
Looping, Feedback<br />
Several <strong>Kyma</strong> <strong>Sound</strong>s have internal feedback loops, but you can also create your own feedback loop by<br />
writing into memory with one module and reading out of it (after an arbitrary delay) with another. In the<br />
signal flow diagram, the writer must occur be<strong>for</strong>e the reader.<br />
MemoryWriter/Reader<br />
Take a look at the first <strong>Sound</strong> in this file, the one called write memory, read memory. This is an implementation<br />
of a basic feedback loop which you might draw as:<br />
Source<br />
+<br />
Delay<br />
134<br />
Output<br />
Notice that in the <strong>Kyma</strong> <strong>Sound</strong> the last module in the diagram is a MemoryWriter. It writes the sum of<br />
the source plus the delayed source into a delay line named, in this example, recording. Notice that the<br />
<strong>Sound</strong> called read the memory is a Sample, one of several <strong>Kyma</strong> <strong>Sound</strong>s that can read from the sample<br />
RAM of the Capybara. Double-click on read the memory because there is one very important parameter<br />
setting that is easy to overlook. Any time you are reading something from memory that is being written<br />
into memory elsewhere in the <strong>Sound</strong> structure, you must check the FromMemoryWriter box. Otherwise,<br />
<strong>Kyma</strong> will search your hard disk looking <strong>for</strong> the sample named recording. If you check FromMemory-<br />
Writer, then <strong>Kyma</strong> knows that it has to put the MemoryWriter on the same expansion card as the<br />
Sample that reads the memory. Try playing write memory, read memory to verify that it does indeed<br />
sound like a simple feedback loop.<br />
Actually you could have done exactly the same thing in a much easier way — by feeding the source into a<br />
DelayWithFeedback and controlling the feedback with a fader. But what if you want to insert some kind<br />
of processing in the feedback loop? Open up process in fdbk loop to see an example of this. <strong>The</strong> fed back<br />
portion of the signal goes through a single side band ring modulator be<strong>for</strong>e it is added in with the source<br />
and fed back into the delay line — so the processing is compounded each time around the loop. Try<br />
playing process in fdbk loop to hear the effect.<br />
In write memory, granulate memory, you see an example of using a GrainCloud, rather than a Sample, to<br />
read out of the delay line. <strong>The</strong> result is a kind of granulated delay line. Try playing it once with the default<br />
source chosen and then switch it over to Live source so you can try singing some long tones into it.<br />
As you probably noticed in this example, the delay line might already have some leftover sound in it<br />
from a previous example. Look at granular read w/zero mem <strong>for</strong> an example of how to clear the memory<br />
in the delay line be<strong>for</strong>e using it. Notice that the input to the MemoryWriter is a Concatenation of a Constant<br />
(with Value zero) followed by the feedback loop. This will write zeroes into the memory on all the<br />
cards first, so the delay lines will be silent at the beginning.<br />
FeedbackLoopInput/FeedbackLoopOutput<br />
What if the modifications you put into the feedback loop are so extensive that they cannot all be scheduled<br />
on the same expansion card as the memory writer and memory reader? To implement a feedback<br />
loop that crosses expansion cards, use the modules called FeedbackLoopInput (writes into the delay line)<br />
and FeedbackLoopOutput (reads from the delay line). Note that these modules can only implement delay<br />
lines of from 12 to 2048 samples long, so if you can get away with using the previous design <strong>for</strong> feedback,<br />
you should preferentially do it that way, because that gives you a larger range of delay times (down to a<br />
single sample).<br />
Open up basic Feedback in/out example to see a stripped-down illustration of how to set one of these up.<br />
Reading from left to right in the signal flow diagram, the first module is a FeedbackLoopOutput called<br />
read from loop. Notice that its parameters are set so that it reads from a “connection” called feedback<br />
after 128 samples of delay. This is fed into an Attenuator so you can control the amount of feedback, then<br />
it is fed into a DelayWithFeedback to add additional delay if desired. From that point on, it should look
pretty familiar. <strong>The</strong> delayed feedback is added to the source in a Mixer, and the Mixer is fed into the<br />
module that writes into the “connection” — the FeedbackLoopInput. This is a simplified example, because<br />
you could implement the same thing using a single DelayWithFeedback module.<br />
For something a little more interesting, play slithering sibilance. This is the same basic configuration but<br />
with a 12-pole AllPass filter in the feedback loop.<br />
Next, try thirds rising. This one has a spectral analysis and resynthesis in the loop. <strong>The</strong> resynthesis oscillators<br />
can be scaled up or down by the interval you set in the virtual control surface.<br />
135
MIDIVoice Scripts<br />
<strong>The</strong> MIDIVoice and MIDIMapper modules give you three choices <strong>for</strong> the source of MIDI events: the live<br />
MIDI input stream (originating with external controllers or a sequencer or other software running in parallel<br />
with <strong>Kyma</strong>), a MIDI file stored on disk, or a MIDI script (which generates MIDI events<br />
algorithmically and then emits them).<br />
<strong>The</strong>se examples illustrate some of the tools <strong>for</strong> algorithmically generating MIDI events using the Script<br />
parameter of a MIDIVoice or MIDIMapper. For more in<strong>for</strong>mation about MIDI event scripts, see MIDI<br />
Scripts beginning on page 522.<br />
Notes and Controllers<br />
Notes<br />
<strong>The</strong> syntax <strong>for</strong> a basic note-on event is:<br />
self keyDownAt: aTime duration: aDur frequency: aFreq velocity: 0To1.<br />
When you drop the velocity tag, the event defaults to a velocity of 1.<br />
Transcription of Short Sequences<br />
Take a look at (and compile, load, start) machautKyrie to see a simple application of these note events:<br />
direct transcription of written notation by hand into MIDI script events. For short note sequences, entering<br />
the events by hand is often the quickest and most straight<strong>for</strong>ward way to do it. Here is an excerpt<br />
from the Machaut example:<br />
MM := 90.<br />
"------------------------------------"<br />
self keyDownAt: 0 beats duration: 3 beats frequency: 4 a.<br />
self keyDownAt: 3 beats duration: 1 beat frequency: 4 a.<br />
self keyDownAt: 4 beats duration: 1 beat frequency: 4 b.<br />
self keyDownAt: 5 beats duration: 1 beat frequency: 4 g.<br />
self keyDownAt: 6 beats duration: 2 beats frequency: 4 a.<br />
self keyDownAt: 8 beats duration: 0.5 beats frequency: 4 f.<br />
self keyDownAt: 8.5 beats duration: 0.5 beats frequency: 4 e.<br />
(and so on…)<br />
<strong>The</strong> first line of this script in<strong>for</strong>ms <strong>Kyma</strong> of the metronome that should be used to define the beat <strong>for</strong> the<br />
rest of the script. <strong>The</strong> remaining lines are a transcription of each note from the piece.<br />
Modulo Arithmetic<br />
<strong>The</strong> script of a MIDIVoice or MIDIMapper is actually a program written in Smalltalk; this means that you<br />
can generate events according to an algorithm. <strong>The</strong> script in Kurt’s new rhythm method illustrates the use<br />
of modulo arithmetic in an algorithm that creates a kind of twisted drum machine.<br />
In this script, a subset of seven different fixed-duration fixed-frequency events is algorithmically selected<br />
<strong>for</strong> scheduling on each beat. <strong>The</strong> following is an outline of the script:<br />
MM := 300.<br />
0 to: 200 do: [ :i |<br />
(a series of omitted event selection decisions)<br />
].<br />
<strong>The</strong> first line of the script sets the metronome. <strong>The</strong> rest of the script is a loop that counts the variable i up<br />
from 0 to 200. Inside the loop, a series of decisions are made to determine whether each of the seven possible<br />
events should be scheduled <strong>for</strong> this beat.<br />
<strong>The</strong> first of the seven event decisions is:<br />
i \\ 4 = 0 ifTrue: [<br />
136
self<br />
keyDownAt: i beats<br />
duration: 25 / 100 hz<br />
frequency: 100 hz].<br />
This part of the script causes an event (of the given frequency and duration) to be scheduled whenever<br />
the beat counter i has no remainder when divided by four (i \\ 4 = 0). This is the same as saying that<br />
this particular event will be scheduled on every fourth beat. <strong>The</strong> other decisions are based on whether the<br />
current beat is a multiple of 2, of 3, of 5 (within the first 50 beats), of 13, of 7, and finally when it is not a<br />
multiple of 7, 5, or 3 after the first 50 beats.<br />
Here is the entire script:<br />
MM := 300.<br />
0 to: 200 do: [ :i |<br />
i \\ 4 = 0 ifTrue: [<br />
self<br />
keyDownAt: i beats<br />
duration: 25 / 100 hz<br />
frequency: 100 hz].<br />
i \\ 2 = 0 ifTrue: [<br />
self<br />
keyDownAt: i beats<br />
duration: 25 / 250 hz<br />
frequency: 250 hz].<br />
i \\ 3 = 0 ifTrue: [<br />
self<br />
keyDownAt: i beats<br />
duration: 25 / 150 hz<br />
frequency: 150 hz].<br />
(i < 50 and: [i \\ 5 = 0]) ifTrue: [<br />
self<br />
keyDownAt: i beats<br />
duration: 25 / 400 hz<br />
frequency: 400 hz].<br />
i \\ 13 = 0 ifTrue: [<br />
self<br />
keyDownAt: i beats<br />
duration: 25 / 700 hz<br />
frequency: 700 hz].<br />
i \\ 7 = 0 ifTrue: [<br />
self<br />
keyDownAt: i beats<br />
duration: 50 / 50 hz<br />
frequency: 50 hz].<br />
(i > 50 and: [i \\ 7 ~= 0 and: [i \\ 5 ~= 0 and: [i \\ 3 ~= 0]]]) ifTrue: [<br />
self<br />
keyDownAt: i beats<br />
duration: 100 / 1000 hz<br />
frequency: 1000 hz].<br />
].<br />
137
Random Events<br />
<strong>The</strong> next example generates one hundred random pitches with random durations and random placement<br />
in the stereo field. Edit the <strong>Sound</strong> called 100 uni<strong>for</strong>m random to follow along.<br />
To generate one hundred of these events, we first create a random number generator, and then repeat the<br />
code <strong>for</strong> the generating single event one hundred times:<br />
| r t |<br />
r := Random newFor<strong>Kyma</strong>WithSeed: 52.<br />
t := 0.<br />
100 timesRepeat: [<br />
self<br />
keyDownAt: t s<br />
duration: (r next + 1) s<br />
frequency: 3 c + (r next * 36 nn)<br />
velocity: r next.<br />
t := t + r next].<br />
You may recognize this as a Smalltalk program (the implication being that you can use any Smalltalk expressions<br />
and control structures to algorithmically generate your MIDI events)!<br />
Local variables are declared at the top by placing them between vertical lines. <strong>The</strong>n a random number<br />
generator is created and stored in the variable r. Another variable, t, which will be keeping track of time,<br />
is initially set to zero:<br />
| r t |<br />
r := Random newFor<strong>Kyma</strong>WithSeed: 52.<br />
t := 0.<br />
Next we repeat the statement within the square brackets one hundred times. Each time through, the duration<br />
is set to some random number between 1 and 2, the frequency is set to a pitch between 3 c and 6 c<br />
(not limited to integer note numbers), the velocity is set to a random number between 0 and 1, and the<br />
start time of the next event is set to a random time up to 1 second after this event:<br />
100 timesRepeat: [<br />
self<br />
keyDownAt: t s<br />
duration: (r next + 1) s<br />
frequency: 3 c + (r next * 36 nn)<br />
velocity: r next.<br />
t := t + r next].<br />
To hear the results, play 100 uni<strong>for</strong>m random. Take a look inside the Attenuator to see how<br />
!KeyVelocity is really being used to control stereo placement, rather than amplitude.<br />
Random generates random numbers that are evenly distributed between zero and one. Let’s modify our<br />
program slightly, replacing Random as the random number generator with several OneOverF generators,<br />
one <strong>for</strong> pitch, one <strong>for</strong> duration, one <strong>for</strong> velocity, and one <strong>for</strong> the next start time:<br />
| rPch rDur rVel rStart t |<br />
rPch := OneOverF newFor<strong>Kyma</strong>WithSeed: 52 states: 128.<br />
rDur := OneOverF newFor<strong>Kyma</strong>WithSeed: 52 states: 128.<br />
rVel := OneOverF newFor<strong>Kyma</strong>WithSeed: 52 states: 128.<br />
rStart := OneOverF newFor<strong>Kyma</strong>WithSeed: 52 states: 128.<br />
t := 0.<br />
200 timesRepeat: [<br />
self<br />
keyDownAt: t s<br />
duration: rDur next s<br />
frequency: 3 c + ((rPch next * 36) roundTo: 1) nn<br />
velocity: rVel next.<br />
t := t + (rStart next * 0.5)].<br />
138
Like Random, OneOverF generates random numbers between zero and one, but it tends to generate<br />
numbers that are close to one another <strong>for</strong> awhile, then make a large jump to a new number, then generate<br />
numbers close to that one <strong>for</strong> awhile, etc. It gets its name from the shape of the distribution in the frequency<br />
domain: 1/f or the inverse of the frequency; in other words, there tend to be large, slow changes<br />
and small, fast changes. To hear what this sounds like, play 200 oneOverF. Try changing the value of the<br />
seeds to hear a different set of events.<br />
Controllers<br />
Event Collections<br />
Play 100 uni<strong>for</strong>m + ctrl and then open it to see an example of how to specify continuous controller values<br />
in a MIDI script. Here the controller !Morph is set to 0 at the beginning and is told to slide from its previous<br />
value to a new random value on each note taking 10 steps to get there:<br />
| r t |<br />
r := Random newFor<strong>Kyma</strong>WithSeed: 2.<br />
t := 0.<br />
self controller: !Morph setTo: 0 atTime: 0 s.<br />
100 timesRepeat: [<br />
self<br />
keyDownAt: t s<br />
duration: (r next + 1) s<br />
frequency: 3 c + (r next * 36 nn)<br />
velocity: r next.<br />
t := t + r next.<br />
self controller: !Morph slideTo: r next steps: 10 byTime: t s].<br />
Next, play 200 oneOverF + ctrl and then open it to see how it works. In this script, !Morph is set to zero<br />
initially, and then slides to a value of one over the course of 40 seconds.<br />
Sometimes it is more convenient to specify the MIDI events as collections of notes and rests, without<br />
having to specify start times <strong>for</strong> each event. <strong>The</strong> actual start times can be inferred from the duration of the<br />
Note or Rest and where it occurs in the collection of events. This corresponds more closely to written music<br />
notation, where note and rest symbols arranged horizontally are interpreted as a sequence of events in<br />
time (where each event’s start time occurs right after the previous event’s duration has expired), and<br />
notes or rests arranged vertically are interpreted as all starting at the same time.<br />
In the MIDI script language, an EventSequence is a collection of Notes, Rests, or other EventCollections<br />
that occur one after another in time (corresponding to horizontal placement in music notation). Since you<br />
can also construct sequences of other collections, you can create higher level structures as well. For example,<br />
sequences of Notes and Rests could be collected in a measure; sequences of measures could be<br />
collected into a phrase; sequences of phrases could be collected into sections; sequences of sections could<br />
be collected into movements, etc. until you run out of traditional musical names <strong>for</strong> the structures(!)<br />
An EventMix is a collection of Notes, Rests, or other EventCollections that occur all at the same time<br />
(corresponding to vertical placement in music notation). Like an EventSequence, the EventMix is recursively<br />
defined (i.e. you could have an EventMix of EventMixes), allowing you to define hierarchical<br />
structures, somewhat analogously to the way you can define <strong>Sound</strong>s.<br />
You can also create a generic EventCollection of Notes, Rests, or other EventCollections, specifying that<br />
you haven’t yet decided whether the events should be simultaneous or sequential but will send a message<br />
to the object later to specify actual start times and turn it into a sequence or a mix of other events.<br />
EventSequence<br />
Play the <strong>Sound</strong> called re-turn of phrase, and then open it so you can study the MIDI script (by the way, in<br />
case you missed this earlier, you can use Ctrl+L to make any parameter field larger — an essential little<br />
feature <strong>for</strong> viewing and editing these scripts).<br />
139
<strong>The</strong> first line is just a declaration of all the variables: measure, group, phrase, and section. Next, a<br />
new sequence is created: a half note on 2 g, followed by a quarter note on 3 d, followed by a half note 2 d:<br />
| measure group phrase section |<br />
measure :=<br />
EventSequence events: #(<br />
{Note durationInBeats: 2 frequency: 2 g}<br />
{Note durationInBeats: 1 frequency: 3 d}<br />
{Note durationInBeats: 2 frequency: 2 d}).<br />
Next, group is defined as a sequence of three measures — but not just the same measure repeated three<br />
times; it is the original measure, followed by the measure transposed up a perfect fifth (7 half steps) and<br />
with all its durations scaled to half their original values, followed by the original measure transposed<br />
down a perfect fourth:<br />
group :=<br />
EventSequence events:<br />
(Array<br />
with: measure<br />
with: ((measure dim: 0.5) trsp: 7)<br />
with: (measure trsp: -5)).<br />
<strong>The</strong>n, phrase is defined as a sequence of three groups — with each copy of group modified in the same<br />
way as each copy of measure was modified to <strong>for</strong>m the original group. Things are starting to look pretty<br />
self-similar here:<br />
phrase :=<br />
EventSequence events:<br />
(Array<br />
with: group<br />
with: ((group dim: 0.5) trsp: 7)<br />
with: (group trsp: -5)).<br />
By now, you can guess that section is going to be defined as a sequence of three phrases, and that each<br />
copy of phrase is subjected to the same trans<strong>for</strong>mations:<br />
section :=<br />
EventSequence events:<br />
(Array<br />
with: phrase<br />
with: (phrase inv: 3 d)<br />
with: (phrase trsp: -5) retrograde).<br />
<strong>The</strong> same set of trans<strong>for</strong>mations can be applied to Notes, Rests, EventSequences, and EventMixes, and<br />
each will be affected in the appropriate manner; <strong>for</strong> example, if you apply trsp: to a Rest, it just remains<br />
as is; if you apply trsp: to an EventSequence, each one of its component events is transposed. In this<br />
example, we could have gotten by with defining a single note as our starting point and applied trans<strong>for</strong>mations<br />
to it to derive the remaining notes in the measure:<br />
n := Note durationInBeats: 2 frequency: 2 g.<br />
measure :=<br />
EventSequence events:<br />
(Array<br />
with: n<br />
with: ((n trsp: 7) dim: 0.5)<br />
with: (n trsp: -5)).<br />
<strong>The</strong> final statement in the script tells the EventSequence in section to play on this MIDIVoice (i.e. the<br />
<strong>Sound</strong> <strong>for</strong> which this Script is a parameter), and sets the metronome to MM = 160.<br />
section playOnVoice: self bpm: 160.<br />
140
Another Way<br />
Re-re-turn of phrase shows a variant on this same algorithm. Rather than building up the sequences of<br />
sequences and storing them in different variables, Re-re-turn of phrase uses the Smalltalk control structure<br />
timesRepeat: to repeatedly replace the old phrase with a new phrase:<br />
| thing |<br />
thing :=<br />
EventSequence events: #(<br />
{Note durationInBeats: 2 frequency: 3 c}<br />
{Note durationInBeats: 1 frequency: 3 g}<br />
{Note durationInBeats: 2 frequency: 2 g}).<br />
6 timesRepeat: [<br />
thing :=<br />
EventSequence events:<br />
(Array<br />
with: thing<br />
with: ((thing dim: 0.5) trsp: 7)<br />
with: (thing trsp: -5))].<br />
thing playOnVoice: self bpm: 160.<br />
Embedded Event-like Behavior<br />
Sometimes the “instrument” itself has some event-like behavior buried within it. Play the <strong>Sound</strong> called<br />
PnoToHrp and then open it so you can study the MIDI script.<br />
After all the variable declarations:<br />
| pat1 dblPat group |<br />
the first step is to create an EventSequence and save it in the variable called pat1.<br />
pat1 :=<br />
EventSequence events: #(<br />
{Note durationInBeats: 4 frequency: 4 g}<br />
{Note durationInBeats: (8/5) frequency: 4 b flat}<br />
{Note durationInBeats: (12/5) frequency: 5 c}).<br />
pat1 is a sequence that lasts <strong>for</strong> 8 beats. You could think of it as a whole note in a measure by itself, followed<br />
by a measure containing a half note followed by a dotted half note with both notes under a bracket<br />
labeled 5:4 or “five in the time of four”.<br />
“But,” you are thinking, “it doesn’t sound like that; it sounds more like a group of five, a group of two,<br />
and a group of three.” <strong>The</strong> secret lies buried within the TimeIndex parameter of PNO, a FunctionGenerator<br />
called time index. Take a look at the Gate parameter of time index. It is saying that <strong>for</strong> as long as<br />
the key is held down, the gate should be triggered at the rate of 160 beats per minute — scaled to be a little<br />
bit faster so we can get five beats in the time of four. So whatever pitches this “instrument” plays, it<br />
will play quarter note quintuplets at MM = 160 (something like the notation equivalent of a slash above<br />
the note heads to indicate a 5:4 quarter note tremolo on each note):<br />
!KeyDown bpm: 160 * (5/4)<br />
<strong>The</strong> changing value of the Morph parameter in pno is not controlled by the MIDI script either. Instead, it<br />
is embedded directly in the parameter field as a function that goes from zero to one over the course of 12<br />
seconds (the first 1 just indicates that the ramp should start immediately and continue <strong>for</strong> 12 seconds<br />
rather than restarting each time a key goes down; otherwise, you would replace the 1 with !KeyDown):<br />
1 ramp: 12 s<br />
141
EventMix<br />
Play the example called out-o-tune, and then edit the <strong>Sound</strong> to examine its script. This is an example of<br />
creating and using an EventMix.<br />
First we declare the variables within vertical lines. <strong>The</strong>n we set the variable chord to an EventMix. In<br />
this case, the chord is constructed out of perfect fourths above 3 d — and these are really perfect fourths,<br />
because we constructed them by scaling the frequency of 3 d (obtained by sending the message hz to 3 d)<br />
by the ratio 4/3.<br />
| chord seq |<br />
chord :=<br />
EventMix events: (Array<br />
with: (Note durationInBeats: 2 frequency: 3 d)<br />
with: (Note durationInBeats: 2 frequency: 3 d hz * 4/3)<br />
with: (Note durationInBeats: 2 frequency: 3 d hz * (4/3 ** 2))<br />
with: (Note durationInBeats: 2 frequency: 3 d hz * (4/3 ** 3))<br />
).<br />
Next, we construct a sequence of these chords. Each chord has all of its frequencies scaled by 4/3 above<br />
the frequencies of the previous chord. In order to do frequency scaling (multiplying the frequencies by a<br />
value) rather than pitch transposition (adding a value to the note number), we use the trans<strong>for</strong>mation<br />
freqScale: rather than the trans<strong>for</strong>mation trsp:.<br />
seq :=<br />
EventSequence events: (Array<br />
with: chord<br />
with: ((chord freqScale: 4/3) dim: 0.125)<br />
with: (chord freqScale: 16/9)).<br />
seq playOnVoice: self bpm: 60.<br />
Finally, the controller called !Frequency is set to start out at 0 and, at the time 3 seconds, to drop down<br />
to -36 in 60 steps over the course of one second. Notice that you can assign any values to controllers in<br />
the MIDI script; they are not limited to a range of (0,1) or (0,127):<br />
self controller: !Frequency setTo: 0 atTime: 0 s.<br />
self controller: !Frequency setTo: 0 atTime: 3 s.<br />
self controller: !Frequency slideTo: -36 steps: 60 byTime: 4 s.<br />
TimedEventCollections<br />
Take a look at (and have a listen to) serial time points. This script contains an example of a TimedEventCollection:<br />
a set of events associated with a set of starting beats. First, we declare the variables,<br />
define a set of intervals, and a collection of events based on those intervals:<br />
| set evs beats prime t |<br />
set := #(0 1 11 5 2 4 3 9 10 6 8 7).<br />
evs :=<br />
set collect: [ :int |<br />
Note durationInBeats: int frequency: 3 a + int nn].<br />
Next, we derive a set of starting beats from the set. <strong>The</strong> distance from one beat to the next comes from the<br />
set:<br />
t := 0.<br />
beats := set collect: [ :int | t := t + int].<br />
Here is where we create the TimedEventCollection:<br />
prime := TimedEventCollection startingBeats: beats events: evs.<br />
142
<strong>The</strong>n, starting on beat 0, we play the events (after scaling all the !KeyVelocity values to one quarter of<br />
their original values; look at the Pan to see how we have twisted the meaning of !KeyVelocity to really<br />
control stereo placement):<br />
(prime velScale: 0.25) playOnVoice: self onBeat: 0 bpm: 400.<br />
On beat 11, we start up another copy of the TimedEventSequence, this one inverted about 3 a and placed<br />
in the opposite channel:<br />
((prime inv: 3 a) velScale: 0.75) playOnVoice: self onBeat: 11 bpm: 400.<br />
TimedEventCollections Read from MIDI Files<br />
You can also create a TimedEventCollection by reading in the events and starting beats from a MIDI file.<br />
If you want to play exactly what’s in the MIDI file, it would be quicker and more straight<strong>for</strong>ward to simply<br />
select MIDI file as the Source in your MIDIVoice. However, once you have read the MIDI file into a<br />
script you can trans<strong>for</strong>m it, twist it, distort it, in short, do all the kinds of things composers love to do!<br />
For example, take a look at the Script <strong>for</strong> the <strong>Sound</strong> called trans<strong>for</strong>m events from MIDI file:<br />
| pat |<br />
pat :=<br />
TimedEventCollection<br />
timesAndEventsFromMIDIFile: 'omino.mid'<br />
channel: 1.<br />
(pat inv: 60 nn) playOnVoice: self onBeat: 5 bpm: 120.<br />
(pat trsp: 31) retrograde playOnVoice: self bpm: 120.<br />
In this script, pat is a TimedEventCollection whose start times and events are read from channel 1 of<br />
MIDI file omino.mid. To hear the original MIDI file, select MIDI file as the Source, and play. <strong>The</strong>n select<br />
Script as the Source and play again to hear the trans<strong>for</strong>med file. Type the name of one of your own<br />
MIDI files in place of omino.mid and try it again.<br />
Generic EventCollections<br />
In randomized times on event collection, you can see an example of a generic EventCollection, one that is<br />
not yet ready to make a commitment to full seriality or simultaneity:<br />
| pat pat2 pat1 |<br />
pat :=<br />
EventCollection events: (Array<br />
with: (Note frequency: 3 d durationInBeats: 1)<br />
with: (Note frequency: 3 f durationInBeats: 1)<br />
with: (Note frequency: 3 a sharp durationInBeats: 1)<br />
with: (Note frequency: 3 b sharp durationInBeats: 1)).<br />
But the message randomizeUsing:totalBeats:quantizeTo:maxSpacing: changes the Event-<br />
Collection into a TimedEventCollection by generating a set of random starting beats and randomly<br />
picking a set of events from the events supplied. You specify the total duration of the result, the smallest<br />
distance between beats (with quantizeTo:) and the longest time between beats (maxSpacing:):<br />
pat1 :=<br />
pat<br />
randomizeUsing: (Random new seed: 92)<br />
totalBeats: 16<br />
quantizeTo: 0.5<br />
maxSpacing: 1.<br />
143
Markov Chain<br />
In <strong>Kyma</strong>, the MarkovChain is a generic object, not necessarily tied to musical applications. It is a kind of<br />
sparse, fast-food version of the classic Markov chain: instead of weighted transitions, you give it a<br />
“training sequence” in the <strong>for</strong>m of an Array, and it constructs weighted transitions based on what transitions<br />
occur and how many times they occur in the training sequence. Once you have “trained” the object<br />
this way, you can ask it to generate any number of sequences, each of which will be statistically related to<br />
the original training sequence you gave it.<br />
For example, if you evaluate the following, short program,<br />
| chain seq |<br />
chain :=<br />
MarkovChain<br />
trainingSequence: #(<br />
what is your name<br />
is it an animal name<br />
or is your name one that would belong to a human<br />
like my name is a name that would<br />
belong to a very human being<br />
)<br />
chainLength: 2.<br />
seq := chain newSequenceOfLength: 100 seed: 9008.<br />
you might get something like this as the result:<br />
OrderedCollection(your name is a name that would belong to a very human being)<br />
Since the chain length is 2, every pair of words in the generated sequence is one that occurs in the original<br />
training sequence. However, the entire chain is something new, not found anywhere in the sequence.<br />
Each time you ask the MarkovChain <strong>for</strong> a new sequence, giving it a different seed, the result will be a<br />
new sequence. Notice that we asked <strong>for</strong> a sequence that was 100 words long; when the MarkovChain<br />
backs itself into a corner and can’t find any more legal transitions, it returns what it has been able to come<br />
up with so far.<br />
Now let’s look at a musical example. Here’s the script from the example called modified Markov chains:<br />
| t chain dur pitchOffset seq |<br />
MM := 160.<br />
chain :=<br />
MarkovChain<br />
trainingSequence: #(<br />
#(0 4) #(3 2) #(-5 2) #(2 4) #(3 2) #(-5 2) #(2 4)<br />
#(3 2) #(-5 4) #(2 2) #(3 2) #(-5 4) #(2 2) #(-5 2)<br />
#(5 2) #(-7 4) #(1 2) #(-2 2) #(1 4) #(0 0.5) #(12 4)<br />
)<br />
chainLength: 2.<br />
t := 0.<br />
1 to: 10 do: [ :i |<br />
seq := chain newSequenceOfLength: 100 seed: i * 26.<br />
seq do: [ :offDur |<br />
dur := (offDur at: 2) / i.<br />
pitchOffset := offDur at: 1.<br />
self<br />
keyDownAt: t beats<br />
duration: dur beats<br />
frequency: 1 g + pitchOffset nn + i nn<br />
velocity: i/10.<br />
t := t + dur]].<br />
144
<strong>The</strong> training sequence is just an Array of Arrays, each subarray containing two numbers — nothing specifically<br />
musical yet:<br />
chain :=<br />
MarkovChain<br />
trainingSequence: #(<br />
#(0 4) #(3 2) #(-5 2) #(2 4) #(3 2) #(-5 2) #(2 4)<br />
#(3 2) #(-5 4) #(2 2) #(3 2) #(-5 4) #(2 2) #(-5 2)<br />
#(5 2) #(-7 4) #(1 2) #(-2 2) #(1 4) #(0 0.5) #(12 4)<br />
)<br />
chainLength: 2.<br />
Next, there is a loop in which the index, i, takes on the values from 1 to 10. Each time through the loop a<br />
new sequence is generated, using a different seed each time, and saved in the variable called seq:<br />
1 to: 10 do: [ :i |<br />
seq := chain newSequenceOfLength: 100 seed: i * 26.<br />
In Smalltalk, you can also create a loop by sending the do: message to an Array. <strong>The</strong> following is a loop<br />
in which the variable offDur takes on each of the values stored in the Array called seq. Each value in<br />
seq is a subarray containing two numbers. Take a look through this code to see if every step makes sense<br />
to you. (If not, don’t worry, it is all explained in more verbose style in the following paragraph!)<br />
seq do: [ :offDur |<br />
dur := (offDur at: 2) / i.<br />
pitchOffset := offDur at: 1.<br />
self<br />
keyDownAt: t beats<br />
duration: dur beats<br />
frequency: 1 g + pitchOffset nn + i nn<br />
velocity: i/10.<br />
t := t + dur].<br />
Each time through the loop, the second element of offDur is divided by i (the index of the outer loop)<br />
and stored in dur. <strong>The</strong> first element of offDur is stored in the variable pitchOffset. <strong>The</strong>n a MIDI<br />
event is created that starts on beat t, lasts <strong>for</strong> dur beats, and whose frequency is 1 g plus the number of<br />
half steps stored in pitchOffset plus a number of half steps equal to the index i. <strong>The</strong>n the time counter<br />
t is incremented by the duration of the event just created and the loop repeats. <strong>The</strong> overall effect is that<br />
we hear several, related sequences, each one faster and at a higher pitch than the one be<strong>for</strong>e it.<br />
Using MIDI Files with the MarkovChain<br />
<strong>The</strong> longer the training sequence, the more likely the generated sequences are to sound related to the<br />
original without being exact copies of the original. But entering long arrays by hand can be tedious, so<br />
here is a little trick <strong>for</strong> obtaining long sequences of MIDI events <strong>for</strong> use in a MarkovChain: Create a<br />
TimedEventSequence by reading it from a MIDI file, make sure it is monophonic, and then create a<br />
MarkovChain using just the events from the TimedEventSequence, ignoring the starting beats.<br />
Play fantasia bill and continue reading while it churns away on this long sequence of MIDI events. Here<br />
is the script:<br />
| pat chain seq |<br />
pat :=<br />
TimedEventCollection<br />
timesAndEventsFromMIDIFile: 'DESAFIN1.MID'<br />
channel: 3.<br />
pat := pat asMonophonicEventSequence.<br />
chain := MarkovChain trainingSequence: pat events chainLength: 3.<br />
seq := chain newSequenceOfLength: 200 seed: 3.<br />
(EventSequence events: seq) playOnVoice: self onBeat: 0 bpm: 90.<br />
145
Recursion<br />
First we create a TimedEventSequence from a MIDI file. § <strong>The</strong>n we get rid of any polyphony using the<br />
asMonophonicEventSequence message. <strong>The</strong>n we create a MarkovChain (length 3), using the events<br />
from the TimedEventCollection. We then ask the MarkovChain to create a new sequence. Finally, we<br />
create a new EventSequence, supplying the Markov-generated sequence as the events. When the example<br />
plays, you will hear one part of the original sequence, followed by the Markov-generated sequence.<br />
Take a look at the <strong>Sound</strong> called self similar melody. This script is an example of how you can create a<br />
Smalltalk “block” and then call it recursively:<br />
| pitchShape durationShape shapingFunction selfSimMel |<br />
pitchShape := #(0 7 -12).<br />
durationShape := #({2/5} {1/5} {2/5}).<br />
shapingFunction := [ :seq :count |<br />
count = 0<br />
ifTrue: [seq]<br />
ifFalse: [<br />
EventSequence events:<br />
((1 to: pitchShape size) collect: [ :i |<br />
shapingFunction<br />
value:<br />
((seq trsp: (pitchShape at: i))<br />
dim: (durationShape at: i))<br />
value: count - 1])]].<br />
selfSimMel :=<br />
shapingFunction<br />
value: (Note frequency: 4 c durationInBeats: 16)<br />
value: 4.<br />
selfSimMel playOnVoice: self onBeat: 0 bpm: 45.<br />
As usual, we start by declaring the variables. <strong>The</strong>n we set pitchShape to an Array of intervals specified<br />
in half steps, and we set durationShape to an Array of ratios, each of which corresponds to an amount<br />
by which to scale a duration:<br />
| pitchShape durationShape shapingFunction selfSimMel |<br />
pitchShape := #(0 7 -12).<br />
durationShape := #({2/5} {1/5} {2/5}).<br />
Next we store an entire block of code (i.e., everything within the square brackets) in a variable called<br />
shapingFunction. This block has two arguments (:seq and :count), and they are listed at the very<br />
beginning of the block, separated from the rest of the block by a vertical bar. <strong>The</strong> code within the block is<br />
not executed at this point; it is just stored in a variable so it can be executed later:<br />
shapingFunction := [ :seq :count |<br />
count = 0<br />
ifTrue: [seq]<br />
ifFalse: [<br />
EventSequence events:<br />
((1 to: pitchShape size) collect: [ :i |<br />
shapingFunction<br />
value:<br />
((seq trsp: (pitchShape at: i))<br />
dim: (durationShape at: i))<br />
value: count - 1])]].<br />
§ Thanks to Bill Walker (walker@taurus.apple.com) <strong>for</strong> the MIDI file DESAFIN1.MID.<br />
146
To actually execute the block of code, we have to supply values <strong>for</strong> each of its arguments. <strong>The</strong> following<br />
line executes the code stored in shapingFunction and stores it in the variable selfSimMel. It sets the<br />
value of the first argument to a Note event on middle C and the second argument to the number 4:<br />
selfSimMel :=<br />
shapingFunction<br />
value: (Note frequency: 4 c durationInBeats: 16)<br />
value: 4.<br />
Now let’s examine what the block of code will do given these values. First, it checks whether count is<br />
equal to 0. It is not, so it chooses to execute the ifFalse: block:<br />
count = 0<br />
ifTrue: [seq]<br />
ifFalse: [<br />
EventSequence events:<br />
((1 to: pitchShape size) collect: [ :i |<br />
shapingFunction<br />
value:<br />
((seq trsp: (pitchShape at: i))<br />
dim: (durationShape at: i))<br />
value: count - 1])]<br />
Let’s look at what the ifFalse: block does. It uses the collect: message to create an Array of events<br />
<strong>for</strong> a new EventSequence. For each entry in pitchShape and durationShape, it executes the block<br />
stored in shapingFunction with the event in seq transposed by the current entry in the pitchShape<br />
array and its duration scaled by entry in the durationShape array, and one less than the value of<br />
count. <strong>The</strong> result is that shapingFunction is evaluated three times (because the pitchShape array is<br />
three long) with a count value of 3. Eventually, count will be 0, and the function returns the value of<br />
seq.<br />
To summarize, the first time it calls the function with a single event and count is 4; then inside there it<br />
calls itself three more times with count set to 3, and each of those calls itself three more times with<br />
count set to 2, each one of those calls itself three more times with count set to 1, and finally it calls itself<br />
three times with count set to 0, so each branch returns at that point and as it returns back up through all<br />
the calls to the function, the EventSequences are collected at each step, until it gets back up to the top<br />
with a recursive collection of EventSequences.<br />
As the last step, the new EventSequence plays itself.<br />
selfSimMel playOnVoice: self onBeat: 0 bpm: 45.<br />
Of course, you could get the same result using iteration:<br />
| c1 |<br />
c1 := Note frequency: 4 c durationInBeats: 16.<br />
4 timesRepeat: [<br />
c1 :=<br />
((1 to: 3) collect: [ :i |<br />
c1 trsp: (pitchShape at: i))<br />
dim: (durationShape at: i))].<br />
but doing the same thing with recursion is just a little bit more thrilling <strong>for</strong> your mind (which must be<br />
kept entertained if you are not to lose it).<br />
147
Morphing<br />
Imagine a scene from your favorite science fiction movie where the character changes from flesh to molten<br />
metal or from human to saurian-faced alien. Now imagine that visual morph supported by an<br />
analogous morph of the sound — a voice changing from human speech to metallic clanging or pitcheddown<br />
porcine screeches. Or imagine a sweetly chirping bird morphing into a wailing siren, or a lounge<br />
singer morphing into a werewolf howling. <strong>Sound</strong> tracks have lagged behind visual morphing effects <strong>for</strong><br />
long enough! Let’s all get out there and create the sound morphs to match or surpass those spectacular<br />
visual effects!<br />
<strong>The</strong> Venerable Cross-fade (and why it is not enough)<br />
Play Crossfade amplitudes, and open it up to take a look at it; this is a Crossfade between two Samples,<br />
controlled by a ramp function. At the beginning you hear the female voice as the loudest and at the end<br />
you hear the male voice at the loudest, but at all times you hear them as two separate voices.<br />
Let’s try refining this a little, and “pitch down” the female voice to the same frequency as the male voice<br />
while cross fading the amplitudes. You can hear the results in cross amp & freq. That’s a little more interesting,<br />
though it still sounds like two voices.<br />
Now try cross spectra, a SumOfSines <strong>Sound</strong> that cross fades between harmonic, spectral analyses of the<br />
male and female voices. This sounds like something entirely different from crossfading. While the voice<br />
does sound a little odd in the intermediate stages, it always sounds like one single voice that is changing<br />
in character, not like two separate people.<br />
Finally, try dominic-carla, to hear an example of what sounds almost like a child’s voice going through<br />
different stages of growth.<br />
Select cross spectra in the <strong>Sound</strong> file window, and expand it by typing Ctrl+E. Double-click on the expanded<br />
version to see how the SumOfSines is put together: the <strong>Sound</strong> called interpSpect does a crossfade<br />
between its two inputs, analysis0 and analysis1. Notice that the left channels of the two inputs can be<br />
controlled independently of the right channels of the two inputs. <strong>The</strong> left channel of a spectral source<br />
contains all the amplitudes and the right channel contains all the frequencies.<br />
Variations on a Gender Bending <strong>The</strong>me<br />
You already know how many ways there are to do crossfades — variations on the speed of the fade, the<br />
shape of the crossfade function, all the combinations of fading functions on the starting and ending<br />
sounds, etc. <strong>The</strong>re are even more ways to do morphing. In the first place, in crossfading you have control<br />
over only one parameter — amplitude; in morphing, you have control over two parameters — amplitude<br />
and frequency. §<br />
Play, <strong>for</strong> example, synchronize & crossfade to hear a resynthesis of the two original samples used in the<br />
subsequent morphing examples. You have control over the crossfade function using !Morph in the virtual<br />
control surface (or the corresponding MIDI fader). Experiment with morphing at different points in<br />
the phrase and at different speeds.<br />
Now compare the following <strong>Sound</strong>s: freq first, then amp, linear morph, and morph on vowel (time will<br />
slow down on “you”, giving you time to complete the entire morph during a vowel).<br />
Independent Frequency and Amplitude<br />
In freq first, then amp, the frequencies morph be<strong>for</strong>e the amplitudes. In other words, it gradually crossfades<br />
between the frequencies of the female voice to the frequencies of the male voice, until it reaches a<br />
point when there are all male frequencies but all female amplitude envelopes. <strong>The</strong>n it quickly crossfades<br />
§ In actuality, you have control over hundreds of pairs of amplitudes and frequencies should you choose to morph<br />
each of the analysis tracks independently of each other. While this is impractical, it may make sense in some instances<br />
to morph subsets of the harmonics independently of one another.<br />
148
<strong>Sound</strong> Effects<br />
Musical Phrases<br />
between the amplitude envelopes of the female and male voices. <strong>The</strong> left channel (the amplitude) is controlled<br />
by<br />
2 * !Morph - 1<br />
while the right channel (the frequency) is controlled by<br />
2 * !Morph<br />
Because the values are limited to the range of 0 to 1, these functions clip at their low and high extremes.<br />
In other words, 2 * !Morph will reach its maximum value of 1 when !Morph is 0.5 and will stay at its<br />
maximum value of 1 <strong>for</strong> all larger values of !Morph. On the other hand, 2 * !Morph - 1, will remain 0<br />
<strong>for</strong> !Morph values of 0 through 0.5, and will then climb from 0 up to 1 as !Morph increases from 0.5<br />
up to 1.<br />
<strong>The</strong> result sounds like a woman growing larger in size because of the lower fundamental frequency and<br />
the shift to lower <strong>for</strong>mant regions or resonances. At the last moment, it seems to “come into focus” as the<br />
normal <strong>for</strong>mant regions of the male voice take over.<br />
Amplitude and Frequency Together<br />
<strong>The</strong> next example, linear morph, controls both amplitudes and frequencies with a single morph parameter.<br />
This gives a different impression than the last example; it sounds more continuous (although this<br />
approach is the most sensitive to artifacts in the analysis).<br />
I’d like to buy a vowel<br />
In listening to the previous examples, you probably noticed that most of the artifacts occur during the<br />
consonants, so another approach might be to morph only during vowels. morph on vowel uses WarpedTimeIndex<br />
to stretch time during the [u] vowel in “you”, giving you enough time to complete the<br />
morph during a vowel. This was done by adding<br />
!Stretch s<br />
or !Stretch number of seconds to each of the IdealTimePoints following the time point at which the<br />
vowel occurs. (You can determine the time at which the vowel starts by locating it in the graphical spectrum<br />
editor).<br />
<strong>The</strong> next example, harley to lion, ‡ uses a GraphicEnvelope to control the shape of the morph; double-click<br />
on the <strong>Sound</strong> called env to see the function. This is a handy way to design your morph functions in an<br />
interactive, yet repeatable way.<br />
Try playing cat baby and then double-click on it to take a look at how it was constructed. This is a Concatenation<br />
of a resynthesized cat (to establish an unmodified, familiar sound in the listener’s mind first),<br />
a cat-to-baby morph, a baby-to-cat morph, and finally another resynthesis of the cat. <strong>The</strong> singing werewolf<br />
example is similar. §<br />
didgeri-mouth uses an Oscillator to control a morph back and <strong>for</strong>th between a didgeridoo and a mouth<br />
harp using the Gaussian wavetable as the shape of the morph.<br />
In drum to tubular, a TimeOffset is used to delay the ramp function that controls the amplitude morph,<br />
so the pitch is completely morphed be<strong>for</strong>e the beginning of the amplitude morph.<br />
‡ Special thanks to Frank Serafine <strong>for</strong> permission to include these analyses of sound effects samples from his CD,<br />
Platinum <strong>Sound</strong>s <strong>for</strong> the 21st Century from L2 <strong>Sound</strong> FX. For more in<strong>for</strong>mation on this sound library, call +1-800-<br />
779-L2FX.<br />
§ Special thanks to Scott Whitney at Hollywood Edge <strong>for</strong> permission to include the analyses we did of the cat, the<br />
baby, and the dog, which are derived from samples in their CD-ROM sound library Hollywood Edge: <strong>The</strong> Edge<br />
Edition. For more in<strong>for</strong>mation on these sound libraries, visit their website at http://www.hollywoodedge.com.<br />
149
Single Musical Tones<br />
You can also morph between analyses of single tones from musical instruments. For example, harp to ah<br />
(kbd) uses the function<br />
1 - (!KeyDown ramp: 1.5 s)<br />
to morph from an analysis of a harp tone to an analysis of someone singing “ah” each time a MIDI key<br />
goes down.<br />
You can also create more subtle morphs between different tones played on the same instrument but in<br />
different frequency ranges. As an example, take a look at KBD morph TRB GA. This examples uses GA<br />
synthesis to morph between three spectra; the morph is controlled by the MIDI key being played. For example,<br />
the morph between 3 c sharp and 4 d sharp is:<br />
(!KeyNumber - 3 c sharp removeUnits) / (4 d sharp - 3 c sharp) removeUnits<br />
or, to describe it another way,<br />
/ <br />
or the ratio of where the current key number is relative to the low end of the pitch range to the full pitch<br />
range.<br />
How to do your own Morphs<br />
But enough of these examples; what you really want is to try morphing your own samples, so here is a<br />
step-by-step example. ‡<br />
I. Selecting and Preparing the Samples<br />
<strong>The</strong> more characteristics the samples share, the smoother (although less dramatic) the morph will be.<br />
Generally speaking, it is best to choose samples that are about the same length, that are normalized and<br />
compressed to remove extreme amplitude changes, and, particularly if you are trying to morph speech,<br />
that are extremely well synchronized with each other in time. In fact, if you have the option, you should<br />
record one per<strong>for</strong>mer first and have the second per<strong>for</strong>mer listen to that track while recording the second<br />
track, trying to “lip synch” (ear synch?) as closely as they can to the first per<strong>for</strong>mer.<br />
In the current version of <strong>Kyma</strong>, you will be much happier if you limit your samples to about six seconds<br />
or less in duration. If you intend to morph a long stretch of speech or music, it is best to look <strong>for</strong> the natural<br />
breaks in the speaking or singing (where the per<strong>for</strong>mer took a breath or paused, or the silence just<br />
be<strong>for</strong>e a consonant or new attack) and to split the sample up into sections bounded by these natural<br />
breaks. <strong>The</strong>n you can either do a string of partial morphs or morph during one of the sections in the middle.<br />
While you would be well-advised to follow these guidelines <strong>for</strong> your first few morphs, once you have<br />
gotten a feel <strong>for</strong> how it works, you can break with some of the guidelines and start experimenting and<br />
discovering your own morphing techniques (the concept of morphing is still new and there is room <strong>for</strong><br />
innovation and invention!)<br />
II. Analyzing the Samples<br />
For this example, let’s use the recordings of Kurt and Carla speaking the word “morphing”. To analyze,<br />
you can use the spectral analysis from <strong>Kyma</strong>’s Tool menu, or, if you are on the Macintosh, you can use a<br />
third party shareware program called Lemur § which is capable of exporting analysis files <strong>for</strong> <strong>Kyma</strong>.<br />
1. Open the spectral analysis tool by choosing Spectral Analysis from the Tools menu.<br />
‡ While the Spectral Analysis tool works on two-card systems, only a few sine wave oscillators can be used to audition<br />
the real-time analysis-resynthesis to test the parameters. You can still do the analysis and listen to the full<br />
resynthesis after producing the spectrum file, or you can use Lemur to do the analyses in non-real-time. If you plan<br />
to do a lot of analysis/resynthesis, we recommend that you use a 3-card system as the minimum configuration.<br />
§ Lemur was written by Kelly Fitz, Bryan Holloway, Bill Walker, and Lippold Haken and is available <strong>for</strong> downloading<br />
from their web site at http://datura.cerl.uiuc.edu. At this web site, you can also find Lime, a music<br />
notation program <strong>for</strong> both Macintosh and Windows written by Lippold Haken and Dorothea Blostein.<br />
150
2. Select the first sample by clicking the Select button and using the file dialog to locate the sample<br />
Cmorph from the speech folder of the Samples folder of the Wavetables folder. <strong>Kyma</strong> will start<br />
playing the sample over and over with a 1 second silence between repetitions. To change the duration<br />
of the silence between repetitions of the sample to two seconds, type in a 2 in place of the 1, and<br />
press Enter.<br />
Listen to the sample and estimate the pitch range of the speech. <strong>The</strong>n click Next to continue.<br />
3. Choose the highest analysis frequency that is still lower than the lowest frequency you hear in the<br />
sample. In this example, the voice seems to go as low as 3 d or 3 c, so try 2 F as the setting.<br />
<strong>The</strong> analysis is done by a bank of band-pass filters equally spaced in frequency from 0 hz up to half of<br />
the sampling rate; the lower the frequency you choose here, the more filters there will be, and the<br />
closer those filters will be spaced in frequency. For 1 F, it uses 512 filters, <strong>for</strong> 2 F it uses 256 filters and<br />
so on (divide the number of filters in half each time you go up an octave in the analysis frequency).<br />
Press the Audition button to hear a real-time analysis and resynthesis with the analysis parameters as<br />
you have them currently set. Just below the Audition button, <strong>Kyma</strong> will print out the number of sine<br />
wave oscillators being used to resynthesize the sound from the real-time analysis. This number will<br />
vary depending on the analysis frequency you have chosen and the number of expansion cards in<br />
your Capybara.<br />
Try out a different analysis frequency by choosing 5 F and then clicking the Audition button again.<br />
Clearly this setting does not give you enough filters to adequately cover what is going on in the signal,<br />
so change it back to 2 F.<br />
4. In the last step, you effectively chose the number of bandpass filters to be used in the analysis. This<br />
next step controls the bandwidth of those filters. In the everpresent tradeoff between time and frequency,<br />
you can choose BestFreq and get the narrowest bandwidths (and the most time smearing), or<br />
you can choose BestTime to get the best time response (but the widest bandwidth and thus the worst<br />
frequency resolution), or you can choose any of the intermediate settings to get intermediate bandwidths<br />
and intermediate results with respect to time smearing and frequency resolution.<br />
Leaving the frequency set at 2 F, try out each of BestFreq, BestTime, BetterFreq, and BetterTime,<br />
clicking the Audition button after each choice to hear the differences. Generally speaking, you can<br />
tell when the bandwidth is too narrow if the result sounds like it has reverb or a delay on it, and you<br />
can tell when the bandwidth is too wide by a kind of roughness or distorted sound in the resynthesis.<br />
When you find the best sounding analysis (or the least-strange-sounding analysis if you are feeling<br />
negative today), click Next to continue.<br />
5. You are ready to try the first analysis! Click the button labeled Create Spectrum File. <strong>The</strong> name of the<br />
analysis file will be the name of the original sample followed by an s (<strong>for</strong> spectrum) and the number<br />
of analysis filters used (or, to put it another way, the number of analysis “tracks” that can be read by<br />
an OscillatorBank and resynthesized).<br />
Create your own wavetables folder called MyWavetables. In it, create a folder Spectra, and within<br />
Spectra create a folder called speech. Save the analysis file in this speech folder. <strong>The</strong> analysis tool<br />
automatically creates a SumOfSines <strong>Sound</strong> and places it into an untitled <strong>Sound</strong> file window <strong>for</strong> you.<br />
Just <strong>for</strong> fun, double-click on this <strong>Sound</strong>, change the Duration to On, and multiply the OnDuration<br />
by 10 to time-stretch the resynthesis.<br />
A straight spectrum is best <strong>for</strong> time-stretching or frequency-scaling, or when the two files you are<br />
morphing have no definite pitch to them. However, if the original samples have identifiable pitches<br />
in them, the morph will probably work better if you proceed to the next step: the quasi-harmonic<br />
analysis.<br />
If your original sample has an identifiable pitch to it, you should continue with the analysis by clicking<br />
on Set Quasi-Harmonic Parameters. Since CMorph (and indeed human speech in general) does<br />
have an identifiable pitch, click on that button now to continue.<br />
6. In this next section of the analysis, <strong>Kyma</strong> asks you to help identify the fundamental frequency of the<br />
original sample. <strong>The</strong> first step is to identify parts of the sound that do not have any identifiable pitch<br />
to them.<br />
151
Adjust the fader upwards until you remove all of the pitched parts of the resynthesis. You’ll know<br />
when the fader is in the proper position when all you can hear is the “ph” in “morphing” and a little<br />
gasp <strong>for</strong> breath at the end. You do not want to hear any of the “ing” and you do not want to hear the<br />
pitched parts of the sound breaking up.<br />
It may seem a little counterintuitive to remove the pitched parts of the signal when you are trying to<br />
analyze just the pitched parts. <strong>The</strong> trick is that once you have removed everything except the noisy<br />
bits, then, by process of elimination <strong>Kyma</strong> knows which parts of the sound do have a pitch to them.<br />
Once all you hear are clicks, air bursts or gasps, you can click Next to continue.<br />
7. Please wait while <strong>Kyma</strong> prepares the next screen; watch the thermometer, or get yourself a glass of<br />
water, but don’t start hitting keys until <strong>Kyma</strong> has displayed a color graph of the lower end of the<br />
spectrum.<br />
8. <strong>The</strong> goal <strong>for</strong> this section is to look at the spectrum, decide which track is the fundamental frequency,<br />
and to trace the fundamental frequency track using the white line you see (now drawn straight across<br />
the lower part of the spectrum).<br />
First, zoom in on what seems to be the fundamental (the orange colored line at the bottom of the<br />
screen):<br />
♦ Click in the black spectrum display to select it. You can tell when it is selected because you<br />
will see the square endpoints on the white line.<br />
♦ Hold down the Control or Command key until you see the cursor change to a magnifying<br />
glass.<br />
♦ Still holding down the key, draw a box around the lower fourth of the spectrum. (<strong>The</strong> plus<br />
sign inside the magnifying glass is transparent, and the center point of the plus is where the<br />
cursor will draw the box).<br />
Line up the first endpoint of the white line with the beginning of the fundamental track by clicking<br />
on the white box and dragging it upwards. Adjust the last endpoint similarly so that the white line<br />
draws a straight line closest to the orange fundamental.<br />
Now add some additional breakpoints to the white line so that it traces the fundamental more<br />
closely. To add a new point, click the mouse while holding down the Shift key.<br />
152
When you get to the “ph”, the “g”, and breath at the end of the word, the fundamental seems to get<br />
lost <strong>for</strong> a short time, and it just looks like crazy random green dots during that segment. Just put a<br />
breakpoint where the fundamental picks up again following the “ph”; in other words, always draw a<br />
straight line right through the ambiguous segments.<br />
Once you have traced the fundamental with the white line, let things settle <strong>for</strong> one repetition of the<br />
sample and then listen. This is an oscillator whose frequency follows the estimated fundamental frequency<br />
curve you have drawn with the white line.<br />
Now click where it says Original Sample to remind yourself of what it sounds like, and then click on<br />
All Harmonics to compare the resynthesized version with the original. If it sounds OK, click Next.<br />
Otherwise, you may have to trace the fundamental a little better or go back and try different analysis<br />
parameters. If you have been following along though, everything should sound pretty good at this<br />
point.<br />
9. Click the button <strong>for</strong> Create Quasi-Harmonic Analysis, and leave the pitch set to its default 60 nn. 60<br />
nn is the default pitch <strong>for</strong> any analysis that has more than one pitch in it or that has no definite pitch.<br />
<strong>The</strong> only time it makes sense to set this to anything other than 60 nn is <strong>for</strong> single instrument tones or<br />
isolated sung tones.<br />
10. Click New Sample to go back through the entire process, this time selecting KMorph as the sample to<br />
analyze.<br />
Follow the directions on the pages of the tool itself this time (referring back through steps 1-9 if necessary<br />
to refresh your memory). <strong>The</strong>re are a few things that should be done differently <strong>for</strong> KMorph:<br />
♦ Set the analysis frequency to 1F (because his voice is about an octave lower)<br />
♦ Set the time/bandwidth response to BetterFreq<br />
♦ Set the level to about 0.75 to avoid clipping<br />
♦ When you get to the part where you trace the fundamental, you can draw the zooming box<br />
around the white line, because it is pretty close to the real fundamental. Once you have<br />
zoomed in, it should be easy to see where the fundamental is and trace it out as you did be<strong>for</strong>e.<br />
Once you have saved the four analysis files on disk (CMorph h, CMorph s256, KMorph h, and KMorph<br />
s512) close the spectral analysis tool window.<br />
153
III. Synchronizing the Analyses<br />
At this point, you could do a morph, but because this is a speech example, there is one more step that can<br />
make the morph work much better — that is to refine the time synchronization by looking at features in<br />
the analysis itself. You can probably skip this step if you are analyzing single instrument tones or if the<br />
two original samples are so different from each other that they don’t really have any corresponding features<br />
that could be lined up. But in instances like this one, where you have two people speaking or<br />
singing the same word or words, the synchronization step is essential.<br />
1. Choose Synchronizing Spectra from the Tools menu. Read the instructions, and then click the Continue<br />
button to start.<br />
2. First, pick the guide spectrum, the one whose timing will not be warped. Click the Guide button, and<br />
locate the analysis file called CMorph h.<br />
3. Once the spectrum is displayed, scrub through it to get an idea of the time at which each phoneme<br />
occurs. To scrub, you can either drag the yellow vertical line across the display with the mouse or use<br />
pitch bend on your MIDI keyboard to move the yellow line. To make fine adjustments in the position<br />
of the yellow line, use the left and right arrow keys on your computer keyboard. To remove a marker,<br />
select it and press Delete.<br />
4. <strong>The</strong> next step is to put a marker at the time point at which each “feature” occurs in the guide spectrum.<br />
To put in a marker, position the scrub bar at the time when the feature occurs, and press the m<br />
key on your computer keyboard.<br />
♦ First scrub all the way to the left edge of the spectrum, and press m to put in a marker at the<br />
very beginning of the file<br />
♦ Scrub until you hear where the “m” first opens up into an “o”. Get close to the point, and<br />
then use the right-arrow key to move right, frame-by-frame until you hear the “m” change.<br />
<strong>The</strong>n press the m key.<br />
♦ Scrub over to the “r”, which looks like the point at which the spectrum gets a little wider. Hit<br />
m.<br />
♦ Scrub over to the “ph”, and use the arrow key to find the point at which the pitch seems to<br />
disappear. Put a marker here to mark the “ph”.<br />
♦ Scrub to the end of the “ph” visually. Use the right-arrow to determine which frame makes<br />
the transition from “unvoiced” to “voiced”. Mark it.<br />
♦ Scrub to the end of the “i” and beginning of “ng”. Mark it.<br />
♦ Mark the end of ‘ng”. You can see this one visually and also use the arrow key to find where<br />
the voice disappears.<br />
♦ Scrub all the way to the right edge, and mark the end of the file.<br />
5. To save your work, press the s key. This will save the markers in the spectrum file. <strong>The</strong> cursor will<br />
change to the pen to show that it is writing to the file, and the resynthesis will play at the end to show<br />
that it has finished.<br />
6. Now click the Warped button. Select the spectrum file whose timing will be warped such that all its<br />
marked features line up with the marked features in the guide file. In this instance, we want the file<br />
called KMorph h.<br />
7. Mark all the same phonemes in KMorph that you marked in CMorph in step 4. Once you have finished,<br />
double check that the markers on corresponding phonemes are of the same color in both the<br />
guide spectrum and the warped spectrum. In other words, if the last marker is red in the guide, it<br />
should also be red in the warped.<br />
154
8. Once all the markers are in KMorph, press the s key to save the markers into the spectrum file.<br />
9. Click the Mix button. This produces a Mixer of the two resynthesized spectra. Select the Mixer and<br />
play it. Pan between the left and right outputs on your amp or mixer to assess how well the signals in<br />
the right and left channels line up in time. Double-click on the Mix and look at the WarpedTimeIndex<br />
that feeds into KMorph. Notice how the ideal time points (upper parameter field) are different from<br />
the actual time points (lower parameter field). <strong>The</strong> WarpedTimeIndex takes the real time points<br />
(where you placed the markers) and stretches or compresses time between those markers such that<br />
they line up with the ideal time points.<br />
10. Click the Morph button. This creates an OscillatorBank that is ready to morph. Play it, and use the<br />
!Morph fader on the virtual control surface or MIDI faders to morph from one voice to the other.<br />
11. Edit crossSpects, setting LeftInterp to !Volume and RightInterp to !Frequency. Play morph,<br />
and experiment with different settings of !Volume and !Frequency. Try morphing with<br />
!Frequency first, and then !Volume. <strong>The</strong>n try !Volume first, followed by !Frequency, and all the<br />
other combinations. This will give you a feel <strong>for</strong> what will make good morphing functions.<br />
12. Copy and paste a GraphicalEnvelope into the !LeftInterp field. Experiment with drawing different<br />
amplitude morph shapes in the GraphicalEnvelope editor.<br />
Alternatives to the Synchronizing Tool<br />
You can, if you prefer, try to synchronize the two samples in a wave editor be<strong>for</strong>e doing the spectral<br />
analyses (<strong>for</strong> instance, you could cut out silences or cut/repeat cycles of vowels to make the phonemes of<br />
the two samples line up in time), or you can try using a TDM Plug-In called VocAlign from Synchro<br />
Arts Ltd in Surrey UK. Or you can use these techniques to get fairly closely synchronized samples in the<br />
time domain, and do the final synchronization tweaks in the synchronize spectra tool.<br />
IV. Invent your own Morph<br />
Every pair of samples will suggest a different kind of morphing technique. Some will work best with<br />
straight spectra, some work best as quasi-harmonic spectra, some work best synchronized, some work<br />
best without synchronization. Experiment, get a feel <strong>for</strong> what the tools do, and then go wild!<br />
155
Output MIDI<br />
Getting Wired<br />
MIDI Notes Off<br />
<strong>The</strong>se examples illustrate how you can generate MIDI events in <strong>Kyma</strong> and send them out to control external<br />
MIDI devices like synthesizers and samplers. You can use this to synchronize external devices to<br />
<strong>Kyma</strong> <strong>Sound</strong>s, to extract parameters from audio signals and send them out as MIDI events, or to algorithmically<br />
generate and process MIDI events in <strong>Kyma</strong> be<strong>for</strong>e sending them to your other sound<br />
modules.<br />
If you don’t have any MIDI-controlled sound modules other than <strong>Kyma</strong>, then you can skip this section. If<br />
you do have a synthesizer/sampler, then hook everything up as follows:<br />
♦ Capybara MIDI output connected to synthesizer MIDI input<br />
♦ If you have a mixer, mix the outputs of the Capybara and the synthesizer<br />
♦ If you do not have a mixer, then patch synthesizer audio output into Capybara audio input<br />
♦ If your synthesizer/sampler has pitch bend, set it to ±12 semitones<br />
<strong>The</strong> quickest way to send an “all MIDI notes off” command in <strong>Kyma</strong> is to use Ctrl+M or else to choose<br />
MIDI notes off from the DSP menu.<br />
Sending Out MIDI Note Events<br />
Double-click simple MIDI out to see its structure and parameters:<br />
<strong>The</strong>n double-click output MIDI events. This is a MIDIOutputEvent. You supply the three elements of a<br />
MIDI note event: a frequency, a gate, and an amplitude, and this <strong>Sound</strong> puts together a MIDI note event<br />
and sends it to the MIDI output of the Capybara. In this instance, we have set these parameters to come<br />
from the corresponding values from the MIDI input: Frequency to !Pitch, Gate to !KeyDown, and<br />
Amplitude to !KeyVelocity. So this <strong>Sound</strong> is per<strong>for</strong>ming the redundant but illustrative task of reading<br />
note events sent to the Capybara’s MIDI input, splitting them into !Pitch, !KeyDown and<br />
!KeyVelocity, and then giving them to the MIDIOutputEvent <strong>Sound</strong> which puts them back together<br />
into a MIDI note-on event which it sends to the Capybara’s MIDI output. Obviously you didn’t need<br />
<strong>Kyma</strong> to do that; you could have just connected the keyboard to the synthesizer directly. But wait, there’s<br />
more…<br />
But first just a quick note about the structure of this <strong>Sound</strong>: notice that external MIDI device and output<br />
MIDI events are both feeding into a Mixer. This is not a Mixer in the usual sense, but in the broader,<br />
156
<strong>Kyma</strong> sense of “simultaneity”. Unlike most <strong>Kyma</strong> <strong>Sound</strong>s, a MIDIOutputEvent does not produce an<br />
audio signal; it simply sends note events to the MIDI output port. Nevertheless, you can schedule it to<br />
occur at the same time as the ADInput (which, in this case, is the audio signal from an external synthesizer)<br />
by placing both <strong>Sound</strong>s in the same Mixer. (If you are mixing the external synthesizer with <strong>Kyma</strong><br />
through your actual physical mixer, you can delete the Mixer <strong>Sound</strong>, replacing it with the MIDIOutput-<br />
Event, since you can hear the synthesizer through your mixer and do not need to bring it into <strong>Kyma</strong> in<br />
order to be able to hear it).<br />
What happens if you send out a MIDI note whose pitch is not in 12-tone equal-tempered tuning? Try it<br />
out by entering the following into the Frequency field of the MIDIOutputEvent:<br />
!Pitch * 0.5 + 48 nn<br />
Select and load simple MIDI out and try playing half steps on the MIDI keyboard. Because the note numbers<br />
are being scaled by one half, you get a quarter-tone scale. <strong>Kyma</strong> computes the difference between the<br />
nearest equal-tempered note number and the note number you are requesting and sends the difference as<br />
pitch bend. In order <strong>for</strong> this to work correctly, you must have your synthesizer’s pitch bend set <strong>for</strong> ±12<br />
half steps.<br />
Synchronizing and Doubling<br />
Processing MIDI<br />
Select synchronizing and Compile, load, start it. When you play the MIDI keyboard, you hear both a<br />
<strong>Kyma</strong> <strong>Sound</strong> and whatever patch is loaded into your external synthesizer, both controlled by the same<br />
MIDI keyboard events. This is one way to synchronize and blend timbres from <strong>Kyma</strong> with timbres from<br />
other sources.<br />
Open up synchronizing to take a look at the signal flow diagram. filt noise+atk is a Mixer whose inputs<br />
are: VCA (a MIDI-controlled subtractive synthesis <strong>Sound</strong>), FM ATK (an attack synthesized using frequency<br />
modulation), and send MIDI out (a MIDIOutputEvent that <strong>for</strong>wards all your incoming MIDI<br />
keyboards events to the MIDI output on the Capybara).<br />
Instead of mirroring the <strong>Kyma</strong> <strong>Sound</strong>, let’s change the MIDIOutputEvent so that the synthesizer doubles<br />
the <strong>Kyma</strong> <strong>Sound</strong> in fourths. Double-click send MIDI out, and change the Frequency parameter to read<br />
!Pitch + 5 nn<br />
Compile, load, start synchrony again and play some nice quartal harmonies on the MIDI keyboard.<br />
Now let’s further modify the MIDIOutputEvent so as to trigger a little burst of repeated notes that die<br />
away over two seconds each time you hit a MIDI key. Change the Gate to<br />
!KeyDown bpm: 250<br />
to send MIDI notes out (repeating the same pitch) at a rate of 250 beats per minute. Change the Amplitude<br />
parameter to<br />
1 - (!KeyDown ramp: 2 s)<br />
so that each time you hit a key, it will start out at full amplitude and then linearly fade out to zero over<br />
the course of 1 second. Compile, load, start synchrony using Ctrl+Space Bar, and try playing the MIDI<br />
keyboard.<br />
Take a look at the signal flow graph <strong>for</strong> the <strong>Sound</strong> called MIDI as <strong>Sound</strong>. This sound illustrates a little<br />
trick by which you can change MIDI data into a fake signal and then treat it as part of the signal flow<br />
path. If you take a Constant, and paste a MIDI event into the Value field, you can then feed that Constant<br />
into a chain of processing modules — thus treating MIDI as if it were an audio signal.<br />
For instance, find the module called KeyDown as <strong>Sound</strong> in the open example. Its Value is set to<br />
!KeyDown. <strong>The</strong>n the Constant is fed into a DelayWithFeedback (called keydown del&fdbk ). Look at the<br />
parameter fields of send MIDI out. Notice that keydown del&fdbk has been pasted into the Gate field.<br />
(To use a <strong>Sound</strong> to control a parameter, select the <strong>Sound</strong>, copy it, and paste it into the parameter field).<br />
Compile, load, start MIDI as <strong>Sound</strong> and play the MIDI keyboard. Once you have a feel <strong>for</strong> what it is doing,<br />
try cautiously adjusting !Delay and !Feedback to hear how this affects the results.<br />
157
Generating MIDI<br />
If you want to turn MIDI key number into a signal, you have to divide it by 127 in the Value field of the<br />
Constant (because the Constant takes values between -1 and 1), and then multiply by 127 nn in the parameter<br />
field where you actually use the result. For example, look at the way MIDI pitch is turned into a<br />
signal and then mapped to a pentatonic scale using a Waveshaper in the <strong>Sound</strong> called double pentatonic.<br />
Try playing the <strong>Sound</strong> called output random MIDI events and adjust the faders in the virtual control<br />
surface. Double-click on it to edit and look at the parameters of events. <strong>The</strong> Gate parameter is:<br />
1 bpm: (!Rate * 1000)<br />
which generates a trigger at a rate of (!Rate * 1000) beats per minute. <strong>The</strong> Frequency parameter<br />
!Pitch + ((((1 bpm: (!Rate * 1000)) nextRandom * !Jitter * 7)) of: #(0 1 2 3 5 8 13)) nn<br />
is a bit more complicated, so let’s break it down into sub-parts. We can paraphrase it as<br />
!Pitch + nn<br />
and then break down as<br />
of: #(0 1 2 3 5 8 13)<br />
In other words, we compute an index, and then use it to look up the value stored at that position in the<br />
array: #(0 1 2 3 5 8 13).<br />
<strong>The</strong> result is that we will add 0, 1, 2, … or 13 half steps to whatever pitch is being played on the keyboard.<br />
Now, how do we come up with ? We can look at as<br />
nextRandom * !Jitter * 7<br />
In other words, at some number of beats per minute, generate random numbers between -1 and 1 and<br />
multiply them by !Jitter * 7. We multiply by 7 because there are seven entries in the array. Multiplying<br />
by !Jitter allows us to control how much variation there is in the random index generator.<br />
Finally, is<br />
1 bpm: (!Rate * 1000)<br />
<strong>The</strong> first number is the trigger or gate <strong>for</strong> turning on and off the metronome. Since it is a constant 1, the<br />
metronome will stay on all the time. <strong>The</strong> rate of the metronome is going to be between 0 and 1000 beats<br />
per minute, depending upon how you have set !Rate in the virtual control surface.<br />
Extracting Parameters from Audio Signals<br />
Once you have started down the path of pasting <strong>Sound</strong>s into the parameter fields of the MIDIOutput-<br />
Event, another idea immediately suggests itself: what about taking some of the “analysis” <strong>Sound</strong>s, the<br />
ones that track various parameters of audio input, and converting those to MIDI output events?<br />
Tracking Amplitude Envelope<br />
For example, play the <strong>Sound</strong> called track the pulse, and listen to the effect of different settings <strong>for</strong><br />
!Thresh in the virtual control surface. (This works best with a staccato or percussive patch setting on<br />
your external synthesizer).<br />
158
Double-click track the pulse to see how it works:<br />
Look at the parameter settings <strong>for</strong> trigger MIDI out when thresh exceeded. Notice that Gate is set so that<br />
it triggers the MIDI output event each time a threshold is exceeded (we will take a close look at the<br />
Threshold <strong>Sound</strong> in a moment), and that Frequency is set to:<br />
(( Threshold2 L nextRandom * 6) of: #(0 2 4 7 9 12)) nn + !Pitch<br />
In other words, each time the threshold is exceeded, it picks a new random index into an array of intervals<br />
and adds that number of half steps the to the current pitch from the keyboard.<br />
Now let’s take a closer look at Threshold2 (double-click on it to show its parameters). <strong>The</strong> output of this<br />
<strong>Sound</strong> is zero except when its input exceeds the Threshold at which point the output becomes one.<br />
Hysteresis is like inertia or a tendency <strong>for</strong> the <strong>Sound</strong> to prefer to stay in its current state of either one or<br />
zero. To switch from zero to one, the input actually has to exceed the Threshold plus the Hysteresis;<br />
once it is at one, it has to dip below the Threshold minus the Hysteresis be<strong>for</strong>e it gives up and goes<br />
back to zero. This protects the <strong>Sound</strong> against clicking on and off rapidly if the Input is wavering just<br />
around the Threshold.<br />
<strong>The</strong> input to the Threshold is an AmplitudeFollower on a GenericSource which, in its default setting, is<br />
playing back a drum loop from a sample CD called Sample Material from <strong>Sound</strong>s Good. ‡ Notice that the<br />
AmplitudeEnvelope <strong>Sound</strong> has a parameter called TimeConstant which we have set to !Tc * 0.1 s, so<br />
that it will be one tenth of its setting in the virtual control surface. This is a kind of responsiveness factor<br />
or averaging time. If it is too short, the output will react to every minute change in the input and you will<br />
just hear the original wave<strong>for</strong>m; on the other hand, if it is too long, then you will lose some of the fast<br />
transients in the input that should be reflected in the amplitude envelope.<br />
Notice that the GenericSource is also fed through a DelayWithFeedback and into a Mixer with the output<br />
of the synthesizer and the MIDIOutputEvent. If you look at the delay parameters, you can verify that the<br />
GenericSource is delayed by the same amount of time as the TimeConstant in the AmplitudeEnvelope,<br />
because an amplitude envelope follower is, by definition, a little “sluggish”, because it is ignoring instantaneous<br />
changes in amplitude in the wave<strong>for</strong>m in favor of getting an overall picture of how the<br />
amplitude is changing over time. Delaying the original audio signal by about the same amount as the<br />
delay introduced by the envelope follower makes the audio line up more exactly with the MIDI events<br />
that are being triggered by the original’s amplitude envelope.<br />
‡ Special thanks to Thomas Tibert <strong>for</strong> permission to include some of the samples from his <strong>Sound</strong>s Good collection.<br />
Thomas (a fellow <strong>Kyma</strong> user) has an interesting ear and has gathered together an intriguing selection of sounds on<br />
several CDs including samples of instruments from all over the world, hilarious outtakes from old documentaries,<br />
analog synths, and excellent per<strong>for</strong>mances and recordings of more traditional instrument tones and loops. See his<br />
web site <strong>for</strong> more in<strong>for</strong>mation http://www.ivo.se/sounds.good/.<br />
159
Note that if you decide to switch the GenericSource from reading a sample to reading the live input, remember<br />
that you may have your external synthesizer plugged into the Capybara’s audio inputs. If so,<br />
you will have to unplug at least one of the inputs and replace it with the output of the microphone preamplifier.<br />
You should also edit external MIDI device and set the right or left check boxes so you will hear<br />
only the external synthesizer and not the microphone input.<br />
Tracking Frequency<br />
Find a sustaining, less percussive patch on your synthesizer and try playing pch to MIDI (> 3F). It starts<br />
out by controlling a sine wave oscillator with the fundamental frequency of the input. To listen to the external<br />
MIDI synthesizer, bring the !OscilOrMIDI fader all the way down to zero. This example is<br />
designed <strong>for</strong> tracking inputs whose fundamental pitch is third octave F or higher. Next try Pch to MIDI<br />
(>2F). This is set up to track inputs whose fundamental pitch is 2 F or higher.<br />
In the virtual control surface, you can adjust !High and !Low to the highest and lowest MIDI note numbers<br />
you expect in the input, so you can modify either of these <strong>Sound</strong>s to track the frequency of different<br />
samples or of the live input.<br />
<strong>The</strong> technique behind these two <strong>Sound</strong>s is likely to change by the time of the next release, so it does not<br />
make sense to describe it in too much detail now. In the meantime, though, these may be useful <strong>Sound</strong>s if<br />
you ever have need to track the pitch of live inputs or recorded samples.<br />
160
Sampling<br />
Sampling to Disk<br />
<strong>Kyma</strong> is not a “sampler” per se, but it does provide several ways <strong>for</strong> you to use samples and digital audio<br />
tracks as raw material <strong>for</strong> further processing and modification.<br />
If you haven’t already read Disk Recording, Playback on page 112, you should read through it at this<br />
point, because it details several ways in which you can record your own samples to disk. It also covers<br />
some techniques <strong>for</strong> playing back recordings from the disk, including how you can trigger disk playbacks<br />
with MIDI events.<br />
Playing Back Samples from Disk<br />
Suppose you have a large number of sound effects and you need a quick way to synchronize them to<br />
picture. Or suppose that you have a piece <strong>for</strong> live per<strong>for</strong>mers and “tape”, but you would like one of the<br />
per<strong>for</strong>mers to have control over when to trigger different sections of the pre-recorded sounds so the per<strong>for</strong>mers<br />
are not slaved to the tape. <strong>The</strong> KeyMappedMultisample could be used in either of these<br />
situations to make it possible <strong>for</strong> you to trigger long disk tracks or a large number of smaller disk recordings<br />
directly from your MIDI keyboard.<br />
For example, try playing sound fx from disk, and triggering the animal sounds from a MIDI keyboard.<br />
Open it up to see what it is — a MIDIVoice on a KeyMappedMultiSample. <strong>The</strong> KeyMappedMultiSample<br />
takes the samples within a folder and maps them to MIDI key numbers or ranges of key numbers.<br />
Notice that in this example, the FirstSample is flamingos — meaning that all samples in the same<br />
folder as flamingos are to be mapped to MIDI key numbers. Notice also that FromDisk is checked,<br />
meaning that these samples will be triggered directly from disk and not read into the Capybara RAM<br />
first.<br />
<strong>The</strong> list of options under the Mapping are the different policies you can choose <strong>for</strong> mapping samples to<br />
key numbers. In this case, the mapping policy is OnePerHalfStep, meaning that the first sample is<br />
mapped to key number 1, the next sample is mapped to key number 2, and so on. <strong>The</strong> pattern repeats if<br />
there are fewer samples than there are MIDI keys.<br />
Finally, notice that the NoTransposition box is also checked. This lets you use different keys to trigger<br />
different recordings without changing the pitch of those recordings.<br />
Click on the disk button next to the FirstSample field and find another folder containing samples files<br />
(<strong>for</strong> example, the Water folder in the Samples folder of the More wavetables folder). Play sound fx<br />
from disk again, and trigger this different set of samples from your MIDI keyboard.<br />
For an example of a different mapping policy, take a look at trb from disk. This one maps samples § to<br />
ranges of key numbers based upon the base pitch stored in the header of an AIFF sample. Compile, load,<br />
start trb from disk and try playing some idiomatically trombone-like passages on the MIDI keyboard.<br />
You can hear where it switches over from one sample to the next.<br />
Playing samples directly from disk is especially useful when any one of your samples is too long to fit<br />
into the sample RAM of one Capybara card (about 20 seconds at 44.1 khz if you have 3 megabytes per<br />
card, and about 90 seconds if you have 12 megabytes per card), and when you do not require more than<br />
four-voice polyphony (the current limit on simultaneous, random-access disk tracks).<br />
§ <strong>The</strong>se samples were contributed by fellow <strong>Kyma</strong> user Lippold Haken, who is working with trombonist and electrical<br />
engineering student Patrick Wolf to do spectral analyses of trombone and cello tones using Lemur. <strong>The</strong>se<br />
analyses are then resynthesized in real time using <strong>Kyma</strong> and controlled and per<strong>for</strong>med using the Continuum — a<br />
multidimensional controller that Lippold is developing. Patrick Wolf played the trombone and the recordings were<br />
made at Pogo Records in Champaign, Illinois.<br />
161
Playing Back Samples from the Capybara RAM<br />
If you read the samples from Capybara RAM, rather than from disk, you can get greater polyphony at the<br />
expense of a slightly longer wait during the compile step while <strong>Kyma</strong> loads the samples from disk into<br />
the Capybara RAM. For an instrumental-sounding example, try out 20-harp subset in RAM.<br />
If there are too many samples to fit into the RAM of one expansion card, you can split the samples up into<br />
separate folders and assign a different KeyMappedMultisample to each folder. For example, open the<br />
<strong>Sound</strong> called hrp on two exp cards:<br />
Feeding into the Mixer called fullharp sampler are two MIDIVoices: 3 e - 6 e and 2 c - 3 d sharp. Doubleclick<br />
3 e - 6 e and notice how LowPitch and HighPitch are set in the parameter fields. This restricts the<br />
range of MIDI key numbers that can trigger the KeyMappedMultisample. <strong>The</strong> KeyMappedMultisample<br />
has celthrp 3 e as its FirstSample.<br />
Compare this to the lower branch of the signal flow graph. <strong>The</strong> lower MIDIVoice has a different range of<br />
key numbers and a different FirstSample (from a different folder) <strong>for</strong> its KeyMappedMultisample.<br />
Choosing Samples other than by MIDI Key Number<br />
velocity violin is an example of a MultiSample. <strong>The</strong> MultiSample takes a list of samples file names and<br />
an Index. <strong>The</strong> index selects which of the samples should be read the next time the MultiSample is gated.<br />
This allows you to select samples using something other than MIDI key numbers. This example uses<br />
!KeyVelocity * 7<br />
to index into the array of seven samples files.<br />
But why stop with MIDI events? Double-click on live input selects samples and look at the parameter<br />
settings of MultiSample9. This MultiSample is triggered when the input from the GenericSource exceeds<br />
an amplitude threshold. Its Frequency is derived from a frequency tracker on the GenericSource, and it<br />
is scaled by an AmplitudeFollower on the GenericSource. <strong>The</strong> Index selecting which sample to trigger is<br />
determined by the expression:<br />
( freq L * SignalProcessor sampleRate * 0.5 hz) nn removeUnits mod: 5<br />
In other words, it is the frequency of the input in hertz, converted into units of half steps (nn stands <strong>for</strong><br />
note number). <strong>The</strong> units of half steps are removed, because this is just an index, not a frequency. <strong>The</strong>n the<br />
number is taken modulo 5, ‡ so that each half step should trigger a different sample up until the 5th half<br />
step when it starts to repeat the pattern.<br />
‡ Just as a refresher, modulo arithmetic is a kind of circular arithmetic similar to arithmetic you per<strong>for</strong>m every day<br />
when you are figuring out time. Time on a circular clock is usually numbered modulo 12. For example, if it is 9<br />
o’clock and you want to know what the time will be in two hours, you can think (9 + 2 = 11). At 11 o’clock if you<br />
were asked what the time would be in two hours, you would think (11 + 2 = 13) if you were in the military, but as a<br />
162
Sampling On-the-fly<br />
You can record live sounds in to the Capybara RAM with one <strong>Sound</strong> and play them back with another.<br />
For example, play the <strong>Sound</strong> called live scrambulation. When the GenericSource asks <strong>for</strong> the source,<br />
press Enter to use the default source (a recording stored on the disk). This <strong>Sound</strong> writes the recording<br />
into Capybara RAM and then reads out of Capybara RAM using four Samples with random loop starts.<br />
Try different settings <strong>for</strong> !Length — the length of the Sample loops.<br />
Now play live scrambulation again, but this time, set the GenericSource to use the live input and try<br />
singing, speaking, whistling, and making other mouth noises into the microphone. Whenever you exceed<br />
the !Threshold amplitude, six seconds of the microphone input is captured in RAM. You can see how<br />
long you have to record by watching the !TimeLeft fader. <strong>The</strong>n if you remain quiet enough not to trigger<br />
another recording, the Samples will continue to loop on whatever was captured the first time. Each<br />
time you exceed the threshold, it will record over the previous six second recording. Play with this <strong>for</strong> a<br />
while, trying different length settings and different kinds of vocal noises.<br />
<strong>The</strong>n double-click live scrambulation to see how it is put together: After the Annotation and Preset (the<br />
sine qua non of any well-documented <strong>Kyma</strong> example!) there is a Mixer called record live input & chop.<br />
True to its name, one branch of this Mixer records the input into RAM, and the other branch of the Mixer<br />
reads out of that same RAM with random loop points.<br />
Double-click on record when threshold exceeded to see its parameters. Its RecordingName is set to recording,<br />
its CaptureDuration is 6 s, and it is triggered by a <strong>Sound</strong> called TimeLeftAndTrigger (which<br />
we will examine more closely in a moment).<br />
Compare that to the parameters of one of the four Samples called ReadMem that feed into the StereoMix4<br />
called 4 chopped samples. This is a Sample that reads out of the same memory that the MemoryWriter<br />
writes into. Its Sample is set to recording (the same name as the RecordingName parameter in the<br />
MemoryWriter). Whenever you want to read out of the RAM that is being written into by a different<br />
<strong>Sound</strong>, you must check the FromMemoryWriter box in the <strong>Sound</strong> that is reading the memory; that way,<br />
<strong>Kyma</strong> knows not to bother looking <strong>for</strong> that sample or wavetable on disk but to look <strong>for</strong> it in another part<br />
of the same <strong>Sound</strong>. Notice also that the LoopStart of the sample comes from Noise and that the<br />
LoopEnd comes from that same Noise generator plus one tenth the value of !Length. Notice that we<br />
had to take the absolute value of the Noise because the output of Noise is in the range of (-1,1) and<br />
LoopStart expects values in the range of (0,1).<br />
Now take a look at the <strong>Sound</strong> called TimeLeft & Trigger, the trigger <strong>for</strong> the MemoryWriter. This is a<br />
<strong>Sound</strong>ToEvent module — a <strong>Sound</strong> that generates Event Values. <strong>The</strong> Event Values generated by a<br />
<strong>Sound</strong>ToEvent look, to all the other <strong>Sound</strong>s, the same as if they had come in from the MIDI input. In this<br />
particular instance, the value to be generated is given by the expression:<br />
| inputTrigger outputTriggerDuration |<br />
"<strong>The</strong> trigger to start our trigger and how long it should be on."<br />
inputTrigger := env follower L threshold: (!Threshold * 0.1).<br />
outputTriggerDuration := 6 s.<br />
1 - (inputTrigger * (1 - !TimeLeft asLogicValue)<br />
ramp: outputTriggerDuration)<br />
This is a somewhat twisted way of saying that the MemoryWriter should be triggered when the amplitude<br />
envelope of the GenericSource exceeds some threshold, and that it should record <strong>for</strong> six seconds<br />
without allowing another triggering during that time.<br />
By the way, this is an advanced example of how one can combine Event Values and expressions, so if it<br />
doesn’t make total sense to you immediately, don’t feel discouraged at this early stage. Just come back to<br />
look at it again later after you have had more experience with Event Values and Smalltalk programming.<br />
If you do understand it at this early stage then call us up and tell us so, because we are impressed!<br />
civilian you would probably continue with (13 mod 12 = 1) be<strong>for</strong>e answering.<br />
163
Scripts<br />
OK, now <strong>for</strong> a verbal explanation of what this expression does. A six second ramp is triggered whenever<br />
both inputTrigger and (1 - !TimeLeft asLogicValue) are greater than zero. This only happens<br />
when the amplitude envelope exceeds the threshold and the ramp has not been triggered within the last<br />
six seconds. <strong>The</strong> actual output (and the value of !TimeLeft which gets fed back into this expression) is<br />
one minus the ramp function. So !TimeLeft goes from 1 down to 0 over the course of six seconds. And<br />
it cannot be triggered again until two conditions are met: one condition is that the ramp has had a chance<br />
to get to 0, and the other is that the amplitude of the input exceeds the threshold amplitude.<br />
See the tutorial called Algorithmic <strong>Sound</strong> Construction: Your Computer is your Slave on page 194.<br />
164
Shepard’s Tone<br />
Continuous<br />
Compile, load, start (Ctrl+Space Bar) the <strong>Sound</strong> called trick keyboard. Play an ascending chromatic<br />
scale on the MIDI keyboard. <strong>The</strong>n play some arpeggios. Most people hear the chromatic scale as ascending<br />
in pitch, but the arpeggios are ambiguous; they seem to be going up in pitch sometimes, down in<br />
pitch at other times. Now try playing the first five notes of a C major scale: C D E F G. So far so good.<br />
Now alternate between playing C and G as an ascending perfect fifth. Despite the fact that it sounds like<br />
each step of the 5 note scale was getting higher in pitch, when you play the ascending perfect fifth, the C<br />
and the G sound as if they could be the same pitch. Now invert the interval, playing a descending perfect<br />
fourth from C down to G. <strong>Sound</strong>s as if the pitch is going up instead of down.<br />
Named <strong>for</strong> perceptual psychologist Roger Shepard, these tones exhibit a property called “circular pitch”,<br />
that is, when used in a scale or glissando they can be perceived both as moving and remaining stationary<br />
in pitch, something like the optical illusion of the spirals on a rotating barber pole.<br />
<strong>The</strong> effect is created by first synthesizing a complex tone consisting only of partials that are equally<br />
spaced in pitch (i.e. log frequency). Most commonly, the components are spaced one octave apart, but any<br />
equally spaced interval will work.<br />
<strong>The</strong> amplitude of each component in the complex tone is determined by a fixed spectral envelope. <strong>The</strong><br />
spectral envelope associates an amplitude with each frequency. As the components of the complex tone<br />
change in pitch, they “slide under” this fixed, unchanging spectral envelope, changing in amplitude as<br />
they change in pitch. <strong>The</strong> envelope should be a raised cosine or Hanning window shape in log frequency<br />
(pitch) space.<br />
Play continous shepard’s and experiment with different intervals and glide speeds, listening to the effect.<br />
<strong>The</strong>n, double-click continous shepard’s to see how it is constructed. Starting with the rightmost module,<br />
double click on each one in order to examine its parameters.<br />
<strong>The</strong> rightmost <strong>Sound</strong> is a Preset, and it is there to preserve the last settings of the Event Values !Glide,<br />
!Int, and !Volume.<br />
<strong>The</strong> next module, a MIDIMapper, is used to set the range of !Glide and !Int to more interesting ranges<br />
of values <strong>for</strong> glide speed and interval in half steps (ranging from 2 half steps as a minimum to 24 half<br />
steps or two octaves at the maximum):<br />
!Glide is: (`Glide min: -0.01 max: 0.01).<br />
!Int is: (`Int min: 2 max: 24)<br />
Feeding into the MIDIMapper is the source of all the sound: an OscillatorBank. You can see that there<br />
are 256 oscillators, and that 56 of them are scheduled on each card (the BankSize).<br />
How are all these 256 oscillators controlled? <strong>The</strong> amplitude and frequency envelopes <strong>for</strong> the Oscillator-<br />
Bank come from the next module to the left, a SyntheticSpectrumFrom<strong>Sound</strong>s. A SyntheticSpectrum-<br />
From<strong>Sound</strong>s, like all spectral source <strong>Sound</strong>s, outputs a stream of linear amplitude values on the left<br />
channel and a stream of frequency values on the right channel. In this particular case, LogScale in the<br />
SyntheticSpectrumFrom<strong>Sound</strong>s has been checked, meaning that the frequency values output to the right<br />
channel are in log frequency, rather than linear frequency, space. Each stream, in this case, is generated<br />
by a <strong>Sound</strong>: one <strong>Sound</strong> <strong>for</strong> the amplitudes, and one <strong>for</strong> the pitches. Let’s look at the <strong>Sound</strong> that generates<br />
the pitches first.<br />
Skip over to the leftmost <strong>Sound</strong>, the one called freq ramp. This is a Sample with looping that reads a ramp<br />
function over and over. Its Frequency is:<br />
256 samp inverse + (!Glide/!Int) hz + 0.002036 hz<br />
Why the 256 samp inverse? Recall that the OscillatorBank and the SyntheticSpectrumFrom<strong>Sound</strong>s<br />
both said there were 256 partials in the spectrum. <strong>The</strong> OscillatorBank expects to receive the spectrum as<br />
a stream of partials, one per sample, in order: 1, 2, … 256, after which it expects to receive the next frame,<br />
starting over again with partial number 1. So a spectrum source has a repetition period of 256 samples;<br />
165
every 256 samples, it outputs the spectrum <strong>for</strong> the next frame. We are trying to make a synthetic set of<br />
pitches <strong>for</strong> the spectrum. Since we know they should be evenly spaced in log frequency, we have set the<br />
SyntheticSpectrumFrom<strong>Sound</strong>s to LogScale, and we are using a ramp wave (i.e. a linear function from<br />
zero to one) that repeats every 256 samples to specify the pitches — assuming that the first partial is the<br />
lowest, then the next partial, and so on linearly until reaching the highest pitch when the ramp reaches its<br />
highest value. Why did we use a Sample with loop rather than an Oscillator? Because the Sample, unlike<br />
the Oscillator, does not interpolate between the last value be<strong>for</strong>e the loop and the beginning of the loop.<br />
For wave<strong>for</strong>m generation, the Oscillator would be better, but <strong>for</strong> this specific application, we want<br />
something that drops immediately from one back to zero, without interpolation.<br />
OK, so far, with a 256 sample period of repetition, we have a static spectrum that does not change from<br />
frame to frame and that gives us components whose frequencies are evenly spaced in pitch space.<br />
What is the effect of increasing or decreasing the frequency of the Ramp wave?<br />
Increasing the frequency of the ramp wave effectively increases its slope. So each corresponding point<br />
along the line is a little larger than it would have been at the original repetition rate. <strong>The</strong> effect is that the<br />
pitches of all the components go up.<br />
Decreasing the repetition rate gives the ramp a shallower slope. So corresponding points are smaller than<br />
they were in the original ramp wave, and the pitches of all components are correspondingly lower.<br />
So far, so good. But we don’t have just a single ramp wave, we have a repeating ramp wave controlling the<br />
pitches of the components. A change in the repetition rate of the ramp means that it no longer lines up<br />
with the 256 sample-long frames. If we increase the repetition rate, the ramp will wrap around to zero<br />
be<strong>for</strong>e the end of each frame. In a sense, the repeating ramp is “rolling” with respect to the frame rate.<br />
Think of two identical tapes being played at very slightly different rates; they slowly move out of synchronization<br />
until they are so far out of synchronization that they line back up again. Or think of two sine<br />
waves that are 2 or 3 hertz apart in frequency; they gradually move out of phase with one another until<br />
they are fully 180 degrees out of phase at which point they line back up (causing a beating effect as they<br />
rein<strong>for</strong>ce or cancel each other during the “roll”).<br />
It turns out that this “roll” is exactly what we want to get the circular pitch effect. Think of one point on<br />
the ramp wave. If we increase the slope of the ramp, then on each frame, this point is higher than it was<br />
on the last. This is true until it reaches the maximum value. <strong>The</strong>n on the next frame, it returns to the lowest<br />
value again. This is the result we are after: that each component increase in pitch until reaching the<br />
highest frequency and then that it wrap around and sneak back in at a subaudio frequency.<br />
<strong>The</strong> Gain called 256 scales the ramp so that its range is (0,256). <strong>The</strong> Attenuator called interval density<br />
reduces that range to achieve the actual pitch interval that you specify with !Int. <strong>The</strong> log frequencies are<br />
set up so that one is the half sample rate and each decrease of 1/15 is a decrease of one octave from that<br />
maximum frequency. <strong>The</strong> Attenuator turns your interval into a fraction of an octave and uses that to<br />
scale the range of the ramp function.<br />
Now <strong>for</strong> the really cool part! How to specify a spectral envelope? It would be tempting to just take an Oscillator<br />
on the Hann wavetable and use that as the Amplitude input to the SyntheticSpectrum-<br />
From<strong>Sound</strong>s. But it would be wrong! Actually <strong>for</strong> a static spectrum, it would be OK. But each amplitude<br />
is matched with its corresponding partial number, not necessarily with any particular pitch. And we have<br />
partials that are changing frequency on each frame. So we need some way to associate specific amplitude<br />
values with specific pitches. One way to do this would be to have a table of values that list the amplitude<br />
value <strong>for</strong> each possible frequency, and use the current frequency value to look into the table <strong>for</strong> the correct<br />
amplitude value to use.<br />
This concept — that of a table where you can use one value as an index into the table and output the<br />
value found at that index — immediately suggests the Waveshaper.<br />
<strong>The</strong> Waveshaper is a nonlinear transfer function that maps values between -1 and 1 to arbitrary values<br />
stored in an arbitrary-sized table. So the first task is to get our all-positive frequencies to lie between -1<br />
and 1. This is accomplished by the ScaleAndOffset called -1 to 1. It simply multiplies by two and subtracts<br />
one.<br />
This scaled value is then used as an index into a Hann function (<strong>for</strong>ced to zero on the first and last entries<br />
of the table) by means of the Waveshaper called pch->amp.<br />
166
Discrete<br />
Rigor<br />
After passing through overall vol <strong>for</strong> controlling the overall amplitude level, it is finally fed in as the amplitude<br />
stream <strong>for</strong> the SyntheticSpectrumFrom<strong>Sound</strong>s.<br />
Now that you fully understand how this <strong>Sound</strong> works, play it once more and experiment with different<br />
parameter settings.<br />
Now Compile, load, start the trick keyboard example. Play a chromatic scale of one octave on the MIDI<br />
keyboard. <strong>The</strong>n play the first note of the scale followed by the last note of the scale; it sounds identical.<br />
Use !Int to specify which interval should be the “equivalence” interval. Besides having fun turning your<br />
own mind inside out, you can also have some fun showing it to your friends.<br />
John Platt, fellow <strong>Kyma</strong> user and professor of psychoacoustics at McMaster University, explains the effect<br />
as follows:<br />
Each tone is ambiguous because the partials are one octave apart. So, <strong>for</strong> example, when you play<br />
a half step from 4 c to 4 c sharp, your brain has a choice of interpreting it as either a half step up,<br />
13 half steps up, or 11 half steps down. Prior experience tells you that the smallest change is<br />
probably the correct interpretation so you hear it as one half step up. For larger intervals, though,<br />
things become more ambiguous. For example if you play a tritone (which is one half of an octave),<br />
your brain will sometimes interpret it as going up and sometimes hear it as going down. If<br />
you try playing various different tritone intervals on the trick keyboard, you can sometimes hear<br />
them as ascending and sometimes as descending; sometimes you can even hear them flip in direction<br />
in your mind in the same way that a 2 dimensional drawing of a cube can flip from one<br />
orientation to another.<br />
By the way, while these examples are useful <strong>for</strong> musical purposes and <strong>for</strong> demonstrating the auditory<br />
illusion of circular pitch, Professor Platt has made some refinements to give more precise control over<br />
these <strong>Sound</strong>s <strong>for</strong> psychoacoustic experimentation. If you are contemplating using these <strong>Sound</strong>s <strong>for</strong> research<br />
purposes, please contact Symbolic <strong>Sound</strong> so we can put you in touch with Professor Platt.<br />
167
Stereo Placement<br />
If a sound source is to your right or left, it is going to reach one of your ears be<strong>for</strong>e it reaches the other<br />
and by the time it reaches the second ear it will have lost energy — both because it has traveled further by<br />
then and because your head is probably blocking some of the energy. <strong>The</strong> bigger your head is, the more<br />
extreme the differences will be between the signal that reaches your left ear and the signal reaching your<br />
right ear.<br />
Amplitude vs Energy<br />
Play the <strong>Sound</strong> Pan amplitude and use the on-screen fader or a MIDI fader to control !Pan. § Compare<br />
that to energy pan1 and energy pan2. Do you hear a difference in the loudness or position as you pan<br />
across the speakers?<br />
That Space between your Ears<br />
Now try Pan phase only. <strong>The</strong> only difference between the left and right channels is the relative delay.<br />
<strong>The</strong>re is no amplitude difference between the left and right outputs. Double-click Pan phase only to take<br />
a look at what modules were used to construct it.<br />
You can see that a GenericSource is being fed into two different delays. <strong>The</strong>n the delays are fed into a<br />
ChannelJoiner: one into the left input of the ChannelJoiner, the other into the right input. A ChannelJoiner<br />
creates a stereo pair out of two inputs: the left channel of the one is routed entirely to the left<br />
side of the stereo pair, the right channel of the other is routed entirely to the right side of the stereo pair.<br />
(Since the right and left channels of the delay output are the same, it is immaterial which channel is read<br />
by the ChannelJoiner in this particular instance).<br />
Double-click on the <strong>Sound</strong> called RIGHT. Its Delay parameter specifies the maximum delay; DelayScale<br />
determines how much of that maximum delay time you want at any given moment. <strong>The</strong><br />
strange message normCos stands <strong>for</strong> normalized cosine. Since so many expressions involving cosine include<br />
a factor of π, that is automatically added when you ask <strong>for</strong> the normCos. In other words<br />
x normCos = (Float pi * x) cos<br />
So the expression<br />
(0.5 * !Pan) normCos<br />
yields the following delays <strong>for</strong> the right and left channels relative to the value of !Pan:<br />
!Pan (0.5 * !Pan) normCos Right Delay (0.5 * !Pan) normSin Left Delay<br />
0 1 800 usec 0 0 usec<br />
0.5 0.5 sqrt 565.6 usec 0.5 sqrt 565.6 usec<br />
1 0 0 usec 1 800 usec<br />
<strong>The</strong> only thing that you really hear is the difference between the two delays, so the effective interaural<br />
difference is 800 microseconds at the two extremes and zero when the sound source is directly in front of<br />
you (since it takes the same amount of time to get to both ears).<br />
Do a side-by-side (i.e. one-after-another) comparison of pan (phase & energy) against energy pan1. What,<br />
if any, effect does adding phase delays add to the pan?<br />
By the way, if you are interested in where the numbers come from, you can find papers on “interaural<br />
time differences” in the Journal of the Acoustical Society of America that explain how they come up with<br />
these time differences based on the diameter of a typical head, the speed of sound, and the assumption<br />
that the sound source is far enough away that you can consider lines drawn from the source to the two<br />
ears to be parallel.<br />
168
Doppler<br />
Mystery Effect<br />
Imagine a sound source moving towards you. As it gets closer and closer, the delay between when the<br />
sound is produced and when the sound gets to you is getting shorter and shorter. At the moment the<br />
sound source passes directly in front of you, the delay is zero. <strong>The</strong>n as it recedes from you, the delay<br />
grows longer and longer.<br />
You can model this phenomenon using a variable delay line with an inverted-triangle-shaped function<br />
controlling the length of the delay. In other words, the delay gets shorter and shorter, reaches zero at the<br />
apex of the triangle, and then grows longer and longer again. Try playing moving source to hear this effect.<br />
Finally, try out the <strong>Sound</strong> called phase Flipper . You may be able to use this effect to bring one sound out<br />
from the background.<br />
169
Tap Tempo<br />
This file contains examples of <strong>Sound</strong>s that can, in various ways, match a tempo that you establish by tapping<br />
on the MIDI keyboard (or other MIDI controllers). You can use these <strong>Sound</strong>s as examples of how to<br />
set up your own <strong>Sound</strong>s <strong>for</strong> live per<strong>for</strong>mances with more than one per<strong>for</strong>mer (or <strong>for</strong> that matter, in any<br />
situation where you might have a need to measure the time it takes <strong>for</strong> someone to tap one key or switch<br />
followed by another).<br />
For example, select and play the <strong>Sound</strong> called tap tempo sample. As per the instructions that appear on<br />
the virtual control surface, tap the 2 C on your MIDI keyboard followed by the 2 D. <strong>The</strong> sample is triggered<br />
at the same rate at which you play the two keys on the keyboard. Listen to the tempo, and try<br />
playing something twice as fast or twice as slow.<br />
<strong>The</strong> Heart of the Clock<br />
Double-click the <strong>Sound</strong> called stop watch to see how you can use <strong>Kyma</strong> <strong>Sound</strong>s to measure time.<br />
<strong>The</strong> rightmost <strong>Sound</strong> is an Annotation; double-click it so you can read the explanation in the Text parameter:<br />
Play 2 c to start the clock, and 2 d to stop it. Its value is one tenth<br />
of the number of seconds between start and stop. 2 c triggers a FunctionGenerator<br />
to start a ramp that takes 10 s. 2 d triggers a<br />
TriggeredSampleAndHold on that ramp.<br />
In other words, suppose you have a friend who can run at an unerringly constant speed of 10 kilometers<br />
per hour. Imagine that you look at your watch, and at exactly 11:30 am, you yell, “Start!” Your friend<br />
starts running, and you follow alongside driving a car (not because you are lazy, just because the car has<br />
an odometer). After a while you yell “Stop,” slam on the brakes and read from the odometer that you<br />
have traveled 5 km. If your friend can really maintain a constant rate of 10 km per hour, then you know<br />
exactly how much time has passed without even looking at your watch. Since 5 km is one half of 10 km, it<br />
must have taken half an hour to run that far. So you let your friend get in the car and you go out to have<br />
lunch together.<br />
In this <strong>Sound</strong>, the FunctionGenerator is the person running. Double-click on it. <strong>The</strong> Wavetable is Ramp<br />
(a straight line from zero up to one) and the OnDuration is 10 s. <strong>The</strong> way to trigger this <strong>Sound</strong> is not by<br />
yelling “Start!” but by pressing MIDI key number 36, as you can see in the Trigger field:<br />
!KeyNumber eq: 36<br />
<strong>The</strong> way to yell “Stop!” and measure how far the ramp function got is seen in the next <strong>Sound</strong> to the right,<br />
the TriggeredSampleAndHold. Its Trigger<br />
!KeyNumber eq: 38<br />
170
ecomes one when you press MIDI key number 38. When the trigger becomes one, the Triggered-<br />
SampleAndHold measures the value of its input and holds onto it until the next time it is triggered (even<br />
if the Input continues to change).<br />
Try playing display duration of tap. This is similar to stopwatch except that it converts the output of the<br />
duration measurement into an Event Value. This Event Value then shows up in the virtual control surface<br />
as a fader, and you can read its value in the numeric display at the top of the fader. Look at your watch<br />
and experiment with tapping out different durations in seconds (up to a maximum duration of 10 seconds).<br />
Watching the Clock<br />
You can use this basic clock to control parameters having to do with the tempo, the rate, the duration, or<br />
other aspects of the <strong>Sound</strong> giving a sense of time or tempo.<br />
Sequencer Rate and Delay Time<br />
In tap sequencer & delay <strong>for</strong> example, the tap controls the rate of an AnalogSequencer. One third of the<br />
tap time is also used as the delay time of a DelayWithFeedback, giving a sense of triplets in the delay<br />
time.<br />
Loop Points<br />
Look at tap tempo loop. It is a mixer of a MemoryWriter and a memory reader (in the <strong>for</strong>m of a Sample).<br />
When you tap the 2 C, not only does the clock start ticking, but the MemoryWriter starts recording into<br />
the sample RAM. When you tap 2 D, not only is the clock stopped and measured by the TriggeredSampleAndHold,<br />
the 2 D also triggers the Sample to begin playing.<br />
<strong>The</strong> length of the loop is the same as the duration between taps. Why? Because the CaptureDuration of<br />
the MemoryWriter is 10 seconds — exactly the same as the OnDuration of the ramp FunctionGenerator.<br />
So the proportion of the tap duration to the total ramp duration is the same as the proportion of the tap<br />
duration to the total duration of the recording that is being read by the Sample.<br />
171
Time Scaling<br />
This section is the dual of Frequency Scaling on page 124; you cannot change the duration of a disk track<br />
or sample without also changing its frequency and vice versa. For example, try playing disk file rate<br />
chipmunks & monsters and twice as long = octave lower. Not only does changing the rate also change<br />
the frequency, it also seems to shift the <strong>for</strong>mant regions up or down, giving the impression that a larger<br />
or smaller source produced the sound (the chipmunk or monster effect).<br />
Granular Time Stretching<br />
Many of the same modeling techniques used in the Frequency Scaling section can also be used to scale the<br />
duration of a recording without affecting its frequency. For example, if we assume that the sound was<br />
produced by a train of impulses hitting a filter, we can use granular time-stretching (see <strong>for</strong> example<br />
time-stretched virtue and time-stretched speech) which slows down the rate without affecting either the<br />
fundamental frequency or the <strong>for</strong>mant frequencies.<br />
In sample cloud stretch dur, two SampleClouds are used to granulate a speech sample. Experiment with<br />
different values <strong>for</strong> !Rate, !TJitter, and !GrainDur in the virtual control surface, and then open up<br />
the <strong>Sound</strong> to see how it works.<br />
Try playing granular time/freq antonio, triggering a repetition of the poem using MIDI key down. This<br />
uses several TimeFrequencyScaler <strong>Sound</strong>s on the same sample ‡ but once a second randomly chooses a<br />
new rate and a new frequency scale. Each time you trigger it from the keyboard it will choose different<br />
rates and different frequencies. live random granular time/freq is the same idea, except that you can<br />
choose the live input as the GenericSource and granulate the live input.<br />
Controlling the TimeIndex of a Resynthesis<br />
If you analyze the spectrum of a sample, you can resynthesize it using an OscillatorBank or a GAOscillators.<br />
Unlike sample playback, an oscillator gives you independent control over duration and frequency.<br />
<strong>The</strong> TimeIndex of a GAOscillators, SumOfSines, or REResonator resynthesis is normally a linear ramp<br />
function that starts at -1 at the beginning, grows to 0 by the middle, and reaches a value of 1 by the end.<br />
In rate control on GA, the TimeIndex OnDuration is set to:<br />
2.39415 s + ((1 - !Rate) * 10)<br />
If !Rate is 1, then the time index has its normal duration and the GA reads through its envelopes at the<br />
normal rate. However, if !Rate is less than 1, the OnDuration is larger, and the time index takes longer<br />
to get through the amplitude envelopes, thus increasing the duration. (Try playing this <strong>Sound</strong> and adjusting!Rate<br />
in the virtual control surface). This technique is not without its artifacts; if you try dur<br />
scaled FL GA, you can hear features like vibrato and tremolo slow down when you slow down the rate.<br />
<strong>The</strong> same technique can be applied to the time index that controls the amplitude and frequency envelope<br />
rate of a full-blown additive resynthesis using the SumOfSines or a spectral source and an Oscillator-<br />
Bank. For example, play Kurdish dur scale § and adjust the !Rate from the virtual control surface.<br />
tantalizing celthrpGliss uses<br />
exp L * 100 s + 2 s<br />
as its OnDuration. Since exp has an exponential function shape, the value of OnDuration gets larger as<br />
time goes on. <strong>The</strong> result is a resynthesis of a harp glissando that never seems to reach the top.<br />
In bass-keydown slows time, ‡ the OnDuration is set to<br />
5 s + (100 * !KeyDown) s<br />
‡ This is a fragment of a poem written and per<strong>for</strong>med by composer and fellow <strong>Kyma</strong> user Antonio Barata.<br />
§ Analysis of sample from Thomas Tibert’s New World Order sample collection.<br />
‡ Analysis of sample from Thomas Tibert’s Methods of Mayham sample collection.<br />
172
so that when a MIDI key is down, the duration jumps from 5 seconds to 105 seconds. Play this <strong>Sound</strong> and<br />
try to hit a MIDI key just at the start of one of the notes.<br />
Play and then take a look at warped time index. Instead of using a FunctionGenerator to generate a full<br />
ramp from -1 to 1, this example uses a WarpedTimeIndex to control the rate of the envelopes. <strong>The</strong> WarpedTimeIndex<br />
takes two arrays, each containing the same number of time points: the ideal time points<br />
and the actual time points. It creates a multi-segment envelope with different slopes corresponding to<br />
different rates of time: steeper slopes go through the envelopes faster, and shallower slopes go through<br />
the envelopes more slowly. <strong>The</strong> WarpedTimeIndex slows down or speeds up the resynthesis such that the<br />
actual times occur at the specified ideal times.<br />
Along these same lines, multiseg env on time index uses a MultiSegmentEnvelope generator to generate<br />
the time index. <strong>The</strong> total duration is broken down into ten segments, and the duration of each segment is<br />
hot, so you can control how long each segment should last using the faders in the virtual control surface<br />
or a MIDI fader box.<br />
Take a look at live freeze frame on key down(4). Look at the parameters of the <strong>Sound</strong> called capture frame<br />
and loop left. This is a DelayWithFeedback with the Feedback set to !KeyDown and the Scale set to 1<br />
- !KeyDown. Scale is an attenuator on the Input, so this means that when no key is being held down,<br />
the Input amplitude will be at the maximum of 1, and when a key is held down, the Input amplitude<br />
will be cut to zero. Notice, however, that whenever the Input amplitude is set to zero, the Feedback<br />
amplitude will be at its maximum (and vice versa); they are the opposites of one another. So when a key is<br />
held down, there is no new input, and the delay line is recirculating with no loss of amplitude on each<br />
feedback loop. In a way, the DelayWithFeedback is acting as an oscillator whose wavetable is whatever<br />
was captured in the delay line, and whose period is 256 samples — the size of one frame when the analysis<br />
frequency is 2 F (see the parameter settings in nonharmonic analysis). <strong>The</strong> length of the delay can be<br />
any multiple of the frame length (<strong>for</strong> example 4096 samp would also work). <strong>The</strong> left and right have to be<br />
delayed separately, because DelayWithFeedback does a mono mix if it gets a stereo input.<br />
Vocoder & RE Time Scaling<br />
Try the <strong>Sound</strong> called vocoder time-stretch, and then double-click on it to see how it is put together. First,<br />
look at the GenericSource. Its Frequency is set to<br />
60 nn hz * !Rate<br />
60 nn or middle C is the default frequency given to samples that do not have a single, identifiable pitch.<br />
60 nn (a pitch) is being converted to a frequency (by giving it units of hz). Scaling the frequency of a<br />
sample is the same as scaling its duration: a lower frequency means that you read through the sample at a<br />
slower rate, so the duration is longer.<br />
As you know, however, slowing down a sample also lowers the frequencies of its <strong>for</strong>mants. So this <strong>Sound</strong><br />
uses a Vocoder to compensate <strong>for</strong> that. Double-click on the Vocoder to see its parameters. Notice that<br />
SideFreq is set to !Rate. So whenever !Rate is made smaller (making the sample frequency and <strong>for</strong>mant<br />
lower in frequency), the analysis filter bank is also shifted lower in frequency. However, the<br />
resynthesis filter bank stays at its original frequency (because InFreq is set to 1). Thus, when the sound<br />
is “resynthesized” by passing noise through the Input filters, the <strong>for</strong>mants are at the normal frequencies,<br />
even though the sample is being played back more slowly.<br />
Note also, that the TimeConstant is also scaled by !Rate, because when the sample is slowed down,<br />
any changes in it happen more slowly, so the time constant controlling the amplitude follower can also be<br />
longer.<br />
Try playing 22-vocoder rate & freq scale, and experiment with the fader settings in the virtual control<br />
surface. This is similar to the previous example except that, instead of using Noise as the Input, this example<br />
uses an Oscillator on a buzz wave<strong>for</strong>m with 64 equal-amplitude harmonics.<br />
electric shaver mouth also uses a buzz-wave<strong>for</strong>m Oscillator, but this time as the Input to an RE filter. In<br />
this example !Rate controls the OnDuration of the TimeIndex controlling the rate at which the RE filter<br />
coefficients are updated.<br />
173
Timing Clock, MTC<br />
When you use <strong>Kyma</strong> in conjunction with other audio hardware and software, you need some way to synchronize<br />
<strong>Kyma</strong> with the rest of the world.<br />
Audio Sequencers and DAWs<br />
Audio Signals<br />
<strong>Kyma</strong> can generate audio tracks in AIFF, SD I, SD II, WAVE, and IRCAM/MTU <strong>for</strong>mats, making it easy<br />
to import audio tracks into <strong>Kyma</strong> <strong>for</strong> further processing and to use the audio tracks generated in <strong>Kyma</strong><br />
with your other software. If you import a <strong>Kyma</strong>-generated track into your audio sequencer, <strong>for</strong> example,<br />
you can adjust it graphically until it is perfectly synchronized with the other audio or MIDI tracks.<br />
Using the ADInput or GenericSource, you can bring live or recorded audio signals into <strong>Kyma</strong>, and use<br />
them to control the timing of <strong>Kyma</strong> <strong>Sound</strong>s (which would then, as a result, be synchronized to the audio<br />
signal). In general, the idea is to:<br />
1. Get the amplitude envelope of the audio signal (by feeding it into an AmplitudeFollower, PeakDetector,<br />
or RMSSquared).<br />
2. Output a trigger whenever the amplitude exceeds a certain threshold or minimum value (by feeding<br />
the amplitude envelope into a Threshold).<br />
3. Use this to trigger a <strong>Kyma</strong> <strong>Sound</strong> (by pasting the Threshold into a Trigger, Gate, or Step field).<br />
For example, try playing the <strong>Sound</strong> called audio signal ctrl sequencer, and then open it up to take a look<br />
at how it works. Once you have a <strong>Sound</strong> editor open on the <strong>Sound</strong>, drag the GenericSource further to the<br />
right to get a clearer picture of what’s going on.<br />
<strong>The</strong> GenericSource is being fed into an AmplitudeFollower which extracts an amplitude envelope from<br />
the signal. This envelope is then fed into a Threshold whose output is 1 when the envelope exceeds the<br />
threshold and 0 otherwise. Select thresh, and choose Oscilloscope from the Info menu. Adjust the time<br />
constant !Tc to 0.1, and !Thresh to 0.5. You should see and hear some clicks whenever the threshold<br />
is exceeded (actually you will hear a click when it is exceeded and another one when the amplitude drops<br />
174
MIDI Note Events<br />
below the threshold and the output of the Threshold returns to zero). Try increasing !Thresh until<br />
nothing in the input exceeds it anymore.<br />
Now look at the parameters of the AnalogSequencer. Notice that thresh has been pasted into the Step<br />
field. Each time the amplitude envelope on the audio signal exceeds the threshold, the sequencer will<br />
read the next set of values in its sequences. Notice that the Durations field is set to 0.1. This means that<br />
all notes in the sequence are of equal duration — 0.1 seconds. It also places an upper limit on the speed of<br />
the sequence. No matter how fast the Step triggers come in, the sequencer will never go faster than one<br />
note every 0.1 seconds. This means that you can use the Durations field as a kind of mask, protecting<br />
the basic rhythm against any spurious triggers that might come from the audio signal.<br />
Try playing audio signal ctrl sequencer again, this time adjusting !Thresh to different values, and<br />
checking/unchecking the boxes in the row along the bottom of the virtual control surface (which set the<br />
velocity values to 1 or 0 depending on whether they are checked or unchecked).<br />
This example used the amplitude of the signal as a trigger in <strong>Kyma</strong>. You could, alternatively, use some<br />
other parameter as a trigger; <strong>for</strong> example, you could use a FrequencyTracker in place of the Amplitude-<br />
Follower and trigger whenever the frequency exceeds a threshold.<br />
If you are using a MIDI sequencer, you can synchronize <strong>Kyma</strong> with your other MIDI devices through<br />
MIDI note events. For example, take a look at KeyDown steps sequencer. This is similar to audio signal<br />
ctrl sequencer except that a !KeyDown event is used in place of the Threshold on the envelope of the<br />
audio signal. You could create a timing track on one channel of your sequencer that is never actually<br />
heard — just supplies triggers to <strong>Kyma</strong> — so that when the tempo changes in the sequencer, <strong>Kyma</strong> will<br />
adapt along everything else that is being controlled by the sequencer.<br />
MIDI Timing Clock<br />
If one of your MIDI devices can output a MIDI timing clock signal, you can synchronize your <strong>Kyma</strong><br />
<strong>Sound</strong>s to changes in the rate of the MIDI clock through the judicious use of two Event Values in <strong>Kyma</strong>:<br />
!TimingClock and !TimingClockDuration. !TimingClock is a trigger that repeats at a rate of 24<br />
times per beat. !TimingClockDuration is the duration in seconds of one !TimingClock trigger. In<br />
other words, if you multiply !TimingClockDuration by 24, you will get the duration in seconds of one<br />
beat at the current tempo.<br />
Take a look at MIDI Timing clock ctrl seq & del <strong>for</strong> an example using !TimingClock and<br />
!TimingClockDuration. This <strong>Sound</strong> synchronizes both the AnalogSequencer and the length of a delay<br />
to an external MIDI clock.<br />
Look first at the DelayWithFeedback. Its maximum Delay is set to 1 s — the same as the duration of a<br />
beat in the AnalogSequencer. If you change the value of Delay, you should also change the Durations<br />
field of the sequencer so they are equal to each other.<br />
<strong>The</strong> DelayScale is set to<br />
!TimingClockDuration * 24<br />
This expression is equal to the duration of one beat in terms of seconds. So, <strong>for</strong> example, if the tempo is<br />
120, the beat is one-half second long, and this number will be 0.5. DelayScale is a multiplier on the<br />
value in Delay, so the delay will be 0.5 seconds long. If the tempo is 60, then !TimingClockDuration<br />
* 24 will equal 1, and the delay will be one second long.<br />
Now look at the AnalogSequencer. First, notice that Step is set to the value<br />
!TimingClock<br />
This means that it is triggered 24 times per beat. But notice that Durations is set to<br />
1<br />
This acts as a mask, meaning that the sequencer cannot be triggered any faster than once per second, even<br />
if the triggers are coming in faster than that. But wait! Almost certainly you will want to trigger this at a<br />
175
faster rate than once per second! Don’t worry about that, because the durations are scalable — according<br />
to the Rate.<br />
Notice that the Rate is set to<br />
(!TimingClockDuration * 24) inverse<br />
What does this imply? We know that rates and durations are the inverses of each other, so if<br />
(!TimingClockDuration * 24) is the duration of one beat in seconds, then the inverse of that value<br />
would be the frequency or the number of beats per second. Let’s say the tempo of the MIDI clock were 120<br />
bpm. That’s two beats per second. That means the Rate would be equal to 2, so the duration of each beat<br />
will be scaled to one half second.<br />
<strong>The</strong> <strong>Sound</strong>s in the next row of the file (MIDI clock ctrl MIDI file rate, MIDI clock ctrl MIDIVoice script,<br />
etc.) are other examples of how you can use !TimingClock and !TimingClockDuration to synchronize<br />
various <strong>Kyma</strong> <strong>Sound</strong>s to an external MIDI clock.<br />
MIDI Time Code (and SMPTE)<br />
You can also use MIDI Time Code (or SMPTE if it is first translated to MTC) as a trigger in a <strong>Kyma</strong><br />
<strong>Sound</strong>. In the trigger or gate field, enter the time when the trigger should occur, followed by the message<br />
triggerAtTimeCode or gateOnAtTimeCodeForDuration: followed by the length of time the gate<br />
should stay on.<br />
For example, look at trigger at time code 00:00:12.00. This is a DiskPlayer whose Trigger field is set to<br />
12 s triggerAtTimeCode<br />
meaning that it will not be heard until <strong>Kyma</strong> receives the MIDI time code <strong>for</strong> 12 seconds. If you prefer,<br />
you can also specify the time in SMPTE <strong>for</strong>mat, <strong>for</strong> example,<br />
00:00:12.00 SMPTE triggerAtTimeCode<br />
In other words, 0 hours, 0 minutes, 12 seconds, and 0 frames.<br />
To send a gate with a specific duration (rather than sending a single trigger) use gateOnAtTimeCode-<br />
ForDuration:. For example, look at the Gate field of the ADSR in the <strong>Sound</strong> gate on at 20 s <strong>for</strong><br />
duration 1 s. It is set to<br />
20 s gateOnAtTimeCodeForDuration: 1 s<br />
meaning that the ADSR will be triggered when the time 20 s is received and will stay on <strong>for</strong> 1 second be<strong>for</strong>e<br />
going into the release of the envelope.<br />
176
Tracking Live Input<br />
Amplitude<br />
Frequency<br />
One of the most exciting aspects of real-time signal processing is that you can control synthesis and processing<br />
parameters in a very direct way, with your voice or with an instrument. This is an even more<br />
direct way of making music or of tweaking sound designs than moving MIDI faders, because you have<br />
years of experience in using your voice and/or playing your instrument, you have incredibly refined and<br />
almost subconscious control over minute aspects of its timbre and timing, and you don’t have to break<br />
that concentrated and sophisticated feedback loop to push a button or move a fader (unless of course, the<br />
mixing console is your instrument in which case you have the same relationship to it as musicians have to<br />
their instruments of wood and skin).<br />
This is an exciting area to explore, and it is also one of the most difficult. (Let’s face it, if it were easy, it<br />
would have been done and perfected already, and you wouldn’t be so interested in it anymore, because<br />
you have already implicated yourself as an inveterate innovator by having read this far into the <strong>Kyma</strong><br />
manual in the first place).<br />
<strong>The</strong> basic idea is that we want to use an audio signal to control a parameter (or parameters) of <strong>Kyma</strong><br />
<strong>Sound</strong>s. What is an audio signal? Basically it is a time-varying amplitude. So let’s start with a simple case<br />
— controlling the amplitude of a <strong>Kyma</strong> <strong>Sound</strong> with the amplitude of a live audio signal.<br />
As you recall from having done the Envelopes tutorial on page 120, one way to impose an amplitude envelope<br />
onto any other <strong>Sound</strong> is to multiply the envelope and the <strong>Sound</strong>. Try this right now. Drag a<br />
Product into a new <strong>Sound</strong> file window (the Product is in the Arithmetic category of the prototype strip).<br />
Open it up, and replace the FunctionGenerator with a GenericSource (from the Sources category of the<br />
prototype strip). Change the GenericSource to use the Live source (or set it to auto-loop on the sample<br />
called Electron). <strong>The</strong>n play the Product. <strong>Sound</strong>s like ring modulation, right? That's because it is ring<br />
modulation. So we have uncovered a way to do ring modulation, but that is not what we had in mind; we<br />
wanted to control the amplitude of the oscillator with the amplitude of the source.<br />
<strong>The</strong> problem is that when we think of the “amplitude” of a sound, we usually mean the amplitude envelope,<br />
that is a kind of averaged, slowly changing, overall amplitude, not the instantaneous amplitude that<br />
changes on every sample tick.<br />
Look in the prototype strip under Analysis. Find AmplitudeFollower and drag it onto the line between<br />
the GenericSource and the Product. An AmplitudeFollower does two things: it makes all of the amplitudes<br />
positive (greater than zero) and it does a kind of averaging over several instantaneous amplitudes<br />
so as to smooth out some of the faster, smaller changes in amplitude. <strong>The</strong> TimeConstant parameter of<br />
the AmplitudeFollower gives you some control over this averaging time: the shorter the TimeConstant,<br />
the faster the envelope responds to changes in its input, but the less smooth it will be. Select the AmplitudeFollower<br />
and choose Full wave<strong>for</strong>m from the Info menu, asking to plot only 3 seconds of the<br />
wave<strong>for</strong>m. <strong>The</strong>n select the Product and listen to the amplitude envelope multiplied with the oscillator.<br />
This immediately begs the question, what about controlling the frequency of the oscillator as well as its<br />
amplitude? How can you tell the frequency of an audio signal when all you have to work with is a stream<br />
of instantaneous amplitudes?<br />
If you look in a textbook <strong>for</strong> the definition of frequency, you will most likely be treated to a drawing of a<br />
perfect, endless-duration sine wave with vertical lines indicating the start and end of one cycle and a<br />
definition having to do with the number of cycles that transpire within one second. Fortunately <strong>for</strong> our<br />
sanity (but un<strong>for</strong>tunately <strong>for</strong> pitch tracking algorithms), real-life signals rarely have perfectly repeating<br />
wave<strong>for</strong>ms at an unchanging frequency.<br />
One module that can help identify frequency and track how it changes over time is the FrequencyTracker<br />
(in the Analysis category of the prototype strip). Its takes a <strong>Sound</strong> as its input and outputs an estimate of<br />
the frequency of that <strong>Sound</strong> as a number between zero and one (which you can then scale up to the range<br />
of DC to one half of the sampling rate if you want to use it in a Frequency field).<br />
177
Timbre<br />
Like an amplitude envelope, a pitch envelope is a feature that takes the human auditory system some<br />
amount of time to integrate and identify. <strong>The</strong> FrequencyTracker uses an algorithm called autocorrelation,<br />
which, as its name implies, is a measure of how correlated a signal is with itself at different delay times.<br />
Imagine that textbook sine wave again. If you were to delay that sine wave by one cycle and then compare<br />
it against itself with no delay, you would have to say that the two signals were extremely well<br />
correlated, if not identical. But if you compared them after a delay time of, say, one-tenth of one cycle,<br />
they would not be as correlated. <strong>The</strong> FrequencyTracker compares the signal against itself at several different<br />
delay times and picks the one delay time at which the original and delayed wave<strong>for</strong>ms are the most<br />
similar. It reasons that this delay is probably the period of one cycle of the wave<strong>for</strong>m, so it can then make<br />
a guess as to the frequency of the signal.<br />
As you can tell from this description, frequency tracking is not a fool-proof or easy task, so the more clues<br />
you can give the FrequencyTracker, the better. If you have some idea of the frequency range of the input,<br />
you should enter that in the MinFrequency and MaxFrequency fields of the FrequencyTracker. <strong>The</strong><br />
more you can narrow-in on the range, the better the FrequencyTracker will do.<br />
Try playing the <strong>Sound</strong> called oscil tracks voice, and then open it up to see how the AmplitudeFollower<br />
and the FrequencyTracker are used to control an oscillator. Notice that there is a Gain on the Amplitude-<br />
Follower (because it tends to have low-amplitude output), and notice that the Frequency field of the<br />
Oscillator is set to:<br />
FreqTrk L * SignalProcessor sampleRate * 0.5 hz<br />
This expression scales the (0,1) output of the FrequencyTracker to the range of DC to one half of the<br />
current sample rate.<br />
Try using your own voice as a source. If the FrequencyTracker has trouble tracking your voice, adjust the<br />
MinFrequency and MaxFrequency to more closely match the range of your speaking or singing voice.<br />
In mouth-controlled filter, the amplitude envelope of the input controls the center frequency of a low<br />
pass filter, and the frequency of the input controls the frequency of a sawtooth oscillator that is fed into<br />
the filter. Listen to the default source, and then switch it over to Live, so you can try controlling it with<br />
your voice. Notice that this <strong>Sound</strong> uses a PeakDetector to follow the amplitude envelope of the source.<br />
Double-click the PeakDetector to look at its parameters. You can think of the PeakDetector as having two<br />
time constants: one <strong>for</strong> reacting to increases in the amplitude of the input, and the other that reacts to decreases<br />
in the amplitude. You can create, <strong>for</strong> example, an amplitude envelope that jumps immediately<br />
upward in response to attacks or onsets in the input, but that decays slowly when the input amplitude<br />
goes to zero.<br />
A PeakDetector is also used in amplitude filter, LFO on attack. Try playing this <strong>Sound</strong>. It is set up as a<br />
drum loop processed by a low pass filter. <strong>The</strong> amplitude envelope of the drum loop controls the cutoff<br />
frequency of the low pass filter. Notice that the attack time of the PeakDetector is modulated, in this case,<br />
by a low frequency oscillator. You could, alternatively, choose two different sources <strong>for</strong> this <strong>Sound</strong>: one<br />
as input to the filter and another to control the cutoff frequency of the filter. Look at the parameters of the<br />
two GenericSources in this <strong>Sound</strong>. One is set to read the right channel and the other is set to read the left<br />
channel of the source, so you could use the two input channels of the Capybara <strong>for</strong> two different audio<br />
signal inputs to this <strong>Sound</strong>, listening to one through the filter and using the other signal to control the<br />
cutoff of that filter.<br />
So far, we have looked at modules <strong>for</strong> tracking the amplitude and the frequency of the signal. What other<br />
parameters does an audio signal have? Some books actually define timbre as those characteristics of a<br />
signal that are not pitch or loudness — sort of a “none of the above” definition. A slightly more useful<br />
(though still insufficient) definition might be: the spectrum, or the time-varying strengths of upper partials<br />
relative to the fundamental. Admittedly this is still vague, but it gives us something to work with.<br />
We know we want to somehow differentiate between the "highs", the "mid-range" and the "lows" or at<br />
least to monitor them independently of one another. So the first thing that springs to mind is filters. We<br />
can use filters to separate a single signal into several frequency bands.<br />
178
Take a look at Highs to lows — an example that splits the signal into two parts: frequencies above 6000<br />
hz and frequencies below 4000 hz, using a high-pass and a low-pass filter respectively.<br />
<strong>The</strong> <strong>Sound</strong> takes the output of each of these filters and feeds it into an AmplitudeFollower. Next, it compares<br />
the energy in the high frequencies against the energy in the low frequencies by taking the ratio of<br />
the high frequencies envelope to the low frequencies in high/low. This ratio is smoothed by a PeakDetector<br />
and then used as an amplitude envelope on some pink noise. <strong>The</strong> result is that you hear a little burst<br />
of noise anytime there is a phoneme with lots of high frequency energy in the input. It is especially noticeable<br />
on the words “so”, “essence”, and “fact”.<br />
We can take this idea of using filters to split the spectrum even further, using a bank of bandpass filters to<br />
split the spectrum into 22 to 88 bands using a Vocoder. This is similar to amplitude following, but on several,<br />
independent frequency bands. So the spectral characteristics of the SideChain signal are<br />
controlling the filters on the Input signal.<br />
As an example, try stressed out cartoon . In this example, the spectral characteristics of the speech sample<br />
control the filtering on an oscillator input. Since the oscillator has a complex wave<strong>for</strong>m, it has a relatively<br />
rich spectrum that can be shaped by the filters, resulting in intelligible speech. At the same time, the amplitude<br />
envelope of the speech is being used to control the frequency of the oscillator (nothing says you<br />
can’t cross-map amplitude to frequency or vice versa). Try playing this again and choosing the Live<br />
source. <strong>The</strong> louder you speak into the microphone, the higher and more stressed-out your voice sounds.<br />
An Alternative Pitch Tracker<br />
It turns out that there is another way, albeit more computationally expensive, to track the frequency besides<br />
the FrequencyTracker module. If you per<strong>for</strong>m a LiveSpectralAnalysis on a signal and then use the<br />
right channel of the fundamental track, you have an estimate of the fundamental frequency of the signal.<br />
Take a look at harm analysis ctrl oscil freq <strong>for</strong> an example of how to do this. ‡<br />
Notice that the GenericSource is fed into a LiveSpectralAnalysis called HarmonicAnalysis-(3a - 5c). Double-click<br />
the LiveSpectralAnalysis to see its parameters. <strong>The</strong> Harmonic box must be checked <strong>for</strong> this to<br />
work. LoFreq and HighFreq should be set to the expected frequency range of the input. Also, take note<br />
of the value of LowestAnalyzedFreq, because we will use this in<strong>for</strong>mation in the next module, which<br />
is, believe it or not a SampleAndHold.<br />
Double-click freq track to see its parameters. This is a SampleAndHold whose HoldTime is 256 samp.<br />
Why 256 samp? Because when you select 2 F as the LowestAnalyzedFreq, the LiveSpectralAnalysis<br />
‡ Keep in mind, however, that this is a temporary and somewhat kludgy way to do this, and that it will become much<br />
easier to do in the next software release. So if you feel disgusted by the explanation that follows, you may just want<br />
to defer your use of this feature until the next release.<br />
179
will output 256 tracks on each frame. § We want to sample only one of those tracks and we want to do it<br />
once per frame. So we sample one value and hold onto it <strong>for</strong> the next 255 samples until the corresponding<br />
value on the next frame. <strong>The</strong> only remaining piece of the puzzle is which of the tracks to read and how to<br />
offset the SampleAndHold to pick that track on each frame. <strong>The</strong> <strong>for</strong>mula <strong>for</strong> this is<br />
(256 - 3) samp<br />
where you would substitute a different number <strong>for</strong> 256 if you were using a different LowestAnalyzed-<br />
Freq.<br />
Finally, double-click track voice to see the parameters of this Oscillator. Notice that the Frequency parameter<br />
is set to<br />
freq track R * SignalProcessor sampleRate * 0.5 hz<br />
This is one of the few examples that uses an R to get the right channel of a pasted <strong>Sound</strong> rather than the<br />
left channel. That’s because the frequency envelopes are on the right output channel of the LiveSpectralAnalysis,<br />
and the amplitude envelopes are on the left channel.<br />
<strong>The</strong> rest of the <strong>Sound</strong>s in this row and the next use the harmonic analysis method <strong>for</strong> tracking the frequency<br />
of the input (but could just as well have used the FrequencyTracker module). Try playing some<br />
(or all) of them and take a look at the ones that interest you in order to see how they were put together.<br />
Decision Thresholds and Logical Comparisons<br />
So far, we have been using parameters extracted from the audio signal as something like continuous controllers.<br />
It’s also possible to use them in a way analogous to discrete switches or gates. <strong>The</strong> key to turning<br />
the continuous envelopes into gates or switches is to use a Threshold or one of the comparison operators.<br />
For an example of using the Threshold on an amplitude, look at trigger a sample on S. This <strong>Sound</strong> is the<br />
same as the Highs to lows example, except that it feeds the ratio of high to low energy into a Threshold.<br />
When the ratio of highs to lows gets above a selected value, the Threshold output is one. At all other<br />
times, the output of a Threshold is zero. By pasting the Threshold into the trigger field of a Sample, you<br />
can trigger the sample whenever the ratio of highs to lows exceeds the selected threshold. In this case the<br />
threshold is set such that it triggers on the “S” sounds at the beginning of “so” and the ending of<br />
“essence”, but does not trigger at any other time.<br />
You can also make decisions based on the frequency of the input. For example, take a look at pch selects<br />
eq. This is a StereoMix2 with two GraphicEQ inputs. <strong>The</strong> scale on the first input is<br />
((22050 * freq L) gt: !Freq nn hz removeUnits) smoothed<br />
and the scale on the second input is<br />
((22050 * freq L) le: !Freq nn hz removeUnits) smoothed<br />
First the FrequencyTracker is scaled to the full range of frequencies using<br />
(22050 * freq L)<br />
You probably noticed that it is missing the units of hz. Since this is not a frequency field, we don’t need to<br />
include the units.<br />
<strong>The</strong> second half of the expression<br />
!Freq nn hz removeUnits<br />
allows you to set a pitch in terms of note number using !Freq, converts the note number value to hertz,<br />
and then removes the units from the number, since we want to compare this number to another number<br />
that does not have units. (<strong>The</strong> MIDIMapper is scaling the range of !Freq to between 12 and 127 in this<br />
example).<br />
§ <strong>The</strong> number of tracks per frame associated with each LowestAnalyzedFreq value are:<br />
1F: 512 2F: 256 3F: 128 4F: 64 5F: 32<br />
180
<strong>The</strong> two frequencies are compared using<br />
le:<br />
an operator that stands <strong>for</strong> less than or equal to. This means that the entire expression will be one when the<br />
input pitch is less than or equal to the pitch that you set using the !Freq fader in the virtual control surface.<br />
If the pitch is higher than the note number you set in the virtual control surface, then the value of the<br />
entire expression will be zero. To avoid the clicks you get from sudden changes, the message<br />
smoothed<br />
is added to the end of the expression. Now take a look at the expression in Scale1 again:<br />
((22050 * freq L) gt: !Freq nn hz removeUnits) smoothed<br />
Compare it carefully against the expression in Scale2. What is the only difference between the two expressions?<br />
What does gt: stand <strong>for</strong>?<br />
Try playing pch selects eq with the default settings and source. <strong>The</strong>n play it again using the Live source<br />
to see if you can trigger it with your voice.<br />
For a different example of using the input frequency as a control, look at time stops until 4 f#.<br />
In this example, a TimeStopper has its Resume condition set to<br />
(22050 * freq L gt: 4 f hz removeUnits)<br />
* (22050 * freq L lt: 4 g hz removeUnits)<br />
You probably recognize the basic <strong>for</strong>m of the each half of this expression<br />
and<br />
(22050 * freq L gt: 4 f hz removeUnits)<br />
(22050 * freq L lt: 4 g hz removeUnits)<br />
from the previous example. But why are they being multiplied together? In a system where false is represented<br />
by zero and true is represented by one, multiplying is the same as a logical AND. In other words,<br />
both of these expressions must be true in order <strong>for</strong> the entire expression to evaluate to one (true).<br />
This expression will only be true if the incoming pitch is between 4 f and 4 g. Try playing time stops until<br />
4 f# with the default source. <strong>The</strong>n play it again with the Live source and try singing into it. <strong>The</strong> MIDI-<br />
Voice will play its first note and stop. It won’t continue until you sing something close to a 4 f# into the<br />
microphone. So the pitch of your voice controls when the MIDIVoice can finish.<br />
<strong>The</strong>y're Everywhere<br />
<strong>The</strong>re are other examples of audio signals used as continuous controllers (or in decisions based on<br />
thresholds) scattered throughout the examples. Look, <strong>for</strong> instance, in the Output MIDI and Cross synthesis<br />
files.<br />
181
Tuning<br />
In <strong>Kyma</strong>, the smallest change in frequency is about 0.0026 hz. § This degree of frequency resolution means<br />
that you can use <strong>Kyma</strong> to implement microtonal tunings or other tuning systems outside the standard 12tone<br />
equal temperament associated with most keyboard instruments.<br />
In any Frequency field, you can enter a constant value directly in hertz or note number; <strong>Kyma</strong> will use<br />
that value directly to control the synthesis or processing algorithm. Additionally, you can enter an arbitrary<br />
real-time expression that maps Event Values (like !Pitch, !KeyNumber, or !Frequency) into a<br />
frequency value in hertz or note number.<br />
Compute Frequency Directly from !Pitch<br />
Try playing the <strong>Sound</strong> called play celesta in the Tuning <strong>Sound</strong> file (found in the Examples folder), and<br />
play a chromatic scale on your MIDI keyboard starting at middle C. Double-click on this <strong>Sound</strong>, and look<br />
at the Frequency parameter of the <strong>Sound</strong> called celesta. It is set to the value !Pitch, meaning that it<br />
gets its frequency from incoming MIDI note events. Thus, it is currently playing from the standard, equaltempered<br />
scale.<br />
Now change the value in the Frequency field to<br />
(!Pitch * 0.5) + 30 nn<br />
Compile, load, start the <strong>Sound</strong> and, once more, play a chromatic scale on the MIDI keyboard. This expression<br />
is taking the MIDI pitch and dividing it in half, so it changes half steps into quarter steps. At<br />
middle C, the MIDI note number is 60; since multiplying that by 0.5 gives us note number 30, we added<br />
30 nn back in, so that middle C would still be middle C.<br />
Next, try using<br />
(!Pitch * 0.25) + 45 nn<br />
in other words, we are going to multiply incoming MIDI note numbers by 1/4 to get eighth-step changes<br />
<strong>for</strong> every half step change on the keyboard, and we are adding 45 nn back in so that middle C is still note<br />
number 60. Now it should take 4 keyboard octaves to equal 1 octave in pitch.<br />
<strong>The</strong> Frequency parameter value can also be calculated directly in hertz. Change the Frequency field to<br />
read<br />
(!KeyNumber / 12) twoExp * 8.176 hz<br />
This takes the frequency of the lowest MIDI note number and multiplies it by a ratio that is the number of<br />
half steps above note number 0, i.e. the definition <strong>for</strong> a the 12-tone equal tempered scale. Try the following<br />
expression to create a 10-tone scale:<br />
(!KeyNumber / 10) twoExp * 8.176 hz<br />
Creating Tuning Expressions using the Tuning Tool<br />
You can use the Tuning Tool to prepare expressions to use in Frequency fields. Choose <strong>Design</strong> Alternate<br />
Tunings from the Tools menu to start up the tool. (See Tools menu: <strong>Design</strong> Alternate Tunings on<br />
page 451 <strong>for</strong> a complete description of this tool.)<br />
§ This number is derived from the fact that all <strong>Kyma</strong> <strong>Sound</strong>s keep at least 12 fractional bits of phase in<strong>for</strong>mation internally<br />
(some of them, like Sample, keep an even larger fractional part, providing even greater accuracy, but you<br />
are always guaranteed at least that accuracy). At the pitch 4 a (440 hz), a change of 0.0026 hz is equal to a change in<br />
pitch of 1/100th of a cent. At 4000 hz, it would be 1/880th of a cent, and at 30 hz it is 1/6th of a cent.<br />
182
On the main page of the tuning tool, you can choose a reference MIDI key number and the corresponding<br />
frequency, and how you want to audition the scale you are designing. After the tool has started, try<br />
playing your MIDI keyboard.<br />
Let’s use the tool to create an expression to tune the play celesta <strong>Sound</strong> to a just scale.<br />
Click the Ratio Scale button. This part of the tool lets you specify each of the twelve scale degrees in<br />
terms of a ratio to the tonic. You can enter the ratios into the fields <strong>for</strong> each scale degree, and interactively<br />
try out the scale.<br />
A just scale is built in to the tool; click the Just button to load it. Try playing the keyboard.<br />
183
Click the Create Example button; <strong>Kyma</strong> will then create an example <strong>Sound</strong> using this scale. Double click<br />
on the example <strong>Sound</strong> and edit the parameters of SampleExample:<br />
<strong>Kyma</strong> has placed an expression <strong>for</strong> the just scale that we designed into the Frequency parameter of this<br />
<strong>Sound</strong>. To tune the celeste GA <strong>Sound</strong> to this just scale, copy the expression from the Frequency parameter<br />
and paste it into the Frequency parameter of the celeste <strong>Sound</strong>.<br />
You can use any of the tuning methods in the tool to create an example, and either use the example directly,<br />
or copy the tuning expression from Frequency parameter <strong>for</strong> use in other <strong>Sound</strong>s of your own<br />
design.<br />
A Retunable Scale<br />
Scales based on the ratios between frequencies must be derived from a particular tonic and, thus, cannot<br />
be valid <strong>for</strong> all keys. <strong>The</strong> <strong>Sound</strong> called tunable kbd is an example of a just diatonic scale with a selectable<br />
tonic, so you can tune the keyboard on the fly. On MIDI channel 1, the keyboard is tuned to a just diatonic<br />
scale; switch to MIDI channel 2 and select a new tonic by playing one of the keys (it doesn’t matter<br />
which octave you play; it is just looking <strong>for</strong> the pitch class), and then switch back to MIDI channel 1 to<br />
play the keyboard tuned relative to that new tonic. Alternatively, you could use two keyboards or two<br />
sequencer tracks, each on a different MIDI channel: one to set the tonic, and the other to play in the “key”<br />
of that new tonic.<br />
Other Tuning Examples<br />
<strong>The</strong> other tuning examples illustrate different ways to obtain the pitches of the notes in the alternate tuning<br />
system. Half steps -> whole steps, just horns, and 13-tone linear scale all use expressions to calculate<br />
the pitch in the scale from the MIDI key number. <strong>The</strong> examples in using a script use the Script <strong>Sound</strong> to<br />
play an “instrument” in alternate tunings (see Scripting on page 522 <strong>for</strong> more in<strong>for</strong>mation about scripts).<br />
<strong>The</strong> examples in using tuning tables use the Waveshaper <strong>Sound</strong> to look up the frequency <strong>for</strong> a given key<br />
number by using a wavetable that contains the scale (a “tuning table”).<br />
184
Wavetable Synthesis<br />
If you look at the wave<strong>for</strong>m of a sample that has an identifiable pitch and is harmonic, you immediately<br />
notice that it is (fairly) periodic — that you can identify patterns that repeat. Imagine taking one of these<br />
cycles, saving it as a wavetable, and using an oscillator to repeat it. This would take up a lot less memory<br />
than a sample and should sound the same, right? Not exactly. Musical sounds are not usually strictly periodic;<br />
they change over time in interesting and lively ways. That’s why most oscillator-based synthesis<br />
techniques include some way to change the wave<strong>for</strong>m over time: the examples in Analog used the<br />
phasing effects of detuning, the amplitude-dependent wave<strong>for</strong>m changes of distortion, and variable low<br />
pass filters to create wave<strong>for</strong>ms that evolve over time.<br />
Classic Wave<strong>for</strong>m Distortion Techniques<br />
Many of the textbook “computer music” sound synthesis techniques you read about are based on the idea<br />
of wavetable synthesis with some <strong>for</strong>m of controllable distortion. Distortion introduces harmonic distortion<br />
products, yielding a broader spectrum than the spectrum of the original, undistorted oscillator. Even<br />
more importantly, though, you can control how much distortion you want to add at any one time, so you<br />
can create timbres that evolve over time (all at relatively small computation costs).<br />
Waveshaping<br />
Imagine a sine wave shape. <strong>The</strong>n imagine what happens when you turn up the gain on it so much that it<br />
clips. It changes from a smooth sine wave to something closer to a sharp-edged square wave, and this<br />
change is reflected in the spectrum as well. Using waveshaping, you can get a similar effect, but with<br />
more control over the results. Try playing the <strong>Sound</strong> called WS:cosine->square. This <strong>Sound</strong> takes a cosine<br />
and uses it as the argument to a polynomial designed to distort the shape of the cosine wave<strong>for</strong>m and<br />
thus add harmonics to its spectrum. Notice that the higher you put !Volume, the more the cosine shape<br />
begins to approach a square wave shape.<br />
Next try the <strong>Sound</strong> called batman head. This <strong>Sound</strong> uses the same polynomial in the Waveshaper, but<br />
instead of using !Volume to control the amplitude of the cosine oscillator, it uses an ADSR envelope,<br />
triggered by the MIDI keyboard. When you first hit the key, the amplitude is at its maximum, the sound<br />
is a little brighter than when it dies away. This corresponds to the behavior of a lot of acoustic instruments,<br />
which have a broad, almost noisy spectrum during the attack, and which turn almost to sine<br />
waves as they decay.<br />
Amplitude Modulation & Ring Modulation<br />
Compile, load, start the <strong>Sound</strong> called AM & RM, and experiment with the fader settings <strong>for</strong> the modulator<br />
frequency and the carrier amplitude. Like the other distortion techniques, amplitude modulation<br />
can give you more frequencies out than you put in (as you can see by playing around with the amplitude<br />
of the carrier).<br />
When you amplitude modulate a complex carrier, each sine wave component of the carrier generates sum<br />
and difference frequencies with the modulator. Try modulating a digital recording or your own voice<br />
coming in from the microphone using AM&RM on a complex carrier.<br />
Frequency Modulation<br />
This is probably the most familiar of all the classical synthesis techniques. It turns out that by simply<br />
modulating the phase of a sine wave oscillator, you can, in theory, generate an infinite number of additional<br />
frequencies (well, all right, most of them are at vanishingly small amplitudes, so you don’t really<br />
get an infinite number of them, but you can easily generate more than you care to hear). Try experimenting<br />
with the fader settings in FM lab.<br />
<strong>Sound</strong> designer, and fellow <strong>Kyma</strong> user Francois Blaignan contributed all of the FM <strong>Sound</strong>s across the top<br />
of this <strong>Sound</strong> file window (i.e. the ones that say ‘francois’ as part of their names). Try these <strong>Sound</strong>s out<br />
and then open them up to see how they are put together. Most of them use more than one frequency<br />
modulated oscillator, where each of the oscillators contributes one sub-part of the total spectrum — a<br />
kind of cross between frequency modulation and additive synthesis.<br />
185
Group-additive Synthesis<br />
In additive synthesis, you add the outputs of hundreds of sine wave oscillators together to produce a<br />
complex wave<strong>for</strong>m. In GA synthesis, you add the outputs of 3 to 5 oscillators, each with a complex wave<strong>for</strong>m<br />
and amplitude envelope, together to produce a complex wave<strong>for</strong>m.<br />
Imagine that you are looking at a spectrum with hundreds of sine wave components. Most of the time,<br />
you will be able to identify several components whose amplitude envelope shapes are almost identical;<br />
imagine grouping those sine waves together (<strong>for</strong>ming a more complex wave<strong>for</strong>m) and having them share<br />
a single amplitude envelope. That’s where the name “group additive” synthesis comes from.<br />
Try out trombone GA on KBD, Fowels vlute, graphic env chopper, and GA vlns from MIDI file. <strong>The</strong>se are<br />
all examples of synthesis using the GAOscillators <strong>Sound</strong>.<br />
Creating your own GA Wavetables<br />
GA synthesis works best when your original sample is a single tone with an identifiable pitch and a fairly<br />
harmonic spectrum. For instance, it can work well on a single tone from a musical instrument, whereas it<br />
will probably not work well on a recording of an explosion or sample of human speech (although it can<br />
work well on sung vowels).<br />
GA wavetables are created from spectrum files, not directly from samples. So the first step is to use the<br />
Spectral Analysis Tool to create a quasi-harmonic spectrum file (i.e. the ones with an “h” after the name, not<br />
the ones with an “s”), and then to use the GA Analysis Tool to generate a GA wavetable from that quasiharmonic<br />
file.<br />
Let’s assume you already have a suitable quasi-harmonic spectral analysis file and proceed to the second<br />
step of generating GA wavetables based on that spectrum:<br />
1. From the Tools menu, choose GA Analysis From Spectrum.<br />
2. Click the Browse… button and locate the quasi-harmonic spectrum file called aou-carla h from<br />
the singing folder of the Spectra folder of the Wavetables folder. Remember, you must start<br />
with a quasi-harmonic spectrum (one with an “h” tacked onto the end of the name) or it will not<br />
work correctly.<br />
Once you have selected a quasi-harmonic spectrum file, the tool will resynthesize it using sine waves<br />
so you that can verify that it is indeed the file you had intended to select.<br />
3. By default, the number of harmonics will be set to 124 and the number of wavetables to 3. When you<br />
set these numbers, keep in mind that the analysis time grows larger when you request more harmonics<br />
or more wavetables. Three wavetables ought to be enough to represent the three vowels in<br />
this spectrum. Since the upper harmonics don’t contribute as much to defining vowels as they do the<br />
consonants, it is safe to change Number of harmonics to 64, so you should change the 124 to a 64.<br />
4. Click the button labeled Create GA file. It will ask you <strong>for</strong> a name <strong>for</strong> the GA file and ask where you<br />
want to save it. To be consistent with other GA files, tack the name of the base pitch onto the end of<br />
the name followed by “GA”; in this case it would be aou-carla 3A GA and save it in your own<br />
Wavetables folder in a subfolder named GA.<br />
Now you have to wait while the Tool to per<strong>for</strong>ms the analysis. First it will display Reading envelopes<br />
from the SOS analysis and show you a progress thermometer.<br />
<strong>The</strong>n it will display Determining wave<strong>for</strong>ms and corresponding envelopes….<br />
Be<strong>for</strong>e you know it, you will be startled by a synthetic voice singing “aou” when the analysis is finished.<br />
5. <strong>The</strong> Tool creates a GAOscillators <strong>Sound</strong> <strong>for</strong> you with the newly created file already specified in the<br />
parameter fields. Open the <strong>Sound</strong> in the untitled window and set its parameters as follows:<br />
Parameter Value<br />
Frequency !Pitch<br />
Duration on<br />
186
<strong>The</strong>n double-click timeIndex and change its parameters to:<br />
Parameter Value<br />
Duration on<br />
Trigger !KeyDown<br />
Compile, load, start aou-carla 3A GA and play a 3 A on the MIDI keyboard.<br />
To get more polyphony, drag a MIDIVoice between the GAOscillators and the output icon. Doubleclick<br />
the MIDIVoice, set Polyphony to 6, and change Left and Right to 0.25. Compile, load, start<br />
the MIDIVoice and try this on the keyboard in the range around middle C.<br />
Double-click the GAOscillators again, and edit the parameters to:<br />
Parameter Value<br />
Morph !Morph<br />
Analysis1 hrn 3A GA<br />
Compile, load, start the MIDIVoice and try playing some quartal harmonies and using !Morph to<br />
change the timbre.<br />
187
Whooshes, Hits, Bys<br />
<strong>The</strong>se are some example <strong>Sound</strong>s you may be able to use as the basis <strong>for</strong> sound effects processing. <strong>The</strong>re<br />
are examples of adding subharmonic rumbling to give a sense of a large, massive object, examples of<br />
doppler and movement from left to right, and examples of flanging or whoosing sounds that can be used<br />
to give a sense of propulsion or movement.<br />
188
Part II: Advanced Features<br />
Variables: What are those Green Question Marks?<br />
In this tutorial, we will replace the constant parameter values of a <strong>Sound</strong> with variables. Drag an Attenuator<br />
from the system prototypes window (Mixers & Attenuators category) into a <strong>Sound</strong> file window.<br />
Double-click on it in order to edit its parameters. Experiment with different values between zero and one<br />
<strong>for</strong> the left and right scales.<br />
By adjusting the values of Left and Right, you can “place” the sound between the left and right speakers.<br />
For example, if you set Left to 1 and Right to 0, the sound seems to emanate from the left, and if<br />
you set Left to 0.2 and Right to 0.8, the sound seems to come from right of center.<br />
One way of specifying the stereo location of a <strong>Sound</strong> is to specify how much of that <strong>Sound</strong> should come<br />
from the left speaker, and specifying that the remainder should come from the right speaker. In other<br />
words, if the portion of the <strong>Sound</strong> that comes from the left speaker is L, then the portion that comes from<br />
the right speaker is 1 - L, since scale values can range from zero to one. This specifies a relationship between<br />
two parameters that is true no matter what the specific value of L. It requires the use of a symbolic<br />
representation <strong>for</strong> the parameters, in this case the letter L to represent some number between zero and<br />
one.<br />
In <strong>Kyma</strong>, you can use variables to serve as symbolic representations. To specify a <strong>Kyma</strong> variable, choose<br />
a memorable name <strong>for</strong> the variable and precede it with a question mark. In the Attenuator <strong>Sound</strong>, enter<br />
?left<br />
<strong>for</strong> the value of Left and<br />
1 - ?left<br />
<strong>for</strong> Right.<br />
<strong>The</strong> parameter fields should now look like this:<br />
Now that you have entered a variable and an expression containing a variable as the values <strong>for</strong> Left and<br />
Right, play the Attenuator.
You have defined a general stereo locator <strong>Sound</strong>, but in order to play it you must supply a specific value<br />
<strong>for</strong> ?left. A dialog box (like the one shown below) requests a value <strong>for</strong> the variable; enter a value between<br />
zero and one (be sure to use a leading zero be<strong>for</strong>e any decimal points).<br />
<strong>The</strong>n click Value (or simply press Enter). Play once more. <strong>The</strong> <strong>Sound</strong> editor remembers the value that<br />
you supplied <strong>for</strong> ?left, so you don’t have to type it in each time you play.<br />
<strong>The</strong> mappings from variables to the values you have supplied in this <strong>Sound</strong> editor are called the environment<br />
of the <strong>Sound</strong> editor. Most of the Action and Info menu operations take place within this<br />
environment. To view the current environment, select Environment from the Info menu.<br />
To clear the values in the environment and choose new values, select Reset environment from the Info<br />
menu. Play the Attenuator again.<br />
Now save the Attenuator to the <strong>Sound</strong> file window. Play it a couple of times. Unlike the <strong>Sound</strong> editor, the<br />
<strong>Sound</strong> file window does not save the environment; you have to define an environment each time you<br />
play a <strong>Sound</strong> that has variable parameters.<br />
Now let’s make this stereo location <strong>Sound</strong> even more general by replacing the Input with a Variable<br />
<strong>Sound</strong>. Open a <strong>Sound</strong> editor on the Attenuator. Replace the Attenuator’s Input with a Variable from the<br />
system prototypes window.<br />
Now select Compile, load, start from the Action menu. <strong>Kyma</strong> will prompt you <strong>for</strong> a value <strong>for</strong> ?left as<br />
be<strong>for</strong>e, and it will also prompt you <strong>for</strong> a value <strong>for</strong> ?Variable. When <strong>Kyma</strong> asks you to supply a value<br />
<strong>for</strong> ?Variable, you can’t type in a value as you did <strong>for</strong> ?left. Instead, select the button labeled Default<br />
<strong>Sound</strong>. (If this had been a <strong>Sound</strong>CollectionVariable, e.g. a variable representing all of the inputs of Concatenation<br />
or Sum, you should select Default collection.)<br />
190
This associates the variable name ?Variable with <strong>Kyma</strong>’s default <strong>Sound</strong>. To change the default <strong>Sound</strong>,<br />
select one of the <strong>Sound</strong>s in the system prototypes window and select Set default <strong>Sound</strong> from the Action<br />
menu. Return to the <strong>Sound</strong> editor and reset the environment. Now try playing the Attenuator again.<br />
Change the name of Attenuator to StereoLocator, and save it in your <strong>Sound</strong> file window <strong>for</strong> future<br />
reference (i.e. the next tutorial!)<br />
Creating and Editing <strong>Sound</strong> Classes: Upward Mobility<br />
This tutorial describes how you can use the class editor to create a new <strong>Sound</strong> class with its own icon,<br />
help messages, and <strong>Sound</strong> editor.<br />
Double-click on StereoLocator, the <strong>Sound</strong> that you constructed in the previous tutorial.<br />
Recall that this <strong>Sound</strong>’s Left is the variable ?left, its Right is the expression 1 - ?left, and its Input is<br />
Variable. Each of the variable parameters can take on an infinite number of potential values. In a sense,<br />
StereoLocator represents an infinite set of <strong>Sound</strong>s, all sharing a single characteristic: the portion of the<br />
<strong>Sound</strong> coming from the right speaker is one minus the portion of the <strong>Sound</strong> coming from the left speaker.<br />
StereoLocator actually represents a whole class of specific instances of <strong>Sound</strong>s having that characteristic.<br />
You can create a new class of <strong>Sound</strong>s based upon the example of StereoLocator. Close the <strong>Sound</strong> editor.<br />
Select StereoLocator, then, under the Action menu, select New class from example. <strong>Kyma</strong> will prompt<br />
you to provide values <strong>for</strong> ?left and ?Variable. Set ?left to 0.75 and click the Default <strong>Sound</strong> button<br />
<strong>for</strong> ?Variable.<br />
<strong>Kyma</strong> then opens a class editor on this example.<br />
Replace newClassFromExample with a more memorable name, like Stereo. <strong>Kyma</strong>’s convention is to<br />
begin class names with uppercase letters.<br />
Drag an AbsoluteValue from the Arithmetic category of the system prototypes window into the Icon<br />
field of the class editor. Use this starting point <strong>for</strong> designing a new icon that represents the stereo placement<br />
of a <strong>Sound</strong> between the left and right speakers.<br />
191
Click in a light area to draw a dark dot, and click in a dark area to draw a light dot. If you keep holding<br />
the mouse button down while you move the mouse around, you can draw dots continuously. Sometimes<br />
it helps to click in the zoom box of the class editor window, expanding the class editor size of the screen<br />
in order to get a larger area <strong>for</strong> editing. <strong>Design</strong> both the large and the small icon.<br />
Read the names listed in the Parameter field. Where have you seen these be<strong>for</strong>e? Apart from the name<br />
parameter, which is shared by all <strong>Sound</strong> classes, each parameter name corresponds to the name of a variable<br />
in the original example <strong>Sound</strong>: ?left, and Variable.<br />
Click on Variable in the Parameter field. This is the input of the new Stereo class. To ensure that only<br />
<strong>Sound</strong>s can be used <strong>for</strong> this parameter, select sound in the Type field. <strong>The</strong> types are listed alphabetically,<br />
and you can use the scroll bar to scroll through the list of types.<br />
You may have noticed that after you selected sound, the list of possible parameter field types changed.<br />
Try selecting a different Type temporarily and watch the Field field. Only those fields that are legal <strong>for</strong><br />
the selected parameter type are displayed in the Field field. Make sure that you have re-selected sound<br />
as the type <strong>for</strong> Variable.<br />
Now modify the location <strong>for</strong> Variable in the Field Rectangle field:<br />
0.5 @ 0 corner: 1 @ 0.8<br />
and press Enter. This places the field in a rectangle whose upper left corner is in the middle of the editor<br />
and flush with the top. <strong>The</strong> lower right corner is flush against the right edge and with the top of the class<br />
name field.<br />
<strong>The</strong> first pair of numbers is the x @ y location of the upper left of the rectangle, and the second pair of<br />
numbers is the x @ y location of its lower right. <strong>The</strong> point 0 @ 0 is the upper left corner of the right half of<br />
the <strong>Sound</strong> editor, and its lower right is 1 @ 1.<br />
<strong>The</strong>se numbers don’t represent specific units like pixels or centimeters; they represent the relative proportions<br />
of a rectangle within a unit (1 by 1) rectangle. Thus, if you wanted a parameter field to take up<br />
the bottom half of the entire area, you would specify an upper left corner of 0 @ 0.5 and a lower right<br />
corner of 1 @ 1.<br />
Return to the Parameter field, and select left. <strong>The</strong> value of left must lie within the range of zero to<br />
one, so select positiveScale in the Type field. (<strong>The</strong> range <strong>for</strong> each variable type is shown in Parameter<br />
Types and Ranges on page 540). For the Field Rectangle, enter<br />
0 @ 0 corner: 0.5 @ 0.25<br />
Notice how Field Layout is updated when you press the Enter key.<br />
Select Variable in the Parameter field, and take note of how the Field Layout changes. Alternate<br />
between selecting name, Variable, and left.<br />
192
<strong>The</strong> Field Layout shows a miniature version of the <strong>Sound</strong> editor <strong>for</strong> this new class. Whenever you select<br />
a parameter, its position in the parameter fields is highlighted.<br />
Double check that Expand has a check mark in it. When checked, the Expand option will cause this new<br />
kind of <strong>Sound</strong> to expand be<strong>for</strong>e any trans<strong>for</strong>mations are applied to it. <strong>The</strong> significance of this will be explained<br />
in Parameter Trans<strong>for</strong>mers: Symbolic <strong>Sound</strong>s on page 198.<br />
Close the class editor and save an instance of this new class. <strong>The</strong> instance of your new class should appear<br />
highlighted in the file window; its name will be Stereo.<br />
Edit the new instance of class Stereo by double-clicking on it. Note the positions of the parameter fields<br />
on the bottom half of the <strong>Sound</strong> editor.<br />
Play the <strong>Sound</strong>. From the Modifiers category of the system prototypes window, drag Chopper into the<br />
Variable field. Play Stereo. Try entering different values <strong>for</strong> the Left parameter and play again. Click<br />
on the parameter label of the Left field. It will tell you that no help is available, but we will soon fix that.<br />
Close the <strong>Sound</strong> editor, saving the changes that you have just made. With Stereo still selected, choose Expand<br />
from the Action menu. Double-click on the new <strong>Sound</strong>, called StereoLocator, that appears in the<br />
<strong>Sound</strong> file window. Notice that this <strong>Sound</strong> is like the original Attenuator that we made the class out of,<br />
but this <strong>Sound</strong> has specific values assigned <strong>for</strong> the Left, Right, and Input parameters. When you play<br />
a <strong>Sound</strong>, it is first expanded to its most primitive components and then sent to the Capybara. You can use<br />
Expand from the Action menu to see how complex <strong>Sound</strong>s are actually constructed out of simpler component<br />
<strong>Sound</strong>s.<br />
Close the <strong>Sound</strong> editor. Select Stereo again, and choose Edit class from the Action menu. Edit class lets<br />
you edit an already existing class. From the Action menu, choose Retrieve example from class. This<br />
saves your original example <strong>Sound</strong> in the <strong>Sound</strong> file window. Go to the <strong>Sound</strong> file window and doubleclick<br />
on the <strong>Sound</strong> that was just retrieved. Notice that Retrieve example from class, unlike Expand, saves<br />
the original example <strong>Sound</strong> with the variables still in it. Close the example <strong>Sound</strong>, and go back to the<br />
class editor, so we can add some on-line help messages to the new class.<br />
193
First, in the Class Description field, enter a short description of what this class does. <strong>The</strong>n select<br />
left in the Parameter list. In the Comment field, remind the user (and yourself many months in the<br />
future when you try to use this <strong>Sound</strong> again but have <strong>for</strong>gotten how you set it up) that this is the level of<br />
the left channel, and that the level on the right channel is one minus this value. With left still selected,<br />
change the Field from positiveScale to hotPositiveScale.<br />
Select Variable and enter a comment <strong>for</strong> this variable as well.<br />
Close the class editor, and save the changes to the edited class. Try out opening Stereo again and paste<br />
the Event Value !Pan into the Left parameter field. Try playing Stereo and controlling the value of<br />
!Pan from the virtual control surface (or MIDI controller). Once you have finished experimenting, close<br />
the <strong>Sound</strong> editor.<br />
Now let’s improve the stereo placement function. Find the example you retrieved (it should be called<br />
StereoLocator and should have variables in it). Edit it and replace its right parameter with<br />
(1 - ?left squared) sqrt<br />
You may have to choose Large window… (Ctrl+L) from the Edit menu to make the field large enough to<br />
see what you are doing. Close the <strong>Sound</strong> editor and keep the changes you have made.<br />
Choose New class from example from the Action menu, supply a value <strong>for</strong> ?left and click on Default<br />
<strong>Sound</strong> <strong>for</strong> Variable. This time we don’t have to start from scratch. Drag Stereo from the <strong>Sound</strong> file window<br />
into the Icon field, and then drag it again into the Parameter field. This sets the icon, parameter<br />
types, and locations to those specified in class Stereo.<br />
Type in ImprovedStereo <strong>for</strong> the name of this new class. Tab over to the Class Description field<br />
and enter a new description. Close the class editor and save an instance of the new class. Compare the<br />
panning of ImprovedStereo to that of Stereo.<br />
Algorithmic <strong>Sound</strong> Construction: Your Computer is your Slave<br />
You have by now seen multiple examples of how to construct <strong>Sound</strong>s in the graphical editor. In those<br />
cases where you can systematically describe the relationships between <strong>Sound</strong>s and parameters, you can<br />
use the Script <strong>Sound</strong> to construct complex <strong>Sound</strong>s <strong>for</strong> you automatically, according to an algorithm that<br />
you specify in the Smalltalk-80 programming language. Your program can be as simple as a series of<br />
events, saying when each <strong>Sound</strong> should start, or as elaborate as a new system <strong>for</strong> music composition. To<br />
specify events, all you have to learn is how to specify the start time of a <strong>Sound</strong>. For more elaborate projects,<br />
you have the power of a full programming language — Smalltalk-80 — to work with.<br />
Let’s start with simple event script and, step-by-step, develop it into a short program. Find Script in the<br />
Algorithms category of the system prototypes window, drag a copy into your <strong>Sound</strong> file window, and<br />
open a <strong>Sound</strong> editor by double-clicking on it. Replace its input wavelet with Attenuator from the system<br />
194
prototypes window category Mixers & Attenuators. Change Attenuator’s name to instr (by selecting it,<br />
pressing Enter, and entering the new name).<br />
In order to be able to set the parameters of instr, replace some of its constant values with variables. Double-click<br />
on instr, and replace its Left parameter with the variable ?left, press the Tab key, and<br />
replace its Right parameter with the expression 1 - ?left. <strong>The</strong>n edit its Input, replacing its Frequency<br />
with the variable ?freq and its Duration by the variable ?dur.<br />
<strong>The</strong> Script parameter of a Script <strong>Sound</strong> consists of Smalltalk-80 expressions and events that assign start<br />
times and other parameters to its inputs. To write your own script, first double-click on Script. Delete the<br />
current contents of the Script field of the prototype. (Click once in the field to select all, and then press<br />
the Delete key). Now, create a simple event by setting the start time of an instance of instr. Type<br />
instr start: 0 s.<br />
into the parameter field. Play Script. <strong>The</strong> <strong>Sound</strong> instr still has variable parameters, so <strong>Kyma</strong> will ask you<br />
to provide specific values <strong>for</strong> those parameters be<strong>for</strong>e playing the <strong>Sound</strong>. Be sure to specify the units of<br />
the frequency and duration parameters (try 440 hz <strong>for</strong> ?freq, 1.5 s <strong>for</strong> ?dur, and 1 <strong>for</strong> ?left). If you<br />
make a mistake in supplying these values; select Reset environment from the Info menu and play Script<br />
again. You should hear one of the Celtic harp samples at 440 hz in the left speaker.<br />
You can set the value of a variable parameter from the Script by typing the name of the variable, a colon,<br />
and then a value <strong>for</strong> that parameter. For example, to create an event that starts instr at 0 s with a<br />
frequency of 500 hz, a duration of 2 s, and a position centered between the two speakers, type Ctrl+L to<br />
enlarge the field, and then type the following:<br />
instr<br />
start: 0 s<br />
freq: 500 hz<br />
dur: 2 s<br />
left: 0.5.<br />
Click the Accept button to accept this new Script.<br />
<strong>The</strong>re can be any number of spaces or carriage returns separating each parameter:value pair; the set of<br />
parameter:value pairs should be terminated by a period. <strong>The</strong>re should be no spaces between the parameter<br />
name and the colon; there must be a space between the colon and the parameter value.<br />
Play the <strong>Sound</strong> as it now stands. <strong>The</strong>n try changing some of the parameter values specified in the<br />
Script, playing the Script after each change.<br />
Add another event to the script. Copy the first event, and paste it after the original event. Start the second<br />
event at 1 s and give it the same duration and stereo position. <strong>The</strong> frequency should be one whole step<br />
higher than that of the previous event. To compute this convert 500 hz to a nn (note number) and then to<br />
add 2 half steps to it.<br />
195
Now your script should look like this:<br />
instr<br />
start: 0 s<br />
freq: 500 hz<br />
dur: 2 s<br />
left: 0.5.<br />
instr<br />
start: 1 s<br />
freq: 500 hz nn + 2 nn<br />
dur: 2 s<br />
left: 0.5.<br />
Try playing the <strong>Sound</strong> now.<br />
Suppose you want to specify a whole-tone scale using the script language. We can define the pitch of any<br />
event in the whole-tone scale as being the pitch of the previous event plus 2 half steps. Let’s encode this<br />
as a Smalltalk loop. Type Ctrl+L to enlarge the Script field and replace the existing script with the following:<br />
| p |<br />
p := 3 c.<br />
1 to: 5 do: [ :i |<br />
instr<br />
start: (i - 1) s<br />
freq: p<br />
dur: 1 s<br />
left: i / 5.<br />
p := p + 2 nn].<br />
Click the Accept button to accept this new Script, and play the <strong>Sound</strong>.<br />
In this example, the Smalltalk variable p is declared at the beginning of the script between vertical bars.<br />
<strong>The</strong>n it is initialized to the value 3 c (once octave below middle C). Notice that there must always be<br />
spaces be<strong>for</strong>e and after the := in an assignment statement. <strong>The</strong> code within the square brackets is executed<br />
five times; in the first iteration, i takes on the value 1, in the second iteration it takes on the value 2,<br />
etc., until the last iteration when it takes on the value 5. An event is specified <strong>for</strong> each of the five iterations.<br />
After the event specification, p is incremented by two half steps, and the loop begins again.<br />
Now try the <strong>Sound</strong> again with the following changes (and explain in words what is going on):<br />
| p |<br />
p := 3 c.<br />
1 to: 5 do: [ :i |<br />
instr<br />
start: (i - 1 * 0.5) s<br />
freq: p<br />
dur: 1 s<br />
left: i / 5.<br />
p := p + 3 nn].<br />
<strong>The</strong> starting pitch is a variable, p; now let’s make the number of notes a variable as well. Let’s call that<br />
variable n. Since n is the number of times through the event loop, we can substitute n <strong>for</strong> 5 in the previous<br />
program, making sure that n is assigned an initial value.<br />
| p n |<br />
n := 5.<br />
p := 3 c.<br />
1 to: n do: [ :i |<br />
instr<br />
start: (i - 1 * 0.5) s<br />
freq: p<br />
dur: 1 s<br />
left: (i - 1) / n.<br />
p := p + 3 nn].<br />
196
Experiment with different values <strong>for</strong> p and n.<br />
This is an adequate solution, except that we have to edit the Script every time we want to change the<br />
values of p and n. Let’s make one final alteration to the Script that will enable us to control its parameters.<br />
Replace the Smalltalk variables, which are known only within Script, with <strong>Kyma</strong> variables, which can be<br />
set from outside of Script. Now the script should look like this:<br />
| p |<br />
p := ?startPch.<br />
1 to: ?nbrNotes do: [ :i |<br />
instr<br />
start: (i - 1 * 0.5) s<br />
freq: p<br />
dur: 1 s<br />
left: (i - 1) / ?nbrNotes.<br />
p := p + 3 nn].<br />
Play the <strong>Sound</strong>. <strong>Kyma</strong> will request values <strong>for</strong> ?startPch and ?nbrNotes. Type 3c <strong>for</strong> ?startPch and<br />
10 <strong>for</strong> ?nbrNotes. Change the name of Script to pattern, and close the <strong>Sound</strong> editor, saving the changes<br />
that you have made. Save your <strong>Sound</strong> file as well.<br />
Duplicate pattern, and then edit duplicateOfPattern by double-clicking on it. First, change its name to<br />
patternMaker. <strong>The</strong>n replace instr with pattern by dragging pattern from the <strong>Sound</strong> file window onto<br />
instr in the signal flow diagram of patternMaker. <strong>The</strong>n modify the Script of patternMaker to read:<br />
| p |<br />
p := 4 c.<br />
1 to: 5 do: [ :i |<br />
pattern<br />
start: (i - 1) s<br />
startPch: p<br />
nbrNotes: 5.<br />
p := p - 2 nn].<br />
Play this <strong>Sound</strong>. What was a script in pattern is now being treated as an instrument in patternMaker.<br />
<strong>The</strong>re is a blurring of the distinctions between the definitions of “instrument” and “score” in <strong>Kyma</strong>. In<br />
their place are structures built up out of other structures; how you choose to name these structures and<br />
how you choose to define “high-level” versus “low-level” is up to you.<br />
Now change the initial pitch value to 0 nn,<br />
| p |<br />
p := 0 nn.<br />
1 to: 20 do: [ :i |<br />
pattern<br />
start: (i - 1) s<br />
startPch: p + !Pitch<br />
nbrNotes: 5.<br />
p := p - 2 nn].<br />
Play patternMaker and play trills on the MIDI keyboard. Use Ctrl+R to restart the <strong>Sound</strong> on the Capybara<br />
without having to load it again. At compile time, fixed values of p plus the Event Value !Pitch are<br />
substituted into copies of the Sample. Since the fixed values of p are so small, they are like offsets to the<br />
pitches that you are supply from the MIDI keyboard.<br />
197
Now use a continuous control on the frequency. Since the continuous controllers are in the range from 0<br />
to 1, multiply the value of the controller by the full range <strong>for</strong> MIDI notes: 127 nn<br />
| p |<br />
p := 0 nn.<br />
1 to: 20 do: [ :i |<br />
pattern<br />
start: (i - 1) s<br />
startPch: p + (!Frequency * 127 nn)<br />
nbrNotes: 5.<br />
p := p - 2 nn].<br />
As a final modification to patternMaker, let’s add a random offset to each starting pitch. Change the initial<br />
value of p back into the audible range and add a random value between minus two half steps and<br />
plus two half steps. To do this, multiply the random number (that lies in the range of (0,1)) by 4 (so that<br />
it lies in the range from (0,4)). <strong>The</strong>n subtract 2 (so that it lies in the range of (-2,2)). Make sure to include<br />
the units of nn so that the number is interpreted as the number of half steps.<br />
| p rando |<br />
rando := Random newFor<strong>Kyma</strong>WithSeed: 2967.<br />
p := 5 c.<br />
1 to: 20 do: [ :i |<br />
pattern<br />
start: (i - 1) s<br />
startPch: p + (rando next * 4 - 2) nn<br />
nbrNotes: 5.<br />
p := p - 2 nn].<br />
Now that you have a basic loop structure, you can start experimenting with other ways to construct complex<br />
<strong>Sound</strong>s algorithmically.<br />
Other examples of using Scripts to construct <strong>Sound</strong> structures can be found in the <strong>Sound</strong> files that came<br />
with <strong>Kyma</strong> (<strong>for</strong> example, the <strong>Sound</strong> called homemade reverb in the file called delays, chorusing, reverb).<br />
Remember that a Script constructs a <strong>Sound</strong> first and then plays it. <strong>The</strong> Smalltalk code is not executed<br />
while the <strong>Sound</strong> is playing.<br />
Parameter Trans<strong>for</strong>mers: Symbolic <strong>Sound</strong>s<br />
In the last tutorial, we used a Script to generate multiple copies of a <strong>Sound</strong> that had variable parameters.<br />
This tutorial demonstrates how to use a ParameterTrans<strong>for</strong>mer to modify the parameters of a <strong>Sound</strong> that<br />
already exists.<br />
198
Drag a ParameterTrans<strong>for</strong>mer from the Algorithms category of the system prototypes window into your<br />
<strong>Sound</strong> file window. Edit it by double-clicking on it, and replace its Input with a LimeInterpreter. A<br />
LimeInterpreter reads binary files generated by Lippold Haken’s Lime music notation program § and<br />
“plays” them using <strong>Kyma</strong> <strong>Sound</strong>s. Try playing the LimeInterpreter. If <strong>Kyma</strong> asks you to locate a Lime<br />
binary called waterbirds, you can find it in a folder called Others within the Examples folder.<br />
Now modify the Trans<strong>for</strong>mation parameter of ParameterTrans<strong>for</strong>mer to:<br />
snd frequency: 100 hz.<br />
Play ParameterTrans<strong>for</strong>mer. What is the effect of this Trans<strong>for</strong>mation? <strong>The</strong> ParameterTrans<strong>for</strong>mer<br />
looks through the entire <strong>Sound</strong> structure and sets any parameters named Frequency to 100 hz. <strong>The</strong><br />
value of any named parameter can be changed by a ParameterTrans<strong>for</strong>mer. For example, try the following<br />
Trans<strong>for</strong>mation:<br />
snd sample: 'celtHrp2a'.<br />
<strong>The</strong> ParameterTrans<strong>for</strong>mer reaches into all the <strong>Sound</strong>s to the left of it in the signal flow diagram and<br />
changes any parameters named Sample to 'celtHrp2a'.<br />
Now try changing all the durations. Change the Trans<strong>for</strong>mation to:<br />
snd duration: 0.1 s.<br />
Suppose you wanted to shift all the frequencies down by three half steps. <strong>The</strong> new frequency is a function<br />
of the old frequency; to access the current value of a parameter, type snd followed by the name of the<br />
parameter. In the following example,<br />
snd frequency isNil ifFalse: [<br />
snd frequency: (snd frequency nn - 3 nn)].<br />
the ParameterTrans<strong>for</strong>mer steps through each <strong>Sound</strong> in the structure, gets its Frequency, converts it to a<br />
note number, subtracts three from it, and sets the frequency parameter to the new value. If any <strong>Sound</strong> in<br />
the structure does not have Frequency as a parameter, it will return nil as its frequency. To assure that<br />
only non-nil values <strong>for</strong> frequency are used, the trans<strong>for</strong>mation is only executed when snd frequency is<br />
not nil.<br />
All of these trans<strong>for</strong>mations are symbolic, based only on the name of the parameters. So, <strong>for</strong> example, this<br />
last trans<strong>for</strong>mation would have no effect on a <strong>Sound</strong> that did not have Frequency as a parameter. <strong>The</strong><br />
trans<strong>for</strong>mation changes the values of parameters in the same way that you might edit the values in the<br />
parameter fields in the <strong>Sound</strong> editor be<strong>for</strong>e playing the <strong>Sound</strong>. A ParameterTrans<strong>for</strong>mer changes the initial<br />
values of the parameters be<strong>for</strong>e the <strong>Sound</strong> is played; it does not operate on the audio output of a<br />
<strong>Sound</strong>.<br />
§ Lime is available at http://datura.cerl.uiuc.edu.<br />
199
Now let’s make a trans<strong>for</strong>mation that depends on the start time of the <strong>Sound</strong> being trans<strong>for</strong>med. <strong>The</strong> reserved<br />
word time always contains the time offset of snd in microseconds. <strong>The</strong> reserved word<br />
totalDuration contains the total duration of the ParameterTrans<strong>for</strong>mer’s immediate input; it too is<br />
given in microseconds. Try the following Trans<strong>for</strong>mation:<br />
snd frequency isNil ifFalse: [<br />
snd frequency:<br />
(snd frequency nn -<br />
(3 * (time / totalDuration)) nn)].<br />
As time progresses from zero up to the number of microseconds in the total duration, the value of (time<br />
/ totalDuration) progresses from zero up to one. <strong>The</strong> frequency of the first note has zero half steps<br />
subtracted from it: no change at all; however, as time goes on, each subsequent note has larger and larger<br />
fractions of 3 half steps subtracted from its pitch.<br />
Not only can a new parameter value depend on time and its current value, it can also depend on the values<br />
of other parameters or combinations of parameter values. Try the following Trans<strong>for</strong>mation:<br />
snd duration isNil ifFalse: [<br />
snd frequency: snd duration inverse * 100].<br />
This trans<strong>for</strong>mation sets the Frequency to 100 times the inverse of whatever the Duration happens to<br />
be.<br />
Next, open the <strong>Sound</strong> file ParameterTrans<strong>for</strong>mer from the Advanced folder. Try playing the <strong>Sound</strong><br />
independent partials; when it asks <strong>for</strong> a frequency, enter 100 hz. Inspect independent partials; by double-clicking<br />
on it and looking at the Frequency field of each Oscillator. <strong>The</strong> first Oscillator’s frequency<br />
is ?frequency, the second one is ?frequency * 2, the third is ?frequency * 3, etc. When you play<br />
independent partials, it sounds like a single, harmonic tone.<br />
Edit the <strong>Sound</strong> called trans<strong>for</strong>mIndependentPartials by double-clicking on it. <strong>The</strong> Trans<strong>for</strong>mation<br />
parameter has a long comment, after which it should read:<br />
snd frequency isNil ifFalse: [<br />
snd frequency:<br />
snd frequency nn + (110.0 hz * time / totalDuration)].<br />
Reading this, we would expect that each repetition of independent partials will be at a higher frequency.<br />
When you play trans<strong>for</strong>m independent partials you hear, as expected, the frequencies getting higher with<br />
each repetition. What you may not have expected is that the sound starts out harmonic and becomes inharmonic<br />
with subsequent repetitions. Why is that?<br />
<strong>The</strong> sequence of events is:<br />
1. <strong>Kyma</strong> sets the Oscillator frequencies to 100 hz, 200 hz, etc.<br />
2. <strong>The</strong> ParameterTrans<strong>for</strong>mer adds a multiple of 110 hz to each repetition of independent partials.<br />
Since it adds a fixed amount to each frequency, the harmonic relationship is no longer maintained. For<br />
example, if you start out with 100, 200, and 300 hz and then you add 110 to each frequency, the result is:<br />
210, 310, and 410 hz. Since 410 hz is not a multiple of the lowest frequency, 210 hz, it is not a harmonic of<br />
210 hz.<br />
Is it possible to trans<strong>for</strong>m the frequencies in such a way as to maintain the harmonic relationship? One<br />
way would be to multiply the frequencies by a constant rather than adding a constant value to them. Another<br />
way is to create a new <strong>Sound</strong> class that maintains the harmonic relationship no matter what.<br />
Select independent partials in the <strong>Sound</strong> file window and choose New class from example from the Action<br />
menu. When <strong>Kyma</strong> asks <strong>for</strong> a value <strong>for</strong> ?frequency, enter 100 hz. Change the name of the new<br />
class from newClassFromExample to HarmonicPartials. <strong>The</strong>n uncheck Expand; this tells the<br />
<strong>Sound</strong>: Apply the trans<strong>for</strong>mation to yourself be<strong>for</strong>e you expand. If you leave Expand checked, then the<br />
<strong>Sound</strong> will expand first and then apply the trans<strong>for</strong>mation to the expanded version of itself.<br />
Close the class editor and answer that you want to save an instance of the new class; you should see a<br />
new <strong>Sound</strong> called HarmonicPartials in your <strong>Sound</strong> file window. In the open <strong>Sound</strong> editor, replace inde-<br />
200
pendent partials with HarmonicPartials. Now play trans<strong>for</strong>m independent partials. <strong>The</strong> frequencies increase<br />
with each repetition, as be<strong>for</strong>e, but this time, the partials stay harmonic. Why does your new class<br />
behave differently from independent partials? It’s because your new class has only one parameter: Frequency.<br />
You apply a trans<strong>for</strong>mation to the frequency, adding something to it. <strong>The</strong>n, your <strong>Sound</strong><br />
computes its other frequencies based on that trans<strong>for</strong>med frequency (by multiplying it by 2, 3, 4, etc.).<br />
201
Part III: Exercises<br />
Time/frequency Scaling using Additive Resynthesis and the Spectrum Editor<br />
F1<br />
F12<br />
<strong>The</strong> first section is a step-by-step example of how you can use spectral analysis and resynthesis to scale<br />
the duration or frequency of your own voice.<br />
Part I: Record your Voice<br />
1. Use the Tape Recorder tool to record your own speaking voice. Come up with a short, meaningful or<br />
humorous phrase (or grab the nearest book or magazine and read a few lines).<br />
2. Use the Spectral Analysis tool to create two spectral analyses (both the straight and the harmonic version)<br />
of your recorded speaking voice. <strong>The</strong> analysis tool also gives you a <strong>Sound</strong> <strong>for</strong> each analysis<br />
which you can transfer into a <strong>Sound</strong> file window. Save the <strong>Sound</strong> file window to disk be<strong>for</strong>e proceeding.<br />
Part II: Time/frequency Alterations<br />
1. Double-click on one of the SumOfSines created by the spectral analysis tool. Change the Duration to<br />
on. Set up the sound to be triggered by the MIDI keyboard. To do this, click in the Gate field, press<br />
Escape, and play two keys simultaneously on the MIDI keyboard. Gate should now have<br />
!KeyDown in it. Now play the sound (using Ctrl+Space Bar).<br />
Try playing the MIDI keyboard to make sure the trigger works.<br />
2. Time-stretch the resynthesis to ten times its original duration without changing its frequency. To do<br />
this, multiply the value in the OnDuration field by 10, <strong>for</strong> example, it might look something like this<br />
5 s * 10<br />
Load the <strong>Sound</strong> using Ctrl+Space Bar and trigger it using the MIDI keyboard.<br />
3. Experiment with different time-stretching factors. <strong>The</strong>n set the OnDuration back to what it was<br />
originally in preparation <strong>for</strong> doing frequency scaling.<br />
4. Control the frequency of the speech from the MIDI keyboard without changing its duration. To do<br />
this, click in the Frequency field, press Escape, and play one key on the MIDI keyboard. This<br />
should set Frequency to !Pitch. Load the <strong>Sound</strong> using Ctrl+Space Bar. <strong>The</strong>n play different keys<br />
on the MIDI keyboard. Which one gives you the original recording back without frequency alterations?<br />
Part III: Spectrum Editor<br />
By opening a spectrum editor on an analysis, you can see a graphic representation of the spectrum, listen<br />
to individual harmonics, and modify the frequency or amplitude of selected harmonics.<br />
1. Open a spectrum editor on the harmonic analysis you did in the first part of this exercise. You can do<br />
this in several ways:<br />
♦ choose Open… from the File menu, set the file type to Spectrum file, and select the name of<br />
the file in the file dialog<br />
♦ double-click on the name of the spectrum file in the File Organizer<br />
♦ edit the SumOfSines, then click the disk button next to Analysis0 while holding down the<br />
Command or Control key.<br />
2. Once the spectrum editor opens, use the leftmost button to play a resynthesis based on this analysis.<br />
<strong>The</strong>n use the mouse to grab the yellow scrub bar and move it back and <strong>for</strong>th across the display. Next,<br />
try controlling the scrub bar by using pitch bend on the MIDI keyboard.<br />
3. Press 1 on the computer keyboard to select and play track 1, the fundamental. <strong>The</strong>n try track 2, 3, etc.<br />
Click the selection criteria button (it is the fourth one from the right and looks like a bunch of tracks<br />
with one selected). This lets you select several tracks at once according to some criteria. Try listening<br />
to different selection criteria.
F13<br />
F1 F2<br />
4. Now, “monotonize” all of the octave harmonics. Click on the track filter button (the third one from<br />
the right). <strong>The</strong>se operate on whatever harmonics are currently selected. Choose Replace Frequency<br />
with average. This will replace the time-varying frequency of each track with a single frequency: the<br />
average frequency the track had over the entire length of the analysis.<br />
5. Compare the sound of all harmonics against the octave harmonics alone using the leftmost play button<br />
and the one right next to it, the play-selection button.<br />
6. Now save the monotonized octave harmonics in another analysis file. <strong>The</strong> octave harmonics should<br />
still be selected. “Copy” these harmonics using Ctrl+C. <strong>Kyma</strong> will ask you to name the new analysis<br />
file and save it somewhere (name it something like “oct harm only”).<br />
Click in your <strong>Sound</strong> file window to bring it to the front and use Ctrl+V to paste a new SumOfSines<br />
based on the octave harmonics file into the window. <strong>The</strong>n you can close the spectrum editor without<br />
saving the changes.<br />
7. Our next task is to try to create an endless glissando effect based on the Shepard’s tones audio illusion.<br />
<strong>The</strong> idea is that we want to change the Frequency of the SumOfSines so that it repeatedly does a<br />
smooth glissando from a very low to a very high frequency. Double-click the SumOfSines. Set its Duration<br />
to on, and check the Loop box. Paste an Oscillator from the prototype strip into the<br />
Frequency field and scale and offset it as follows:<br />
Oscillator L * (300 - 30) hz + 30 hz<br />
This will scale the Oscillator to the range of 30 to 300 hz.<br />
Now we have to change the Oscillator so that it repeats once every 15 seconds and so that it uses<br />
Ramp rather than Sine as its wavetable. That will give us the repeating glissando function. Doubleclick<br />
in a white space of the signal flow diagram. Edit the Oscillator parameters, changing the Wavetable<br />
to Ramp and the Frequency to 15 s inverse (because the period of repetition in seconds is<br />
the inverse of frequency in hertz).<br />
Listen to the SumOfSines so far. In order to avoid the discontinuity when the ramp goes back to zero<br />
every 15 seconds, let’s put a repeating amplitude envelope on the whole thing, so it fades in and<br />
fades out on each repetition.<br />
8. To make the envelope, paste another Oscillator from the prototypes into the Envelope field. Edit<br />
the Oscillator, changing its Wavetable to LinearEnvelope and its Frequency to 15 s inverse.<br />
Now play the SumOfSines again. This time, it should fade in and fade out on each repetition.<br />
9. <strong>The</strong> next step is to add another SumOfSines. This one should have the same kind of glissando but it<br />
should start halfway through the first SumOfSine’s glissando. <strong>The</strong> idea is to gradually fade in a new<br />
glissando, just as the first glissando is reaching its top and it is fading out.<br />
To add another <strong>Sound</strong>, we have to use a Mixer. Drag one from the prototypes and place it on the line<br />
between the SumOfSines and the speaker. Replace its default inputs with the SumOfSines. <strong>The</strong>n drag<br />
the SumOfSines from the signal flow area into the Mixer’s Inputs field. You should end up with a<br />
Mixer of two SumsOfSines. Change the Mixer Left and Right attenuators to 1, rather than the default<br />
0.5.<br />
So far we have two identical SumOfSines. But we need to delay both the glissando and the envelope<br />
Oscillators that control the frequency and amplitude of the second SumOfSines. Click on the tab on<br />
the left edge of the second SumOfSines while holding down the Command or Control key so it<br />
shows all of its inputs.<br />
Insert a TimeOffset between the envelope oscillator and the SumOfSines. <strong>The</strong>n insert another<br />
TimeOffset between the glissando oscillator and the SumOfSines. We want to set the delay to half the<br />
duration of the glissando. So set the SilentTime in each of the TimeOffsets to 7.5 s.<br />
10. Try listening to the Mixer. It should give at least something of the illusion of an endlessly rising pitch,<br />
because as the higher octaves fade out, some lower octaves are fading in below them.<br />
203
Creating a Wavetable using the Sample Editor<br />
In this exercise, you will create a wavetable that contains an impulse response, useful <strong>for</strong> making percussive<br />
sounds.<br />
First, open the sample editor. Choose New… from the File menu, set the file type to Samples file, and<br />
press Enter.<br />
<strong>The</strong> upper half of the sample editor lets you do the usual kinds of cut, copy, and paste operations (see<br />
Sample Editor on page 501 <strong>for</strong> full details), and the lower half provides templates <strong>for</strong> generating new<br />
wavetables or segments of wavetables.<br />
Scroll in the template list until you find the Impulse Response template. Select all of the wave<strong>for</strong>m in the<br />
graphic wave<strong>for</strong>m editor (the upper half) by clicking once in the wave<strong>for</strong>m area and then by choosing<br />
Select all from the Edit menu. Now click the Insert button. Insert replaces the selection in the upper half<br />
with whatever you have specified in the template.<br />
<strong>The</strong> Impulse Response template takes the specified center frequencies, bandwidths, and amplitudes of<br />
several <strong>for</strong>mants, and it constructs a filter that matches your specification; when you click Insert, it inserts<br />
the response of that filter to a single impulse. This can be an interesting template to play with <strong>for</strong> creating<br />
wavetables <strong>for</strong> percussive sounds.<br />
Try changing some of the center frequencies and then click Insert again. If the wave<strong>for</strong>m is clipped or<br />
very small in amplitude, you may have to adjust the value of Gain as well. To hear the result, click on the<br />
play button above the graphic editor.<br />
204
Continue experimenting with different values until you are satisfied with your percussive sound. <strong>The</strong>n<br />
close the editor, and confirm that you want to save your new wavetable. Choose the file type, the number<br />
of channels, and the number of bits per sample, press Enter, then enter a name <strong>for</strong> your wavetable.<br />
From the system prototypes, drag a Sample into a <strong>Sound</strong> file window and double-click it to edit it. Set<br />
Duration to on, Frequency to !Pitch, Gate to !KeyDown, and use the disk button next to the Sample<br />
parameter to locate your newly created impulse response. Try playing the Sample. Try inserting a<br />
Waveshaper between the Sample and output speaker icon to make the audio output louder through distortion.<br />
Now substitute an Oscillator <strong>for</strong> the Sample; set its Duration to on and its Frequency to !Frequency<br />
* 50 hz and its Wavetable to your impulse response wavetable. Play the Oscillator and control<br />
!Frequency using the virtual control surface.<br />
Unlike a Sample, which plays through its wavetable once each time you trigger it, an Oscillator reads<br />
through its wavetable cyclically, over and over again. Depending on the Frequency you specify, an Oscillator<br />
will step through the wavetable using larger or smaller increments; this increases or decreases the<br />
rate at which you hear the wave<strong>for</strong>m repeating, thus changing the perceived pitch of the oscillator.<br />
205
<strong>Kyma</strong> Quick Reference<br />
System Prototypes Window<br />
<strong>Sound</strong> File Window<br />
This <strong>Sound</strong> is selected.<br />
<strong>The</strong> Action and Info menu<br />
operations refer to this<br />
<strong>Sound</strong>.<br />
Press the Control or<br />
Command key along with<br />
the Space Bar to compile,<br />
load and start the selected<br />
<strong>Sound</strong>.<br />
Double-click any <strong>Sound</strong>’s<br />
icon to edit its structure<br />
and parameters.<br />
A <strong>Sound</strong> can be dragged<br />
from any window into<br />
this window.<br />
<strong>The</strong> prototypes are categorized by function.<br />
Clicking on a category name here changes the list<br />
of prototypes that appears at the right.<br />
Some <strong>Sound</strong>s appear in more than one category.<br />
Select a prototype by clicking on its icon.<br />
This <strong>Sound</strong> prototype is selected. <strong>The</strong> Action and<br />
Info menu operations refer to this <strong>Sound</strong>.<br />
Press the Control or Command key along with<br />
the Space Bar to compile, load and start this prototype.<br />
Click any <strong>Sound</strong> icon to select it. Press Enter<br />
to change the name of the <strong>Sound</strong>.<br />
This <strong>Sound</strong> is being edited.
<strong>Sound</strong> Editor Window<br />
This is the signal flow<br />
diagram of the <strong>Sound</strong><br />
being edited.<br />
A stereo signal travels<br />
along each line from left<br />
to right.<br />
A thick line with a<br />
number along it indicates<br />
that a signal is<br />
used more than once.<br />
Click any <strong>Sound</strong>’s icon<br />
to select it. Press Enter<br />
to change the name of<br />
the <strong>Sound</strong>.<br />
Drag this line up or<br />
down to control the<br />
space devoted to the<br />
signal flow relative to<br />
the parameters.<br />
<strong>The</strong>se are the parameters<br />
of the <strong>Sound</strong> double-clicked<br />
in the signal<br />
flow diagram.<br />
Working with the Signal Flow Diagram<br />
Click on the icon’s tab<br />
to show hidden inputs.<br />
Clicking again will hide<br />
the inputs.<br />
Click and drag an icon<br />
to reposition it. Hold<br />
down the Shift key to<br />
move the <strong>Sound</strong>’s inputs<br />
at the same time.<br />
To insert a <strong>Sound</strong> into<br />
the signal flow, drag the<br />
<strong>Sound</strong> onto a line connecting<br />
two <strong>Sound</strong>s.<br />
<strong>The</strong> black border added<br />
to this field indicates<br />
that it is the active field.<br />
<strong>The</strong> Edit menu operations<br />
always refer to<br />
the active field. Click in<br />
a field to make it active.<br />
Click the close box to close<br />
the editor. Use Save from the<br />
File menu to save to disk<br />
changes made in this editor.<br />
207<br />
Double-clicking a <strong>Sound</strong> in the signal<br />
flow diagram causes the <strong>Sound</strong>’s parameters<br />
to be shown below, and causes<br />
its icon to be replaced with this pattern.<br />
<strong>The</strong> Action and Info menu<br />
operations refer to the selected<br />
<strong>Sound</strong>.<br />
Control or Command with<br />
Space Bar compiles, loads,<br />
starts the selected <strong>Sound</strong>.<br />
To replace a <strong>Sound</strong> with a copy of another <strong>Sound</strong>, drag<br />
the other <strong>Sound</strong> on top of an icon. Hold down the Control<br />
or Option key to replace a <strong>Sound</strong> with the other<br />
<strong>Sound</strong> without making a copy. Alternatively, use Paste<br />
or Paste special… from the Edit menu.<br />
To delete a <strong>Sound</strong>, click on<br />
its icon to select it, then<br />
press Delete or choose<br />
Clear from the Edit menu.<br />
Undo from the Edit menu<br />
will undo the deletion.
Working with the Parameter Fields of a <strong>Sound</strong><br />
A parameter field with a<br />
white background and<br />
non-italic name is a constant<br />
parameter. Constant<br />
parameters have a<br />
fixed value <strong>for</strong> the duration<br />
of the <strong>Sound</strong>.<br />
<strong>The</strong> duration of a <strong>Sound</strong><br />
is how long it runs on<br />
the Capybara, and is<br />
found by taking the<br />
longest duration of any<br />
input or parameter of the<br />
<strong>Sound</strong>.<br />
Many <strong>Sound</strong>s have a<br />
Duration parameter.<br />
Use ON (or on) to keep a<br />
<strong>Sound</strong> turned on indefinitely.<br />
Or, use a value<br />
with units, <strong>for</strong> example,<br />
10 s or 1.5 h.<br />
This the name of one of the <strong>Sound</strong>’s parameters.<br />
Click on the name <strong>for</strong> help on<br />
how to set the parameter.<br />
Click this button to<br />
choose a file from a<br />
standard file dialog.<br />
Hold down the Control<br />
or Command key while<br />
clicking the button to<br />
open an editor on the<br />
file.<br />
Hot parameter fields can<br />
contain Event Values<br />
controlled by MIDI or<br />
the Virtual Control Surface.<br />
Event Values can<br />
be inserted by hitting the<br />
Escape key and moving<br />
a MIDI controller or<br />
playing the MIDI keyboard,<br />
choosing Paste<br />
hot… from the Edit<br />
menu, or by typing an<br />
exclamation point (!) followed<br />
by the name of the<br />
Event Value.<br />
208<br />
This <strong>Sound</strong> is being edited.<br />
Double-click a different <strong>Sound</strong><br />
to edit its parameters.<br />
A parameter field with a<br />
cyan background and italic<br />
name is a hot parameter. Hot<br />
parameters can be altered<br />
while the <strong>Sound</strong> is playing.<br />
This is the kind of <strong>Sound</strong> being edited.<br />
Click here <strong>for</strong> a description of the <strong>Sound</strong><br />
type and its parameters.<br />
Hot parameter fields can contain<br />
<strong>Sound</strong>s. To insert a <strong>Sound</strong> into a<br />
hot parameter field, Copy the<br />
<strong>Sound</strong>, and then Paste it into the<br />
field. Use L <strong>for</strong> left, R <strong>for</strong> right, or M<br />
<strong>for</strong> mono mix of the channels.<br />
If a parameter field flashes when you try to play<br />
the <strong>Sound</strong>, it indicates an error in the value or<br />
expression in the field.
Can’t see everything in a parameter<br />
field? Choose Large window…<br />
from the Edit menu to expand<br />
the field to full screen size.<br />
A parameter field can be set to<br />
!Pitch, !KeyDown, or !KeyVelocity<br />
by hitting Escape and<br />
playing 1, 2, or 3 keys simultaneously<br />
on the MIDI keyboard.<br />
<strong>The</strong> black border added to this<br />
field indicates that it is the active<br />
field. <strong>The</strong> Edit menu operations<br />
always refer to the active field.<br />
Click in a field to make it active.<br />
Alternatively, press Tab to advance<br />
the active field through each<br />
of the fields.<br />
Signal inputs to a <strong>Sound</strong> appear in both the signal flow diagram and in the <strong>Sound</strong>’s parameters.<br />
To change the input, Cut, Copy, Paste, or drag <strong>Sound</strong>s into the parameter field, or onto the icon<br />
of the old input in the signal flow diagram.<br />
<strong>The</strong> signal flow diagram will not be updated until you double-click a different <strong>Sound</strong> or doubleclick<br />
in the background of the signal flow diagram.<br />
209
Specifying Units in Parameter Fields<br />
Time Functions in Parameter Fields<br />
Example Meaning<br />
on about 2 years<br />
3 days 3 days (4320 minutes)<br />
2.1 h 2.1 hours (126 minutes)<br />
3 m 3 minutes<br />
4.7 s 4.7 seconds<br />
100 ms 100 milliseconds (0.1 seconds)<br />
100 usec 100 microseconds (0.0001 seconds)<br />
5 samp 5 samples<br />
4 beats 4 beats at current value of MM<br />
01:37:42.7 SMPTE 1 hour, 37 minutes, 42 seconds, and 7 frames<br />
440 hz 440 hertz<br />
60 nn MIDI note number 60 (middle C)<br />
4 c note number 60<br />
4 c sharp note number 61<br />
4 c flat note number 59<br />
4 do note 60 (from solfege scale: do, re, mi, fa, so, la, ti)<br />
default “natural” duration or frequency of sample file<br />
4 c removeUnits 60, the value with units removed<br />
Message Explanation Example<br />
ramp ramp from 0 to 1 over 1 second when triggered !KeyDown ramp<br />
ramp: same as ramp:, except use given duration !KeyDown ramp: 10 s<br />
repeatingRamp same as ramp, except repeats until trigger turns off !KeyDown repeatingRamp<br />
repeatingRamp: same as ramp:, except repeats until trigger off !KeyDown repeatingRamp: 2.3 s<br />
fullRamp ramp from -1 to 1 over 1 second when triggered !KeyDown fullRamp<br />
fullRamp: same as fullRamp:, except use given duration !KeyDown fullRamp: 10 s<br />
repeatingFullRamp same as fullRamp, except repeats until trigger off !KeyDown repeatingFullRamp<br />
repeatingFullRamp: same as fullRamp:, except repeats until trigger off !KeyDown repeatingFullRamp: 2.3 s<br />
bpm: periodic trigger output at given rate when trigger on !KeyDown bpm: 60<br />
bpm:dutyCycle: same as bpm:, except output duty cycle is given !KeyDown bpm: 30 dutyCycle: 0.60<br />
random random numbers generated at given time intervals 1 s random<br />
nextRandom random number generated on each trigger !KeyDown nextRandom<br />
smooth: linearly ramp to new value over the given duration !cc01 smooth: 0.5 s<br />
smoothed same as smooth: with an argument of 100 ms !cc01 smoothed<br />
210
Real-Time Expressions in Parameter Fields<br />
Message Explanation Example Value<br />
+ addition 3.0 + 2.0 5.0<br />
- subtraction 3.0 - 2.0 1.0<br />
* multiplication 3.0 * 2.0 6.0<br />
/ division 3.0 / 2.0 1.5<br />
// truncating division 3.0 // 2.0 1<br />
mod: modulo 3.0 mod: 2.0 1<br />
negated additive inverse 3.0 negated -3.0<br />
inverse multiplicative inverse 3.0 inverse 0.3333333<br />
** exponentiation 3.0 ** 2.0 9.0<br />
sqrt square root 2.0 sqrt 1.4142<br />
exp powers of e 1 exp 2.71828<br />
twoExp powers of 2 3 twoExp 8<br />
log logarithm base 10 100 log 2.0<br />
twoLog logarithm base 2 8 twoLog 3.0<br />
db decibel conversion -20 db, -6 db 0.1, 0.5<br />
inSOSPitch SOS pitch conversion 11025.0 inSOSPitch 0.5<br />
truncated truncation 3.2 truncated, -3.6 truncated 3, 4<br />
rounded round to nearest integer 3.2 rounded, 3.6 rounded 3, 4<br />
abs absolute value -3.0 abs, 3 abs 3, 3<br />
sign sign -10 sign, 0 sign, 10 sign -1, 0, 1<br />
clipTo01 clip to lie in (0, 1) interval -5 clipTo01, 0.5 clipTo01, 1.2 clipTo01 0, 0.5, 1<br />
vmin: select minimum value 3 vmin: 2 2<br />
vmax: select maximum value 3 vmax: 2 3<br />
cos cosine in radians 3.14159 cos -1<br />
normCos cos(πx) 1 normCos -1<br />
sin sine in radians 3.14159 sin 0<br />
normSin sin(πx) 1 normSin 0<br />
asLogicValue 0 is false, 1 is true -1 asLogicValue, 2 asLogicValue 0, 1<br />
eq: equal 2 eq: 3 0<br />
ne: not equal 2 ne: 3 1<br />
gt: greater than 2 gt: 3 0<br />
lt: less than 2 lt: 3 1<br />
ge: greater or equal 2 ge: 3 0<br />
le: less or equal 2 le: 3 1<br />
neg:zero:pos: choose value -3 neg: 0.1 zero: 0.2 pos: 0.3 0.1<br />
true:false: conditional evaluation 0 true: 2 twoExp false: 3 twoExp 8<br />
of: array indexing 3 of: #(0.1 0.2 0.3 0.4 0.5 0.6) 0.4<br />
211
Virtual Control Surface<br />
<strong>The</strong> axes of the spectrum are linear frequency<br />
and dB magnitude. Magnitude and frequency of<br />
the mouse location is displayed in upper right.<br />
Explanatory text comes from<br />
Annotation <strong>Sound</strong>.<br />
Spectrum and Wave<strong>for</strong>m<br />
come from SpectrumAnalyzer-<br />
Display and Oscilloscope-<br />
Display <strong>Sound</strong>s or by choosing<br />
Spectrum analyzer or Oscilloscope<br />
from the Info menu.<br />
All other controls come from<br />
Event Values in the <strong>Sound</strong> (<strong>for</strong><br />
instance, !Amp or !Reset). If a<br />
MIDI device is mapped to the<br />
Event Value, it can be controlled<br />
through MIDI or by manipulating<br />
the graphic control.<br />
Event values can be displayed<br />
as faders, small faders, gates, or<br />
toggles.<br />
For faders, use mouse to move,<br />
or enter text in box and press<br />
Enter. Tab cycles through entries.<br />
This is an example of a gate.<br />
Global and Local Maps<br />
!EventValue is: `EventSource.<br />
Horizontal zoom in/out<br />
212<br />
<strong>The</strong> axes of the oscilloscope are time and<br />
amplitude. <strong>The</strong> amplitude of the mouse<br />
location is displayed in upper right.<br />
Vertical zoom in/out<br />
This is an example of a toggle.<br />
Use EventValue as the name of EventSource.<br />
!EventValue is: (`EventSource channel: 2).<br />
Specify that EventSource comes from MIDI<br />
channel 2. <strong>The</strong> channel must be between 1 and<br />
16. If this option is omitted, the default MIDI<br />
channel will be used.<br />
!EventValue is: (`EventSource min: 100 max: 500). Scale the (0,1) range of EventSource to<br />
(100,500).<br />
!EventValue is: (`EventSource min: 0 max: 10 grid: 2). Constrain the allowable values of EventSource<br />
to multiples of 2 between 0 and 10.<br />
!EventValue is: (`EventSource taper: #log).<br />
Map the (0,1) range of EventSource with a<br />
log taper. Either #log or #linear can be used.<br />
If this option is omitted, #linear will be used.<br />
!EventValue is: (`EventSource displayAs: #smallFader). Show EventValue as a small fader in the virtual<br />
control surface. <strong>The</strong> possible display types are<br />
#fader, #smallFader, #gate, #toggle, or<br />
#nothing. If this option is omitted, #fader will<br />
be used.<br />
!EventValue is:<br />
(`EventSource<br />
channel: 2;<br />
min: 100 max: 500 grid: 0.1;<br />
taper: #log;<br />
displayAs: #smallFader).<br />
See Sources of Event Values on page 473 <strong>for</strong> a list of allowable event sources.<br />
Combine any of the above by separating them<br />
with a semicolon.
MIDI Script Messages<br />
File Organizer<br />
Example Remarks<br />
self keyDownAt: 1 s duration: 0.25 s frequency: 100 hz velocity: 0.8.<br />
self keyDownAt: 1 s duration: 0.25 s frequency: 4 c sharp.<br />
self keyDownAt: 1 s frequency: 60.2 nn duration: 0.25 s.<br />
self keyDownAt: 1 s duration: 0.25 s velocity: 0.8.<br />
self keyDownAt: 1 s duration: 0.25 s.<br />
self keyDownAt: 1 s.<br />
self controller: !Volume setTo: 0.5 atTime: 5 s.<br />
self controller: !Volume slideTo: 1 byTime: 6 s.<br />
self controller: !Volume slideTo: 0.75 steps: 100 byTime: 10 s.<br />
self controller: !Volume slideTo: 0 stepSize: 0.01 byTime: 20 s.<br />
See MIDI Scripts on page 522 <strong>for</strong> in<strong>for</strong>mation about EventCollections.<br />
Files and folders are listed<br />
here with color coding.<br />
Underline: open folder<br />
Gray: unopened folder<br />
Turquoise: sample file<br />
Purple: spectrum file<br />
Red-brown: GA file<br />
Yellow-orange: RE file<br />
Green: MIDI file<br />
Double-click a folder to<br />
show or hide the contents of<br />
the folder.<br />
213<br />
Fully specified note event: !Key-<br />
Down is 1 at 1 s and 0 at 1.25 s,<br />
!KeyNumber is set to 100 hz nn<br />
removeUnits, !KeyVelocity is<br />
set to 0.8<br />
!KeyVelocity defaults to 1<br />
Alternate order of line above<br />
!KeyNumber defaults to mapper’s<br />
LowPitch parameter<br />
!KeyNumber defaults to mapper’s<br />
LowPitch parameter, !Key-<br />
Velocity defaults to 1<br />
!KeyNumber defaults to mapper’s<br />
LowPitch parameter, !Key–<br />
Velocity defaults to 1, duration<br />
defaults to 10 ms<br />
!Volume jumps to 0.5 at 5 s<br />
!Volume slides to 1 by 6 s in 10<br />
steps<br />
!Volume slides to 0.75 by 10 s in<br />
100 steps<br />
!Volume slides to 0 by 20 s in<br />
steps of size 0.01<br />
Click file to select it.<br />
Use arrow keys to move<br />
selection up and down<br />
within the window.<br />
Double-click file to edit<br />
it. Press Control or<br />
Command along with<br />
Space Bar to hear the<br />
file. Drag the file into a<br />
<strong>Sound</strong> file window to<br />
create a <strong>Sound</strong> that uses<br />
this file.<br />
In<strong>for</strong>mation on the selected<br />
file or folder.
Spectrum Editor<br />
Overview<br />
Navigating and Selecting<br />
Markers indicate labeled<br />
time points, and time segments<br />
<strong>for</strong> cutting or auditioning.<br />
Each line represents a sine<br />
wave track. Color indicates<br />
the amplitude, vertical position<br />
indicates the frequency.<br />
Gray tracks have zeroed<br />
(cleared) amplitudes.<br />
Scrub bar can be moved<br />
with the mouse, with pitchbend<br />
from MIDI, or left or<br />
right arrow keys.<br />
Brightly colored tracks are<br />
selected.<br />
Select by clicking on individual<br />
tracks, or by drawing<br />
a box around a region<br />
to select.<br />
Hold the shift key to add to<br />
or remove from the current<br />
selection.<br />
Hold down the Control or<br />
Command key while<br />
drawing a box to zoom in<br />
on a specific region.<br />
Plays selection outside of<br />
start and end markers.<br />
Plays selection between<br />
start and end markers.<br />
Plays selection.<br />
Plays entire spectrum.<br />
Zoom all the way out.<br />
Switches between timefrequency<br />
and time- amplitude<br />
display modes.<br />
Switches between isolateddot<br />
and connected-dot between<br />
spectral frames.<br />
214<br />
In<strong>for</strong>mation is displayed<br />
here about the track under<br />
the crosshair cursor.<br />
Select track between<br />
1 and 10 by pressing<br />
a number key (1-9, 0).<br />
Up and down arrow<br />
keys select next larger<br />
or smaller track.
Markers<br />
Editing<br />
Selected marker’s time and<br />
name are displayed here.<br />
Click marker to select it.<br />
Scrub bar moves to marker<br />
when selected. Press Enter<br />
to rename marker; use Delete<br />
or Cut from Edit menu<br />
to remove marker.<br />
Sets pre- and post-roll play<br />
times.<br />
Creates end marker at<br />
scrub bar location.<br />
Creates start marker at<br />
scrub bar location.<br />
Creates marker at scrub<br />
bar location.<br />
Zero the amplitude of the<br />
selection by choosing<br />
Clear from Edit menu.<br />
Create a <strong>Sound</strong> to play the<br />
selection by choosing Copy<br />
from Edit menu, then Paste<br />
into <strong>Sound</strong> file window or<br />
<strong>Sound</strong> editor.<br />
Switch in and out of drawing<br />
mode .<br />
Cut the time between the<br />
start and end markers.<br />
Modify the selection in<br />
various ways.<br />
Select tracks and frames<br />
based on various criteria.<br />
215<br />
Start and end markers.
Sample File Editor<br />
This box indicates the region of the<br />
file that is visible in the middle section.<br />
Clicking and dragging with the mouse<br />
will change the visible region.<br />
This is the wave<strong>for</strong>m of<br />
the entire file. Two channels<br />
are displayed, even<br />
when editing single channel<br />
files.<br />
<strong>The</strong> samples between<br />
these lines are selected.<br />
Click and drag with the<br />
mouse in this area to<br />
change the selection.<br />
This section is used to<br />
generate new samples algorithmically.<br />
216<br />
<strong>The</strong>se marks indicate the<br />
current selection.<br />
Top shows peak displayable<br />
level in the middle section.<br />
Bottom shows the duration,<br />
start and end of the selection.<br />
Time zoom out Time zoom in<br />
Selection zoom in Level zoom out<br />
Paste sample from disk<br />
Play selection<br />
Move one page to left<br />
Selected template <strong>for</strong> algorithmic<br />
sample creation.<br />
Use arrow button to select<br />
from the list of templates.<br />
Parameters <strong>for</strong> template<br />
Level zoom out<br />
Options…<br />
Move one page to right<br />
Edit menu Cut, Copy,<br />
Paste, Trim, and Clear<br />
selection when this is active<br />
field (indicated by<br />
black border).<br />
Evaluate template with<br />
the given parameters and<br />
replace selection with the<br />
result.
Compiled <strong>Sound</strong> Grid<br />
Status from the File Menu<br />
Status from the DSP Menu<br />
Output peak level indicator.<br />
Click mouse in window to<br />
clear. Possible clipping if it<br />
shows >0
Prototypes Reference
AbsoluteValue<br />
Math Category<br />
<strong>The</strong> output of an AbsoluteValue is the absolute value of its Input. (Choose Full wave<strong>for</strong>m from the Info<br />
menu to see that the output wave<strong>for</strong>m contains only positive values, rather than values above and below<br />
zero).<br />
Input<br />
This is the <strong>Sound</strong> whose absolute value is taken.<br />
219
ADSR<br />
Envelopes & Control Signals Category<br />
Generates a traditional four-segment envelope with attack, initial decay, sustain, and release segments.<br />
As long as Gate is 0, no envelope is generated. When Gate becomes positive, the attack and decay are<br />
generated. <strong>The</strong> envelope continues to decay towards the SustainLevel until the Gate value returns to<br />
zero at which time the envelope enters its release portion.<br />
In a prototype with an Envelope parameter field (Oscillator, <strong>for</strong> example) you can use the ADSR as the<br />
Envelope parameter. Envelope generators can also be used to control other parameters (such as<br />
Frequency or OnDuration). To apply an envelope to any <strong>Sound</strong>, use the <strong>Sound</strong> and an envelope<br />
generator as Inputs to the VCA prototype. (<strong>The</strong> VCA simply multiplies its two inputs by each other).<br />
AttackTime<br />
Time <strong>for</strong> the envelope to reach the maximum amplitude (attenuated by Scale) once it has been triggered.<br />
DecayTime<br />
Time <strong>for</strong> the envelope to decay from the maximum level down to the SustainLevel.<br />
SustainLevel<br />
Level that will be sustained <strong>for</strong> as long as Gate remains nonzero.<br />
ReleaseTime<br />
Time <strong>for</strong> envelope to decay from SustainLevel down to 0.<br />
Type<br />
Choose between linear envelope segments or exponential segments.<br />
Scale<br />
Overall level <strong>for</strong> the envelope. IF you have the Linear box checked, you can set Scale to a negative<br />
value to generate envelopes that go from 0 down to a negative value. (Note that this makes most sense<br />
when using the ADSR to control parameters other than amplitude, e.g. when using this as a pitch<br />
envelope).<br />
Gate<br />
Enter a 1 in this field to make the envelope last exactly as long as the <strong>Sound</strong> is on.<br />
If you use an EventValue (<strong>for</strong> example, !KeyDown) in this field, the envelope can be retriggered as often<br />
as you like <strong>for</strong> as long as this <strong>Sound</strong> is on.<br />
When Gate becomes positive, the envelope is started; when Gate becomes zero, the envelope is<br />
released.<br />
Legato<br />
Legato affects the behavior of the envelope when triggered by the Gate field.<br />
When Legato has a zero or negative value, the envelope will rapidly reset to zero be<strong>for</strong>e beginning the<br />
re-attack. When Legato has a positive value, the attack will begin from the current envelope value<br />
(without first resetting to zero).<br />
220
AmplitudeFollower<br />
Tracking Live Input Category<br />
Follows the amplitude of the Input by taking an average of the absolute values of individual input<br />
samples. This is similar to the RMS but requires less computation. TimeConstant controls how long the<br />
average runs; thus, the longer the TimeConstant, the smoother the output (but the less quickly it can<br />
respond to transients in the Input).<br />
Input<br />
This is the <strong>Sound</strong> whose amplitude is tracked.<br />
TimeConstant<br />
This controls the response time. Longer timeConstants result in smoother outputs at a cost of losing<br />
some of the detail in the attacks. Short timeConstants result in outputs that respond more immediately to<br />
attack transients but that may not be as smooth <strong>for</strong> the steady state portions. For a constant input at<br />
maximum amplitude, this is the time required <strong>for</strong> the output to reach 60% of the full output amplitude.<br />
(Note that the output may never reach the maximum possible amplitude since it is the average of the<br />
squares of the amplitudes).<br />
Scale<br />
Attenuates the input amplitude.<br />
221
AnalogSequencer<br />
Sequencers Category<br />
Generates sequences of note events and continuous controller values <strong>for</strong> EventValues in parameters of<br />
the Input. <strong>The</strong>re is a sequence of MIDI notenumbers, durations, duty cycles and velocities to supply MIDI<br />
note events to the Input, and ExtraValues lets you supply a sequence of values <strong>for</strong> any continuous<br />
controller EventValues in the Input’s parameters.<br />
<strong>The</strong> length of all sequences is the length of the longest sequence; any shorter sequences will repeat their<br />
final values in order to be as long as the longest sequence. For example, if you want all values in a<br />
sequence to be 0.5, you need only enter the number a single time, because it will be repeated <strong>for</strong> as<br />
many times as necessary to make it as long as the other sequences.<br />
If Step is a constant 1, then the Durations and the DutyCycles are used to determine when !KeyDown<br />
events should be generated and how long each key should remain down. If no other units of time are<br />
used and if the value of Rate is 1, the numbers in the Durations sequence are interpreted in seconds.<br />
Rate is a divisor on the length of each duration, so if Rate is greater than 1, the durations will be shorter,<br />
and if Rate is less than 1, they will be longer.<br />
Use Step to step through the sequences one by one, according to a trigger. For example, you could use<br />
!KeyDown to control the step rate from a MIDI sequencer, or you could use 1 bpm: (!Speed * 1024) to<br />
control it with an internal metronome, or you could paste in an audio signal that has been passed through<br />
an amplitude follower and a threshold to trigger each element of the sequences in synch with an audio<br />
signal, or you could use !TimingClock to step using the MIDI clock from a software sequencer or external<br />
synthesizer.<br />
To trigger using the Step field, you should set all Durations to the same value; this value (taken along with<br />
the value of DutyCycle and Rate) will determine the duration of each note, and the Step trigger will<br />
specify the onset time of the note. <strong>The</strong> value you pick <strong>for</strong> the Durations will act as a kind of "mask" on the<br />
speed of the step triggers. Notes cannot be triggered any more often than the minimum values specified<br />
in the Durations field. This can be helpful if you are triggering from the !TimingClock (24 triggers per<br />
beat) or an audio signal with lots of peaks in it, because it will <strong>for</strong>ce the sequencer to ignore triggers that<br />
occur faster than at the desired rate.<br />
Input<br />
EventValues anywhere in this <strong>Sound</strong> can be controlled by the arrays of key events or continuous<br />
controller values sequenced by this AnalogSequencer.<br />
Left<br />
Attenuator on the left channel amplitude.<br />
Right<br />
Attenuator on the right channel amplitude.<br />
Gate<br />
When this value changes from 0 to 1, it restarts the sequences. If Loop is checked, the sequences will<br />
repeat <strong>for</strong> as long as Trigger is nonzero.<br />
Use a constant value of 1 to get an infinitely repeating sequence. Use an EventValue such as !KeyDown<br />
to restart and stop the sequence interactively.<br />
222
Step<br />
Step to the next set of values in the sequence when this value changes from a zero to a number greater<br />
than zero. If Step is changing faster than the specified durations, some of the steps will be ignored. In<br />
other words, you can use the sequence of durations as a kind of mask, constraining the minimum<br />
durations to be at least those specified in the duration sequence.<br />
Rate<br />
This is the rate at which the sequences are traversed. When Rate is 1, all Durations are interpreted as<br />
seconds, when Rate is 2, the Durations are half as long, and when Rate is 0.5 the Durations are twice as<br />
long.<br />
Loop<br />
Check this box to loop back to the StartIndex once the EndIndex has been reached.<br />
StartIndex<br />
This is the starting position of the sequence. Each position in the sequence is numbered from 0 up to the<br />
length of the sequence minus 1.<br />
EndIndex<br />
This is the ending position of the sequence. Each position in the sequence is numbered from 0 up to the<br />
length of the sequence minus 1.<br />
Polyphony<br />
<strong>The</strong> sequencer is monophonic, but this allows some overlap between the release of one event and the<br />
attack of the next. Polyphony specifies how many events can be heard overlapping each other at any<br />
one time.<br />
Durations<br />
A sequence of durations. If no units are used, the numbers are assumed to be in seconds. Each<br />
Duration, in conjunction with the corresponding DutyCycle, is used to determine when to send each<br />
!KeyDown and how long to keep it down.<br />
DutyCycles<br />
A sequence of duty cycles where the duty cycle is the fraction of the beat during which the note is on.<br />
For example, a duty cycle of 0.5 means that the note is on <strong>for</strong> half the beat and off <strong>for</strong> the second half of<br />
the beat. A duty cycle of 0 would mean that the note is never on, and a duty cycle of 1 would mean that<br />
the note is continuously on and never turns off.<br />
Pitches<br />
A sequence of MIDI notenumbers that will supply the pitches to any !Pitch or !KeyNumber EventValues in<br />
the parameters of the Input.<br />
Velocities<br />
A sequence of values between 0 and 1 that will supply the values to any !KeyVelocity EventValues in the<br />
parameters of the Input.<br />
ExtraValues<br />
Use this field to specify a sequence of changes <strong>for</strong> any non-keyboard EventValues in the Input. <strong>The</strong><br />
syntax is:<br />
#( , .., )<br />
For example, to send a sequence of 3 values <strong>for</strong> !Morph and <strong>for</strong> !Pan, you would use something like the<br />
following:<br />
223
#(!Morph 0 0.25 1)<br />
#(!Pan 0 0.5 1)<br />
224
AnalysisFilter<br />
Tracking Live Input Category<br />
Bandpass filter designed to isolate the individual harmonics of its Input. It has quadrature output (i.e. the<br />
left channel output is the cosine part of the Input signal at that frequency; the right channel is the sine part<br />
of the Input at that frequency); thus you can use a QuadratureOscillator to frequency shift this harmonic<br />
using single side band ring modulation.<br />
<strong>The</strong> filter is designed such that, if you were to add together the output of filters set at each harmonic from<br />
0 to the harmonic closest to half the sampling rate, the amplitude of that sum would be 1.<br />
Input<br />
This is the <strong>Sound</strong> that gets filtered.<br />
Fundamental<br />
This is the assumed fundamental frequency. In most cases, you should set it to be the same as the Input<br />
frequency.<br />
Harmonic<br />
This is the number of the harmonic that the filter will try to isolate. In other words, the center frequency of<br />
the filter will be the Fundamental * this Harmonic.<br />
225
Annotation<br />
Variables & Annotation Category<br />
An Annotation contains a Text commenting on its Input. It does not affect the sound of the Input in any<br />
way; it is just a comment. <strong>The</strong> Text of an Annotation shows up in the Virtual control surface whenever the<br />
<strong>Sound</strong> is loaded. (<strong>The</strong> text of any Annotations that occur in <strong>Sound</strong>s to the left of this one will appear<br />
below this one’s Text in the Virtual control surface).<br />
Input<br />
<strong>The</strong> Text refers to this <strong>Sound</strong>.<br />
Text<br />
This is a textual description of the Input.<br />
226
AR<br />
Envelopes & Control Signals Category<br />
Generates an envelope with the specified attack and release times with either linear or exponential<br />
segments.<br />
In a prototype with an Envelope parameter field (Oscillator, <strong>for</strong> example) you can use an envelope<br />
generator directly as the Envelope parameter. Envelope generators can also be used to control other<br />
parameters (such as Frequency or OnDuration). To apply an envelope to any <strong>Sound</strong>, use the <strong>Sound</strong> and<br />
an envelope generator as Inputs to the VCA prototype. (<strong>The</strong> VCA simply multiplies its two inputs by each<br />
other).<br />
AttackTime<br />
Time required <strong>for</strong> the envelope to reach its maximum value (as attenuated by Scale) whenever its Gate<br />
value becomes positive.<br />
ReleaseTime<br />
Time it takes <strong>for</strong> the envelope to return to 0 once Gate changes from a positive number back to zero.<br />
Type<br />
Choose between linear and exponential segment shapes.<br />
Scale<br />
Overall attenuation on the envelope generator values.<br />
Gate<br />
Enter a 1 in this field to play the <strong>Sound</strong> exactly once <strong>for</strong> the duration you have specified in the Duration<br />
field.<br />
If you use an EventValue (<strong>for</strong> example, !KeyDown) in this field, the <strong>Sound</strong> can be retriggered as often as<br />
you like within the duration specified in the Duration field.<br />
When Gate becomes positive, the <strong>Sound</strong> is heard; when Gate becomes zero, the <strong>Sound</strong> is released.<br />
227
ArcTan<br />
Math Category<br />
<strong>The</strong> output of ArcTan is the four-quadrant arctangent of the ratio of the right channel input to the left<br />
channel input.<br />
Input<br />
This is the <strong>Sound</strong> whose arctangent is taken.<br />
228
Attenuator<br />
Level, Compression, Expansion Category<br />
An Attenuator multiplies the left and right channels of its Input by the values in Left and Right. It can be<br />
used to "place" the Input between the speakers; <strong>for</strong> example, if the Input is multiplied by 1.0 in the right<br />
channel and by 0 in the left channel, it will seem as if the source of the Input is located to the right of the<br />
listener.<br />
Input<br />
This is the <strong>Sound</strong> whose left and right channels will be attenuated.<br />
Left<br />
This controls the level of the left input channel. <strong>The</strong> maximum value is 1 and the minimum is -1. <strong>The</strong> left<br />
channel of the input is multiplied by the value of this parameter. Some example values <strong>for</strong> Left are:<br />
1 (no attenuation)<br />
0 (maximum attenuation)<br />
!Fader1 (continuous controller sets level)<br />
!KeyVelocity (MIDI key velocity controls the amplitude)<br />
You can also paste another signal into this field, and the amplitude will vary with the output amplitude of<br />
the pasted signal (something like an LFO controlling the attenuation). (See the manual <strong>for</strong> a complete<br />
description of hot parameters, EventValues, EventSources, and Map files).<br />
Right<br />
This controls the level of the right input channel. <strong>The</strong> maximum value is 1 and the minimum is -1. <strong>The</strong><br />
right channel of the input is multiplied by the value of Right. Some example values <strong>for</strong> Right are:<br />
1 (no attenuation)<br />
0 (maximum attenuation)<br />
!Fader1 (continuous controller sets level)<br />
!KeyVelocity (MIDI key velocity controls the amplitude)<br />
You can also paste another signal into this field, and the amplitude will vary with the output amplitude of<br />
the pasted signal (something like an LFO controlling the attenuation). (See the manual <strong>for</strong> a complete<br />
description of hot parameters, EventValues, EventSources, and Map files).<br />
229
AudioInput<br />
Sampling Category<br />
An AudioInput represents the analog or digital inputs on the back of the Capybara. If Digital Input is<br />
selected in the DSP Status window, then this represents the digital input.<br />
If there are (preamplified) microphones connected to the inputs then this <strong>Sound</strong> represents the input from<br />
those microphones. You can also connect the audio outputs of some other line-level sound generator<br />
(like a CD or DAT) to the input.<br />
<strong>The</strong> individual channel check boxes control which audio input channel(s) will be used. If only one channel<br />
is checked, it will be output on both channels of the AudioInput.<br />
Channel1<br />
Check this box to use the channel 1 audio input of the signal processor.<br />
Channel2<br />
Check this box to use the channel 2 audio input of the signal processor.<br />
Channel3<br />
Check this box to use the channel 3 audio input of the signal processor.<br />
Channel4<br />
Check this box to use the channel 4 audio input of the signal processor.<br />
Channel5<br />
Check this box to use the channel 5 audio input of the signal processor.<br />
Channel6<br />
Check this box to use the channel 6 audio input of the signal processor.<br />
Channel7<br />
Check this box to use the channel 7 audio input of the signal processor.<br />
Channel8<br />
Check this box to use the channel 8 audio input of the signal processor.<br />
230
AveragingLowPassFilter<br />
Filters Category<br />
Low-pass filter that operates by taking a running average of the stream of Input values. <strong>The</strong> length of the<br />
running average is the period of the cutoff frequency. <strong>The</strong> Cutoff frequency and its harmonics are<br />
cancelled out by the filter (and frequencies close to the cancelled frequencies are attenuated).<br />
Input<br />
This is the <strong>Sound</strong> that is to be low-pass filtered.<br />
Cutoff<br />
Frequencies above the cutoff will be attenuated by the filter.<br />
Wavetable<br />
This is the wavetable that is used to keep the running average of the last few samples. Select Private if<br />
you want the next free wavetable and do not need to reference this same segment of memory again. (If<br />
you want to reference this same memory segment from another <strong>Sound</strong>, type in a unique name <strong>for</strong> the<br />
wavetable and use that same name when accessing the memory from the other <strong>Sound</strong>.)<br />
Scale<br />
This is the attenuation on the input. For the full amplitude use +1.0 or -1.0 (or 0 dB); any factor whose<br />
absolute value is less than 1 will attenuate the output.<br />
231
CellularAutomaton<br />
Scripts Category<br />
This <strong>Sound</strong> is based on the one-dimensional cellular automata described by Stephen Wolfram in his<br />
book, <strong>The</strong>ory and Applications of Cellular Automata. <strong>The</strong> state, an n-place binary number, where n is the<br />
number of Inputs, determines which of the Inputs is turned on and which is turned off in a given<br />
generation. An integer, rule, is used to determine the next state.<br />
Inputs<br />
Each <strong>Sound</strong> is associated with a position in the state array, starting with position 1 at the upper left and<br />
moving from top to bottom and left to right. <strong>The</strong>se <strong>Sound</strong>s <strong>for</strong>m a sort of "chord" in which individual<br />
<strong>Sound</strong>s are turned on or turned off according to whether they correspond to a position in the state array<br />
that contains a 1 or a position that contains a 0.<br />
Rule<br />
If you look at the rule and the state as 8-bit binary numbers, you can use the rule to compute the next<br />
generation of the state. Number the positions of the digits 0 to 7 counting from right to left. To compute<br />
the next generation of position P of the state: Take the number at position P, P+1 and P-1 (i.e. the<br />
number at position P and its neighbors to the right and to the left). Think of this as a three digit binary<br />
number N that you are going to use as an index into the binary number representing the rule. Look at<br />
position N of the rule. <strong>The</strong> value at position N of the rule is the value of position P in the next generation<br />
of the state.<br />
For example, if the rule is 2r10101110 and the state is 2r10010101, let’s compute the next generation<br />
state of position 3. <strong>The</strong> current value at position 3 of the state is ’0’. Looking at position 3 and its two<br />
neighbors as a binary number, we get ’101’ or the number 5. Using this number as an index, look at<br />
position 5 of the rule; it is ’1’. So the value of position three in the next generation is ’1’. When you reach<br />
the rightmost or leftmost digit in the state, make the assumption that there is an infinite number of zeroes<br />
extending both leftwards and rightwards.<br />
Iterations<br />
<strong>The</strong> value of iterations is the number of generations.<br />
InitialState<br />
Imagine the initial state as an n-bit binary number where n is the size of the collection of inputs. Each digit<br />
in the binary number corresponds to an input; use a 1 to indicate that a <strong>Sound</strong> is initially on, a 0 to<br />
indicate that it is initially off.<br />
Left<br />
This controls the level of the left input channel. <strong>The</strong> maximum value is 1 and the minimum is -1. <strong>The</strong> left<br />
channel of the input is multiplied by the value of this parameter. Some example values <strong>for</strong> Left are:<br />
1 (no attenuation)<br />
0 (maximum attenuation)<br />
!Fader1 (continuous controller sets level)<br />
!KeyVelocity (MIDI key velocity controls the amplitude)<br />
You can also paste another signal into this field, and the amplitude will vary with the output amplitude of<br />
the pasted signal (something like an LFO controlling the attenuation). (See the manual <strong>for</strong> a complete<br />
description of hot parameters, EventValues, EventSources, and Map files).<br />
232
Right<br />
This controls the level of the right input channel. <strong>The</strong> maximum value is 1 and the minimum is -1. <strong>The</strong><br />
right channel of the input is multiplied by the value of Right. Some example values <strong>for</strong> Right are:<br />
1 (no attenuation)<br />
0 (maximum attenuation)<br />
!Fader1 (continuous controller sets level)<br />
!KeyVelocity (MIDI key velocity controls the amplitude)<br />
You can also paste another signal into this field, and the amplitude will vary with the output amplitude of<br />
the pasted signal (something like an LFO controlling the attenuation). (See the manual <strong>for</strong> a complete<br />
description of hot parameters, EventValues, EventSources, and Map files).<br />
233
CenteringMixer<br />
Mixing & Panning Category<br />
Lines up all of the Inputs’ duration midpoints with the longest Input’s midpoint and outputs the mix of all<br />
the Inputs. <strong>The</strong> "midpoint" is defined as half the duration of the longest Input.<br />
Inputs<br />
<strong>The</strong> duration midpoint of each of these <strong>Sound</strong>s occurs at the same time.<br />
Left<br />
This controls the level of the left input channel. <strong>The</strong> maximum value is 1 and the minimum is -1. <strong>The</strong> left<br />
channel of the input is multiplied by the value of this parameter. Some example values <strong>for</strong> Left are:<br />
1 (no attenuation)<br />
0 (maximum attenuation)<br />
!Fader1 (continuous controller sets level)<br />
!KeyVelocity (MIDI key velocity controls the amplitude)<br />
You can also paste another signal into this field, and the amplitude will vary with the output amplitude of<br />
the pasted signal (something like an LFO controlling the attenuation). (See the manual <strong>for</strong> a complete<br />
description of hot parameters, EventValues, EventSources, and Map files).<br />
Right<br />
This controls the level of the right input channel. <strong>The</strong> maximum value is 1 and the minimum is -1. <strong>The</strong><br />
right channel of the input is multiplied by the value of Right. Some example values <strong>for</strong> Right are:<br />
1 (no attenuation)<br />
0 (maximum attenuation)<br />
!Fader1 (continuous controller sets level)<br />
!KeyVelocity (MIDI key velocity controls the amplitude)<br />
You can also paste another signal into this field, and the amplitude will vary with the output amplitude of<br />
the pasted signal (something like an LFO controlling the attenuation). (See the manual <strong>for</strong> a complete<br />
description of hot parameters, EventValues, EventSources, and Map files).<br />
234
ChannelCrosser<br />
Mixing & Panning Category<br />
A Crossover lets you switch any portion of the left channel signal into the right channel and vice versa.<br />
Input<br />
<strong>The</strong> left and right channels of this <strong>Sound</strong> can be attenuated and mixed using the sliders.<br />
LeftInLeft<br />
This is the portion of the left input that appears in the left output.<br />
RightInLeft<br />
This is the portion of the right input that appears in the left output.<br />
LeftInRight<br />
This is the portion of the left input that appears in the right output.<br />
RightInRight<br />
This is the portion of the right input that appears in the right output.<br />
235
ChannelJoin<br />
Mixing & Panning Category<br />
This <strong>Sound</strong> places the left channel of Left into the left output channel and the right channel of Right into<br />
the right output channel.<br />
Left<br />
<strong>The</strong> left channel of this <strong>Sound</strong> is output to the left channel.<br />
Right<br />
<strong>The</strong> right channel of this <strong>Sound</strong> is output to the right channel.<br />
236
Channeller<br />
Mixing & Panning Category<br />
If LeftChannel is checked, the left channel of Input is output on both channels.<br />
If RightChannel is checked, the right channel of Input is output on both channels.<br />
If both are checked, the Input is passed through unchanged.<br />
If neither is checked, there will be no output.<br />
Input<br />
Either the left or right channel of this <strong>Sound</strong> will be output.<br />
LeftChannel<br />
If only this control is checked, the left channel of Input will be output on both channels.<br />
RightChannel<br />
If only this control is checked, the right channel of Input will be output on both channels.<br />
237
Chopper<br />
Envelopes & Control Signals Category<br />
Multiplies the Input by a stream of "grains" or envelopes (one cycle of the selected wavetable), each<br />
lasting <strong>for</strong> GrainDuration with InterGrainDelay silence in between. During the InterGrainDelay the Input is<br />
multiplied by zero.<br />
Input<br />
This <strong>Sound</strong> is multiplied by an alternating stream of grains and inter-grain silences.<br />
GrainDuration<br />
This is the duration of each grain. (Duration should always be greater than 0.)<br />
InterGrainDelay<br />
This is the delay time between grains. (Duration should always be greater than 0.)<br />
Wavetable<br />
One cycle of the selected wavetable will be used as the envelope of each grain.<br />
238
Constant<br />
Math Category<br />
<strong>The</strong> output of a Constant is its Value. If Value is set to a number, the output of the Constant is the same<br />
number over its entire duration.<br />
If you paste an Event Value into the Value field of a Constant, the Constant’s output is equal to the Event<br />
Value. This is useful <strong>for</strong> processing Event Values as if they were <strong>Sound</strong>s. For example, if you were to<br />
paste !cc07 into the Value field of this Constant, you could then feed the Constant into a delay, put it into<br />
a waveshaper, multiply it by a sine wave oscillator, or per<strong>for</strong>m any number of other signal processing<br />
operations on it.<br />
Value<br />
Enter a value from -1.0 to 1.0. You can also paste Event Values or <strong>Sound</strong>s into this field (since their<br />
values fall within the range of -1 to 1).<br />
If you paste !Pitch or !KeyNumber into this field, you must divide it by 127 in order to scale it down to the<br />
range of 0 to 1; if you then use this Constant in the Frequency field of another <strong>Sound</strong>, remember to<br />
multiply the Constant by 127 nn in order to scale it back into the range of 0 nn to 127 nn.<br />
239
ContextFreeGrammar<br />
Scripts Category<br />
A <strong>Sound</strong> consisting of Concatenations and CenteringMixers of the Inputs is generated from the<br />
startExpression by rewriting according to the production rules of a context-free grammar. A seed is used<br />
<strong>for</strong> repeatable results.<br />
Inputs<br />
<strong>The</strong>se <strong>Sound</strong>s act as the terminals of the production rules; in order from top to bottom, left to right they<br />
are referred to in the productions as s1, s2, ..., sn.<br />
Drag a folder or any number of individual <strong>Sound</strong>s into this field.<br />
RewriteRules<br />
Production rules should be of the following <strong>for</strong>m,<br />
Variable -> option {| option}*.<br />
A single uppercase letter is followed by -> and then one or more options separated by the delimiter, |.<br />
Each option consists of a fully parenthesized expression followed by a number in brackets indicating the<br />
relative weighting of that choice. Each expression should consist of binary combinations of <strong>Sound</strong>s, s1 -<br />
sn where n is the number of Inputs, and Variables (single uppercase letters), separated by a comma <strong>for</strong><br />
Concatenation or plus <strong>for</strong> a CenteringMixer. For example, the following production rule will always<br />
generate palindromes:<br />
A -> ((s1 , A) , (s1)) [2] |<br />
((s2 , A) , (s2)) [2] |<br />
((s3 , A) , (s3)) [2] |<br />
(s1) [1] | (s2) [1] | (s3) [1].<br />
This assumes that there are at least 3 Inputs.<br />
StartExpression<br />
This expression is rewritten using the production rules. It should consist of some combination of<br />
variables, A - Z, and terminals, s1 - sn where n is the number of sub<strong>Sound</strong>s, separated by one of the<br />
operators, comma or plus (where a comma represents a Concatenation and a plus represents a<br />
CenteringMixer). <strong>The</strong> starting expression represents a <strong>Sound</strong>; it should be fully parenthesized. Some<br />
legitimate examples of startExpressions are:<br />
(A)<br />
(A + (s1 , B))<br />
((E , Z) + ((T , U) , (s3 , (X , s5)))),<br />
where A, B, E, Z, T, U, and X all appear on the left hand sides of production rules and there are at least 5<br />
Inputs.<br />
Seed<br />
Type in an integer less than 65535, <strong>for</strong> example, 34897.<br />
240
MaxRewrites<br />
This is an upper bound on the number of times the startExpression will be rewritten.<br />
MaxSize<br />
This puts an upper bound on the number of <strong>Sound</strong>s that will be generated by the grammar.<br />
Left<br />
This controls the level of the left input channel. <strong>The</strong> maximum value is 1 and the minimum is -1. <strong>The</strong> left<br />
channel of the input is multiplied by the value of this parameter. Some example values <strong>for</strong> Left are:<br />
1 (no attenuation)<br />
0 (maximum attenuation)<br />
!Fader1 (continuous controller sets level)<br />
!KeyVelocity (MIDI key velocity controls the amplitude)<br />
You can also paste another signal into this field, and the amplitude will vary with the output amplitude of<br />
the pasted signal (something like an LFO controlling the attenuation). (See the manual <strong>for</strong> a complete<br />
description of hot parameters, EventValues, EventSources, and Map files).<br />
Right<br />
This controls the level of the right input channel. <strong>The</strong> maximum value is 1 and the minimum is -1. <strong>The</strong><br />
right channel of the input is multiplied by the value of Right. Some example values <strong>for</strong> Right are:<br />
1 (no attenuation)<br />
0 (maximum attenuation)<br />
!Fader1 (continuous controller sets level)<br />
!KeyVelocity (MIDI key velocity controls the amplitude)<br />
You can also paste another signal into this field, and the amplitude will vary with the output amplitude of<br />
the pasted signal (something like an LFO controlling the attenuation). (See the manual <strong>for</strong> a complete<br />
description of hot parameters, EventValues, EventSources, and Map files).<br />
241
Crossfade<br />
Level, Compression, Expansion Category<br />
Crossfades between its two <strong>Sound</strong> inputs while optionally also panning and attenuating the result.<br />
Pan<br />
A Pan value of 0 places the sound entirely in the left speaker, and a Pan value of 1 places it entirely in<br />
the right. Values inbetween those extremes make the Input source appear as if it were placed<br />
somewhere inbetween the two speakers.<br />
Scale<br />
Attenuates the crossfaded signal.<br />
Snd1<br />
This <strong>Sound</strong> will be crossfaded with Snd2.<br />
Snd2<br />
This <strong>Sound</strong> is crossfaded with Snd1.<br />
Fade<br />
0 corresponds to entirely Snd1, and 1 corresponds to entirely Snd2. Values in between correspond to<br />
mixtures of Snd1 and Snd2.<br />
Type<br />
Choose between a straight, linear crossfading function (which, psychoacoustically, "jumps" in the middle)<br />
and a power function that will sound, psychoacoustically, as if it were a linear change from one <strong>Sound</strong> to<br />
the other. <strong>The</strong> linear fade function is sometimes the more desireable one when crossfading between<br />
control functions (See also the Interpolation prototype).<br />
242
DelayWithFeedback<br />
Reverb, Delay, Feedback Category<br />
Delays the Input signal, optionally feeding some of that delayed signal back and adding it to the current<br />
Input.<br />
Type<br />
Choose between Comb and Allpass filters. Both Comb and Allpass are delays with feedback. Allpass<br />
also adds some of the direct signal to the output in order to make the long term frequency response flat.<br />
With Comb selected, you will not hear the Input until after the first delay. With Allpass, you will hear the<br />
direct Input immediately.<br />
Input<br />
This is the signal to be delayed.<br />
Scale<br />
An attenuation factor on the Input (where 1 is full amplitude and 0 is completely attenuated so there is no<br />
more Input).<br />
Feedback<br />
Controls the amount of the delayed signal that is fed back and added to the Input. It is the attenuation on<br />
the feedback signal (where 1 or 0 dB feeds back the full amplitude signal and adds that to the current<br />
Input signal).<br />
Delay<br />
<strong>The</strong> maximum delay time. <strong>The</strong> proportion of this time that is actually used is determined by multiplying<br />
this value by DelayScale. <strong>Kyma</strong> needs to know the maximum possible delay in order to allocate some<br />
memory <strong>for</strong> this <strong>Sound</strong> to use as a delay line, but the actual delay can vary over the course of the <strong>Sound</strong><br />
from 0 s up to the value of DelayTime.<br />
DelayScale<br />
<strong>The</strong> proportion of DelayTime that is actually used as the delay, where 0 is no delay, and 1 is equal to the<br />
value in the DelayTime field.<br />
Wavetable<br />
In almost all situations, this should be set to Private, so <strong>Kyma</strong> can allocate some unused wavetable<br />
memory to be used as a delay time <strong>for</strong> this program. (<strong>The</strong> only time you would want to name this<br />
wavetable is if you would like multiple delays or resonators to share a single delay line. In that case, you<br />
would type a name <strong>for</strong> the wavetable and make sure that the other delays use the same name <strong>for</strong> their<br />
wavetables.)<br />
Prezero<br />
Check this box to start with an empty delay line when this program starts. If Prezero is not checked, the<br />
delay line may have garbage in it from previous programs. This can have interesting, if unpredictable,<br />
effects and, in some sense, models a physical object or resonator which would maintain its "state"<br />
between excitations.<br />
243
Interpolation<br />
When Linear is selected, changes to DelayScale are linearly interpolated, causing smoother changes to<br />
the delay.<br />
When None is selected, changes to DelayScale are not interpolated, resulting in zipper noise.<br />
For fixed delays, it is better to select None, since that uses fewer DSP resources.<br />
244
Math Category<br />
Outputs the difference of Input and minusInput.<br />
Difference<br />
Input<br />
<strong>The</strong> <strong>Sound</strong> in the MinusInput field will be subtracted from this <strong>Sound</strong>.<br />
MinusInput<br />
Minus<strong>Sound</strong> is subtracted from <strong>Sound</strong>.<br />
245
DiskCache<br />
Sampling Category<br />
Stores the Input as a disk recording when Record is clicked. When Record is unclicked, the input is<br />
played off the disk rather than computed in real time.<br />
This <strong>Sound</strong> can be useful when you are trying to reduce the amount computation required by one branch<br />
of a large <strong>Sound</strong> structure. Whenever you make a change to the Input, remember to click Record and<br />
recapture the new version of Input on the disk.<br />
Input<br />
When Record is checked, the Input is recorded into a disk file. When Record is not checked, the<br />
recording of the Input is played, not the Input itself.<br />
FileName<br />
Enter a memorable name <strong>for</strong> the samples file that will be used to "cache" the Input <strong>Sound</strong>.<br />
Record<br />
Check this box when you want to record the Input. Uncheck it when you want to play back the previously<br />
recorded input.<br />
246
DiskPlayer<br />
Sampling Category<br />
This <strong>Sound</strong> plays back recordings from the disk file specified in FileName, starting at the time specified in<br />
FilePosition and continuing <strong>for</strong> the amount of time specified in Duration and at the rate specified in<br />
RateScale. Whenever Trigger changes to a positive number, the playback restarts from FilePosition and<br />
plays again.<br />
To treat this as a sample controlled from the MIDI keyboard, set FileName to the name of the sample, set<br />
Duration to the total time during which you would like to be able to trigger the sample, set Trigger to<br />
!KeyDown (or a MIDI switch), and set RateScale to the ratio of the desired frequency to the original<br />
recorded frequency, <strong>for</strong> example<br />
!Pitch hz / 2 a hz<br />
to use the MIDI keyboard to control a sample whose recorded pitch was 2 a.<br />
FileName<br />
Enter the name of a Samples file or use the Browse button to select a file from the standard file list dialog.<br />
<strong>The</strong> file can be a recording made in <strong>Kyma</strong>, a recording imported from another program, or a sample from<br />
a CD-ROM (as long as the file is in one of the <strong>for</strong>mats listed in the <strong>Kyma</strong> manual).<br />
FilePosition<br />
This is the start time within the recording. In other words, you don’t have to start playback at the<br />
beginning of the file; instead, you can start some amount of time into the file.<br />
RateScale<br />
This is the rate of playback. For example, use 1 to play back at the original rate, 0.5 <strong>for</strong> half speed, 2 <strong>for</strong><br />
twice as fast, etc.<br />
Trigger<br />
When the Trigger becomes nonzero, one event is triggered. You can trigger several events over the<br />
course of the total Duration of this program as long as the value of Trigger returns to zero be<strong>for</strong>e the next<br />
trigger. Some example values <strong>for</strong> Trigger are:<br />
1 (plays once with no retriggering)<br />
0 (the sound is silent, never triggered)<br />
!KeyDown (trigger on MIDI key down)<br />
!cc64 (trigger when controller 64 > 0)<br />
You can also paste another signal into this field, and events will be triggered every time that signal<br />
changes from zero to a positive value. (See the manual <strong>for</strong> a complete description of hot parameters,<br />
Event Values, and the Global map files).<br />
247
DiskRecorder<br />
Sampling Category<br />
Records its Input to disk <strong>for</strong> CaptureDuration when its Trigger becomes positive.<br />
Input<br />
This is the <strong>Sound</strong> to be recorded onto disk.<br />
FileName<br />
<strong>The</strong> name of the samples file where Input will be recorded.<br />
Format<br />
Choose the samples file <strong>for</strong>mat. <strong>Kyma</strong> can record or playback any of these, but if you are going to export<br />
this sample to be used in another application, choose a <strong>for</strong>mat that the other application can read.<br />
WordSize<br />
This is the number of bits used <strong>for</strong> each sample point. 24-bit words take up the most memory but will<br />
provide the best dynamic range and signal to noise ratio. 8-bit words provide the least dynamic range but<br />
also take up the least amount of space on disk. If you are going to export this samples file <strong>for</strong> use in<br />
another application, choose a word size appropriate <strong>for</strong> that application. For example, if you are creating<br />
an alert sound <strong>for</strong> a Windows application, you would choose 8-bit words and the WAV <strong>for</strong>mat. But if you<br />
have 18-bit converters and digital I/O, and this is an audio track that you want to use in ProTools, you<br />
would probably want to choose 24-bit words and the SD-II <strong>for</strong>mat.<br />
Channels<br />
Choose between monaural and stereo recording. If both channels of the Input are identical, choose<br />
Mono since it will take half the disk space of a stereo file.<br />
Trigger<br />
When Trigger becomes positive, the Input will be recorded into the specified file <strong>for</strong> the specified<br />
CaptureDuration. You cannot retrigger without replaying the DiskRecorder (so you will not accidently<br />
write over what you have just captured on disk).<br />
CaptureDuration<br />
Amount of time to record the Input to disk when triggered. This duration can be shorter than the duration<br />
of the Input, so, <strong>for</strong> example, you could have a 1 day long ADInput, and just capture 3 s of it when you<br />
trigger the recording. To automatically set the CaptureDuration to the full duration of the Input, enter 0 s<br />
here.<br />
Gated<br />
When checked, Gated makes the trigger act as a gate. This means that its input is only recorded when<br />
Trigger is a positive value (<strong>for</strong> example, if Trigger is !KeyDown, the input is only recorded while the key is<br />
held down).<br />
248
DualParallelTwoPoleFilter<br />
Filters Category<br />
Two parallel second-order filter sections having fixed zeroes (at the complex location 1%0). <strong>The</strong> output<br />
of this <strong>Sound</strong> is the sum of the outputs from the two filter sections.<br />
This <strong>Sound</strong> is useful if you already know the complex pole locations of the filters that you want.<br />
Otherwise, use the TwoFormantElement prototype; it will give you the same results but with more intuitive<br />
parameters (like Frequency and Bandwidth).<br />
Input<br />
This is the <strong>Sound</strong> that is filtered.<br />
Pole1<br />
This is the pole of the first filter. Type a complex number of the <strong>for</strong>m, r % i, where r is the x coordinate in<br />
the z-plane and i is the y coordinate in the z-plane. Try 0.0%0.9 <strong>for</strong> a high-pass filter, or 0.9%0.0 <strong>for</strong> a<br />
low-pass. If (r**2 + i**2) is greater than 1.0, the filter output will overflow. <strong>The</strong> second pole of this filter is<br />
automatically the complex conjugate of this one, so you don’t have to specify it.<br />
Scale1<br />
This is the scale factor on the first filter section. For the full amplitude use +1.0 or -1.0; any factor whose<br />
absolute value is less than 1 will attenuate the output.<br />
Pole2<br />
This is the pole of the second filter. Type a complex number of the <strong>for</strong>m, r % i, where r is the x coordinate<br />
in the z-plane and i is the y coordinate in the z-plane. Try 0.0%0.9 <strong>for</strong> a high-pass filter, or 0.9%0.0 <strong>for</strong> a<br />
low-pass. If (r**2 + i**2) is greater than 1.0, the filter output will overflow. <strong>The</strong> second pole of this filter is<br />
automatically the complex conjugate of this one, so you don’t have to specify it.<br />
Scale2<br />
This is the scale factor on the second filter section. For the full amplitude use +1.0 or -1.0; any factor<br />
whose absolute value is less than 1 will attenuate the output.<br />
249
DynamicRangeController<br />
Level, Compression, Expansion Category<br />
Compresses or expands the Input’s dynamic range as a function of the SideChain’s amplitude envelope.<br />
<strong>The</strong> Input and output levels will be the same except when the SideChain amplitude envelope crosses the<br />
specified Threshold.<br />
If Compressor is selected, the Input will be attenuated whenever the SideChain amplitude exceeds the<br />
Threshold.<br />
If Expander is selected, the Input amplitude will be boosted whenever the SideChain amplitude falls<br />
below the Threshold.<br />
You specify the Ratio of the input to the output amplitude.<br />
Typical uses include: Limiting (compression with a very large ratio and high threshold), Gating (expansion<br />
with extremely small ratio and low threshold), Ducking (set attack and decay to 1 or 2 seconds, put the<br />
signal you want to duck in an out at the Input and put the controlling signal at the SideChain, and also mix<br />
the SideChain with the output of the DynamicRangeController) , making short percussive sounds seem<br />
louder (compress, then increase the overall gain), and smoothing out extreme changes in amplitude<br />
(particularly useful when recording to media with limited dynamic range, such as cassette tape or<br />
videotape).<br />
SideChain<br />
<strong>The</strong> amplitude envelope of this signal affects the amplitude envelope on the Input. Whenever the<br />
SideChain’s envelope crosses the Threshold, the Input’s dynamic range will be either compressed or<br />
expanded.<br />
Input<br />
This is the signal whose dynamic range will be compressed or expanded.<br />
Type<br />
Choose Compressor to compress all amplitudes above the threshold to a narrower dynamic range.<br />
Choose Expander to expand the dynamic range of all amplitudes below the threshold to a wider dynamic<br />
range.<br />
Ratio<br />
This is the ratio of the Input amplitude to the output amplitude. For compression, it should be greater<br />
than 1. For expansion, it should be less than 1. (This only affects the Input when the SideChain crosses<br />
the Threshold).<br />
Threshold<br />
This is the point at which a graph of Input to output level changes from a straight line to a curved line.<br />
In compression, the Input is unchanged when the SideChain amplitude is below this threshold. When the<br />
SideChain amplitude exceeds this threshold, the Input is attenuated.<br />
In expansion, the Input is unchanged when the SideChain amplitude is above this threshold. When the<br />
SideChain amplitude falls below this threshold, the Input is boosted.<br />
250
AttackTime<br />
Relates to how quickly or slowly the output amplitude will be modified whenever the Threshold is crossed.<br />
This controls how quickly the envelope follower on the SideChain reacts to increases in the SideChain’s<br />
amplitude.<br />
ReleaseTime<br />
Relates to how quickly or slowly the output amplitude returns to normal whenever the Threshold is<br />
crossed. This controls how quickly the envelope follower on the SideChain reacts to decreases in the<br />
SideChain’s amplitude.<br />
Delay<br />
Typically set to equal to the attack plus the decay time. This is to compensate <strong>for</strong> the delay introduced by<br />
the envelope follower on the SideChain.<br />
Gain<br />
Besides changing the relative levels within the signal, compression and expansion usually change the<br />
overall level of the output signal as well. Use Gain to adjust the overall level up or down.<br />
251
EndTogetherMixer<br />
Mixing & Panning Category<br />
Forces all of its Inputs to end at the same time (if necessary, by delaying the start time of the shorter<br />
Inputs).<br />
Inputs<br />
All of these Inputs end at the same time.<br />
Left<br />
This controls the level of the left input channel. <strong>The</strong> maximum value is 1 and the minimum is -1. <strong>The</strong> left<br />
channel of the input is multiplied by the value of this parameter. Some example values <strong>for</strong> Left are:<br />
1 (no attenuation)<br />
0 (maximum attenuation)<br />
!Fader1 (continuous controller sets level)<br />
!KeyVelocity (MIDI key velocity controls the amplitude)<br />
You can also paste another signal into this field, and the amplitude will vary with the output amplitude of<br />
the pasted signal (something like an LFO controlling the attenuation). (See the manual <strong>for</strong> a complete<br />
description of hot parameters, EventValues, EventSources, and Map files).<br />
Right<br />
This controls the level of the right input channel. <strong>The</strong> maximum value is 1 and the minimum is -1. <strong>The</strong><br />
right channel of the input is multiplied by the value of Right. Some example values <strong>for</strong> Right are:<br />
1 (no attenuation)<br />
0 (maximum attenuation)<br />
!Fader1 (continuous controller sets level)<br />
!KeyVelocity (MIDI key velocity controls the amplitude)<br />
You can also paste another signal into this field, and the amplitude will vary with the output amplitude of<br />
the pasted signal (something like an LFO controlling the attenuation). (See the manual <strong>for</strong> a complete<br />
description of hot parameters, EventValues, EventSources, and Map files).<br />
252
Equality<br />
Math Category<br />
Whenever InputA equals InputB (plus or minus the Tolerance), the output of this <strong>Sound</strong> is one; at all other<br />
times, the output is zero.<br />
Tolerance<br />
This is the amount of deviation from equality that is still to be considered equality.<br />
InputA<br />
InputA is compared, sample point by sample point, against the <strong>Sound</strong> in InputB.<br />
InputB<br />
InputB is compared, sample point by sample point, against the <strong>Sound</strong> in InputA.<br />
253
FeedbackLoopInput<br />
Xtra Category<br />
A FeedbackLoopInput and FeedbackLoopOutput must always be used as a pair sharing the same<br />
Connection name, start time, and duration. <strong>The</strong> FeedbackLoopInput writes into the delay line specified in<br />
Connection, and the FeedbackLoopOutput reads out of that same delay line.<br />
(This differs from other ways of doing feedback in that it allows <strong>Kyma</strong>’s scheduler to put the input to the<br />
delay line and the output from the delay line on different expansion cards--freeing up more computation<br />
time <strong>for</strong> processing modules that are in the loop. For simpler cases of feedback, use the<br />
DelayWithFeedback or simply write into memory with a MemoryWriter and read out of it with a TimeOffset<br />
Sample, Oscillator, or TriggeredTableRead.)<br />
Input<br />
This is the signal that is to be delayed.<br />
Connection<br />
This is the name of the delay line (It must be the same as that specified in the corresponding<br />
FeedbackLoopOutput).<br />
254
FeedbackLoopOutput<br />
Xtra Category<br />
A FeedbackLoopInput and FeedbackLoopOutput must always be used as a pair sharing the same<br />
Connection name, start time, and duration. <strong>The</strong> FeedbackLoopInput writes into the delay line specified in<br />
Connection, and the FeedbackLoopOutput reads out of that same delay line.<br />
(This differs from other ways of doing feedback in that it allows <strong>Kyma</strong>’s scheduler to put the input to the<br />
delay line and the output from the delay line on different expansion cards--freeing up more computation<br />
time <strong>for</strong> processing modules that are in the loop. For simpler cases of feedback, use the<br />
DelayWithFeedback or simply write into memory with a MemoryWriter and read out of it with a TimeOffset<br />
Sample, Oscillator, or TriggeredTableRead.)<br />
Connection<br />
This is the name of the delay line and must be the same as that specified in the corresponding<br />
FeedbackLoopInput.<br />
Delay<br />
Specify a delay time between 12 samp and 2048 samp. For longer delays, feed the output of this <strong>Sound</strong><br />
into a DelayWithFeedback. Shorter delays may cause clicking in the output.<br />
255
FFT<br />
Spectral Analysis FFT Category<br />
<strong>The</strong> FFT takes an input from the time domain and produces an output signal in the frequency domain or<br />
vice versa. Length is the length of the FFT.<br />
Two independent time domain signals are present: one in the left channel and one in the right.<br />
<strong>The</strong> frequency domain signal repeats every Length/2 samples, alternating between the spectrum of the<br />
left channel time domain signal and the spectrum of the right channel time domain signal. <strong>The</strong> frequency<br />
signal is output in frequency order: 0 hz, Fs / Length, 2*Fs / Length, etc. Each frequency domain sample<br />
has the real part in the left channel and the imaginary part in the right channel.<br />
When Inverse is not checked, the Input is a time domain signal and the output is a frequency domain<br />
signal. When Inverse is checked, the Input is a frequency domain signal and the output is a time domain<br />
signal.<br />
Input<br />
This is the signal that will be trans<strong>for</strong>med from the time domain to the frequency domain or vice versa.<br />
Length<br />
This is the window length of the FFT.<br />
Inverse<br />
Click here to per<strong>for</strong>m an inverse FFT (to convert from a spectrum back to a time-domain wave<strong>for</strong>m).<br />
256
Filter<br />
Filters Category<br />
An IIR filter of the specified type, cutoff frequency, and order with gain or attenuation on the input and an<br />
attenuator on the amount of feedback.<br />
Input<br />
This is the <strong>Sound</strong> to be filtered.<br />
Type<br />
Choose:<br />
LowPass to attenuate all frequencies above the cutoff Frequency.<br />
HighPass to attenuate all frequencies below the cutoff Frequency.<br />
AllPass to allow all frequencies to pass through unattenuated (but phase shifted by (-90 * Order) degrees<br />
at the specified Frequency, with smaller phase shifts at frequencies below that and larger ones <strong>for</strong><br />
frequencies above).<br />
Frequency<br />
<strong>The</strong> cutoff frequency <strong>for</strong> the filter can be specified in units of pitch or frequency. When Feedback is close<br />
to 1, the filter will tend "ring" at this frequency. <strong>The</strong> following are all ways to specify the A above middle<br />
C:<br />
440 hz (in hertz or cycles per second)<br />
4 a (as the 4th octave A)<br />
69 nn (as a MIDI notenumber)<br />
4 c + 9 nn (as 9 half steps above middle C)<br />
1.0 / 0.00227273 s (inverse of a period at 44.1 kHz sample rate)<br />
<strong>The</strong> following are examples of how to control the frequency using MIDI, the virtual control surface, or a<br />
third-party program:<br />
!Pitch (key number plus pitch bend)<br />
!KeyNumber nn (MIDI notenumber)<br />
4 c + (!Frequency * 9 nn) (continuous controller from 4 c to 4 a)<br />
Q<br />
Q is related to Bandwidth.<br />
For AllPass filters, this affects the size of the phase shift on frequencies around the center Frequency<br />
(higher Q corresponds to a narrower band of frequencies that will be phase-shifted).<br />
For LowPass and HighPass filters, this control has no effect.<br />
Scale<br />
This is the attenuation or gain on the Input. <strong>The</strong> typical maximum <strong>for</strong> scale is 1, but it can be set as high<br />
as 2 if necessary.<br />
HighPass filters generally require lower Scale values than LowPass filters.<br />
257
Feedback<br />
<strong>The</strong> higher the Feedback, the longer the filter will ring in response to an input.<br />
This is the amount of filtered signal that is fed back in and added to the Input (when low pass is selected,<br />
the feedback is negative). Negative feedback values are the same as the positive ones but 180 degrees<br />
out of phase.<br />
To simulate a traditional analog sound, use a 4th order low pass or high pass filter, and use feedback to<br />
increase the "resonance".<br />
Order<br />
<strong>The</strong> order of the filter corresponds to the number of poles. In general, the higher the order of the filter,<br />
the sharper the cutoff, and the more real-time computation required.<br />
258
ForcedProcessorAssignment<br />
Sampling Category<br />
Forces the Input to be scheduled on the specified expansion card’s processor.<br />
In almost all cases, it is better to let <strong>Kyma</strong> automatically handle the scheduling of <strong>Sound</strong>s on different<br />
processors. However, this <strong>Sound</strong> lets you override the default scheduling and <strong>for</strong>ce a particular <strong>Sound</strong> to<br />
be computed on a particular processor. Reasons <strong>for</strong> doing this might include: wanting to record a sample<br />
into the wavetable memory of a specific expansion card (or range of cards) and being able to read out of<br />
that same memory later; or trying to reschedule a <strong>Sound</strong> by hand if <strong>Kyma</strong>’s scheduling of it doesn’t keep<br />
up with real time (doing your own processor allocation by hand is tricky and time-consuming and it is not<br />
necessarily recommended! See the Tutorial entitled "What is Real Time Really" <strong>for</strong> other ways to reduce<br />
the computational complexity of a <strong>Sound</strong> that can’t keep up with real time).<br />
Processor<br />
Number of the expansion card that Input will be scheduled on.<br />
Input<br />
<strong>Sound</strong> that will be <strong>for</strong>ced onto the specified expansion card.<br />
259
FormantBankOscillator<br />
Xtra Sources Category<br />
Synthesizes a filtered pulse train where the filter is based on the shape of the FormantImpulse and on the<br />
<strong>for</strong>mant frequencies, amplitudes, and bandwidths that you supply in the Spectrum parameter (which is<br />
usually a SyntheticSpectrumFromArray <strong>Sound</strong>).<br />
Frequency<br />
This is the fundamental frequency of the pulse train input.<br />
Spectrum<br />
This should be a spectral source (typically a SyntheticSpectrumFromArray) and should specify center<br />
frequencies, bandwidths, and amplitudes <strong>for</strong> the desired <strong>for</strong>mants.<br />
CascadeInput<br />
Whatever <strong>Sound</strong> you place at this input will be added to the output of the current <strong>Sound</strong>. You can use<br />
this to cascade several FormantBankOscillators or to mix the output of a different kind of <strong>Sound</strong> with the<br />
output of this <strong>Sound</strong>.<br />
FirstFormant<br />
<strong>The</strong> lowest numbered <strong>for</strong>mant that you would like to read from the spectrum specification. This is almost<br />
always going to be 1 (but can be set to a different number if you would like to skip over some <strong>for</strong>mants or<br />
if this is one in a chain of cascaded FormantBankOscillators).<br />
NbrFormants<br />
<strong>The</strong> number of <strong>for</strong>mants that you would like to synthesize (which can be less than the number of <strong>for</strong>mants<br />
specified in the Spectrum input).<br />
FormantImpulse<br />
This is a wavetable containing the impulse response <strong>for</strong> each of the <strong>for</strong>mant filters. In other words, if you<br />
were to hit one of the <strong>for</strong>mant filters with a single 1 followed by an infinite string of zeroes, this would be<br />
the output of the filter.<br />
NbrImpulses<br />
This is the maximum number of simultaneous impulse responses that can be generated. Leave it at its<br />
default value unless you hear the sound breaking up (in which case you can try a smaller number).<br />
AllowFormantAtDC<br />
In nearly all situations, you should leave this box unchecked. You can use this option to synthesize a<br />
pulse train whose shape is stored in the FormantImpulse wavetable. (To do this, you also have to<br />
specify a spectrum that is a single <strong>for</strong>mant centered at 0 hz or DC).<br />
260
FrequencyScale<br />
Frequency & Time Scaling Category<br />
Scales the frequency of the Input by the value specified in FrequencyScale. It does this by "granulating"<br />
the input and then either overlapping the grains to scale up in frequency, or leaving time between the<br />
grains to scale down in frequency.<br />
Input<br />
This is the <strong>Sound</strong> whose frequency is to be scaled.<br />
FreqTracker<br />
In order to scale the frequency, we have to know the frequency.<br />
<strong>The</strong> normal setup is to have a FrequencyTracker as the Input in this field. It could also be a Constant or<br />
a FunctionGenerator if you already have a good frequency estimate (or intentionally want to supply a<br />
different frequency estimate).<br />
FrequencyScale<br />
<strong>The</strong> frequency of the input will be multiplied by this value.<br />
For example, to shift up by an octave, the FrequencyScale should be 2, and to shift down and octave, the<br />
scale should be 0.5. To shift up by 3 half steps, you would use:<br />
2 ** (3/12)<br />
To shift down by 7 half steps, you would use:<br />
2 ** (-7/12)<br />
To continuously shift between 0 and 4 half steps under control of !Frequency, you could use:<br />
2 ** (!Frequency * 4 / 12)<br />
MaxScale<br />
This should be equal to the FrequencyScale, or, if FrequencyScale is an Event Value, this should be the<br />
maximum value of the Event Value.<br />
<strong>The</strong> larger MaxScale is, the more computation time is required by the FrequencyScale.<br />
Window<br />
This function is used as a window or envelope on each grain.<br />
Delay<br />
Use this to delay the Input so that it lines up with the FrequencyTracker’s estimate of its frequency (since<br />
the FrequencyTracker has to have at least two cycles of the Input be<strong>for</strong>e it can make its frequency<br />
estimate).<br />
It should be a power of two number of samples. Use the following to calculate the delay based on the<br />
value of MinFrequency that you have set in the FreqTracker that feeds into this module:<br />
(2 raisedTo: ((1.0 / 120 "!
FrequencyTracker<br />
Tracking Live Input Category<br />
Outputs a continuously updated estimate of the frequency of the Input.<br />
Set the range of frequencies (MinFrequency to MaxFrequency) to be as narrow as possible given what<br />
you know about the range of the instrument or voice you are tracking. It is recommended that you leave<br />
Confidence, Scale, Emphasis, and Detectors at their default values until you have gotten a reasonably<br />
good frequency tracker <strong>for</strong> a given Input. <strong>The</strong>n, if you want to fine-tune the tracker, experiment with<br />
making small changes to these values, one at a time (starting by increasing the number of Detectors), so<br />
you can be sure of what effect each one will have on the tracking. If the tracking gets worse instead of<br />
better, revert back to the default values.<br />
<strong>The</strong> output of the FrequencyTracker falls within the range of 0 to1; to use this value in a frequency field,<br />
multiply it by the maximum possible frequency:<br />
SignalProcessor sampleRate hz * 0.5<br />
Input<br />
Estimates the frequency of this <strong>Sound</strong>.<br />
MinFrequency<br />
This is the lowest expected input frequency. In general, try to set this as high as possible given what you<br />
know about the input. For example, if you are frequency tracking a recording or sample and know the<br />
lowest frequency, enter it here. Or, <strong>for</strong> example, if you are tracking the frequency of a live violin, you<br />
know that there won’t be any frequencies lower than that of the lowest open string 3 g, so if you were to<br />
enter 3 e here, you know you would be safe.<br />
MaxFrequency<br />
This is the highest expected input frequency. In general, set this as low as you can given what you know<br />
about the Input. But don’t underestimate the value, because higher frequencies will then be misidentified<br />
as being an octave lower than they really are.<br />
Confidence<br />
This is a measure of how confident the FrequencyTracker must be of a new estimate be<strong>for</strong>e it lets go of<br />
the previous estimate. In other words, this is a control on how easily the FrequencyTracker will change to<br />
a new estimate when the Input frequency is changing over time. A Confidence value of 1 means that the<br />
tracker must be 100% sure of its new estimate be<strong>for</strong>e giving up the previous estimate; since the tracker is<br />
not omniscent it never feels *that* sure, so the result is that it sticks with its very first guess throughout the<br />
entire Input, no matter how much the Input’s frequency changes. Setting the Confidence to 0 means that<br />
the tracker will output every guess even if it is not confident at all, resulting in a lot of spurious frequency<br />
estimates. Carefully adjust the Confidence to some value between these two extremes, fine-tuning this<br />
setting depending on the Input.<br />
Scale<br />
This is an attenuator on the Input to the FrequencyTracker. In general, the input must be attenuated,<br />
since the FrequencyTracker uses an autocorrelation which requires summing the contributions of at least<br />
1000 sample points at a time.<br />
262
Detectors<br />
This determines the sensitivity of the frequency tracking. Try starting with a value of 10, and then<br />
experiment with more or fewer if you want to try fine tuning the frequency tracking. (More is not<br />
necessarily better; there is some optimal number of detectors <strong>for</strong> each circumstance.)<br />
Emphasis<br />
This is a frequency-dependent weighting giving preference to higher frequency estimates. <strong>The</strong> range of<br />
this value is 0 to 1, where 1 is the highest weighting and 0 means to do no weighting. <strong>The</strong><br />
recommmended value is 1.<br />
263
FunctionGenerator<br />
Envelopes & Control Signals Category<br />
Reads the specified Wavetable <strong>for</strong> the specified OnDuration whenever it receives a Trigger.<br />
Useful <strong>for</strong> envelope generation or <strong>for</strong> reading recordings stored in the wavetable memory (see also the<br />
Sample prototype).<br />
In a prototype with an Envelope parameter field (Oscillator, <strong>for</strong> example) you can use the<br />
FunctionGenerator directly as the Envelope parameter. A FunctionGenerator can also be used to control<br />
other parameters (such as Frequency or OnDuration). To apply an envelope to any <strong>Sound</strong>, use the<br />
<strong>Sound</strong> and an envelope generator as Inputs to the VCA prototype. (<strong>The</strong> VCA simply multiplies its two<br />
inputs by each other).<br />
Trigger<br />
When the Trigger becomes nonzero, one event is triggered. You can trigger several events over the<br />
course of the total Duration of this program as long as the value of Trigger returns to zero be<strong>for</strong>e the next<br />
trigger. Some example values <strong>for</strong> Trigger are:<br />
1 (plays once with no retriggering)<br />
0 (the sound is silent, never triggered)<br />
!KeyDown (trigger on MIDI key down)<br />
!F1 (trigger when MIDI switch > 0)<br />
You can also paste another signal into this field, and events will be triggered every time that signal<br />
changes from zero to a nonzero value. (See the manual <strong>for</strong> a complete description of hot parameters,<br />
EventValues, EventSources, and Map files).<br />
OnDuration<br />
This is the duration of each triggered event. It should be the same length or shorter than the value in<br />
Duration (which is the total length of time that this program is available to be triggered). Think of Duration<br />
as analogous to the total lifetime of a piano string, and OnDuration as the duration of each individual note<br />
that you play on that piano string. <strong>The</strong> OnDuration must be greater than zero, and you must specify the<br />
units of time, <strong>for</strong> example:<br />
2 s (<strong>for</strong> 2 seconds)<br />
2 ms (<strong>for</strong> 2 milliseconds)<br />
200 usec (<strong>for</strong> 200 microseconds)<br />
2 m (<strong>for</strong> 2 minutes)<br />
2 h (<strong>for</strong> 2 hours)<br />
2 days<br />
2 samp (<strong>for</strong> 2 samples)<br />
1 / 2 hz (<strong>for</strong> the duration of one period of a 2 hz signal)<br />
Wavetable<br />
This is the name of the function that will be generated (or the sample that will be played) each time the<br />
FunctionGenerator is triggered.<br />
FromMemoryWriter<br />
Check FromMemoryWriter when the wavetable does not come from a disk file but is recorded by a<br />
MemoryWriter in real time.<br />
264
Gain<br />
Level, Compression, Expansion Category<br />
Gain can be used to boost the amplitude above the maximum of 1.0. This can be useful when you want<br />
to multiply by numbers greater than 1 or when you have a low amplitude <strong>Sound</strong>.<br />
If you need variable gain, you can use an Attenuator with variable loss (using Left and Right scales) on<br />
the <strong>Sound</strong> be<strong>for</strong>e feeding it into the Gain.<br />
Input<br />
This is the <strong>Sound</strong> whose amplitude will be boosted.<br />
Left<br />
This is the scale on the left channel. It can be any value.<br />
Right<br />
This is the scale on the left channel. It can be any value.<br />
265
GAOscillators<br />
Xtra Sources Category<br />
Additive synthesis using oscillators with complex wave<strong>for</strong>ms (rather than sine waves). Each oscillator<br />
has its own amplitude envelope and all oscillators share the same frequency deviation envelope.<br />
TimeIndex<br />
This controls the position within the frequency and amplitude envelopes, where -1 points to the beginning<br />
of the envelopes, 0 points to the middle, and 1 points to the end of the envelopes. To move linearly from<br />
the beginning to the end of the envelopes, use a FunctionGenerator whose wavetable is a FullRamp, or<br />
use the EventValue fullRamp generator. For example,<br />
!KeyDown fullRamp: 3 s<br />
would go from -1 up to 1 whenever a MIDI key goes down.<br />
Analysis0<br />
This is the GA analysis file used when Morph is set to 0. A GA analysis file is an AIFF file containing<br />
each of the wavetables, followed by each of the amplitude envelopes, followed by the frequency deviation<br />
envelope. Each of the wave<strong>for</strong>ms is 4096 samples long, and each of the amplitude envelopes and the<br />
frequency envelope is the same length as each other (but this length varies from analysis to analysis).<br />
To create your own analysis file from a sample, first do a spectral analysis of the sample, and then<br />
generate a GA analysis file from that. Both of these operations can be per<strong>for</strong>med using tools found in the<br />
Tools menu. (See the tutorial on GA analysis/synthesis <strong>for</strong> full details).<br />
Analysis1<br />
This is the GA analysis file used when Morph is set to 1. A GA analysis file is an AIFF file containing<br />
each of the wavetables, followed by each of the amplitude envelopes, followed by the frequency deviation<br />
envelope. Each of the wave<strong>for</strong>ms is 4096 samples long, and each of the amplitude envelopes and the<br />
frequency envelope is the same length as each other (but this length varies from analysis to analysis).<br />
To create your own analysis file from a sample, first do a spectral analysis of the sample, and then<br />
generate a GA analysis file from that. Both of these operations can be per<strong>for</strong>med using tools found in the<br />
Tools menu. (See the tutorial on GA analysis/synthesis <strong>for</strong> full details).<br />
Envelope<br />
This is an overall envelope on all of the enveloped oscillators.<br />
Frequency<br />
<strong>The</strong> frequency can be specified in units of pitch or frequency. <strong>The</strong> following are all ways to specify the A<br />
above middle C:<br />
440 hz (in hertz or cycles per second)<br />
4 a (as the 4th octave A)<br />
69 nn (as a MIDI notenumber)<br />
4 c + 9 nn (as 9 half steps above middle C)<br />
1.0 / 0.00227273 s (inverse of a period at 44.1 kHz sample rate)<br />
<strong>The</strong> following are examples of how to control the frequency using MIDI, the virtual control surface, or a<br />
third-party program:<br />
266
!Pitch (key number plus pitch bend)<br />
!KeyNumber nn (MIDI notenumber)<br />
4 c + (!Frequency * 9 nn) (continuous controller from 4 c to 4 a)<br />
Morph<br />
This controls a crossfade between each of the wave<strong>for</strong>ms and envelopes in Analysis0 with each of the<br />
wave<strong>for</strong>ms and envelopes in Analysis1.<br />
267
GenericSource<br />
Xtra Sources Category<br />
This <strong>Sound</strong> can represent the live input, a sample read from the disk, or a sample read from RAM. If Ask<br />
is checked, you can choose between these three kinds of sources each time you recompile the <strong>Sound</strong>.<br />
Source<br />
Select the live input, an audio track on disk, or a sample in RAM.<br />
LeftChannel<br />
Check this box to monitor the left channel of the source signal.<br />
RightChannel<br />
Check this box to monitor the right channel of the source signal.<br />
Sample<br />
Enter the name of a sample file or click the disk icon to choose it from the file dialog.<br />
Autoloop<br />
Check here to loop the sample or disk.<br />
Trigger<br />
Whenever Trigger changes from 0 to a nonzero value, it will replay the disk or sample in RAM from the<br />
beginning.<br />
AttackTime<br />
Attack time <strong>for</strong> a linear envelope applied to the sample source.<br />
ReleaseTime<br />
Release time <strong>for</strong> a linear envelope applied to the sample source.<br />
Scale<br />
Scales the amplitude of the source.<br />
Frequency<br />
For samples in RAM or on disk, this controls the playback frequency. For samples that are unpitched, the<br />
original frequency is assumed to be 4 c (60 nn).<br />
268
GrainCloud<br />
Xtra Sources Category<br />
Generates a cloud of short-duration grains of sound, each with the specified Wave<strong>for</strong>m and each with an<br />
amplitude envelope whose shape is given by GrainEnv. <strong>The</strong> density of simultaneous grains within the<br />
cloud is controlled by Density, with the maximum number of simultaneous grains given by MaxGrains.<br />
Amplitude controls an amplitude envelope over the *entire* cloud (each individual grain amplitude is<br />
controlled by GrainEnv). Similarly, Duration is the duration of the entire cloud, not of each individual<br />
grain.<br />
You can control the Frequency, stereo positioning, and duration of each grain as well as specifying how<br />
much (if any) random jitter should be added to each of these parameters (giving the cloud a more<br />
focused or a more dispersed sound, depending on how much randomness is added to each of the<br />
parameters).<br />
Wave<strong>for</strong>m<br />
<strong>The</strong> wave<strong>for</strong>m of the oscillator inside each grain.<br />
GrainEnv<br />
Defines the shape of each grain’s amplitude envelope. To minimize clicks, choose a wavetable that<br />
starts and ends on zero.<br />
MaxGrains<br />
Maximum number of grains that can be playing at any one time. <strong>The</strong> smaller this number, the less<br />
computational power the GrainCloud requires (but the less dense the texture you can generate). For<br />
even denser textures, put more than one GrainCloud into a Mixer, and give each GrainCloud a different<br />
Seed value.<br />
Amplitude<br />
An overall level or amplitude envelope applied to the entire cloud. Note that this is independent of the<br />
amplitude envelope on each individual grain.<br />
Density<br />
Controls the number of new grains that can start up at any one time. Small Density values result in a<br />
sparse texture; large Density values generate a dense texture.<br />
GrainDur<br />
<strong>The</strong> duration of an individual grain.<br />
<strong>The</strong> duration of each grain is a function of three parameters:<br />
GrainDur + CyclesPerGrain + (GrainDurJitter * 2 * (GrainDur + CyclesPerGrain))<br />
To specify the number of wave<strong>for</strong>m cycles within each grain (implies that higher frequency grains will<br />
have shorter duration than lower frequency grains and assures that every grain will contain an integer<br />
number of full cycles of the wave<strong>for</strong>m):<br />
GrainDur = 0 s<br />
CyclesPerGrain = <br />
269
To specify a constant duration, no matter what the frequency of the wave<strong>for</strong>m within each grain (implying<br />
that high frequency grains will have more cycles in them than low frequency grains):<br />
GrainDur = <br />
CyclesPerGrain = 0<br />
GrainDurJitter<br />
<strong>The</strong> amount of random jitter added to the grain duration value when a new grain starts up. When<br />
GrainDurJitter is 0, every new grain will have the same duration. At the other extreme, when it is set to 1,<br />
the durations vary randomly from 0 to twice the specified duration.<br />
CyclesPerGrain<br />
<strong>The</strong> integer number of full cycles of the wave<strong>for</strong>m that should occur inside each grain. Use this<br />
parameter to specify grains that are shorter <strong>for</strong> high frequencies than they are <strong>for</strong> low frequencies. If you<br />
prefer uni<strong>for</strong>m grain durations over all frequencies, set this parameter to zero and use GrainDur to set the<br />
grain duration.<br />
Frequency<br />
Frequency of the oscillator within each grain.<br />
FreqJitter<br />
<strong>The</strong> amount of random jitter added to the Frequency value when a new grain starts up. When FreqJitter<br />
is 0, the frequency inside each grain will be equal to the value in the Frequency parameter. When it is 1,<br />
each grain will have a different, randomly selected frequency.<br />
It is defined as:<br />
(1 + ( * FreqJitter)) * Frequency<br />
so when FreqJitter is 1, the frequency can range from 0 hz up to twice the specified Frequency (100% up<br />
is an octave up, while 100% down is DC). When FreqJitter is zero, no random deviations are added to<br />
the Frequency.<br />
Pan<br />
Stereo position of each grain (where 0 is hard left, 0.5 is in the middle, and 1 is hard right).<br />
PanJitter<br />
<strong>The</strong> amount of random jitter added to the Pan value when a new grain starts up. <strong>The</strong> larger this number,<br />
the more diffuse the apparent location, and the smaller the number, the more localized the sound.<br />
Seed<br />
A starting point <strong>for</strong> the random number generator. It should be a number between 0 and 1. Each<br />
different seed number results in a different (but repeatable) sequence of random numbers. When adding<br />
several GrainClouds with the same control parameters together in a Mixer, give each of them a different<br />
seed in order to ensure that each of them has *different* random jitter added to its parameters (otherwise,<br />
they will just double each other).<br />
270
GraphicalEnvelope<br />
Envelopes & Control Signals Category<br />
Similar to the ADSR envelope, except that you can graphically specify an arbitrary number of segments<br />
and can specify loop points.<br />
Typical uses include amplitude envelopes, pitch envelopes, and time index functions.<br />
Envelope<br />
Use this field to edit the envelope.<br />
To add an envelope breakpoint, click the mouse while holding down the Shift key. Click and drag a<br />
breakpoint to move it. Click a breakpoint and press the Delete key to delete it. <strong>The</strong> button at the lower<br />
right of this field is used to control the looping behavior of the selected breakpoint.<br />
See the section on Parameter Settings in the manual <strong>for</strong> more in<strong>for</strong>mation.<br />
Level<br />
This is a scale factor (from 0 to 1) <strong>for</strong> attenuating the overall output level.<br />
Gate<br />
When Gate changes from zero to a nonzero, the envelope will be triggered. Gate must return to zero<br />
again be<strong>for</strong>e the envelope can be retriggered. If you have specified beginning and ending segments <strong>for</strong> a<br />
loop, the envelope will repeat the loop segments <strong>for</strong> as long as the Gate is nonzero. If the ending loop<br />
segment ends on a higher or lower value than the start of the beginning segment, the entire looped<br />
portion will get larger or smaller each time it is repeated (because each segment has a *slope* associated<br />
with it, not the absolute values at each point).<br />
Rate<br />
This is the rate at which the envelope is played.<br />
Use 1 to play it back as shown in the Envelope parameter field (where each heavy vertical line<br />
represents one second), 0.5 to make the envelope last twice as long, 2 to make it play twice as fast, etc.<br />
271
GraphicEQ<br />
Filters Category<br />
This gives you independent control over the levels of seven, octave-wide bands ranging in center<br />
frequency from 250 hz up to 16,000 hz. You can use it <strong>for</strong> attenuating or accentuating subparts of the<br />
Input spectrum. When all levels are set to 1, you should hear the original Input signal with no change.<br />
Input<br />
This is the <strong>Sound</strong> to be filtered or equalized.<br />
CF250Hz<br />
Controls the level of a band from DC up to about 4 f.<br />
CF500Hz<br />
Controls the level of an octave band from about 4 f to 5 f (350-670 hz).<br />
CF1000Hz<br />
Controls the level of an octave band from about 5 f to 6 f (670-1340 hz).<br />
CF2000Hz<br />
Controls the level of an octave band from about 6 f to 7 f (1340-2794 hz).<br />
CF4000Hz<br />
Controls the level of an octave band from about 7 f to 8 f (2794-5588 hz).<br />
CF8000Hz<br />
Controls the level of an octave band from about 8 f to 9 f (5588-11,175 hz).<br />
CF16000Hz<br />
Controls the level of an octave band from about 9 f to 10 f (11,175 up to half the sampling rate).<br />
272
HarmonicResonator<br />
Filters Category<br />
A filter that has resonances at the specified Frequency and all of its harmonics.<br />
Input<br />
This is the <strong>Sound</strong> that will be filtered.<br />
DecayTime<br />
This is the time it will take <strong>for</strong> the input amplitude to decay to -60 dB below its initial amplitude.<br />
Brightness<br />
<strong>The</strong> higher this value, the longer it will take <strong>for</strong> the high frequency partials to die away, resulting in a<br />
brighter timbre.<br />
Frequency<br />
<strong>The</strong> frequency can be specified in units of pitch or frequency. <strong>The</strong> following are all ways to specify the A<br />
above middle C:<br />
440 hz (in hertz or cycles per second)<br />
4 a (as the 4th octave A)<br />
69 nn (as a MIDI notenumber)<br />
4 c + 9 nn (as 9 half steps above middle C)<br />
1.0 / 0.00227273 s (inverse of a period at 44.1 kHz sample rate)<br />
<strong>The</strong> following are examples of how to control the frequency using MIDI, the virtual control surface, or a<br />
third-party program:<br />
!Pitch (key number plus pitch bend)<br />
!KeyNumber nn (MIDI notenumber)<br />
4 c + (!Frequency * 9 nn) (continuous controller from 4 c to 4 a)<br />
Wavetable<br />
Type in the name of a wavetable to use as a delay line, or select Private to let <strong>Kyma</strong> choose some free<br />
wavetable memory <strong>for</strong> you.<br />
Prezero<br />
Check this box if you want to assure that the delay line is clear be<strong>for</strong>e it is used in this <strong>Sound</strong>. Leaving it<br />
unchecked simulates a physical resonator by allowing the filter to remember its state between excitations.<br />
Scale<br />
This is an attenuator on the input <strong>Sound</strong>. For the full amplitude use +1.0 or -1.0; any factor whose<br />
absolute value is less than 1 will attenuate the output.<br />
273
HighShelvingFilter<br />
Filters Category<br />
Boosts or cuts the frequencies above the specified cutoff frequency.<br />
Input<br />
This is the <strong>Sound</strong> to be filtered.<br />
CutoffFreq<br />
Frequencies above this will be boosted or cut by the specified amount.<br />
BoostOrCut<br />
Indicate the amount of boost or cut in units of dB. Negative values indicate a cut, positive values a boost.<br />
Scale<br />
Attenuator on the input.<br />
274
Interpolate<br />
Math Category<br />
A linear combination of two inputs. <strong>The</strong> left channel of Input0 is multiplied by 1-leftInterp, the left channel<br />
of Input1 is multiplied by leftInterp, and the two are added together (and the same <strong>for</strong> the right channels<br />
and rightInterp).<br />
This <strong>Sound</strong> is useful <strong>for</strong> interpolating between control functions and envelopes (<strong>for</strong> example, interpolating<br />
between two sets of analysis envelopes and using the result as an input to an OscillatorBank results in a<br />
spectral "morph" from one spectrum to another be<strong>for</strong>e it is fed into the OscillatorBank).<br />
Input1<br />
When the Interpolation value is 0, this <strong>Sound</strong> is at full amplitude and Input2 is at zero amplitude.<br />
Input2<br />
When the Interpolation value is 1, this <strong>Sound</strong> is at full amplitude and Input1 is at zero amplitude.<br />
LeftInterp<br />
This parameter controls the left channel of the output. 0 results in an output of Input1 alone, and 1 results<br />
in an output of Input2 alone. Any values between 0 and 1 result in a mix of Input1 and Input2 to be output.<br />
(If Inputs are spectral sources, this channel is the amplitude envelopes.)<br />
RightInterp<br />
This parameter controls the right channel of the output. 0 results in an output of Input1 alone, and 1<br />
results in an output of Input2 alone. Any values between 0 and 1 result in a mix of Input1 and Input2 to be<br />
output. (If Inputs are spectral sources, this channel is the frequency envelopes.)<br />
275
IteratedWaveshaper<br />
Distortion & Waveshaping Category<br />
This is like waveshaping, except that the output of the waveshaping is fed back into the waveshaper <strong>for</strong><br />
the specified number of Iterations be<strong>for</strong>e the result is finally output.<br />
This algorithm was submitted by Agostino Di Scipio.<br />
Iterations<br />
Specify the number of times the output of the waveshaper should be fed back through the shaping<br />
function be<strong>for</strong>e the output.<br />
Input<br />
Each sample of this <strong>Sound</strong> is used as an index into the shaping function stored in the Wavetable.<br />
Scale<br />
This attenuation is applied prior to feeding the output back into the waveshaper <strong>for</strong> each iteration.<br />
Wavetable<br />
This is the shaping function. An input value of zero indexes into the middle of this table, minus one<br />
indexes into the beginning, and plus one indexes into the end of the table.<br />
276
KeyMappedMultisample<br />
Sampling Category<br />
This provides a quick way to map a large bank of samples to specific ranges of a MIDI keyboard. It can<br />
be used <strong>for</strong> mapping large numbers of samples taken from musical instruments to narrow ranges on the<br />
keyboard (much as is done on a standard sampler) or <strong>for</strong> being able to select and trigger large banks of<br />
sound effects in real time (from a sequencer or from the MIDI keyboard).<br />
To specify the samples that belong in the same bank, place all of them in the same folder or directory.<br />
<strong>Kyma</strong> will only look at the top level of your directory, so any folders within that folder will be ignored. <strong>The</strong><br />
ordering of the samples within that file will be interpreted to be alphabetical by name (when ordering is<br />
important).<br />
<strong>The</strong> files within the directory must all be mono or all stereo; mixtures of mono and stereo files are not<br />
guaranteed to be interpreted correctly.<br />
Frequency<br />
Use Default here if you want the Frequency to equal the pitch of the recorded sample. <strong>The</strong> frequency<br />
can be specified in units of pitch or frequency. <strong>The</strong> following are all ways to specify the A above middle<br />
C:<br />
440 hz (in hertz or cycles per second)<br />
4 a (as the 4th octave A)<br />
69 nn (as a MIDI notenumber)<br />
4 c + 9 nn (as 9 half steps above middle C)<br />
1.0 / 0.00227273 s (inverse of a period at 44.1 kHz sample rate)<br />
<strong>The</strong> following are examples of how to control the frequency using MIDI, the virtual control surface, or a<br />
third-party program:<br />
!Pitch (key number plus pitch bend)<br />
!KeyNumber nn (MIDI notenumber)<br />
4 c + (!Frequency * 9 nn) (continuous controller from 4 c to 4 a)<br />
Gate<br />
Enter a 1 in this field to play the <strong>Sound</strong> exactly once <strong>for</strong> the duration you have specified in the Duration<br />
field.<br />
If you use an EventValue (<strong>for</strong> example, !KeyDown) in this field, the <strong>Sound</strong> can be retriggered as often as<br />
you like within the duration specified in the Duration field.<br />
When Gate becomes positive, the <strong>Sound</strong> is heard; when Gate becomes zero, the <strong>Sound</strong> is released and<br />
will finish playing through the current sample and then stop.<br />
If the sample file has loop points stored in its header, <strong>Kyma</strong> will loop the sample <strong>for</strong> as long as Gate<br />
remains positive (so, <strong>for</strong> example, as long as the MIDI key is held down).<br />
Velocity<br />
If By Base Pitch is checked, this value will pick between several samples of the same base pitch but<br />
different velocity ranges as long as you have set those ranges in the header of the samples file.<br />
FirstSample<br />
Use the disk icon to browse, and then select one sample file within the folder or directory containing all<br />
277
the samples to be mapped.<br />
LoFreq<br />
Lowest frequency on the keyboard that will trigger one of the samples.<br />
HiFreq<br />
Highest frequency on the keyboard that will trigger one of the samples.<br />
Mapping<br />
<strong>The</strong> policy <strong>for</strong> mapping note number to samples file:<br />
OnePerHalfStep: assign each samples file in order to the next half step on the keyboard. If you run<br />
out of samples files start over again from the first file. This is a good mode <strong>for</strong> triggering sound effects<br />
from the keyboard since you know that each half step will trigger a different sample.<br />
EquallySpaced: Give each samples file an equal-sized range of the keyboard. <strong>The</strong> first samples file in<br />
the list gets the lowest range of keys, the next file gets the next block of keys, etc. This is especially<br />
useful when you have arranged the files alphabetically in your directory from the lowest to the highest<br />
originally recorded pitches.<br />
ByBasePitch: Use the base pitch (as specified in the header of AIFF files) to assign samples to the<br />
frequencies closest to their originally recorded pitch. This is the best policy to use when you have a set of<br />
samples that covers the range of a musical instrument, since it will result in the least distortion of the<br />
samples if you can play them as close as possible to their original pitches.<br />
ByPitchRange: Assigns each sample to the pitch range specified in the sample file header. When the<br />
ranges overlap, sample files whose names sort later in the alphabet take precedence.<br />
AttackTime<br />
Duration of the attack of an envelope applied to the sample.<br />
ReleaseTime<br />
Duration of the release of an envelope applied to the sample.<br />
Scale<br />
Overall level of the sample.<br />
Loop<br />
Click here if you want to loop the sample using the loop points specified in the header of the samples file.<br />
(Applies only to samples read from RAM, not those read directly from disk).<br />
FromDisk<br />
Click here to indicate that the sample should be read directly from disk rather than from sample RAM on<br />
the Capybara. You can use this option when <strong>Kyma</strong> tells you that you have run out of sample RAM<br />
(because your sample is too long or you have requested too many samples).<br />
NoTransposition<br />
Click here to indicate that the samples should not be transposed from their originally recorded pitches.<br />
This is so you can use the keyboard to trigger sound effects or long disk files without changing the<br />
duration or frequency of the recordings.<br />
278
LimeInterpreter<br />
Scripts Category<br />
Reads binary files produced by the Lime music notation program and maps values to parameters of<br />
<strong>Kyma</strong> <strong>Sound</strong>s. This allows you to "play" scores produced in Lime using <strong>Kyma</strong> <strong>Sound</strong>s as the<br />
instruments.<br />
FileName<br />
This is the name of a binary file created and saved in Lime.<br />
Inputs<br />
<strong>The</strong>se <strong>Sound</strong>s are treated as templates. Each name should begin with a letter and contain only<br />
alpha-numeric characters; this field will reject any <strong>Sound</strong>s with "illegal" names. You can reference these<br />
<strong>Sound</strong>s by name in the Script field.<br />
Script<br />
<strong>The</strong> script contains Smalltalk code that reads and interprets data from the specified Lime binary file. See<br />
the manual <strong>for</strong> a more details about Smalltalk.<br />
Left<br />
This controls the level of the left input channel. <strong>The</strong> maximum value is 1 and the minimum is -1. <strong>The</strong> left<br />
channel of the input is multiplied by the value of this parameter. Some example values <strong>for</strong> Left are:<br />
1 (no attenuation)<br />
0 (maximum attenuation)<br />
!Fader1 (continuous controller sets level)<br />
!KeyVelocity (MIDI key velocity controls the amplitude)<br />
You can also paste another signal into this field, and the amplitude will vary with the output amplitude of<br />
the pasted signal (something like an LFO controlling the attenuation). (See the manual <strong>for</strong> a complete<br />
description of hot parameters, EventValues, EventSources, and Map files).<br />
Right<br />
This controls the level of the right input channel. <strong>The</strong> maximum value is 1 and the minimum is -1. <strong>The</strong><br />
right channel of the input is multiplied by the value of Right. Some example values <strong>for</strong> Right are:<br />
1 (no attenuation)<br />
0 (maximum attenuation)<br />
!Fader1 (continuous controller sets level)<br />
!KeyVelocity (MIDI key velocity controls the amplitude)<br />
You can also paste another signal into this field, and the amplitude will vary with the output amplitude of<br />
the pasted signal (something like an LFO controlling the attenuation). (See the manual <strong>for</strong> a complete<br />
description of hot parameters, EventValues, EventSources, and Map files).<br />
279
LiveSpectralAnalysis<br />
Tracking Live Input Category<br />
This <strong>Sound</strong> should be used as the Spectrum parameter of an OscillatorBank. It analyzes the Input and<br />
produces amplitude and frequency envelopes <strong>for</strong> controlling a bank of oscillators.<br />
Input<br />
<strong>The</strong> output of the LiveSpectralAnalysis is the spectrum of this Input.<br />
LowestAnalyzedFreq<br />
Check the highest frequency that will still lie below the lowest fundamental frequency of the Input. <strong>The</strong><br />
lower this frequency, the more time-smearing and delay, so pick the highest one that will still encompass<br />
the fundamental.<br />
<strong>The</strong> frequency value you select will also determine how many bandpass filters are used in the analysis<br />
and, there<strong>for</strong>e, the number of tracks or partials generated by the analysis. <strong>The</strong> lower the frequency, the<br />
more partials that are generated:<br />
1 F: 512<br />
2 F: 256<br />
3 F: 128<br />
4 F: 64<br />
5 F: 32<br />
If you use this LiveSpectralAnalysis to control an OscillatorBank, this is the maximum number of<br />
oscillators that you should specify in the OscillatorBank (you can specify fewer of them, but specifying<br />
more of them will not result in any additional partials).<br />
AmpScale<br />
This is the overall amplitude level <strong>for</strong> all the partials.<br />
FreqScale<br />
This scales the frequency of all the oscillators without affecting the timing or duration of the amplitude<br />
envelopes. <strong>The</strong>re is no limit on the range, so to control it continuously use:<br />
!Freq * 10<br />
Or to control it from a MIDI keyboard use:<br />
!KeyNumber nn hz / 60 nn hz<br />
Response<br />
This is the time response of the filters. Experiment to find the best time response that does not add<br />
distortion to the sound. This specifies the bandwidth of the bandpass filters used in the analysis:<br />
"BestFreq" is the narrowest bandwidth, "BestTime" is the widest bandwidth, and the others are<br />
intermediate bandwidths.<br />
Harmonic<br />
Some kinds of live morphs work better with Harmonic checked, but you should experiment with it both<br />
checked and unchecked. It is a little trickier to do the harmonic analysis, so you should avoid checking<br />
this box except in situations where it is required.<br />
280
Once you check this box, you must also set several other parameters: LowFreq, HighFreq, InitFreq,<br />
TrackedHarmonic, UnpitchedThreshold.<br />
UnpitchedOnly<br />
Set this value to 1, and adjust UnpitchedThreshold if you would like to hear the unpitched parts of the<br />
sound only (transients, clicks, consonants, noise, etc). It requires that you have Harmonic checked.<br />
UnpitchedThreshold<br />
Set UnpitchedOnly to 1, and adjust this value if you would like to hear only the unpitched parts of the<br />
Input (clicks, consonants, transients, noise). This requires that you have Harmonic checked.<br />
TrackedHarmonic<br />
Only required if you have Harmonic set. A pitch-follower attempts to track whichever harmonic you<br />
indicate in this field. Usually it is 1 <strong>for</strong> the fundamental, but if a higher harmonic is stronger, it may be<br />
easier to track harmonic 2, 3 or higher. <strong>The</strong> harmonic’s frequency must lie between LowFreq and<br />
HighFreq.<br />
LowFreq<br />
Only required if you have Harmonic checked. This is the lowest frequency you expect to see in the<br />
tracked harmonic.<br />
HighFreq<br />
Required only when you have Harmonic checked. This is the highest frequency you expect to encounter<br />
in the tracked harmonic.<br />
InitFreq<br />
Required only if Harmonic is checked. This is an estimate of the initial frequency of the tracked harmonic.<br />
FundamentalOnly<br />
This only applies when Harmonic is checked. Check this box if you would like to listen to the estimated<br />
fundamental frequency. It can help you judge whether adjusting LowFreq or HighFreq might result in a<br />
better estimate.<br />
281
LowShelvingFilter<br />
Filters Category<br />
Boost or cut the spectrum below the specified cutoff frequency.<br />
Input<br />
This is the <strong>Sound</strong> to be filtered.<br />
CutoffFreq<br />
Frequencies below this will be boosted or cut by the specified amount.<br />
BoostOrCut<br />
Indicate the amount of boost or cut in units of dB. Negative values indicate a cut, positive values a boost.<br />
Scale<br />
Attenuator on the input.<br />
282
Matrix4<br />
Spatializing Category<br />
This <strong>Sound</strong> is a four-input four-output matrix mixer. <strong>The</strong> four input <strong>Sound</strong>s are routed and mixed to the<br />
four output channels of the signal processor.<br />
This <strong>Sound</strong> only works properly as the rightmost <strong>Sound</strong> in the signal flow diagram.<br />
In1<br />
One of the four input <strong>Sound</strong>s.<br />
In2<br />
One of the four input <strong>Sound</strong>s.<br />
In3<br />
One of the four input <strong>Sound</strong>s.<br />
In4<br />
One of the four input <strong>Sound</strong>s.<br />
InsToOut1<br />
This parameter is a list of four mixing levels. <strong>The</strong>se levels are used to mix the four inputs into an output<br />
<strong>for</strong> channel 1.<br />
InsToOut2<br />
This parameter is a list of four mixing levels. <strong>The</strong>se levels are used to mix the four inputs into an output<br />
<strong>for</strong> channel 2.<br />
InsToOut3<br />
This parameter is a list of four mixing levels. <strong>The</strong>se levels are used to mix the four inputs into an output<br />
<strong>for</strong> channel 3.<br />
InsToOut4<br />
This parameter is a list of four mixing levels. <strong>The</strong>se levels are used to mix the four inputs into an output<br />
<strong>for</strong> channel 4.<br />
283
Matrix8<br />
Spatializing Category<br />
This <strong>Sound</strong> is a eight-input eight-output matrix mixer. <strong>The</strong> eight input <strong>Sound</strong>s are routed and mixed to the<br />
eight output channels of the signal processor.<br />
This <strong>Sound</strong> only works properly as the rightmost <strong>Sound</strong> in the signal flow diagram.<br />
In1<br />
One of the eight input <strong>Sound</strong>s.<br />
In2<br />
One of the eight input <strong>Sound</strong>s.<br />
In3<br />
One of the eight input <strong>Sound</strong>s.<br />
In4<br />
One of the eight input <strong>Sound</strong>s.<br />
In5<br />
One of the eight input <strong>Sound</strong>s.<br />
In6<br />
One of the eight input <strong>Sound</strong>s.<br />
In7<br />
One of the eight input <strong>Sound</strong>s.<br />
In8<br />
One of the eight input <strong>Sound</strong>s.<br />
InsToOut1<br />
This parameter is a list of eight mixing levels. <strong>The</strong>se levels are used to mix the eight inputs into an output<br />
<strong>for</strong> channel 1.<br />
InsToOut2<br />
This parameter is a list of eight mixing levels. <strong>The</strong>se levels are used to mix the eight inputs into an output<br />
<strong>for</strong> channel 2.<br />
InsToOut3<br />
This parameter is a list of eight mixing levels. <strong>The</strong>se levels are used to mix the eight inputs into an output<br />
<strong>for</strong> channel 3.<br />
InsToOut4<br />
284
This parameter is a list of eight mixing levels. <strong>The</strong>se levels are used to mix the eight inputs into an output<br />
<strong>for</strong> channel 4.<br />
InsToOut5<br />
This parameter is a list of eight mixing levels. <strong>The</strong>se levels are used to mix the eight inputs into an output<br />
<strong>for</strong> channel 5.<br />
InsToOut6<br />
This parameter is a list of eight mixing levels. <strong>The</strong>se levels are used to mix the eight inputs into an output<br />
<strong>for</strong> channel 6.<br />
InsToOut7<br />
This parameter is a list of eight mixing levels. <strong>The</strong>se levels are used to mix the eight inputs into an output<br />
<strong>for</strong> channel 7.<br />
InsToOut8<br />
This parameter is a list of eight mixing levels. <strong>The</strong>se levels are used to mix the eight inputs into an output<br />
<strong>for</strong> channel 8.<br />
285
MemoryWriter<br />
Sampling Category<br />
When Trigger becomes positive, records the Input into the wavetable memory of the signal processor <strong>for</strong><br />
the length of time specified in CaptureDuration.<br />
Any <strong>Sound</strong>s that read wavetables can be used to play back this recording (<strong>for</strong> example,<br />
FunctionGenerator, Sample, and others).<br />
Input<br />
<strong>The</strong> output of this <strong>Sound</strong> is recorded into the wavetable memory of the signal processor.<br />
CaptureDuration<br />
<strong>The</strong> length of time to record the Input. Enter 0 s if you want to record Input <strong>for</strong> its full duration.<br />
Global<br />
Click here to record the Input into the wavetable memory on all expansion cards (otherwise, it will be<br />
recorded only into the memory of the expansion card on which the MemoryWriter happens to get<br />
scheduled, and <strong>Kyma</strong> will be <strong>for</strong>ced to schedule the playback <strong>Sound</strong> on that same card. If you make the<br />
recording global, it is much easier <strong>for</strong> <strong>Kyma</strong> to schedule the playback <strong>Sound</strong>s, because it can schedule<br />
them on any cards, knowing that the recording is available in the memory of all the cards.)<br />
Cyclic<br />
When Cyclic is selected, the MemoryWriter does a "looping" recording. In other words, it records <strong>for</strong> the<br />
specified CaptureDuration; then, if Trigger is still positive, it wraps around to the beginning of the<br />
recording and continues recording the Input, overwriting what it had previously recorded there.<br />
RecordingName<br />
Enter a name <strong>for</strong> the sample that you are recording into the wavetable memory. Use this same name in<br />
the playback <strong>Sound</strong>s, so they can find the sample in the wavetable memory. Any <strong>Sound</strong> that reads from<br />
the wavetable memory can also read the sample that you are writing into the memory with MemoryWriter.<br />
<strong>Sound</strong>s like Sample and FunctionGenerator read arbitarily long tables, whereas <strong>Sound</strong>s like Oscillator<br />
will use only the first 4096 entries of the named wavetable (only the first 4096 sample points).<br />
Silent<br />
Click here if you would like to record the Input silently, without also monitoring it at the same time.<br />
Trigger<br />
When the Trigger becomes nonzero, the recording is triggered. You can trigger several events over the<br />
course of the total Duration of this program as long as the value of Trigger returns to zero be<strong>for</strong>e the next<br />
trigger. Some example values <strong>for</strong> Trigger are:<br />
1 (plays once with no retriggering)<br />
0 (the sound is silent, never triggered)<br />
!KeyDown (trigger on MIDI key down)<br />
!F1 (trigger when MIDI switch > 0)<br />
You can also paste another signal into this field, and events will be triggered every time that signal<br />
changes from zero to a nonzero value. (See the manual <strong>for</strong> a complete description of hot parameters,<br />
286
EventValues, EventSources, and Map files).<br />
287
MIDIFileEcho<br />
MIDI Out Category<br />
This <strong>Sound</strong>s reads up all MIDI events on the specified range of channels from the designated file and<br />
then echoes them to the MIDI output.<br />
It does not output MIDI within <strong>Kyma</strong> but copies the MIDI file directly to the DSP MIDI output.<br />
LowChannel<br />
<strong>The</strong> lowest MIDI channel to echo.<br />
HighChannel<br />
Highest MIDI channel to echo.<br />
FileName<br />
A MIDI file<br />
288
MIDIMapper<br />
MIDI In Category<br />
Defines its Input as a MIDI voice of the specified polyphony that takes its input from the specified MIDI<br />
input channel within the given range of pitches either in real time or from a MIDI file. Left and Right are<br />
attenuators on the left and right channels of the audio output of this <strong>Sound</strong>.<br />
A local map supplied in the Map field overrides the global MIDI map <strong>for</strong> any Event Values in its Input. If<br />
you don’t need to override the global map, use MIDIVoice instead.<br />
Input<br />
Input (including all of its inputs) is the <strong>Sound</strong> associated with this MIDI voice. If any of Input’s parameters<br />
are Event Values, they will be mapped to Event Sources by the Map parameter (which overrides the<br />
currently select global map but only <strong>for</strong> Input)<br />
Map<br />
Enter any mappings from Event Values to Event Sources that should be *different* in Input (and its<br />
inputs) than they are in the currently selected global map. If an Event Value is not defined here in the<br />
local map, <strong>Kyma</strong> will use the global map to determine its Event Source.<br />
<strong>The</strong> syntax <strong>for</strong> a mapping is:<br />
!EventValueName is: ‘EventSourceName<br />
Left<br />
This controls the level of the left input channel. <strong>The</strong> maximum value is 1 and the minimum is -1. <strong>The</strong> left<br />
channel of the input is multiplied by the value of this parameter. Some example values <strong>for</strong> Left are:<br />
1 (no attenuation)<br />
0 (maximum attenuation)<br />
!Fader1 (continuous controller sets level)<br />
!KeyVelocity (MIDI key velocity controls the amplitude)<br />
You can also paste another signal into this field, and the amplitude will vary with the output amplitude of<br />
the pasted signal (something like an LFO controlling the attenuation). (See the manual <strong>for</strong> a complete<br />
description of hot parameters, EventValues, EventSources, and Map files).<br />
Right<br />
This controls the level of the right input channel. <strong>The</strong> maximum value is 1 and the minimum is -1. <strong>The</strong><br />
right channel of the input is multiplied by the value of Right. Some example values <strong>for</strong> Right are:<br />
1 (no attenuation)<br />
0 (maximum attenuation)<br />
!Fader1 (continuous controller sets level)<br />
!KeyVelocity (MIDI key velocity controls the amplitude)<br />
You can also paste another signal into this field, and the amplitude will vary with the output amplitude of<br />
the pasted signal (something like an LFO controlling the attenuation). (See the manual <strong>for</strong> a complete<br />
description of hot parameters, EventValues, EventSources, and Map files).<br />
Channel<br />
<strong>The</strong> MIDIMapper only pays attention to this incoming MIDI channel (or MIDI events on this channel of the<br />
289
MIDI file).<br />
Set Channel to 0 to use whatever channel is specified in the global map.<br />
Source<br />
Choose between live MIDI input, reading from a MIDI file, or receiving MIDI events specified in the Script<br />
field.<br />
MidiFile<br />
Read the MIDI event stream from this file if MIDI File is selected as the Source. Use the Browse button to<br />
bring up a standard file list and select the filename from the list.<br />
Polyphony<br />
Number of simultaneous MIDI note events possible on this voice. For example, if you specify a<br />
Polyphony value of 4, <strong>Kyma</strong> makes 4 copies of the Input <strong>Sound</strong>, so any one of them can be triggered at<br />
any time and all four can be sounding at the same time. <strong>The</strong> higher the value of Polyphony, the more<br />
computation time is required per sample tick.<br />
LowPitch<br />
<strong>The</strong> lowest MIDI pitch that this voice responds to. Be sure to include units of pitch or frequency with the<br />
value. (For this particular <strong>Sound</strong>, if you specify this value as a frequency, <strong>Kyma</strong> will round to the nearest<br />
equal-tempered MIDI notenumber).<br />
This allows you to map different regions of the MIDI note range to different voices and to define keyboard<br />
splits.<br />
HighPitch<br />
<strong>The</strong> highest MIDI pitch that this voice responds to. Be sure to include units of pitch or frequency with the<br />
value. (For this particular <strong>Sound</strong>, if you specify this value as a frequency, <strong>Kyma</strong> will round to the nearest<br />
equal-tempered MIDI notenumber).<br />
This allows you to map different regions of the MIDI note range to different voices and to define keyboard<br />
splits.<br />
Script<br />
When Source is set to Script, this program sends MIDI events to the Input (just as if these events were<br />
being read from a MIDI file). See the manual <strong>for</strong> more in<strong>for</strong>mation on algorithmically generating and<br />
manipulating MIDI events.<br />
To specify a MIDI event, use:<br />
self keyDownAt: duration: frequency: velocity: .<br />
Be sure to include units on the start time, duration, and frequency values, and specify velocity within a<br />
range of 0 to 1. Frequency can be any value specified in hz or nn; you are not limited to the pitches from<br />
the 12-tone equal tempered scale. All arguments must be real values (as opposed to EventValues).<br />
As a shortcut, you can drop any of the tags, <strong>for</strong> example, the following are all valid:<br />
self keyDownAt: 0 s.<br />
self keyDownAt: 3 s duration: 10 beats.<br />
self keyDownAt: 0 beats duration: 10 beats frequency: 4 c.<br />
self keyDownAt: 5 beats duration: 0.25 beats frequency: 4 c + 0.5 nn velocity: 0.75.<br />
This field is actually a Smalltalk program, so you can use Smalltalk expressions or control structures to<br />
generate these events algorithmically, <strong>for</strong> example:<br />
1 to: 12 do: [ :i |<br />
290
self keyDownAt: (i - 1) beats duration: 0.25 beats frequency: 4 c + i nn velocity: (i / 12.0)].<br />
or:<br />
| r t |<br />
r := Random newFor<strong>Kyma</strong>WithSeed: 66508.<br />
t := 0.<br />
100 timesRepeat: [<br />
t := t + r next.<br />
self keyDownAt: t s duration: 0.25 beats frequency: (r next * 1000 + 60) hz velocity: r next].<br />
You can also create sequences and mixes of "notes" and "rests" or collections of MIDI events, each<br />
associated with its own time tag.<br />
To create a rest object, use:<br />
Rest durationInBeats:<br />
To create a note, use any of the following creation messages:<br />
Note durationInBeats:<br />
Note durationInBeats:frequency:<br />
Note durationInBeats:frequency:velocity:<br />
Note durationInBeats:velocity: frequency:<br />
Note durationInBeats: frequency:durationInBeats:velocity:<br />
To create a sequence of events (where an event is a Note, a Rest, an EventSequence, an EventMix, or a<br />
TimedEventCollection) use:<br />
EventSequence events: .<br />
To create a mix of events which all start at the same time (where an event is a Note, a Rest, an<br />
EventSequence, an EventMix, or a TimedEventCollection) use:<br />
EventMix events: .<br />
To create a collection of events, each of which has a starting time associated with it (where an event is a<br />
Note, a Rest, an EventSequence, an EventMix, or a TimedEventCollection, and the starting time is<br />
specified in beats) use:<br />
TimedEventCollection startingBeats: events: .<br />
To play a Note, Rest, EventSequence or EventMix, use:<br />
playOnVoice:onBeat:bpm:<br />
playOnVoice:<br />
playOnVoice:bpm:<br />
playOnVoice:onBeat:<br />
Trans<strong>for</strong>mations that can be applied to Notes, Rests, EventSequences, EventMixes or<br />
TimedEventCollections include:<br />
dim: <br />
trsp: <br />
dbl: <br />
retrograde<br />
Trans<strong>for</strong>mations that can be applied to EventSequences, EventMixes or TimedEventCollections include:<br />
randomOrder<br />
randomizeTimesUsing: <br />
pickingEventsUsing: <br />
totalBeats: <br />
quantizeTo: <br />
maxSpacing: <br />
For examples using these creation and manipulation methods, see MIDI scripts in the manual.<br />
291
MIDIOutputController<br />
MIDI Out Category<br />
This <strong>Sound</strong> outputs its Value parameter to the MIDI output on the specified channel as the specified<br />
continuous controller.<br />
Channel<br />
MIDI output channel.<br />
ControllerNumber<br />
This is the MIDI continuous controller number.<br />
Value<br />
This is the value that will be output as the controller data. Paste a <strong>Sound</strong> in here to turn a <strong>Sound</strong> into a<br />
MIDI controller output.<br />
292
MIDIOutputEvent<br />
MIDI Out Category<br />
When Gate becomes positive, a note-on message with the current values of Frequency and Amplitude is<br />
sent as the note number and velocity on the given MIDI channel. When Gate returns to zero, a note-off<br />
message will be sent.<br />
Frequency<br />
<strong>The</strong>re is no help available <strong>for</strong> this parameter.<br />
Amplitude<br />
<strong>The</strong>re is no help available <strong>for</strong> this parameter.<br />
Channel<br />
<strong>The</strong>re is no help available <strong>for</strong> this parameter.<br />
Gate<br />
<strong>The</strong>re is no help available <strong>for</strong> this parameter.<br />
293
MIDIOutputEventInBytes<br />
MIDI Out Category<br />
This <strong>Sound</strong>s sends an uninterpreted sequence of bytes to the MIDI output. You can use it to send<br />
arbitrary MIDI events.<br />
Bytes<br />
Enter the MIDI message as a sequence of numbers separated by spaces. If you want to specify them in<br />
hex, precede the number with 16r, <strong>for</strong> example:<br />
16rFF<br />
294
MIDIVoice<br />
MIDI In Category<br />
Defines its Input as a MIDI voice of the specified polyphony that takes its input from the specified MIDI<br />
input channel within the given range of pitches either in real time or from a MIDI file. Left and Right are<br />
attenuators on the left and right channels of the audio output of this <strong>Sound</strong>.<br />
Input<br />
Input (including all of its inputs) is the <strong>Sound</strong> associated with this MIDI voice. If any of Input’s parameters<br />
are Event Values, they will be mapped to Event Sources by the Map parameter (which overrides the<br />
currently select global map but only <strong>for</strong> Input)<br />
Left<br />
This controls the level of the left input channel. <strong>The</strong> maximum value is 1 and the minimum is -1. <strong>The</strong> left<br />
channel of the input is multiplied by the value of this parameter. Some example values <strong>for</strong> Left are:<br />
1 (no attenuation)<br />
0 (maximum attenuation)<br />
!Fader1 (continuous controller sets level)<br />
!KeyVelocity (MIDI key velocity controls the amplitude)<br />
You can also paste another signal into this field, and the amplitude will vary with the output amplitude of<br />
the pasted signal (something like an LFO controlling the attenuation). (See the manual <strong>for</strong> a complete<br />
description of hot parameters, EventValues, EventSources, and Map files).<br />
Right<br />
This controls the level of the right input channel. <strong>The</strong> maximum value is 1 and the minimum is -1. <strong>The</strong><br />
right channel of the input is multiplied by the value of Right. Some example values <strong>for</strong> Right are:<br />
1 (no attenuation)<br />
0 (maximum attenuation)<br />
!Fader1 (continuous controller sets level)<br />
!KeyVelocity (MIDI key velocity controls the amplitude)<br />
You can also paste another signal into this field, and the amplitude will vary with the output amplitude of<br />
the pasted signal (something like an LFO controlling the attenuation). (See the manual <strong>for</strong> a complete<br />
description of hot parameters, EventValues, EventSources, and Map files).<br />
Channel<br />
<strong>The</strong> MIDIVoice only pays attention to this incoming MIDI channel (or MIDI events on this channel of the<br />
MIDI file).<br />
Set Channel to 0 to use whatever channel is specified in the global map.<br />
Source<br />
Choose between live MIDI input, reading from a MIDI file, or receiving events specified in the Script field.<br />
MidiFile<br />
Read the MIDI event stream from this file if MIDI File is selected as the Source. Use the Browse button to<br />
bring up a standard file list and select the filename from the list.<br />
295
Polyphony<br />
Number of simultaneous MIDI note events possible on this voice. For example, if you specify a<br />
Polyphony value of 4, <strong>Kyma</strong> makes 4 copies of the Input <strong>Sound</strong>, so any one of them can be triggered at<br />
any time and all four can be sounding at the same time. <strong>The</strong> higher the value of Polyphony, the more<br />
computation time is required per sample tick.<br />
LowPitch<br />
<strong>The</strong> lowest MIDI pitch that this voice responds to. Be sure to include units of pitch or frequency with the<br />
value. (For this particular <strong>Sound</strong>, if you specify this value as a frequency, <strong>Kyma</strong> will round to the nearest<br />
equal-tempered MIDI notenumber).<br />
This allows you to map different regions of the MIDI note range to different voices and to define keyboard<br />
splits.<br />
HighPitch<br />
<strong>The</strong> highest MIDI pitch that this voice responds to. Be sure to include units of pitch or frequency with the<br />
value. (For this particular <strong>Sound</strong>, if you specify this value as a frequency, <strong>Kyma</strong> will round to the nearest<br />
equal-tempered MIDI notenumber).<br />
This allows you to map different regions of the MIDI note range to different voices and to define keyboard<br />
splits.<br />
Script<br />
When Source is set to Script, this program sends MIDI events to the Input (just as if these events were<br />
being read from a MIDI file). See the manual <strong>for</strong> more in<strong>for</strong>mation on algorithmically generating and<br />
manipulating MIDI events.<br />
To specify a MIDI event, use:<br />
self keyDownAt: duration: frequency: velocity: .<br />
Be sure to include units on the start time, duration, and frequency values, and specify velocity within a<br />
range of 0 to 1. Frequency can be any value specified in hz or nn; you are not limited to the pitches from<br />
the 12-tone equal tempered scale. All arguments must be real values (as opposed to EventValues).<br />
As a shortcut, you can drop any of the tags, <strong>for</strong> example, the following are all valid:<br />
self keyDownAt: 0 s.<br />
self keyDownAt: 3 s duration: 10 beats.<br />
self keyDownAt: 0 beats duration: 10 beats frequency: 4 c.<br />
self keyDownAt: 5 beats duration: 0.25 beats frequency: 4 c + 0.5 nn velocity: 0.75.<br />
This field is actually a Smalltalk program, so you can use Smalltalk expressions or control structures to<br />
generate these events algorithmically, <strong>for</strong> example:<br />
1 to: 12 do: [ :i |<br />
self keyDownAt: (i - 1) beats duration: 0.25 beats frequency: 4 c + i nn velocity: (i / 12.0)].<br />
or:<br />
| r t |<br />
r := Random newFor<strong>Kyma</strong>WithSeed: 66508.<br />
t := 0.<br />
100 timesRepeat: [<br />
t := t + r next.<br />
self keyDownAt: t s duration: 0.25 beats frequency: (r next * 1000 + 60) hz velocity: r next].<br />
You can also create sequences and mixes of "notes" and "rests" or collections of MIDI events, each<br />
associated with its own time tag.<br />
To create a rest object, use:<br />
296
Rest durationInBeats:<br />
To create a note, use any of the following creation messages:<br />
Note durationInBeats:<br />
Note durationInBeats:frequency:<br />
Note durationInBeats:frequency:velocity:<br />
Note durationInBeats:velocity: frequency:<br />
Note durationInBeats: frequency:durationInBeats:velocity:<br />
To create a sequence of events (where an event is a Note, a Rest, an EventSequence, an EventMix, or a<br />
TimedEventCollection) use:<br />
EventSequence events: .<br />
To create a mix of events which all start at the same time (where an event is a Note, a Rest, an<br />
EventSequence, an EventMix, or a TimedEventCollection) use:<br />
EventMix events: .<br />
To create a collection of events, each of which has a starting time associated with it (where an event is a<br />
Note, a Rest, an EventSequence, an EventMix, or a TimedEventCollection, and the starting time is<br />
specified in beats) use:<br />
TimedEventCollection startingBeats: events: .<br />
To play a Note, Rest, EventSequence or EventMix, use:<br />
playOnVoice:onBeat:bpm:<br />
playOnVoice:<br />
playOnVoice:bpm:<br />
playOnVoice:onBeat:<br />
Trans<strong>for</strong>mations that can be applied to Notes, Rests, EventSequences, EventMixes or<br />
TimedEventCollections include:<br />
dim: <br />
trsp: <br />
dbl: <br />
retrograde<br />
Trans<strong>for</strong>mations that can be applied to EventSequences, EventMixes or TimedEventCollections include:<br />
randomOrder<br />
randomizeTimesUsing: <br />
pickingEventsUsing: <br />
totalBeats: <br />
quantizeTo: <br />
maxSpacing: <br />
For examples using these creation and manipulation methods, see MIDI scripts in the manual.<br />
297
Mixer<br />
Mixing & Panning Category<br />
Adds all of its Inputs together. Mixes the outputs of all the <strong>Sound</strong>s in the Inputs field.<br />
Inputs<br />
Inputs are all added together (mixed) so they will be heard simultaneously.<br />
Left<br />
This controls the level of the left input channel. <strong>The</strong> maximum value is 1 and the minimum is -1. <strong>The</strong> left<br />
channel of the input is multiplied by the value of this parameter. Some example values <strong>for</strong> Left are:<br />
1 (no attenuation)<br />
0 (maximum attenuation)<br />
!Fader1 (continuous controller sets level)<br />
!KeyVelocity (MIDI key velocity controls the amplitude)<br />
You can also paste another signal into this field, and the amplitude will vary with the output amplitude of<br />
the pasted signal (something like an LFO controlling the attenuation). (See the manual <strong>for</strong> a complete<br />
description of hot parameters, EventValues, EventSources, and Map files).<br />
Right<br />
This controls the level of the right input channel. <strong>The</strong> maximum value is 1 and the minimum is -1. <strong>The</strong><br />
right channel of the input is multiplied by the value of Right. Some example values <strong>for</strong> Right are:<br />
1 (no attenuation)<br />
0 (maximum attenuation)<br />
!Fader1 (continuous controller sets level)<br />
!KeyVelocity (MIDI key velocity controls the amplitude)<br />
You can also paste another signal into this field, and the amplitude will vary with the output amplitude of<br />
the pasted signal (something like an LFO controlling the attenuation). (See the manual <strong>for</strong> a complete<br />
description of hot parameters, EventValues, EventSources, and Map files).<br />
298
Monotonizer<br />
Frequency & Time Scaling Category<br />
Removes pitch changes from the input and uses the specified Frequency instead.<br />
Input<br />
Any frequency changes in the Input will be flattened out or removed by this module.<br />
Frequency<br />
This is the new frequency of the monotonized input.<br />
MinInputPitch<br />
This is the lowest frequency you expect in the input. It must include units: hz <strong>for</strong> a frequency or nn <strong>for</strong> a<br />
notenumber.<br />
MaxInputPitch<br />
This is the highest frequency you expect in the input. It must include units: hz <strong>for</strong> a frequency or nn <strong>for</strong> a<br />
notenumber.<br />
299
MultifileDiskPlayer<br />
Sampling Category<br />
This is similar to DiskPlayer except that you specify an array of disk file names rather than a single disk<br />
file name.<br />
<strong>The</strong> value of Index determines which file will play on the next retrigger. (An index of 0 chooses the first<br />
file in the array, an index of 1 chooses the second, etc.) Only one disk file will play at any one time, but<br />
the choice of file can be made in real time. (To get more than one disk file to play simultaneously, feed<br />
this <strong>Sound</strong> into a MIDIVoice and set the desired polyphony).<br />
You can use a single Rate <strong>for</strong> all disk files, or make Rate a function of the Index if you want different files<br />
to play at different rates.<br />
<strong>The</strong> MultiFileDiskPlayer can be used whenever you need real-time random access to several different<br />
disk recordings through a keyboard or MIDI controller. For example, it can be used to choose from a set<br />
of live sound effects and synchronize them by hand to a film, to create a disk-based sampler with a<br />
different sample <strong>for</strong> every key on the keyboard, to per<strong>for</strong>m a composition made up of several, long disk<br />
recordings, or (if the trigger is linked to the FrequencyTracker or EnvelopeFollower) as a synchronizable<br />
"tape part" that responds to a live per<strong>for</strong>mer.<br />
FileNames<br />
List each of the file names that could be triggered, enclosing each of them within single quotes. <strong>The</strong><br />
Index corresponds to the placement of the filename in this field. In other words, an index of 0 selects the<br />
first filename in the field, and index of 1 selects the second filename, etc.<br />
RateScale<br />
This is the rate of playback. For example, use 1 to play back at the original rate, 0.5 <strong>for</strong> half speed, 2 <strong>for</strong><br />
twice as fast, etc.<br />
Trigger<br />
When the Trigger becomes nonzero, one event is triggered. You can trigger several events over the<br />
course of the total Duration of this program as long as the value of Trigger returns to zero be<strong>for</strong>e the next<br />
trigger. Some example values <strong>for</strong> Trigger are:<br />
1 (plays once with no retriggering)<br />
0 (the sound is silent, never triggered)<br />
!KeyDown (trigger on MIDI key down)<br />
!cc64 (trigger when controller 64 > 0)<br />
You can also paste another signal into this field, and events will be triggered every time that signal<br />
changes from zero to a positive value. (See the manual <strong>for</strong> a complete description of hot parameters,<br />
Event Values, and the Global map files).<br />
Gated<br />
NOT IMPLEMENTED YET.<br />
Index<br />
This is an integer that selects which of the disk files should be played when the next trigger is received.<br />
An index of 0 selects the first file. If the index is less than 0, it selects the 0th file (the first file in the list).<br />
If the index is larger than the length of the file list, it selects the last file in the list.<br />
300
MultiplyingWaveshaper<br />
Level, Compression, Expansion Category<br />
Multiplies Input by a value read from the Wavetable at an index supplied by the NonlinearInput and<br />
attenuates or amplifies the result by multiplying it by Scale.<br />
Can be used as a computationally inexpensive dynamic range controller if the NonlinearInput is a signal<br />
fed through a peak detector or RMS detector and the Input is that same signal delayed by some amount.<br />
In this situation, the Wavetable describes the attenuation of the output amplitude as a function of input<br />
amplitude.<br />
To design a new input-output characteristic function, open the Sample/Wavetable editor and use the<br />
InputOutputCharacteristic template to generate a new transfer function with the desired<br />
compression/expansion parameters.<br />
NonlinearInput<br />
<strong>The</strong> output of this <strong>Sound</strong> is used as an index into the Wavetable.<br />
Input<br />
This <strong>Sound</strong> is multiplied by the value from the Wavetable that is indexed by the NonlinearInput.<br />
Scale<br />
This is a gain control <strong>for</strong> the output. It can be any positive number.<br />
Wavetable<br />
This is the transfer function that the NonlinearInput indexes into. When used as a dynamic range control,<br />
this function describes a multiplier on the output amplitude as a function of the input amplitude.<br />
301
Multisample<br />
Sampling Category<br />
This provides a quick way to select from a number of samples. <strong>The</strong> sample files are listed in the Samples<br />
field, and the Index field is used to determine which sample file to play whenever the Gate changes to a<br />
positive value.<br />
Frequency<br />
Use 0 hz here if you want the Frequency to equal the pitch of the recorded sample. <strong>The</strong> frequency can<br />
be specified in units of pitch or frequency. Different frequencies are obtained by changing the size of the<br />
increment through the recorded sample. <strong>The</strong> following are all ways to specify the A above middle C:<br />
440 hz (in hertz or cycles per second)<br />
4 a (as the 4th octave A)<br />
69 nn (as a MIDI notenumber)<br />
4 c + 9 nn (as 9 half steps above middle C)<br />
1.0 / 0.00227273 s (inverse of a period at 44.1 kHz sample rate)<br />
<strong>The</strong> following are examples of how to control the frequency using MIDI, the virtual control surface, or a<br />
third-party program:<br />
!Pitch (key number plus pitch bend)<br />
!KeyNumber nn (MIDI notenumber)<br />
4 c + (!Frequency * 9 nn) (continuous controller from 4 c to 4 a)<br />
Gate<br />
Enter a 1 in this field to play the <strong>Sound</strong> exactly once <strong>for</strong> the duration you have specified in the Duration<br />
field.<br />
If you use an EventValue (<strong>for</strong> example, !KeyDown) in this field, the <strong>Sound</strong> can be retriggered as often as<br />
you like within the duration specified in the Duration field.<br />
When Gate becomes positive, the <strong>Sound</strong> is heard; when Gate becomes zero, the <strong>Sound</strong> is released. If<br />
the sample file has loop points stored in its header, <strong>Kyma</strong> will loop the sample <strong>for</strong> as long as Gate<br />
remains positive (so, <strong>for</strong> example, as long as the MIDI key is held down).<br />
Samples<br />
Takes a list of samples file names, each within single quotes.<br />
Index<br />
An expression whose value is the index into the list of filenames: 0 selects the first file in the list, 1 the<br />
second, and so on.<br />
AttackTime<br />
Duration of the attack of an envelope applied to the sample.<br />
ReleaseTime<br />
Duration of the release of an envelope applied to the sample.<br />
Scale<br />
302
Overall level of the sample.<br />
Loop<br />
Click here if you want to loop the sample using the loop points specified in the header of the samples file.<br />
303
MultisegmentEnvelope<br />
Envelopes & Control Signals Category<br />
Similar to the ADSR envelope, except that you can specify an arbitrary number of segments and can<br />
specify loop points. See also MultiSlopeFunctionGenerator and GraphicalEnvelope. Use the<br />
GraphicalEnvelope except in those cases where you need hot BreakPoints or Levels.<br />
Typical uses include amplitude envelopes, pitch envelopes, and time index functions.<br />
Durations<br />
Enter the durations of each segment of the envelope. You must include the units of time and enclose the<br />
duration and its units within curly braces, <strong>for</strong> example<br />
{!Length s} or {2 s}<br />
<strong>The</strong> number of Durations must be one less than the number of BreakPoints.<br />
BreakPoints<br />
<strong>The</strong>se are the amplitude values at the endpoints of each segment. <strong>The</strong>re should always be one more<br />
breakpoint than there are segment durations. Every time there is a change in slope or a "break" in the<br />
line corresponding to the envelope, you have to specify the amplitude at that point (including the very last<br />
point in the envelope, since it does not necessarily have to end on a zero). <strong>The</strong>se numbers can be any<br />
value from 0 to 1. If you enter a larger value, the amplitude of the envelope will approach that number at<br />
the rate required to reach that number in the given duration, but it will stick at the value of 1 once that has<br />
been reached.<br />
StartLoop<br />
<strong>The</strong> number of the first segment included in the loop (where the segments are numbered from 1 to the<br />
number of segments).<br />
EndLoop<br />
<strong>The</strong> number of the last segment included in the loop (where the segments are numbered from 1 to the<br />
number of segments).<br />
Level<br />
This is a scale factor (from 0 to 1) <strong>for</strong> attenuating the overall output level.<br />
Gate<br />
When Gate changes from zero to a nonzero, the envelope will be triggered. Gate must return to zero<br />
again be<strong>for</strong>e the envelope can be retriggered. If you have specified beginning and ending segments <strong>for</strong> a<br />
loop, the envelope will repeat the loop segments <strong>for</strong> as long as the Gate is nonzero. If the ending loop<br />
segment ends on a higher or lower value than the start of the beginning segment, the entire looped<br />
portion will get larger or smaller each time it is repeated (because each segment has a *slope* associated<br />
with it, not the absolute values at each point).<br />
304
MultislopeFunctionGenerator<br />
Envelopes & Control Signals Category<br />
This is similar to the MultiSegmentEnvelope, except that you specify time points and *slopes* between<br />
the time points (rather than time points and the levels at those time points), and you cannot loop the<br />
envelope.<br />
GraphicalEnvelope is easier to use than the MultiSlopeFunctionGenerator except in those situations<br />
where you need hot TimePoints and/or Slopes.<br />
<strong>The</strong> resting value of this envelope is 1. Each time it is triggered, it generates the envelope exactly once.<br />
TimePoints<br />
<strong>The</strong>se are the time points at which the slope of the envelope should change. <strong>The</strong>re should be one more<br />
TimePoint than there are Slopes because the slopes specify the slope of a line *between* adjacent pairs<br />
of TimePoints.<br />
You must include the units of time and enclose the time point and its units within curly braces, <strong>for</strong><br />
example<br />
{!TimePoint1 s} or {2 s}<br />
Slopes<br />
Specify a slope <strong>for</strong> each pair of adjacent TimePoints (you should end up with one more TimePoint than<br />
you have slopes). A slope of 1 is a 45 degree angle, slopes of less than 1 are shallower, and slopes of<br />
greater than 1 are steeper. Negative slopes go downward at the same angle as the positive slopes go<br />
upward.<br />
Level<br />
This is an overall amplitude scale on the entire envelope.<br />
Gate<br />
When this changes from a zero to a number larger than zero, the envelope is generated exactly once.<br />
<strong>The</strong> resting value of the envelope is the maximum amplitude (1).<br />
305
Noise<br />
Xtra Sources Category<br />
This generates white or pink noise, which is a stream of pseudo-random numbers. Choose different<br />
initial states to generate different streams of random numbers.<br />
To get random numbers at a lower rate, use something like:<br />
1 ms random<br />
in a hot parameter field.<br />
InitialState<br />
Type in a seed value within the range of -1 to 1, excluding zero. (If you type a zero it will be changed to a<br />
1 by the program).<br />
Pink<br />
Check this box to generate pink rather than white noise.<br />
306
Oscillator<br />
Xtra Sources Category<br />
<strong>The</strong> Wavetable is treated as a single cycle of a periodic function. <strong>The</strong>re are options <strong>for</strong> interpolation and<br />
modulation. In general, the more options that are selected and more parameters that are time-varying,<br />
the more complicated the computation of the Oscillator and the fewer of them you can compute in real<br />
time.<br />
Frequency<br />
<strong>The</strong> frequency can be specified in units of pitch or frequency. <strong>The</strong> following are all ways to specify the A<br />
above middle C:<br />
440 hz (in hertz or cycles per second)<br />
4 a (as the 4th octave A)<br />
69 nn (as a MIDI notenumber)<br />
4 c + 9 nn (as 9 half steps above middle C)<br />
1.0 / 0.00227273 s (inverse of a period at 44.1 kHz sample rate)<br />
<strong>The</strong> following are examples of how to control the frequency using MIDI, the virtual control surface, or a<br />
third-party program:<br />
!Pitch (key number plus pitch bend)<br />
!KeyNumber nn (MIDI notenumber)<br />
4 c + (!Frequency * 9 nn) (continuous controller from 4 c to 4 a)<br />
Wavetable<br />
Select a wavetable <strong>for</strong> the oscillator. <strong>The</strong> Oscillator expects wavetables with 4096 entries.<br />
Modulation<br />
Select whether or not there should be frequency modulation.<br />
Modulator<br />
If Modulation has been set to frequency, then this <strong>Sound</strong> is the Modulator (otherwise it is ignored).<br />
Usually the Modulator is another Oscillator, but it can be any <strong>Sound</strong>.<br />
MaxMI<br />
This is the value of the modulation index when the Modulator is at its full amplitude.<br />
Interpolation<br />
Choose linear if you would like to interpolate between the values read from the wavetable.<br />
Envelope<br />
This is an attenuator on the output of the Oscillator. Enter 1 (or 0 dB) <strong>for</strong> the full amplitude. For a<br />
time-varying amplitude, paste in a <strong>Sound</strong> (such as AR, ADSR, or FunctionGenerator) or an Event Value<br />
(such as !Volume) in this field.<br />
PitchBend<br />
This is a deviation from the specified Frequency computed as:<br />
307
actualFreq := Frequency + (Frequency * pitchBend).<br />
<strong>The</strong> maximum pitchBend value is 2 and the minimum value is 0.<br />
Reset<br />
When reset is nonzero, it resets the phase to zero. In other words, it sets the wavetable index to its initial<br />
position.<br />
308
OscillatorBank<br />
Xtra Sources Category<br />
Generates the sum of several oscillators on the specified wave<strong>for</strong>m, each with its own frequency and<br />
amplitude envelope.<br />
NbrOscillators<br />
This is the number of oscillators that will be added together. Each oscillator is associated with a partial<br />
from the time-varying spectrum given in the Spectrum field.<br />
BankSize<br />
This is the number of oscillators that will be synthesized at a time. This is important since the signal<br />
processor has a maximum number of oscillators it can add at a single time (typically 50-56).<br />
For instance, if NbrOscillators is 100 and BankSize is 50, this <strong>Sound</strong> will add up two groups of 50<br />
oscillators.<br />
Wavetable<br />
This is the wave<strong>for</strong>m used by all the oscillators.<br />
Spectrum<br />
<strong>The</strong> Spectrum controls the amplitude and frequency envelopes <strong>for</strong> each oscillator. This should come from<br />
one of the <strong>Sound</strong>s in the Spectral Sources or Spectral Modifiers categories of the System Prototypes.<br />
309
OscilloscopeDisplay<br />
Tracking Live Input Category<br />
Displays the Input as an oscilloscope trace on the Virtual control surface. Use the buttons along the<br />
bottom of the display to zoom in or out in the time or amplitude dimensions. <strong>The</strong> value at the cursor point<br />
(where the red cross hairs meet) is displayed in the upper left. Clicking on the display freezes it so you<br />
can hold down the mouse over specific points to read their exact values.<br />
An Oscilloscope can be placed anywhere along the signal flow path; it does not necessarily have to be<br />
the final <strong>Sound</strong> in a signal flow path (it could, <strong>for</strong> example, be displaying the Input to the <strong>Sound</strong> that is<br />
actually being heard). If a <strong>Sound</strong> has more than one Oscilloscope within it, all the traces will be displayed<br />
side by side in the Virtual control surface.<br />
You can also view the oscilloscope trace of any <strong>Sound</strong> by selecting the <strong>Sound</strong> and then choosing<br />
Oscilloscope from the Info menu. (But the menu method only allows you to view one <strong>Sound</strong> at a time on<br />
the Oscilloscope and does not allow you to adjust the trigger frequency <strong>for</strong> a stable display).<br />
Input<br />
<strong>The</strong> amplitude of this <strong>Sound</strong> is continuously displayed on the Virtual control surface, as if by an<br />
oscilloscope.<br />
Trigger<br />
In order to see a picture of the wave<strong>for</strong>m that does not drift across the screen, use a PulseTrain here, and<br />
set the repetition period of the pulses to equal the inverse of the Input’s frequency. That way, the<br />
Oscilloscope is triggered once every Input period, and you will see a single period of the Input in the<br />
display window.<br />
310
Output4<br />
Spatializing Category<br />
This <strong>Sound</strong> routes the four input <strong>Sound</strong>s to the four output channels of the signal processor.<br />
This <strong>Sound</strong> only works properly as the rightmost <strong>Sound</strong> in the signal flow diagram.<br />
Out1<br />
This <strong>Sound</strong> is routed to output channel 1 of the signal processor.<br />
Out2<br />
This <strong>Sound</strong> is routed to output channel 2 of the signal processor.<br />
Out3<br />
This <strong>Sound</strong> is routed to output channel 3 of the signal processor.<br />
Out4<br />
This <strong>Sound</strong> is routed to output channel 4 of the signal processor.<br />
311
Output8<br />
Spatializing Category<br />
This <strong>Sound</strong> routes the eight input <strong>Sound</strong>s to the eight output channels of the signal processor.<br />
This <strong>Sound</strong> only works properly as the rightmost <strong>Sound</strong> in the signal flow diagram.<br />
Out1<br />
This <strong>Sound</strong> is routed to output channel 1 of the signal processor.<br />
Out2<br />
This <strong>Sound</strong> is routed to output channel 2 of the signal processor.<br />
Out3<br />
This <strong>Sound</strong> is routed to output channel 3 of the signal processor.<br />
Out4<br />
This <strong>Sound</strong> is routed to output channel 4 of the signal processor.<br />
Out5<br />
This <strong>Sound</strong> is routed to output channel 5 of the signal processor.<br />
Out6<br />
This <strong>Sound</strong> is routed to output channel 6 of the signal processor.<br />
Out7<br />
This <strong>Sound</strong> is routed to output channel 7 of the signal processor.<br />
Out8<br />
This <strong>Sound</strong> is routed to output channel 8 of the signal processor.<br />
312
OverlappingMixer<br />
Mixing & Panning Category<br />
Overlaps the start times of its Inputs by the specified OverlapTime.<br />
Inputs<br />
<strong>The</strong>se <strong>Sound</strong>s will be played one after another, overlapping with each other by the amount of time<br />
specified in OverlapTime. <strong>The</strong> ordering is determined by their position in the Inputs field: left to right and<br />
top to bottom.<br />
OverlapTime<br />
This is the amount of time that each Input overlaps with the previous Input. Be sure to include the units of<br />
time.<br />
Left<br />
This controls the level of the left input channel. <strong>The</strong> maximum value is 1 and the minimum is -1. <strong>The</strong> left<br />
channel of the input is multiplied by the value of this parameter. Some example values <strong>for</strong> Left are:<br />
1 (no attenuation)<br />
0 (maximum attenuation)<br />
!Fader1 (continuous controller sets level)<br />
!KeyVelocity (MIDI key velocity controls the amplitude)<br />
You can also paste another signal into this field, and the amplitude will vary with the output amplitude of<br />
the pasted signal (something like an LFO controlling the attenuation). (See the manual <strong>for</strong> a complete<br />
description of hot parameters, EventValues, EventSources, and Map files).<br />
Right<br />
This controls the level of the right input channel. <strong>The</strong> maximum value is 1 and the minimum is -1. <strong>The</strong><br />
right channel of the input is multiplied by the value of Right. Some example values <strong>for</strong> Right are:<br />
1 (no attenuation)<br />
0 (maximum attenuation)<br />
!Fader1 (continuous controller sets level)<br />
!KeyVelocity (MIDI key velocity controls the amplitude)<br />
You can also paste another signal into this field, and the amplitude will vary with the output amplitude of<br />
the pasted signal (something like an LFO controlling the attenuation). (See the manual <strong>for</strong> a complete<br />
description of hot parameters, EventValues, EventSources, and Map files).<br />
313
Pan<br />
Mixing & Panning Category<br />
Places the Input between the left and right speakers and optionally attenuates the overall output.<br />
Input<br />
This is the signal being attenuated and positioned between the speakers.<br />
Pan<br />
A Pan value of 0 places the sound entirely in the left speaker, and a Pan value of 1 places it entirely in<br />
the right. Values inbetween those extremes make the Input source appear as if it were placed<br />
somewhere inbetween the two speakers.<br />
Scale<br />
Attenuates the Input.<br />
Type<br />
When Power is selected, the Input is about as loud <strong>for</strong> Pan = 0.5 as it is <strong>for</strong> Pan = 0 and Pan = 1. When<br />
Linear is selected, the Input is softer at the midpoint than it is at the two extremes.<br />
314
ParameterTrans<strong>for</strong>mer<br />
Scripts Category<br />
Parameters of the Input can be altered or set by statements made in the Trans<strong>for</strong>mation field (<strong>for</strong> full<br />
details, see the corresponding tutorial and chapter in the manual). All trans<strong>for</strong>mations take place<br />
symbolically (in other words, these are not signal processing trans<strong>for</strong>mations but trans<strong>for</strong>mations to the<br />
parameters fields *be<strong>for</strong>e* the Input is compiled and loaded into the signal processor--be<strong>for</strong>e it has<br />
started generating sound).<br />
Input<br />
<strong>The</strong> parameters of this <strong>Sound</strong> (and, in turn, any inputs *it* might have) can be set or modified by<br />
statements in the Trans<strong>for</strong>mation field.<br />
Trans<strong>for</strong>mation<br />
Here are two examples of simple modifications. For examples of more elaborate trans<strong>for</strong>mations, see the<br />
manual.<br />
To set the all parameters named "frequency" to 400 hz, type:<br />
snd frequency: 400 hz.<br />
To double all frequencies, type:<br />
snd frequency isNil ifFalse: [snd frequency: snd frequency * 2].<br />
315
PeakDetector<br />
Tracking Live Input Category<br />
Outputs an amplitude envelope <strong>for</strong> its Input by tracking increases in the Input’s absolute value.<br />
Responds to increases in the Input amplitude within the specified AttackTime and responds to decreases<br />
in Input amplitude within the specified ReleaseTime. Scale is an attenuator on the Input amplitude.<br />
Input<br />
This is the <strong>Sound</strong> whose amplitude is being tracked.<br />
AttackTime<br />
This is the shortest attack time that will be tracked by the PeakDetector. You are specifying that any<br />
faster increases in amplitude should be smoothed over.<br />
ReleaseTime<br />
This is the shortest decay time that will be tracked by the PeakDetector. You are specifying that any<br />
faster decreases in amplitude should be smoothed over.<br />
Scale<br />
This is an attenuator on the input.<br />
316
PhaseShiftBy90<br />
Math Category<br />
This is a combination of two filters tuned to do a 90 degree phase shift between the left and right<br />
channels at the specified Frequency (by shifting one channel backwards 45 degrees and the other<br />
channel <strong>for</strong>ward 45 degrees).<br />
Expand the prototype SingleSideBandRM <strong>for</strong> an example of how to use this <strong>Sound</strong> as the Envelope of a<br />
QuadratureOscillator to do single side band ring modulation on Input.<br />
NOTE: <strong>The</strong>se filters are very sensitive to Input amplitude. Try attenuating the Input amplitude by 0.05<br />
and gradually adjusting it upwards until you hear distortion and then backing it off a little. (It helps to also<br />
look at the output of the PhaseShiftBy90 on the Info Oscilloscope as you adjust the Input amplitude).<br />
Frequency<br />
This is the only frequency at which the 90 degree phase shift occurs. Frequency can be specified in<br />
units of pitch or frequency. <strong>The</strong> following are all ways to specify the A above middle C:<br />
440 hz (in hertz or cycles per second)<br />
4 a (as the 4th octave A)<br />
69 nn (as a MIDI notenumber)<br />
4 c + 9 nn (as 9 half steps above middle C)<br />
1.0 / 0.00227273 s (inverse of a period at 44.1 kHz sample rate)<br />
<strong>The</strong> following are examples of how to control the frequency using MIDI, the virtual control surface, or a<br />
third-party program:<br />
!Pitch (key number plus pitch bend)<br />
!KeyNumber nn (MIDI notenumber)<br />
4 c + (!Frequency * 9 nn) (continuous controller from 4 c to 4 a)<br />
Input<br />
This is the <strong>Sound</strong> whose left and right channels will shifted 90 degrees out of phase from each other (but<br />
only at the specified Frequency).<br />
317
PresenceFilter<br />
Filters Category<br />
Acts as a band pass or band reject (notch) filter. Specify a center frequency, a bandwidth, and indicate<br />
the boost or cut amount in units of dB (negative values are cuts, positive values boosts).<br />
Input<br />
This is the <strong>Sound</strong> to be filtered.<br />
CenterFreq<br />
<strong>The</strong> center of the boost or cut region of the spectrum.<br />
Bandwidth<br />
<strong>The</strong> width of the boost or cut region of the spectrum.<br />
BoostOrCut<br />
Indicate the amount of boost or cut in units of dB. Negative values indicate a cut, positive values a boost.<br />
Scale<br />
Attenuator on the input.<br />
318
Preset<br />
MIDI In Category<br />
Click the Set to Current Event Values button to save the current settings of faders and buttons in the<br />
Virtual Control Surface (and/or the current settings of all MIDI controllers). <strong>The</strong> current values are written<br />
into the EventValues field as a reminder (but they are not editable). Each time you play this <strong>Sound</strong>, any<br />
EventValues in its Input will be initially set to the saved values; you can then change them using the<br />
Virtual Control Surface or MIDI.<br />
Input<br />
Any EventValues in this <strong>Sound</strong> will be initially set to the values shown in the EventValues field. If that<br />
field is empty, set the EventValues to reasonable initial values, and then click the Set to Current Event<br />
Values button.<br />
EventValues<br />
<strong>The</strong>se are initial values <strong>for</strong> the EventValues in the Input. If this field is blank, click on the Set to Current<br />
Event Values button.<br />
319
Product<br />
Math Category<br />
Outputs the product of its Inputs. If there are two, audio frequency inputs, this does ring modulation. If<br />
one of the Inputs changes at sub-audio frequencies and the other is at audio frequencies, the effect will<br />
be like applying an amplitude envelope to the Input that is at audio frequencies.<br />
Inputs<br />
<strong>The</strong> output of the Product is the product of all the <strong>Sound</strong>s in this field.<br />
320
PulseGenerator<br />
Xtra Sources Category<br />
Generates a bandlimited square wave of the specified DutyCycle. <strong>The</strong> square wave always has a zero<br />
DC offset regardless of the pulse width setting; this means that the minimum and maximum of the<br />
wave<strong>for</strong>m will change as the pulse width is changed.<br />
Frequency<br />
<strong>The</strong> frequency can be specified in units of pitch or frequency. <strong>The</strong> following are all ways to specify the A<br />
above middle C:<br />
440 hz (in hertz or cycles per second)<br />
4 a (as the 4th octave A)<br />
69 nn (as a MIDI notenumber)<br />
4 c + 9 nn (as 9 half steps above middle C)<br />
1.0 / 0.00227273 s (inverse of a period at 44.1 kHz sample rate)<br />
<strong>The</strong> following are examples of how to control the frequency using MIDI, the virtual control surface, or a<br />
third-party program:<br />
!Pitch (key number plus pitch bend)<br />
!KeyNumber nn (MIDI notenumber)<br />
4 c + (!Frequency * 9 nn) (continuous controller from 4 c to 4 a)<br />
Modulation<br />
Select whether or not there should be frequency modulation.<br />
Modulator<br />
If Modulation has been set to frequency, then this <strong>Sound</strong> is the Modulator (otherwise it is ignored).<br />
MaxMI<br />
When Modulation is set to frequency, this is the value of the modulation index when the Modulator is at its<br />
full amplitude.<br />
Interpolation<br />
Choose linear if you would like to interpolate between the values read from the wavetable.<br />
Envelope<br />
This is an attenuator on the output. Enter 1 (or 0 dB) <strong>for</strong> the full amplitude. For a time-varying amplitude,<br />
paste in a <strong>Sound</strong> (such as AR, ADSR, or FunctionGenerator) or an Event Value (such as !Volume) in this<br />
field.<br />
DutyCycle<br />
<strong>The</strong> proportion of each period that the wave<strong>for</strong>m is in the "up" portion of its cycle. (If you add up all the<br />
sample points in a cycle, the sum is zero, no matter what the duty cycle; when the duty cycle is 0.5 the<br />
wave<strong>for</strong>m is above zero half the time and below zero <strong>for</strong> the other half cycle.).<br />
Reset<br />
321
When reset is nonzero, it resets the phase to zero. In other words, it sets the wavetable index to its initial<br />
position.<br />
322
PulseTrain<br />
Xtra Sources Category<br />
If VariableDutyCycle is unchecked, then PulseTrain’s value is 1 <strong>for</strong> the first sample of each period and<br />
zero <strong>for</strong> the remainder of each period. If VariableDutyCycle is checked, then DutyCycle controls how<br />
much of each period’s is spent outputting 1 and how much is spent outputting 0.<br />
Period<br />
<strong>The</strong> amount of time <strong>for</strong> each period.<br />
If you want a period corresponding to a certain frequency, <strong>for</strong> example 440 hz, use:<br />
440 hz inverse<br />
VariableDutyCycle<br />
Check here to control the percentage of the period that the output should be one. If unchecked, the<br />
output will be one <strong>for</strong> eactly one sample per period.<br />
DutyCycle<br />
Enter a value between 0 and 1, where 0 means that the output is never 1, 0.5 means that it is 1 <strong>for</strong> half of<br />
each period, and 1 means that it is 1 <strong>for</strong> all of each period.<br />
323
QuadOscillator<br />
Xtra Sources Category<br />
Multiplies the left channel of Envelope by a sine wave oscillator and the right channel of Envelope by a<br />
cosine oscillator. <strong>The</strong> output is the sum of the ring-modulated left and right channels. If the Envelope<br />
has the same signal but 90 degrees out of phase in the left and right channels, the lower sideband will be<br />
cancelled out, leaving only the upper sideband (the sum of the frequencies of the Envelope and the<br />
QuadratureOscillator).<br />
Expand the SingleSideBandRM prototype <strong>for</strong> an example of how to use this as a nonharmonic frequency<br />
shifter.<br />
Frequency<br />
This is the frequency of the sine and cosine oscillators. <strong>The</strong> frequency can be specified in units of pitch<br />
or frequency. <strong>The</strong> following are all ways to specify the A above middle C:<br />
440 hz (in hertz or cycles per second)<br />
4 a (as the 4th octave A)<br />
69 nn (as a MIDI notenumber)<br />
4 c + 9 nn (as 9 half steps above middle C)<br />
1.0 / 0.00227273 s (inverse of a period at 44.1 kHz sample rate)<br />
<strong>The</strong> following are examples of how to control the frequency using MIDI, the virtual control surface, or a<br />
third-party program:<br />
!Pitch (key number plus pitch bend)<br />
!KeyNumber nn (MIDI notenumber)<br />
4 c + (!Frequency * 9 nn) (continuous controller from 4 c to 4 a)<br />
Envelope<br />
<strong>The</strong> left channel of Envelope will be multiplied by a sine and the right channel by a cosine. If this <strong>Sound</strong><br />
has gone through a PhaseShiftBy90 (<strong>for</strong>cing its left and right channels to be 90 degrees out of phase with<br />
each other at a specified frequency), then putting it through the QuadratureOscillator will per<strong>for</strong>m single<br />
side band ring modulation. In this configuration, only the upper sideband is heard. To get the lower<br />
sideband alone, use a negative frequency <strong>for</strong> the QuadratureOscillator (or else swap the left and right<br />
channels of Envelope using a ChannelCrosser).<br />
324
RandomSelection<br />
Scripts Category<br />
Chooses <strong>Sound</strong>s from the sample space of all Inputs and assigns them start times that are randomly<br />
generated according to an exponential distribution of delay times having the specified averageDelay time.<br />
<strong>The</strong> value in Iterations is the total number of <strong>Sound</strong>s. Seeds are supplied so that the results are<br />
repeatable.<br />
Inputs<br />
This serves as the sample space. <strong>Sound</strong>s in the result are randomly chosen from among these <strong>Sound</strong>s.<br />
Weights<br />
Supply the relative likelihoods of each Input (where Inputs are ordered according to their positions in the<br />
field from top to bottom and left to right). You must specify the same number of likelihoods as there are<br />
Inputs. <strong>The</strong> likelihoods are normalized, so you can use numbers in any range.<br />
AverageDelay<br />
Supply an average delay time <strong>for</strong> the Input <strong>Sound</strong>s. (Durations should always be greater than 0.)<br />
Iterations<br />
This is the total number of randomly selected <strong>Sound</strong>s.<br />
DelaySeed<br />
This is a seed value <strong>for</strong> the exponential distribution of delay times. Type in an integer less than 65535,<br />
<strong>for</strong> example, 35409.<br />
SampleSeed<br />
This is a seed value <strong>for</strong> the sample space of sub<strong>Sound</strong>s. Type in an integer less than 65535, <strong>for</strong><br />
example, 35425.<br />
Left<br />
This controls the level of the left input channel. <strong>The</strong> maximum value is 1 and the minimum is -1. <strong>The</strong> left<br />
channel of the input is multiplied by the value of this parameter. Some example values <strong>for</strong> Left are:<br />
1 (no attenuation)<br />
0 (maximum attenuation)<br />
!Fader1 (continuous controller sets level)<br />
!KeyVelocity (MIDI key velocity controls the amplitude)<br />
You can also paste another signal into this field, and the amplitude will vary with the output amplitude of<br />
the pasted signal (something like an LFO controlling the attenuation). (See the manual <strong>for</strong> a complete<br />
description of hot parameters, EventValues, EventSources, and Map files).<br />
Right<br />
This controls the level of the right input channel. <strong>The</strong> maximum value is 1 and the minimum is -1. <strong>The</strong><br />
right channel of the input is multiplied by the value of Right. Some example values <strong>for</strong> Right are:<br />
1 (no attenuation)<br />
325
0 (maximum attenuation)<br />
!Fader1 (continuous controller sets level)<br />
!KeyVelocity (MIDI key velocity controls the amplitude)<br />
You can also paste another signal into this field, and the amplitude will vary with the output amplitude of<br />
the pasted signal (something like an LFO controlling the attenuation). (See the manual <strong>for</strong> a complete<br />
description of hot parameters, EventValues, EventSources, and Map files).<br />
326
REResonator<br />
Filters Category<br />
This is a time-varying filter whose coefficients have been derived by analyzing a digital recording (a<br />
"sample") using the RE Analysis Tool. RE (resonator/exciter) analysis assumes that the sound was<br />
produced by an excitation signal feeding into a resonator. This <strong>Sound</strong> is the resonator and its input is the<br />
excitation.<br />
<strong>The</strong> most striking results occur when the analyzed signal is from a source whose resonances change<br />
dramatically over time (e.g. human speech, singing, instruments like the didgeridoo, mouth harp, or<br />
tabla). For analyses of instruments or other sound sources that do not change shape very much over<br />
time, the REResonator will sound like a fixed, unchanging filter.<br />
Input<br />
This is the new excitation that you are substituting <strong>for</strong> the original excitation. Be sure to use extreme<br />
attenuation of your input.<br />
Broadband signals such as noise or pulse trains work best as inputs, because they cover more of the<br />
spectrum and will be able to excite all the resonances of the filter.<br />
Wavetable<br />
This is a table of time-varying filter coefficents produced by the RE analysis. Use the RE Analysis Tool to<br />
create your own sets of filter coefficients.<br />
TimeIndex<br />
This determines where to read from the sequence of filter coefficients. A value of -1 reads the beginning<br />
set of coefficients, and a value of 1 reads the last set of coefficients. A FunctionGenerator whose<br />
wavetable is a FullRamp will go through the coefficients in time order. To go through the coefficients at<br />
the original rate, set the duration of the FunctionGenerator to be the same as the duration of the original,<br />
analyzed sample. Use longer or shorter durations to stretch or compress time.<br />
327
ReverbSection<br />
Reverb, Delay, Feedback Category<br />
Same as DelayWithFeedback except that the characteristics are specified in terms of DecayTime, the<br />
time it takes <strong>for</strong> the delayed and fed-back input to die away 60 dB below its initial level.<br />
You can use combinations of these <strong>Sound</strong>s and others to build your own reverberation algorithms.<br />
Type<br />
Choose between comb and allpass filters. Both comb and allpass are delays with feedback. Allpass also<br />
adds some of the direct signal to the output in order to make the long term frequency response flat.<br />
Input<br />
This signal is delayed and added to itself.<br />
Scale<br />
An attenuation factor on the Input (where 1 is full amplitude and 0 is completely attenuated so there is no<br />
more Input).<br />
DecayTime<br />
This is the time it takes <strong>for</strong> the signal to die away to 60 dB below its original level.<br />
Delay<br />
<strong>The</strong> maximum delay time. <strong>The</strong> proportion of this time that is actually used is determined by multiplying<br />
this value by DelayScale. <strong>Kyma</strong> needs to know the maximum possible delay in order to allocate some<br />
memory <strong>for</strong> this <strong>Sound</strong> to use as a delay line, but the actual delay can vary over the course of the <strong>Sound</strong><br />
from 0 s up to the value of DelayTime.<br />
DelayScale<br />
<strong>The</strong> proportion of DelayTime that is actually used as the delay, where 0 is no delay, and 1 is equal to the<br />
value in the DelayTime field.<br />
Wavetable<br />
In almost all situations, this should be set to Private, so <strong>Kyma</strong> can allocate some unused wavetable<br />
memory to be used as a delay time <strong>for</strong> this program. (<strong>The</strong> only time you would want to name this<br />
wavetable is if you would like multiple delays or resonators to share a single delay line. In that case, you<br />
would type a name <strong>for</strong> the wavetable and make sure that the other delays use the same name <strong>for</strong> their<br />
wavetables.)<br />
Prezero<br />
Check this box to start with an empty delay line when this program starts. If Prezero is not checked, the<br />
delay line may have garbage in it from previous programs. This can have interesting, if unpredictable,<br />
effects.<br />
Interpolation<br />
When Linear is selected, changes to DelayScale will be interpolated, causing smoother changes to the<br />
delay.<br />
328
When None is selected, changes to DelayScale are not interpolated, resulting in zipper noise.<br />
For fixed delays, it is better to select None, since that uses less DSP resources.<br />
329
RhythmicCellularAutomaton<br />
Scripts Category<br />
This <strong>Sound</strong> is based on the one-dimensional cellular automata described by Stephen Wolfram in his book<br />
"<strong>The</strong>ory and Applications of Cellular Automata". <strong>The</strong> state, an n-place binary number, where n is the<br />
number of Inputs, determines when the Input is turned on and when it is turned off in a given generation.<br />
An integer, rule, is used to determine the next state.<br />
This differs from the CellularAutomaton in that the state is interpreted "horizontally" (rhythmically) rather<br />
than "vertically" (harmonically). Each generation of the automaton is interpreted as a rhythmic pattern,<br />
where a 1 means the Input is turned on, and a 0 means the Input is turned off (<strong>for</strong> the duration of the<br />
Input).<br />
Input<br />
This <strong>Sound</strong> is repeated in a pattern determined by the state of the automaton in each generation. When<br />
a value in the state array is 1, the <strong>Sound</strong> is played, and when a value in the state array is 0, there is a<br />
silence of the same duration as the <strong>Sound</strong>. This field accepts only one <strong>Sound</strong> at a time.<br />
Rule<br />
If you look at the rule and the state as 8-bit binary numbers, you can use the rule to compute the next<br />
generation of the state. Number the positions of the digits 0 to 7 counting from right to left. To compute<br />
the next generation of position P of the state: Take the number at position P, P+1 and P-1 (i.e. the<br />
number at position P and its neighbors to the right and to the left). Think of this as a three digit binary<br />
number N that you are going to use as an index into the binary number representing the rule. Look at<br />
position N of the rule. <strong>The</strong> value at position N of the rule is the value of position P in the next generation<br />
of the state.<br />
For example, if the rule is 2r10101110 and the state is 2r10010101, let’s compute the next generation<br />
state of position 3. <strong>The</strong> current value at position 3 of the state is ’0’. Looking at position 3 and its two<br />
neighbors as a binary number, we get ’101’ or the number 5. Using this number as an index, look at<br />
position 5 of the rule; it is ’1’. So the value of position three in the next generation is ’1’. When you reach<br />
the rightmost or leftmost digit in the state, make the assumption that there is an infinite number of zeroes<br />
extending both leftwards and rightwards.<br />
Generations<br />
This is the number of generations.<br />
InitialState<br />
Imagine the initial state as an n-bit binary number where n is the size of the collection of Inputs. Each digit<br />
in the binary number corresponds to a <strong>Sound</strong> in the Input collection; use a 1 to indicate that a <strong>Sound</strong> is<br />
initiallly on, a 0 to indicate that it is initially off.<br />
GenerationLength<br />
This is the number of bits in each generation.<br />
330
RMSSquared<br />
Tracking Live Input Category<br />
This can be used to get an estimate of the amplitude envelope of the Input. <strong>The</strong> output is<br />
input^2 * timeConst + prev * (1 - timeConst)<br />
This is the root mean square of the input without the final square root at the end.<br />
Input<br />
This is the <strong>Sound</strong> whose amplitude is tracked.<br />
TimeConstant<br />
This controls the response time. Longer timeConstants result in smoother outputs at a cost of losing<br />
some of the detail in the attacks. Short timeConstants result in outputs that respond more immediately to<br />
attack transients but that may not be as smooth <strong>for</strong> the steady state portions. For a constant input at<br />
maximum amplitude, this is the time required <strong>for</strong> the output to reach 60% of the full output amplitude.<br />
(Note that the output may never reach the maximum possible amplitude since it is the average of the<br />
squares of the amplitudes).<br />
Scale<br />
Attenuates the input amplitude.<br />
331
RunningMax<br />
Math Category<br />
Output is the maximum of all Input amplitudes seen so far, from the start of the <strong>Sound</strong> until the current<br />
time. To reset the maximum to zero and restart on calculating the running max, set Reset to a nonzero<br />
value. By the end of the <strong>Sound</strong>, if there have been no resets, the value is the maximum of all the Input’s<br />
sample points.<br />
Input<br />
This is the <strong>Sound</strong> whose maximum amplitude over its entire duration is being computed.<br />
Reset<br />
When this <strong>Sound</strong> becomes nonzero, it resets the running maximum.<br />
332
RunningMin<br />
Math Category<br />
<strong>The</strong> output of this <strong>Sound</strong> is the minimum amplitude of its Input as seen so far. Whenever Reset is<br />
nonzero, the current minimum is thrown away, and the process starts over again. If Reset is always zero,<br />
the final value of this <strong>Sound</strong> is the minimum of all the output values of its Input.<br />
Input<br />
This is the <strong>Sound</strong> whose minimum amplitude is being computed.<br />
Reset<br />
Whenever this <strong>Sound</strong> is nonzero, the min is reset to the maximumAmplitude and the process of keeping<br />
track of the minimum seen so far begins again.<br />
333
Sample<br />
Sampling Category<br />
Plays the specified Sample from the wavetable memory of the signal processor. If there is a loop stored<br />
in the header of the sample file or if you have SetLoop checked, the sample will play once up through the<br />
LoopEnd; then it will loop back to LoopStart and continue looping <strong>for</strong> as long as Gate has a positive<br />
value; when Gate returns to zero, the sample will play on through LoopEnd to the end of the sample file.<br />
Frequency<br />
Use 0 hz here if you want the Frequency to equal the pitch of the recorded sample. <strong>The</strong> frequency can<br />
be specified in units of pitch or frequency. Different frequencies are obtained by changing the size of the<br />
increment through the recorded sample. <strong>The</strong> following are all ways to specify the A above middle C:<br />
440 hz (in hertz or cycles per second)<br />
4 a (as the 4th octave A)<br />
69 nn (as a MIDI notenumber)<br />
4 c + 9 nn (as 9 half steps above middle C)<br />
1.0 / 0.00227273 s (inverse of a period at 44.1 kHz sample rate)<br />
<strong>The</strong> following are examples of how to control the frequency using MIDI, the virtual control surface, or a<br />
third-party program:<br />
!Pitch (key number plus pitch bend)<br />
!KeyNumber nn (MIDI notenumber)<br />
4 c + (!Frequency * 9 nn) (continuous controller from 4 c to 4 a)<br />
Gate<br />
Enter a 1 in this field to play the <strong>Sound</strong> exactly once <strong>for</strong> the duration you have specified in the Duration<br />
field.<br />
If you use an EventValue (<strong>for</strong> example, !KeyDown) in this field, the <strong>Sound</strong> can be retriggered as often as<br />
you like within the duration specified in the Duration field.<br />
When Gate becomes positive, the <strong>Sound</strong> is heard; when Gate becomes zero, the <strong>Sound</strong> is released and<br />
will finish playing through the sample and then stop.<br />
If the sample file has loop points stored in its header, <strong>Kyma</strong> will loop the sample <strong>for</strong> as long as Gate<br />
remains positive (so, <strong>for</strong> example, as long as the MIDI key is held down).<br />
Sample<br />
Choose a sample from among those stored in the Wavetables folder or directory. When you<br />
compile/load/start, <strong>Kyma</strong> will read the sample from the hard disk of the host computer and load it into the<br />
wavetable memory (the sample RAM) of the signal processor. This <strong>Sound</strong> then reads the sample from<br />
the memory of the signal processor, not directly off the disk.<br />
SetLoop<br />
Check this box if you would like to set the loop points using the LoopStart and LoopEnd parameter fields.<br />
LoopStart<br />
When SetLoop is checked, this is the start point of the loop (otherwise it is ignored). Enter a value in the<br />
range from 0 to 1, where 0 is the beginning of the sample and 1 is the end of the sample. In other words,<br />
this is the proportion of the total sample duration when the start point should occur. (To compute the<br />
334
exact time within the sample where the start point occurs, multiply LoopStart’s value by the total duration<br />
of the sample. For example, if your sample is 5 seconds long and LoopStart is set to 0.2, then the<br />
beginning of the loop is 1 second into the sample.)<br />
LoopEnd<br />
When SetLoop is checked, this is the end point of the loop (otherwise it is ignored). Enter a value in the<br />
range from 0 to 1, where 0 is the beginning of the sample and 1 is the end of the sample. In other words,<br />
this is the proportion of the total sample duration when the end point should occur. (To compute the<br />
exact time within the sample where the end point of the loop occurs, multiply LoopEnd’s value by the total<br />
duration of the sample. For example, if your sample is 5 seconds long and LoopEnd is set to 0.4, then<br />
the end of the loop occurs at 2 seconds into the sample.)<br />
LoopFade<br />
When checked, this puts a quick fade in at the beginning of a loop and a quick fade out at the end to help<br />
minimize any clicks due to discontinuities in the wave<strong>for</strong>m between the beginning and end of the looped<br />
section.<br />
Start<br />
This is the start point of playback within the sample. Enter a value in the range from 0 to 1, where 0 is the<br />
beginning of the sample and 1 is the end of the sample. In other words, this is the proportion of the total<br />
sample duration when the start point should occur. (To compute the exact time within the sample where<br />
the start point occurs, multiply Start’s value by the total duration of the sample. For example, if your<br />
sample is 5 seconds long and Start is set to 0.2, then the beginning of the playback is 1 second into the<br />
sample.)<br />
End<br />
This is the end point of the sample playback. Enter a value in the range from 0 to 1, where 0 is the<br />
beginning of the sample and 1 is the end of the sample. In other words, this is the proportion of the total<br />
sample duration when the end should occur. (To compute the exact time within the sample where the<br />
end occurs, multiply End’s value by the total duration of the sample. For example, if your sample is 5<br />
seconds long and End is set to 0.4, then the end of the playback occurs at 2 seconds into the sample.)<br />
FromMemoryWriter<br />
Check FromMemoryWriter when the wavetable does not come from a disk file but is recorded by a<br />
MemoryWriter in real time.<br />
AttackTime<br />
Duration of the attack of an envelope applied to the sample.<br />
ReleaseTime<br />
Duration of the release of an envelope applied to the sample.<br />
Scale<br />
Overall level of the sample.<br />
335
SampleAndHold<br />
Sampling Category<br />
A SampleAndHold holds onto the current value of its Input <strong>for</strong> the duration specified in HoldTime. While it<br />
is holding onto this value, it ignores any changes in its Input’s value. When HoldTime has expired, a<br />
SampleAndHold looks at its Input’s value again, and holds onto THAT value <strong>for</strong> HoldTime and so on.<br />
This effectively lowers the sample rate on the Input.<br />
Try pasting this <strong>Sound</strong> into another <strong>Sound</strong>’s Frequency field and multiplying it by the desired range of<br />
frequencies and adding an offset frequency to it, <strong>for</strong> example:<br />
4 c + ([SampleAndHold] * 12 nn)<br />
where [SampleAndHold] is a this <strong>Sound</strong> copied and pasted into another <strong>Sound</strong>’s Frequency field.<br />
Input<br />
This is the <strong>Sound</strong> whose output is periodically sampled by the SampleAndHold.<br />
HoldTime<br />
<strong>The</strong> amount of time that each sampled value is held be<strong>for</strong>e the Input is sampled again. If you think of the<br />
SampleAndHold as downsampling its input, then this is the period of the new, lower sample rate.<br />
OffsetTime<br />
This is the amount of time to initially wait be<strong>for</strong>e starting the process of sampling and holding.<br />
336
SampleCloud<br />
Sampling Category<br />
Generates a cloud of short-duration grains, each using GrainEnv as an amplitude envelope on a short<br />
segment of sound taken from the specified Sample at a point in the sample given by the TimeIndex. <strong>The</strong><br />
density of simultaneous grains within the cloud is controlled by Density, with the maximum number of<br />
simultaneous grains given by MaxGrains. Amplitude controls an amplitude envelope over the *entire*<br />
cloud (each individual grain amplitude is controlled by GrainEnv). Similarly, Duration is the duration of<br />
the entire cloud, not of each individual grain. You can control the Frequency, stereo positioning, time<br />
point within the sample, and the duration of each grain as well as specifying how much (if any) random<br />
jitter should be added to each of these parameters (giving the cloud a more focused or a more dispersed<br />
sound, depending on how much randomness is added to each of the parameters).<br />
Sample<br />
Enter the name of a mono sample file or click the disk icon to choose a file from the file dialog. This is the<br />
source material <strong>for</strong> each of the short duration grains.<br />
GrainEnv<br />
This is the shape of the amplitude envelope on each grain. <strong>The</strong> wavetables in the Windows category<br />
make the classic, smooth grain envelopes, and some of the shapes in Impulse Responses also give<br />
interesting results.<br />
MaxGrains<br />
This is the maximum number of simultaneous grains. <strong>The</strong> smaller this number, the less computational<br />
power the SampleCloud requires (but the less dense the texture you can generate). On a Capybara-66<br />
you should be able to get around 28 simultaneous grains per cloud. For even denser textures, put more<br />
than one SampleCloud into a Mixer, and give each cloud a different Seed value.<br />
Amplitude<br />
This is an overall level applied to the entire cloud. Paste an envelope generator into this field to give an<br />
overall envelope to the cloud.<br />
Density<br />
Small Density values result in a sparse texture; large Density values generate a dense texture. This<br />
controls the average number of new grains starting up at any given point in time.<br />
GrainDur<br />
This is the duration of each individual grain.<br />
GrainDurJitter<br />
Adds some amount of random jitter to the grain durations. When set to 1, the durations vary randomly<br />
from 0 to twice the specified duration. When this is set to 0, all grains will have a duration of GrainDur. In<br />
other words, the actual grain duration <strong>for</strong> each grain is:<br />
GrainDur + ( * GrainDurJitter * GrainDur)<br />
where is a random number between -1 and 1.<br />
337
Pan<br />
This is the stereo position of each new grain where 0 is hard left, 0.5 is in the middle, and 1 is hard right.<br />
PanJitter<br />
This is the amount of random deviation added to the pan position. <strong>The</strong> larger this number, the more<br />
diffuse the apparent location, and the smaller the number, the more localized the sound.<br />
Seed<br />
This should be a number between 0 and 1. <strong>The</strong> seed provides a starting point <strong>for</strong> the random number<br />
generator, so each different seed results in a different (but repeatable) sequence of random numbers.<br />
When adding several SampleGrains with the same control parameters together in a Mixer, give each of<br />
them a different seed in order to ensure that each of them has *different* random jitter added to its<br />
parameters (otherwise, they will just double each other).<br />
FromMemoryWriter<br />
Check this box to granulate the live input or to granulate a sample that is being changed by a<br />
MemoryWriter as the granulation is going on. This SampleCloud should be fed into a Mixer along with a<br />
MemoryWriter that is recording something into the sample that you are granulating with the SampleCloud.<br />
<strong>The</strong> SampleCloud should be fed through a TimeOffset of at least 1 sample, so it is reading *after* the<br />
sample is written.<br />
TimeIndex<br />
This is a pointer into the Sample memory. -1 points to the beginning of the sample, 0 points to the<br />
middle, and 1 points to the end of the sample. Grains are selected from this point and from random<br />
positions in the neighborhood (whose size is determined TimeIndexJitter) around this point.<br />
To read through the sample in linear, <strong>for</strong>ward time, you can use something like:<br />
!KeyDown fullRamp: 10 s<br />
which will scan the sample from beginning to end over the course of 10 seconds each time it receives a<br />
MIDI note event.<br />
To remove the element of time from the sample, set TimeIndex to a fixed position like 0 (the middle of the<br />
sample), and increase TimeIndexJitter to its maximum value. <strong>The</strong>n grains will be chosen at random from<br />
all different time points within the sample.<br />
TimeIndexJitter<br />
TimeIndex is a time point in the Sample, and TimeIndexJitter is an amount of random deviation <strong>for</strong>ward or<br />
backward in time from the one point specified TimeIndex. A TimeIndexJitter of zero means that all grains<br />
will be chosen from the single point specified in TimeIndex, whereas a TimeIndexJitter of 1 means that<br />
grains may be chosen at random from any time point in the entire sample.<br />
338
SamplesFromDiskSingleStep<br />
Sampling Category<br />
As long as the Trigger is greater than zero, the SamplesFromDiskSingleStep will read samples from the<br />
disk file; if the Trigger is less than or equal to zero, the last sample read will be output. Gate resets the<br />
pointer to the beginning of the file.<br />
FileName<br />
This is the name of a sample file that you have previously created either in <strong>Kyma</strong> or in another<br />
application.<br />
FilePosition<br />
This is the first sample point to play back.<br />
Trigger<br />
As long as the Trigger is greater than zero, the SamplesFromDiskSingleStep will read samples from the<br />
disk file; if the Trigger is less than or equal to zero, the last sample read will be output. PulseTrain is a<br />
good <strong>Sound</strong> to use as a source of periodic triggers, and by putting an Event Value in the PulseTrain’s<br />
Period field, you can control the rate at which the triggers occur.<br />
Gate<br />
Each time this value becomes positive, the <strong>Sound</strong> will start over again from the beginning of the sample.<br />
Enter a 1 in this field to play the <strong>Sound</strong> exactly once. If you use an EventValue (<strong>for</strong> example, !KeyDown)<br />
in this field, you can restart the sound multiple times.<br />
339
ScaleAndOffset<br />
Math Category<br />
<strong>The</strong> output of this <strong>Sound</strong> is:<br />
(Input * Scale) + Offset<br />
This is can be useful <strong>for</strong> changing the minimum value and range of a control signal be<strong>for</strong>e using it to<br />
control another <strong>Sound</strong>, as <strong>for</strong> example, in scaling or offsetting the left and right channel outputs of a<br />
SpectrumFromRAM be<strong>for</strong>e they are fed into an OscillatorBank. (However, <strong>for</strong> those cases when the<br />
control signal is pasted directly into a hot parameter field, it may be more straight<strong>for</strong>ward to just use<br />
regular arithmetic to scale or offset the value in the parameter field itself).<br />
Input<br />
<strong>The</strong> output of this <strong>Sound</strong> is multiplied by Scale and then the added to Offset.<br />
LeftScale<br />
Multiplier on the left channel. <strong>The</strong> range of allowable values is -2 to +2.<br />
LeftOffset<br />
Offset on the left channel. <strong>The</strong> range of allowable values is -1 to +1.<br />
RightScale<br />
Multiplier on the right channel. <strong>The</strong> range of allowable values is -2 to +2.<br />
RightOffset<br />
Offset on the right channel.Offset on the left channel. <strong>The</strong> range of allowable values is -1 to +1.<br />
340
ScaleVocoder<br />
Filters Category<br />
Vocoder whose center frequencies are tuned to a base pitch and a scale.<br />
Input<br />
This is the source material to be filtered by the SideChain-controlled filters. This <strong>Sound</strong> is heard directly,<br />
through the filters (whereas the SideChain is never heard directly). For example, if you want to make an<br />
animal talk, put a sample of the animal sound here and put a sample of speech (or use a microphone) as<br />
the SideChain.<br />
<strong>The</strong> best Inputs tend to be fairly broad band signals that have energy in each of the frequency bands<br />
covered by the resynthesis filter bank. For example, Noise or an Oscillator on a wave<strong>for</strong>m with lots of<br />
harmonics (such as Buzz128) will work well because they generate energy over the full frequency range.<br />
SideChain<br />
Sometimes referred to as the "modulation", this <strong>Sound</strong> is never heard directly; it controls the amplitudes<br />
of the filters in the bank.<br />
TimeConstant<br />
This determines how quickly the amplitude envelopes on the filters will respond to changes in the<br />
SideChain. For precise, intelligible results, use values less than 0.1 s. For a more diffuse, reverberated<br />
result, use a longer TimeConstant.<br />
NbrBands<br />
This is the number of band pass filters in the filter bank.<br />
BankSize<br />
This is the number of filters per processor. Type<br />
default<br />
to get the standard number of filters per processor. If you are running out of time, try reducing the default<br />
size, <strong>for</strong> example<br />
default * 0.75<br />
Tonic<br />
This is the tonic or first pitch in the scale.<br />
Intervals<br />
This is the interval pattern of the scale in half steps. For example, a major scale would be<br />
0 2 4 5 7 9 11<br />
Arithmetic expressions should be enclosed in curly braces, <strong>for</strong> example<br />
{!SmallInterval1 rounded nn}<br />
<strong>The</strong> scale can have any number of steps, and the steps are repeated in each octave <strong>for</strong> as many bands<br />
as you have specified.<br />
SideLevel<br />
341
Controls the level of the SideChain <strong>Sound</strong> be<strong>for</strong>e it is fed into the analysis filters.<br />
InputLevel<br />
Controls the level on the input <strong>Sound</strong> be<strong>for</strong>e it goes through the filters.<br />
InBandwidth<br />
Control on the bandwidth of the filters on the Input <strong>Sound</strong>.<br />
SideBandwidth<br />
Control on the bandwidth of the filters on the Sidechain <strong>Sound</strong>.<br />
Tone<br />
A tone control where higher values emphasize higher frequencies, and lower values emphasize lower<br />
frequencies. Rolloff determines the width of the tone control filter.<br />
Rolloff<br />
This controls the steepness of the edges of a weak tone control filter on the Input. Use 1 if the edges<br />
should rolloff precipitously at LoCutoff and HiCutoff. Use smaller numbers if you would like the<br />
attenuation to start sooner and take longer.<br />
Gain<br />
You can boost or cut the overall output level here.<br />
342
Script<br />
Scripts Category<br />
A Script is a handy way to construct <strong>Sound</strong>s algorithmically (rather than piecing them together graphically<br />
in the <strong>Sound</strong> editor). <strong>The</strong> constructed <strong>Sound</strong> will be a Mixer of several Inputs, each with its own start<br />
time (or TimeOffset).<br />
A Script is like any other <strong>Sound</strong> in that it can be used as an Input to a more complex <strong>Sound</strong>; <strong>for</strong> example,<br />
a Script can contain variables and can even be used as an Input to another Script.<br />
Inputs<br />
Use the script to schedule each of these <strong>Sound</strong>s at a specific time and to supply values <strong>for</strong> any variables<br />
in the <strong>Sound</strong>’s parameters. (Script actually uses each of these Input <strong>Sound</strong>s as a template or model <strong>for</strong><br />
creating new instances of the <strong>Sound</strong>s with specific values at specific times. Multiple instances of a<br />
<strong>Sound</strong> can be scheduled from the script by specifying simultaneous start times or overlapping durations.)<br />
Script<br />
<strong>The</strong> script supplies start times <strong>for</strong> the <strong>Sound</strong>s in the Inputs field and, optionally, sets the values of any<br />
variable parameters. To specify an event in the script, type:<br />
start: {: }.<br />
In other words, type the name of an Input <strong>Sound</strong>, a space, the word "start" followed by a colon and then a<br />
space, a start time followed by units of samp or s or beats, and then any number of <br />
pairs followed by a period. <strong>The</strong> pairs consist of the name of a variable in the Input, a<br />
colon, a space, and then a value <strong>for</strong> that variable. To specify the length of a beat, assign the desired<br />
metronome setting to the variable MM. If an Input takes another <strong>Sound</strong> as an argument, you can supply<br />
it from the script as a parenthesized event with no start time.<br />
Any Smalltalk expression can appear in the script, including temporary variable declarations and control<br />
structures like loops.<br />
See the manual <strong>for</strong> more details and examples.<br />
Left<br />
This controls the level of the left output channel. <strong>The</strong> maximum value is 1 and the minimum is -1. <strong>The</strong><br />
left channel of the output is multiplied by the value of this parameter. Some example values <strong>for</strong> Left are:<br />
1 (no attenuation)<br />
0 (maximum attenuation)<br />
!Fader1 (continuous controller sets level)<br />
!KeyVelocity (MIDI key velocity controls the amplitude)<br />
You can also paste another signal into this field, and the amplitude will vary with the output amplitude of<br />
the pasted signal (something like an LFO controlling the attenuation). (See the manual <strong>for</strong> a complete<br />
description of hot parameters, EventValues, EventSources, and Map files).<br />
Right<br />
This controls the level of the right output channel. <strong>The</strong> maximum value is 1 and the minimum is -1. <strong>The</strong><br />
right channel of the output is multiplied by the value of Right. Some example values <strong>for</strong> Right are:<br />
1 (no attenuation)<br />
343
0 (maximum attenuation)<br />
!Fader1 (continuous controller sets level)<br />
!KeyVelocity (MIDI key velocity controls the amplitude)<br />
You can also paste another signal into this field, and the amplitude will vary with the output amplitude of<br />
the pasted signal (something like an LFO controlling the attenuation). (See the manual <strong>for</strong> a complete<br />
description of hot parameters, EventValues, EventSources, and Map files).<br />
344
SetDuration<br />
Time & Duration Category<br />
Sets the duration and start time of its input. (It is the equivalent of dragging the input <strong>Sound</strong> into a<br />
timeline and changing its duration and start time graphically). Without the SetDuration the Input <strong>Sound</strong>’s<br />
program would continue running indefinitely; with the SetDuration you can specify that it should stop after<br />
a given amount of time.<br />
Input<br />
Duration sets the duration of this <strong>Sound</strong> and StartTime sets its start time relative to the SetDuration.<br />
StartTime<br />
Start time of the <strong>Sound</strong> in Input relative to the start time of the SetDuration. Must be a value greater than<br />
zero. Examples of startTimes:<br />
0<br />
1 samp<br />
440 hz<br />
Duration<br />
Duration of the Input. Can be specified in seconds, samples, or in terms of frequency (where the duration<br />
will be the duration of one period at that frequency). Must be a value greater than zero. Examples of<br />
durations:<br />
1 s<br />
44100 samp<br />
440 hz<br />
345
SetRange<br />
Math Category<br />
This maps the output range of the Input to the specified range of newMin to newMax.<br />
Input<br />
<strong>The</strong> output of this <strong>Sound</strong> is scaled to a range of newMin to newMax. Set oldMin and oldMax to the<br />
current output range of this <strong>Sound</strong> (typically -1.0 to 1.0 or 0 to 1.0). For example, a FunctionGenerator<br />
that steps through the wavetable #ramp has a range of 0 to 1.0, but if the wavetable is #sine the range is<br />
-1.0 to 1.0.<br />
OldMin<br />
<strong>The</strong> current minimum value of the Input. This is typically -1.0 (<strong>for</strong> full range wavetables) or 0 (<strong>for</strong><br />
wavetables like #ramp that never go negative).<br />
OldMax<br />
<strong>The</strong> current maximum output of the Input. Typically, this is the full amplitude: 1.0.<br />
NewMin<br />
This is the new minimum output.<br />
NewMax<br />
This is the new maximum output.<br />
346
SimplePitchShifter<br />
Frequency & Time Scaling Category<br />
Shift the pitch of the input up or down by an interval (given in half steps).<br />
Input<br />
<strong>The</strong> frequency of this input will be shifted up or down by the given interval. Works best on monophonic<br />
inputs with a strong <strong>for</strong>mant structure.<br />
Interval<br />
A positive or negative number of halfsteps by which to shift the input’s pitch up or down. This does not<br />
have to be an integer but can include fractions of halfsteps.<br />
MinInputPitch<br />
This is the lowest frequency you expect in the input. It must include units: hz <strong>for</strong> a frequency or nn <strong>for</strong> a<br />
notenumber.<br />
MaxInputPitch<br />
This is the highest frequency you expect in the input. It must include units: hz <strong>for</strong> a frequency or nn <strong>for</strong> a<br />
notenumber.<br />
347
SingleSideBandRM<br />
Frequency & Time Scaling Category<br />
Does nonharmonic frequency scaling of the input. Takes the input and does a 90 degree phase shift<br />
between the left and right channels at the frequency specified in the Frequency parameter field.<br />
Multiplies this by a QuadratureOscillator with sine in the left and cosine in the right. <strong>The</strong> resulting ring<br />
modulation gives you sum and difference frequencies but, because they are 90 degrees out of phase, the<br />
difference frequency is mostly cancelled out, leaving you with single side band modulation. Expand to<br />
see how this is put together.<br />
Input<br />
This signal will be ring modulated to scale its frequency by the specified FreqScale.<br />
Frequency<br />
This is the frequency at which there will be perfect cancellation of the difference frequency side-band.<br />
<strong>The</strong> further the input is from this frequency, the less cancellation there will be and the more the result will<br />
be like regular ring modulation.<br />
FreqScale<br />
Any part of the input that was at Frequency will be scaled by this ratio.<br />
348
SOSOscillators<br />
Xtra Sources Category<br />
Generates the sum of several oscillators on the specified wave<strong>for</strong>m, each with its own frequency and<br />
amplitude envelope.<br />
Spectrum<br />
This should be either a SpectralShape or an SOSAnalysis. <strong>The</strong> Spectrum controls the amplitude and<br />
frequency envelopes <strong>for</strong> each oscillator.<br />
CascadeInput<br />
<strong>The</strong> left channel of this input is mixed with the outputs of the oscillators.<br />
NbrOscillators<br />
This is the number of oscillators that will be added together. Each oscillator is associated with a partial<br />
from the Input analysis, starting from the partial number associated with the firstOscillator.<br />
FirstOscillator<br />
This is the partial number to be resynthesized by the first oscillator in the bank. For example, set this to 1<br />
if you want the lowest frequency oscillator to correspond to the fundamental. If you want to skip the<br />
fundamental, set this to 2.<br />
If you are mixing two or more OscillatorBanks, they can cover different portions of the spectrum. For<br />
instance, one OscillatorBank might have 1 as its FirstPartial and 10 as the number of partials; the next<br />
OscillatorBank might have 11 as its FirstPartial and 10 as its number of partials; and a third might have<br />
21 as its FirstPartial and 10 as its number of partials.<br />
Wavetable<br />
This is the wave<strong>for</strong>m used by all the oscillators.<br />
349
<strong>Sound</strong>CollectionVariable<br />
Variables Category<br />
This represents a collection of <strong>Sound</strong>s. It can appear in any parameter field that takes more than one<br />
<strong>Sound</strong>. It is typically used when creating new <strong>Sound</strong> classes that have an arbitrary number of inputs.<br />
350
<strong>Sound</strong>ToGlobalController<br />
Tracking Live Input Category<br />
Takes a number, a pasted <strong>Sound</strong>, or an Event expression as its input and generates a corresponding<br />
EventValue (either a single event or a continuous controller stream) which, to all other <strong>Kyma</strong> <strong>Sound</strong>s,<br />
looks the same as EventValues coming from the Virtual control surface or from an external MIDI source.<br />
GeneratedEvent<br />
Enter an EventValue name (including the exclamation point prefix) <strong>for</strong> the generated EventValue.<br />
Value<br />
Paste a <strong>Sound</strong> or enter a number or EventValue here. <strong>The</strong> constant or time-varying value here will be<br />
translated into an EventValue named in GeneratedEvent.<br />
351
SpectralShape<br />
Spectral Sources Category<br />
A SpectralShape sets the frequencies and amplitudes of oscillators in an OscillatorBank according to the<br />
Spacing and SpectralEnvelope parameters. This kind of <strong>Sound</strong> makes sense only when used as an<br />
Input to an OscillatorBank. Frequencies are output on the right channel and their corresponding<br />
amplitudes are output on the left channel.<br />
Frequency<br />
<strong>The</strong> frequency can be specified in units of pitch or frequency. <strong>The</strong> following are all ways to specify the A<br />
above middle C:<br />
440 hz (in hertz or cycles per second)<br />
4 a (as the 4th octave A)<br />
69 nn (as a MIDI notenumber)<br />
4 c + 9 nn (as 9 half steps above middle C)<br />
1.0 / 0.00227273 s (inverse of a period at 44.1 kHz sample rate)<br />
<strong>The</strong> following are examples of how to control the frequency using MIDI, the virtual control surface, or a<br />
third-party program:<br />
!Pitch (key number plus pitch bend)<br />
!KeyNumber nn (MIDI notenumber)<br />
4 c + (!Frequency * 9 nn) (continuous controller from 4 c to 4 a)<br />
Spacing<br />
This is the spacing between the partials and should be specified in units of frequency. To specify<br />
harmonic partials, set the Spacing to be the same as the Frequency. For example, if you have set<br />
Frequency to !KeyNumber nn, then setting Spacing to !KeyNumber nn will tell the OscillatorBank to<br />
generate harmonics of !KeyNumber nn.<br />
NbrPartials<br />
This is the number of (amplitude,frequency) pairs that the SpectralShape will supply to an OscillatorBank.<br />
For example, if there are 20 partials, this <strong>Sound</strong> will output the amp1 and freq1 on the first sample, amp2<br />
and freq2 on the second sample, and on through amp20 and freq20 on the 20th sample. <strong>The</strong>n it will start<br />
over again with amp1 and freq1.<br />
Wavetable<br />
<strong>The</strong> shape stored in this wavetable is interpreted as the shape of the spectrum, from 0 hz up to half the<br />
sampling rate. An OscillatorBank can use this table to set the amplitude of each of its oscillators<br />
according to that oscillator’s frequency. For example, if the frequency falls in a region with a low<br />
amplitude in this table, it will be attenuated in the OscillatorBank. To see the spectral envelope, open this<br />
file using File open with the file type set to Samples file. If the OscillatorBank wave<strong>for</strong>m is Sine, and you<br />
have chosen harmonic spacing, then this shape will be something like a filter acting on a bandlimited<br />
pulse train (equal amplitude, harmonically spaced sine waves).<br />
Scale<br />
Used as an overall amplitude scale applied equally to all of the oscillators.<br />
352
SpectrumAnalyzerDisplay<br />
Tracking Live Input Category<br />
A real-time spectrum analyzer. Displays the spectrum of the Input on the Virtual control surface. Use the<br />
buttons below the display to zoom in or out in the frequency or magnitude dimensions. <strong>The</strong> value at the<br />
cursor point (where the red cross hairs meet) is displayed in the upper left. Clicking on the display<br />
freezes it so you can hold down the mouse over specific points to read their exact values.<br />
A SpectrumAnalyzer can be placed anywhere along the signal flow path; it does not necessarily have to<br />
be the final <strong>Sound</strong> in a signal flow path (it could, <strong>for</strong> example, be displaying the spectrum of the Input to<br />
the <strong>Sound</strong> that is actually being heard). If a <strong>Sound</strong> has more than one SpectrumAnalyzer within it, all the<br />
spectra will be displayed side by side in the Virtual control surface.<br />
You can also view the real-time spectrum of any <strong>Sound</strong> by selecting the <strong>Sound</strong> and then choosing<br />
Spectrum analyzer from the Info menu. (But the menu method only allows you to view one <strong>Sound</strong> at a<br />
time on the SpectrumAnalyzer and does not allow you to adjust the windowing function or the length of<br />
the FFT, except by changing the Preferences).<br />
Input<br />
<strong>The</strong> spectrum of this <strong>Sound</strong> is continuously displayed on the Virtual control surface, as if by a real-time<br />
spectrum analyzer.<br />
Window<br />
Window weighting function applied to the analysis window of the FFT used to compute the spectra.<br />
Length<br />
Length of the FFT. Ideally it should be the same as the number of samples in the period of the lowest<br />
frequency or fundamental frequency.<br />
353
SpectrumFrequencyScale<br />
Spectral Modifiers Category<br />
Takes a spectral source (which must be harmonic) as its input and scales the frequency envelopes<br />
without changing the amplitude envelopes. This allows you to shift the pitch of the resynthesis, while<br />
leaving the <strong>for</strong>mants at their original frequencies. <strong>The</strong> SpectrumFrequencyScale should be fed to an<br />
OscillatorBank in order to resynthesize the newly scaled spectrum.<br />
Spectrum<br />
Should be a <strong>Sound</strong> from the spectral sources category of the Prototypes (based on an harmonic<br />
analysis).<br />
Scale<br />
All frequencies in the spectrum will be multiplied by this scale factor. For example, use 2 to scale up by<br />
one octave, 1 <strong>for</strong> no change, 0.5 <strong>for</strong> down by one octave. You can get other intervals by using a ratio of<br />
two pitches that have been converted to hertz. For example, to get a half step up, you could use<br />
4 c sharp hz / 4 c hz<br />
or to shift down by a perfect fifth, you could use<br />
4 c hz / 4 g hz<br />
To control the pitch from the MIDI keyboard, use the ratio of !Pitch to the original pitch of the recording.<br />
For example, if the original recording is a 3rd octave b, you could use<br />
!Pitch hz / 3 b<br />
354
SpectrumInRAM<br />
Spectral Sources Category<br />
This <strong>Sound</strong> is used only as the Spectrum input to an OscillatorBank.<br />
It reads an analysis file that contains a series of spectra indexed by TimeIndex. It outputs a spectrum as<br />
a sequence of (amplitude,frequency) pairs on every sample tick <strong>for</strong> nbrPartials samples. After nbrPartials<br />
samples, it starts over again from the fundamental and outputs the entire spectrum again.<br />
Frequency<br />
Use Default to leave the frequency unchanged from the original analysis. Otherwise, the frequency<br />
envelopes will be altered to scale the base pitch of the analysis to the value listed in this parameter field.<br />
<strong>The</strong> frequency can be specified in units of pitch or frequency. <strong>The</strong> following are all ways to specify the A<br />
above middle C:<br />
440 hz (in hertz or cycles per second)<br />
4 a (as the 4th octave A)<br />
69 nn (as a MIDI notenumber)<br />
4 c + 9 nn (as 9 half steps above middle C)<br />
1.0 / 0.00227273 s (inverse of a period at 44.1 kHz sample rate)<br />
<strong>The</strong> following are examples of how to control the frequency using MIDI, the virtual control surface, or a<br />
third-party program:<br />
!Pitch (key number plus pitch bend)<br />
!KeyNumber nn (MIDI notenumber)<br />
4 c + (!Frequency * 9 nn) (continuous controller from 4 c to 4 a)<br />
Level<br />
This is a control on the overall amplitude of all the partials. Enter 1 to leave all amplitudes as they are;<br />
numbers larger than one result in a gain, and numbers less than one result in attenuation.<br />
TimeIndex<br />
This selects where we are in the series of spectral snapshots. <strong>The</strong> first snapshot is at -1, the middle<br />
snapshot is at 0, and the last snapshot is at 1. To go through the series in linear time, use a<br />
FunctionGenerator whose Duration equals the duration of the original recording and whose Wavetable is<br />
FullRamp (which goes from -1 to 1). Change the Duration of the FunctionGenerator to go through the<br />
spectra at different rates. Change the wavetable to go through the spectra in a different order.<br />
Analysis<br />
Use a spectrum file from the Wavetables folder or directory. <strong>The</strong>se files came from spectral analyses<br />
per<strong>for</strong>med on digital recordings by the Spectral Analysis Tool or by Lemur.<br />
NbrPartials<br />
This is the number of partials you want to output <strong>for</strong> the resynthesis. Use Default to output all of the<br />
partials in the file.<br />
FirstPartial<br />
This is the first analyzed partial that you want to output--usually it is partial number 1. If you want to skip<br />
over some of the lower partials, enter a higher number here.<br />
355
SpectrumLogToLinear<br />
Spectral Modifiers Category<br />
A spectrum can be in one of two <strong>for</strong>ms: linear frequency or logarithmic frequency. This <strong>Sound</strong> converts a<br />
logarithmic frequency spectrum input into a linear frequency spectrum output.<br />
Generally, a spectrum that comes from a spectrum file has logarithmic frequencies, and a spectrum<br />
generated in real time has linear frequencies.<br />
Spectrum<br />
This logarithmic frequency spectrum input is converted to linear frequency and then output.<br />
356
SpectrumModifier<br />
Spectral Modifiers Category<br />
A SpectrumModifier takes one of the <strong>Sound</strong>s from the Spectral Sources category of the Prototype strip as<br />
its input and modifies the spectrum. To resynthesize the modified spectrum, feed the SpectrumModifier<br />
into the spectrum input of an OscillatorBank.<br />
In order to modify the output of a spectral source, the SpectrumModifier selects or rejects tracks of the<br />
spectrum according to some criteria, and then it optionally scales and offsets each frequency and/or<br />
amplitude value of the selected tracks.<br />
Decide whether to select or reject the tracks that meet the criteria.<br />
<strong>The</strong>n decide whether the rejected tracks should have their amplitudes set to zero or whether they should<br />
simply pass through unaffected by the scale and offset modifications.<br />
<strong>The</strong>n set the selection (or rejection) criteria, including frequency range, track number range, or amplitude<br />
range. <strong>The</strong> frequency and amplitude hysteresis values can prevent tracks that are close to the selected<br />
range from popping in and out as they cross the threshold. Probability is the likelihood (ranging from 0 up<br />
to 1) that a track will be selected (or rejected) on each frame.<br />
Finally, you can choose to scale and/or offset either the frequency or amplitude (or both) on each frame<br />
of each selected track.<br />
Spectrum<br />
This is the spectrum that will be modified; it should be one of the classes of <strong>Sound</strong> found in the Spectral<br />
Sources category (e.g. LiveSpectralAnalysis, SpectrumInRAM). <strong>The</strong> SpectrumModifier assumes linear<br />
(rather than log) frequencies, so you may see a dialog asking you to insert a SpectrumLogToLinear<br />
module inbetween the spectral source and the SpectrumModifier.<br />
Select<br />
Check this to specify the criteria <strong>for</strong> *selection*. Otherwise, the tracks that meet the criteria will be<br />
*rejected*. Unchecking this box is like placing a logical NOT after all of the selection criteria.<br />
LoTrack<br />
Enter an integer track number. Only this track and higher-numbered tracks will be selected.<br />
HiTrack<br />
Enter an integer track number. Only this track and lower-numbered tracks will be selected. To be certain<br />
of selecting all tracks, enter a number much larger than the highest possible track number (e.g. 10000).<br />
LoFreq<br />
Enter a pitch or frequency with units. On each frame, a track will be selected if the value of the frequency<br />
envelope on that frame is at this frequency or a higher frequency. Use FreqHysteresis to prevent tracks<br />
from popping in and out on each frame if they are wavering around this frequency.<br />
HiFreq<br />
Enter a pitch or frequency with units. On each frame, a track will be selected if the value of the frequency<br />
envelope on that frame is at this frequency or a lower frequency. Use FreqHysteresis to prevent tracks<br />
from popping in and out on each frame if they are wavering around this frequency.<br />
357
FreqHysteresis<br />
Enter a frequency or pitch with units that is smaller than the value of LoFreq. If a track is currently<br />
selected, its frequency will have to drop this much *lower* than LoFreq in order to be rejected. If a track<br />
is currently unselected, it will have to be this much *higher* than LoFreq in order to become selected.<br />
(And similarly, the frequency of a selected track must be this much *higher* than HiFreq in order to be<br />
deselected, and the frequency of a rejected track would have to be this much lower than HiFreq in order<br />
to switch from being rejected to selected).<br />
Adjust this value to keep tracks that are close to LoFreq or HiFreq from switching between on and off on<br />
every frame.<br />
FreqScale<br />
Multiply the frequency of each selected track by this number between 0 and 1.<br />
FreqOffset<br />
Add this number (between 0 and 1) to the frequency value of each selected track.<br />
LoAmp<br />
Enter an amplitude value between 0 and 1 (or from -1000 to 0 dB). On each frame, a track will be<br />
selected if the value of the amplitude envelope on that frame is at this amplitude or a higher amplitude.<br />
Use AmpHysteresis to prevent tracks from popping in and out on each frame if they are wavering around<br />
this amplitude.<br />
HiAmp<br />
Enter an amplitude value between 0 and 1 (or from -1000 to 0 dB). On each frame, a track will be<br />
selected if the value of the amplitude envelope on that frame is at this amplitude or a lower amplitude.<br />
Use AmpHysteresis to prevent tracks from popping in and out on each frame if they are wavering around<br />
this amplitude.<br />
AmpHysteresis<br />
Enter a number between 0 and 1 but smaller than the value of LoAmp. If a track is currently selected, its<br />
amplitude will have to drop this much *lower* than LoAmp in order to be rejected. If a track is currently<br />
unselected, it will have to be this much *higher* than lowAmp in order to become selected. (And similarly,<br />
the amplitude of a selected track must be this much *higher* than HiAmp in order to be deselected, and<br />
the amplitude of a rejected track would have to be this much lower than HiAmp in order to switch from<br />
being rejected to selected).<br />
Adjust this value to keep tracks that are close to LoAmp or HiAmp from switching between on and off on<br />
every frame.<br />
AmpScale<br />
Multiply the amplitude of each selected track by this number between 0 and 1.<br />
AmpOffset<br />
Add this number (between 0 and 1) to the amplitude value of each selected track.<br />
Probability<br />
Enter a likelihood from 0 to 1. Numbers larger than 1 will be clipped to 1 (the maximum likelihood). On<br />
each frame and <strong>for</strong> each track, this is the likelihood that the track will be selected on this frame. Use 1 to<br />
say that the track will be selected 100% of the time, use 0.5 to give it a 50-50 chance of being selected,<br />
and use 0 to indicate that it will never be selected. You can make the likelihood a function of the track<br />
number. For example,<br />
358
TrackNumber / 128<br />
would make the higher tracks more likely to be selected on each frame than the lower tracks, and:<br />
(TrackNumber - 1) rem: 2<br />
would make the even-numbered tracks 100% likely, and the odd-numbered tracks 0% likely (because an<br />
odd number minus 1 is an even number, and an even number modulo 2 is zero, while an odd number<br />
modulo 2 is 1).<br />
Seed<br />
Enter a number from -1 to 1. This is the seed <strong>for</strong> the random number generator used in conjunction with<br />
the value of Probability to determine whether a track should be selected on a given frame.<br />
HearAll<br />
Check this box to hear all the tracks, both the selected and the rejected. Uncheck it to set the rejected<br />
tracks’ amplitudes to zero.<br />
(Only the selected tracks are affected by the FreqScale, FreqOffset, AmpScale, and AmpOffset, so check<br />
the HearAll box to hear all tracks but modify only the selected tracks).<br />
359
SpectrumOnDisk<br />
Spectral Sources Category<br />
This can be used in place of a SpectrumInRAM as the input to an OscillatorBank. <strong>The</strong> difference is that<br />
this reads the analysis file directly off the disk, rather than first loading the analysis file into RAM. This is<br />
helpful <strong>for</strong> SOS analyses that are too long to fit into sample RAM.<br />
Unlike the SpectrumInRAM, this <strong>Sound</strong> can only go through the analysis envelopes in <strong>for</strong>ward-time order.<br />
(<strong>The</strong> SpectrumInRAM TimeIndex parameter lets you read the analysis at any point in time and in any<br />
time order with any function). In this <strong>Sound</strong>, you can, however, control the Rate at which you go <strong>for</strong>ward<br />
through the analysis file.<br />
Frequency<br />
Use Default to leave the frequency unchanged from the original analysis. Otherwise, the frequency<br />
envelopes will be altered to scale the base pitch of the analysis to the value listed in this parameter field.<br />
<strong>The</strong> frequency can be specified in units of pitch or frequency. <strong>The</strong> following are all ways to specify the A<br />
above middle C:<br />
440 hz (in hertz or cycles per second)<br />
4 a (as the 4th octave A)<br />
69 nn (as a MIDI notenumber)<br />
4 c + 9 nn (as 9 half steps above middle C)<br />
1.0 / 0.00227273 s (inverse of a period at 44.1 kHz sample rate)<br />
<strong>The</strong> following are examples of how to control the frequency using MIDI, the virtual control surface, or a<br />
third-party program:<br />
!Pitch (key number plus pitch bend)<br />
!KeyNumber nn (MIDI notenumber)<br />
4 c + (!Frequency * 9 nn) (continuous controller from 4 c to 4 a)<br />
Level<br />
This is a control on the overall amplitude of all the partials.<br />
Enter 1 to leave all amplitudes as they are; numbers larger than one result in a gain, and numbers less<br />
than one result in attenuation.<br />
RateScale<br />
This controls the rate at which the analysis is read: use 1 to read it at the original rate, numbers greater<br />
than 1 to read through it faster, and numbers less than 1 to read through it more slowly.<br />
FileName<br />
Click the Browse button to be able to select the file name from a list of names in the standard file dialog.<br />
NbrPartials<br />
This is the number of partials you want to output <strong>for</strong> the resynthesis. Use Default to output all of the<br />
partials in the file.<br />
FirstPartial<br />
This is the first analyzed partial that you want to output--usually it is partial number 1. If you want to skip<br />
360
over some of the lower partials, enter a higher number here.<br />
Trigger<br />
When this number becomes positive, the <strong>Sound</strong> will start over again at the beginning of the analysis file.<br />
361
SqrtMagnitude<br />
Math Category<br />
This is the square root of the sum of the left and right channels squared. If the square root of the sum of<br />
the squares is greater than 1.0, this <strong>Sound</strong> saturates at 1.0. It can be useful in doing spectral analysis<br />
where the left channel is defined to be the real part and the right channel as the imaginary part of a<br />
complex number. You could also use this as a strange kind of measure of the instantaneous "distance"<br />
between two signals, one in the left and one in the right.<br />
Input<br />
<strong>The</strong> output is the square root of the sum of the squares of the left and right channels of this <strong>Sound</strong>.<br />
362
StereoInOutput4<br />
Spatializing Category<br />
This <strong>Sound</strong> routes the two stereo input <strong>Sound</strong>s to the four output channels of the signal processor.<br />
This <strong>Sound</strong> only works properly as the rightmost <strong>Sound</strong> in the signal flow diagram.<br />
Out12<br />
This <strong>Sound</strong> will be routed to channels 1 and 2.<br />
Out34<br />
This <strong>Sound</strong> will be routed to channels 3 and 4.<br />
363
StereoInOutput8<br />
Spatializing Category<br />
This <strong>Sound</strong> routes the four stereo input <strong>Sound</strong>s to the eight output channels of the signal processor.<br />
This <strong>Sound</strong> only works properly as the rightmost <strong>Sound</strong> in the signal flow diagram.<br />
Out12<br />
This <strong>Sound</strong> will be routed to channels 1 and 2.<br />
Out34<br />
This <strong>Sound</strong> will be routed to channels 3 and 4.<br />
Out56<br />
This <strong>Sound</strong> will be routed to channels 5 and 6.<br />
Out78<br />
This <strong>Sound</strong> will be routed to channels 7 and 8.<br />
364
StereoMix2<br />
Mixing & Panning Category<br />
Adds the outputs of the <strong>Sound</strong>s in the In1 and In2 fields, each with the specified Pan and Scale<br />
(attenuation) value. <strong>The</strong> overall output can also be panned and attenuated.<br />
Left<br />
This controls the level of the left outpu channel. <strong>The</strong> maximum value is 1 and the minimum is -1. <strong>The</strong> left<br />
channel of the mix is multiplied by the value of this parameter. Some example values <strong>for</strong> Left are:<br />
1 (no attenuation)<br />
0 (maximum attenuation)<br />
!Fader1 (continuous controller sets level)<br />
!KeyVelocity (MIDI key velocity controls the amplitude)<br />
You can also paste another signal into this field, and the amplitude will vary with the output amplitude of<br />
the pasted signal (something like an LFO controlling the attenuation). (See the manual <strong>for</strong> a complete<br />
description of hot parameters, EventValues, EventSources, and Map files).<br />
Right<br />
This controls the level of the right output channel. <strong>The</strong> maximum value is 1 and the minimum is -1. <strong>The</strong><br />
right channel of the mix is multiplied by the value of Right. Some example values <strong>for</strong> Right are:<br />
1 (no attenuation)<br />
0 (maximum attenuation)<br />
!Fader1 (continuous controller sets level)<br />
!KeyVelocity (MIDI key velocity controls the amplitude)<br />
You can also paste another signal into this field, and the amplitude will vary with the output amplitude of<br />
the pasted signal (something like an LFO controlling the attenuation). (See the manual <strong>for</strong> a complete<br />
description of hot parameters, EventValues, EventSources, and Map files).<br />
In1<br />
<strong>The</strong> output of this <strong>Sound</strong> will be added to the output of the <strong>Sound</strong> in In2.<br />
Pan1<br />
<strong>The</strong> stereo position of In1. (0 is hard left and 1 is hard right).<br />
Scale1<br />
Attenuation on In1. 1 (or 0 dB) is no attenuation, and 0 is fully attenuated.<br />
In2<br />
This <strong>Sound</strong> is added to the <strong>Sound</strong> in the In1 field.<br />
Pan2<br />
<strong>The</strong> stereo position of In2. (0 is hard left and 1 is hard right).<br />
Scale2<br />
Attenuation on In2. 1 (or 0 dB) is no attenuation, and 0 is fully attenuated.<br />
365
StereoMix4<br />
Mixing & Panning Category<br />
Adds the outputs of In1, In2, In3, and In4, each with its own Pan position and Scale (attenuation). Scale<br />
and Pan control the attenuation and stereo position of the overall mix.<br />
Left<br />
This controls the level of the left output channel. <strong>The</strong> maximum value is 1 and the minimum is -1. <strong>The</strong><br />
left channel of the mix is multiplied by the value of this parameter. Some example values <strong>for</strong> Left are:<br />
1 (no attenuation)<br />
0 (maximum attenuation)<br />
!Fader1 (continuous controller sets level)<br />
!KeyVelocity (MIDI key velocity controls the amplitude)<br />
You can also paste another signal into this field, and the amplitude will vary with the output amplitude of<br />
the pasted signal (something like an LFO controlling the attenuation). (See the manual <strong>for</strong> a complete<br />
description of hot parameters, EventValues, EventSources, and Map files).<br />
Right<br />
This controls the level of the right output channel. <strong>The</strong> maximum value is 1 and the minimum is -1. <strong>The</strong><br />
right channel of the mix is multiplied by the value of Right. Some example values <strong>for</strong> Right are:<br />
1 (no attenuation)<br />
0 (maximum attenuation)<br />
!Fader1 (continuous controller sets level)<br />
!KeyVelocity (MIDI key velocity controls the amplitude)<br />
You can also paste another signal into this field, and the amplitude will vary with the output amplitude of<br />
the pasted signal (something like an LFO controlling the attenuation). (See the manual <strong>for</strong> a complete<br />
description of hot parameters, EventValues, EventSources, and Map files).<br />
In1<br />
<strong>The</strong> output of this <strong>Sound</strong> will be added to the output of the <strong>Sound</strong>s in In2, In3, and In4.<br />
Pan1<br />
<strong>The</strong> stereo position of In1. (0 is hard left and 1 is hard right).<br />
Scale1<br />
Attenuation on In1. 1 (or 0 dB) is no attenuation, and 0 is fully attenuated.<br />
In2<br />
<strong>The</strong> output of this <strong>Sound</strong> will be added to the output of the <strong>Sound</strong>s in In1, In3, and In4.<br />
Pan2<br />
<strong>The</strong> stereo position of In2. (0 is hard left and 1 is hard right).<br />
Scale2<br />
Attenuation on In2. 1 (or 0 dB) is no attenuation, and 0 is fully attenuated.<br />
366
In3<br />
<strong>The</strong> output of this <strong>Sound</strong> will be added to the output of the <strong>Sound</strong>s in In1, In2, and In4.<br />
Pan3<br />
<strong>The</strong> stereo position of In3. (0 is hard left and 1 is hard right).<br />
Scale3<br />
Attenuation on In3. 1 (or 0 dB) is no attenuation, and 0 is fully attenuated.<br />
In4<br />
<strong>The</strong> output of this <strong>Sound</strong> will be added to the output of the <strong>Sound</strong>s in In1, In2, and In3.<br />
Pan4<br />
<strong>The</strong> stereo position of In4. (0 is hard left and 1 is hard right).<br />
Scale4<br />
Attenuation on In4. 1 (or 0 dB) is no attenuation, and 0 is fully attenuated.<br />
367
SumOfSines<br />
Xtra Sources Category<br />
Resynthesizes sounds from the spectral analyses stored in Analysis0 and Analysis1. <strong>The</strong> dbMorph<br />
parameter interpolates between the amplitudes of Analysis0 and Analysis1, and the pchMorph parameter<br />
interpolates between the pitches in Analysis0 and Analysis1.<br />
OnDuration<br />
This is the duration of each triggered event. It should be the same length or shorter than the Duration<br />
which is the total length of time that this program is available to be triggered. Think of Duration as<br />
analogous to the total lifetime of a piano string, and OnDuration as the duration of each individual note<br />
that you play on that piano string. <strong>The</strong> OnDuration must be greater than zero, and you must specify the<br />
units of time, <strong>for</strong> example:<br />
2 s (<strong>for</strong> 2 seconds)<br />
2 ms (<strong>for</strong> 2 milliseconds)<br />
200 usec (<strong>for</strong> 200 microseconds)<br />
2 m (<strong>for</strong> 2 minutes)<br />
2 h (<strong>for</strong> 2 hours)<br />
2 days<br />
2 samp (<strong>for</strong> 2 samples)<br />
1 / 2 hz (<strong>for</strong> the duration of one period of a 2 hz signal)<br />
Frequency0<br />
Frequency of of the resynthesis based on Analysis0. Use 0 hz to default to the base frequency as stored<br />
in the samples file.<br />
Frequency1<br />
Frequency of resynthesis based on Analysis1. Use 0 hz to default to the base frequency as stored in the<br />
samples file.<br />
Analysis0<br />
Select a spectrum file from the dialog that you get when you click on the disk button next to this field.<br />
<strong>The</strong> spectrum file contains frequency and amplitude in<strong>for</strong>mation <strong>for</strong> resynthesizing an analyzed sound<br />
using banks of sine wave oscillators.<br />
Analysis1<br />
Select a spectrum file from the dialog that you get when you click on the disk button next to this field.<br />
<strong>The</strong> spectrum file contains frequency and amplitude in<strong>for</strong>mation <strong>for</strong> resynthesizing an analyzed sound<br />
using banks of sine wave oscillators.<br />
DBMorph<br />
Specifies how much of the amplitude envelopes of each of the envelopes is present in the resynthesized<br />
sound. A value of zero specifies that the amplitude envelopes come from Analysis0 only, a value of one<br />
specifies Analysis1 only, and values between specify mixtures of the two analyses.<br />
Use a continuous controller or a control signal here to morph continuously between the two sets of<br />
amplitude envelopes.<br />
368
PchMorph<br />
Specifies how much of the frequency envelopes of each of the envelopes is present in the resynthesized<br />
sound. A value of zero specifies that the frequency envelopes come from Analysis0 only, a value of one<br />
specifies Analysis1 only, and values between specify mixtures of the two analyses.<br />
Use a continuous controller or a control signal here to morph continuously between the two sets of<br />
frequency envelopes.<br />
NbrPartials<br />
This is the total number of sine wave oscillators used to resynthesize the analyzed sound. Try increasing<br />
the number of partials to hear the effect on the sound. <strong>The</strong>re will be some maximum number above<br />
which there is no longer any improvement in the perceived quality of the sound. <strong>The</strong> more partials you<br />
request, the more computation this algorithm requires, so choose the minimum number of partials that<br />
still gives you acceptable sound quality.<br />
BankSize<br />
This specifies the number of oscillators per bank. If you get a message that you are running out of real<br />
time, try larger or smaller bank sizes.<br />
TimeIndex<br />
<strong>The</strong> analyzed sounds are like sequences of spectral snapshots. This value describes which snapshot to<br />
resynthesize. A FunctionGenerator with Fullramp as its Wavetable is a straight line from - 1 to 1, and this<br />
moves <strong>for</strong>ward through the spectra in linear time. Try different functions (or use a continuous controller)<br />
to go backwards through the sequence of spectra or to vary the rate at which you are stepping through<br />
the spectra.<br />
This parameter is only active if CtrlTime is checked.<br />
Gate<br />
Enter a 1 in this field to play the <strong>Sound</strong> exactly once <strong>for</strong> the duration you have specified in the Duration<br />
field.<br />
If you use an EventValue (<strong>for</strong> example, !KeyDown) in this field, the <strong>Sound</strong> can be retriggered as often as<br />
you like within the duration specified in the Duration field.<br />
When Gate becomes positive, the <strong>Sound</strong> is heard; when Gate becomes zero, the <strong>Sound</strong> is released.<br />
This parameter is ignored if CtrlTime is checked.<br />
Loop<br />
Check this box if you would like to set the loop points using the LoopStart and LoopEnd parameter fields.<br />
This parameter is ignored if CtrlTime is checked.<br />
LoopStart<br />
When Loop is checked, this is the start point of the loop (otherwise it is ignored). Enter a value in the<br />
range from 0 to 1, where 0 is the beginning of the sample and 1 is the end of the sample. In other words,<br />
this is the proportion of the total sample duration when the start point should occur. (To compute the<br />
exact time within the sample where the start point occurs, multiply LoopStart’s value by the total duration<br />
of the sample. For example, if your sample is 5 seconds long and LoopStart is set to 0.2, then the<br />
beginning of the loop is 1 second into the sample.)<br />
LoopEnd<br />
When Loop is checked, this is the end point of the loop (otherwise it is ignored). Enter a value in the<br />
range from 0 to 1, where 0 is the beginning of the sample and 1 is the end of the sample. In other words,<br />
this is the proportion of the total sample duration when the end point should occur. (To compute the<br />
369
exact time within the sample where the end point of the loop occurs, multiply LoopEnd’s value by the total<br />
duration of the sample. For example, if your sample is 5 seconds long and LoopEnd is set to 0.4, then<br />
the end of the loop occurs at 2 seconds into the sample.)<br />
CtrlTime<br />
<strong>The</strong> analyzed sounds are like sequences of spectral snapshots. This sound provides two ways to move<br />
through these spectral snapshots.<br />
If CtrlTime is not checked, then the snapshots will be played back in <strong>for</strong>ward order over the duration given<br />
in the OnDuration field. <strong>The</strong> playback will start whenever Gate becomes positive. If Loop is checked, the<br />
playback will loop between the StartLoop and EndLoop points within the analysis <strong>for</strong> as long as Gate is<br />
positive.<br />
If CtrlTime is checked, then the snapshot played back is controlled directly by the value in the TimeIndex<br />
field.<br />
Envelope<br />
This is an attenuator on the output of the Oscillator. Enter 1 (or 0 dB) <strong>for</strong> the full amplitude. For a<br />
time-varying amplitude, paste in a <strong>Sound</strong> (such as AR, ADSR, or FunctionGenerator) or an Event Value<br />
(such as !Volume) in this field.<br />
370
SyntheticSpectrumFromArray<br />
Spectral Sources Category<br />
Creates a synthetic spectrum from two arrays: an array of amplitude values <strong>for</strong> each track in the frame,<br />
and an array of frequency values <strong>for</strong> each track in the frame (and, if SendBandwidths is checked, a<br />
corresponding array of bandwidths <strong>for</strong> each of the tracks as well). A SyntheticSpectrumFromArray<br />
should be fed to an OscillatorBank, FormantBankOscillator, or VocoderChannelBank in order to<br />
synthesize the partials, <strong>for</strong>mants, or bank of vocoder filters. <strong>The</strong> SyntheticSpectrumFromArray produces<br />
a set of envelopes <strong>for</strong> controlling the parameters of an OscillatorBank, FormantBankOscillator, or<br />
VocoderChannelBank.<br />
NbrPartials<br />
This is the number of partials (or filters) to synthesize. In most cases, it should be the same as the size of<br />
the Frequencies array; however, you can specify a slower update rate <strong>for</strong> the envelopes by using a larger<br />
number here. <strong>The</strong> time between updates of the control envelopes is equal to the number you specify<br />
here but in units of samples. If you enter 128 here, <strong>for</strong> example, the envelopes will be updated every 128<br />
samples (that is about every 3 milliseconds if your sampling rate is 44.1 kHz).<br />
LogScale<br />
Check this box to output the Frequencies (and, optional Bandwidths) in log rather than linear frequency.<br />
In most cases, this box should be unchecked; the only time it should be checked is if you want to<br />
manipulate the frequency envelopes in pitch space rather than in hertz.<br />
SendBandwidths<br />
Check this box to send bandwidth in<strong>for</strong>mation. Bandwidths are required <strong>for</strong> controlling the filters of a<br />
FormantBankOscillator or a VocoderChannelBank, but they are not required <strong>for</strong> controlling the oscillators<br />
in an OscillatorBank.<br />
Envelope<br />
This is an overall amplitude envelope.<br />
Amplitudes<br />
Enter an array of amplitude values separated by spaces. Enclose any arithmetic expressions or units<br />
within curly braces, <strong>for</strong> example:<br />
!Amp1 {!Amp2 * 0.5} {-6 db} !KeyVelocity {!KeyDown ramp: 5 s} {0.1 s random}<br />
<strong>The</strong> number of amplitude values should be the same as the number of frequency values (and optional<br />
bandwidth values). If the frequency, amplitude (and bandwidth if used) arrays are different sizes, the<br />
smallest array will be used, and any extra values in the other two arrays are thrown away.<br />
Frequencies<br />
Enter an array of frequency values separated by spaces. If you leave off the units, the values will be<br />
interpreted as frequencies in hertz. Enclose any arithmetic expressions or frequencies with units within<br />
curly braces, <strong>for</strong> example:<br />
609 {!Freq1 * 1000} {2048 hz} {60 nn} {5 c}<br />
<strong>The</strong> number of frequency values should be the same as the number of amplitude values (and optional<br />
bandwidth values). If the frequency, amplitude (and bandwidth if used) arrays are different sizes, the<br />
371
smallest array will be used, and any extra values in the other two arrays are thrown away.<br />
Bandwidths<br />
This is array is optional and need only be set if the SendBandwidths box is checked. Bandwidths are<br />
required by the FormantBankOscillator and VocoderChannelBank, but they are not required by the<br />
OscillatorBank.<br />
Enter an array of bandwidth values separated by spaces. If you leave off the units, the values will be<br />
interpreted as frequencies in hertz. Enclose any arithmetic expressions or frequencies with units within<br />
curly braces, <strong>for</strong> example:<br />
609 {!Freq1 * 1000} {2048 hz} {60 nn} {5 c}<br />
<strong>The</strong> number of bandwidth values should be the same as the number of amplitude and frequency values.<br />
If the frequency, amplitude and bandwidth arrays are different sizes, the smallest array will be used and<br />
any extra values in the other two arrays are thrown away.<br />
372
SyntheticSpectrumFrom<strong>Sound</strong>s<br />
Spectral Sources Category<br />
Generates a synthetic spectrum whose amplitudes, frequencies (and optionally, bandwidths) are<br />
controlled by two input <strong>Sound</strong>s. One input supplies the amplitudes and the other supplies the<br />
frequencies (optionally alternating with bandwidths). You can think of each cycle of the input <strong>Sound</strong>s as<br />
defining one frame of the spectrum. If the input <strong>Sound</strong>s change from cycle to cycle, then the spectrum<br />
will also change from frame to frame.<br />
A SyntheticSpectrumFrom<strong>Sound</strong>s (like other <strong>Sound</strong>s in the Spectral Sources category) outputs spectral<br />
envelopes in the following <strong>for</strong>mat:<br />
Left Channel: Amp1 Amp2 ... AmpN<br />
Right Channel: Freq1 Freq2 ... FreqN<br />
For each frame, Amp1 is the amplitude of the first partial (and Freq1 is the frequency or pitch of the first<br />
partial), Amp2 is the amplitude of the second partial (corresponding with Freq2), and AmpN is the<br />
amplitude of the highest numbered partial (specified in NbrPartials). <strong>The</strong>n the whole sequence repeats<br />
<strong>for</strong> the next frame of the spectrum. Because of this repetition rate, the output of the<br />
SyntheticSpectrumFrom<strong>Sound</strong> has a kind of periodicity to it, where the period is the equal to the same<br />
number of samples as there are partials in each frame.<br />
Amplitudes<br />
If the period of this <strong>Sound</strong> in samples is equal to NbrPartials, then one cycle of this <strong>Sound</strong> defines one<br />
frame’s worth of amplitudes <strong>for</strong> the synthesized spectrum. (For example, to synthesize 80 partials, set<br />
the Frequency of this <strong>Sound</strong> to 80 samp inverse if you want the cycles to line up with frames). If the<br />
repetition rate of this <strong>Sound</strong> is lined up with the number of partials in each frame of the spectrum, then the<br />
wave<strong>for</strong>m of each cycle of this <strong>Sound</strong> will correspond to a kind of spectral envelope <strong>for</strong> each frame of the<br />
spectrum. For example, if you select ExponRev as the wave<strong>for</strong>m of an oscillator whose period is 80<br />
samples and set NbrPartials to 80, then each frame of the spectrum will have high amplitudes on its<br />
lower-numbered partials and lower amplitudes on the upper partials. Even more interesting is to make<br />
this <strong>Sound</strong>’s frequency adjustable within a narrow range so you can create spectral envelopes that "drift"<br />
because their repetition rates are slightly out of phase with the number of partials being generated on<br />
each frame.<br />
FrequenciesAndBandwidths<br />
If the period of this <strong>Sound</strong> in samples is equal to NbrPartials, then one cycle of this <strong>Sound</strong> defines one<br />
frame’s worth of frequencies (or pitches i f you have LogScale checked) <strong>for</strong> the synthesized spectrum.<br />
(For example, to synthesize 80 partials, set the Frequency of this <strong>Sound</strong> to 80 samp inverse if you want<br />
the cycles to line up with frames). If the repetition rate of this <strong>Sound</strong> is lined up with the number of<br />
partials in each frame of the spectrum, then the wave<strong>for</strong>m of each cycle of this <strong>Sound</strong> will provide the<br />
frequencies <strong>for</strong> each partial in one frame of the spectrum. For example, if you select Ramp as the<br />
wave<strong>for</strong>m of an oscillator whose period is 80 samples and set NbrPartials to 80, then, in each frame of<br />
the spectrum, the lower-numbered partials will have low frequencies, and the higher-numbered partials<br />
will have high frequencies. Even more interesting is to make this <strong>Sound</strong>’s frequency adjustable within a<br />
narrow range so you can create spectra that "drift" because their repetition rates are slightly out of phase<br />
with the number of partials being generated on each frame.<br />
If the SyntheticSpectrumFrom<strong>Sound</strong>s is controlling something that requires bandwidth (like<br />
FormantBankOscillator or VocoderChannelBank), and you have checked the SendBandwidths box, then<br />
373
every other value of this <strong>Sound</strong> will be interpreted as a bandwidth, rather than a frequency.<br />
NbrPartials<br />
This is the number of partials in the synthetic spectrum. It should be greater than or equal to the number<br />
of oscillators or filters in the <strong>Sound</strong> being controlled by the SyntheticSpectrumFrom<strong>Sound</strong>s.<br />
LogScale<br />
Check this box to output log-frequency (pitch) envelopes rather than frequency envelopes.<br />
IncludesBandwidths<br />
Check here if the synthetic spectrum is feeding into a <strong>Sound</strong> that can use bandwidth in<strong>for</strong>mation (e.g.<br />
FormantBankOscillators and VocoderChannelBanks).<br />
374
TextFileInterpreter<br />
Scripts Category<br />
Reads and interprets a line at a time from a text file. This <strong>Sound</strong> can be used to interpret scores<br />
prepared <strong>for</strong> Music N languages (such as csound) and map the parameters to the variable parameters of<br />
<strong>Kyma</strong> <strong>Sound</strong>s, essentially treating <strong>Kyma</strong> <strong>Sound</strong>s as "instruments". It can also be used more generally to<br />
read data from text files and map them to the parameters of <strong>Kyma</strong> <strong>Sound</strong>s.<br />
This is like the Script in that it constructs a new <strong>Sound</strong> algorithmically and then plays it; it does NOT set<br />
up fixed "patches" and then update the parameters by reading them out of the text file as the <strong>Sound</strong> is<br />
playing.<br />
FileName<br />
This is the name of a text file created in <strong>Kyma</strong> or another program. In other programs, save a file as<br />
text-only (ASCII) if you want to use it as a <strong>Kyma</strong> text file.<br />
Inputs<br />
<strong>The</strong>se <strong>Sound</strong>s are treated as templates. Each name should begin with a letter and contain only<br />
alpha-numeric characters; this field will reject any <strong>Sound</strong>s with "illegal" names. You can reference these<br />
<strong>Sound</strong>s by name in the Script field.<br />
Script<br />
Enter the Smalltalk code to read and interpret data from the specified text file. See the manual <strong>for</strong> a<br />
detailed description and example scripts.<br />
Left<br />
This controls the level of the left output channel. <strong>The</strong> maximum value is 1 and the minimum is -1. <strong>The</strong><br />
left channel of the output is multiplied by the value of this parameter. Some example values <strong>for</strong> Left are:<br />
1 (no attenuation)<br />
0 (maximum attenuation)<br />
!Fader1 (continuous controller sets level)<br />
!KeyVelocity (MIDI key velocity controls the amplitude)<br />
You can also paste another signal into this field, and the amplitude will vary with the output amplitude of<br />
the pasted signal (something like an LFO controlling the attenuation). (See the manual <strong>for</strong> a complete<br />
description of hot parameters, EventValues, EventSources, and Map files).<br />
Right<br />
This controls the level of the right input channel. <strong>The</strong> maximum value is 1 and the minimum is -1. <strong>The</strong><br />
right channel of the input is multiplied by the value of Right. Some example values <strong>for</strong> Right are:<br />
1 (no attenuation)<br />
0 (maximum attenuation)<br />
!Fader1 (continuous controller sets level)<br />
!KeyVelocity (MIDI key velocity controls the amplitude)<br />
You can also paste another signal into this field, and the amplitude will vary with the output amplitude of<br />
the pasted signal (something like an LFO controlling the attenuation). (See the manual <strong>for</strong> a complete<br />
description of hot parameters, EventValues, EventSources, and Map files).<br />
375
Threshold<br />
Tracking Live Input Category<br />
<strong>The</strong> output of a Threshold is 1 when its Input amplitude exceeds the specified threshold; otherwise it is 0.<br />
<strong>The</strong> smaller the value of hysteresis, the more sensitive the Threshold is to momentary changes in the<br />
Input amplitude.<br />
When trying to detect when an amplitude is exceeded, it is usually a good idea to put your input through<br />
an AmplitudeFollower or PeakDetector first so you are detecting when the amplitude *envelope* exceeds<br />
the threshold rather than when individual sample points might cross the threshold.<br />
Input<br />
When this <strong>Sound</strong>’s amplitude exceeds the threshold, the output of the Threshold will be a 1 (i.e. the<br />
maximum deviation).<br />
Threshold<br />
When the amplitude of the Input is less than the threshold (plus or minus half the hysteresis), the output<br />
of this sound is zero. Otherwise the output is 1.<br />
Hysteresis<br />
<strong>The</strong> larger the hysteresis, the less sensitive the <strong>Sound</strong> will be to small changes in the Input amplitude.<br />
Hysteresis comes from the Greek husteros, come later or behind. This is the tendency of this <strong>Sound</strong> to<br />
stay in its previous state (either 1 or 0).<br />
376
TimeControl<br />
Time & Duration Category<br />
Slows down or speeds up the rate that time is progressing in its Input by controlling how the time counter<br />
is incremented on the signal processor. This affects only the start time of events within the Input (e.g. if<br />
Input is a Script or Concatenation or contains TimeOffsets), not the sample rate.<br />
Input<br />
<strong>The</strong> duration of this <strong>Sound</strong> can be shortened or lengthened depending on the value of Rate.<br />
Rate<br />
This is the rate that time progresses. For example, use 1 to increment time at the normal rate, 0.5 <strong>for</strong> half<br />
speed, 2 <strong>for</strong> twice as fast, etc.<br />
377
TimeFrequencyScale<br />
Frequency & Time Scaling Category<br />
Simultaneously time stretches and/or frequency scales a disk recording or a sample stored in wavetable<br />
memory.<br />
FrequencyScale<br />
<strong>The</strong> frequency of the input will be multiplied by this value.<br />
For example, to shift up by an octave, the FrequencyScale should be 2, and to shift down and octave, the<br />
scale should be 0.5. To shift up by 3 halfsteps, you would use:<br />
2 raisedTo: (3/12)<br />
To shift down by 7 half steps, you would use:<br />
2 raisedTo: (-7/12)<br />
Rate<br />
This is the rate of playback. <strong>The</strong> value should be less than or equal to 1, because the <strong>Sound</strong> can only do<br />
time stretching, not time compression. For example, use 1 to play back at the original rate, 0.5 <strong>for</strong> half<br />
speed, 0.25 <strong>for</strong> one quarter of the speed, etc.<br />
Gate<br />
Enter a 1 in this field to play the <strong>Sound</strong> exactly once <strong>for</strong> the duration you have specified in the Duration<br />
field.<br />
If you use an EventValue (<strong>for</strong> example, !KeyDown) in this field, the <strong>Sound</strong> can be retriggered as often as<br />
you like within the duration specified in the Duration field.<br />
When Gate becomes positive, the <strong>Sound</strong> is heard; when Gate becomes zero, the <strong>Sound</strong> is released.<br />
MinInputFreq<br />
This is the minimum frequency you expect to hear at the input. Follow the usual conventions <strong>for</strong><br />
specifying frequencies.<br />
MaxInputFreq<br />
This is the maximum frequency you expect to hear at the input. Follow the usual conventions <strong>for</strong><br />
specifying frequencies.<br />
MaxFreqScale<br />
This is the largest scale that will be applied to the frequency (the maximum allowable is 4).<br />
Detectors<br />
This determines the sensitivity of the frequency tracking. Try starting with a value of 10, and then<br />
experiment with more or fewer if you want to try fine tuning the frequency tracking. (More is not<br />
necessarily better; there is some optimal number of detectors <strong>for</strong> each circumstance.)<br />
FromDisk<br />
When the box is checked, read the recording directly from the disk. Otherwise, look <strong>for</strong> it in wavetable<br />
378
memory.<br />
Sample<br />
If FromDisk is checked, this is the name of the disk file. Otherwise, this should be the name of a sample<br />
in the Wavetables list or the name of a segment of wavetable memory being recorded into by a<br />
MemoryWriter prior to or in parallel with this <strong>Sound</strong>.<br />
FromMemoryWriter<br />
Check FromMemoryWriter when the wavetable does not come from a disk file but is recorded by a<br />
MemoryWriter in real time.<br />
379
TimeOffset<br />
Time & Duration Category<br />
Offsets the start time of its Input by the specified SilentTime. If Retrograde or Reverse is set, a Constant<br />
zero is concatenated to the end of Input; this can be useful <strong>for</strong> adding some silence to the end of an input<br />
to a reverberator or echo in order to give the reverberation time to die away.<br />
Input<br />
This <strong>Sound</strong>’s start time is delayed by the amount of time specified in SilentTime. If retrograde or reverse<br />
(but not both) is true, the silence will follow this <strong>Sound</strong>.<br />
SilentTime<br />
Amount of time to delay the start time of the Input. It can be any amount of time from 0 to the maximum<br />
possible duration. If retrograde or reverse (but not both) is true, this silence follows the Input.<br />
380
TimeStopper<br />
Time & Duration Category<br />
Allows Input to be loaded into the signal processor and start playing but then stops any further progress<br />
of time on the signal processor. Time resumes only when the value in the Resume field becomes<br />
nonzero. For example, even if Input had a duration of 1 samp, it would last until Resume became<br />
nonzero. If the input has multiple events in it that occur sequentially, only the first one will take place<br />
immediately; the others will occur only after Resume becomes nonzero.<br />
Input<br />
This <strong>Sound</strong> is loaded and started but it will not terminate unless Resume becomes nonzero.<br />
Resume<br />
Time is stopped until this value becomes something other than 0. You could use an EventValue (such<br />
as !KeyDown) in this field to control when time should progress. By putting a Threshold <strong>Sound</strong> here, you<br />
can make the progress of time depend on the amplitude of another <strong>Sound</strong> (such as the ADInput). Use an<br />
Equality prototype to make time depend on an Event Value or <strong>Sound</strong> reaching an exact value.<br />
ResumeOnZero<br />
Click here if you would like time to resume when Resume equals 0 (rather than resuming whenever the<br />
value in Resume becomes nonzero).<br />
381
TriggeredSampleAndHold<br />
Sampling Category<br />
When triggered, reads a value from Input and holds onto it until triggered again. This is like<br />
SampleAndHold except that the sampling only occurs on triggers, not periodically.<br />
Input<br />
A sample of this <strong>Sound</strong> is read each time the Trigger becomes positive.<br />
Trigger<br />
When the Trigger becomes positive, one event is triggered. You can trigger several events over the<br />
course of the total Duration of this program as long as the value of Trigger returns to zero be<strong>for</strong>e the next<br />
trigger. Some example values <strong>for</strong> Trigger are:<br />
1 (plays once with no retriggering)<br />
0 (the sound is silent, never triggered)<br />
!KeyDown (trigger on MIDI key down)<br />
!F1 (trigger when MIDI switch > 0)<br />
You can also paste another signal into this field, and events will be triggered every time that signal<br />
changes from zero to a nonzero value. (See the manual <strong>for</strong> a complete description of hot parameters,<br />
EventValues, EventSources, and Map files).<br />
382
TriggeredTableRead<br />
Sampling Category<br />
As long as the Trigger is greater than zero, the TriggeredTableRead will read samples from the<br />
Wavetable; if the Trigger is less than or equal to zero, the last sample read will be output. Gate resets<br />
the pointer to the beginning of the Wavetable.<br />
Trigger<br />
As long as the Trigger is greater than zero, the TriggeredTableRead will read samples from the<br />
Wavetable; if the Trigger is less than or equal to zero, the last sample read will be output. PulseTrain is a<br />
good <strong>Sound</strong> to use as a source of periodic triggers, and by putting an Event Value in the PulseTrain’s<br />
Period field, you can control the rate at which the triggers occur.<br />
Wavetable<br />
Select a wavetable or a sample. A single sample point is read from this table each time Trigger becomes<br />
positive.<br />
Gate<br />
Each time this value becomes positive, the <strong>Sound</strong> will start over again from the beginning of the<br />
Wavetable. Enter a 1 in this field to play the <strong>Sound</strong> exactly once. If you use an EventValue (<strong>for</strong> example,<br />
!KeyDown) in this field, you can restart the sound multiple times.<br />
IgnoreLoops<br />
Click here if the Wavetable (or sample) has loop points specified in the header and you want to ignore the<br />
loop points.<br />
FromMemoryWriter<br />
Check FromMemoryWriter when the wavetable does not come from a disk file but is recorded by a<br />
MemoryWriter in real time.<br />
383
TunableVocoder<br />
Filters Category<br />
Tune the base frequency of the vocoder and control the spacing of the center frequencies of the filters.<br />
Input<br />
<strong>The</strong> sound source that you hear going through the filter bank.<br />
SideChain<br />
<strong>The</strong> spectrum of this <strong>Sound</strong> controls the amplitudes of each filter in the filter bank.<br />
TimeConstant<br />
<strong>The</strong> smaller the time constant, the more quickly the amplitude envelopes respond to changes in the side<br />
chain spectrum. Longer time constants result in a less precise sound (and give a reverberated effect).<br />
NbrBands<br />
This is the number of filters desired.<br />
BankSize<br />
This is the number of filters that should be scheduled on each processor. Ordinarily you should leave this<br />
set to default. If you run out of realtime processing, you can try reducing the bankSize, as <strong>for</strong> example<br />
0.75 * default<br />
LogSpacing<br />
Check this box to specify the spacing between center frequencies as an interval in pitch space. Uncheck<br />
the box if you prefer to specify the spacing as a frequency in hertz.<br />
AnalysisFreq<br />
This is the lowest center frequency in the filter bank operating on the SideChain.<br />
SynthesisFreq<br />
This is the lowest center frequency in the filter bank operating on the Input.<br />
AnalysisLevel<br />
This is an attenuator on the amplitude of the SideChain be<strong>for</strong>e it goes through the filters.<br />
SynthesisLevel<br />
This is an attenuator on the amplitude of the Input be<strong>for</strong>e it goes through the filters.<br />
AnalysisSpacing<br />
This is the spacing between the center frequencies of the filters on the SideChain. Use nn as the units if<br />
LogFrequency is checked. Use hz as the units if LogFrequency is unchecked.<br />
SynthesisSpacing<br />
384
This is the spacing between the center frequencies of the filters on the Input. Use nn as the units if<br />
LogFrequency is checked. Use hz as the units if LogFrequency is unchecked.<br />
AnalysisBW<br />
This is a control on the bandwidth of the filters on the SideChain.<br />
SynthesisBW<br />
This is a control on the bandwidth of the filters on the Input.<br />
Tone<br />
This is a tone control. Higher values emphasize the filters with higher center frequencies. Lower values<br />
emphasize the filters with lower center frequencies. (Rolloff determines the narrowness of this filter).<br />
Rolloff<br />
This is a control on the bandwidth of the Tone filter. Set this to 0 if all filters should have equal weight.<br />
<strong>The</strong> bigger the value of Rolloff, the sharper the cutoff on the effect of the Tone filter.<br />
Gain<br />
You can boost or cut the final output amplitude here.<br />
385
TwoFormantElement<br />
Filters Category<br />
A TwoFormantElement is realized as a DualParallelTwoPoleFilter; however, rather than specifying the<br />
filter in terms of pole locations, you specify the desired center frequency and bandwidth of the two<br />
<strong>for</strong>mants.<br />
Input<br />
This is the <strong>Sound</strong> to be filtered.<br />
Formant1<br />
This is the center frequency of the first <strong>for</strong>mant.<br />
Bandwidth1<br />
This is the bandwidth of the lower <strong>for</strong>mant region. <strong>The</strong> narrower the bandwidth, the more "pitched" the<br />
<strong>for</strong>mant will sound--also the more likely the the filter is to overflow.<br />
Scale1<br />
This controls the amplitude of the first <strong>for</strong>mant. For the full amplitude use +1.0 or -1.0; any factor whose<br />
absolute value is less than 1 will attenuate the output.<br />
Formant2<br />
This is the center frequency of the second <strong>for</strong>mant.<br />
Bandwidth2<br />
This is the bandwidth of the upper <strong>for</strong>mant region. <strong>The</strong> narrower the bandwidth, the more "pitched" the<br />
<strong>for</strong>mant will sound--also the more likely the the filter is to overflow.<br />
Scale2<br />
This controls the amplitude of the second <strong>for</strong>mant. For the full amplitude use +1.0 or -1.0; any factor<br />
whose absolute value is less than 1 will attenuate the output.<br />
386
TwoFormantVoiceElement<br />
Xtra Sources Category<br />
An excitation signal similar to a glottal pulse (with a randomly chosen rate of vibrato) is used as the input<br />
to a pair of parallel second-order filter sections that simulate two of the <strong>for</strong>mants of the vocal cavity.<br />
Frequency<br />
<strong>The</strong> frequency can be specified in units of pitch or frequency. <strong>The</strong> following are all ways to specify the A<br />
above middle C:<br />
440 hz (in hertz or cycles per second)<br />
4 a (as the 4th octave A)<br />
69 nn (as a MIDI notenumber)<br />
4 c + 9 nn (as 9 half steps above middle C)<br />
1.0 / 0.00227273 s (inverse of a period at 44.1 kHz sample rate)<br />
<strong>The</strong> following are examples of how to control the frequency using MIDI, the virtual control surface, or a<br />
third-party program:<br />
!Pitch (key number plus pitch bend)<br />
!KeyNumber nn (MIDI notenumber)<br />
4 c + (!Frequency * 9 nn) (continuous controller from 4 c to 4 a)<br />
Formant1<br />
For an [IY] sound, try a center frequency of 238 hz. This will be the center frequency of the first <strong>for</strong>mant.<br />
This is not the fundamental frequency of the TwoFormantVoiceElement but the center of an emphasized<br />
region of the spectrum.<br />
Bandwidth1<br />
For an [IY] sound, try a a bandwidth of 70 hz. This is the bandwidth of the lower <strong>for</strong>mant region. <strong>The</strong><br />
narrower the bandwidth, the more "pitched" the <strong>for</strong>mant will sound--also the more likely the the filter is to<br />
overflow.<br />
Scale1<br />
For an [IY] sound, scale this <strong>for</strong>mant to 0.3. This controls the amplitude of the first <strong>for</strong>mant. For the full<br />
amplitude use +1.0 or -1.0; any factor whose absolute value is less than 1 will attenuate the output.<br />
Formant2<br />
For an [IY] sound, try a center frequency of 1741 hz. This will be the center frequency of the second<br />
<strong>for</strong>mant. This is not the fundamental frequency of the TwoFormantVoiceElement but the center of an<br />
emphasized region of the spectrum.<br />
Bandwidth2<br />
For an [IY] sound, try a a bandwidth of 100 hz. This is the bandwidth of the upper <strong>for</strong>mant region. <strong>The</strong><br />
narrower the bandwidth, the more "pitched" the <strong>for</strong>mant will sound--also the more likely the the filter is to<br />
overflow.<br />
Scale2<br />
For an [IY] sound, scale this <strong>for</strong>mant to 1.0. This controls the amplitude of the second <strong>for</strong>mant. For the<br />
387
full amplitude use +1.0 or -1.0; any factor whose absolute value is less than 1 will attenuate the output.<br />
Seed<br />
Supply an integer less than 2**30 as a seed <strong>for</strong> the random number generator that controls the vibrato<br />
rate.<br />
388
Variable<br />
Variables & Annotation Category<br />
A Variable is a placeholder that represents a single <strong>Sound</strong>. You can assign a value to the Variable in a<br />
Script or related <strong>Sound</strong> by typing the name of the Variable followed by a colon, a space, and then the<br />
name of the <strong>Sound</strong> that you want to assign to the variable.<br />
389
VCA<br />
Envelopes & Control Signals Category<br />
Multiplies its Inputs together. To apply an amplitude envelope to a <strong>Sound</strong>, use the <strong>Sound</strong> and the<br />
envelope generator as inputs to this <strong>Sound</strong>.<br />
Inputs<br />
<strong>The</strong>se <strong>Sound</strong>s are multiplied together. Typically the inputs are a <strong>Sound</strong> and the amplitude envelope that<br />
you want to apply to the <strong>Sound</strong>.<br />
390
Vocoder<br />
Filters Category<br />
<strong>The</strong> Vocoder applies the spectral character of the SideChain <strong>Sound</strong> onto the Input <strong>Sound</strong>. What you<br />
hear is the Input <strong>Sound</strong> filtered by the SideChain <strong>Sound</strong>. For example, you can use this module to apply<br />
the spectral characteristics of human speech (the SideChain) onto any other sample or synthetic sound<br />
(the Input). On some analog vocoders, the SideChain input is called the "modulation" input.<br />
<strong>The</strong> Vocoder is implemented as two filter banks--an analysis bank and a resynthesis bank. <strong>The</strong> analysis<br />
bank is used to measure the amount of energy in each frequency band of the SideChain <strong>Sound</strong>. <strong>The</strong><br />
resynthesis bank is used to filter the Input <strong>Sound</strong>. <strong>The</strong>re is an amplitude follower on the output of each of<br />
the filters in the analysis bank. <strong>The</strong> resulting amplitude envelopes are then applied to the corresponding<br />
filters in the resynthesis bank. In this way, the SideChain controls the amplitude envelopes on the<br />
resynthesis filters.<br />
Input<br />
This is the source material to be filtered by the SideChain-controlled filters. This <strong>Sound</strong> is heard directly,<br />
through the filters (whereas the SideChain is never heard directly). For example, if you want to make an<br />
animal talk, put a sample of the animal sound here and put a sample of speech (or use a microphone) as<br />
the SideChain.<br />
<strong>The</strong> best Inputs tend to be fairly broad band signals that have energy in each of the frequency bands<br />
covered by the resynthesis filter bank. For example, Noise or an Oscillator on a wave<strong>for</strong>m with lots of<br />
harmonics (such as Buzz128) will work well because they generate energy over the full frequency range.<br />
SideChain<br />
Sometimes referred to as the "modulation", this <strong>Sound</strong> is never heard directly; it controls the amplitudes<br />
of the filters in the bank.<br />
TimeConstant<br />
This determines how quickly the amplitude envelopes on the filters will respond to changes in the<br />
SideChain. For precise, intelligible results, use values less than 0.1 s. For a more diffuse, reverberated<br />
result, use a longer TimeConstant.<br />
NbrBands<br />
This is the number of band pass filters in the filter bank. In other words, this is the number of<br />
equally-spaced frequency bands between LowCF and HighCF, inclusive.<br />
BankSize<br />
This is the number of filters per expansion card. In general, you should be able to get about 10 to 11<br />
filters per card. Experiment with fewer or more filters per card to optimize the efficiency of your particular<br />
<strong>Sound</strong>.<br />
InputLevel<br />
Controls the level on the input <strong>Sound</strong> be<strong>for</strong>e it goes through the filters.<br />
SideLevel<br />
Controls the level of the SideChain <strong>Sound</strong> be<strong>for</strong>e it is fed into the analysis filters.<br />
391
LowCF<br />
This is the center frequency of the lowest bandpass filter in the bank.<br />
HighCF<br />
This is the center frequency of the highest bandpass filter in the bank.<br />
InFreq<br />
This is a scale factor on all of the center frequencies in the "resynthesis" bank.<br />
SideFreq<br />
A scale factor on all of the center frequencies in the "analysis" filter bank.<br />
Bw<br />
A control on the bandwidth of all the bandpass filters in both the analysis and the resynthesis filter banks.<br />
Pitch<br />
Check here if you would like the bandpass filters to be spaced equally in pitch space from the LowCF to<br />
the HighCF. If you uncheck this box, the filters will be spaced equally in frequency space.<br />
LoCutoff<br />
Everything below this frequency should drop off in amplitude according to the slope specified in Rolloff.<br />
This is a weak tone-control-style filter applied to the Input <strong>Sound</strong> be<strong>for</strong>e it is fed to the resynthesis filter<br />
bank. Use it to attenuate the low end if the output is too boomy (or set it to 0 hz if you want to give your<br />
subwoofers something to do).<br />
HiCutoff<br />
Everything above this frequency should drop off in amplitude according to the slope specified in Rolloff.<br />
This is a weak tone-control-style filter applied to the Input <strong>Sound</strong> be<strong>for</strong>e it is fed to the resynthesis filter<br />
bank. Use it to attenuate the high end if the output is too piercing or trebly. Set it to an even higher<br />
frequency if the output sounds muffled or low pass and you would like to boost the high end.<br />
Rolloff<br />
This controls the steepness of the edges of a weak tone control filter on the Input. Use 1 if the edges<br />
should rolloff precipitously at LoCutoff and HiCutoff. Use smaller numbers if you would like the<br />
attenuation to start sooner and take longer.<br />
392
VocoderChannelBank<br />
Filters Category<br />
For most situations, you should use a Vocoder rather than the VocoderChannelBank, because the<br />
Vocoderis a higher-level <strong>Sound</strong> with higher-level parameters and controls. Use a VocoderChannelBank<br />
only in those situations requiring independent control over the center frequency, amplitude, and<br />
bandwidth of each filter in both the analysis and the resynthesis filter banks.<br />
<strong>The</strong> VocoderChannelBank works by feeding the sidechain input through a bank of bandpass filters (the<br />
analysis filters), extracting an amplitude envelope from the output of each of those filters, applying the<br />
extracted amplitude envelopes to a second bank of filters (the synthesis filters), and feeding the input<br />
through that bank of filters.<br />
To see an example of how the VocoderChannelBank can be used, drag a Vocoder into a <strong>Sound</strong> file<br />
window and expand it; it expands into cascaded VocoderChannelBanks.<br />
CascadeInput<br />
<strong>The</strong> cascaded input is added to whatever output is produced by this VocoderChannelBank. Use it to<br />
cascade several VocoderChannelBanks when you need more filter banks than can fit on a single<br />
expansion card (usually around 11).<br />
Input<br />
This is the <strong>Sound</strong> that is actually heard through the filter bank. <strong>The</strong> output of the VocoderChannelBank is<br />
the sound of the Input but filtered through <strong>for</strong>mants of the SideChain.<br />
<strong>The</strong> kinds of Inputs that work best are those that are broadband and continuous enough to excite all of<br />
the filters in the bank at all times.<br />
SideChain<br />
This is the <strong>Sound</strong> that controls the amplitude envelopes on each of the filters in the filter bank. <strong>The</strong><br />
<strong>for</strong>mants of the SideChain will be imposed on the basic sound characteristics of the Input.<br />
<strong>The</strong> kinds of SideChains that work best are those with strong <strong>for</strong>mants that change noticeably over time<br />
(e.g. human speech, tablas, mouth harps).<br />
InputParameters<br />
This should be a <strong>Sound</strong> from the spectral sources category (most typically the<br />
SyntheticSpectrumFromArray). Use the spectral source <strong>Sound</strong> to specify the center frequencies,<br />
amplitudes, and bandwidths <strong>for</strong> all the filters in the synthesis bank.<br />
To use the same settings on both the analysis filters and the synthesis filters (as it is in the classic<br />
channel vocoder), hold down the option key and drag this <strong>Sound</strong> into the SideChainParameters field.<br />
SideChainParameters<br />
This should be one of the <strong>Sound</strong>s from the spectral sources category (most typically the<br />
SyntheticSpectrumFromArray). Use the spectral source <strong>Sound</strong> to specify the center frequencies,<br />
amplitudes, and bandwidths <strong>for</strong> all the filters in the analysis bank.<br />
To use the same settings on both the analysis filters and the synthesis filters (as it is in the classic<br />
channel vocoder), hold down the option key and drag this <strong>Sound</strong> into the InputParameters field.<br />
393
TimeConstant<br />
Controls the reaction time of the envelope follower on each of filters in the side chain bank. Smaller<br />
numbers should be used <strong>for</strong> better intelligibility, larger numbers <strong>for</strong> a more diffuse, reverberated result.<br />
First<br />
This is the number of the first filter in this bank. If this is the first VocoderChannelBank in a cascade, this<br />
number will be 1, but the next VocoderChannelBank in the cascade should start at (1 + Count). <strong>The</strong> total<br />
number of filters in the entire cascade should be equal to the NbrPartials specified in the InputParameters<br />
and the SideChainParameters.<br />
Count<br />
This is the total number of filters in this bank. You can get about 11 filters per card on a Capybara-66.<br />
To get more filters, feed this <strong>Sound</strong> into the cascade input of another VocoderChannelBank.<br />
394
WaitUntil<br />
Time & Duration Category<br />
Don’t start the Input <strong>Sound</strong> until the Resume condition is true. This is like TimeStopper except that a<br />
WaitUntil won’t even let its Input start until the Resume value becomes nonzero (and a TimeStopper lets<br />
its Input get started but won’t let it end until Resume becomes nonzero).<br />
Input<br />
Input will not start until Resume becomes nonzero.<br />
Resume<br />
Input will not start playing until this value becomes positive.<br />
If this field contains a <strong>Sound</strong>, the Input will not resume until the <strong>Sound</strong> in this field ends.<br />
ResumeOnZero<br />
Click here if you want the Input to start whenever Resume becomes zero (rather than whenever it is no<br />
longer zero).<br />
395
WarpedTimeIndex<br />
Time & Duration Category<br />
Can be used as the input to any <strong>Sound</strong> that requires a time index (e.g. GAOscillators, REResonator,<br />
SampleCloud, SpectrumInRAM). Generates a time index with a variable slope so that it can move more<br />
quickly through some parts of sound and more slowly through others. You provide a set of current time<br />
points that should be adjusted <strong>for</strong>ward or backward in time to match a set of ideal time points, and it<br />
generates a time index function that moves from -1 up to 1 but with a varying slope.<br />
IdealTimePoints<br />
Enter a chronological sequence of time points with units, enclosed within curly braces and separated by<br />
spaces. <strong>The</strong>se are the new time points. Time will be sped up or slowed down to make the<br />
CurrentTimePoints line up with these ideal time points.<br />
CurrentTimePoints<br />
Enter a chronological sequence of time points with units, enclosed within curly braces and separated by<br />
spaces. <strong>The</strong>se are the time points that should be moved <strong>for</strong>ward or backward in time in order until they<br />
line up with the IdealTimePoints.<br />
Trigger<br />
Each time this value changes from a zero to a number greater than zero, the time function starts over<br />
again from the beginning.<br />
396
Waveshaper<br />
Distortion & Waveshaping Category<br />
<strong>The</strong> Input is used as an index into the table specified in ShapingFunction (if ShapeFrom is set to<br />
Wavetable) or as the input to a polynomial whose coefficients are those listed in the Coefficients<br />
parameter field (if ShapeFrom is set to Polynomial).<br />
Unless the ShapingFunction or polynomial is a straight line, the Input will be nonlinearly distorted. <strong>The</strong><br />
distortion adds harmonics to the synthesized or sampled Input. Since polynomials tend to be close to<br />
linear around zero and less linear the further they are from zero, low amplitude Inputs will be less<br />
distorted than high amplitude Inputs. This tends to match the behavior of physical instruments (which<br />
sound "brighter" when played louder) and also of electronic components like amplifiers which produce<br />
harmonic distortions of their inputs at high amplitudes.<br />
A Waveshaper can also be used to map non-signal Inputs to new values according to the<br />
ShapingFunction or polynomial. For example, if the Input were a Constant whose Value were !Pitch, the<br />
full range of MIDI notenumbers could be remapped by a Waveshaper to frequencies of an alternate<br />
tuning system as stored in a table (the ShapingFunction).<br />
Input<br />
This <strong>Sound</strong> is used as an index into the ShapingFunction (or as the input into the polynomial described<br />
the list of Coefficients).<br />
Interpolation<br />
Choose whether to use only integer values to index into the ShapingFunction or whether to use the<br />
fractional part of the Input value to interpolate between the values actually stored in the table to values<br />
that would fall "inbetween" the table entries if the actual values were connected by a straight line.<br />
ShapeFrom<br />
Choose whether to use a function stored in a table (Wavetable) or a polynomial computed on the fly using<br />
the Coefficients (Polynomial).<br />
ShapingFunction<br />
Select the wavetable that will be used to map the Input to the output.<br />
Coefficients<br />
Enter a list of coefficients A0 A1 A2 ... An (separated by spaces) <strong>for</strong> a polynomial of the <strong>for</strong>m:<br />
A0 + A1x + A2x^2 + A3x^3 + ... + Anx^n<br />
where Input is x.<br />
FromMemoryWriter<br />
Check FromMemoryWriter when the shaping function does not come from a disk file but is recorded by a<br />
MemoryWriter in real time.<br />
397
398
<strong>Sound</strong> Classes by Category<br />
Sources & Generators FormantBankOscillator 260<br />
Sources & Generators DiskPlayer 247<br />
Sources & Generators DynamicRangeController 250<br />
Sources & Generators TwoFormantElement 386<br />
Sources & Generators Oscillator 307<br />
Sources & Generators GenericSource 268<br />
Sources & Generators GrainCloud 269<br />
Sources & Generators AudioInput 230<br />
Sources & Generators SumOfSines 368<br />
Sources & Generators Attenuator 229<br />
Sources & Generators OscillatorBank 309<br />
Sources & Generators PulseGenerator 321<br />
Sources & Generators Sample 334<br />
Sources & Generators Mixer 298<br />
Sources & Generators SampleCloud 337<br />
Sources & Generators TimeFrequencyScale 378<br />
Sources & Generators MultiplyingWaveshaper 301<br />
Sources & Generators KBD Ctrl OscillatorBank 309<br />
Sources & Generators KBD Ctrl ScaleVocoder 341<br />
Sources & Generators KBD Ctrl Mixer 298<br />
Sources & Generators KBD Ctrl FormantBankOscillator 260<br />
Sources & Generators KBD Ctrl GAOscillators 266<br />
Sources & Generators KBD Ctrl GrainCloud 269<br />
Sources & Generators KBD Ctrl HarmonicResonator 273<br />
Sources & Generators KBD Ctrl KeyMappedMultisample 277<br />
Sources & Generators KBD Ctrl SumOfSines 368<br />
Sources & Generators KBD Ctrl Filter 257<br />
Sources & Generators KBD Ctrl Product 320<br />
Sources & Generators KBD Ctrl IteratedWaveshaper 276<br />
Additive synthesis OscillatorBank 309<br />
Additive synthesis DynamicRangeController 250<br />
Additive synthesis SumOfSines 368<br />
Additive synthesis SOSOscillators 349<br />
Additive synthesis Product 320<br />
Compression/Expansion DynamicRangeController 250<br />
Compression/Expansion Mixer 298<br />
399
Compression/Expansion Gain 265<br />
Cross synthesis DynamicRangeController 250<br />
Cross synthesis REResonator 327<br />
Cross synthesis Vocoder 391<br />
Delays-Mono DelayWithFeedback 243<br />
Delays-Mono Mixer 298<br />
Disk DiskCache 246<br />
Disk DiskPlayer 247<br />
Disk DiskRecorder 248<br />
Disk GenericSource 268<br />
Disk SamplesFromDiskSingleStep 339<br />
Distortion & Waveshaping Mixer 298<br />
Distortion & Waveshaping MultiplyingWaveshaper 301<br />
Drum machines StereoMix4 366<br />
Envelopes & Control Signals ADSR 220<br />
Envelopes & Control Signals Product 320<br />
Envelopes & Control Signals Gain 265<br />
Envelopes & Control Signals AR 227<br />
Envelopes & Control Signals Constant 239<br />
Envelopes & Control Signals FunctionGenerator 264<br />
Envelopes & Control Signals GraphicalEnvelope 271<br />
Envelopes & Control Signals Oscillator 307<br />
Envelopes & Control Signals MultisegmentEnvelope 304<br />
Envelopes & Control Signals MultislopeFunctionGenerator 305<br />
Envelopes & Control Signals PeakDetector 316<br />
Envelopes & Control Signals PulseTrain 323<br />
Envelopes & Control Signals SampleAndHold 336<br />
Envelopes & Control Signals Difference 245<br />
Envelopes & Control Signals TriggeredSampleAndHold 382<br />
Envelopes & Control Signals TriggeredTableRead 383<br />
EQ StereoMix2 365<br />
EQ Vocoder 391<br />
EQ Gain 265<br />
EQ GraphicEQ 272<br />
EQ PresenceFilter 318<br />
EQ HighShelvingFilter 274<br />
EQ LowShelvingFilter 282<br />
Filters AnalysisFilter 225<br />
Filters DualParallelTwoPoleFilter 249<br />
400
Filters GraphicEQ 272<br />
Filters HighShelvingFilter 274<br />
Filters LowShelvingFilter 282<br />
Filters PresenceFilter 318<br />
Filters TunableVocoder 384<br />
Filters TwoFormantElement 386<br />
Filters Vocoder 391<br />
Filters VocoderChannelBank 393<br />
Filters-Mono Filter 257<br />
Filters-Mono AnalysisFilter 225<br />
Filters-Mono AveragingLowPassFilter 231<br />
Filters-Mono ScaleVocoder 341<br />
Filters-Mono HarmonicResonator 273<br />
Filters-Mono Mixer 298<br />
Filters-Stereo ChannelJoin 236<br />
Flanging & Chorusing-Mono Mixer 298<br />
Frequency & Time Scaling OscillatorBank 309<br />
Frequency & Time Scaling Annotation 226<br />
Frequency & Time Scaling FrequencyScale 261<br />
Frequency & Time Scaling Monotonizer 299<br />
Frequency & Time Scaling QuadOscillator 324<br />
Frequency & Time Scaling SimplePitchShifter 347<br />
Frequency & Time Scaling Gain 265<br />
Frequency & Time Scaling SpectrumFrequencyScale 354<br />
Frequency & Time Scaling Mixer 298<br />
Gain & Level Attenuator 229<br />
Gain & Level Gain 265<br />
Global controllers Attenuator 229<br />
Global controllers <strong>Sound</strong>ToGlobalController 351<br />
Granulating & Chopping-Mono Chopper 238<br />
Granulating & Chopping-Mono Mixer 298<br />
Granulating & Chopping-Mono Product 320<br />
Inputs AudioInput 230<br />
Inputs GenericSource 268<br />
Looping Sample 334<br />
Looping AnalogSequencer 222<br />
Math AbsoluteValue 219<br />
Math ArcTan 228<br />
401
Math Difference 245<br />
Math Equality 253<br />
Math Interpolate 275<br />
Math Constant 239<br />
Math PhaseShiftBy90 317<br />
Math Product 320<br />
Math DelayWithFeedback 243<br />
Math RunningMax 332<br />
Math RunningMin 333<br />
Math SampleAndHold 336<br />
Math ScaleAndOffset 340<br />
Math SetRange 346<br />
Math SqrtMagnitude 362<br />
Math TriggeredSampleAndHold 382<br />
Math VCA 390<br />
MIDI In MIDIMapper 289<br />
MIDI In MIDIVoice 295<br />
MIDI In Preset 319<br />
MIDI Out MIDIFileEcho 288<br />
MIDI Out MIDIOutputController 292<br />
MIDI Out MIDIOutputEvent 293<br />
MIDI Out MIDIOutputEventInBytes 294<br />
Mixing & Panning CenteringMixer 234<br />
Mixing & Panning ChannelJoin 236<br />
Mixing & Panning Channeller 237<br />
Mixing & Panning Crossfade 242<br />
Mixing & Panning EndTogetherMixer 252<br />
Mixing & Panning Difference 245<br />
Mixing & Panning Mixer 298<br />
Mixing & Panning Output8 312<br />
Mixing & Panning Output4 311<br />
Mixing & Panning OverlappingMixer 313<br />
Mixing & Panning Pan 314<br />
Mixing & Panning StereoInOutput4 363<br />
Mixing & Panning StereoInOutput8 364<br />
Mixing & Panning StereoMix2 365<br />
Mixing & Panning StereoMix4 366<br />
Modulation Oscillator 307<br />
Modulation Product 320<br />
402
Modulation Gain 265<br />
Outputs Matrix4 283<br />
Outputs Matrix8 284<br />
Processing analyzed spectra OscillatorBank 309<br />
Processing analyzed spectra SumOfSines 368<br />
Reverb-Mono ReverbSection 328<br />
Reverb-Spatializing Mixer 298<br />
Reverb-Spatializing StereoInOutput4 363<br />
Reverb-Stereo Mixer 298<br />
Sampling Sample 334<br />
Sampling DiskCache 246<br />
Sampling DiskPlayer 247<br />
Sampling DiskRecorder 248<br />
Sampling ForcedProcessorAssignment 259<br />
Sampling GenericSource 268<br />
Sampling MemoryWriter 286<br />
Sampling Filter 257<br />
Sampling SampleAndHold 336<br />
Sampling Mixer 298<br />
Sampling TriggeredSampleAndHold 382<br />
Sampling TriggeredTableRead 383<br />
Scripts CellularAutomaton 232<br />
Scripts ContextFreeGrammar 240<br />
Scripts StereoMix4 366<br />
Scripts LimeInterpreter 279<br />
Scripts ParameterTrans<strong>for</strong>mer 315<br />
Scripts RandomSelection 325<br />
Scripts RhythmicCellularAutomaton 330<br />
Scripts Script 343<br />
Scripts MIDIVoice 295<br />
Scripts TextFileInterpreter 375<br />
Sequencers AnalogSequencer 222<br />
Spatializing ChannelCrosser 235<br />
Spatializing Channeller 237<br />
Spatializing StereoMix4 366<br />
Spatializing Difference 245<br />
Spatializing Matrix4 283<br />
Spatializing Matrix8 284<br />
403
Spatializing Output8 312<br />
Spatializing Output4 311<br />
Spatializing StereoInOutput4 363<br />
Spatializing StereoInOutput8 364<br />
Spatializing StereoMix2 365<br />
Spatializing Mixer 298<br />
Spectral Analysis-FFT ChannelJoin 236<br />
Spectral Analysis-FFT Mixer 298<br />
Spectral Modifiers SpectrumFrequencyScale 354<br />
Spectral Modifiers SpectrumLogToLinear 356<br />
Spectral Modifiers SpectrumModifier 357<br />
Spectral Processing-Live Gain 265<br />
Spectral Processing-Live OscillatorBank 309<br />
Spectral Sources LiveSpectralAnalysis 280<br />
Spectral Sources SyntheticSpectrumFrom<strong>Sound</strong>s 373<br />
Spectral Sources SpectralShape 352<br />
Spectral Sources SpectrumInRAM 355<br />
Spectral Sources SpectrumOnDisk 360<br />
Spectral Sources SyntheticSpectrumFromArray 371<br />
Time & Duration SetDuration 345<br />
Time & Duration TimeControl 377<br />
Time & Duration TimeOffset 380<br />
Time & Duration TimeStopper 381<br />
Time & Duration WaitUntil 395<br />
Time & Duration WarpedTimeIndex 396<br />
Tracking Live Input Gain 265<br />
Tracking Live Input Threshold 376<br />
Tracking Live Input FrequencyTracker 262<br />
Tracking Live Input OscilloscopeDisplay 310<br />
Tracking Live Input PeakDetector 316<br />
Tracking Live Input SpectrumAnalyzerDisplay 353<br />
Variables & Annotation Annotation 226<br />
Variables & Annotation <strong>Sound</strong>CollectionVariable 350<br />
Variables & Annotation Variable 389<br />
Visual Displays <strong>Sound</strong>ToGlobalController 351<br />
Visual Displays OscilloscopeDisplay 310<br />
Visual Displays SpectrumAnalyzerDisplay 353<br />
Vocoders ScaleVocoder 341<br />
Vocoders TunableVocoder 384<br />
404
Xtra FeedbackLoopInput 254<br />
Xtra FeedbackLoopOutput 255<br />
Xtra Sources GAOscillators 266<br />
Xtra Sources MultifileDiskPlayer 300<br />
Xtra Sources Multisample 302<br />
Xtra Sources OscillatorBank 309<br />
Xtra Sources TimeFrequencyScale 378<br />
Xtra Sources Mixer 298<br />
405
406
<strong>Sound</strong> Classes by Name<br />
AbsoluteValue Math 219<br />
ADSR Envelopes & Control Signals 220<br />
AnalogSequencer Sequencers 222<br />
AnalogSequencer Looping 222<br />
AnalysisFilter Filters-Mono 225<br />
AnalysisFilter Filters 225<br />
Annotation Variables & Annotation 226<br />
Annotation Frequency & Time Scaling 226<br />
AR Envelopes & Control Signals 227<br />
ArcTan Math 228<br />
Attenuator Global controllers 229<br />
Attenuator Gain & Level 229<br />
Attenuator Sources & Generators 229<br />
AudioInput Inputs 230<br />
AudioInput Sources & Generators 230<br />
AveragingLowPassFilter Filters-Mono 231<br />
CellularAutomaton Scripts 232<br />
CenteringMixer Mixing & Panning 234<br />
ChannelCrosser Spatializing 235<br />
ChannelJoin Spectral Analysis-FFT 236<br />
ChannelJoin Mixing & Panning 236<br />
ChannelJoin Filters-Stereo 236<br />
Channeller Spatializing 237<br />
Channeller Mixing & Panning 237<br />
Chopper Granulating & Chopping-Mono 238<br />
Constant Math 239<br />
Constant Envelopes & Control Signals 239<br />
ContextFreeGrammar Scripts 240<br />
Crossfade Mixing & Panning 242<br />
DelayWithFeedback Math 243<br />
DelayWithFeedback Delays-Mono 243<br />
Difference Spatializing 245<br />
Difference Mixing & Panning 245<br />
Difference Math 245<br />
Difference Envelopes & Control Signals 245<br />
DiskCache Sampling 246<br />
407
DiskCache Disk 246<br />
DiskPlayer Sampling 247<br />
DiskPlayer Disk 247<br />
DiskPlayer Sources & Generators 247<br />
DiskRecorder Sampling 248<br />
DiskRecorder Disk 248<br />
DualParallelTwoPoleFilter Filters 249<br />
DynamicRangeController Cross synthesis 250<br />
DynamicRangeController Compression/Expansion 250<br />
DynamicRangeController Additive synthesis 250<br />
DynamicRangeController Sources & Generators 250<br />
EndTogetherMixer Mixing & Panning 252<br />
Equality Math 253<br />
FeedbackLoopInput Xtra 254<br />
FeedbackLoopOutput Xtra 255<br />
Filter Sampling 257<br />
Filter Filters-Mono 257<br />
Filter Sources & Generators KBD Ctrl 257<br />
ForcedProcessorAssignment Sampling 259<br />
FormantBankOscillator Sources & Generators KBD Ctrl 260<br />
FormantBankOscillator Sources & Generators 260<br />
FrequencyScale Frequency & Time Scaling 261<br />
FrequencyTracker Tracking Live Input 262<br />
FunctionGenerator Envelopes & Control Signals 264<br />
Gain Tracking Live Input 265<br />
Gain Spectral Processing-Live 265<br />
Gain Modulation 265<br />
Gain Gain & Level 265<br />
Gain Frequency & Time Scaling 265<br />
Gain EQ 265<br />
Gain Envelopes & Control Signals 265<br />
Gain Compression/Expansion 265<br />
GAOscillators Xtra Sources 266<br />
GAOscillators Sources & Generators KBD Ctrl 266<br />
GenericSource Sampling 268<br />
GenericSource Inputs 268<br />
GenericSource Disk 268<br />
GenericSource Sources & Generators 268<br />
GrainCloud Sources & Generators KBD Ctrl 269<br />
408
GrainCloud Sources & Generators 269<br />
GraphicalEnvelope Envelopes & Control Signals 271<br />
GraphicEQ Filters 272<br />
GraphicEQ EQ 272<br />
HarmonicResonator Filters-Mono 273<br />
HarmonicResonator Sources & Generators KBD Ctrl 273<br />
HighShelvingFilter Filters 274<br />
HighShelvingFilter EQ 274<br />
Interpolate Math 275<br />
IteratedWaveshaper Sources & Generators KBD Ctrl 276<br />
KeyMappedMultisample Sources & Generators KBD Ctrl 277<br />
LimeInterpreter Scripts 279<br />
LiveSpectralAnalysis Spectral Sources 280<br />
LowShelvingFilter Filters 282<br />
LowShelvingFilter EQ 282<br />
Matrix4 Spatializing 283<br />
Matrix4 Outputs 283<br />
Matrix8 Spatializing 284<br />
Matrix8 Outputs 284<br />
MemoryWriter Sampling 286<br />
MIDIFileEcho MIDI Out 288<br />
MIDIMapper MIDI In 289<br />
MIDIOutputController MIDI Out 292<br />
MIDIOutputEvent MIDI Out 293<br />
MIDIOutputEventInBytes MIDI Out 294<br />
MIDIVoice Scripts 295<br />
MIDIVoice MIDI In 295<br />
Mixer Xtra Sources 298<br />
Mixer Spectral Analysis-FFT 298<br />
Mixer Spatializing 298<br />
Mixer Sampling 298<br />
Mixer Reverb-Stereo 298<br />
Mixer Reverb-Spatializing 298<br />
Mixer Mixing & Panning 298<br />
Mixer Granulating & Chopping-Mono 298<br />
Mixer Frequency & Time Scaling 298<br />
Mixer Flanging & Chorusing-Mono 298<br />
Mixer Filters-Mono 298<br />
409
Mixer Distortion & Waveshaping 298<br />
Mixer Delays-Mono 298<br />
Mixer Compression/Expansion 298<br />
Mixer Sources & Generators KBD Ctrl 298<br />
Mixer Sources & Generators 298<br />
Monotonizer Frequency & Time Scaling 299<br />
MultifileDiskPlayer Xtra Sources 300<br />
MultiplyingWaveshaper Distortion & Waveshaping 301<br />
MultiplyingWaveshaper Sources & Generators 301<br />
Multisample Xtra Sources 302<br />
MultisegmentEnvelope Envelopes & Control Signals 304<br />
MultislopeFunctionGenerator Envelopes & Control Signals 305<br />
Oscillator Modulation 307<br />
Oscillator Envelopes & Control Signals 307<br />
Oscillator Sources & Generators 307<br />
OscillatorBank Xtra Sources 309<br />
OscillatorBank Spectral Processing-Live 309<br />
OscillatorBank Processing analyzed spectra 309<br />
OscillatorBank Frequency & Time Scaling 309<br />
OscillatorBank Additive synthesis 309<br />
OscillatorBank Sources & Generators KBD Ctrl 309<br />
OscillatorBank Sources & Generators 309<br />
OscilloscopeDisplay Visual Displays 310<br />
OscilloscopeDisplay Tracking Live Input 310<br />
Output4 Spatializing 311<br />
Output4 Mixing & Panning 311<br />
Output8 Spatializing 312<br />
Output8 Mixing & Panning 312<br />
OverlappingMixer Mixing & Panning 313<br />
Pan Mixing & Panning 314<br />
ParameterTrans<strong>for</strong>mer Scripts 315<br />
PeakDetector Tracking Live Input 316<br />
PeakDetector Envelopes & Control Signals 316<br />
PhaseShiftBy90 Math 317<br />
PresenceFilter Filters 318<br />
PresenceFilter EQ 318<br />
Preset MIDI In 319<br />
Product Modulation 320<br />
Product Math 320<br />
410
Product Granulating & Chopping-Mono 320<br />
Product Envelopes & Control Signals 320<br />
Product Additive synthesis 320<br />
Product Sources & Generators KBD Ctrl 320<br />
PulseGenerator Sources & Generators 321<br />
PulseTrain Envelopes & Control Signals 323<br />
QuadOscillator Frequency & Time Scaling 324<br />
RandomSelection Scripts 325<br />
REResonator Cross synthesis 327<br />
ReverbSection Reverb-Mono 328<br />
RhythmicCellularAutomaton Scripts 330<br />
RunningMax Math 332<br />
RunningMin Math 333<br />
Sample Sampling 334<br />
Sample Looping 334<br />
Sample Sources & Generators 334<br />
SampleAndHold Sampling 336<br />
SampleAndHold Math 336<br />
SampleAndHold Envelopes & Control Signals 336<br />
SampleCloud Sources & Generators 337<br />
SamplesFromDiskSingleStep Disk 339<br />
ScaleAndOffset Math 340<br />
ScaleVocoder Vocoders 341<br />
ScaleVocoder Filters-Mono 341<br />
ScaleVocoder Sources & Generators KBD Ctrl 341<br />
Script Scripts 343<br />
SetDuration Time & Duration 345<br />
SetRange Math 346<br />
SimplePitchShifter Frequency & Time Scaling 347<br />
SOSOscillators Additive synthesis 349<br />
<strong>Sound</strong>CollectionVariable Variables & Annotation 350<br />
<strong>Sound</strong>ToGlobalController Visual Displays 351<br />
<strong>Sound</strong>ToGlobalController Global controllers 351<br />
SpectralShape Spectral Sources 352<br />
SpectrumAnalyzerDisplay Visual Displays 353<br />
SpectrumAnalyzerDisplay Tracking Live Input 353<br />
SpectrumFrequencyScale Spectral Modifiers 354<br />
SpectrumFrequencyScale Frequency & Time Scaling 354<br />
411
SpectrumInRAM Spectral Sources 355<br />
SpectrumLogToLinear Spectral Modifiers 356<br />
SpectrumModifier Spectral Modifiers 357<br />
SpectrumOnDisk Spectral Sources 360<br />
SqrtMagnitude Math 362<br />
StereoInOutput4 Spatializing 363<br />
StereoInOutput4 Reverb-Spatializing 363<br />
StereoInOutput4 Mixing & Panning 363<br />
StereoInOutput8 Spatializing 364<br />
StereoInOutput8 Mixing & Panning 364<br />
StereoMix2 Spatializing 365<br />
StereoMix2 Mixing & Panning 365<br />
StereoMix2 EQ 365<br />
StereoMix4 Spatializing 366<br />
StereoMix4 Scripts 366<br />
StereoMix4 Mixing & Panning 366<br />
StereoMix4 Drum machines 366<br />
SumOfSines Processing analyzed spectra 368<br />
SumOfSines Additive synthesis 368<br />
SumOfSines Sources & Generators KBD Ctrl 368<br />
SumOfSines Sources & Generators 368<br />
SyntheticSpectrumFromArray Spectral Sources 371<br />
SyntheticSpectrumFrom<strong>Sound</strong>s Spectral Sources 373<br />
TextFileInterpreter Scripts 375<br />
Threshold Tracking Live Input 376<br />
TimeControl Time & Duration 377<br />
TimeFrequencyScale Xtra Sources 378<br />
TimeFrequencyScale Sources & Generators 378<br />
TimeOffset Time & Duration 380<br />
TimeStopper Time & Duration 381<br />
TriggeredSampleAndHold Sampling 382<br />
TriggeredSampleAndHold Math 382<br />
TriggeredSampleAndHold Envelopes & Control Signals 382<br />
TriggeredTableRead Sampling 383<br />
TriggeredTableRead Envelopes & Control Signals 383<br />
TunableVocoder Vocoders 384<br />
TunableVocoder Filters 384<br />
TwoFormantElement Filters 386<br />
TwoFormantElement Sources & Generators 386<br />
412
Variable Variables & Annotation 389<br />
VCA Math 390<br />
Vocoder Filters 391<br />
Vocoder EQ 391<br />
Vocoder Cross synthesis 391<br />
VocoderChannelBank Filters 393<br />
WaitUntil Time & Duration 395<br />
WarpedTimeIndex Time & Duration 396<br />
413
414
415
416
Reference
Menu Operations<br />
<strong>The</strong> menus available in <strong>Kyma</strong> are File, Edit, DSP, Action, Info, and Tools. Only those menu operations<br />
that can be applied in the current context will be highlighted; all other menu operations will be dimmed<br />
and unselectable. Each menu and menu item is explained in the following sections.<br />
<strong>The</strong> File menu (see page 419) is<br />
used to create or modify files, file<br />
editors, and other <strong>Kyma</strong> windows.<br />
<strong>The</strong> Action menu (see page 436) is<br />
used to manipulate the selected<br />
<strong>Sound</strong>(s) within the active window.<br />
<strong>The</strong> Edit menu (see page 425) is<br />
used to edit <strong>Sound</strong>s, samples, or<br />
text within the active window.<br />
<strong>The</strong> Info menu (see page 439) is<br />
used to obtain in<strong>for</strong>mation on the<br />
selected <strong>Sound</strong>(s) within the active<br />
window.<br />
<strong>The</strong> DSP menu (see page 433) is<br />
used to configure and monitor the<br />
Capybara.<br />
<strong>The</strong> Tools menu (see page 442) is<br />
used to start up high level tools <strong>for</strong><br />
designing alternate tunings and <strong>for</strong><br />
recording or analyzing sample files.
File Menu<br />
File menu: New…<br />
Many of the menu items have a keyboard short-cut listed to the right. All of these shortcuts are two-key<br />
combinations: the Control or the Command (marked as or ) key and a letter key. Usually the letter is<br />
the first letter of the operation name (e.g., Ctrl+S or -S <strong>for</strong> Save… from the File menu).<br />
<strong>Kyma</strong> operating on a Macintosh OS computer uses a single menu bar in the standard position. <strong>Kyma</strong> operating<br />
on a Windows 95 computer uses a menu bar on each window; the menu bar <strong>for</strong> each window<br />
manipulates the contents of only that window. Windows-based versions of <strong>Kyma</strong> have an additional<br />
Launcher window not present on the Macintosh; the Launcher window contains most of the menu bar<br />
operations in pop-up menu <strong>for</strong>m. §<br />
Operations under the File menu are used to create or modify files, file editors, and other <strong>Kyma</strong> windows.<br />
To create a new file choose New… from the File menu. New… opens a dialog box requesting the type of<br />
the new file.<br />
To select a type, push down on the arrow to see a list of file types. Drag the mouse to the desired file type<br />
and release the mouse button. Click the New button or press Enter to create a new file.<br />
Types of Files Usable in <strong>Kyma</strong><br />
<strong>The</strong> following table lists the kinds of files that <strong>Kyma</strong> can use.<br />
File Description File Type Open Create Play Import<br />
<strong>Sound</strong> file KYM0 / KYM yes yes no yes<br />
AIFF sample file AIFF / AIF yes yes yes yes<br />
IRCAM/MTU samples sf / SF yes yes yes yes<br />
SD-I sample file SFIL / SD1 yes yes yes yes<br />
SD-II sample file Sd2f / --- yes* yes* yes* no<br />
WAV sample file .WAV / WAV yes yes yes yes<br />
Spectrum file KYMs / SPC yes yes yes yes<br />
Compiled <strong>Sound</strong> file KYM9 / KYC no yes yes yes<br />
Compiled <strong>Sound</strong> grid PMAP / PRG yes yes no yes<br />
Global map KYM8 / MAP yes yes no yes<br />
LIME file Lime / LIM no no no yes<br />
MIDI file Midi / MID no no yes yes<br />
Preferences file PREF / PRE no no no no<br />
Text file TEXT / TXT yes yes no yes<br />
Tool file KYM7 / PCI yes no* no yes<br />
§ On Windows computers, if you close all of the windows in <strong>Kyma</strong> without exiting the <strong>Kyma</strong> application, you would<br />
no longer have access to a menu bar, since the menu bar appears in each window. <strong>The</strong> Launcher window contains<br />
most of the items found in the menu bar, so you can still open files, exit <strong>Kyma</strong>, etc. even in this case.<br />
419
About the table:<br />
♦ File Description describes the kind of file.<br />
♦ File Type lists the Macintosh file type (4 letters) and the Windows file extension (3 letters).<br />
♦ Open indicates whether you can open an editor on files of this type via Open… in the File menu.<br />
♦ Create indicates whether you can use <strong>Kyma</strong> to create files of this type.<br />
♦ Play indicates whether <strong>Kyma</strong> can play files of this type via Play… in the File menu or the File Organizer.<br />
♦ Import indicates whether <strong>Kyma</strong> can import files of this type via Import… in the File menu.<br />
About the files:<br />
♦ A <strong>Sound</strong> file contains a collection of <strong>Sound</strong> objects.<br />
♦ <strong>The</strong> five flavors of sample files contain digital recordings in various <strong>for</strong>mats.<br />
♦ A spectrum file contains amplitude and frequency envelopes <strong>for</strong> additive resynthesis.<br />
♦ A compiled <strong>Sound</strong> file contains the Capybara program <strong>for</strong> a specific <strong>Sound</strong>.<br />
♦ A compiled <strong>Sound</strong> grid is a collection of <strong>Sound</strong>s and their associated compiled <strong>Sound</strong> files.<br />
♦ A global map file contains text that describes a relationship between MIDI devices and <strong>Kyma</strong> Event<br />
Values.<br />
♦ A LIME file contains music notation created by the Lime application. ‡<br />
♦ A MIDI file contains a MIDI sequence created by a MIDI sequencer application.<br />
♦ A preferences file contains the settings of <strong>Kyma</strong>’s user preference items.<br />
♦ A text file contains text.<br />
♦ A tool file contains a high level tool, made up of a state machine with a graphic user interface, created<br />
in the developer’s version of <strong>Kyma</strong>.<br />
Where the File Type In<strong>for</strong>mation is Stored<br />
<strong>The</strong> Macintosh and Windows operating systems store the file type in different ways.<br />
On Macintosh computers, there is a four character file type value stored in the resource <strong>for</strong>k of each file.<br />
Applications running on the Macintosh use this file type value to determine whether a specific file is a<br />
text file, MIDI file, AIFF sample file, etc.<br />
On Windows computers, the file type is stored in the three character extension that follows the period in<br />
each file’s name. Applications running on Windows use this extension to determine whether a specific<br />
file is a text file, MIDI file, AIFF sample file, etc.<br />
File menu: Open…<br />
To open a file that already exists, choose Open… from the File menu.<br />
‡ Lime is available at: http://datura.cerl.uiuc.edu.<br />
420
In the file list, select the file type and the name of the file to be opened. To select a type, push down on the<br />
arrow to see a list of file types. Drag the mouse to the desired file type and release the mouse button. <strong>The</strong><br />
list of files will show files of the selected type only. Either double-click on the name of the desired file in<br />
the list, or click on the name of the desired file and click Open to open. A list of files that can be opened is<br />
given in the section called Types of Files Usable in <strong>Kyma</strong> on page 419.<br />
File menu: Open any…<br />
File menu: Play…<br />
To open a file regardless of its file type, choose Open any… from the File menu. In the file list, select the<br />
name of the file to be opened and click Open, or double-click on the file name. <strong>Kyma</strong> will open the file<br />
with the appropriate file editor. A list of files that can be opened is given in the section called Types of<br />
Files Usable in <strong>Kyma</strong> on page 419.<br />
To play a file without opening an editor on the file, choose Play… from the File menu. (To play a <strong>Sound</strong>,<br />
see Action menu: Compile, load, start on page 436.)<br />
In the file list, select the file type and the name of the file to be played. To select a type, push down on the<br />
arrow to see a list of file types. Drag the mouse to the desired file type and release the mouse button. <strong>The</strong><br />
list of files will show files of the selected type only. Either double-click on the name of the desired file in<br />
the list, or click on the name of the desired file and click Open to play. A list of files that can be played is<br />
given in the section called Types of Files Usable in <strong>Kyma</strong> on page 419.<br />
File menu: Import…<br />
<strong>The</strong> Macintosh and Windows operating systems use different methods of storing the type of a file (see<br />
Where the File Type In<strong>for</strong>mation is Stored on page 420 <strong>for</strong> more in<strong>for</strong>mation). When moving <strong>Kyma</strong> files<br />
from Windows to Macintosh computers (also, when moving files from the Internet to Macintosh computers),<br />
the file type is not available in the place normally used by the Macintosh <strong>for</strong> storing this in<strong>for</strong>mation.<br />
Without this file type in<strong>for</strong>mation, these files will not be usable by <strong>Kyma</strong>.<br />
On Macintosh computers, choosing Import… from the File menu opens a file list. In the file list, select<br />
each file that has been moved to the Macintosh and click Open. <strong>Kyma</strong> will read the file type (encoded as<br />
the three letter extension at the end of each file name) and store the proper file type in<strong>for</strong>mation in the<br />
selected file. Click Cancel when all files have been imported.<br />
421
File menu: Close<br />
File menu: Save…<br />
Close closes the active window. Additionally, any window can be closed by clicking the window’s close<br />
box (upper left corner of windows on the Macintosh; upper right corner of windows on Windows 95).<br />
If there are changes in the window that have not been saved, <strong>Kyma</strong> will ask whether the changes in the<br />
window should be saved.<br />
Choose Save… from the File menu to save the contents of the active window into its current file.<br />
File menu: Save as…<br />
Choose Save as… from the File menu to save the contents of the active window to a different file.<br />
In the file list, select the folder and enter the name of the file to store the contents of the active window.<br />
Click Save to save the contents of the window into the file.<br />
File menu: Choose window…<br />
It can be hard to locate a specific window when many overlapping windows are opened simultaneously.<br />
To cycle through the open windows, bringing each window in turn to the front, use either Ctrl+↑ or<br />
Ctrl+↓. To bring a window to the front directly, choose Choose window… from the File menu.<br />
To select a window, push down on the arrow to see a list of the windows. Drag the mouse to the desired<br />
window and release the mouse button. Click OK to bring the selected window to the front.<br />
422
File menu: System prototypes<br />
<strong>The</strong> system prototypes window is a palette containing an example of each <strong>Sound</strong> built in to <strong>Kyma</strong>. <strong>The</strong>se<br />
prototypical <strong>Sound</strong>s are modified and combined with other <strong>Sound</strong>s when doing sound design and composition<br />
in <strong>Kyma</strong>. (See System Prototypes and the <strong>Sound</strong> File Window on page 458 <strong>for</strong> more<br />
in<strong>for</strong>mation.)<br />
Choose System prototypes from the File menu to open the system prototypes window.<br />
File menu: Choose global map…<br />
<strong>The</strong> global map specifies a mapping between MIDI values received by the Capybara (<strong>for</strong> example, values<br />
from continuous controller #18 on MIDI channel 1) and memorable names (<strong>for</strong> example, !Frequency).<br />
<strong>Sound</strong>s designed using these descriptive names can be used on any <strong>Kyma</strong> System, regardless of the MIDI<br />
devices connected to the Capybara, by simply modifying the global map to reflect the available MIDI devices.<br />
(See Event Values, Virtual Control Surface, and Global Map on page 472 <strong>for</strong> more in<strong>for</strong>mation.)<br />
Choose Choose global map… from the File menu to open a file list <strong>for</strong>m which to select the global map.<br />
File menu: Virtual control surface<br />
<strong>The</strong> virtual control surface displays the adjustable parameters of the <strong>Sound</strong> that was last compiled and<br />
loaded. <strong>The</strong> appearance of the controls within the window is set by the global map and any maps contained<br />
within the loaded <strong>Sound</strong> (see Virtual Control Surface and Mappings on page 483). As a<br />
preferences option, the virtual control surface can be opened whenever a <strong>Sound</strong> is compiled and loaded,<br />
see Per<strong>for</strong>mance… on page 430.<br />
To open the virtual control surface, choose Virtual control surface from the File menu.<br />
423
For more in<strong>for</strong>mation, see Virtual Control Surface on page 481.<br />
File menu: File organizer<br />
Open the file organizer by choosing File organizer from the File menu. <strong>The</strong> file organizer provides a way<br />
to quickly access, edit, and audition sound-producing files on the hard disk of the host computer.<br />
<strong>The</strong> file organizer lists the files on the host computer’s hard disks, color-coded according to the type of<br />
each file, and indented to indicate the folder hierarchy. <strong>The</strong> color conventions are:<br />
Description Color Code<br />
Unopened disk or folder Gray<br />
Open disk or folder Underlined Black<br />
Sample, EX Turquoise<br />
Spectrum Purple<br />
GA Red-brown<br />
RE Yellow-orange<br />
MIDI Green<br />
Double-click on a disk or folder to hide or show the folders and files contained in it. Select a file or folder<br />
by clicking on it once with the mouse. Use the arrow keys and the page up and down keys to move<br />
around in the list.<br />
<strong>The</strong> in<strong>for</strong>mation stored in the header of the selected file is displayed in the lower part of the file organizer<br />
window. <strong>The</strong> items displayed include the full path name <strong>for</strong> the file, the date and time on which it was<br />
last modified, and other in<strong>for</strong>mation specific to the file type.<br />
To hear the selected file, use Ctrl+Space Bar. <strong>Kyma</strong> plays samples files directly. For analysis files<br />
(spectrum, GA, or RE), <strong>Kyma</strong> uses the analysis to synthesize the sound. For MIDI files, <strong>Kyma</strong> constructs a<br />
minimal “orchestra” and plays the notes of the MIDI file on those simple “instruments”.<br />
To edit the selected file, press Enter or double-click on the file. This will open the appropriate <strong>Kyma</strong><br />
editor or, if there is an external editor specified <strong>for</strong> this file type (see File Editors… on page 430), it will<br />
open the preferred program <strong>for</strong> editing files of this type.<br />
To create a <strong>Sound</strong> based on a file, drag the file from the file organizer into a <strong>Sound</strong> file window. To set the<br />
value of any parameter field in the <strong>Sound</strong> editor, drag a file name from the file organizer into the pa-<br />
424
File menu: Status<br />
rameter field. If it is a parameter that makes sense <strong>for</strong> the file, the file will paste its value <strong>for</strong> that parameter<br />
into the field.<br />
To monitor the status of memory on the host computer, choose Status from the File menu. <strong>The</strong> following<br />
window will appear:<br />
Memory Use<br />
<strong>The</strong> horizontal bar indicates the percentage of available memory being used by the host computer. On<br />
color monitors, the display is color coded as follows: cyan <strong>for</strong> light usage, green and yellow <strong>for</strong> moderate<br />
usage, and red <strong>for</strong> heavy usage.<br />
<strong>The</strong> Recycle button in the upper right is <strong>for</strong> recycling memory. <strong>Kyma</strong> tries to keep memory recycled<br />
automatically whenever this window is opened; however, if the bar turns red and <strong>Kyma</strong> starts to get<br />
sluggish, click the Recycle button to cause <strong>Kyma</strong> to recycle memory.<br />
You should leave this window opened all of the time so that <strong>Kyma</strong> can automatically recycle memory <strong>for</strong><br />
you.<br />
When the Recycle button is clicked, in addition to scanning the host computer’s memory <strong>for</strong> objects that<br />
are no longer in use, <strong>Kyma</strong> removes any in<strong>for</strong>mation about recently accessed files and folders. This<br />
means that it is a good idea to click Recycle whenever a file or folder has been changed or moved to another<br />
location using another application (<strong>for</strong> example, using the Finder on the Macintosh, File Manager<br />
on Windows 3.1, or Windows Explorer on Windows 95).<br />
MIDI Input<br />
File menu: Quit<br />
Edit Menu<br />
<strong>The</strong> bottom section of the status window displays in<strong>for</strong>mation related to Event Values, MIDI input, and<br />
the A/D used in the last <strong>Sound</strong> that was loaded. <strong>The</strong> status window indicates the following:<br />
♦ the name of the global map being used to define Event Values<br />
♦ whether the <strong>Sound</strong> expects input from the A/D<br />
♦ the MIDI channels (if any) on which the <strong>Sound</strong> expects keyboard input<br />
♦ the Event Value names (if any) that control the <strong>Sound</strong>’s parameters<br />
Choosing Quit from the File menu causes <strong>Kyma</strong> to close all open windows (asking to save changes <strong>for</strong><br />
any window whose contents have been changed), save the preferences, and exit the <strong>Kyma</strong> application.<br />
Any <strong>Sound</strong> playing on the Capybara will be stopped.<br />
Operations under the Edit menu are used to edit <strong>Sound</strong>s, samples, and text in the active window or active<br />
field within the active window. In windows that include several editable fields (<strong>for</strong> example, the <strong>Sound</strong><br />
editor or the sample file editor), the active field will have a dark border drawn around it.<br />
425
Edit menu: Undo<br />
Edit menu: Cut<br />
Edit menu: Copy<br />
Edit menu: Paste<br />
In this window, the Frequency field is active.<br />
A field can be activated by clicking the mouse within its borders, or by using the Tab key to cycle<br />
through all editable fields.<br />
Undo cancels the effect of the last editing operation.<br />
Cut removes the selection (whether it is a <strong>Sound</strong>, samples, or text) from the active field and places it into<br />
the clipboard.<br />
Copy places a copy of the selection (whether it is a <strong>Sound</strong>, samples, or text) into the clipboard.<br />
Paste replaces the selection in the active field with the contents of the clipboard.<br />
Edit menu: Paste special…<br />
Paste special… applies to both text fields and <strong>Sound</strong> fields.<br />
In text fields, Paste special… presents a choice of the last several text selections cut or copied. Use the pull<br />
down list to select the text, and click the Paste button to paste that text into the active field.<br />
In <strong>Sound</strong> fields, Paste special… pastes exactly the <strong>Sound</strong>s that are in the clipboard, not a copy of the<br />
<strong>Sound</strong>s that are in the clipboard. This is one way to cause different <strong>Sound</strong>s to share the same input.<br />
Edit menu: Paste hot…<br />
Paste hot… presents a list of commonly used expressions together with all of the Event Values in the current<br />
global map.<br />
426
Edit menu: Clear<br />
Use the pull down list to select an Event Value or expression, and click Paste to paste it into the hot parameter<br />
field. Alternatively, type all or part of the name of the expression and hit Enter.<br />
Clear from the Edit menu and the Delete key accomplish the same result: the selection is removed without<br />
being saved in the clipboard.<br />
Be<strong>for</strong>e <strong>Kyma</strong> removes any <strong>Sound</strong>, it will verify that you really want to delete it.<br />
If you have several <strong>Sound</strong>s selected and would like to remove all of them, click Remove All.<br />
427
Edit menu: Trim<br />
<strong>The</strong> Trim operation is the complement of the Clear operation. Whereas Clear removes the selection,<br />
leaving the unselected items untouched, Trim removes the unselected items, leaving the selection untouched.<br />
Edit menu: Evaluate<br />
Evaluate tries to evaluate the selection as a Smalltalk-80 expression, and, if successful, inserts the result<br />
immediately following the selection. (See <strong>The</strong> Smalltalk-80 <strong>Language</strong> on page 513 <strong>for</strong> an introduction to<br />
Smalltalk-80.) If there is an error, the field will flash and <strong>Kyma</strong> will either insert a message into the text<br />
indicating the error or it will present dialog explaining the error.<br />
Edit menu: Select all<br />
Edit menu: Find…<br />
Choosing Select all from the Edit menu causes the entire contents of the active field to be selected.<br />
Find… is used to search the active field <strong>for</strong> the text entered into the dialog. <strong>Kyma</strong> begins the search after<br />
the current selection, and selects the next occurrence of the text that it finds. <strong>Kyma</strong> will cause the host<br />
computer to beep if the text cannot be found.<br />
Edit menu: Find again<br />
Find again searches the active field <strong>for</strong> the text that was last entered in Find… dialog. <strong>Kyma</strong> begins the<br />
search after the current selection, and selects the next occurrence of the text that it finds. <strong>Kyma</strong> will cause<br />
the host computer to beep if the text cannot be found.<br />
Edit menu: Replace…<br />
Replace… is used to replace an occurrence of one text with another text. Enter the text to be replaced and<br />
the replacement text, and then click Replace to replace the first occurrence or click Replace all to replace<br />
all occurrences. <strong>Kyma</strong> will cause the computer to beep if the text cannot be found.<br />
Edit menu: Replace again<br />
Replace again replaces the next occurrence of the text to be replaced with the replacement text. <strong>Kyma</strong><br />
will cause the computer to beep if the text cannot be found.<br />
Edit menu: Large window…<br />
Large window… expands the active field to fill the entire screen. Click Accept to save the contents of the<br />
large window back into the active field, or click Cancel to discard the changes.<br />
428
Edit menu: Zoom in<br />
Certain parameter fields in the <strong>Sound</strong> editor (<strong>for</strong> example, the Envelope field of GraphicalEnvelope) and<br />
certain fields of other editors (the spectrum area in the spectrum editor) can be viewed with different<br />
magnifications. Zoom in increases the magnification of the field, showing more detail.<br />
Edit menu: Zoom out<br />
Zoom out per<strong>for</strong>ms the opposite of Zoom in : it decreases the magnification of the field, showing less detail.<br />
Edit menu: Clean up<br />
In fields or windows that contain <strong>Sound</strong>s, Clean up positions the <strong>Sound</strong>s into straight rows while attempting<br />
to keep them from overlapping. When applied to the signal flow diagram in the <strong>Sound</strong> editor,<br />
Clean up restores the original layout of the signal flow diagram.<br />
Edit menu: View…<br />
View… controls the appearance of a <strong>Sound</strong> file window, a <strong>Sound</strong> editor, or the file organizer. For <strong>Sound</strong><br />
file windows, View… controls the size of the icons in the window. For <strong>Sound</strong> editors, View… controls<br />
icon size and icon connection style. For file organizers, View… controls how folders are displayed.<br />
Edit menu: Preferences…<br />
<strong>The</strong> global preference items can be set by choosing Preferences… from the Edit menu. <strong>The</strong>se preferences<br />
are automatically saved in a file (<strong>Kyma</strong> Preferences on the Macintosh or kyma.pre on Windows)<br />
when exiting <strong>Kyma</strong>.<br />
<strong>The</strong> six categories of preferences are explained in detail below.<br />
<strong>The</strong> <strong>Kyma</strong> release number and release date is shown in the lower left of the dialog.<br />
Appearance…<br />
<strong>The</strong> appearance preferences control the appearance of certain items in the parameter fields of <strong>Sound</strong>s:<br />
429
♦ Icon Size in <strong>Sound</strong> Editor Fields controls the size of <strong>Sound</strong> icons in Input or other <strong>Sound</strong> fields.<br />
♦ Show Full Path Names controls whether fields that display file names (<strong>for</strong> example, Sample) show<br />
the entire file path or only the name of the file.<br />
♦ Show All Digits in Double Floating Point Numbers controls whether double precision floating<br />
point numbers are displayed with all twelve digits or with only six digits.<br />
Per<strong>for</strong>mance…<br />
<strong>The</strong> per<strong>for</strong>mance preferences control how <strong>Kyma</strong> should behave when compiling, loading and starting<br />
<strong>Sound</strong>s.<br />
Update Display during Disk Operations controls whether <strong>Kyma</strong> will allow editing and other <strong>for</strong>ms of<br />
user interaction when playing a <strong>Sound</strong> that uses the host computer’s hard disk (<strong>for</strong> example, DiskPlayer<br />
or DiskRecorder).<br />
Optimize Sample RAM Use controls how efficiently <strong>Kyma</strong> will use the Capybara sample RAM. If turned<br />
off, the <strong>Kyma</strong> compiler will operate more quickly, but each sample file referenced will be loaded into all<br />
Capybara expansion cards, possibly wasting sample RAM. If this option is turned on, the <strong>Kyma</strong> compiler<br />
will load each sample file referenced into the Capybara expansion cards that use the sample.<br />
Time Code frames / sec controls how <strong>Kyma</strong> interprets SMPTE times and durations (<strong>for</strong> example,<br />
1:23:45.12 SMPTE) in the parameter fields of <strong>Sound</strong>s. (Use 30 fps <strong>for</strong> either 29.97 or 30 fps).<br />
Virtual Control Surface controls whether the virtual control surface should be opened and brought into<br />
view or left in its current state whenever a <strong>Sound</strong> is played.<br />
File Editors…<br />
430
<strong>The</strong> file editors preferences control the selection of editors <strong>for</strong> different kinds of files. If the box is checked<br />
in front of a file type, then <strong>Kyma</strong> will use a different application to edit files of that type. On computers<br />
using Windows, the application chosen will be the same as the one that the Windows File Manager or<br />
Windows Explorer uses when a file is opened. On computers using the Macintosh operating system,<br />
<strong>Kyma</strong> will prompt <strong>for</strong> the application to use.<br />
Choosing Open… from the File menu (see page 420) and selecting a file will always use <strong>Kyma</strong>’s built-in<br />
editor <strong>for</strong> files of that type. <strong>The</strong> editors described here are used when editing a file from the File Organizer<br />
(see page 424) or when editing a file from the parameter field of a <strong>Sound</strong> (by clicking on the field’s<br />
disk button while holding down either the Option or Control keys).<br />
Frequently Used Folders…<br />
<strong>The</strong> frequently used folders (or directories) preferences controls where <strong>Kyma</strong> looks to locate files. Select<br />
folders in the upper list and click Open to display any folders inside of the selected folder. Click Add to<br />
add the selected folder to the list of frequently used folders. To remove a folder from the list of frequently<br />
used folders, select the folder in the bottom list and click Remove.<br />
<strong>Kyma</strong> will use these folders and the folders that they contain to locate files it cannot find immediately.<br />
<strong>The</strong>re<strong>for</strong>e, it is unnecessary to add folders contained in any folder already in the frequently used folders<br />
list.<br />
Because <strong>Kyma</strong> removes any path in<strong>for</strong>mation from files that it cannot locate immediately, it is important<br />
that there is only one file with a given name among all of the folders and subfolders of the frequently used<br />
folders. Keep in mind that <strong>Kyma</strong> may select any of the files with the same name among the frequently<br />
used folders.<br />
How <strong>Kyma</strong> locates files<br />
While <strong>Kyma</strong> is locating a file, it changes the cursor to some eyeglasses; the eyeballs within the lens move<br />
as <strong>Kyma</strong> searches folders <strong>for</strong> the desired file.<br />
<strong>Kyma</strong> uses the following procedure to locate files:<br />
431
♦ If the file name has a complete path and the file exists, <strong>Kyma</strong> uses the file name directly.<br />
♦ <strong>Kyma</strong> removes any path in<strong>for</strong>mation from the name.<br />
♦ If that file name has been found recently, <strong>Kyma</strong> uses the file that was found at that time.<br />
♦ <strong>Kyma</strong> checks the most recently used folders <strong>for</strong> a file with the same name.<br />
♦ <strong>Kyma</strong> checks each folder and subfolder in the list of frequently used folders <strong>for</strong> a file with the same<br />
name. During this process, <strong>Kyma</strong> will periodically put up this dialog:<br />
♦ Click Keep looking to have <strong>Kyma</strong> continue checking the frequently used folders list, click Use file<br />
dialog to locate the file using a file list, or click Cancel to stop <strong>Kyma</strong>.<br />
♦ At this point, <strong>Kyma</strong> has exhausted all automatic ways of finding the file and opens a file list.<br />
Because <strong>Kyma</strong> keeps track of recently accessed files and folders, it is important to in<strong>for</strong>m <strong>Kyma</strong> whenever<br />
a file or folder has been changed using another application (<strong>for</strong> example, renaming or deleting files using<br />
the Finder on the Macintosh, File Manager on Windows 3.1, or Windows Explorer on Widows 95). To do<br />
this, click on the Recycle button in the Status window (see File menu: Status on page 425).<br />
Substituting <strong>for</strong> missing files<br />
If you use <strong>Sound</strong>s developed by someone else on another computer, that person might have used a different<br />
set of files or might have created some files you do not have on your computer. When you try to<br />
load a <strong>Sound</strong> that uses a file you do not have, a dialog box will prompt you to locate the file. <strong>The</strong> same<br />
thing could happen if you rename a file on the host computer’s hard disk but have not changed the reference<br />
to that file name in the <strong>Sound</strong>s’ parameter fields.<br />
To have <strong>Kyma</strong> substitute a different file in place of the missing file, choose the replacement file from the<br />
file list. This substitution will remain in effect until either the Recycle button in the Status window is<br />
clicked or the Capybara is initialized via Initialize DSP under the DSP menu.<br />
Spectrum Analyzer…<br />
<strong>The</strong> spectrum analyzer preferences control the settings <strong>for</strong> the spectrum analyzer that <strong>Kyma</strong> creates when<br />
Spectrum analyzer from the Info menu is chosen. (<strong>Kyma</strong> also includes a separate SpectrumAnalyzer<br />
<strong>Sound</strong> that displays the spectrum of its input, but the <strong>Sound</strong> is unaffected by the these preference settings.)<br />
Spectrum Analyzer Length controls the length of the FFT used by the spectrum analyzer. <strong>The</strong> larger the<br />
number the better the frequency resolution.<br />
Spectrum Analyzer Window controls the window function applied to the signal be<strong>for</strong>e using the FFT.<br />
Each of the window functions has different properties; in general, resolution increases in the following<br />
order: LinearEnvelope, Hamming, Hann, and Long Kaiser.<br />
432
DSP Menu<br />
DSP menu: Stop<br />
Miscellaneous<br />
<strong>The</strong> miscellaneous preferences control a few random items.<br />
♦ Show Help on Startup controls whether a help window will be opened when <strong>Kyma</strong> is started.<br />
♦ Show Untitled Window on Startup controls whether an untitled <strong>Sound</strong> file window will be opened<br />
when <strong>Kyma</strong> is started.<br />
♦ Stack Traces controls whether <strong>Kyma</strong> allows low-level debugging stack traces when errors occur.<br />
Generally, this should be left set to Disallowed unless instructed to do otherwise by Symbolic <strong>Sound</strong>.<br />
Operations under the DSP menu are used to configure and monitor the Capybara.<br />
To stop a <strong>Sound</strong> while it is playing, choose Stop from the DSP menu.<br />
If Update Display during Disk Operations in the Per<strong>for</strong>mance… preferences (see page 430) is turned off<br />
and the <strong>Sound</strong> uses the computer’s hard disk, click the mouse while holding down the Shift key to stop<br />
the <strong>Sound</strong>.<br />
DSP menu: Restart<br />
Once a <strong>Sound</strong> has been loaded into the Capybara, it can be restarted immediately by choosing Restart<br />
from the DSP menu. This is often used in conjunction with Compile & load from the Action menu (see<br />
page 436).<br />
DSP menu: Status<br />
<strong>The</strong> DSP status window configures the audio inputs and outputs, and, while a <strong>Sound</strong> is running, it displays<br />
the expansion card usage and the input and output levels. To open the DSP status window, select<br />
Status from the DSP menu.<br />
433
Time and Time Code Displays<br />
<strong>The</strong> time display at the upper left of the status window is reset to zero each time you start a <strong>Sound</strong>. <strong>The</strong><br />
display <strong>for</strong>mat is hours:minutes:seconds. When the <strong>Sound</strong> finishes (or when the <strong>Sound</strong> is stopped by<br />
choosing Stop from the DSP menu), the time display stops.<br />
<strong>The</strong> time code display in the upper right of the status panel shows incoming MIDI time code. <strong>The</strong> display<br />
<strong>for</strong>mat is hours:minutes:seconds.frames.<br />
Input and Output Levels<br />
<strong>The</strong> two bars at the left of the window show the left and right input levels. <strong>The</strong> left and right output levels<br />
are shown by the pair of bars to the right of the input level bars. <strong>The</strong> marks alongside the bars<br />
represent steps of 10 dB.<br />
Between each pair of bars is a peak level indicator. <strong>The</strong> peak level indicator will show >0< if the signal<br />
may have clipped. <strong>The</strong> peak level indicators can be reset by clicking the mouse.<br />
Expansion Card Usage<br />
<strong>The</strong> number of bars displayed in the Expansion Card Usage section of the status window will depend<br />
upon the number of expansion cards installed in your Capybara. Shown above is an example with four<br />
expansion cards. Each bar indicates the current computational load on each expansion card relative to the<br />
card’s ability to compute <strong>Sound</strong>s in real time. When the expansion cards are in normal operation<br />
(processing in real time), each mark indicates approximately 20% expansion card usage.<br />
If your Capybara is unable to process a complex <strong>Sound</strong> in real time, you can use these bars to determine<br />
when that happens. <strong>The</strong> bar representing the most heavily-taxed expansion card will “stick” against the<br />
top of the scale until the card’s processing time catches up with real time. By noting when the bars run<br />
out of headroom, you can pinpoint which part of the <strong>Sound</strong> needs to be simplified or recorded into a disk<br />
cache to allow the expansion cards to return to real time computation. Alternatively, you can lower the<br />
sample rate and play the <strong>Sound</strong> again.<br />
When the Capybara is unable to process a complex <strong>Sound</strong> in real time, the usage bar display does not<br />
accurately display the usage of the expansion cards.<br />
Sample Rate<br />
Use the pull down menu in the Sample Rate field to change the sampling rate of the Capybara. <strong>The</strong>re are<br />
seven sampling rates available via the menu; they are divisions of the compact disk sampling rate: 44100,<br />
22050 and 11025 samples per second; divisions of the digital audio tape sampling rate: 48000, 24000 and<br />
12000 samples per second; and the extended-play DAT sampling rate of 32000 samples per second. <strong>The</strong><br />
higher you set the sampling rate, the higher the frequencies that you can synthesize or reproduce; you<br />
can produce frequencies up to half of the sampling rate. However, the higher the sampling rate, the less<br />
time the Capybara has to compute each sample.<br />
In general, use the highest sampling rate that still allows the Capybara enough time to compute each<br />
sample. If an algorithm is particularly complex, it may be necessary to lower the sampling rate (allowing<br />
more computation time per sample) or to store the sound on the host computer’s hard disk <strong>for</strong> later real<br />
time playback.<br />
Interface<br />
Use the Interface pull down menu to choose between the analog and digital audio interfaces. If a digital<br />
device is plugged into the Capybara’s digital input, the source will determine the sample rate, overriding<br />
<strong>Kyma</strong>’s setting (the sample rate setting display will not automatically update, however). For example, if<br />
the source is operating at a 32 khz sample rate, <strong>Kyma</strong> will operate at that sample rate.<br />
Even though the device controls the sample rate of the signal processor, <strong>Kyma</strong> has no way of finding out<br />
that sample rate value. So, whenever using the digital audio input, remember to make sure that the sample<br />
rate shown in the Sample Rate field is the same as the sample rate of the digital device.<br />
434
Analog EQ<br />
<strong>The</strong> analog audio output of the Capybara has an equalization section that can be used to adjust the frequency<br />
content of the output signal. Click on the Analog EQ button to configure this equalization section.<br />
<strong>The</strong> upper part of the configuration dialog shows the frequency response of the analog equalizer. <strong>The</strong><br />
fields below are used to set the parameters <strong>for</strong> the overall gain, a low shelving filter, a high shelving filter,<br />
and a presence filter. Click the Set button to update the equalizer and the frequency response graph.<br />
Click Done when finished.<br />
To disable the action of any of the filters specify 0.0 dB <strong>for</strong> the filter’s gain parameter. <strong>The</strong> default<br />
equalizer setting has all filters disabled, giving a flat frequency response between DC and 40% of the<br />
sampling rate.<br />
DSP menu: Configure MIDI…<br />
<strong>The</strong> Capybara’s MIDI interface is configured by choosing Configure MIDI… from the DSP menu.<br />
<strong>The</strong> Default Input Channel is the MIDI channel used by <strong>Sound</strong>s that are controlled by MIDI but have no<br />
MIDIVoice, MIDIMapper, or other <strong>Sound</strong> to specify the MIDI channel to use. MIDIVoices and MIDI-<br />
Mappers with Channel set to 0 use the Default Input Channel as well.<br />
<strong>The</strong> MIDI Clock Speed Adjustment pull down menu is used to speed up or slow down the Capybara’s<br />
MIDI clock. Some MIDI devices (including some personal computer MIDI interfaces) use a MIDI clock<br />
that is incompatible with the normal clock setting. Use this menu to try slower and faster MIDI clock<br />
435
speeds that may be compatible with the MIDI device. This option has no effect on the responsiveness or<br />
speed of processing of MIDI events on the Capybara.<br />
Clicking the Show MIDI Messages button opens a window that displays in<strong>for</strong>mation about the continuous<br />
controller and keyboard MIDI messages as they are received by the Capybara. This can be useful<br />
when troubleshooting MIDI configurations.<br />
DSP menu: MIDI notes off<br />
MIDI notes off sends a note-off event (key up) <strong>for</strong> every note on every MIDI channel. <strong>The</strong> note-off events<br />
are sent to the Capybara MIDI out connector, silencing any MIDI synthesizers attached to the Capybara.<br />
DSP menu: Initialize DSP<br />
Action Menu<br />
Use Initialize DSP from the DSP menu to initialize the Capybara. <strong>The</strong>re are only a few circumstances<br />
where this will be needed. Generally, in any of these circumstances, <strong>Kyma</strong> will display a dialog (such as<br />
the one below) to indicate a problem.<br />
If you see this warning, click OK, and then choose Initialize DSP from the DSP menu.<br />
Operations under the Action menu are used to manipulate the selected <strong>Sound</strong>(s) within the active window.<br />
Action menu: Compile, load, start<br />
Selecting Compile, load, start from the Action menu causes the selected <strong>Sound</strong> to be compiled and then<br />
loaded into the digital signal processor. -Space Bar or Ctrl+Space Bar are the key-equivalents. Often<br />
the compiler will be able to start the Capybara playing while it loads the rest of the <strong>Sound</strong>.<br />
If more than one <strong>Sound</strong> and/or <strong>Sound</strong> collection is selected, the <strong>Sound</strong>s will be loaded one after another<br />
in order from top to bottom and left to right.<br />
While the <strong>Sound</strong> is being compiled, the cursor changes to a watch. If the <strong>Sound</strong> uses any sample files, the<br />
cursor will change to an animated picture of a wave<strong>for</strong>m being downloaded to the Capybara while the<br />
sample files are being transferred from the hard disk into the RAM. Once <strong>Kyma</strong> begins sending in<strong>for</strong>mation<br />
to the Capybara, the cursor changes to an animation of a <strong>Sound</strong> transferring data to the Capybara.<br />
While the <strong>Sound</strong> is playing, the cursor changes:<br />
♦ If the <strong>Sound</strong> does not use the computer’s hard disk, the cursor will be a hollow arrow.<br />
♦ If the <strong>Sound</strong> uses the computer’s hard disk, and Update Display during Disk Operations in the Per<strong>for</strong>mance…<br />
preferences (see page 430) is turned on, the cursor will be a partially-filled arrow.<br />
♦ If the <strong>Sound</strong> uses the computer’s hard disk, and Update Display during Disk Operations in the Per<strong>for</strong>mance…<br />
preferences is turned off, the cursor will be a floppy disk.<br />
To stop a <strong>Sound</strong> while it is playing, choose Stop from the DSP menu. If the cursor looks like a floppy<br />
disk, click the mouse while holding the Shift key down. When the <strong>Sound</strong> has finished or has been stopped, the<br />
cursor will change back to the normal fully-filled arrow.<br />
Action menu: Compile & load<br />
Choose Compile & load to compile and load the selected <strong>Sound</strong> into the Capybara without immediately<br />
starting the <strong>Sound</strong>. Once the <strong>Sound</strong> has been compiled and loaded, start it by selecting Restart from the<br />
436
DSP menu. This is useful <strong>for</strong> loading a <strong>Sound</strong> be<strong>for</strong>e a per<strong>for</strong>mance or <strong>for</strong> very dense <strong>Sound</strong>s with many<br />
structure changes that must be completely downloaded be<strong>for</strong>e being started.<br />
Action menu: Record to disk…<br />
Select Record to disk… to make a digital recording of the selected <strong>Sound</strong> into a sample file on the hard<br />
disk. (See Samples on page 493 <strong>for</strong> additional in<strong>for</strong>mation about digital recordings.)<br />
A dialog box asks you to specify how the <strong>Sound</strong> should be recorded: pick a file <strong>for</strong>mat; decide whether to<br />
record in stereo or monaural; and choose a bit resolution of 8, 16, or 24-bits.<br />
If your <strong>Sound</strong> is the same in the left and right channels, recording in monaural will save disk space.<br />
Similarly, if you know that the recorded samples will only be played back over 16-bit converters, you can<br />
save disk space by choosing the 16-bit recording <strong>for</strong>mat.<br />
In monaural mode, only the left channel of the selected <strong>Sound</strong> is recorded to disk.<br />
Choose the file <strong>for</strong>mat, number of channels, and resolution, and click OK or press Enter. <strong>The</strong>n enter the<br />
name of the sample file in which to place the digital recording:<br />
and click Save or press Enter.<br />
If the selected <strong>Sound</strong> uses live input (either MIDI or audio input), <strong>Kyma</strong> will prompt <strong>for</strong> the length and<br />
tempo of a metronome count-off. When you click OK the Capybara will beep <strong>for</strong> the specified number of<br />
beats at the specified tempo. Recording begins on the beat after the count-off.<br />
If you don’t want a count-off, enter zero <strong>for</strong> the number of beats.<br />
Finally, <strong>Kyma</strong> will compile, load, and start the selected <strong>Sound</strong>, recording the audio into the sample file.<br />
To stop the recording prematurely, click the mouse button while holding down the Shift key.<br />
437
Even if the selected <strong>Sound</strong> cannot play in real time (and is heard with clicks in the audio output), the<br />
digital recording made will be correct and will be free of clicks.<br />
Action menu: Compile to disk…<br />
Compile to disk… stores a compiled version of the selected <strong>Sound</strong> onto the disk. Compiled <strong>Sound</strong> files<br />
can be played by choosing Play… from the File menu (see page 421). Compiled <strong>Sound</strong> files are also used<br />
by the compiled <strong>Sound</strong> grid.<br />
Compiled <strong>Sound</strong> files and the compiled <strong>Sound</strong> grid are explained in detail in Compiled <strong>Sound</strong> Grid<br />
starting on page 485.<br />
Action menu: Collect<br />
Collect… applies only to groups of selected <strong>Sound</strong>s in <strong>Sound</strong> file windows. It prompts <strong>for</strong> the name of<br />
the collection and places the selected <strong>Sound</strong>s into a new <strong>Sound</strong> collection (icon shown on the left) with<br />
the given name.<br />
Action menu: Duplicate<br />
Duplicate applies only to the selected <strong>Sound</strong> in a <strong>Sound</strong> file window. It makes a copy of the selected<br />
<strong>Sound</strong>(s) and/or <strong>Sound</strong> collections(s), and puts them into the <strong>Sound</strong> file window. A duplicate of a <strong>Sound</strong><br />
collection contains a duplicate of each <strong>Sound</strong> that was in the original collection.<br />
Action menu: Expand<br />
More than half of the prototypes supplied with <strong>Kyma</strong> are constructed out of other <strong>Sound</strong>s. Selecting Expand<br />
from the Action menu makes this lower level construction available <strong>for</strong> editing and inspection.<br />
Expand often is used to debug complex <strong>Sound</strong>s and <strong>Sound</strong> classes.<br />
Expand can be applied in the <strong>Sound</strong> file window and the <strong>Sound</strong> editor. In the <strong>Sound</strong> file window, a copy<br />
of the expanded <strong>Sound</strong> is saved in the window and no changes are made to the selected <strong>Sound</strong>. However,<br />
in a <strong>Sound</strong> editor, Expand replaces the selected <strong>Sound</strong> with its expansion; this operation is not reversible.<br />
Action menu: Revert<br />
Revert applies only to the <strong>Sound</strong> editor. It discards all changes made to the <strong>Sound</strong> whose parameters are<br />
displayed in the lower half of the <strong>Sound</strong> editor.<br />
Action menu: Set default <strong>Sound</strong><br />
<strong>Kyma</strong> keeps a default <strong>Sound</strong> that it can use as a value <strong>for</strong> variables that are <strong>Sound</strong>s. To change the value<br />
of this default <strong>Sound</strong>, select a <strong>Sound</strong> and choose Set default sound. See Variables on page 510 <strong>for</strong> more<br />
in<strong>for</strong>mation.<br />
Action menu: Set default <strong>Sound</strong> collection<br />
<strong>Kyma</strong> also keeps a default <strong>Sound</strong> collection that it can use as a value <strong>for</strong> <strong>Sound</strong>CollectionVariables. To<br />
change the value of this default <strong>Sound</strong> collection, select a group of <strong>Sound</strong>s and choose Set default collection.<br />
See Variables on page 510 <strong>for</strong> more in<strong>for</strong>mation.<br />
438
Action menu: Find prototype<br />
Find prototype… applies only to prototype windows. Type all or part of the name of a <strong>Sound</strong> into the<br />
dialog, and click OK or press Enter. <strong>Kyma</strong> will select the named <strong>Sound</strong>. If more than one <strong>Sound</strong> matches<br />
the name entered, choose one of the <strong>Sound</strong>s from the list.<br />
Action menu: Edit class<br />
Edit class can be applied in <strong>Sound</strong> file windows and <strong>Sound</strong> editors. Choose Edit class to modify aspects<br />
of the selected <strong>Sound</strong>’s class. Class creation and modification are described in <strong>The</strong> Class Editor on page<br />
536.<br />
Action menu: New class from example<br />
New class from example can be applied only in <strong>Sound</strong> file windows. It defines a new <strong>Sound</strong> classes<br />
based upon the selected <strong>Sound</strong>. Class creation and modification are described in <strong>The</strong> Class Editor on<br />
page 536.<br />
Action menu: Retrieve example from class<br />
Info Menu<br />
Retrieve example from class, active only in the <strong>Sound</strong> class editor, saves the original <strong>Sound</strong> on which<br />
this class was based, preserving any variables that were in the original <strong>Sound</strong>. Class creation and modification<br />
are described in <strong>The</strong> Class Editor on page 536.<br />
Operations under the Info menu are used to obtain in<strong>for</strong>mation on the selected <strong>Sound</strong>(s) within the active<br />
window.<br />
Info menu: Get info<br />
Get info opens a window containing in<strong>for</strong>mation about the selected <strong>Sound</strong>, including its <strong>Sound</strong> class,<br />
duration (in samples and seconds), complexity (useful as a rough estimate of the relative efficiencies of<br />
different <strong>Sound</strong>s), variable names (if any), Event Value names (if any), sample files, and parameter names<br />
and values.<br />
439
Info menu: Describe sound<br />
Describe sound opens a help window with a description of the selected <strong>Sound</strong>’s class and its parameters.<br />
Info menu: Structure as text<br />
Structure as text opens a window containing a textual representation of the <strong>Sound</strong> structure. Each <strong>Sound</strong><br />
is represented by the name of the <strong>Sound</strong> followed by a list of its inputs’ names enclosed in parentheses.<br />
Below each <strong>Sound</strong>, each of its inputs is listed in the same manner but indented. <strong>The</strong> level of indenting<br />
indicates the number of levels between the <strong>Sound</strong> and the final output <strong>Sound</strong>.<br />
Info menu: Environment<br />
Environment applies only in the <strong>Sound</strong> editor. It shows the current mapping of <strong>Kyma</strong> variables to values.<br />
To clear that mapping, select Reset environment. See Variables on page 510 <strong>for</strong> more in<strong>for</strong>mation.<br />
Info menu: Reset environment<br />
Reset environment clears the current mapping of <strong>Kyma</strong> variables to values. See Variables on page 510<br />
<strong>for</strong> more in<strong>for</strong>mation.<br />
Info menu: Full wave<strong>for</strong>m<br />
To see a graphic representation of the selected <strong>Sound</strong> as amplitude versus time, select Full wave<strong>for</strong>m.<br />
<strong>The</strong> Capybara will play the <strong>Sound</strong>, recording it into the Capybara’s sample memory. If the <strong>Sound</strong>’s total<br />
duration is too long to fit into memory, <strong>Kyma</strong> will ask you to specify the length of time that you would<br />
like to plot. After per<strong>for</strong>ming the recording, <strong>Kyma</strong> reads the wave<strong>for</strong>m out of the memory and displays it<br />
in a newly opened window. Also displayed are the minimum and maximum amplitudes <strong>for</strong> that <strong>Sound</strong>.<br />
440
If the minimum and/or maximum are -1 or +1, respectively, and portions of the displayed wave<strong>for</strong>m appear<br />
to be flattened on the top or bottom, it is likely that the <strong>Sound</strong> is clipping; correct this by attenuating<br />
the amplitudes in the <strong>Sound</strong> structure. Click in the close box when you are finished with the wave<strong>for</strong>m.<br />
Info menu: Oscilloscope<br />
When Oscilloscope from the Info menu is chosen, <strong>Kyma</strong> compiles, loads, and starts the selected <strong>Sound</strong><br />
and opens an oscilloscope display in the virtual control surface. <strong>The</strong> oscilloscope displays a mix of the left<br />
and right outputs of the selected <strong>Sound</strong>.<br />
<strong>The</strong> buttons across the bottom shrink the time axis, expand the time axis, shrink the amplitude axis, and<br />
expand the amplitude axis, respectively. <strong>The</strong> amplitude value corresponding to the vertical position of<br />
the cursor is displayed in the upper right of the oscilloscope window as long as the mouse is inside the<br />
window.<br />
<strong>The</strong> oscilloscope always displays a power-of-two number of samples; a signal with a period that is 1, 2, 4,<br />
8, 16, 32, 64, 128, 256, or 512 samples will be locked on the display.<br />
Info menu: Spectrum analyzer<br />
When Spectrum analyzer is chosen, <strong>Kyma</strong> compiles, loads, and starts the selected <strong>Sound</strong> and displays<br />
the spectrum of the selected <strong>Sound</strong> in real time in the virtual control surface window. <strong>The</strong> spectrum of a<br />
mix of the left and right outputs of the selected <strong>Sound</strong> is displayed.<br />
<strong>The</strong> spectrum window displays the output of an FFT; the horizontal axis is linear frequency and the vertical<br />
axis is magnitude in dB. <strong>The</strong> buttons across the bottom shrink the frequency axis, expand the<br />
frequency axis, shrink the magnitude axis, and expand the magnitude axis, respectively. <strong>The</strong> length of the<br />
441
Tools Menu<br />
FFT and the window function applied be<strong>for</strong>e the FFT are both specified in the preferences under Spectrum<br />
analyzer… (see Spectrum Analyzer… on page 432 <strong>for</strong> more in<strong>for</strong>mation).<br />
<strong>The</strong> image above shows the real-time spectrum analyzer display of a band-limited square wave whose<br />
fundamental frequency is 187.5 hz. <strong>The</strong> crosshairs are centered on the fundamental. <strong>The</strong> frequency and<br />
level in<strong>for</strong>mation are displayed in the upper right.<br />
<strong>Kyma</strong> also includes <strong>Sound</strong>s that put oscilloscopes and spectrum analyzers at any point in the signal path,<br />
so that the signal at that point will be displayed in the virtual control surface. See the OscilloscopeDisplay<br />
and SpectrumAnalyzerDisplay <strong>Sound</strong>s in the Analysis category of the system prototypes.<br />
Operations under the Tools menu are used to start up high level tools, such as those <strong>for</strong> designing alternate<br />
tunings and <strong>for</strong> recording and analyzing sample files.<br />
Tools placed into the Tools folder within the Program folder of the <strong>Kyma</strong> folder are available directly<br />
from the Tools menu. Additionally, you can use a Tool by choosing Open… from the File menu, choosing<br />
Use tool as the file type, and selecting the Tool you want to use.<br />
This section describes the Tools that come with <strong>Kyma</strong> Release <strong>4.5</strong>; additional tools are available from<br />
third-party developers and from the Symbolic <strong>Sound</strong> FTP site.<br />
Tools menu: Tape Recorder<br />
<strong>The</strong> tape recorder tool provides a way to record the audio signal presented to the signal processor’s analog<br />
or digital inputs. To record the output of a <strong>Kyma</strong> <strong>Sound</strong>, see Action menu: Record to disk… on page<br />
437.<br />
This tool mimics the operation of a tape recorder: the transport buttons (at the left center of the tool) control<br />
the recording and playback of audio, the faders control the level of the signal being recorded, the<br />
channel select buttons (above the level faders) select the input channels to record, and the metering section<br />
(to the left of the level faders) shows the current input level and the peak level since last reset.<br />
<strong>The</strong> Filename button, at the upper left, is used to select the type of digital recording to make, including<br />
the file type (AIFF, WAV, etc.), the resolution (8, 16, or 24 bits), the number of channels in the file, and the<br />
name of the new file. <strong>The</strong> selected file name is shown in the box immediately below.<br />
442
To record, click the record button (the rightmost transport control button). This automatically depresses<br />
the pause button. <strong>The</strong> recorder will begin monitoring the input signal. While monitoring, you can adjust<br />
the recording level and choose which input channels to record. When ready to record to the disk, click the<br />
pause button to un-pause the recording. During the recording, the time counter will display the approximate<br />
elapsed time of the recording. To pause the recording, click on the pause button again; to stop the<br />
recording, click on the stop button (the leftmost transport control button).<br />
To play back your recording, click the play button. You can pause the playback at any time by pressing<br />
the pause button. Clicking the stop button will stop the recording. To edit the recording, choose Open…<br />
from the File menu, select Sample file as the file type, and locate the recording in using the file dialog.<br />
Tools menu: Spectral Analysis<br />
Use the Spectral Analysis Tool to create a spectrum file from a sample recorded at a 44.1 khz sample rate.<br />
<strong>The</strong> spectrum file, when used in conjunction with the SumOfSines <strong>Sound</strong>, can be used <strong>for</strong> morphing and<br />
other spectral manipulations. Spectrum files can be manipulated in a graphical editor, see Spectrum Editor<br />
on page 487 <strong>for</strong> more in<strong>for</strong>mation.<br />
<strong>The</strong> Spectral Analysis Tool can create two different kinds of spectrum files: straight spectrum files that<br />
contain the time-varying amplitude in<strong>for</strong>mation at equally spaced frequencies (between 0 hz and one-half<br />
of the sample rate), and quasi-harmonic files that contain spectral in<strong>for</strong>mation <strong>for</strong> the harmonic part of<br />
the sample only.<br />
Both kinds of spectrum files can be used <strong>for</strong> time scaling, pitch shifting, and morphing, § however, you<br />
can get quite different results between the two kinds of spectrum files. Additionally, the results you get<br />
are very dependent on the source samples that you analyze: try to use recordings that have very little<br />
background noise and that are as free of reverberation as possible.<br />
Quasi-harmonic files generally work best <strong>for</strong> morphing between nearly harmonic sources (such as voices<br />
or musical instruments). Because these files store only the harmonic part of the sample, non-harmonic or<br />
noisy sounds (such as church bells, car crashes, or jet fly-bys) and polyphonic or other overlapping<br />
sounds (such as a chorus, a conversation, or an outdoor ambiance) will work best as straight spectra.<br />
Straight spectrum files generally have the fewest artifacts when used <strong>for</strong> time scaling and pitch shifting.<br />
§ You should always per<strong>for</strong>m morphs between the same kinds of spectrum files: either both straight spectrum files or<br />
both quasi-harmonic files.<br />
443
Using the Tool<br />
Choose Spectral Analysis from the Tools menu to start analyzing a sample. <strong>The</strong> analysis has several<br />
steps to it, and the Tool guides you through them.<br />
First, you must choose a sample file to be analyzed. Click the Select button and choose the sample from<br />
the file dialog. ‡ <strong>The</strong> name of the file that you select will be displayed immediately above the button and<br />
you will hear the sample played back repeatedly, with a one second delay between repetitions.<br />
In the text field below the button, you can change the number of seconds of silence between repetitions of<br />
the playback when auditioning the analysis. Click Next to proceed to the next step of the analysis procedure.<br />
<strong>The</strong> next step is to specify the three analysis parameters that are common to both kinds of analysis files.<br />
<strong>The</strong> first parameter setting is used to set the lowest frequency in the analysis. Choose one of the five settings<br />
based on the material you are analyzing. You should select the highest setting that is still below the<br />
fundamental frequency (or the lowest frequency) in the sample. For example, if you are analyzing a sample<br />
of singing and the pitch of the sample is middle C (4 c), then you should choose Above 3F.<br />
<strong>The</strong> second setting concerns the tradeoff between time and frequency. Whenever a spectral analysis is<br />
per<strong>for</strong>med, when you request high frequency resolution you get poor timing resolution and vice versa.<br />
<strong>The</strong>se settings allow you to choose between favoring frequency resolution and favoring timing resolution<br />
in order: BestFreq, BetterFreq, BetterTime, and BestTime.<br />
<strong>The</strong> level fader is used to control the overall amplitude level of the analysis.<br />
‡ <strong>The</strong> Spectral Analysis Tool only works with monaural sample files recorded at a sample rate of 44.1 khz.<br />
444
At any time during the setting of these analysis parameters, you can click the Audition button to hear a<br />
resynthesis based on an analysis with the current settings. § Generally, you should try different combinations<br />
of these parameters and audition them, using your ear to judge which setting is best. Press Next<br />
when you are satisifed with the settings.<br />
<strong>The</strong> next step requires a decision. If your goal is to create a straight spectrum file, click the Create Spectrum<br />
File button, and you are done. If you want to create a quasi-harmonic file, click the Set Quasi-<br />
Harmonic Parameters button.<br />
§ <strong>The</strong> number of sine waves used in the resynthesis depends on the power of your signal processor, and is indicated<br />
immediately below the Audition button.Certain settings of the parameters may require more processing power<br />
than is available on your signal processor. <strong>Kyma</strong> will warn you when this occurs.<br />
445
If you are unsure which type of file to create, here are some guidelines. Use a quasi-harmonic file <strong>for</strong><br />
♦ speech<br />
♦ monophonic (as opposed to polyphonic) musical sounds with clearly identifiable pitch<br />
Use a straight spectrum file <strong>for</strong><br />
♦ polyphonic musical sounds<br />
♦ ambient or background sounds<br />
♦ noisy or unpitched sounds<br />
♦ highly reverberant sounds<br />
For straight spectrum files, this is as far as you have to go. <strong>The</strong> Tool will open up an untitled <strong>Sound</strong> file<br />
window with an example SumOfSines <strong>Sound</strong> set up to play the analysis file you just created.<br />
If you want to create a quasi-harmonic spectrum, you should click Set Quasi-Harmonic Parameters to<br />
continue.<br />
<strong>The</strong>re are two more steps involved in creating a quasi-harmonic analysis file. <strong>The</strong> first step is to identify<br />
the unpitched material in the sample.<br />
Adjust the fader slowly upwards while you listen to the resynthesis. As you move the fader up, more and<br />
more of the pitched material in the sample will be removed. You should adjust the fader until you hear<br />
only the unpitched part of the sample. <strong>The</strong>se unpitched parts include the attack of a musical instrument<br />
note, the consonants (such as “t”, “f”, and “s”) in speech or singing, or noisy parts of a sound effect sample.<br />
Adjust the fader such that you no longer hear any pitched sounds. If you hear some pitched segments<br />
of the signal breaking up, you should adjust the fader higher until the pitched segment disappears entirely.<br />
Press Next when you have finished setting the fader.<br />
<strong>The</strong> last step is to trace the fundamental frequency envelope of the sample using a series of line segments.<br />
<strong>The</strong> Tool displays a tentative analysis of the sample. <strong>The</strong> fundamental frequency envelope is indicated by<br />
the white curve drawn in this display. Using the mouse, add points to this curve and adjust the locations<br />
of the points to closely follow the fundamental frequency of the sample.<br />
446
To zoom in on an area, hold down the Command or Control key while clicking and dragging a box<br />
around the area to magnify. To return to a display of the entire spectrum press the Return or Enter key.<br />
To toggle between drawing tracks as unconnected frames or as frames connected by lines, press the L key<br />
(lowercase).<br />
You should try to follow the fundamental with the white curve as closely as possible. You can add points<br />
by clicking the mouse while holding the Shift key down. To delete a point, select it using the mouse and<br />
then press the Delete key. You can move a point by clicking and dragging it.<br />
While you are making adjustments to the curve, you can use the radio buttons to choose between the<br />
original sample, a resynthesized fundamental, and a resynthesis of the sample using the number of partials<br />
shown.<br />
447
If you hear clipping in the resynthesis, you can use the level field to reduce the amplitude of the analysis.<br />
If the fundamental frequency envelope of the sample being analyzed is difficult to follow, you can choose<br />
to trace different harmonic. Enter the harmonic number into the Traced Harmonic field, and adjust the<br />
white curve to track that harmonic.<br />
When you have finished tracing the fundamental frequency curve, click Next.<br />
At this point, you have provided all of the parameters needed to create a quasi-harmonic file. Click the<br />
Create Quasi-Harmonic Spectrum File button to do this. <strong>Kyma</strong> will prompt you <strong>for</strong> the name of the file,<br />
per<strong>for</strong>m the analysis, and open an untitled <strong>Sound</strong> file window with a SumOfSines <strong>Sound</strong> set up to play<br />
the analysis just created.<br />
<strong>The</strong> other buttons on this page allow you to repeat any of the steps along the way to creating the analysis.<br />
New sample takes you to the first page, where you can specify a new sample to analyze. Adjust range &<br />
response takes you to the second page, where you can adjust the lowest analysis frequency parameter<br />
and the tradeoff between frequency and timing resolution. Adjust pitched/unpitched takes you to the<br />
fourth page, where you made an adjustment to leave only unpitched material audible. Adjust fundamental<br />
takes you to the penultimate page, where you traced the fundamental frequency envelope.<br />
Tools menu: Synchronizing Spectra<br />
It is important to tightly synchronize the spectra used in per<strong>for</strong>ming certain kinds of morphs. For example,<br />
morphing between the voices of two people speaking the same text has the fewest artifacts when the<br />
voices are very well synchronized in time.<br />
<strong>The</strong> Synchronizing Spectra Tool provides a way to specify how two spectra should align in time. In this<br />
tool, you enter color coded markers at corresponding time points in two different spectra. <strong>The</strong> Tool can<br />
then produce an example of either a mix or a morph of the two spectra in which the corresponding points<br />
line up in time.<br />
To open the Synchronizing Spectra Tool, choose Synchronizing Spectra from the Tools menu.<br />
448
<strong>The</strong> two spectra to be synchronized are displayed in the Guide View and Warped View fields. Using<br />
markers, you specify the time points in the warped spectrum file that will be shifted to align with the corresponding<br />
points in the guide spectrum file. For example, you could mark the beginning and the ending<br />
of each feature in the guide spectrum and then mark the beginning and ending of those same features in<br />
the warped spectrum. “Features” would be things like the attack of an instrument tone, each phoneme in<br />
a sample of human speech, or each note in a musical passage.<br />
Click the Guide… button and the Warped… button to choose these two spectra using file dialogs. If the<br />
files already contain markers, the markers will be displayed along with the spectrum.<br />
Only one of the spectrum views can be active at a time — the one with the white border. To switch to the<br />
other spectrum view, you can either click the mouse in the view, or you can press the Tab key.<br />
To zoom in on an area in the active spectrum view, hold down the Command or Control key while<br />
clicking and dragging a box around the area to magnify. To return to a display of the entire spectrum,<br />
click in the marker area to deselect the markers and press the Return or Enter key.<br />
To audition the active spectrum file, press the Space Bar. Use either pitch bend on a MIDI controller or<br />
drag the yellow scrub bar to scrub through the spectrum.<br />
To add a marker at the scrub bar position, press the m key. To let <strong>Kyma</strong> choose these markers automatically,<br />
press the a key. <strong>The</strong>n add or remove markers as necessary.<br />
To make it easier to see the correspondence between markers in the two files, the markers are color coded<br />
in order from left to right: red, green, blue, red, green, etc. A red marker in the warped spectrum will be<br />
shifted ahead or behind in time to line up with the corresponding red marker in the guide spectrum.<br />
To name a marker, select the marker with the mouse, and press Enter. To delete a marker, select it and<br />
press the Delete key. Press the s key to save the markers into the spectrum file in the active view.<br />
Click the Save markers button to save the markers you have entered.<br />
<strong>The</strong> Mix and Morph buttons construct example <strong>Sound</strong>s to per<strong>for</strong>m a mix of the resynthesized spectra or a<br />
morph between the two spectrum files. In order <strong>for</strong> these examples to be generated, the two files must<br />
have the same number of markers.<br />
Tools menu: RE Analysis<br />
<strong>The</strong> RE Analysis Tool is used to create files <strong>for</strong> resynthesis using the Resonator/Excitation synthesis<br />
method (RE synthesis) found in the REResonators <strong>Sound</strong>.<br />
449
<strong>The</strong> Tool per<strong>for</strong>ms an analysis that breaks down the sample into a time-varying filter (the resonator) and<br />
an input to the filter (the excitation) that exactly recreates the sample. <strong>The</strong> description of the resonator is<br />
placed into an RE file, and the excitation is placed into an EX file.<br />
<strong>The</strong> RE file can be used to control an REResonators filter operating on an entirely different input in order<br />
to per<strong>for</strong>m cross synthesis. In this case, the REResonators will impose the <strong>for</strong>mant (or filter characteristics)<br />
of the analyzed sample onto its input.<br />
To use the RE Analysis Tool, choose RE Analysis from the Tools menu.<br />
Click on the Browse… button to choose from a file dialog the sample to be analyzed. <strong>Kyma</strong> will play the<br />
sample that you selected.<br />
<strong>The</strong> other parameters control the analysis. Try the default parameters first. <strong>The</strong>n you can try adjusting<br />
them:<br />
♦ Filter order is approximately twice the number of resonant peaks in the time-varying filter. <strong>The</strong><br />
larger this number, the larger the number of <strong>for</strong>mants or harmonics that can be tracked, but the<br />
longer it will take to complete the analysis.<br />
♦ Filter updates per second controls the number of individual filters that are created each second. For<br />
improved time resolution in the resynthesis, make this number larger.<br />
♦ Averaging time controls how much of the sample at any one time should be used by the analyzer to<br />
determine the filter. This number should be about twice the period of the input signal (in other<br />
words, twice the duration of a typical cycle of the sample). If you know the fundamental frequency of<br />
the sample, you can take the inverse of that and multiply by two to get an approximate averaging<br />
time.<br />
Click Create RE file only to create just the file containing the description of the time-varying filter, or<br />
click Create RE and EX files to create both the filter description and the filter input files. In either case,<br />
after the analysis has completed, an example <strong>Sound</strong> will be placed into an untitled <strong>Sound</strong> file window <strong>for</strong><br />
your use.<br />
<strong>The</strong> resulting filter is extremely sensitive to overflow when not using the corresponding EX file as its input.<br />
You should use an Attenuator to attenuate the REResonators Input (sometimes by as much as<br />
0.001).<br />
450
Tools menu: GA Analysis from Spectrum<br />
<strong>The</strong> group additive synthesis oscillator (called GAOscillator in <strong>Kyma</strong>) resynthesizes a sound from a<br />
small set of complex wave<strong>for</strong>ms. It offers many of the advantages of both sampling and sine wave additive<br />
synthesis. Using GA synthesis you can independently scale time and frequency, and you can morph<br />
between two analyses. While not general enough to resynthesize speech or long musical passages, GA<br />
synthesis is more computationally efficient than full additive synthesis, and, <strong>for</strong> individual harmonic<br />
tones, can sound just as good.<br />
Use the GA Analysis from Spectrum Tool (choose GA Analysis from Spectrum from the Tools menu) to<br />
create an analysis file <strong>for</strong> use with the GAOscillator.<br />
Click on the Browse… button to choose the quasi-harmonic analysis from a file dialog. <strong>Kyma</strong> will play a<br />
resynthesis of the file that you selected.<br />
<strong>The</strong> other parameters control the GA analysis algorithm. Try the other parameters first. <strong>The</strong>n you can try<br />
adjusting them:<br />
♦ Number of harmonics controls the number of harmonics to be included in the complex wave<strong>for</strong>ms.<br />
♦ Number of wave<strong>for</strong>ms controls the number of complex wave<strong>for</strong>ms used in the group additive resynthesis.<br />
When choosing the parameters <strong>for</strong> GA analysis, keep in mind that the larger the numbers, the longer the<br />
analysis will take.<br />
Click Create GA file to create the file containing the complex wave<strong>for</strong>ms and their corresponding amplitude<br />
envelopes. After the analysis has completed, an example <strong>Sound</strong> will be placed into an untitled<br />
<strong>Sound</strong> file window <strong>for</strong> your use.<br />
Tools menu: <strong>Design</strong> Alternate Tunings<br />
<strong>The</strong> <strong>Design</strong> Alternate Tunings Tool (choose <strong>Design</strong> Alternate Tunings from the Tools menu) lets you<br />
interactively design certain kinds of tuning systems. Throughout the use of this Tool, a MIDI keyboard<br />
can be used to try out the tuning in real time. §<br />
§ Thanks to Marcus Hobbs <strong>for</strong> motivating the work on this Tool. Marcus, Ervin Wilson, and Stephen Taylor are<br />
working on more advanced tuning systems and a special 500+ key keyboard <strong>for</strong> controlling <strong>Kyma</strong>. You can reach<br />
Marcus at: marcus@fa.disney.com.<br />
451
<strong>The</strong> main page of the Tool contains a few global settings, as well as buttons to display pages <strong>for</strong> designing<br />
specific kinds of tunings.<br />
Tonic Key Number and Tonic Frequency specify a MIDI key number and the corresponding frequency<br />
in hertz. <strong>The</strong>se two parameters are used to specify a “fixed point” between all of the tunings; no matter<br />
which tuning is selected, the specified key number will always play at the specified frequency. <strong>The</strong> default<br />
value specifies middle C and its frequency in the conventional equal tempered tuning system.<br />
In the middle of this page, you can specify the kind of sound to be used <strong>for</strong> auditioning the scale. Use the<br />
radio buttons to choose between a 21 harmonic sawtooth oscillator, a sine wave oscillator, or a sample.<br />
Click the Choose… button to choose the sample to be used from a file dialog. <strong>The</strong> Volume fader (active at<br />
all times through MIDI continuous controller 7) controls the volume of the sound being played.<br />
<strong>The</strong> five buttons provide access to the five different ways to design tunings in this Tool:<br />
♦ Ratio Scale is used to design 12-note octave scales by specifying the ratio of each scale degree to the<br />
tonic.<br />
♦ Cents Scale is used to design 12-note octave scales by specifying the number of cents difference between<br />
each scale degree and the tonic.<br />
♦ Equal Tempered is used to design equal tempered scales with an arbitrary number of scale degrees<br />
per octave.<br />
♦ Two Interval is used to design scales with an arbitrary number of scale degrees per octave, where the<br />
scale is made up by raising an interval to successively larger powers. Also called a y x scale.<br />
♦ From Text File is used to design completely arbitrary scales.<br />
452
Clicking on Ratio Scale brings up this page. Across the top are twelve fields <strong>for</strong> the numerator and<br />
twelve fields <strong>for</strong> the denominator of the twelve ratios that define the scale. <strong>The</strong> buttons at the lower left<br />
are used to preset the ratios to three different example ratio scales. ‡ To change a value, click the mouse in<br />
the field, and type in the new value. To cause the tuning to be updated with the new value, either press<br />
Enter, press Tab to go to the next field, or click in a different field.<br />
<strong>The</strong> central view is common to all of the tuning pages in this Tool. It describes an octave starting on the<br />
tonic key number specified on the main page. It lists the MIDI key number, the absolute frequency of that<br />
key number in this scale, the ratio of the scale degree to the tonic, and the cents difference in pitch between<br />
the tonic and the scale degree.<br />
<strong>The</strong> buttons at the lower right are also common to all of the tuning pages in this Tool:<br />
♦ Create Example opens an untitled <strong>Sound</strong> file window containing an example using the current tuning<br />
and currently selected instrument.<br />
♦ Load allows you to select a text file containing a tuning that you had saved earlier. <strong>The</strong> in<strong>for</strong>mation in<br />
the file is then used to set the parameters in the current tuning method. <strong>The</strong> Tool either uses the in<strong>for</strong>mation<br />
in the file directly (if the current tuning method is the same as the one used when saving<br />
the file), or it comes up with a set of parameters <strong>for</strong> this tuning method that approximates the tuning<br />
in the text file.<br />
♦ Save saves the parameters <strong>for</strong> the current tuning into a text file. Even though the Tool shows only one<br />
octave of the scale, the text file contains a listing of the frequencies in hertz of the 128 MIDI key numbers.<br />
You may find it useful to open this file with a text editor to view or edit that in<strong>for</strong>mation.<br />
♦ Back takes you back to the main tuning page.<br />
‡ Thanks to Brian Belet of the San Jose State University <strong>for</strong> providing the ratios of the “BB Sharp Chromatic (5-limit)<br />
Just Scale” used <strong>for</strong> the Just scale example.<br />
453
Clicking on Cents Scale brings up this page. Across the top are twelve fields <strong>for</strong> the pitch difference in<br />
cents between the tonic key number and each scale degree. <strong>The</strong> buttons at the lower left are used to preset<br />
the fields with a few different example scales. To change a value, click the mouse in the field, and type in<br />
the new value. To cause the tuning to be updated with the new value, either press Enter, press Tab to go<br />
to the next field, or click in a different field.<br />
Clicking on Equal Tempered brings up this page. <strong>The</strong> only parameter <strong>for</strong> an octave-based equal tempered<br />
scale is the number of scale degrees per octave.<br />
454
Clicking on Two Interval brings up this page. § <strong>The</strong>re are two parameters <strong>for</strong> this tuning: the number of<br />
scale degrees per octave, and the generating interval. This scale is constructed by raising the generating<br />
interval to successively higher powers. Whenever the value exceeds two, it is reduced by a factor of two<br />
so that it falls within the same octave as the other scale degrees.<br />
Clicking on From Text File brings up this page. <strong>The</strong>re are no parameters <strong>for</strong> this tuning; all pitches come<br />
directly from the file. Scales made with this part of the Tool can have completely arbitrary tunings.<br />
§ <strong>The</strong> name Two Interval comes from the fact that the each scale degree is generated by multiplying the previous<br />
scale degree by one of two intervals: either the generating interval or one-half of the generating interval. Thanks to<br />
tuning theorist Ervin Wilson <strong>for</strong> introducing us to this kind of scale.<br />
455
This part of the tool reads lines from the file consisting of the MIDI key number and the corresponding<br />
frequency in hertz. <strong>The</strong> last line has a key number of 999. <strong>The</strong> easiest way to prepare a file <strong>for</strong> use here is<br />
to save a tuning file from any of the other methods, and edit it using a text editor.<br />
Here is an example of one such prepared file:<br />
456
0 8.17581 hz<br />
1 9.51787 hz<br />
2 9.7463 hz<br />
3 9.98021 hz<br />
4 10.2198 hz<br />
5 11.8974 hz<br />
6 12.1829 hz<br />
7 12.4753 hz<br />
8 12.7747 hz<br />
9 15.2287 hz<br />
10 15.5941 hz<br />
11 15.9683 hz<br />
12 16.3516 hz<br />
13 19.0357 hz<br />
14 19.4926 hz<br />
15 19.9604 hz<br />
16 20.4395 hz<br />
17 23.7947 hz<br />
18 24.3659 hz<br />
19 24.9506 hz<br />
20 25.5494 hz<br />
21 30.4574 hz<br />
22 31.1883 hz<br />
23 31.9367 hz<br />
24 32.7033 hz<br />
25 38.0715 hz<br />
26 38.9852 hz<br />
27 39.9209 hz<br />
28 40.8791 hz<br />
29 47.5894 hz<br />
30 48.7318 hz<br />
31 49.9012 hz<br />
32 51.0988 hz<br />
33 60.9147 hz<br />
34 62.3765 hz<br />
35 63.8734 hz<br />
36 65.4065 hz<br />
37 76.143 hz<br />
38 77.9704 hz<br />
39 79.8417 hz<br />
40 81.7581 hz<br />
41 95.1789 hz<br />
42 97.4635 hz<br />
43 99.8025 hz<br />
44 102.198 hz<br />
45 121.829 hz<br />
46 124.753 hz<br />
47 127.747 hz<br />
48 130.813 hz<br />
49 152.286 hz<br />
50 155.941 hz<br />
51 159.683 hz<br />
52 163.516 hz<br />
53 190.358 hz<br />
54 194.927 hz<br />
55 199.605 hz<br />
56 204.395 hz<br />
57 243.659 hz<br />
58 249.506 hz<br />
59 255.493 hz<br />
60 261.626 hz<br />
61 30<strong>4.5</strong>72 hz<br />
62 311.882 hz<br />
63 319.367 hz<br />
64 327.032 hz<br />
65 380.716 hz<br />
66 389.854 hz<br />
67 399.21 hz<br />
68 408.791 hz<br />
69 487.318 hz<br />
70 499.012 hz<br />
71 510.987 hz<br />
72 523.252 hz<br />
73 609.144 hz<br />
74 623.763 hz<br />
75 638.734 hz<br />
76 654.065 hz<br />
77 761.431 hz<br />
78 779.708 hz<br />
79 798.42 hz<br />
80 817.581 hz<br />
81 974.635 hz<br />
82 998.025 hz<br />
83 1021.97 hz<br />
84 1046.5 hz<br />
85 1218.29 hz<br />
86 1247.53 hz<br />
87 1277.47 hz<br />
88 1308.13 hz<br />
89 1522.86 hz<br />
90 1559.42 hz<br />
91 1596.84 hz<br />
92 1635.16 hz<br />
93 1949.27 hz<br />
94 1996.05 hz<br />
95 2043.95 hz<br />
96 2093.01 hz<br />
97 2436.58 hz<br />
98 2495.05 hz<br />
99 2554.93 hz<br />
100 2616.26 hz<br />
101 3045.72 hz<br />
102 3118.83 hz<br />
103 3193.68 hz<br />
104 3270.33 hz<br />
105 3898.54 hz<br />
106 3992.1 hz<br />
107 4087.9 hz<br />
108 4186.02 hz<br />
109 4873.15 hz<br />
110 4990.11 hz<br />
111 5109.87 hz<br />
112 5232.52 hz<br />
113 6091.45 hz<br />
114 6237.67 hz<br />
115 6387.36 hz<br />
116 6540.65 hz<br />
117 7797.08 hz<br />
118 7984.2 hz<br />
119 8175.79 hz<br />
120 8372.03 hz<br />
121 9746.3 hz<br />
122 9980.22 hz<br />
123 10219.7 hz<br />
124 10465.0 hz<br />
125 12182.9 hz<br />
126 12475.3 hz<br />
127 12774.7 hz<br />
999 END
System Prototypes and the <strong>Sound</strong> File Window<br />
<strong>The</strong> system prototypes window contains an example of each kind of <strong>Sound</strong> included with the <strong>Kyma</strong> system.<br />
<strong>The</strong> system prototypes can be used to supply the components you need to build new sound designs.<br />
A <strong>Sound</strong> file window allows you to examine and manipulate the <strong>Sound</strong>s contained in a <strong>Sound</strong> file. It is<br />
used as a workspace <strong>for</strong> creating new <strong>Sound</strong>s and editing old <strong>Sound</strong>s.<br />
Prototype Strips<br />
A prototype strip (or prototypes window) is a collection of <strong>Sound</strong>s that you can use as templates <strong>for</strong> new<br />
<strong>Sound</strong>s. <strong>The</strong>re are two types of prototype strips in <strong>Kyma</strong>: the system prototypes and custom prototype<br />
strips.<br />
<strong>The</strong> system prototypes contains an example of each kind of <strong>Sound</strong> included with the <strong>Kyma</strong> system. <strong>The</strong><br />
system prototypes are organized into categories. <strong>The</strong> categories are identified in the scrolling list at the<br />
left of the system prototype strip; the <strong>Sound</strong>s in the selected category are displayed in the horizontal<br />
scrolling strip. See Prototypes Reference beginning on page 218 <strong>for</strong> descriptions of each system prototype<br />
<strong>Sound</strong>. To open the system prototypes, choose System prototypes from the File menu.<br />
By exploring the system prototypes using Describe <strong>Sound</strong> from the Info menu and Compile, load, start<br />
from the Action menu, you can learn about the different prototypes provided in <strong>Kyma</strong>. Each prototype<br />
serves as an example of a <strong>Kyma</strong> <strong>Sound</strong>, so experimenting with the prototypes is one way to learn about<br />
the <strong>Kyma</strong> System.
As you start to design your own <strong>Sound</strong>s, you will probably want to use some of them as templates. To<br />
use one of your customized <strong>Sound</strong>s as a template, open the <strong>Sound</strong> file that contains the template as a<br />
custom prototype strip. To open a <strong>Sound</strong> file as a custom prototype strip, choose Open… from the File<br />
menu, select Custom prototypes as the file type, and select the <strong>Sound</strong> file to be opened. Any <strong>Sound</strong> collections<br />
in the <strong>Sound</strong> file will show up as categories in the custom prototype strip; other <strong>Sound</strong>s will<br />
show up under the General category in the custom prototype strip.<br />
<strong>Sound</strong> File Windows<br />
While you are in <strong>Kyma</strong>, a <strong>Sound</strong> file window allows you to examine and manipulate the <strong>Sound</strong>s contained<br />
in a <strong>Sound</strong> file. It serves as a workspace <strong>for</strong> creating new <strong>Sound</strong>s and editing old <strong>Sound</strong>s.<br />
When you leave <strong>Kyma</strong>, you have the option of saving your work in the <strong>Sound</strong> file on the disk. <strong>Sound</strong>s<br />
stored in a <strong>Sound</strong> file are not sample files or digital recordings but instructions <strong>for</strong> producing sound on<br />
the digital signal processor (DSP). This representation is much more compact than a digital recording.<br />
A <strong>Sound</strong> file can contain individual <strong>Sound</strong>s and/or <strong>Sound</strong> collections. A <strong>Sound</strong> collection is itself a collection<br />
of individual <strong>Sound</strong>s and/or other <strong>Sound</strong> collections. A <strong>Sound</strong> collection is a convenient way to<br />
categorize or organize the objects in a <strong>Sound</strong> file.<br />
<strong>The</strong> operations in the Action, Info and Edit menus (see pages 436, 439, and 425) affect the selected<br />
<strong>Sound</strong>(s). Click a <strong>Sound</strong> to select it. Press Enter to change the name of a selected <strong>Sound</strong>. Use standard<br />
click and drag techniques to select and move <strong>Sound</strong>s in the <strong>Sound</strong> file window or between windows.<br />
Clicking and dragging the mouse in the background of the <strong>Sound</strong> file window lets you draw a box<br />
around many <strong>Sound</strong>s at once, selecting all <strong>Sound</strong>s within the box. If you hold down the shift key while<br />
per<strong>for</strong>ming any of these mouse operations, you will add to or remove from the current selection, rather<br />
than starting a new selection.<br />
To move a <strong>Sound</strong>, hold down the Control or Option key as you click and drag. Normally, you will not<br />
want to move a <strong>Sound</strong>; it is safer to move a copy. To move a copy of a <strong>Sound</strong>, click on the <strong>Sound</strong> (without<br />
pressing the Option or Control keys) and drag the <strong>Sound</strong>’s icon.<br />
459
Creating and Editing <strong>Sound</strong>s<br />
In <strong>Kyma</strong>, you do not start from scratch when designing a new <strong>Sound</strong>. Instead, you use an existing <strong>Sound</strong><br />
as a template <strong>for</strong> your new <strong>Sound</strong>, substituting new components <strong>for</strong> the old. Any existing <strong>Sound</strong> can<br />
function as a template <strong>for</strong> a new <strong>Sound</strong>.<br />
To create a new <strong>Sound</strong>, first choose an existing <strong>Sound</strong> to serve as a template. Drag the template’s icon to<br />
the <strong>Sound</strong> file window from either a prototype strip or another <strong>Sound</strong> file window. In <strong>Kyma</strong>, when you<br />
drag a <strong>Sound</strong>’s icon from one window to another, you are actually dragging a duplicate of that <strong>Sound</strong>.<br />
<strong>The</strong> original <strong>Sound</strong> remains unchanged, ready to be reused.<br />
Whenever you drag a <strong>Sound</strong> from a prototype strip, you are really creating and dragging a duplicate of<br />
the <strong>Sound</strong>. <strong>Kyma</strong> automatically appends a number to the name of the <strong>Sound</strong> that you drag from the<br />
prototype strip to indicate that you have a copy of the original. <strong>The</strong> number <strong>Kyma</strong> appends to the<br />
<strong>Sound</strong>’s name corresponds to the number of times you have dragged that <strong>Sound</strong> from a prototype strip.<br />
Once the <strong>Sound</strong> you have chosen as a template is in a <strong>Sound</strong> file window, double-click on the <strong>Sound</strong> to<br />
begin editing it. A <strong>Sound</strong> editor window will open, allowing you to make changes to the <strong>Sound</strong>’s parameters.<br />
When you close the <strong>Sound</strong> editor window after making changes, a dialog will allow you to<br />
choose between saving or discarding your changes to the <strong>Sound</strong>.<br />
460
<strong>Sound</strong> Editor Window<br />
In <strong>Kyma</strong> you construct new <strong>Sound</strong>s by combining and modifying other <strong>Sound</strong>s in a <strong>Sound</strong> editor window.<br />
To open a <strong>Sound</strong> editor, go to the <strong>Sound</strong> file window and double-click on the <strong>Sound</strong> you would like<br />
to edit. A <strong>Sound</strong> editor window will appear. Only one editor at a time can be open on any particular<br />
<strong>Sound</strong>, but any number of editors can be open at once. Opening or double-clicking a <strong>Sound</strong> that is already<br />
being edited will bring its <strong>Sound</strong> editor to the front.<br />
<strong>The</strong> <strong>Sound</strong> editor is divided into two parts; the top section shows the signal flow diagram, and the lower<br />
section shows the parameter settings.<br />
Select a <strong>Sound</strong> in the signal flow diagram by clicking on it once; the <strong>Sound</strong> will be highlighted in gray to<br />
indicate that it has been selected. Operations in the Action and Info menus apply to the <strong>Sound</strong> that is selected<br />
in the signal flow diagram.<br />
You can edit the parameters of a <strong>Sound</strong> in the signal flow diagram by double-clicking on it. <strong>The</strong> parameter<br />
area of the <strong>Sound</strong> editor will change to the parameters of the double-clicked <strong>Sound</strong> and the doubleclicked<br />
<strong>Sound</strong>’s icon will be replaced with a gray pattern.<br />
Operations in the Edit menu apply to the active field in the <strong>Sound</strong> editor. <strong>The</strong> active field is the field with<br />
a border drawn just inside its editing area. You can click inside a field to make it active, or press Tab to<br />
cycle through all of the editable fields.<br />
Signal Flow Diagram<br />
Viewing Inputs<br />
<strong>The</strong> top half of the <strong>Sound</strong> editor window is the signal flow diagram. <strong>The</strong> signal flows from left to right.<br />
<strong>The</strong> rightmost <strong>Sound</strong> is the “output” <strong>Sound</strong>, the one you double-clicked in the <strong>Sound</strong> file window to<br />
open the <strong>Sound</strong> editor. <strong>The</strong> output <strong>Sound</strong>’s immediate inputs appear to its left.<br />
In the <strong>Sound</strong> editor, an arrow tab on the left side of a <strong>Sound</strong>’s icon indicates that the <strong>Sound</strong> has inputs.<br />
<strong>The</strong> arrow tab acts as a toggle — click once to see the input(s) of a <strong>Sound</strong>, and click again to hide the inputs.<br />
Clicking on the arrow tab while holding down the Control or Command key displays the entire<br />
signal flow path leading into that <strong>Sound</strong>.
Clicking the arrow tab on Vocoder1, shown here:<br />
reveals that it has several inputs:<br />
Several <strong>Sound</strong>s can share an input. In this case, there is a connection drawn from each <strong>Sound</strong> to the<br />
shared input. In the example above, compressor is an input to both Vocoder1 and PeakDetector1.<br />
462
Clicking on the arrow tab of compressor reveals its inputs:<br />
If a <strong>Sound</strong> and its input are connected with a thick line labeled with a number, that means the input is<br />
used more than once within that <strong>Sound</strong>. <strong>The</strong> number of times the input is used is indicated by the label<br />
displayed on the connection. In the example above, count is used twice as an input to compressor.<br />
Signal Flow Diagram Layout<br />
You can change the appearance of the signal flow diagram by selecting View… from the Edit menu and<br />
selecting the desired layout attributes.<br />
<strong>Sound</strong>s can be displayed as large or small icons. Small icons take up one quarter the area of large icons.<br />
<strong>The</strong> radial and right angle attributes refer to the contour of the connections between the <strong>Sound</strong>s. Radial<br />
edges fan out radially from the left edge of a <strong>Sound</strong> to points at the right edges of its inputs. Right angle<br />
connections use only straight lines and right angles.<br />
463
You can adjust the layout of the signal flow diagram by dragging the <strong>Sound</strong> icons around with the<br />
mouse. Dragging an icon moves its position relative to the rest of the signal flow diagram; dragging an<br />
icon while holding down the Shift key moves the <strong>Sound</strong> and all of its inputs simultaneously.<br />
When you move a <strong>Sound</strong> to a new position within the same signal flow diagram, you are producing only<br />
a cosmetic change not a change to the <strong>Sound</strong>. Clean up (in the Edit menu) restores the signal flow diagram<br />
to its original layout.<br />
Editing the Signal Flow Diagram<br />
You can edit the signal flow diagram by replacing <strong>Sound</strong>s in the diagram with other <strong>Sound</strong>s and by inserting<br />
new <strong>Sound</strong>s into the diagram. You can replace a <strong>Sound</strong> in the signal flow diagram by dragging<br />
another <strong>Sound</strong> over its icon. To insert a <strong>Sound</strong> between two <strong>Sound</strong>s in the signal flow, drag and drop the<br />
<strong>Sound</strong> onto a line in the signal flow diagram. To remove a <strong>Sound</strong> that is between two other <strong>Sound</strong>s, select<br />
the <strong>Sound</strong> and press Delete or Backspace. To change the name of the selected <strong>Sound</strong>, press Enter, then<br />
type the new name in the dialog box.<br />
Replacing <strong>Sound</strong>s in the Signal Flow Diagram<br />
To replace a <strong>Sound</strong> in the signal flow diagram:<br />
1. select the new <strong>Sound</strong> with the mouse<br />
2. while holding the mouse button down, drag the icon on top of the <strong>Sound</strong> that you want to replace<br />
3. release the mouse button<br />
You will be prompted to confirm the replacement. If the <strong>Sound</strong> has inputs, you will be given a choice<br />
between replacing the <strong>Sound</strong> and keeping any inputs with the same name (Replace), or to replace the<br />
<strong>Sound</strong> and its inputs (Replace all).<br />
464
Inserting <strong>Sound</strong>s to the Signal Flow Diagram<br />
To insert a <strong>Sound</strong> between two others in the signal flow diagram:<br />
1. select the new <strong>Sound</strong> with the mouse<br />
2. while holding the mouse button down, drag the icon on top of the line connecting the two <strong>Sound</strong>s<br />
3. release the mouse button<br />
Only <strong>Sound</strong>s that have input fields can be inserted into the signal flow diagram in this way. If the new<br />
<strong>Sound</strong> has several inputs, you will be asked to choose which input the existing <strong>Sound</strong> should be placed<br />
into. ‡<br />
Removing <strong>Sound</strong>s from the Signal Flow Diagram<br />
To remove a <strong>Sound</strong> from the signal flow diagram, select the <strong>Sound</strong> and press the Delete or Backspace<br />
key. Only <strong>Sound</strong>s with visible inputs can be removed in this way.<br />
Internally, <strong>Kyma</strong> implements this by replacing the <strong>Sound</strong> to be deleted with one of its inputs, so you will<br />
be asked to confirm the replacement and to decide which input should be used as the replacement.<br />
Renaming <strong>Sound</strong>s in the Signal Flow Diagram<br />
To rename a <strong>Sound</strong> in the signal flow diagram, select the <strong>Sound</strong> and press Enter. You will be asked <strong>for</strong><br />
the new name.<br />
Parameter Settings<br />
In addition to editing a <strong>Sound</strong> by changing its signal flow diagram, the <strong>Sound</strong> editor window also allows<br />
you to edit the <strong>Sound</strong>’s parameters.<br />
‡ To change the number of inputs to a <strong>Sound</strong> that takes multiple input <strong>Sound</strong>s, edit the Inputs field of that <strong>Sound</strong>;<br />
you can drag additional <strong>Sound</strong>s in the Inputs field or delete <strong>Sound</strong>s that are already in the Inputs field.<br />
465
Double-click a <strong>Sound</strong> in the signal flow diagram to edit its parameters. While a <strong>Sound</strong>’s parameter fields<br />
are being edited, the <strong>Sound</strong>’s icon is gray, and its parameters are shown in the lower section of the <strong>Sound</strong><br />
editor window. You can edit the parameters of only one <strong>Sound</strong> at a time. To close the parameters of a<br />
<strong>Sound</strong>, double-click on either an empty area of the signal flow diagram or double-click on another <strong>Sound</strong><br />
in the signal flow diagram.<br />
Each parameter field has the parameter name above it. To see a description of the parameter, click on the<br />
parameter name. To see a complete description of the <strong>Sound</strong>, click on the <strong>Sound</strong> class name in the lower<br />
right of the window (Oscillator in the image above). To expand the active parameter field to the full size<br />
of the screen, choose Large window… from the Edit menu. Alternatively, to make more space <strong>for</strong> the parameter<br />
fields, you can either resize the window (by clicking and dragging the mouse in the lower right<br />
corner of the window), or you can click and drag the thick line that divides the upper and lower halves of<br />
the <strong>Sound</strong> editor window.<br />
Operations in the Edit menu apply to the active field in the <strong>Sound</strong> editor. <strong>The</strong> active field is the field with<br />
a border drawn just inside its editing area (Reset in the image above). You can click inside a field to<br />
make it active, or press Tab to cycle through all of the editable fields.<br />
In parameter fields that contain text, all of the standard text editing operations are available, including the<br />
keyboard arrow keys (←, →, ↑, ↓) <strong>for</strong> positioning the cursor and the operations listed in the Edit menu.<br />
To select text that is enclosed within parentheses, brackets, or quotes, place the blinking insertion point<br />
just within the enclosing punctuation, and double-click the mouse.<br />
To set a parameter field to the same value it has in another <strong>Sound</strong>, drag the other <strong>Sound</strong> into the parameter<br />
field. (If the dragged <strong>Sound</strong> doesn’t have a parameter of that name, the <strong>Sound</strong> is rejected and the<br />
parameter field is unchanged.)<br />
Variables as Parameter Values<br />
Variables are names preceded by question marks; they are green on color monitors and bold on other<br />
monitors. A variable is a kind of place holder in a parameter field of a <strong>Sound</strong>. <strong>The</strong> variable must be set to<br />
a real value be<strong>for</strong>e the <strong>Sound</strong> can be compiled; if you try to load a <strong>Sound</strong> that still has some free variables<br />
in it, a series of dialog boxes will prompt you to enter a value <strong>for</strong> each variable. Once the variable has<br />
been assigned a value, that variable takes on that value <strong>for</strong> the full duration of the <strong>Sound</strong>.<br />
A variable or an expression containing variables can appear in any parameter field. For more in<strong>for</strong>mation<br />
about variables, see Variables on page 510.<br />
If you set an array parameter to a variable, <strong>Kyma</strong> will ask whether you want an array containing that one<br />
variable or whether you want the variable to represent the entire array:<br />
466
Evaluating the Parameters<br />
When you change a parameter of a <strong>Sound</strong>, <strong>Kyma</strong> will test the new value to make sure that it is a legal<br />
value. This test will not occur until you double click a different <strong>Sound</strong>, or until you select one of the operations<br />
in the Action or Info menus. If a parameter value is illegal, the field will flash and the computer<br />
will beep twice. <strong>The</strong> most common problems with parameters are leaving the units off frequency or duration<br />
parameters, specifying a negative or zero value where it does not make sense, and introducing a<br />
syntax error (such as an extra space or a hidden character).<br />
As long as there is an illegal parameter value, you cannot edit the parameters of another <strong>Sound</strong>. If you<br />
click in the close box of the <strong>Sound</strong> editor while there is a problem in a parameter field, <strong>Kyma</strong> will ask you<br />
if you would like to drop the changes made to the <strong>Sound</strong> being edited.<br />
If there is trouble with a value entered into a parameter, you can either fix the parameter or use Revert<br />
from the Action menu. Revert drops any changes that have been made to the parameters since the last<br />
time the <strong>Sound</strong> was double-clicked.<br />
Working with the Parameter Fields<br />
<strong>The</strong>re are several different types of parameter fields: file name, disk file segment, envelope breakpoint,<br />
radio button, check box, input, text, script, value, array, and others. § You are probably familiar with how<br />
to use many of these fields, so only the unfamiliar field types will be explained here.<br />
A file name field consists of a text field together with a disk button:<br />
You can either type in a file name (with or without the path in<strong>for</strong>mation, see How <strong>Kyma</strong> locates files on<br />
page 431), or click the disk button to choose the file from a file list. Hold down Command or Control<br />
while clicking the disk button to open an editor on the file.<br />
A disk file segment field is used in the DiskSplicer <strong>Sound</strong>, see DiskSplicer on page 495 <strong>for</strong> more in<strong>for</strong>mation.<br />
§ A complete list of parameter field types can be found in Parameter Types and Ranges on page 540.<br />
467
An envelope breakpoint field is used in the GraphicalEnvelope <strong>Sound</strong>. Time is displayed horizontally, and<br />
the envelope value (between 0 and 1) is displayed vertically. <strong>The</strong> heavy lines indicate one second<br />
boundaries, the thin lines are one-tenth of a second apart. <strong>The</strong> duration of each segment is scaled by the<br />
inverse of the value in the Rate field. For example, if Rate is 0.5, then the heavy lines are two seconds<br />
apart. Use Zoom in and Zoom out from the Edit menu to change the magnification of the display.<br />
To select a breakpoint, click the mouse on a square marker; the selected breakpoint is always shown as a<br />
hollow square, and its location is shown in the upper right. To add a breakpoint, click the mouse at the<br />
new breakpoint location while holding down the Shift key. To remove a breakpoint, select the breakpoint<br />
and press the Delete or Backspace key. To move a breakpoint, click on the breakpoint and drag it to its<br />
new location; the coordinates of the breakpoint will be displayed as you move it around.<br />
Breakpoints with arrows within them indicate loop points <strong>for</strong> the envelope. To add or remove a loop<br />
point, select a breakpoint and click on the loop button at the lower right of the field. <strong>The</strong> behavior of the<br />
envelope when there are right and left loop points is as follows<br />
Right Left Action<br />
no no no looping<br />
no yes illegal<br />
yes no on trigger off, jumps to right-arrow breakpoint<br />
yes yes if trigger on, jumps to right-arrow breakpoint upon reaching left-arrow breakpoint;<br />
on trigger off, jumps to left-arrow breakpoint<br />
An input field accepts <strong>Sound</strong>s that are to be used as signal input or inputs to the edited <strong>Sound</strong>. Some input<br />
fields will accept an arbitrary number of <strong>Sound</strong>s. Other <strong>Sound</strong> fields place some restrictions on the number<br />
or kinds of <strong>Sound</strong>s they will accept.<br />
You can drag <strong>Sound</strong>s into and out of input fields, as well as use any of the operations in the Edit menu<br />
(when the input field is active, that is, when it has the black border drawn within it). Selecting one or<br />
more <strong>Sound</strong>s and pressing Delete or Backspace is a quick way to remove <strong>Sound</strong>s from an input field.<br />
In <strong>Sound</strong>s where the ordering of inputs is important (Concatenation, <strong>for</strong> example), the inputs are arranged<br />
within the parameter field from left to right and from top to bottom. To change the order of the<br />
inputs, change their positions in the parameter field.<br />
<strong>Sound</strong>s in input fields (as well as <strong>Sound</strong>s used as control signals in other parameter fields) also show up<br />
in the signal flow diagram. Remember to double click a different <strong>Sound</strong> (or double click in the background<br />
of the signal flow diagram) to update the signal flow diagram after making changes to an input<br />
parameter field.<br />
468
You can create shared inputs between <strong>Sound</strong>s in several ways using an input field:<br />
♦ Use Copy from the Edit menu to place the input <strong>Sound</strong> into the clipboard. <strong>The</strong>n repeatedly use Paste<br />
special… from the Edit menu to place the input <strong>Sound</strong> into each of the parameter fields that need<br />
that input <strong>Sound</strong>.<br />
♦ Hold the Control or Option key while dragging the input <strong>Sound</strong> from the parameter field where the<br />
<strong>Sound</strong> is used on top of the <strong>Sound</strong> you want to replace in the signal flow diagram.<br />
♦ Hold the Control or Option key while dragging the input <strong>Sound</strong> from the signal flow diagram into<br />
the parameter field where you want to share that <strong>Sound</strong>.<br />
Script fields are text fields that contain a script <strong>for</strong> <strong>Kyma</strong> to evaluate when it is compiling a <strong>Sound</strong>. For<br />
more in<strong>for</strong>mation about scripts, see Scripting on page 522.<br />
Value fields are text fields that contain a numeric value. <strong>The</strong> numeric value may be given directly, or it<br />
may be the result of a Smalltalk-80 calculation. Certain value fields (with cyan colored backgrounds) are<br />
hot; hot value fields can be set to a time-varying numeric value. Some value fields require units to be supplied<br />
along with the numeric value. You can add explanatory comments to value fields by enclosing the<br />
comments within double quotes.<br />
Array fields are value fields that contain a list of numeric values. <strong>The</strong> numeric values are simply listed one<br />
after another, separated by spaces. If the value is complex or the result of a calculation, it must be enclosed<br />
in curly braces so that <strong>Kyma</strong> can find where one value ends and the next begins. For example,<br />
1 !Fader1 {2 + 3} {!Frequency * 2}<br />
could be used in an array parameter to specify four different values.<br />
More about Value Fields<br />
A value fields is a text field that contains a numeric value. <strong>The</strong>se fields can contain anything from a simple<br />
constant value to a complete Smalltalk program. <strong>The</strong> value of the field is calculated when the <strong>Sound</strong><br />
that contains the field is compiled.<br />
<strong>The</strong>re are two types of value parameters: hot and cold. Cold parameters are fixed values, set when you<br />
first load the <strong>Sound</strong> and never altered again. Cold parameter values can be constants, variables, or<br />
Smalltalk expressions that evaluate to constant values. Hot parameters can be continuously updated even<br />
after the <strong>Sound</strong> has been loaded into the signal processor. Using hot parameters, you can control <strong>Kyma</strong><br />
<strong>Sound</strong> parameters in real time. Hot parameter fields can be identified by their light cyan background<br />
color and italicized parameter names. Hot parameter fields can take all the same kinds of values that cold<br />
parameters can; in addition, they can be controlled by Event Values or the output of other <strong>Kyma</strong> <strong>Sound</strong>s.<br />
See Event Values, Virtual Control Surface, and Global Map on page 472 <strong>for</strong> more in<strong>for</strong>mation.<br />
Duration and Sample are cold parameters; Frequency, Gate, etc. are hot parameters.<br />
469
Specifying Numbers<br />
You specify numbers in <strong>Kyma</strong> much as you would in any other application. <strong>The</strong> particulars of the syntax<br />
are as follows:<br />
Whenever you enter a number between 1 and -1 that has a decimal point, you should include the leading<br />
zero. For example, you should use 0.1, or -0.005 not .1 or .005.<br />
Floating point numbers can be entered as a mantissa and an exponent. For example, 44.1E3 = 44100, or<br />
1.0E-6 = 0.000001. This notation can also be used to specify large integers. For example, 2E32 or 1e6.<br />
In general, an integer can be expressed in any radix (or base) by preceding it with the radix and the letter<br />
r. For example, hexadecimal (i.e., base 16) numbers are preceded by 16r. Similarly, to specify an integer<br />
as a binary number, precede it with 2r as in 2r1011. Numerals greater than nine are represented by the<br />
letters A, B, C, etc. Some examples are 16rFFEF, 12rBAABAA and 3r211.<br />
If you enter a number as the ratio of two integers, the number will be retained as a fraction, or, if the numerator<br />
is evenly divisible by the denominator, as an integer; <strong>for</strong> example 3 / 2 will remain as the<br />
fraction 3/2, whereas 4 / 2 will become 2.<br />
Specifying Units<br />
You must specify units in any parameter setting that involves frequency or duration, using one of the<br />
following abbreviations:<br />
Abbreviation Meaning<br />
days days<br />
h hours<br />
m minutes<br />
s seconds<br />
ms milliseconds<br />
usec microseconds<br />
samp samples<br />
beat (default BPM setting is quarter note = 60)<br />
SMPTE SMPTE time code<br />
hz hertz<br />
nn MIDI note number<br />
For example,<br />
440 hz<br />
60 nn<br />
1 s<br />
1 day + 3 m + 17 s<br />
To specify frequency, you can also type the octave followed by the lettername of the pitch class. For example,<br />
4 c sharp<br />
indicates middle C sharp (MIDI note number 61 nn). <strong>The</strong> solfeggio names <strong>for</strong> the pitch class are also accepted:<br />
do, re, mi, fa, so or sol, la, ti or si.<br />
To specify an arbitrarily long duration, use on. ON is equivalent to 730 days or 2 years.<br />
470
Using Values with Units in Calculations<br />
<strong>The</strong> rules of regular arithmetic with units apply to parameters that have units of time or frequency. For<br />
instance, you can multiply a value with units by a number with no units, but if you are adding two values,<br />
one of the following conditions must apply: both must be in units of time, both must be in units of<br />
frequency, or both must be without units.<br />
If the values being combined are of the same type (both in units of time or both in units of frequency), but<br />
are not the same units, the calculation will be per<strong>for</strong>med in units of hertz or seconds:<br />
Example Value<br />
60 nn hz 261.6256 hz<br />
100 hz nn 43.35 nn<br />
60 nn + 100 hz 361.6256 hz<br />
60 nn + 100 hz nn 103.35 nn<br />
60 nn hz + 100 hz 361.6256 hz<br />
If you want to remove the units after per<strong>for</strong>ming a conversion or calculation, use removeUnits. For example,<br />
if you needed to use a pitch in units of hertz in computing the value of a non-frequency field, you<br />
would need to remove the units, as in the following code:<br />
4 c hz removeUnits / SignalProcessor sampleRate.<br />
A SMPTE time or duration can be specified as<br />
hours:minutes:seconds.frames SMPTE<br />
as in the following example:<br />
1:04:32.2 SMPTE<br />
Closing the <strong>Sound</strong> Editor and Saving Changes<br />
To close the <strong>Sound</strong> editor, click in the close box at the upper left. <strong>Kyma</strong> will ask whether or not you want<br />
to keep the changes you have made. At this point you have a choice of replacing the old <strong>Sound</strong> with the<br />
edited version, dropping the changes that you just made, or changing your mind and canceling.<br />
If you want to save the edited <strong>Sound</strong> as a new <strong>Sound</strong> while keeping the original <strong>Sound</strong> unchanged, drag<br />
the rightmost <strong>Sound</strong> from the signal flow diagram into a <strong>Sound</strong> file window; then close the <strong>Sound</strong> editor,<br />
and choose No when it asks if you want to save the changes.<br />
Note that changes made to a <strong>Sound</strong> are not saved onto the disk until you have saved the entire <strong>Sound</strong> file<br />
window. To do this, choose Save or Save as… from the File menu.<br />
471
Event Values, Virtual Control Surface, and Global Map<br />
Event Values<br />
Placing Event Values and <strong>Sound</strong>s into hot parameter fields of a <strong>Sound</strong> lets you control the parameters of<br />
the <strong>Sound</strong> in real time. You can exercise this real-time control when you link the Event Values to the virtual<br />
control surface, external MIDI controllers, or programmed events. In effect, you create custom, realtime<br />
controls of your patch by using Event Values in the parameter fields of your <strong>Sound</strong>s.<br />
<strong>The</strong> virtual control surface allows you to monitor and control Event Values in the currently loaded <strong>Sound</strong>.<br />
Event Values are like hardware controls (a volume control, <strong>for</strong> instance) in that they have initial positions<br />
that you can adjust within specified ranges. Event Values are also like most hardware controls in that<br />
they remain at the value where you last set them until you reset them. But unlike hardware knobs and<br />
buttons, these software controls are easily remapped. This mapping is contained in the global map.<br />
Event Values can be used as real-time “hot-links” between your <strong>Kyma</strong> <strong>Sound</strong> and the outside world. You<br />
can set an Event Value to be updated by external event sources such as MIDI, the virtual control surface,<br />
or programs other than <strong>Kyma</strong>. Event Values can be linked to sources of events by MIDIVoice, MIDIMapper,<br />
<strong>Sound</strong>ToEvent or AnalogSequencer <strong>Sound</strong>s. If your <strong>Sound</strong> does not include any of these <strong>Sound</strong>s, the<br />
Event Value will be associated with a source in the global map. This global map is initially set to a default<br />
map. Later, you may want to devise your own maps that correspond to the controllers in your studio.
An Event Value is displayed as a name preceded by an exclamation point; Event Values are red on color<br />
monitors and bold on other monitors. If you use an Event Value that is defined in the global map or the<br />
Map of a MIDIMapper, the map transparently connects the source of events as defined in the map to that<br />
Event Value. If you use an Event Value that is not defined in any map, <strong>Kyma</strong> will only allow that Event<br />
Value to be controlled from the virtual control surface.<br />
Events Values and expressions involving Event Values can appear only in hot parameter fields. ‡ <strong>The</strong>re<br />
are several ways to enter Event Values:<br />
♦ Press the Escape key once and play a chord of one, two, or three keys on a MIDI keyboard to obtain<br />
!Pitch, !KeyDown, or !KeyVelocity.<br />
♦ Press the Escape key once and move a MIDI continuous controller to enter the name of that continuous<br />
controller.<br />
♦ Choose Paste hot… from the Edit menu to select an Event Value or expression from a list and paste it<br />
into the parameter field.<br />
♦ Type the name of the Event Value (preceded by an exclamation point) directly into the field.<br />
Sources of Event Values<br />
All Event Values are made up of combinations of Event Sources. <strong>The</strong> mapping specified in the global<br />
map or in a MIDIMapper <strong>Sound</strong> (see Global and Local Maps on page 482) provides a memorable name<br />
(the Event Value) <strong>for</strong> a combination of hardware and software sources (the Event Sources).<br />
An Event Source is one of the following<br />
♦ a value derived from MIDI continuous controller events<br />
♦ a value derived from MIDI keyboard (note) events<br />
♦ a value derived from other MIDI events (<strong>for</strong> example, MIDI time code)<br />
♦ a value derived from the signal processor (such as the current time)<br />
♦ a value derived from the output of a <strong>Sound</strong> (the Value of a <strong>Sound</strong>ToEvent)<br />
♦ a value derived from the virtual control surface or other software running on the host computer<br />
‡ A hot parameter field has a cyan colored background and an italics label. <strong>The</strong> Frequency field of a Sample is an<br />
example of a hot parameter field.<br />
473
Event Sources are specified by preceding the name of the Event Source by an accent grave (`). <strong>The</strong>y are<br />
displayed in blue in the user interface.<br />
<strong>The</strong> only way to control an Event Value externally (<strong>for</strong> example, by a MIDI keyboard, fader, sequencer,<br />
etc.) is to map it to one of the following Event Sources:<br />
`MIDIKeyDown `MIDIKeyNumber `MIDIKeyVelocity<br />
`MIDIController00 thru `MIDIController127<br />
`MIDIPitchBend `MIDITimeCode `MIDIChannelPressure<br />
`MIDIProgramNumber<br />
MIDI Continuous Controller Sources<br />
MIDI continuous controller Event Sources are designated as `MIDIController00 through `MIDI-<br />
Controller127. <strong>The</strong> signal processor automatically scales the continuous controller values received via<br />
MIDI control change messages (which are in the range of (0,127)) to the range of (0,1).<br />
MIDI Keyboard Sources<br />
MIDI note on and off messages control the Event Sources `MIDIKeyDown, `MIDIKeyNumber, and<br />
`MIDIKeyVelocity. <strong>Kyma</strong> treats MIDI note on messages with zero velocity in the same way as MIDI<br />
note off messages with a velocity equal to the velocity of the original note on message.<br />
`MIDIKeyDown is set in the following way:<br />
♦ a note off message causes it to be set to 0<br />
♦ a note on message causes it to first be set to -1, and then, five milliseconds later, to be set to +1<br />
A value of -1 in the trigger of an envelope (<strong>for</strong> example, ADSR) tells the envelope to rapidly decay the<br />
envelope to zero. <strong>The</strong> later value of +1 tells the envelope to begin its attack.<br />
`MIDIKeyNumber contains the key number from the note on message. It is set at the same time that<br />
`MIDIKeyDown is set to +1.<br />
<strong>The</strong> velocity part of a MIDI note message is scaled from its range of (0,127) to the range of (0,1).<br />
`MIDIKeyVelocity is set to this scaled value at the same time that `MIDIKeyDown is set to +1.<br />
MIDI note events are allocated to individual voices within a MIDIMapper or MIDIVoice according to the<br />
polyphony, MIDI channel and pitch range specified in the mapping <strong>Sound</strong>. A note is allocated to the oldest<br />
voice that is not in use, or, if all voices are currently in use, the voice that has been on <strong>for</strong> the longest<br />
amount of time.<br />
Other MIDI Sources<br />
<strong>The</strong> remaining MIDI messages are mapped in the following way:<br />
♦ MIDI program change messages cause the Event Source `MIDIProgramNumber to be set to the new<br />
program number. Program numbers are in the range of 1 to 128.<br />
♦ MIDI channel aftertouch messages cause the Event Source `MIDIChannelPressure to be set to the<br />
channel pressure value (scaled from (0,127) to (0,1)).<br />
♦ MIDI pitch bend messages set `MIDIPitchBend. Its range of (-2048,2048) is scaled to the range<br />
of (-1,1).<br />
♦ MIDI time code messages cause `MIDITimeCode to be set to the time received. Additionally,<br />
`RealTime (the time in seconds since the <strong>Sound</strong> was started) is updated whenever these messages<br />
are received.<br />
Signal Processor Sources<br />
<strong>The</strong> signal processor itself is the source of some Event Sources:<br />
♦ `Time is the time in seconds since the entire <strong>Sound</strong> structure was started.<br />
♦ `LocalTime is the time in seconds since the <strong>Sound</strong> using `LocalTime was started.<br />
474
Other Event Source names can be used, but can only be controlled through <strong>Kyma</strong>:<br />
<strong>Kyma</strong> Event Sources<br />
<strong>Sound</strong>ToEvent acts as a source of Event Values. Changes to its Value parameter cause the GeneratedEvent<br />
Event Value to change in response. AnalogSequencer can also act as a source of the values of the<br />
Event Values listed in its ExtraValues field, as can MIDIVoice and MIDIMapper when you have<br />
FromScript checked.<br />
Other Sources<br />
All sources (except `MIDIKeyDown, `MIDIKeyNumber, and `MIDIKeyVelocity) can additionally obtain<br />
their value from the virtual control surface, a tool, or a third party program that uses the Capybara<br />
driver. Any source not listed above can only obtain its value in this way.<br />
Using <strong>Sound</strong>s in Hot Parameter Fields<br />
Hot parameter fields can also use <strong>Sound</strong>s as their values. This is like connecting the output of one module<br />
to the input of another in a voltage-controlled analog synthesizer. As with the analog synthesizer, the<br />
control signal is never actually heard; it just supplies a constantly changing value <strong>for</strong> the parameter of a<br />
<strong>Sound</strong> which is heard.<br />
When you paste a <strong>Sound</strong> into a hot parameter field, it appears in the field as the <strong>Sound</strong>’s name enclosed<br />
in a box followed by an L to indicate the left channel. Once you update the signal flow diagram (by double-clicking<br />
in a white space), the <strong>Sound</strong> will also show up in the signal flow diagram.<br />
You can combine <strong>Sound</strong>s, Event Values, and numbers in arithmetic expressions. Since the output of a<br />
<strong>Sound</strong> is a stereo pair, when you use <strong>Sound</strong>s with numbers and Event Values, you must specify which<br />
channel to use as the source of the control signal. Use L to indicate the left channel of the <strong>Sound</strong>, R to indicate<br />
the right channel, and M to indicate the monophonic mix of the two channels.<br />
475
By default, <strong>Sound</strong>s in hot parameter fields are treated as control signals and update once every millisecond<br />
(so the maximum frequency without aliasing of an LFO is 500 hz). To use a lower update rate, append<br />
a colon and a number to indicate the number of milliseconds between updates. For example,<br />
Oscillator L: 5<br />
updates once every five milliseconds (200 hz sample rate).<br />
Arithmetic with Event Values and <strong>Sound</strong>s<br />
<strong>The</strong> signal processor contains a real-time evaluator that can calculate the value of expressions involving<br />
Event Values and/or <strong>Sound</strong>s in “hot” parameter fields. <strong>The</strong> real-time evaluator calculates the value of an<br />
expression whenever it receives a new value <strong>for</strong> a <strong>Sound</strong> or Event Value used in the expression.<br />
<strong>The</strong> real-time evaluator implements a subset of the operations available to the Smalltalk evaluator on the<br />
host computer. <strong>The</strong> following is a list of all operations available to the real-time evaluator. Examples are<br />
given using constants, to make it easier to see exactly what the operation does, but any of these operations<br />
can also be used on <strong>Sound</strong>s or Event Values.<br />
Arithmetic Operators<br />
Plus, minus, times, and divide-by are standard arithmetic operators and behave just as you would expect<br />
them to behave.<br />
Message Example Result<br />
+ 3 + 2, -3 + 2 5, -1<br />
- 3 - 2, -3 - 2 1, -5<br />
* 3 * 2, -3 * 2 6, -6<br />
/ 3 / 2, -3 / 2, 3.0 / 2 3/2, -3/2, 1.5<br />
** means raise to a power, the // takes the floor of the result of a division (rounds toward negative infinity),<br />
the \\ is the first argument modulo the second, and negated toggles the sign of its argument.<br />
mod: is the same as the double-backslash operator.<br />
Message Example Result<br />
** 3 ** 2, -3 ** 2 9, ERROR<br />
// 3 // 2, -3 // 2 1, -2<br />
\\ 3 \\ 2, -3 \\ 2, 3 \\ -2 1, 1, -1<br />
mod: 3 mod: 2, -3 mod: 2, 3 mod: -2 1, 1, -1<br />
negated 3 negated, -3 negated -3, 3<br />
inverse is one divided by its argument. abs gives the absolute value (the magnitude) of its argument.<br />
sqrt is the square root of its argument.<br />
Message Example Result<br />
inverse 3 inverse, -3 inverse, 3.0 inverse (1/3), (-1/3), 0.333333<br />
abs 3 abs, -3 abs 3, 3<br />
sqrt 3 sqrt, -3 sqrt 1.73205, ERROR<br />
476
truncated drops any fractional part of the number (towards zero, not minus infinity). rounded rounds<br />
to the nearest integer. sign returns -1 <strong>for</strong> negative numbers, 0 <strong>for</strong> zero, and 1 <strong>for</strong> positive arguments.<br />
clipTo01 returns 0 <strong>for</strong> all arguments less than or equal to zero, and it returns 1 <strong>for</strong> all arguments<br />
greater than or equal to one; arguments between zero and one are unaffected.<br />
Message Example Result<br />
truncated 3.1 truncated, -2.1 truncated 3, -2<br />
rounded 3.5 rounded, -2.1 rounded 4, -2<br />
sign -3 sign, 0 sign, 2 sign -1, 0, 1<br />
clipTo01 -3 clipTo01, 0.5 clipTo01, 2 clipTo01 0, 0.5, 1<br />
vmin: returns the smaller of two numbers and vmax: returns the larger of two numbers.<br />
Message Example Result<br />
vmin: 3 vmin: 2, 2 vmin: 3 2<br />
vmax: 3 vmax: 2, 2 vmax: 3 3<br />
Transcendental Functions<br />
cos and sin return the cosine and sine of a number. normCos returns the cosine of the number multiplied<br />
by π (and similarly normSin returns the sine of a number multiplied by π). normCos and normSin<br />
come in handy because <strong>Kyma</strong> controllers have a range of (0,1), but typically you would like to take the<br />
sine or cosine of values between 0 and π. normCos and normSin scale your fader value to between<br />
(0,π) be<strong>for</strong>e taking the cosine or sine.<br />
exp gives you e raised to the power of the argument. twoExp gives you 2 raised to the power of the argument.<br />
log is the power of 10 which would evaluate to the argument. twoLog is the power of 2 which<br />
would evaluate to the argument.<br />
Message Example Result<br />
cos (Float pi) cos, 0 cos -1.0, 1.0<br />
sin (Float pi * -0.5) sin, (Float pi * 0.5) sin -1.0, 1.0<br />
normCos 0 normCos, 1 normCos 1.0, -1.0<br />
normSin 0.5 normSin, -0.5 normSin 1.0. -1.0<br />
exp 0, 1.0 1.0, 2.71828<br />
twoExp 0, 9 twoExp, 10 twoExp 1.0, 512.0, 1024.0<br />
log 1.0 log, 10 log, 100 log, 0.1 log 0.0, 1.0, 2.0, -1.0<br />
twoLog 1.0 twoLog, 2 twoLog, 0.5 twoLog 0.0, 1.0, -1.0<br />
Array Accessing<br />
<strong>The</strong> first argument of the of: message is an index, and the second argument is the array. <strong>The</strong> first element<br />
of the array is considered to be at index zero, not at index one. <strong>The</strong> index can be a real-time<br />
expression, but the array must consist of numbers. Since the index is typically a continuous controller<br />
whose range is (0,1), it should in most cases be scaled by the size of the array less one (since the indexing<br />
goes from (0 ,size-1)).<br />
Message Example Result<br />
of: 1 of: #(8 9 10 11), (0 of: #(1 3)) of: #(4 3 2 1) 9, 3<br />
477
Booleans<br />
<strong>The</strong> real-time evaluator can per<strong>for</strong>m all of the standard comparison operators. <strong>The</strong>y return 0 <strong>for</strong> false and<br />
1 <strong>for</strong> true.<br />
Message Example Result<br />
ne: (not equal) 3 ne: 2, 3 ne: 3 1, 0<br />
eq: (equal) 3 eq: 2, 3 eq: 3 0, 1<br />
gt: (greater than) 3 gt: 2, 3 gt: 3 1, 0<br />
lt: (less than) 3 lt: 2, 3 lt: 3 0, 0<br />
ge: (greater or equal) 3 ge: 2, 3 ge: 3 1, 1<br />
le: (less or equal) 3 le: 2, 3 le: 3 0, 1<br />
Conditionals<br />
neg:zero:pos: takes on one of three values, depending upon the value of the message receiver. All<br />
expressions are evaluated, but only one of the results is used, depending on whether the first expression<br />
has a negative, zero, or positive value. neg:zero:pos:initially: is the same as neg:zero:pos:<br />
except that you can specify the initial value of the entire expression. In neg:zero:pos:, the initial value<br />
of the entire expression is always 0. <strong>The</strong> expression takes on the initial value only <strong>for</strong> as long as the message<br />
receiver does not yet have a value (e.g. if it depends on an event that has not yet occurred).<br />
true:false: or false:true: does conditional evaluation of either the true argument or the false argument<br />
depending upon the value of a test expression. It evaluates only one, not both of the true and<br />
false arguments. For this conditional, true is considered to be any positive number, false is any zero or<br />
negative number.<br />
Message Example Result<br />
neg:zero:pos: -1 neg: 4 zero: 3 pos: 2 4<br />
neg:zero:pos:initially: 1 neg: 4 zero: 3 pos: 2 initially: 8 2<br />
true:false: 0 true: 3 false: 2, 0.5 true: 5 false: 6 2, 5<br />
false:true -2 false: 0 true: 100, 10 false: 40 true: 60 0, 60<br />
Conversions<br />
<strong>Kyma</strong> considers positive numbers as boolean true values and zero or negative numbers as boolean false<br />
values. asLogicValue maps all true values to 1 and all false values to 0.<br />
You can use db to convert a decibel value into its linear equivalent. 0 db is equal to 1 or full amplitude,<br />
and increases of 6 db double the amplitude, and decreases of 6 db halve the amplitude.<br />
inSOSPitch converts a frequency in hertz or pitch in note numbers to a pitch in the same <strong>for</strong>mat and<br />
range as the output of the spectral sources (e.g. SpectrumInRAM, SyntheticSpectrumFromArray, etc.).<br />
<strong>The</strong>se pitches map the range from 0 hz through 22050 hz to a log curve drawn between 0 and 1. Every<br />
doubling of the frequency in hertz corresponds to adding 1/15 to the number in SOS pitch, so at 22050 hz,<br />
the SOS pitch is 1, at 11025 hz it is 1-(1/15), and so on.<br />
Message Example Result<br />
asLogicValue -2 asLogicValue, 0 asLogicValue, 3 asLogicValue 0, 0, 1<br />
db 0 db, 6 db, -6 db, -12 db 1.0, 1.99, 0.5, 0.25<br />
inSOSPitch 22050.0 hz inSOSPitch, 1378.12 hz inSOSPitch 1.0d, 0.73<br />
478
You can use asLogicValue to per<strong>for</strong>m logic operations using arithmetic:<br />
Units<br />
Logic <strong>Kyma</strong> Equivalent<br />
a AND b a asLogicValue * b asLogicValue<br />
a OR b (a asLogicValue + b asLogicValue) asLogicValue<br />
NOT a 1 - a asLogicValue<br />
a XOR b a asLogicValue ne: b asLogicValue<br />
a EQV b a asLogicValue eq: b asLogicValue<br />
Units of frequency, amplitude and time are also understood by the real-time evaluator. <strong>The</strong> following are<br />
units of time <strong>for</strong> seconds, minutes, hours, days, milliseconds, samples, and microseconds:<br />
Message Example Result<br />
s 3 s 3 s<br />
m 3 m 180.0 s<br />
h 3 h 10800.0 s<br />
days 3 days 259200.0 s<br />
ms 3 ms 0.003 s<br />
samp 3 samp 3 samp<br />
usec 3 usec 3.0d-6 s<br />
<strong>The</strong> following are the messages <strong>for</strong> specifying hertz (cycles per second), MIDI note number (where middle<br />
C is note number 60), and octave pitch class (where 4 c is middle C).<br />
Message Example Result<br />
hz 440 hz 440 hz<br />
nn 69 nn 69 nn<br />
Unit Conversions<br />
4 a 69 nn<br />
4 mi flat 63 nn<br />
To convert between seconds and samples or hertz and note number, cascade the unit messages. To strip<br />
off the units (e.g. <strong>for</strong> parameter fields like Scale that do not expect a number with units), use remove-<br />
Units.<br />
Example Result<br />
1 s samp 44100 samp<br />
4410 samps 0.1 s<br />
4 c hz 261.6256 hz<br />
269.2918152432d hz nn 60.5 nn<br />
4 a removeUnits 69<br />
479
Symbolic Times and Frequencies<br />
Use on in a Duration field to indicate (virtually) infinite duration. Use default in a Duration field of<br />
a Sample, DiskPlayer, or GenericSource to indicate the “natural” duration, i.e. the duration of the original<br />
recording. If used in the Frequency field, it represents the “natural” frequency or the originally recorded<br />
frequency as stored in the header of the AIFF or WAV file (if no base pitch has been indicated in the<br />
header, it will be set to 60 nn <strong>for</strong> you). <strong>The</strong> symbolic durations and frequencies can be used only in the<br />
context of a <strong>Sound</strong> that is playing back a digital recording.<br />
Functions of time<br />
ramp has a resting value of 1. When the message receiver becomes positive, this expression will grow<br />
linearly from 0 up to 1 over the course of one second, and then stick at its resting value of 1. It cannot be<br />
triggered again until the message receiver becomes zero or negative. For example<br />
1 ramp<br />
will immediately go from 0 to 1 in one second and stick at 1 <strong>for</strong>ever, and<br />
!KeyDown ramp<br />
will start at 1, and go from 0 to 1 over the course of one second whenever a MIDI key down event is received.<br />
ramp: is like ramp except that you can specify the amount of time it takes to get from 0 to 1. For example<br />
1 ramp: 3 s<br />
will take three seconds to go from 0 to 1 and then stick at the value of 1 <strong>for</strong>ever.<br />
fullRamp is like ramp except that it goes from -1 up to 1. fullRamp: is like ramp: except it goes from<br />
-1 to 1 in the amount of time specified after the colon.<br />
repeatingRamp: is like ramp: except that instead of sticking at its resting value at the end, it continuously<br />
repeats the ramp <strong>for</strong> as long as it is triggered (i.e. <strong>for</strong> as long as its message receiver is positive).<br />
<strong>The</strong>re exist repeating versions of all of the ramp-like functions: repeatingRamp, repeatingRamp:,<br />
repeatingFullRamp, and repeatingFullRamp:.<br />
bpm: has a resting value of 0 and changes to 1 periodically, at a rate specified in beats-per-minute (the<br />
same way you would specify a tempo using a metronome marking). It remains at 1 <strong>for</strong> half the time between<br />
beats and then returns to 0 be<strong>for</strong>e the next beat. <strong>The</strong>se expressions are typically used in Gate or<br />
Trigger fields in order to periodically trigger the <strong>Sound</strong>. For example,<br />
!KeyDown bpm: 60<br />
would become 1 once per second whenever and <strong>for</strong> as long as a MIDI key is held down, and<br />
1 bpm: (!Rate * 208)<br />
would repeat at an adjustable rate from 0 up to 208 beats per minute. To convert a rate in terms the number<br />
of seconds between beats into a value in beats per minute, divide 60 by the number of seconds<br />
between beats. For example<br />
1 bpm: (60.0/3)<br />
would trigger your <strong>Sound</strong> once every three seconds. You can use this is in a DiskPlayer to “loop” a sample<br />
being read from disk by putting the natural duration (without units) of your recording in as the<br />
number of seconds between repetitions,<br />
1 bpm: (60.0 / durationOfSample)<br />
bpm:dutyCycle: is like bpm: except that you can control the amount of time that it remains at a value<br />
of 1. A duty cycle of 0.5 means that it stays at 1 <strong>for</strong> half of the duration between beats. A smaller duty<br />
cycle means that it will stay at 1 <strong>for</strong> less time, and a larger duty cycle means it will stay at 1 <strong>for</strong> a longer<br />
amount of time. A duty cycle of 0 means that it will never go to 1 and a duty cycle of 1 would mean that<br />
it sticks at 1 <strong>for</strong>ever.<br />
1 bpm: 120 dutyCycle: 0.25<br />
480
Random Numbers<br />
random is a message sent to a time. It generates a new random number between -1 and 1 at the periodic<br />
rate. For example,<br />
2 s random<br />
would generate a new number once every 2 seconds.<br />
nextRandom is typically sent to an Event Value that is acting as a trigger. It generates a random number<br />
between -1 and 1 each time the trigger becomes positive. For example,<br />
!KeyDown nextRandom<br />
would generate a new random number each time you pressed a key on the MIDI keyboard.<br />
Smoothing<br />
<strong>The</strong>re are two operations that smooth out or filter the changes between sequential real-time expression<br />
values.<br />
!Fader1 smooth: 2 s<br />
will take two seconds to get from the old value of !Fader1 to its new value, rather than jumping instantly<br />
to its new value.<br />
!Fader1 smoothed<br />
will use a default value of 100 milliseconds as the time it takes to get from the old value to the new value.<br />
For example, to add portamento to a <strong>Sound</strong>, you can smooth its frequency parameter using<br />
!Pitch smoothed<br />
or,<br />
!Pitch smooth: 25 ms<br />
<strong>for</strong> a quicker portamento.<br />
Virtual Control Surface<br />
To open the virtual control surface, choose Virtual control surface from the File menu. § <strong>The</strong> virtual control<br />
surface allows you to monitor and control Event Values in the currently loaded <strong>Sound</strong>. <strong>The</strong> virtual<br />
control surface is global; it will change whenever you load a different <strong>Sound</strong>.<br />
<strong>The</strong> faders, toggles and gates in the virtual control surface serve two functions: they can be used to control<br />
Event Values directly from the virtual control surface; they also display any changes made to the<br />
§ By default, <strong>Kyma</strong> opens the virtual control surface automatically <strong>for</strong> you whenever a <strong>Sound</strong> is played, see<br />
Per<strong>for</strong>mance… on page 430.<br />
481
Event Value via the MIDI input of the signal processor or by some other software running on your computer.<br />
‡<br />
<strong>The</strong> Event Values displayed in the virtual control surface are organized alphabetically from left to right.<br />
Each type of control: annotations, oscilloscope and spectrum analyzer displays, faders, gates, small faders,<br />
and toggles occupies a separate row on the virtual control surface. <strong>The</strong> type of display a particular<br />
Event Value will have depends on the settings in the local or global map that defines the Event Value; see<br />
Virtual Control Surface and Mappings on page 483. Any Event Value not defined in a map will be displayed<br />
as a fader. See the quick reference on page 212 <strong>for</strong> in<strong>for</strong>mation on how to use the controls within<br />
the virtual control surface.<br />
When you use an Event Value that is defined in the global map, the specified Event Source will supply<br />
values to that Event Value. If you use an Event Value not defined in the global map, <strong>Kyma</strong> will create a<br />
new Event Source that gets its value from the virtual control surface.<br />
Global and Local Maps<br />
<strong>The</strong> Global Map<br />
Unless you specify otherwise, Event Values in your <strong>Sound</strong>s are evaluated in the context of a global map<br />
that associates Event Values with Event Sources. You can override the global map by using a local map<br />
specified in the Map field of a MIDIMapper <strong>Sound</strong>.<br />
To edit a global map, choose Open… from the File menu, select Global map as the file type and select the<br />
global map file to edit. You can create a new global map by choosing New… from the File menu and by<br />
selecting Global map as the new file type.<br />
<strong>The</strong> global map editor is simply a text editor. Make changes to the global map as you would to any text<br />
file, choosing Save, Save as…, or Close from the File menu to save any changes that you have made. Use<br />
Choose global map… from the File menu to tell <strong>Kyma</strong> which global map to use when compiling <strong>Sound</strong>s.<br />
Your system arrives with a default global map, but you may find that a customized global map is helpful<br />
when working with the MIDI controllers found in your studio. To see the default map on-line, choose<br />
Open… from the File menu, select Global map as the file type, then select the file named Default (in<br />
the Global Maps folder) from the file list.<br />
You can create your own customized global map that corresponds to the specific MIDI devices that you<br />
use with <strong>Kyma</strong>. For example, <strong>Kyma</strong> comes with example global maps <strong>for</strong> use with the Peavey PC 1600<br />
MIDI controller (called PC1600) and the Buchla Lighting wand-based controller (called Lighting).<br />
It is a good idea to create a new map rather than modifying the default map and saving it; that way you<br />
always have the original map to use as a reference.<br />
You can also override the global map locally. To override or extend the global map, use a MIDIMapper<br />
<strong>Sound</strong>. In the Map parameter of the MIDIMapper, you only need to enter the associations that are different<br />
from the associations in the global map. When you use a MIDIMapper to change the global map, the<br />
changes you make affect only <strong>Sound</strong>s to the left of the MIDIMapper in the signal flow diagram and only<br />
<strong>for</strong> the duration of those <strong>Sound</strong>s — not in any permanent way.<br />
Specifying the Map<br />
A map (whether in the global map file or in the Map field of a MIDIMapper <strong>Sound</strong>) associates Event Values<br />
with Event Sources.<br />
<strong>The</strong>re are several ways to specify this association, all variants of the following syntax:<br />
!anEventValue is: `anEventSourceOrExpression.<br />
‡ To send MIDI data to <strong>Kyma</strong> from another program, connect your keyboard controller to the MIDI input on your<br />
computer or MIDI interface, connect the MIDI output of your MIDI interface to the MIDI input of the signal processor;<br />
then run <strong>Kyma</strong> and the other program simultaneously. (It is recommended that you switch off your<br />
computer when connecting MIDI cables.) Remember that when you want to use <strong>Kyma</strong> alone you might have to<br />
explicitly patch a MIDI thru connection using a MIDI patcher on your host computer.<br />
482
For example,<br />
!Volume is: `MIDIController07.<br />
You could enter !Volume as the value of the Scale parameter in a Sample; the map would then associate<br />
the Scale parameter with MIDI controller 7 data on the default MIDI channel (as specified in<br />
Configure MIDI… under the DSP menu).<br />
Event Values can be combinations of Event Sources and constants. For example,<br />
!Pitch is: (`MIDIKeyNumber + (`MIDIPitchBend displayAs: #nothing)) nn.<br />
Defines !Pitch to be the key number found in incoming MIDI note-on events offset by the incoming<br />
value of the pitch bend wheel (which will not show up in the virtual control surface). In this example, the<br />
pitch bend can contribute up to a half-step variation in the pitch. You can change the range of pitch bend<br />
to an octave variation by using<br />
!Pitch is: (`MIDIKeyNumber + (12 * `MIDIPitchBend)) nn.<br />
in the global map.<br />
When the global map is used to supply Event Values, <strong>Kyma</strong> uses the default MIDI channel number given<br />
in Configure MIDI… under the DSP menu. A MIDIVoice or MIDIMapper <strong>Sound</strong> can override the default<br />
MIDI channel <strong>for</strong> its input <strong>Sound</strong> by specifying the channel number in the Channel field.<br />
Event Source Options<br />
<strong>The</strong> Event Sources on the right side of each association in the map can have additional options controlling<br />
MIDI channel, value scaling, and presentation in the virtual control surface.<br />
You can override the default MIDI channel specification by adding a channel: tag to the specification of<br />
the Event Source:<br />
!Volume is: (`MIDIController07 channel: 5).<br />
This tells <strong>Kyma</strong> that !Volume is associated with continuous controller number 7 on MIDI channel 5. Notice<br />
that parentheses must enclose the Event Source whenever a tag is used.<br />
You can specify how the Event Source should be scaled prior to being used as an Event Source:<br />
!Volume is: (`MIDIController07 min: 0.5 max: 0.75).<br />
<strong>Kyma</strong> will scale the normal (0,1) range of the MIDI continuous controller to the specified range of<br />
(0.5,0.75).<br />
You can also restrict the values to fall on a grid:<br />
!Volume is: (`MIDIController07 min: 0.5 max: 0.75 grid: 0.05).<br />
In this case, !Volume can only be one of the values 0.5, 0.55, 0.6, 0.65, 0.7, or 0.75.<br />
You can specify whether changes in the Event Source result in linear or logarithmic changes in the Event<br />
Value. By default, a change in the Event Source results in a linear change to the Event Value. To cause<br />
logarithmic changes, use:<br />
!Volume is: (`MIDIController07 taper: #log).<br />
You can combine these options by separating them by semicolons, as in:<br />
!Volume is: (`MIDIController07 channel: 5; min: 100 max: 1000 grid: 50; taper: #log).<br />
Virtual Control Surface and Mappings<br />
By defining the controller type in the map, you determine how controllers associated with Event Values<br />
will appear in the virtual control surface. Controllers can be one of three types: faders, toggles, or gates.<br />
Faders are commonly associated with continuous controllers. Toggles are typically used to switch from<br />
one state to another (i.e., you can use a toggle to switch something on until you want to switch it off).<br />
Gates are like momentary buttons; they are on <strong>for</strong> as long as they are held down, and they turn off as<br />
soon as the button is released. (For example, the damper pedal is typically interpreted as a gate.)<br />
483
Defining a controller type in the global map affects only the way in which the control appears in the virtual<br />
control surface; faders show up as (you guessed it) faders, gates show up as buttons, and toggles<br />
show up as check boxes.<br />
If you want a controller to show up as a fader in the virtual control surface, you would use<br />
!Brightness is : (`MIDIController64 displayAs: #fader).<br />
If you want a controller to show up as a numeric entry box in the virtual control surface, you would use<br />
!Brightness is : (`MIDIController64 displayAs: #smallFader).<br />
You can use this kind of screen control as a fader as well. Hold down the Command or Control key<br />
while pressing the mouse button in the numeric entry box; vertical mouse movements will then be interpreted<br />
as if you were moving an invisible fader.<br />
If you want the controller to show up in the virtual control surface as a check box (allowing only values of<br />
0 or 1 <strong>for</strong> brightness), use<br />
!Brightness is : (`MIDIController64 displayAs: #toggle).<br />
If you want it to show up in the virtual control surface as a button (i.e., so that its output is 1 when you<br />
hold down the button and 0 otherwise), use<br />
!Brightness is : (`MIDIController64 displayAs: #gate).<br />
If you do not want the controller to be displayed in the virtual control surface, use<br />
!Brightness is : (`MIDIController64 displayAs: #nothing).<br />
484
Compiled <strong>Sound</strong> Grid<br />
<strong>The</strong> Compiled <strong>Sound</strong> grid is useful <strong>for</strong> organizing <strong>Sound</strong>s to be used in an interactive per<strong>for</strong>mance environment<br />
(which could include musical per<strong>for</strong>mances, psychoacoustic tests, classroom demonstrations, or<br />
any other environment where a user selectively loads <strong>Sound</strong>s whose ordering and timing are not predetermined).<br />
<strong>The</strong> grid provides a means <strong>for</strong> quickly loading and starting <strong>Sound</strong>s that have already been<br />
compiled, simply by clicking in a box in the grid or by sending a MIDI program change with the number<br />
indicated in the box.<br />
Creating a Compiled <strong>Sound</strong> Grid<br />
To create a compiled <strong>Sound</strong> grid, select New… from the File menu, then choose Compiled <strong>Sound</strong> grid as<br />
the file type. <strong>The</strong> interface <strong>for</strong> a compiled <strong>Sound</strong> grid consists of a grid of 128 boxes, a program channel<br />
field, and an On check box. Each numbered box in the grid corresponds to a MIDI program number. To<br />
associate a <strong>Kyma</strong> <strong>Sound</strong> with a specific MIDI program number, drag the <strong>Sound</strong> into the corresponding<br />
box. To edit a <strong>Sound</strong> in the grid, make sure the On box is unchecked and then double-click the <strong>Sound</strong> in<br />
the grid.<br />
<strong>The</strong> Program Channel Field<br />
<strong>The</strong> value you enter in the program channel field determines the MIDI channel on which <strong>Kyma</strong> looks <strong>for</strong><br />
program changes. To set the channel, type in the number of a MIDI channel and press Enter. This setting<br />
does not affect the MIDI channels on which the <strong>Sound</strong>(s) can receive or send MIDI in<strong>for</strong>mation other than<br />
program changes. In other words, all other MIDI events are received on the default MIDI channel. This<br />
default channel need not be the same channel on which you choose to receive program changes.<br />
Using the Compiled <strong>Sound</strong> Grid<br />
When you have finished making the associations between <strong>Sound</strong>s and program numbers, choose Compile<br />
to disk… from the Action menu; this compiles each <strong>Sound</strong>, stores the compiled <strong>Sound</strong> on the disk in<br />
<strong>Kyma</strong>’s temporary folder, and names each file using a unique number. Compiling also stores copies of<br />
the samples that would be loaded into sample RAM and copies of any MIDI files needed to play the<br />
<strong>Sound</strong>s, as well as saving the global map, the current number of expansion cards, the available wavetable<br />
memory, and the full file names of any sample files (such as digital recordings) used in the <strong>Sound</strong>.
Because the compiled <strong>Sound</strong>s do not automatically update if you make changes to the original <strong>Sound</strong>s or<br />
any of the samples or MIDI files the <strong>Sound</strong>s may depend upon, you should recompile the compiled<br />
<strong>Sound</strong> grid if you make changes to these files or any time you update your <strong>Kyma</strong> software or hardware<br />
to a different version. To <strong>for</strong>ce all <strong>Sound</strong>s in the grid to compile, choose Compile to disk… from the Action<br />
menu and click on the All <strong>Sound</strong>s button.<br />
Once you have compiled the <strong>Sound</strong>s in the grid, you can use the grid by clicking in the On check box.<br />
When the On box is checked, an incoming MIDI program change causes <strong>Kyma</strong> to load the corresponding<br />
<strong>Sound</strong>. You can also load any <strong>Sound</strong> in the grid by clicking once in its box in the grid.<br />
Since you can play <strong>Sound</strong>s, save <strong>Sound</strong>s, edit <strong>Sound</strong>s, and organize <strong>Sound</strong>s in a compiled <strong>Sound</strong> grid,<br />
you may prefer to use these grids in place of <strong>Sound</strong> file windows as your basic workspace in <strong>Kyma</strong>.<br />
486
Spectrum Editor<br />
A spectrum file contains a collection of tracks; each track consists of an amplitude and a frequency envelope<br />
that describe the change over time of the amplitude and frequency of a single sine wave oscillator.<br />
<strong>The</strong> amplitude and frequency values at one specific point in time <strong>for</strong> all of the tracks is called a frame.<br />
Spectrum files are typically created using the Spectrum Analysis Tool or a third-party program such as<br />
Lemur. §<br />
Opening a Spectrum File<br />
Open the spectrum editor on a file using Open… from the File menu or by double-clicking a spectrum<br />
file in the file organizer.<br />
<strong>The</strong> band across the top is reserved <strong>for</strong> showing marker positions and track in<strong>for</strong>mation. <strong>The</strong> large color<br />
area in the center is <strong>for</strong> displaying the spectrum. ‡ <strong>The</strong> buttons across the bottom are <strong>for</strong> editing and display<br />
operations. <strong>The</strong>y are grouped to correspond with the function keys on your computer keyboard.<br />
Spectrum Display<br />
In the center area of the editor, time is shown from left to right, frequency from bottom to top, and amplitude<br />
is mapped to color: the bright colors like yellow and green are the largest amplitude, then the<br />
blues and purples, with red (and black) showing the smallest amplitudes.<br />
<strong>The</strong> horizontal lines are the tracks. Each track corresponds to an amplitude and frequency envelope <strong>for</strong> a<br />
sine wave oscillator. <strong>The</strong> change in the color of a track as you trace it from left to right corresponds to the<br />
amplitude envelope on that oscillator. <strong>The</strong> change in vertical position from left to right corresponds to the<br />
frequency envelope.<br />
To display in<strong>for</strong>mation on a particular track at a particular point in time, place the mouse over that track<br />
(without clicking down). <strong>The</strong> track number and the time in seconds corresponding to the mouse location,<br />
the amplitude in dB (where 0 dB is the maximum), the raw amplitude value § (where 127 is the maximum),<br />
and the frequency in hertz are displayed in the upper part of the editor.<br />
§ For more in<strong>for</strong>mation on the Spectrum Analysis Tool, see Tools menu: Spectral Analysis on page 443. Lemur is<br />
available from http://datura.cerl.uiuc.edu.<br />
‡ Since the spectrum editor uses color extensively, some of the screen images in this section may not reproduce well<br />
in the printed version of this manual.<br />
§ Raw amplitude values are used by the track selection and track filtering options.
Display Amplitude Envelopes<br />
F10<br />
Join the Dots<br />
F11<br />
By default, the spectrum editor displays frequency on the vertical axis and time on the horizontal axis. To<br />
switch to showing amplitude on the vertical axis, use the button that toggles between amplitude and frequency.<br />
In this mode, frequency is not shown at all (other than the general tendency that the higher<br />
numbered tracks are centered at higher frequencies). This mode makes it possible <strong>for</strong> you to change an<br />
amplitude envelope by drawing all or part of it in by hand.<br />
When you are displaying in amplitude mode, the vertical axis is labeled AMP in red (rather than FREQ in<br />
green).<br />
Pressing the join-the-dots button toggles between displaying each time point (frame) <strong>for</strong> each track as an<br />
isolated dot, or by connecting the time points (frames) <strong>for</strong> each track by lines. Join-the-dots mode only<br />
takes effect at higher magnifications where there are large gaps between the frames (and thus, between<br />
the dots).<br />
Selecting and Deselecting<br />
To select a single track, click on it. You will hear that track and its color will become brighter to indicate<br />
that it is selected. To extend the selection, hold the Shift key down while making another selection. Otherwise,<br />
the current selection will be deselected be<strong>for</strong>e a new selection is made. To select any of tracks 1<br />
through 10, type the corresponding number on the computer keyboard (use 0 to select track ten). To select<br />
the track above the currently selected one, use the up-arrow key (and similarly to select the track<br />
below the selected one, use the down-arrow key).<br />
Anytime you make a selection, the selected tracks or portions of tracks are immediately played so you<br />
can hear what you just selected.<br />
Selecting Regions<br />
To select a region that includes several tracks, use the mouse to draw a box around the region. You can<br />
extend boxed selections in the same way that you extend single track selections, by holding the Shift key<br />
down when you make the new selection.<br />
To deselect a smaller box contained within a selected region, hold the shift-key down and draw a box<br />
around the region to be deselected. This will leave a “hole” in the middle of the selected area. As long as<br />
you begin drawing the new box inside a selected region, the new box will be deselected and leave a hole<br />
in the selected area. If you begin drawing a new box from a point outside the selected area, the new box<br />
will extend the current selection (even if it intersects the selected region).<br />
488
Using Selection Criteria<br />
F12<br />
Playing<br />
Scrubbing<br />
Zooming in/out<br />
F9<br />
To select tracks according to some criteria, press the selection criteria button. This presents you with a list<br />
of options <strong>for</strong> selecting tracks:<br />
Amplitudes within a range selects only those tracks and frames whose raw amplitude values §<br />
fall within the specified range<br />
Above amplitude threshold selects only those tracks and frames whose raw amplitude value exceeds<br />
the given threshold<br />
Complement selection selects all tracks and frames that are not currently selected<br />
Even tracks selects the even numbered tracks only<br />
Odd tracks selects the odd numbered tracks only<br />
Octave harmonics selects tracks whose numbers are a power-of-two<br />
Fibonacci tracks selects tracks numbered (1, 2, 3, 5, 8, 13…)<br />
Prime numbered tracks selects tracks whose numbers are prime (1, 2, 3, 5, 7, 11, 13…)<br />
<strong>The</strong> leftmost play button plays all tracks. Pressing the F1 key also plays all tracks. <strong>The</strong> button to the right<br />
of that one is <strong>for</strong> playing the selected regions only. Pressing F2 also plays the selected tracks only. To play<br />
the segment marked by begin and end loop markers, use the button third from the left, and the button<br />
fourth from the left is used <strong>for</strong> playing everything but the segment marked by the begin and end loop<br />
markers.<br />
F1 F2 F3 F4<br />
When you move the scrub bar with the mouse, with MIDI pitch bend, or using the left/right arrow keys,<br />
you will hear either all tracks or the selected tracks only, depending upon which of the play buttons was<br />
used last.<br />
To hear different sections of the file, use the mouse to drag the vertical yellow scrub bar over the regions<br />
you would like to hear. If you hold down the Shift key while dragging the scrub bar, the scrub bar will<br />
always jump to the mouse location rather than smoothly approach the mouse location.<br />
You can also use MIDI pitch bend to move the scrub bar. To step the scrub bar one frame to the left or one<br />
frame to the right use the left and right arrow keys.<br />
To zoom closer, that is, to look in more detail at a smaller region of the display, use Zoom in (Ctrl+]) from<br />
the Edit menu.<br />
Alternatively, you can zoom in on a region of interest by holding down the Control or Command key<br />
while drawing a box around the area of interest. <strong>The</strong> editor will magnify the boxed region so that it fills<br />
the entire area of the display.<br />
To zoom back out again use Zoom out (Ctrl+[) to zoom out in steps, or press the full display button to<br />
zoom all the way out.<br />
§ <strong>The</strong> raw amplitude value is the value shown in parenthesis in the in<strong>for</strong>mation area when you pass the mouse over a<br />
track.<br />
489
Markers<br />
F5<br />
F6 F7<br />
F8<br />
You can use markers to label different time points in the spectrum file. Click the marker button to place a<br />
marker at the current location of the scrub bar. <strong>The</strong> markers are associated with labels (strings) and stored<br />
in the header of the spectrum file the next time you save the file. By default the name of a marker is ‘m’<br />
followed by the time in frames. To change the label, select the marker and hit Enter or Return.<br />
<strong>The</strong> next two buttons place special markers <strong>for</strong> the beginning and ending points of a loop. <strong>The</strong> SumOfSines<br />
<strong>Sound</strong> uses the begin and end loop markers to loop the analysis file during resynthesis.<br />
<strong>The</strong> button with a circle on it lets you set a pre- and post-roll time. This is the amount of time prior to the<br />
loop start and after the loop end that you will hear when you hit the play-between-loop-markers button.<br />
Clearing and Deleting<br />
Clearing<br />
Deleting<br />
F6<br />
F7<br />
F3<br />
F14<br />
<strong>The</strong>re are two ways to “remove” material from the spectrum. One is to simply set the amplitude of the<br />
track to zero <strong>for</strong> all or part of its duration. <strong>The</strong> other is to actually delete the material from the analysis<br />
file.<br />
To zero the amplitude of the selected tracks or portions of tracks, use Clear from the Edit menu. To zero<br />
the amplitudes of everything but the selected region, use Trim from the Edit menu. Zeroed tracks are<br />
displayed in dark gray and no longer contribute to the resynthesis.<br />
To restore a grayed-out track to its original amplitude, select it. To permanently zero the amplitude in<br />
such a way that it can no longer be restored through selection, save the file to disk (choose Save or Save<br />
as… from the File menu).<br />
Deleting time frames from a file is done in two steps.<br />
<strong>The</strong> first step is to mark the beginning and ending of the segment of time that is to be deleted using the<br />
begin loop and end loop markers. To place the start marker at the current position of the scrub bar, press<br />
the start loop button.<br />
Similarly to place an end loop marker at the current position of the scrub bar, press the end loop button.<br />
To listen to the marked time segment, use the play-between-markers button.<br />
To delete the marked time frames use the scissors button. This will remove the marked time frames. To<br />
effect a permanent removal of the time frames, choose Save or a Save as… from the File menu.<br />
Copy and Paste<br />
Modifying<br />
To create a new spectrum file based only on the tracks and times within the selected region, use Copy<br />
(Ctrl+C) from the Edit menu. <strong>Kyma</strong> will prompt you <strong>for</strong> a name <strong>for</strong> the new spectrum file. To create a<br />
<strong>Kyma</strong> <strong>Sound</strong> based on this new spectrum file, click in a <strong>Sound</strong> file window and Paste (Ctrl+V).<br />
<strong>The</strong> amplitude and frequency envelopes associated with each track can be modified by redrawing them<br />
or by applying a “filter” or algorithm to all tracks within the selected region.<br />
490
Drawing Mode<br />
F9<br />
F15<br />
You can redraw any part of a single amplitude or frequency envelope using the mouse. To redraw part of<br />
an envelope, first choose whether you want to edit amplitude or frequency envelope by toggling the A/F<br />
button. <strong>The</strong>n select the envelope to be edited and zoom in on it so you can see it in detail. When you are<br />
ready to start drawing, click on the draw button.<br />
While in draw-mode, you can use the mouse as a pen, redrawing sections of the selected envelope. You<br />
will also hear the results of your redrawing as you edit. Be careful to turn off draw-mode by hitting the<br />
pencil button again be<strong>for</strong>e you use the mouse <strong>for</strong> anything else (because you can inadvertently alter the<br />
envelope by clicking anywhere in the display while in draw mode).<br />
When you are in drawing mode, you hear exactly what you are drawing in either the amplitude or the<br />
frequency envelope.<br />
Algorithmic Modifications to Tracks<br />
F13<br />
By pressing the track-filters button, you can get a list of algorithmic modifications that can be applied to<br />
the selected tracks. <strong>The</strong>se are filters, not in the audio sense, but in the graphical sense that they smooth or<br />
otherwise modify the graphical representation of the amplitude or frequency envelope.<br />
Scale amplitudes Scale the amplitudes of the selected by the given amount.<br />
Replace amplitude with average For each selected track, replace the amplitude envelope with a constant<br />
envelope of the average amplitude value.<br />
Smooth amplitude For each selected track, replace each single amplitude envelope value<br />
with the average (mean) of the neighboring group of values. You are<br />
prompted <strong>for</strong> the size of the neighborhood.<br />
Remove outliers in amplitude For each selected track, replace each single amplitude envelope value<br />
with the middle value (median) of the neighboring group of values. You<br />
are prompted <strong>for</strong> the size of the neighborhood.<br />
Force to harmonic frequency You are prompted <strong>for</strong> the number of a “harmonic” guide track. <strong>The</strong> frequency<br />
envelope of each track in the selection is replaced with a copy of<br />
the guide track frequency envelope that has been scaled according to the<br />
ratio of the track number to the guide track number.<br />
For example, if track 4 is selected, and track 2 is the guide track, track 4’s<br />
frequency envelope will be set to a copy of track 2’s frequency envelope<br />
moved an octave higher (two times the frequency of track 2).<br />
Replace frequency with average For each selected track, replace the frequency envelope with a constant<br />
envelope of the average frequency value.<br />
Smooth frequency For each selected track, replace each single frequency envelope value<br />
with the average (mean) of the neighboring group of values. You are<br />
prompted <strong>for</strong> the size of the neighborhood.<br />
Remove outliers in frequency For each selected track, replace each single frequency envelope value<br />
with the middle value (median) of the neighboring group of values. You<br />
are prompted <strong>for</strong> the size of the neighborhood.<br />
Add noise to frequency You are prompted <strong>for</strong> the amount of frequency deviation and the rate of<br />
change of the deviation. For each selected track, this track filter adds a<br />
random amount of frequency deviation.<br />
Arpeggiate Staggers the selected tracks in time, with the higher numbered tracks<br />
delayed by proportionally more time. You are prompted <strong>for</strong> the amount<br />
of time to delay each track relative to the previous track.<br />
491
492
Samples<br />
A sample file is a digital recording of a signal; it stores the instantaneous amplitude versus time of the recorded<br />
signal. A sample file usually contains a header in a specific <strong>for</strong>mat; the header contains in<strong>for</strong>mation<br />
about the way the sample was recorded (<strong>for</strong> example, the sample rate of the recording, the number of<br />
channels recorded, and the resolution of the recording). <strong>Kyma</strong> can work with sample files in the AIFF,<br />
SD-I, SD-II, SF/IRCAM/MTU or WAV <strong>for</strong>mats.<br />
<strong>The</strong> sample memory (also called sample RAM) on the signal processor is like the RAM on your computer; it<br />
is volatile memory that provides only temporary storage, but offers faster access times and more flexibility<br />
than the computer’s hard disk. <strong>Kyma</strong> uses sample memory <strong>for</strong> delay lines, samples, and wavetables<br />
(single cycles of standard wave<strong>for</strong>ms, such as sine waves or envelope functions). Sample memory can<br />
either be automatically loaded from a sample file stored on the host computer’s hard disk, or it can be<br />
written in real time by a <strong>Sound</strong>.<br />
<strong>The</strong> sample editor provides basic cutting and splicing tools <strong>for</strong> manipulating sample files.<br />
What is a Wavetable?<br />
<strong>The</strong>re are two uses <strong>for</strong> the word “wavetable” in <strong>Kyma</strong>. One use refers to the size of a block of memory in<br />
the Capybara sample RAM and the other use refers to how a sample file is intended to be used.<br />
When <strong>Kyma</strong> uses the Capybara sample memory, it allocates the memory in chunks of 4096 samples.<br />
<strong>The</strong>se 4096 sample long chunks are called wavetables. Standard configurations have either 255 or 1023<br />
wavetables. Sometimes you will see messages referring to the amount of sample RAM in terms of these<br />
wavetables.<br />
<strong>The</strong> parameter names of the <strong>Sound</strong> modules have been chosen to assist you in understanding how <strong>Kyma</strong><br />
will use the recording stored in the sample file. Typically, a Wavetable field is used to specify a monophonic<br />
sample file that contains exactly one cycle of a wave<strong>for</strong>m of exactly 4096 sample points (one<br />
wavetable long). Other fields (<strong>for</strong> example, Sample) in which you specify sample files generally assume<br />
that the file contains an arbitrary digital recording of arbitrary length. To be sure of the kind of digital<br />
recording a specific <strong>Sound</strong> requires, see the on-line help <strong>for</strong> that parameter by clicking on the name of the<br />
parameter in the <strong>Sound</strong> editor.<br />
Using Sample Files<br />
<strong>Kyma</strong> <strong>Sound</strong>s are not digital recordings. <strong>The</strong> typical <strong>Kyma</strong> <strong>Sound</strong> is a set of instructions telling the Capybara<br />
how to generate an audio signal in real time. <strong>The</strong>re are two fundamental advantages to this<br />
approach: an instruction list takes up much less memory than the equivalent digital recording, and instructions<br />
can be more flexibly modified than digital recordings.<br />
<strong>The</strong>re are times, however, when you will want to create, store and play digital recordings stored in sample<br />
files. In <strong>Kyma</strong>, recording to the hard disk allows you to<br />
♦ sample live input from the A/D converter or other sources<br />
♦ record any <strong>Kyma</strong> <strong>Sound</strong> as a sample<br />
♦ export samples to other programs<br />
♦ build up complex textures through multi-tracking, or<br />
♦ pre-compute subsections of a <strong>Sound</strong> that is too complex to compute in real time<br />
<strong>Kyma</strong> also has the complementary ability to play digital recordings stored on the hard disk, so you can<br />
listen to <strong>Sound</strong>s you have recorded in previous sessions. Because <strong>Kyma</strong> can recognize sample files in a<br />
variety of <strong>for</strong>mats, the program’s ability to play disk recordings also allows you to import samples from<br />
other sources (CD-ROM sample collections and hard disk recording software, <strong>for</strong> example).
Exporting, Importing and Post-Processing<br />
<strong>Kyma</strong>’s ability to record and play sample files allows you to exchange files between <strong>Kyma</strong> and other<br />
synthesis and editing environments. For example, you can use <strong>Kyma</strong> to design <strong>Sound</strong>s, record the<br />
<strong>Sound</strong>s into sample files, then edit, mix and sequence the sample files using a different program (like a<br />
DAW or an audio sequencer). You could also exchange <strong>Sound</strong>s with a colleague who doesn’t have <strong>Kyma</strong>.<br />
<strong>Kyma</strong> can exchange sample files with any program that recognizes AIFF (Audio Interchange File Format),<br />
WAV (Microsoft Wave), SF/IRCAM/MTU, or SD-I and SD-II (<strong>Sound</strong> <strong>Design</strong>er I and II) files.<br />
Regardless of whether your sample files were generated in <strong>Kyma</strong> or another program, <strong>Kyma</strong> lets you<br />
play them directly from the hard disk using a DiskPlayer, MultifileDiskPlayer, KeyMappedMultisample,<br />
or a DiskSplicer (all found in the Disk category of the system prototypes), or from sample memory using<br />
Sample, MultiSample, or KeyMappedMultiSample (all found in the Sampling category), or from either<br />
the hard disk or sample memory using the GenericSource (found in the Sources category). You can add<br />
reverberation, mix it with <strong>Sound</strong>s generated in <strong>Kyma</strong>, do filtering; in short, you can treat these <strong>Sound</strong>s<br />
like any other <strong>Sound</strong> in <strong>Kyma</strong>. <strong>The</strong>n, once you have processed the sample file to your satisfaction, you<br />
can record the processed version to the hard disk as a new file.<br />
Playing and Editing<br />
You can play back sample files by choosing Play… from the File menu and then selecting the sample file<br />
you wish to play from the file dialog. To see the files graphically and make minor edits, select Open…<br />
from the File menu and choose Sample file as the file type (see Sample Editor on page 501 <strong>for</strong> more in<strong>for</strong>mation).<br />
You can also play sample files using the DiskPlayer, MultifileDiskPlayer, DiskSplicer,<br />
Sample, MultiSample, KeyMappedMultiSample, and GenericSource <strong>Sound</strong>s. Alternatively, you can play<br />
and edit sample files from the file organizer, see File menu: File organizer on page 424.<br />
DiskPlayer, MultifileDiskPlayer, DiskSplicer, and KeyMappedMultisample and GenericSource (if set to<br />
play from disk) play sample files directly from the hard disk of your computer. <strong>The</strong> number of sample<br />
files you can play directly from disk at any one time depends on the speed of your computer’s hard disk<br />
and disk driver software. (At a 44.1 khz sample rate, you should be able to play three or four simultaneous<br />
monaural sample files.) You can, however, build up arbitrarily complex <strong>Sound</strong>s by recording to disk,<br />
playing back from the disk with modifications and additions, and recording the modified <strong>Sound</strong> into another<br />
disk file, ad infinitum (or at least until you run out of disk space).<br />
Sample, MultiSample, KeyMappedMultiSample, and KeyMappedMultisample and GenericSource (if set<br />
to play from RAM) play sample files from the RAM of the signal processor. Because of this, these <strong>Sound</strong>s<br />
are restricted to playing sample files that can fit in the sample memory. However, when the sample is<br />
stored in sample memory, it is possible to play through the sample in different ways, including in reverse<br />
and with arbitrary, moveable loop points.<br />
494
DiskPlayer<br />
You can play back a recording from the hard disk by using a DiskPlayer <strong>Sound</strong>. A DiskPlayer can be<br />
treated like any other <strong>Kyma</strong> <strong>Sound</strong>.<br />
MultifileDiskPlayer<br />
<strong>The</strong> MultifileDiskPlayer is similar to the DiskPlayer, except that you provide it with a list of sample files.<br />
<strong>The</strong> Index field provides a real time way of choosing which sample file to play when the MultifileDisk-<br />
Player is triggered. See the Prototypes Reference beginning on page 218, the on-line help, and the<br />
examples that come with <strong>Kyma</strong> <strong>for</strong> more in<strong>for</strong>mation about this <strong>Sound</strong>.<br />
DiskSplicer<br />
Another way to play back sample files is to use a DiskSplicer. A DiskSplicer <strong>Sound</strong> allows you to play all<br />
or part of a samples file; it also lets you splice together segments from one or more samples files. With a<br />
DiskSplicer <strong>Sound</strong> you can per<strong>for</strong>m non-destructive graphic edits on multiple samples files.<br />
Segments Fields and Controls<br />
<strong>The</strong> left half of the Segments field provides an overview of all of the sample files as they are currently<br />
spliced together. Click and drag in this part of the field to select the portion to be displayed in the right<br />
half of the Segments field. Click and drag in the right half of the Segments field to make a selection.<br />
Cut, Copy, Paste, Clear, and Trim from the Edit menu operate on this selection.<br />
495
<strong>The</strong> icon buttons per<strong>for</strong>m actions that apply to the selection (with the exception of the left and right arrow<br />
buttons). From left to right, the buttons per<strong>for</strong>m the following actions:<br />
scrolls one page of samples to the left<br />
plays the currently selected samples<br />
pastes a disk file over the selection<br />
causes selection to exactly fill the display area<br />
contracts the display in the time direction<br />
expands the display in the time direction<br />
contracts the display in the amplitude direction<br />
expands the display in the amplitude direction<br />
scrolls one page of samples to the right<br />
In<strong>for</strong>mation on the selection is also shown in the field below the overview display. <strong>The</strong> value on the left<br />
displays the magnification of the selection. <strong>The</strong> values on the right displays the size and range of the selection.<br />
Click these fields to change their units.<br />
To play a sample file using a DiskSplicer, drag one from the system prototypes into a <strong>Sound</strong> file window<br />
and open it. To replace the default samples provided in the prototype with the sample file you wish to<br />
play, select the entire right half of the Segments field using Select all from the Edit menu. Click the disk<br />
button and select the sample file you want to play from the file list. <strong>The</strong> samples from this sample file will<br />
appear in the Segments field.<br />
Unlike a DiskPlayer, a DiskSplicer does not automatically change the sample rate of a sample file to<br />
match that of the current sample rate or to match the sample rates of the other files in the same<br />
DiskSplicer. For example, if your signal processor is set to a sample rate of 44.1 khz and you splice in part<br />
of a file that was originally recorded at a sample rate of 22.05 khz, the spliced section will play back at<br />
twice the speed and frequency of the original recording.<br />
Sample, MultiSample and KeyMappedMultiSample<br />
A Sample plays back the sample file after first loading it into the sample memory. It can play its sample<br />
back in reverse, and it has real-time adjustable loop points.<br />
<strong>The</strong> MultiSample and the KeyMappedMultiSample are similar to the Sample, except that you can provide<br />
a list of sample files. See the Prototypes Reference beginning on page 218, the on-line help, and the examples<br />
that come with <strong>Kyma</strong> <strong>for</strong> more in<strong>for</strong>mation about these <strong>Sound</strong>s.<br />
496
GenericSource<br />
A GenericSource can play back a sample file either directly from the hard disk or from RAM after the<br />
sample file has been loaded into the sample memory. It can play either or both channels of the sample<br />
file, and includes an attack/release envelope.<br />
Recording to the Hard Disk<br />
You can make recordings to the hard disk using the tape recorder tool (see Tools menu: Tape Recorder on<br />
page 442), Record to disk… from the Action menu (see Action menu: Record to disk… on page 437), the<br />
DiskRecorder <strong>Sound</strong>, or the DiskCache <strong>Sound</strong>. Like other <strong>Kyma</strong> <strong>Sound</strong>s, DiskRecorder and DiskCache<br />
can be placed anywhere in a <strong>Sound</strong>’s structure, allowing you to schedule a recording to disk at a certain<br />
time during a <strong>Sound</strong>. You can also have multiple and simultaneous DiskRecording and DiskCache<br />
<strong>Sound</strong>s within the same <strong>Sound</strong> structure.<br />
DiskRecorder <strong>Sound</strong><br />
You can use a DiskRecorder <strong>Sound</strong> to make digital recordings. Using a DiskRecorder as an input in a<br />
larger <strong>Sound</strong> structure allows you to record to disk at a specific point in time and a specific point in the<br />
signal flow diagram within a complex <strong>Sound</strong>.<br />
To use a DiskRecorder, edit its parameters, make your recording <strong>for</strong>mat choices, name the destination<br />
sample file, and drag the <strong>Sound</strong> you want to record into the DiskRecorder’s Input field. Choose 0 s <strong>for</strong><br />
the CaptureDuration if you want to record <strong>for</strong> the duration of the DiskRecorder’s input, otherwise,<br />
497
enter the length of time you want to record. <strong>The</strong> recording will take place when the Trigger becomes<br />
positive; if Gated is checked, the recording will stop when Trigger becomes zero or negative, and will<br />
resume when Trigger becomes positive again.<br />
DiskCache <strong>Sound</strong><br />
If your <strong>Sound</strong> is too complex to be played in real time, you can ease the computational burden on your<br />
Capybara by replacing part of the <strong>Sound</strong> with a DiskCache <strong>Sound</strong>. A DiskCache computes its input and<br />
records it to disk only if Record is checked. When the Record parameter is unchecked, the DiskCache<br />
reads the recording stored on the disk.<br />
In the following example, everything to the left of the DiskCache has been computed ahead of time and<br />
recorded in a disk file. When you play the <strong>Sound</strong>, the cached part of the structure can be read from the<br />
disk rather than generated in real time — thus easing the computational load on the signal processor.<br />
Traditionally, when you make a recording you lose the history of how the recorded sound was created.<br />
Using the DiskCache in <strong>Kyma</strong>, you can preserve the structure that you used to generate the samples,<br />
making it easier <strong>for</strong> you to come back later and make changes to the parameters of the generating <strong>Sound</strong>.<br />
Using Sample Memory<br />
Many <strong>Sound</strong> modules in <strong>Kyma</strong> use sample memory in order to carry out their functions. For example,<br />
Sample plays a sample out of sample memory, and GrainCloud uses the grain wave<strong>for</strong>m and the grain<br />
envelope stored in sample memory to create its output.<br />
<strong>The</strong>re are several different ways that the Capybara uses sample memory:<br />
♦ <strong>for</strong> storing an entire digital recording<br />
♦ <strong>for</strong> storing one cycle of periodic functions<br />
♦ <strong>for</strong> storing control parameters<br />
♦ <strong>for</strong> delay lines<br />
♦ to hold the intermediate results of a calculation<br />
In all cases, <strong>Kyma</strong> manages the memory allocation automatically.<br />
To use a sample file in a <strong>Sound</strong>, click on the disk button in the parameter field and select the name of that<br />
sample from the file list, or simply type the name into the field.<br />
498
<strong>The</strong> <strong>Kyma</strong> <strong>Sound</strong> compiler allocates a portion of sample memory <strong>for</strong> every parameter field in which you<br />
specify a sample file. <strong>The</strong> compiler can then do one of several different things:<br />
♦ If the <strong>Sound</strong> has FromMemoryWriter checked, the compiler tries to make this <strong>Sound</strong> use the same<br />
sample memory that a MemoryWriter in the same <strong>Sound</strong> structure and with the same name <strong>for</strong> its<br />
RecordingName parameter has written, see Writing Sample Memory In Real Time, below.<br />
♦ If the parameter field is set to Private, the compiler will not allow the sample memory to be shared.<br />
Private memory is typically used as delay lines <strong>for</strong> filters or reverberators, or in other situations<br />
where the sample memory is only needed internally <strong>for</strong> the duration of the <strong>Sound</strong>.<br />
♦ Otherwise, <strong>Kyma</strong> assumes the parameter field names a sample file on the hard disk and tries to locate<br />
it. (See How <strong>Kyma</strong> locates files on page 431 <strong>for</strong> more in<strong>for</strong>mation.) If Optimize Sample RAM Use<br />
(see Per<strong>for</strong>mance… on page 430) is on, <strong>Kyma</strong> will load the sample file onto only the expansion cards<br />
that require it; otherwise, <strong>Kyma</strong> will load the sample file onto all expansion cards. Note that all<br />
<strong>Sound</strong>s that use a sample file on a particular expansion card will share the same sample.<br />
Writing Sample Memory In Real Time<br />
If you are using <strong>Kyma</strong> as a real-time per<strong>for</strong>mance tool, there can be situations in which you might want to<br />
capture a sound and play it back later during the per<strong>for</strong>mance. You can use a MemoryWriter <strong>Sound</strong> to<br />
write the output of any other <strong>Sound</strong> (including ADInput) into sample memory in real time. Once written,<br />
that section of sample memory can be read by any <strong>Sound</strong> that can access sample memory as long as that<br />
<strong>Sound</strong> has FromMemoryWriter checked.<br />
In the following example (a Concatenation of a MemoryWriter followed by a Sample), the inputs write to<br />
and read from sample memory:<br />
MemoryWriter captures one second of the ADInput in a segment of sample memory named recTable.<br />
After that the Sample reads recTable <strong>for</strong> a duration of one second, thus playing back the recording that<br />
was just made. When you load this <strong>Sound</strong>, <strong>Kyma</strong> reserves one second of time in the sample memory, and<br />
it protects this memory until the last time it is read by the Sample at time 2 s. <strong>The</strong>n it releases the memory<br />
<strong>for</strong> use by other <strong>Sound</strong>s.<br />
A sample written by MemoryWriter <strong>Sound</strong>s is ephemeral by nature; it is protected in sample memory<br />
only <strong>for</strong> the duration of the <strong>Sound</strong>(s) <strong>for</strong> which it is a parameter. When the last <strong>Sound</strong> to reference that<br />
sample finishes playing, the sample memory used by the recording is made available <strong>for</strong> recycling. To<br />
guarantee that a sample persists <strong>for</strong> longer than the <strong>Sound</strong> in which it is recorded, use a DiskRecorder or<br />
a DiskCache <strong>Sound</strong> to write the sample to disk rather than to sample memory.<br />
499
Feedback<br />
Typically, you use the FeedbackLoopInput and FeedbackLoopOutput <strong>Sound</strong>s to feed back the output of a<br />
<strong>Sound</strong> back into its input.<br />
You can also use MemoryWriters to create regeneration effects and other types of feedback. For example,<br />
to specify the following system:<br />
A<br />
u(n) +<br />
y(n)<br />
as a <strong>Sound</strong>, you could use a MemoryWriter to write into the sample memory and an Oscillator to read<br />
out of that same memory after a one-sample delay:<br />
Sample Memory Warning Messages<br />
Each of the expansion cards in your Capybara has its own sample memory. If a MemoryWriter writes<br />
into the sample memory on one expansion card and the <strong>Sound</strong> that reads out of that sample memory<br />
cannot be scheduled on the same expansion card, you will get an error message. <strong>The</strong> easiest solution to<br />
500<br />
z -1
Sample Editor<br />
Graphic Editor<br />
this problem is to write the samples to the sample memory of all the expansion cards by checking<br />
Global in the MemoryWriter.<br />
If you inadvertently try to read from memory be<strong>for</strong>e you have written anything there (or if you write to<br />
memory and never read what you have written), you will also get a warning message. You can usually<br />
solve this problem by putting a TimeOffset on the <strong>Sound</strong> that reads the memory.<br />
<strong>The</strong> sample editor can be used to edit or create AIFF, SD-I, SD-II, SF/IRCAM/MTU or WAV <strong>for</strong>mat sample<br />
files stored on the hard disk of your computer.<br />
Select New… from the File menu, choose Sample file as the file type, and press Enter or click OK to create<br />
a new sample file. Select Open… from the File menu and choose Sample file as the file type to open a<br />
sample editor on an existing sample file. Alternatively, double-click a sample file name in the file organizer,<br />
or click the Disk button while holding down the Command or Control key in a parameter field of<br />
the <strong>Sound</strong> editor.<br />
<strong>The</strong>re are two parts to the editor: the graphic editor (top half) and the generator templates (bottom half).<br />
<strong>The</strong> graphic editor displays a graphic view of the samples versus time and is primarily used <strong>for</strong> editing<br />
what is already there. <strong>The</strong> generator templates section provides both templates and short Smalltalk programs<br />
<strong>for</strong> generating new samples.<br />
<strong>The</strong> top half of the graphic editor provides an overview of the entire sample file. Click and drag in this<br />
part of the editor to choose the portion of the sample file to be displayed in the lower half of the graphic<br />
editor. Click and drag in the lower half of the graphic editor to select the samples you wish to manipulate<br />
or play. Cut, Copy, Paste, Clear, and Trim from the Edit menu all operate on this selection.<br />
<strong>The</strong> numbers to the right of the overview provide in<strong>for</strong>mation on the selection. <strong>The</strong> upper number tells<br />
you the magnification of the wave<strong>for</strong>m shown in the lower half of the graphic editor. <strong>The</strong> lower numbers<br />
tell you the beginning and ending times of the current selection, with the total duration indicated in parentheses.<br />
Click on the numbers to switch between dB and linear scales and between seconds and<br />
samples.<br />
<strong>The</strong> buttons between the top and bottom sections of the graphic editor per<strong>for</strong>m operations on the selection<br />
and control the placement and size of the detailed view in the lower half of the editor.<br />
From left to right, the buttons per<strong>for</strong>m the following actions:<br />
scrolls one page of samples to the left<br />
plays the currently selected samples<br />
pastes a disk file over the selection<br />
causes selection to exactly fill the display area<br />
contracts the display in the time direction<br />
501
expands the display in the time direction<br />
contracts the display in the amplitude direction<br />
expands the display in the amplitude direction<br />
additional options (e.g. edit header in<strong>for</strong>mation)<br />
scrolls one page of samples to the right<br />
To edit the in<strong>for</strong>mation in the file’s header, click on the additional options button (…) and select Edit<br />
info.<br />
In this dialog, you can change the file’s <strong>for</strong>mat and the in<strong>for</strong>mation stored in its header. For example, you<br />
can select the start and end times of a sustain loop (this loop in<strong>for</strong>mation is used by the Sample <strong>Sound</strong>).<br />
Generator Templates<br />
<strong>The</strong> generator templates generate new wave<strong>for</strong>m segments that replace the selection in the graphic editor<br />
when you click the Insert button. If nothing is selected in the graphic editor, the new segment will be inserted<br />
into the file at the insertion point when you click Insert.<br />
<strong>The</strong> pop-up menu in the upper left of the generator section includes several templates <strong>for</strong> generating<br />
standard shapes or functions. <strong>The</strong> pop-up list also includes a short Smalltalk program corresponding to<br />
each of the templates, so you can modify the code or use the template code as an example or starting<br />
point <strong>for</strong> writing your own function-generating program.<br />
To select a template, click on the arrow to the right of the list. You will see a hierarchical pop-up list. Select<br />
the desired template.<br />
<strong>The</strong> following templates are available in the sample editor.<br />
Buzz<br />
Generates the specified number of harmonic sine waves, starting with the Lowest Harmonic. <strong>The</strong> amplitude<br />
of each harmonic is the AmpBase raised to the power of the harmonic number. For example, if<br />
you specified an AmpBase of 0.5, then the amplitude of the third harmonic would be 0.125.<br />
502
Use Gain to adjust the overall amplitude of the wave<strong>for</strong>m until it is close as possible to a range of -1 to 1<br />
without clipping. Test the Gain setting by using the Insert button; if the inserted segment looks clipped,<br />
adjust Gain and press Insert again.<br />
Cubic Spline<br />
Indicate the total length of the segment in the Duration field (4096 samp is the length of a standard<br />
wavetable). Enter a list of points that the spline should pass through (range is -1 to 1). <strong>The</strong>n indicate the<br />
proportion of the total duration taken up by each segment. <strong>The</strong> number of segments should always be<br />
one less than the number of end points.<br />
Exponential Segments<br />
Indicate the total length of the wave<strong>for</strong>m in the Duration field (4096 samp is the length of a standard<br />
wavetable). Enter a list of end points <strong>for</strong> the exponential segments (remember that exponential functions<br />
are undefined at 0, so keep the values between 0 and 1). <strong>The</strong>n indicate the proportion of the total duration<br />
taken up by each segment. <strong>The</strong> number of segments should be one less than the number of end points.<br />
Fourier<br />
This lets you specify a wave<strong>for</strong>m by specifying its component sine waves. Enter the list of desired harmonics<br />
by number (where 1 is the fundamental, 3 is the third harmonic, etc.). <strong>The</strong>n enter the relative<br />
amplitudes of each harmonic (range of -1 to 1), and the relative phase (in radians) of each harmonic. To<br />
specify π, use {Float pi}. Do any arithmetic on π within curly braces, e.g., {2 * Float pi}. For wave<strong>for</strong>ms<br />
requiring a large number of partials and/or to get inharmonic partials, modify the Fourier Program<br />
template (found in the hierarchical list under Programs).<br />
Impulse Response<br />
This generates the impulse response of a filter that you specify. Set the number of <strong>for</strong>mants and the center<br />
frequency, bandwidth, and relative amplitude of each <strong>for</strong>mant of the filter. Use Gain to adjust the overall<br />
amplitude to be as close as possible to the full range (-1 to 1) without clipping. You may have to try Insert<br />
several times to adjust the Gain to the optimum level.<br />
Interpolate Selection<br />
This is used to time-stretch or time-compress the selection. It can be used, <strong>for</strong> example, to take a single<br />
cycle from a recording and stretch or compress it to exactly 4096 samples so that it can be used as the<br />
wavetable of an Oscillator. You can also use this to shift a sample down in frequency without aliasing<br />
(by time-stretching it).<br />
<strong>The</strong> selection will be sinc-interpolated to the length specified in the template parameters. Gain is used to<br />
scale the samples. Interpolation Points controls how many points are used in the sinc interpolation;<br />
use larger numbers than the default <strong>for</strong> better results, especially when changing the length drastically.<br />
(This operation can take a long time).<br />
Line Segments<br />
Indicate the total length of the wave<strong>for</strong>m or function in the Duration field (4096 samp is the length of a<br />
standard wavetable). Enter a list of end points <strong>for</strong> the linear segments (in the range of -1 to 1). <strong>The</strong>n indicate<br />
the proportion of the total duration taken up by each segment. <strong>The</strong> number of segments should be<br />
one less than the number of end points.<br />
Normalize Selection<br />
This scales all amplitudes in the selected portion of the sample to the maximum indicated in the Amplitude<br />
field.<br />
Polynomial<br />
This generates the polynomial whose x values range over the interval you provide and whose coefficients<br />
are supplied in the Coefficients field. Polynomial is particularly useful <strong>for</strong> generating wavetables<br />
503
that can be used as waveshapers by the Waveshaper <strong>Sound</strong>. For example, if you typed in the coefficients<br />
5, 4, and -2.5 you would be specifying the polynomial<br />
4 + 4x − 2.5x 2<br />
If the interval you enter is -1 to 1, then the editor will evaluate this polynomial <strong>for</strong> x values ranging from -<br />
1 to 1.<br />
Random<br />
This generates a random wave<strong>for</strong>m whose amplitude ranges from -1 to 1. Specify a seed so that you can<br />
get repeatable results. Change the seed when you want to generate a different random wave<strong>for</strong>m. To<br />
generate different kinds of noise, modify the Random Program template.<br />
Window Selection<br />
This template applies a fade-in and fade-out curve to the selection in the graphic editor. <strong>The</strong> Transition<br />
Duration is the duration of the fade in and fade out.<br />
Viewing the Template Code<br />
<strong>The</strong> hierarchical list of templates also contains the subheading Programs, which contains Smalltalk code<br />
<strong>for</strong> each of the template types. If you like a particular template but want to make a minor change in the<br />
algorithm, you can modify (but not save) its Smalltalk implementation. If you are not sure you understand<br />
one of the templates, you can read its Smalltalk code to see what it does.<br />
If you want to write your own Smalltalk code <strong>for</strong> generating a wavetable, you can use the existing<br />
Smalltalk programs as models or starting points <strong>for</strong> your own code. To save your modified wavetable<br />
generator, copy the text and paste it into a newly created text file.<br />
Wavetables Provided with <strong>Kyma</strong><br />
Compress<br />
Control<br />
When used in a MultiplyingWaveshaper, this wave<strong>for</strong>m can be used to do computationally inexpensive<br />
compression and expansion. Think of the curves as output-attenuation-as-a-function-of-input-amplitude.<br />
To create new curves, use the InputOutputCharacteristic Program template in the sample editor.<br />
C5_01_1<br />
<strong>The</strong>se are typically used in FunctionGenerators to generate envelopes or “control signals” <strong>for</strong> hot parameters.<br />
If you want a periodically repeating control signal, use one of these samples in a low frequency<br />
oscillator. To generate your own, use any of the templates in the sample editor or modify template code<br />
to compute an arbitrary mathematical function and store it as a sample.<br />
Exponential<br />
ExponRev<br />
FourExpons<br />
504
EX<br />
GA<br />
FullRamp<br />
Gaussian<br />
Ramp<br />
Random<br />
<strong>The</strong> RE analysis tool separates a sample into two parts: a time-varying filter (the resonator) and the signal<br />
(the excitation) to feed through this filter to recreate the original sample. <strong>The</strong>se files are the excitations<br />
from various samples, and can be used as an input to the REResonator <strong>Sound</strong>.<br />
<strong>The</strong> GA (group additive) analysis tool reduces a spectral analysis file (consisting of potentially hundreds<br />
of sine waves with different frequency and amplitude envelopes) into a smaller set of more complex<br />
wave<strong>for</strong>ms with corresponding amplitude envelopes. <strong>The</strong>se files are derived from various musical instrument<br />
samples, and can be used in the Analysis0 or Analysis1 parameter in the GAOscillators<br />
<strong>Sound</strong>.<br />
This is a display of a GA file <strong>for</strong> a harp pluck. <strong>The</strong> GA analysis tool reduced a spectral analysis file with<br />
128 partials into three complex wave<strong>for</strong>ms (shown above in the left two-thirds of the display), three corresponding<br />
amplitude envelopes, and a frequency deviation envelope (all shown in the right one-third of<br />
the display above).<br />
Impulse Responses<br />
<strong>The</strong>se files contain the responses of various filters to an impulsive input. <strong>The</strong>y are typically used in FunctionGenerators,<br />
Samples, or Oscillators.<br />
ah<br />
ahhhhhhh<br />
FilteredPulse<br />
505
Internal<br />
oo<br />
<strong>The</strong>se are used internally by <strong>Kyma</strong> <strong>Sound</strong>s. You don’t want to delete or modify any of these tables or<br />
some of the <strong>Sound</strong>s will stop working!<br />
Cosine Inverse Kym3 SpecLPF2 SpecLPF8<br />
Iterated Functions<br />
RE<br />
Samples<br />
Spectra<br />
Spectral Shapes<br />
Wave<strong>for</strong>ms<br />
FTrkrTbl Kym1 MiscTbls SpecLPF4 VocodExp<br />
Greeting Kym2 SOSExp SpecLPF6 Zero<br />
<strong>The</strong>se files can be used with the IteratedWaveshaper <strong>Sound</strong> to per<strong>for</strong>m Functional Iteration Synthesis. §<br />
<strong>The</strong>se files can also be used with Waveshaper to create variable-width oscillators.<br />
<strong>The</strong> RE analysis tool separates a sample into two parts: a time-varying filter (the resonator) and the signal<br />
(the excitation) to feed through this filter to recreate the original sample. <strong>The</strong>se files are the time-varying<br />
filters from various samples, and can be used as the Wavetable <strong>for</strong> the REResonator <strong>Sound</strong>.<br />
<strong>The</strong>se digital recordings are typically used in a Sample or in a DiskPlayer <strong>Sound</strong>. Some of these files are<br />
grouped in folders <strong>for</strong> use directly in KeyMappedMultiSample.<br />
<strong>The</strong>se files are used by the SpectrumInRAM, SpectrumOnDisk, and SumOfSines <strong>Sound</strong>s. Each of these<br />
files represents a spectral analysis of a sample. When you use one of them to control an OscillatorBank,<br />
you can resynthesize the original signal through additive synthesis. To generate your own spectral analyses,<br />
see Tools menu: Spectral Analysis on page 443.<br />
<strong>The</strong>se are typically used in SpectralShape <strong>Sound</strong>s and then used to control the spectrum of an OscillatorBank.<br />
Think of these as showing amplitude as a function of frequency.<br />
A<strong>for</strong>mnts<br />
BPF500<br />
<strong>The</strong>se are typically used in Oscillators but can also be used in Samples with looping turned on. Think of<br />
them as single cycles of periodic wave<strong>for</strong>ms. <strong>The</strong> files in the Buzzes, Saws, and Squares folders contain<br />
band-limited approximations to those wave<strong>for</strong>ms, each constructed using a different number of harmonics;<br />
these files are appropriate <strong>for</strong> use with the KeyMappedMultiSample.<br />
§ See Agostino Di Scipio’s paper <strong>for</strong> in<strong>for</strong>mation about Functional Iteration Synthesis.<br />
506
Waveshapers<br />
Buzz<br />
Buzzes Folder<br />
Cosine<br />
GlottalPulse<br />
Saw21<br />
Saws Folder<br />
Sine<br />
Square21<br />
Squares Folder<br />
Triangle<br />
<strong>The</strong>se are typically used a Waveshaper <strong>Sound</strong> as the shaping function. Think of these shapes as outputsample-as-a-function-of-input-sample.<br />
ATAN20<br />
ATAN40<br />
Pentaton<br />
507
Windows<br />
Pythag<br />
<strong>The</strong>se are symmetric waveshapes that can be used in FunctionGenerators or Oscillators as control signals<br />
or amplitude envelopes. <strong>The</strong>y can also be useful in other <strong>Sound</strong>s that have window parameters like SampleCloud,<br />
GrainCloud, FormantBankOscillator, and the SpectrumAnalyzerDisplay.<br />
BristowJohnson<br />
Hamming<br />
Hann<br />
LinearEnvelope<br />
Rectangular<br />
508
Advanced Topics
Variables<br />
By introducing variables, we can generalize one particular <strong>Sound</strong> to describe a whole class of <strong>Sound</strong>s.<br />
Such an abstracted <strong>Sound</strong> is called a lifted <strong>Sound</strong>, so-called because it is at a “higher” level of abstraction<br />
than is any specific <strong>Sound</strong>.<br />
A single lifted <strong>Sound</strong> represents an infinite number of real <strong>Sound</strong>s. Lifting a <strong>Sound</strong> by introducing variables<br />
is similar to introducing variables into an arithmetic expression. While 4 + 5 is just one expression,<br />
x + y represents a whole class of expressions — all possible sums of two numbers.<br />
<strong>The</strong>re are two places you might want to use variables: when encapsulating a complex <strong>Sound</strong> (see <strong>The</strong><br />
Class Editor on page 536), or in a Script or in one of the various FileInterpreters (see Scripting on page<br />
522).<br />
<strong>Kyma</strong> Variables<br />
Variables<br />
Variable <strong>Sound</strong>s<br />
In <strong>Kyma</strong> there are three kinds of variables: variables, Variable <strong>Sound</strong>s, and <strong>Sound</strong>CollectionVariables. A<br />
variable is used to represent values you can type into parameter fields, a Variable <strong>Sound</strong> acts as a place<br />
holder <strong>for</strong> <strong>Sound</strong>s, and a <strong>Sound</strong>CollectionVariable represents a collection of <strong>Sound</strong>s.<br />
<strong>The</strong> typeable parameters of a <strong>Sound</strong> can be represented by variables or expressions involving variables.<br />
To assign a variable to a parameter, type a name <strong>for</strong> the variable preceded by a question mark:<br />
<strong>The</strong> variable will be displayed in green in the parameter field.<br />
A Variable functions as a place holder <strong>for</strong> an actual <strong>Sound</strong> that may be assigned to it later on. You can use<br />
a Variable anywhere you would use any other <strong>Sound</strong>.<br />
<strong>Sound</strong>CollectionVariables<br />
Sometimes you may want to set an entire collection of <strong>Sound</strong>s (rather than the individual <strong>Sound</strong>s of a<br />
collection) to a variable — <strong>for</strong> example, in the Inputs field of a Concatenation or a Sum. To do this, drag<br />
<strong>Sound</strong>CollectionVariable from the system prototypes into the Inputs parameter field. <strong>The</strong> <strong>Sound</strong>CollectionVariable<br />
acts as a place holder <strong>for</strong> a collection of <strong>Sound</strong>s. It can be placed only in fields that accept<br />
more than one <strong>Sound</strong>.<br />
You can use <strong>Sound</strong>CollectionVariables in defining a new kind of <strong>Sound</strong> that can take multiple inputs (see<br />
<strong>The</strong> Class Editor on page 536 <strong>for</strong> more in<strong>for</strong>mation). You can also use a Script to set the value of a<br />
<strong>Sound</strong>CollectionVariable. Its value should be a collection of <strong>Sound</strong>s (<strong>for</strong> example, an Array). See<br />
Scripting on page 522 and <strong>The</strong> Smalltalk-80 <strong>Language</strong> on page 513 <strong>for</strong> more in<strong>for</strong>mation.
Syntax<br />
Like the Variable <strong>Sound</strong>, you can refer to a <strong>Sound</strong>CollectionVariable by name elsewhere in the structure.<br />
See <strong>The</strong> Smalltalk-80 <strong>Language</strong> on page 513 or one of the recommended Smalltalk texts listed there <strong>for</strong><br />
messages that you can send to collections.<br />
Despite the fact that a <strong>Sound</strong>CollectionVariable is not a <strong>Sound</strong> (it represents a collection of <strong>Sound</strong>s), it<br />
will appear as a <strong>Sound</strong> in the <strong>Sound</strong> structure, and you can edit its name just as you would edit a <strong>Sound</strong>’s<br />
name.<br />
Variables typed into parameter fields are indicated by a leading ? character followed by a string of numbers<br />
or letters; the first character in the string must be a letter. Variable names should contain no internal<br />
spaces. Variables are displayed with a green color in the <strong>Kyma</strong> user interface.<br />
<strong>The</strong> names of Variables and <strong>Sound</strong>CollectionVariables are not preceded by question marks, since it is<br />
clear from the context that these are variables. Otherwise, they should follow the same syntactical guidelines<br />
as typed variables.<br />
Some examples of legal variables are:<br />
?freq<br />
?<strong>for</strong>mant2<br />
?theDaysAreAhead123456789<br />
?syntheseVirtuelle<br />
?fumoBianco<br />
and some illegal examples would be:<br />
gaaf<br />
?20Jahrhunderts<br />
?table Lookup<br />
511
Playing a Lifted <strong>Sound</strong><br />
Environments<br />
When you play a lifted <strong>Sound</strong>, <strong>Kyma</strong> prompts you to supply a value <strong>for</strong> each of the variable parameters.<br />
Be<strong>for</strong>e you can hear the lifted <strong>Sound</strong>, a specific value must be assigned to each variable.<br />
If the requested value is a number, string, symbol, or array, enter the value and click Value or press Enter.<br />
If the requested value is a <strong>Sound</strong>, click the button labeled Default <strong>Sound</strong>.<br />
If the requested value is a <strong>Sound</strong> collection, click the button labeled Default Collection. Use Set default<br />
<strong>Sound</strong> and Set default collection from the Action menu to set the selected <strong>Sound</strong> or collection of <strong>Sound</strong>s<br />
to be the defaults used by these dialogs. <strong>The</strong> default <strong>Sound</strong> should always be a single <strong>Sound</strong>. <strong>The</strong> default<br />
<strong>Sound</strong> collection can be a set of one or more <strong>Sound</strong>s or collections.<br />
In the <strong>Sound</strong> file window, you will be asked to supply values <strong>for</strong> the variables each time you play a lifted<br />
<strong>Sound</strong>. In the <strong>Sound</strong> editor, you only have to supply values <strong>for</strong> the variables once. <strong>The</strong> <strong>Sound</strong> editor remembers<br />
the associations of variables to values in what is called the environment. To see the state of the<br />
current environment, select Environment from the Info menu.<br />
If you want to change the values associated with the variables, select Reset environment from the Info<br />
menu. <strong>The</strong> next time you play the <strong>Sound</strong>, <strong>Kyma</strong> will ask you to supply values <strong>for</strong> the variables again.<br />
512
<strong>The</strong> Smalltalk-80 <strong>Language</strong><br />
This chapter is intended to provide you with just enough background to get you started in writing your<br />
own algorithmically constructed <strong>Sound</strong>s. Once you start using Smalltalk extensively, you should keep the<br />
book Smalltalk-80: <strong>The</strong> <strong>Language</strong> and Its Implementation by Adele Goldberg and David Robson around <strong>for</strong><br />
reference.<br />
Learning Smalltalk<br />
If you have never programmed be<strong>for</strong>e, Smalltalk is an excellent first programming language. It has a<br />
simple syntax and reflects a natural way of thinking about problems, the properties of objects, and the<br />
interactions between objects. If you are already familiar with a procedural programming language like C<br />
or Pascal, you will find that, once you spend a little time familiarizing yourself with the syntax, Smalltalk<br />
is not very different from the languages you are using now.<br />
Smalltalk has its roots in the work of the Learning Research Group at the Xerox Palo Alto Research Center<br />
in the early 1970’s. <strong>The</strong> mandate of this group was to come up with ways in which people of different<br />
backgrounds might effectively and joyfully make use of computers. This group later evolved into the<br />
Software Concepts Group (SCG). <strong>The</strong> goal of the SCG was to design a system that could grow as its user’s<br />
knowledge of the system grew.<br />
Sending Messages to Objects<br />
Precedence<br />
You can think of a Smalltalk program as a miniature universe of your own creation. <strong>The</strong> universe contains<br />
objects that you, as the master of the universe, can order around. For example, suppose the universe<br />
contains the object 10 and you wanted that object to negate itself. You would evaluate the following<br />
statement:<br />
10 negated<br />
This is an example of a message–send; the message is negated and the receiver of the message is the object<br />
10. This particular kind of message–send is called a unary message send, since there is only one receiver<br />
and one message. You can test the effects of this statement by typing it into the Script field of a Script,<br />
highlighting it, and then selecting Evaluate from the Edit menu.<br />
If a message has particular values associated with it, it is called a keyword message and consists of pairs<br />
of keywords and values separated by colons. For example, if you wanted the string object 'smalltalk'<br />
to tell you the value of its third character, you would type<br />
'smalltalk' at: 3.<br />
Try evaluating this in the script field of a Script.<br />
A keyword message can consist of any number of keyword:value pairs, <strong>for</strong> example<br />
'smalltalk' copyFrom: 3 to: 5.<br />
<strong>The</strong> simplest examples of binary messages are the binary operations of arithmetic. For example<br />
3 + 5<br />
is technically a keyword + with the value 5 sent to the receiver 3. This would be an awkward way to describe<br />
something as straight<strong>for</strong>ward as the addition of two numbers, so it is simply referred to as a binary<br />
message instead.<br />
Messages are cumulative. For example the message–send,<br />
60 nn hz<br />
would first send the message nn to the object 60. <strong>The</strong> result would be a FrequencyInPitch object. <strong>The</strong>n<br />
the message hz is sent to the FrequencyInPitch object. <strong>The</strong> result is a FrequencyInHertz object. Try<br />
evaluating this in the script field of a Script.
Comments<br />
Variables<br />
Binary messages and keyword messages are also cumulative, but they are evaluated in an order defined<br />
by the following precedence rules:<br />
♦ Unary<br />
♦ Binary<br />
♦ Keyword<br />
You can override the precedence rules by placing an expression within parentheses. For example<br />
2.0 raisedTo: 13 + 3 negated<br />
evaluates to 1024, whereas<br />
((2.0 raisedTo: 13) + 3) negated<br />
evaluates to -8195.<br />
When in doubt, use parentheses to make your intentions clear.<br />
A comment is some explanatory text that is not evaluated as part of the program. In Smalltalk, comments<br />
are delineated by enclosing them within double quotes. It is important to include comments explaining<br />
each logical step of your program. Not only does this make it easier <strong>for</strong> others to understand your code,<br />
but it makes it easier <strong>for</strong> you to remember why you chose to do things the way you did when you look at<br />
your programs later.<br />
Smalltalk variables must begin with a letter and contain only alphanumeric characters. It is common<br />
practice to begin a variable name with a lower-case letter and to indicate multi-word variable names by<br />
capitalizing the first letter of each new word. For example,<br />
r<br />
x2<br />
tacuma<br />
mrJavelina<br />
theMainEvent<br />
darthBara<br />
tryToEnjoy<strong>The</strong>Daylight<br />
are all typical variable names in Smalltalk.<br />
Smalltalk variables are distinct from the <strong>Kyma</strong> variables described in Variables. <strong>The</strong> scope of a Smalltalk<br />
variable extends only as far as the parameter field it is contained in. For example, variables declared in a<br />
Script field of a Script <strong>Sound</strong> are valid only within that Script field.<br />
Variables are declared at the beginning of a program by listing them between vertical lines, <strong>for</strong> example<br />
| r x2 hybris terminalLight gaaf |<br />
is a variable declaration.<br />
To assign a value to a variable, type the variable name, a space, the assignment symbol :=, another space,<br />
and then the expression whose value is to be assigned to the variable, followed by a period. For example,<br />
| r x2 a<strong>Sound</strong> darthBara |<br />
r := Random newFor<strong>Kyma</strong>WithSeed: 1032.<br />
x2 := r next.<br />
darthBara := a<strong>Sound</strong> frequency: x2 * 1000 hz.<br />
514
Numbers<br />
Integers, <strong>for</strong> example,<br />
7 -9<br />
are written as numerals with no decimal points.<br />
To express an integer in another radix, <strong>for</strong> example as a binary or hexadecimal number<br />
2r1010 16rEFFF<br />
type the base, followed by the letter r, followed by the number expressed in that radix. For example, a<br />
number expressed in base 2 is a binary number and contains only 1s and 0s. For radix numbers greater<br />
than 10, any numbers represented by letters can be in upper or lower case (e.g. 16rFFF or 16rfff).<br />
Sending the message printStringRadix: to a decimal integer will give a string that contains that<br />
number expressed in the given base. For example:<br />
17 printStringRadix: 2<br />
would evaluate to '10001', which is a string that contains the binary representation of 17.<br />
Floating point numbers are expressed as numerals with decimal points, <strong>for</strong> example,<br />
1.3 0.1611<br />
Floating point numbers can also be expressed in scientific notation (the following example expresses<br />
1.14 × 10 10 in scientific notation):<br />
1.14e10<br />
Like integers, a floating point number in another radix is preceded by the radix and an r, <strong>for</strong> example,<br />
2r10.1<br />
<strong>The</strong>re must be a numeral be<strong>for</strong>e the radix point, even if that number is a zero. For example, the number<br />
.5<br />
must be written as<br />
0.5<br />
or it will not be interpreted correctly. In Smalltalk, a period indicates the end of a sentence. A decimal<br />
point that is not preceded by a zero is ambiguous; it could be the period terminating a previous statement,<br />
rather than a decimal point. By always making the leading zero explicit, you remove this<br />
ambiguity.<br />
<strong>The</strong> number<br />
0.991 % 1<br />
is an example of a complex number in Smalltalk; the first number is the real part, and the second number<br />
is the imaginary part.<br />
515
Arithmetic Operations<br />
Besides the usual operations of addition, subtraction, multiplication, and division (+, -, *, and /), here are<br />
some of the arithmetic operators you can use in Smalltalk:<br />
// divide and truncate the result towards negative infinity<br />
\\ mod<br />
** raise to a power<br />
abs absolute value<br />
inverse 1 divided by receiver<br />
quo: divide and truncate the result towards zero<br />
rem: like mod except truncated towards zero<br />
rounded add 0.5 and truncate<br />
truncated round towards negative infinity<br />
vmax: take the maximum of receiver and argument<br />
vmin: take the minimum of receiver and argument<br />
For example,<br />
-7 // 3 -3<br />
7 // 3 2<br />
-7 \\ 3 2<br />
7 \\ 3 1<br />
2 inverse 1/2<br />
-7 quo: 3 -2<br />
7 quo: 3 2<br />
-7 rem: 3 -1<br />
7 rem: 3 1<br />
-2.5 rounded -2.0<br />
-2.5 truncated -3<br />
5 vmax: 2 5<br />
5 vmin: 2 2<br />
Mathematical Functions<br />
<strong>The</strong> following are some of the more common mathematical functions that are available in Smalltalk:<br />
ln natural log<br />
exp exponent<br />
sqrt square root<br />
sin sine<br />
cos cosine<br />
normCos (receiver * π) cos<br />
normSin (receiver * π) sin<br />
log log of receiver base 10<br />
twoLog log of receiver base 2<br />
twoExp two raised to the receiver<br />
<strong>The</strong> expression<br />
2 raisedTo: 10<br />
means two raised to the tenth power.<br />
516
Other Literals<br />
For more arithmetic operations, mathematical functions, and bit-level operations, see one of the referenced<br />
texts.<br />
Smalltalk constants are called literals. Numbers, symbols, characters, strings, and arrays are all literals.<br />
A single character is prefaced by a dollar sign, <strong>for</strong> example<br />
$T<br />
Strings of characters are delimited by single quotes, <strong>for</strong> example,<br />
'this is a string'<br />
You can concatenate two strings by typing a comma between them, <strong>for</strong> example,<br />
'first half', 'second half'<br />
evaluates to the string<br />
'first half second half'<br />
A symbol is prefaced by a number sign and cannot include any internal blanks, <strong>for</strong> example,<br />
#thisIsASymbol<br />
You can create a symbol from a string by sending it the message asSymbol, <strong>for</strong> instance,<br />
'thisIsAString' asSymbol<br />
Two strings of the same characters are not necessarily the same object. However, two symbols with the<br />
same name are actually the same object. Each symbol is unique in the system.<br />
Arrays are enclosed within parentheses and prefaced by a number sign, as in<br />
#(3 5 6 #anArray).<br />
Each object within the array is interpreted as a literal, thus the contents of the array<br />
#(2 $+ 5 #anArray)<br />
would be the number<br />
2<br />
followed by the character<br />
$+<br />
the number<br />
5<br />
and the symbol<br />
#anArray<br />
Leading number and dollar signs are not required within an array literal. For instance, the array defined<br />
earlier could be equivalently written as<br />
#(2 + 5 anArray)<br />
Suppose you wanted to evaluate the expression 2 + 5 be<strong>for</strong>e putting it into the array and that anArray<br />
was actually a variable. <strong>The</strong>n you would need to create the array as in the following example:<br />
| anArray |<br />
anArray := #(a b c).<br />
anotherArray := Array with: 2 + 5 with: anArray.<br />
<strong>The</strong> value of anotherArray is<br />
#(7 (a b c))<br />
517
Booleans<br />
Alternatively, you can place expressions to be evaluated within curly braces:<br />
#({2+5} #(abc))<br />
A boolean is one of two values: true or false. <strong>The</strong>re are two boolean literals:<br />
true<br />
and<br />
false<br />
Some examples of boolean expressions include:<br />
(2 + 2) = 5<br />
i >= 2<br />
Logical Operations<br />
Blocks<br />
aSet isEmpty<br />
file atEnd<br />
Boolean expressions can be combined using the logical operators AND and OR.<br />
<strong>The</strong>re are two different kinds of logical operations <strong>for</strong> both AND and OR. One type evaluates only as<br />
much of the expression as is necessary to determine whether the entire expression is true or false; in this<br />
type of expression, the second alternative is placed within a block, <strong>for</strong> example:<br />
anArray isEmpty or: [(anArray at: 1) = 0]<br />
aStream atEnd not and: [aStream next == ‘a’]<br />
<strong>The</strong> other type always evaluates both arguments of the expression; in this type of expression, the two arguments<br />
are separated by an ampersand <strong>for</strong> AND or a vertical bar <strong>for</strong> OR, <strong>for</strong> example:<br />
t > 2.5 & (t < 550.0)<br />
r next > 0.5 | (r next = 0.0)<br />
<strong>The</strong> following expression is true if anArray is empty or if its first entry is 0. If the first expression is true,<br />
then the expression within square brackets is not evaluated, since the entire expression is true if either of<br />
the subexpressions is true. By using this <strong>for</strong>m of the OR, you are protected against trying to access an<br />
empty array.<br />
anArray isEmpty or: [(anArray at: 1) = 0]<br />
In the next example, the OR operation is represented by a vertical bar. Both expressions are evaluated no<br />
matter what the value of the first expression. In this example, the message next returns the next value in a<br />
stream of values. It also has the side effect of advancing the pointer into the stream. In cases where an expression<br />
has a side-effect, you may want to evaluate both expressions even when the first is true.<br />
anArray isEmpty | (aStream next = 0)<br />
In the following example of the AND operator, the second expression is evaluated only if the first expression<br />
is true. In the case of this example, you wouldn’t want to try accessing the ith position of anArray<br />
unless you were sure that anArray had at least i positions in it.<br />
(anArray size >= i) and: [(anArray at: i) = 10]<br />
<strong>The</strong> ampersand operator is an AND in which both expressions are evaluated even if the first is false. In<br />
this particular case, the message removeFirst returns the first element of aCollection, but it also has<br />
the side effect of changing aCollection by removing the first element.<br />
i > 10 & (aCollection removeFirst = 0)<br />
A block is a deferred sequence of instructions having the <strong>for</strong>m<br />
518
Loop Structures<br />
[ {:blkArg}* |<br />
| {blkVar}+ |<br />
{blkStmnt}*]<br />
where blkArg is an optional list of <strong>for</strong>mal arguments to the block, blkVar is an optional declaration of<br />
variables local to the block and blkStmnt is a series of Smalltalk statements. <strong>The</strong> Smalltalk statements<br />
within a block are not executed until you send it one of the variants of the message value. In the following<br />
code<br />
| incrBlk i result |<br />
i := 0.<br />
incrBlk := [i := i + 1].<br />
result := incrBlk value.<br />
the variable result ends up with the value 1. Block arguments are declared by typing them preceded by<br />
colons at the beginning of the block and separating the declaration from the rest of the code by a vertical<br />
bar. If the block has arguments, each one must be assigned a value in the evaluation message. In the following<br />
code,<br />
| sumBlk result |<br />
sumBlk := [ :a :b | a + b].<br />
result := sumBlk value: 3 value: 2.5.<br />
the variable sumBlk contains a block of code that will return the sum of its two arguments (a and b)<br />
when it receives the value:value: message. <strong>The</strong> variable result ends up with the value 5.5.<br />
<strong>The</strong> most common use of blocks is to delineate sequences of instructions that are to be executed conditionally<br />
or repetitively.<br />
To simply repeat a sequence of instructions, send the message timesRepeat: to the integer number of<br />
repetitions desired. For example,<br />
4 timesRepeat: [<br />
a<strong>Sound</strong><br />
start: 0 s<br />
freq: 100 hz<br />
dur: 1 s].<br />
would start up four copies of a<strong>Sound</strong>, all at the same time and having the same frequency and duration.<br />
(Since a<strong>Sound</strong> is being played four times with the same start time and parameters, the result will sound<br />
like a<strong>Sound</strong> being played with an amplitude four times larger.)<br />
To iterate over an collection of values, send the message do: to the collection of values. For example, in<br />
0 to: 3 do: [ :i |<br />
a<strong>Sound</strong><br />
start: i s<br />
freq: ((i + 1) * 100) hz<br />
dur: 1 s].<br />
the block argument i takes on the values 0, 1, 2, and 3. This would start up four copies of a<strong>Sound</strong> with<br />
the respective frequencies 100, 200, 300, and 400 hz, each starting one second after the other. (Refer to<br />
one of the books listed at the end of this appendix <strong>for</strong> more examples of what you can do with loop<br />
structures and collections in Smalltalk.)<br />
To iterate as long as a condition holds true, send the message whileTrue: to a block that evaluates to<br />
true or false. For example,<br />
| i |<br />
519
Conditionals<br />
i := 0.<br />
[i 1 s)<br />
varIfTrue: [1 s]<br />
ifFalse: [0.1 * ?dur]<br />
as the value of the attack parameter.<br />
Random Numbers<br />
To obtain random numbers in Smalltalk, you create an object that will supply you with an endless stream<br />
of random numbers. To create a random number generator use<br />
Random newFor<strong>Kyma</strong>WithSeed: 3413.<br />
If you assign the random number generator to a variable, you can ask it <strong>for</strong> the next random value by<br />
sending it the message next.<br />
| r |<br />
r := Random newFor<strong>Kyma</strong>WithSeed: 1002.<br />
4 timesRepeat: [r next].<br />
generates four random numbers between zero and one. <strong>The</strong> following statements,<br />
| r |<br />
r := Random newFor<strong>Kyma</strong>WithSeed: 2530.<br />
1 to: 100 do: [ :i |<br />
a<strong>Sound</strong><br />
start: i s<br />
freq: ((r next * 100) + 500) hz].<br />
creates a sequence of 100 instances of a<strong>Sound</strong>, each with a randomly selected frequency between 500 and<br />
600 hz.<br />
Set the seed to an integer value from 0 to 65535, so the <strong>Sound</strong> will be repeatable.<br />
520
For Further In<strong>for</strong>mation<br />
This should give you enough of the basics so that you can get started. For more depth of in<strong>for</strong>mation on<br />
Smalltalk, consult the following texts:<br />
Smalltalk-80: <strong>The</strong> <strong>Language</strong> and Its Implementation by Adele Goldberg and David Robinson, published by<br />
Addison-Wesley.<br />
Inside Smalltalk, Volume I by Wilf R. LaLonde and John R. Pugh, published by Prentice-Hall.<br />
An Introduction to Object-Oriented Programming and Smalltalk by Lewis J. Pinson and Richard S. Wiener,<br />
published by Addison-Wesley.<br />
If you want to dive into Smalltalk as a general purpose programming language, you may want to obtain a<br />
Smalltalk environment. A freely available version of the Smalltalk-80 language is available on the Internet<br />
at http://www.create.ucsb.edu.<br />
521
Scripting<br />
MIDI Scripts<br />
<strong>The</strong>re are two different kinds of scripts in <strong>Kyma</strong>: Event Value-generating scripts (found in the MIDIVoice<br />
and the MIDIMapper <strong>Sound</strong>s), and <strong>Sound</strong>-constructing scripts (Scripts and FileInterpreters).<br />
MIDIVoice and MIDIMapper scripts provide an algorithmic way to generate events indistinguishable<br />
from events coming from a MIDI file or a MIDI device. You can use these scripts to generate control signals<br />
or note events algorithmically. MIDI scripts are intended to replace the older scripting <strong>Sound</strong>s in<br />
applications that model an “instrument” playing from a “score”.<br />
MIDIVoice and MIDIMapper scripts do not run in real time. When you compile a MIDI script, the script<br />
is executed first and the generated events are saved. <strong>The</strong>n the remainder of the <strong>Sound</strong> is compiled and<br />
loaded along with the events saved from the script. When you start the <strong>Sound</strong>, the generated events will<br />
be started at the appointed time.<br />
<strong>The</strong> Script and FileInterpreter <strong>Sound</strong>s construct new <strong>Sound</strong>s that are combinations of Mixers and<br />
TimeOffsets. Scripting <strong>Sound</strong>s do not generate events. Instead, they assist you in the process of building<br />
<strong>Sound</strong>s the way you would build them in the graphic <strong>Sound</strong> editor. When there is a describable pattern<br />
to the <strong>Sound</strong> parameters and the way the <strong>Sound</strong>s are put together, you can use a scripting <strong>Sound</strong> to construct<br />
complex <strong>Sound</strong> structures automatically. For example, say you wanted to construct a reverberation<br />
algorithm out of six ReverbSection <strong>Sound</strong>s, each with a slightly different DecayTime and Delay. Using a<br />
scripting <strong>Sound</strong>, you could use a loop to construct a Mixer of ReverbSection <strong>Sound</strong>s, each with its own<br />
DecayTime and Delay. That way, you could save time by writing a single loop instead of setting all<br />
twelve parameters by hand.<br />
When you compile a scripting <strong>Sound</strong>, it first constructs the equivalent combination of Mixers and<br />
TimeOffsets; then it compiles, loads and starts that automatically-constructed <strong>Sound</strong>.<br />
<strong>The</strong> MIDIVoice and MIDIMapper modules give you three choices <strong>for</strong> the source of MIDI events: the live<br />
MIDI input stream (originating from external controllers, or from a sequencer or other software running<br />
in parallel with <strong>Kyma</strong>), a MIDI file stored on disk, or a script (which generates events algorithmically and<br />
then emits them). To the <strong>Kyma</strong> <strong>Sound</strong>, events coming from a script are indistinguishable from events<br />
coming from a MIDI file.<br />
<strong>The</strong>re are two main ways of working with the MIDI scripts:<br />
1. Creating low-level notes and controller events at specific times<br />
2. Creating and manipulating high level EventCollections: combinations of Note and Rest objects<br />
Creating Notes and Controller Events<br />
<strong>The</strong> syntax <strong>for</strong> a basic note event is:<br />
self keyDownAt: aTime duration: aDur frequency: aFreq velocity: aVel.<br />
Where aTime is a time specified with units (<strong>for</strong> example, 1 s or 2 beats), aDur is a duration specified<br />
with units, aFreq is a frequency specified with units (<strong>for</strong> example, 440 hz, 60 nn, or 4c), and aVel is a<br />
velocity value between 0 and 1. <strong>The</strong> duration:, frequency:, and velocity: tags are optional, the<br />
default values are 10 ms, 0 nn, and 1, respectively.<br />
For example, to send a note event <strong>for</strong> a middle C lasting <strong>for</strong> one second, you would use:<br />
self keyDownAt: 0 s duration: 1 s frequency: 4 c.<br />
Note events cause the following to happen:<br />
♦ At the given time, !KeyDown is set to -1.<br />
♦ After 5 ms, !KeyDown is set to 1, !KeyNumber is set to the pitch equivalent of the frequency, and<br />
!KeyVelocity is set to the velocity value.<br />
♦ After the given duration has passed, !KeyDown is set to 0.
Event Collections<br />
Note that !KeyNumber can take on non-integer values and has 16 fractional bits, giving a pitch accuracy<br />
of 0.0015 cents <strong>for</strong> events generated by MIDVoice and MIDIMapper scripts. !PitchBend is not used to<br />
get these non-integer values.<br />
To specify a value <strong>for</strong> a continuous controller in a MIDI script, use either:<br />
self controller: aName setTo: aValue atTime: aTime.<br />
to cause the controller to jump immediately to a specified value at a specified time, or<br />
self controller: aName slideTo: aValue steps: nbrSteps byTime: aTime.<br />
to cause the controller to slide from its previous value to the specified value by the specified time in the<br />
specified number of steps, or<br />
self controller: aName slideTo: aValue stepSize: step byTime: aTime.<br />
if you prefer to specify the size of each step, rather than the total number of steps.<br />
For example, to cause !Frequency to move from 100 to 1000 over 10 seconds, starting at 30 seconds, you<br />
could use:<br />
self controller: !Frequency setTo: 100 atTime: 30 s.<br />
self controller: !Frequency slideTo: 1000 steps: 100 byTime: 40 s.<br />
Sometimes it is more convenient to specify the MIDI events as collections of notes and rests, without<br />
having to specify start times <strong>for</strong> each event. <strong>The</strong> actual start times can be inferred from the duration of the<br />
Note or Rest and where it occurs in the collection of events. This corresponds more closely to written music<br />
notation, where note and rest symbols arranged horizontally are interpreted as a sequence of events in<br />
time (where each event’s start time occurs immediately after the previous event’s duration has expired),<br />
and notes or rests arranged vertically are interpreted as all starting at the same time.<br />
In the MIDI script language, an EventSequence is a collection of Notes, Rests, or other EventCollections<br />
that occur one after another in time (corresponding to horizontal placement in music notation). Since you<br />
can also construct sequences of other collections, you can create higher level structures as well. For example,<br />
sequences of Notes and Rests could be collected in a measure; sequences of measures could be<br />
collected into a phrase; sequences of phrases could be collected into sections; sequences of sections could<br />
be collected into movements, etc. until you run out of traditional musical names <strong>for</strong> the structures(!)<br />
An EventMix is a collection of Notes, Rests, or other EventCollections that occur all at the same time<br />
(corresponding to vertical placement in music notation). Like an EventSequence, the EventMix is recursively<br />
defined (i.e. you could have an EventMix of EventMixes), allowing you to define hierarchical<br />
structures, somewhat analogously to the way you can define <strong>Sound</strong>s.<br />
You can also create a generic EventCollection of Notes, Rests, or other EventCollections, specifying that<br />
you haven’t yet decided whether the events should be simultaneous or sequential but will send a message<br />
to the object later to specify actual start times and turn it into a sequence or a mix of other events.<br />
Notes and Rests<br />
<strong>The</strong> syntax <strong>for</strong> creating a single Rest is:<br />
Rest durationInBeats: aDurInBeatsWithNoUnits.<br />
To create a Note, you can use:<br />
Note durationInBeats: aDur frequency: freqWithUnits velocity: aVel.<br />
You can leave off any of the tags if you don’t mind using the default values <strong>for</strong> those parameters.<br />
Examples of creating Rests and Notes:<br />
| n1 n2 n3 |<br />
n1 := Note durationInBeats: 2 frequency: 2 g.<br />
r2 := Rest durationInBeats: 1.<br />
n3 := Note durationInBeats: 2 frequency: 2 d.<br />
523
Sequences and Mixes<br />
An EventSequence is a collection of events that occur in time order. <strong>The</strong> syntax <strong>for</strong> creating an EventSequence<br />
is:<br />
EventSequence events: anArray.<br />
An EventMix is a collection of events that occur at the same time. <strong>The</strong> syntax <strong>for</strong> creating an EventMix is:<br />
EventMix events: anArray.<br />
<strong>The</strong>re are several ways to create the Array. You can specify each item in the array:<br />
EventSequence events:<br />
(Array<br />
with: (Note durationInBeats: 1 frequency: 3 g)<br />
with: (Note durationInBeats: 1 frequency: 4 e)<br />
with: (Note durationInBeats: 2 frequency: 4 c))<br />
You can collect items that you create within a loop:<br />
EventSequence events:<br />
((1 to: 100) collect: [ :i |<br />
Note durationInBeats: 2 frequency: 4 c + (i * 2) nn])<br />
Or you can put literal values within parentheses preceded by a sharp sign. If you create the Array this<br />
way, remember to enclose the Notes and Rests within curly braces to make them literal values:<br />
EventMix events:<br />
#( {Note durationInBeats: 1 frequency: 3 g}<br />
{Note durationInBeats: 1 frequency: 4 e}<br />
{Note durationInBeats: 2 frequency: 4 c} )<br />
TimedEventCollections<br />
A TimedEventCollection is a collection of events together with the starting beat <strong>for</strong> each event. One way<br />
to create a TimedEventCollection is:<br />
TimedEventCollection startingBeats: beats events: events.<br />
where beats is a collection of the starting beat numbers <strong>for</strong> each event in the events collection.<br />
You can also create a TimedEventCollection by reading in the events and starting beats from a MIDI file.<br />
If all you want to do is play exactly what’s in the MIDI file, then it would be quicker and more straight<strong>for</strong>ward<br />
to simply select MIDI file as the Source in your MIDIVoice. However, once you have read the<br />
MIDI file into a TimedEventCollection you can trans<strong>for</strong>m it, twist it, distort it, in short, do all the kinds<br />
of things composers love to do!<br />
<strong>The</strong> syntax <strong>for</strong> reading a MIDI file is:<br />
TimedEventCollection timesAndEventsFromMIDIFile: 'file.mid' channel: 1.<br />
Generic EventCollections<br />
An EventCollection is a collection of Notes and Rests without any ordering. To create an EventCollection,<br />
use:<br />
EventCollection events: anArray.<br />
Where anArray is a collection of Notes, Rests and other collections of events.<br />
<strong>The</strong> message randomizeUsing:totalBeats:quantizeTo:maxSpacing: <strong>for</strong>ces an EventCollection<br />
to become a TimedEventCollection by generating a set of random starting beats and randomly picking a<br />
set of events from the events supplied:<br />
(EventCollection events: anArray)<br />
randomizeUsing: (Random newFor<strong>Kyma</strong>WithSeed: 92)<br />
totalBeats: 16<br />
524
quantizeTo: 0.5<br />
maxSpacing: 1.<br />
You specify the total duration in beats of the result, the smallest distance between beats (with the quantizeTo:<br />
argument) and the longest time between beats (the maxSpacing: argument).<br />
Alternatively, you can choose the starting beats with one random number generator and the events using<br />
another, <strong>for</strong> example:<br />
(EventCollection events: anArray)<br />
randomizeTimesUsing: (Random newFor<strong>Kyma</strong>WithSeed: 561)<br />
pickingEventsUsing: (OneOverF newFor<strong>Kyma</strong>WithSeed: 17661)<br />
totalBeats: 16<br />
quantizeTo: 0.333<br />
maxSpacing: 1.<br />
Manipulating Event Collections<br />
All event collections can be manipulated in various ways:<br />
anEventCollection dim: aScale.<br />
anEventCollection trsp: aTransposition.<br />
anEventCollection inv: aPitch.<br />
anEventCollection retrograde.<br />
dim: applies a scale to the duration of each event in the collection, trsp: transposes each event in the<br />
collection the given number of half-steps, inv: inverts each event in the collection about the given pitch,<br />
and retrograde reverses the time order of the event in the collection.<br />
Finally, to actually output the events <strong>for</strong> the MIDIVoice to play, use:<br />
anEventCollection playOnVoice: self bpm: 160.<br />
Scripts and FileInterpreters<br />
Script<br />
Scripts and the FileInterpreters are <strong>Kyma</strong> <strong>Sound</strong> classes that enable you to construct <strong>Sound</strong>s algorithmically.<br />
Both Scripts and the FileInterpreters take inputs that can include both <strong>Sound</strong>s and lifted <strong>Sound</strong>s. In<br />
a Script, you can combine and manipulate the inputs using Smalltalk. TextFileInterpreters and MIDIFile-<br />
Interpreters let you use Smalltalk code to interpret data from text files and MIDI files.<br />
A Script <strong>Sound</strong> lets you refer to its inputs by name, assigning them start times and parameter values. In<br />
this respect, you could think of the inputs as “instruments” and the start time and parameter value assignments<br />
as the “score” (similar in some respects to the instruments and score of a Music–N language).<br />
Unlike Music–N, however, a Script lets you use Smalltalk as part of the score. <strong>The</strong> script is not just an<br />
event list; it is a Smalltalk program. So you can think of the Script as being more than a score; it is a tool<br />
<strong>for</strong> constructing complex <strong>Sound</strong>s algorithmically.<br />
In <strong>Kyma</strong>’s version of a “score,” not only can you supply start times and other parameters to an instrument,<br />
you can also change the instrument itself from the script.<br />
TextFileInterpreter<br />
Using a TextFileInterpreter <strong>Sound</strong> you can read and interpret text files. One application of the TextFileInterpreter<br />
is to use a score file from a Music–N language (like Csound) to control <strong>Kyma</strong> <strong>Sound</strong>s as its<br />
instruments. A TextFileInterpreter, however, is not limited to reading Music–N scores. In fact, you can<br />
use it to map any data to the parameters of a <strong>Sound</strong>. This capability makes a TextFileInterpreter useful <strong>for</strong><br />
data sonification and generating signals <strong>for</strong> psychoacoustic experiments.<br />
525
MIDIFileInterpreter<br />
Events<br />
With a MIDIFileInterpreter, you can read in<strong>for</strong>mation from a MIDI file and process or reinterpret it using<br />
Smalltalk be<strong>for</strong>e mapping it to the parameters of <strong>Kyma</strong> <strong>Sound</strong>s.<br />
Assigning Start Times<br />
Each input of a Script <strong>for</strong>ms the basis of an instrument. An instrument is not strictly a <strong>Sound</strong>; it is a template<br />
that can be used to create any number of instances of its basis <strong>Sound</strong>.<br />
Each event in the Script corresponds to an instantiation (i.e., the scheduling of a specific instance) of one<br />
of the instruments. <strong>The</strong> simplest event is the name of an instrument followed by a start time. For example,<br />
if you had an instrument named anInstr, and you wanted an instance of it to start at time 0, you would<br />
type<br />
anInstr start: 0 s.<br />
Suppose anInstr is based on a <strong>Sound</strong> whose duration is 5 seconds. <strong>The</strong>n the following Script<br />
anInstr start: 0 s.<br />
anInstr start: 6 s.<br />
specifies that you will hear anInstr followed by 1 second of silence followed by anInstr. You can also<br />
make the instances of anInstr overlap, <strong>for</strong> example,<br />
anInstr start: 0 s.<br />
anInstr start: 1 s.<br />
anInstr start: 2 s.<br />
anInstr start: 3 s.<br />
Beats and Metronome Indications<br />
To specify times in beats instead of seconds, indicate the number of beats per minute at the beginning of<br />
the Script. For example,<br />
MM := 90.<br />
specifies that one beat is equivalent to 1/90 of a minute in subsequent events. You can redefine MM any<br />
number of times within a script. If you don’t specify a value <strong>for</strong> MM in a top level Script, it will default to a<br />
value of 60, or one beat per second.<br />
If you are using multiple Scripts or FileInterpreter <strong>Sound</strong>s within a shared top <strong>Sound</strong>, you should explicitly<br />
specify the desired value <strong>for</strong> MM in each script.<br />
Setting Parameters<br />
Parameter:Value Pairs<br />
You can do more than simply assign start times to instruments; if the inputs have variables in them, each<br />
event in the script can also supply parameter values to the variables in the instrument. Any variable parameter<br />
can be set from the script.<br />
To set parameters from the script, type the name of the input, the start time, and then a list of parameter-<br />
Name:value pairs. Each pair consists of the name of a variable in the input and a value <strong>for</strong> that variable.<br />
(To see a list of the variables in the selected <strong>Sound</strong>, choose Get info from the Info menu.)<br />
For example, suppose a <strong>Sound</strong> named anInstr has some variable parameters in it named<br />
?centerFreq, ?dur, and ?bandwidth. Here is an example Script <strong>for</strong> setting the parameters of an-<br />
Instr.<br />
anInstr<br />
start: 0 s<br />
dur: 2 s<br />
centerFreq: 1000 hz<br />
526
andwidth: 10 hz.<br />
anInstr start: 2 s.<br />
anInstr start: 3 s freq: 4 a.<br />
anInstr start: 3.2 s centerFreq: 4 a dur: 0.5 s.<br />
Each event consists of the name of a <strong>Sound</strong> followed by a start time, any number of parameter:value pairs,<br />
and a terminating period. Any number of spaces, tabs, or carriage returns can separate the parameter:value<br />
pairs; carriage returns and tabs are encouraged when they will improve readability.<br />
<strong>The</strong> unassigned parameter values <strong>for</strong> an event default to the values assigned to those parameters in the<br />
previous event. If a parameter has never been set in the script, <strong>Kyma</strong> will prompt you to supply a value<br />
<strong>for</strong> its variable.<br />
<strong>The</strong> parameter:value pairs can occur in any order, and any parameter may be omitted. However, if the start<br />
time is omitted, the event is no longer a well-defined event, and it will not be scheduled at all.<br />
Non-Numeric Parameters<br />
An instrument’s parameter values are not limited to numbers. A parameter’s value can be any Smalltalk<br />
object, including a <strong>Sound</strong>; thus, strings, symbols, arrays, etc. can all appear as parameter values in a<br />
script. For example, the following is a legal Script:<br />
anInstr start: 0 s wavetable: 'sine'.<br />
anotherInstr start: 1 s weights: #(1 1 1 4).<br />
aScriptingL start: 1 s script: 'intern start: 0 s'.<br />
where the number sign and parentheses indicate an Array and single quotes indicate a String. (See <strong>The</strong><br />
Smalltalk-80 <strong>Language</strong> on page 513 <strong>for</strong> more in<strong>for</strong>mation.)<br />
Instrument parameters can be set to <strong>Sound</strong>s as well. Suppose you have an instrument named aNoise<br />
based on a <strong>Sound</strong> having a variable ?dur, and an instrument named aFilter based on a <strong>Sound</strong> having a<br />
variable input (a Variable <strong>Sound</strong>).<br />
You can set the value of input to aNoise as follows:<br />
aFilter<br />
start: 1 s<br />
input: (aNoise dur: 1 s).<br />
Since aNoise is given no start time, it is a <strong>Sound</strong>, but it will not be scheduled on the Capybara. It can be<br />
the value <strong>for</strong> the Variable <strong>Sound</strong>. <strong>The</strong>n when you gave aFilter a start time, aNoise would be assigned the<br />
same start time. If you were to use<br />
aFilter start: 1 s input: aNoise.<br />
Because it has not been assigned a value in the script, <strong>Kyma</strong> would ask you to supply a value <strong>for</strong> ?dur.<br />
Referring to the Orchestra<br />
You can refer to a Script instrument in two ways: by its name or by its position in the “orchestra.” In the<br />
following event,<br />
(orchestra at: 3) start: 3 s.<br />
(orchestra at: 3) refers to the instrument based on the third input (counting from top to bottom,<br />
left to right). This can be useful when Inputs has been set to a <strong>Sound</strong>CollectionVariable or when you<br />
want to make an algorithmic choice of instrument.<br />
Algorithmically-generated Events<br />
A Script can include any Smalltalk-80 statements. For example, the script<br />
anInstr start: 0 s freq: 100 hz dur: 1 s.<br />
anInstr start: 1 s freq: 200 hz dur: 1 s.<br />
anInstr start: 2 s freq: 300 hz dur: 1 s.<br />
527
Variables<br />
could be rewritten as a loop:<br />
0 to: 2 do: [ :i |<br />
anInstr<br />
start: i s<br />
freq: ((i + 1) * 100) hz<br />
dur: 1 s].<br />
In the loop above, the expression within brackets<br />
anInstr start: i s<br />
freq: ((i + 1) * 100) hz<br />
dur: 1 s<br />
is iteratively evaluated with i set to the values 0, 1, and 2.<br />
To learn more about how you can use Smalltalk in a script, refer to the Script examples in the file<br />
Scripts.<br />
<strong>Kyma</strong> Variables<br />
A <strong>Kyma</strong> variable represents the value of a <strong>Sound</strong> parameter; it can be a Variable <strong>Sound</strong>, a <strong>Sound</strong>CollectionVariable,<br />
or a name preceded by a question mark.<br />
You can use <strong>Kyma</strong> variables in a script. <strong>The</strong> following example plays a harmonic series (of ?total harmonics<br />
of 100 hz, spaced 1 second apart):<br />
1 to: ?total do: [ :i |<br />
pluck start: (i - 1) s freq: (100 * i) hz].<br />
<strong>The</strong> variable ?total controls the number of times the code within the square brackets is executed; thus,<br />
it determines the number of events in this Script. When you load this Script <strong>Sound</strong>, <strong>Kyma</strong> will prompt<br />
you <strong>for</strong> a value <strong>for</strong> ?total. As the use of <strong>Kyma</strong> variables in this sample script suggests, scripts can be<br />
used as inputs of other scripts.<br />
Variables in Scripts and FileInterpreters<br />
Each event in a Script or FileInterpreter script corresponds to a mapping of variable names to values <strong>for</strong><br />
those variables. When you load a Script, it binds the variables of its input(s) to the values supplied in the<br />
script.<br />
You can see a list of the selected <strong>Sound</strong>’s variables by choosing Get info from the Info menu.<br />
If the script fails to map one of the variables to a value, then you must supply a value <strong>for</strong> that variable in<br />
some other way, either by entering values when prompted, by using the <strong>Sound</strong> as an example <strong>for</strong> a new<br />
class, or by making the <strong>Sound</strong> an input of another Script or FileInterpreter.<br />
<strong>Kyma</strong> variables in the script of a Script or a FileInterpreter are treated just like variable parameters. <strong>The</strong>se<br />
variables must be set from “outside” (that is, from some <strong>Sound</strong> to the right of them in the signal flow diagram).<br />
Smalltalk Variables<br />
You can also use Smalltalk variables in a script. A Smalltalk variable has no preceding question mark;<br />
instead it has to be declared at the beginning of the script in which it is used. Smalltalk variables are used<br />
as temporary storage locations within a script. <strong>The</strong>y do not directly represent <strong>Sound</strong> parameters.<br />
A Smalltalk variable is defined only within the script in which it appears. A <strong>Kyma</strong> variable is defined<br />
throughout the entire <strong>Sound</strong> structure in which it appears.<br />
Smalltalk variables must be declared at the beginning of the Script by typing them between vertical lines,<br />
| curTime curFreq |<br />
528
You can assign values to Smalltalk variables using the := assignment operator. For example, in the following<br />
Script,<br />
| curTime curFreq |<br />
curTime := 0.<br />
curFreq := 100.<br />
curTime is assigned the value 0 and curFreq is set to the value 100.<br />
Additional kinds of Smalltalk variables (called block arguments and block temporaries) are described in<br />
<strong>The</strong> Smalltalk-80 <strong>Language</strong> on page 513.<br />
TextFileInterpreter Messages<br />
A TextFileInterpreter (a version of the Script <strong>Sound</strong>) reads data from text files. You can use a TextFileInterpreter<br />
to read and interpret scores written <strong>for</strong> a Music–N language. More generally, you can use a<br />
TextFileInterpreter to map any data to sound parameters.<br />
In addition to allowing you to use general Smalltalk messages, a TextFileInterpreter also lets you use the<br />
following specialized messages <strong>for</strong> accessing text files:<br />
Smalltalk Message Result<br />
atEnd Returns true if at the end of the file, or false if not at the end.<br />
linesInFile Returns the number of lines in the text file.<br />
maxValue Returns the largest number in the file. If there are no numbers in the file,<br />
maxValue returns -∞.<br />
minValue Returns the smallest number in the file. If there are no numbers in the file, min-<br />
Value returns +∞.<br />
nextNumber Returns the next number. Returns 0 at the end of the file or at a letter.<br />
nextParameters Returns the entire next line as an Array. Each item on the line that is separated by<br />
a space is put into a separate entry in the Array.<br />
reset Moves to the beginning of the file.<br />
In the script of a TextFileInterpreter, you refer to the text file by the name file. You can address the file<br />
in its entirety, asking file <strong>for</strong> the number of lines it has and <strong>for</strong> its maximum and minimum values. For<br />
example, the following statements assign the largest value in the file to the Smalltalk variable max, the<br />
smallest value to min, and the number of lines to lines:<br />
| max min lines |<br />
max := file maxValue.<br />
min := file minValue.<br />
lines := file linesInFile.<br />
You can also access the data in the file one line at a time. In the following statements, the Smalltalk variable<br />
dataArray is assigned an array containing each value found on the next line of the disk file:<br />
| dataArray |<br />
dataArray := file nextParameters.<br />
<strong>The</strong> TextFileInterpreter keeps track of the last line it read from the file, so you can continue to read the<br />
“next” line until you reach the end of the file. To start over again at the beginning of a file, reset the file by<br />
using<br />
file reset.<br />
in the Script.<br />
529
As a final illustration, let’s take a slightly more complicated problem. Suppose that you have created a<br />
text file that had four items on each line, and that you wanted to interpret these four items as representing<br />
a start time, a duration, a frequency, and a wavetable, <strong>for</strong> example:<br />
0 1 440.0 sine<br />
0.5 1 453 sine<br />
To interpret such a data file, you might use the following Script:<br />
| event |<br />
[file atEnd] whileFalse: [<br />
event := file nextParameters.<br />
anInstr<br />
start: (event at: 1) s<br />
duration: (event at: 2) s<br />
frequency: (event at: 3) hz<br />
wavetable: (event at: 4)].<br />
<strong>The</strong> TextFileInterpreter continues to read lines out of the file until reaching the end of the file. Each line of<br />
the file is stored in turn as an array in the variable called event. <strong>The</strong> first position of the array is accessed<br />
as (event at: 1), the second by (event at: 2), etc.<br />
MIDIFileInterpreter Messages<br />
Much like the manner in which a TextFileInterpreter reads data from text files, a MIDIFileInterpreter<br />
reads data from MIDI files. A MIDIFileInterpreter interprets files using specialized Smalltalk messages<br />
that are sent to the MIDI file object.<br />
Most of the specialized messages that you can use in a MIDIFileInterpreter address a single MIDI event.<br />
To navigate through the MIDI file, a MIDIFileInterpreter can send the following messages to the MIDI<br />
file:<br />
Smalltalk Message Result<br />
nextEvent Returns the next event in the MIDI file.<br />
reset Moves to the beginning of the file.<br />
atEnd Returns true if at the end of the file, or false if not at the end.<br />
After using nextEvent to read the next event of a MIDI file, the MIDIFileInterpreter can send a number<br />
of messages to interpret the data in that MIDI event. (A MIDI “Note On” command coupled with the corresponding<br />
“Note Off” command constitutes an event.)<br />
<strong>The</strong> following is a list of Smalltalk messages that can be sent to the event:<br />
Smalltalk Message Result<br />
channel Returns the MIDI channel (1-16) that the event is on.<br />
isChannelPressure Returns true or false depending on whether the event is a<br />
channel pressure.<br />
channelPressureValue If the event is a channel pressure, returns the value (0-127).<br />
isControl Returns true or false.<br />
controlNumber If the event is a control, returns the control number (0-127).<br />
controlValue If event is a control, returns the control value (0-127).<br />
lastControlValueForChannel:<br />
controlNumber:<br />
ifNone:<br />
isNoteOff Returns true or false.<br />
Returns the last control value (0-127) seen <strong>for</strong> the given channel.<br />
<strong>The</strong> last argument is a block (i.e. code enclosed in<br />
brackets) that can return a default value if no control change<br />
<strong>for</strong> the given controller on the given channel has been found.<br />
530
Debugging<br />
isNoteOn Returns true or false.<br />
noteNumber If the event is a note on or note off, returns the note number<br />
(0-127). MIDI note numbers correspond exactly to units of<br />
pitch in <strong>Kyma</strong>.<br />
duration If the event is a note on, returns the duration to the corresponding<br />
note off (in microseconds).<br />
isPitchWheel Returns true or false.<br />
pitchWheelChange If the event is a pitch wheel, returns the value (to ±2048). You<br />
can scale this value in the Script.<br />
lastPitchWheelValueForChannel:<br />
sensitivityInHalfSteps:<br />
ifNone:<br />
pitchWheelPointsForChannel:<br />
sensitivityInHalfSteps:<br />
ifNone:<br />
isPolyphonicKeyPressure Returns true or false.<br />
Returns the last pitch wheel value seen <strong>for</strong> the given channel.<br />
If there has been no pitch wheel value received, the last argument<br />
is evaluated.<br />
Returns a collection of time points <strong>for</strong> the given channel’s<br />
pitch wheel data. <strong>The</strong> last argument is evaluated if there has<br />
been none.<br />
polyphonicKeyPressureValue If event is a key pressure, returns the value (0-127).<br />
isProgramChange Returns true or false.<br />
programNumber If the event is a program change, returns the program number<br />
(0-127).<br />
isSwitch Returns true or false.<br />
isSwitchOn Returns true or false.<br />
isSwitchOff Returns true or false.<br />
status Returns the status byte as one of the following Symbols:<br />
#noteOff, #noteOn, #polyphonicKeyPressure, #control, #program-<br />
Change, #channelPressure, #pitchWheel, or #unknown.<br />
time Returns the start time of the event (in microseconds).<br />
velocity If the event is a note on or note off, returns the key velocity<br />
(0-127).<br />
Inspecting Values<br />
When debugging scripts, it can be useful to inspect the value of a Smalltalk variable as the script is being<br />
evaluated. To inspect the values of the variables, you can include the Smalltalk messages debugWithLabel:value:<br />
or debug: in the script. To illustrate, by including the statement<br />
self debugWithLabel: ‘i’ value: i.<br />
in a script, the phrase “i = ” and the value of i will be displayed in a dialog. (debug: returns just the<br />
value, without the label.) For example, in this segment,<br />
0 to: 3 do: [ :i |<br />
self debugWithLabel: ‘i’ value: i.<br />
anInstr start: i s freq: (i * 100) hz dur: 1 s].<br />
<strong>Kyma</strong> will display the following on the first iteration of the loop:<br />
531
If you click OK, the program will proceed, and the next value of i displayed will be 1. To stop evaluating<br />
the script, click Cancel.<br />
Expand<br />
If a Script or one of the FileInterpreters isn’t behaving the way you think it should, try expanding it so<br />
that you can see what kind of structure your script is producing. Choose Expand from the Action menu<br />
to expand a <strong>Sound</strong> once. You can then select specific inputs <strong>for</strong> further expansion.<br />
Like many <strong>Sound</strong>s in <strong>Kyma</strong>, a Script <strong>Sound</strong> is actually a shorthand representation <strong>for</strong> the <strong>Sound</strong> as it is<br />
actually realized on the Capybara. A <strong>Sound</strong> may have to expand several times be<strong>for</strong>e it consists of only<br />
primitive <strong>Sound</strong>s, i.e. <strong>Sound</strong>s that have assembly language representations on the Capybara.<br />
Commented Examples<br />
<strong>The</strong> following examples can be found in the file called Scripts in the Examples folder.<br />
532
<strong>The</strong> first example is called Kurt’s Rhythmic Pulsation. It uses a <strong>Sound</strong> called thump that has variables<br />
?frequency and ?cycles.<br />
"Set the metronome to 300 beats per minute."<br />
MM := 300.<br />
"Set i to the values 0, 1, … 200 on each iteration."<br />
0 to: 200 do: [ :i |<br />
"If i mod 4 is 0 (i.e. if i is a multiple of 4), then start the instrument<br />
called thump at i beats with a frequency of 100 hertz and 25<br />
cycles within each envelope."<br />
i \\ 4 = 0 ifTrue: [<br />
thump start: i beats<br />
"etc…" i \\ 2 = 0 ifTrue: [<br />
frequency: 100 hz<br />
cycles: 25].<br />
thump start: i beats<br />
frequency: 250 hz<br />
cycles: 25].<br />
i \\ 3 = 0 ifTrue: [<br />
thump start: i beats<br />
frequency: 150 hz<br />
cycles: 25].<br />
"If i is less than 50 AND i is a multiple of 5, then start the instrument<br />
called thump at i beats with a frequency of 400 hertz and 25<br />
cycles within each envelope."<br />
(i < 50 and: [i \\ 5 = 0]) ifTrue: [<br />
thump start: i beats<br />
frequency: 400 hz<br />
cycles: 25].<br />
i \\ 13 = 0 ifTrue: [<br />
thump start: i beats<br />
frequency: 700 hz<br />
cycles: 25].<br />
i \\ 7 = 0 ifTrue: [<br />
thump start: i beats<br />
frequency: 50 hz<br />
cycles: 50].<br />
"If i is greater than 50 AND i is not a multiple of 7, 5 or 3, then<br />
start the instrument called thump at i beats with a frequency of 1000<br />
hertz and 100 cycles within each envelope."<br />
(i > 50 and: [i \\ 7 ~= 0<br />
and: [i \\ 5 ~= 0 and: [i \\ 3 ~= 0]]])<br />
ifTrue: [<br />
thump start: i beats<br />
frequency: 1000 hz<br />
cycles: 100].<br />
"End of 0 to: 200 do: loop."<br />
].<br />
533
<strong>The</strong> next example is called Serial Example. In this example, inst takes two arguments: offset and<br />
sound. <strong>The</strong> argument sound must be another <strong>Sound</strong>; in this case it is called aPluck. <strong>The</strong> <strong>Sound</strong> aPluck<br />
also takes two arguments: left and right. Notice that whenever aPluck is provided as the argument to<br />
inst, aPluck is not assigned a start time.<br />
inst looks at the pitch of its <strong>Sound</strong> argument and adds the value of offset to that pitch. For instance, if<br />
the frequency of aPluck were 4 a and the offset were 3, the result would be a copy of aPluck whose<br />
frequency was 5 c.<br />
In this example, p0 is an array of intervals that determines the sequence of pitches and the start times of<br />
aPluck.<br />
| p0 start |<br />
MM := 480.<br />
"Set p0 to an array of 12 intervals, expressed as the number of half<br />
steps to be added to the pitch of aPluck."<br />
p0 := #(0 1 11 5 2 4 3 9 10 6 8 7).<br />
start := 0 beats.<br />
"Step <strong>for</strong>ward through p0 by setting i to 1, 2,.., 12 successively and<br />
using it as the index into the array. Each copy of inst starts (p0 at:<br />
i) beats after the previous one. <strong>The</strong> pitch of each copy of inst is the<br />
pitch of aPluck plus the offset (p0 at: i) halfsteps. For example, on<br />
the third time through the loop, (p0 at: i) = 5. Thus, a copy of inst<br />
will start 5 beats after the previous copy and its pitch will be the<br />
pitch of aPluck plus 5 halfsteps."<br />
1 to: 12 do: [ :i |<br />
start := start + (p0 at: i).<br />
inst<br />
start: start beats<br />
offset: (p0 at: i)<br />
sound: (aPluck left: 1 right: 1)].<br />
"r5: This time, step backwards through the array, and start 5 halfsteps<br />
above the base pitch. Reset start so that these events overlap some of<br />
the previously scheduled events."<br />
start := 6.<br />
12 to: 1 by: -1 do: [ :i |<br />
start := start + (p0 at: i).<br />
inst start:<br />
start beats<br />
offset: (p0 at: i) + 5<br />
sound: (aPluck left: 0 right: 1)].<br />
"ri0: This time, go through the array backwards, negate each of the<br />
offsets, and subtract 24 (i.e. transpose them two octaves down). Reset<br />
start so that these events occur simultaneously with the events of r5."<br />
start := 6.<br />
12 to: 1 by: -1 do: [ :i |<br />
start := start + (p0 at: i).<br />
inst<br />
start: start beats<br />
offset: (p0 at: i) negated - 24<br />
sound: (aPluck left: 0.6 right: 0)].<br />
"Play a low frequency sound starting at 9 seconds."<br />
low<br />
start: 9 s<br />
carFreq: 100 hz<br />
534
cmRatio: 2.0<br />
dur: 0.5 s.<br />
"r0: This time, step backwards through the array. Reset start so that<br />
this group of events begins at 10 seconds."<br />
start := 10 s.<br />
12 to: 1 by: -1 do: [ :i |<br />
start := start + (p0 at: i).<br />
inst<br />
start: start beats<br />
offset: (p0 at: i)<br />
sound: (aPluck left: 1 right: 1)].<br />
"p6: Step <strong>for</strong>ward through the array, and start 5 halfsteps above the<br />
base pitch. Reset start so that this group of events begins 6 beats after<br />
10 seconds."<br />
start := 10 s + 6 beats.<br />
1 to: 12 do: [ :i |<br />
start := start + (p0 at: i).<br />
inst<br />
start: start beats<br />
offset: (p0 at: i) + 5<br />
sound: (aPluck left: 0 right: 1)].<br />
"Step backwards through the array, and add the inverted interval to the<br />
base pitch two octaves lower. Reset start so that this group of events<br />
begins simultaneously with the previous group."<br />
start := 10 seconds inBeats + 6.<br />
12 to: 1 by: -1 do: [ :i |<br />
start := start + (p0 at: i).<br />
inst<br />
start: start beats<br />
offset: (p0 at: i) negated - 24<br />
sound: (aPluck)].<br />
"Play a final low frequency sound at the end."<br />
low<br />
start: start beats<br />
carFreq: 100 hz<br />
cmRatio: 2.0<br />
dur: 0.5 s.<br />
535
<strong>The</strong> Class Editor<br />
In the course of designing new <strong>Sound</strong>s, you may find that you have constructed a complex <strong>Sound</strong> with<br />
only a few relevant control parameters. Suppose, <strong>for</strong> example, that you have constructed a 16-harmonic<br />
additive synthesis <strong>Sound</strong>. To change the fundamental, you could edit all sixteen frequency fields. However,<br />
since you know the relationship between the harmonics, you could instead specify them<br />
symbolically as (!Frequency, !Frequency*2, …, !Frequency*16). <strong>The</strong>n when you changed<br />
!Frequency, all the Oscillators would maintain their harmonic relationship to one another. You can<br />
specify the same kind of relationship with variables (i.e., ?freq, ?freq*2, …, ?freq*16).<br />
Since ?freq is the only parameter needed to control the whole <strong>Sound</strong>, you can hide the low-level details<br />
of the structure by encapsulating the structure into a single, new kind of <strong>Sound</strong> object. In <strong>Kyma</strong>, this process<br />
is called defining a new class of <strong>Sound</strong>s. This new class can have its own parameters, its own icon, and<br />
its own editor.<br />
<strong>Sound</strong> Classes and <strong>Sound</strong>s<br />
Each <strong>Sound</strong> is a specific instance of a <strong>Sound</strong> class. <strong>The</strong>re can be any number of instances of each class. <strong>The</strong><br />
<strong>Sound</strong> class contains in<strong>for</strong>mation that all of its instances have in common. For example, all instances of<br />
class Concatenation share the same icon (shown in the left margin).<br />
<strong>The</strong>y also share the same parameter names: Name, Inputs, Retrograde, Reverse. In <strong>Kyma</strong>, you never<br />
work directly with the system classes; instead, you modify the instances of the system classes that appear<br />
in the system prototypes window.<br />
Creating and Editing <strong>Sound</strong> Classes<br />
<strong>The</strong> Action menu gives you three options <strong>for</strong> creating and editing classes. <strong>The</strong> Edit class operation allows<br />
you to edit previously defined classes. New class from example (active only in the <strong>Sound</strong> file window)<br />
opens an editor on a new class based upon the selected <strong>Sound</strong>. Retrieve example from class (active only<br />
in the <strong>Sound</strong> class editor) extracts the <strong>Sound</strong> that is being used as the template <strong>for</strong> a user-defined class<br />
and saves it to the <strong>Sound</strong> file window.<br />
You can create a custom <strong>Sound</strong> class by introducing variable into an example <strong>Sound</strong> parameters (see<br />
Variables on page 510). <strong>The</strong> variables in the example <strong>Sound</strong> become the parameters of the new <strong>Sound</strong><br />
class.<br />
Setting Up the Example<br />
Class Editor<br />
Start with the <strong>Sound</strong> that you would like to use as an example <strong>for</strong> a new class of <strong>Sound</strong>s. <strong>The</strong> first step is<br />
to decide which of the <strong>Sound</strong>’s parameters should be constant, which parameters should be variable, and<br />
whether there should be any relations maintained between parameters.<br />
Edit the <strong>Sound</strong>, replacing the parameters that are allowed to vary from instance to instance with variables,<br />
Variables, or <strong>Sound</strong>CollectionVariables.<br />
To specify relations between parameters, use expressions involving variables and constant values. For<br />
example, an additive synthesis <strong>Sound</strong> might consist of a Sum with 16 Oscillators as inputs. By setting<br />
their frequency values to the expressions<br />
?freq, ?freq*2, … , ?freq*16<br />
you stipulate that fifteen Oscillators have frequencies that are harmonics of the first, no matter what the<br />
frequency of the first Oscillator.<br />
After you have saved your newly edited <strong>Sound</strong> (be sure it is still selected), select New Class from example…<br />
from the Action menu.<br />
This opens a class editor that will let you define a new <strong>Sound</strong> class based upon your example.
A class editor has several parts:<br />
♦ An icon editor <strong>for</strong> designing the class icon<br />
♦ An icon editor <strong>for</strong> designing the class small icon<br />
♦ Field Layout: a miniature version of the <strong>Sound</strong> editor<br />
♦ A text editor <strong>for</strong> the new <strong>Sound</strong> class name<br />
♦ A text editor <strong>for</strong> the class description<br />
♦ Parameter: a list of the class parameters<br />
♦ Type: the parameter type of the selected parameter<br />
♦ Field: a list of the legal field types <strong>for</strong> the selected parameter<br />
♦ Field Rectangle: the relative position of the selected parameter’s field within the <strong>Sound</strong> editor<br />
♦ Comment: a text editor <strong>for</strong> editing the selected parameter’s description<br />
♦ A check box <strong>for</strong> specifying that a <strong>Sound</strong> should expand be<strong>for</strong>e trans<strong>for</strong>mations are applied to it<br />
Using the Icon Editors<br />
Click in a white area to draw a black dot, and click in a black area to erase. If you hold the mouse button<br />
down as you move the mouse, you can draw or erase continuously. While you are designing the icon,<br />
you can also see an actual size version of it below or to the left of the large version.<br />
<strong>The</strong>re are two icons <strong>for</strong> each class. <strong>The</strong> small icon is used whenever you select Small icon in the dialog<br />
under View in the Edit menu. <strong>The</strong> other icon is the one you see by default.<br />
To set the large and small icons to be the same as those of another <strong>Sound</strong>, drag that <strong>Sound</strong> into the icon<br />
editor.<br />
Parameter Types and Fields<br />
When you select a name from the Parameter list, you see its type selected in the Type list and the kind<br />
of parameter field it uses selected in the Field list. <strong>The</strong> position of the parameter field is shown highlighted<br />
in the miniature <strong>Sound</strong> editor labeled Field Layout.<br />
Parameter Types<br />
Each variable name in the example <strong>Sound</strong> becomes a parameter name in this new class. You can set parameter<br />
types to be the same as those in another <strong>Sound</strong> by dragging that <strong>Sound</strong> icon onto the Parameter<br />
list in the Class editor.<br />
To manually set the type of a parameter, first select the parameter name in the list labeled Parameter.<br />
<strong>The</strong>n choose from among the given list of types under the Type heading. <strong>The</strong> type of a parameter defines<br />
537
its range of legal values, its default value, its list of units, and whether it requires units (e.g., hz or s). <strong>The</strong><br />
type is used by the <strong>Sound</strong> editor to check whether the values entered in the parameter fields make sense<br />
<strong>for</strong> those particular parameters. Later, when you compile a <strong>Sound</strong> of this new class, any parameter fields<br />
with invalid values will flash and the host computer will beep twice.<br />
<strong>The</strong> best way to learn about types is to use the class editor to inspect the parameter types of some of the<br />
system <strong>Sound</strong> classes. See the table at the end of this chapter <strong>for</strong> an exhaustive listing of the types and<br />
their ranges.<br />
Parameter Fields<br />
Field describes the kind of field the parameter will have in the <strong>Sound</strong> editor. <strong>The</strong> kind of field determines<br />
how you will be able to enter values <strong>for</strong> that parameter in the <strong>Sound</strong> editor. For example, a<br />
hotValue field lets you type Event Values as well as constants, and a soundCollection field allows<br />
you to drag multiple <strong>Sound</strong>s into the field.<br />
In the <strong>Sound</strong> class editor, the contents of the Field list depends upon the currently selected Type; only<br />
those fields that are legal <strong>for</strong> the selected type are shown.<br />
<strong>The</strong> different kinds of fields available are as follows:<br />
Field Description<br />
array Allows you to type in values separated by spaces; this field accepts them<br />
in order as an array.<br />
boolean A check box that allows you to choose true or false.<br />
codeString Used in Script, the FileInterpreters, and ParameterTrans<strong>for</strong>mer <strong>for</strong> the<br />
Script or Trans<strong>for</strong>mation field. It parses what you have entered and<br />
checks its syntax whenever you try to load or edit another <strong>Sound</strong>. A<br />
codeString provides you with more detailed error messages than a<br />
value field does.<br />
fileName A browse button that opens a file list dialog.<br />
grammar <strong>The</strong> field used <strong>for</strong> the production rules of ContextFreeGrammar. See the<br />
Prototypes Reference on page 218.<br />
legalName<strong>Sound</strong>-<br />
Collection<br />
Accepts any number of <strong>Sound</strong>s with legal variable names. This is needed<br />
in Script and the FileInterpreters so that you can refer to the <strong>Sound</strong>s by<br />
name in the Script.<br />
radioButtons Presents built-in choices (depending on the type of field) as a column of<br />
radio buttons. For example, if you choose radio button in the class editor<br />
<strong>for</strong> the type of the WordSize field in a DiskRecorder, the WordSize field<br />
will display radio buttons corresponding to the three word size choices.<br />
radioButtonsTwoColumns Same as radioButtons, but displays in two columns.<br />
samplesFileList <strong>The</strong> field used in the Segments parameter of the SamplesFileSplicer.<br />
sound Accepts only one <strong>Sound</strong> at a time.<br />
soundCollection Accepts any number of <strong>Sound</strong>s.<br />
string A text editor that will accept any sequence of characters. It cannot be set<br />
to a variable.<br />
symbolList A pop-up list of choices that presents a list of values.<br />
value Allows you to type any value, variable, or expression. <strong>The</strong> expression is<br />
evaluated when you load or edit another <strong>Sound</strong>.<br />
wavetable Allows you to select a sample from a file dialog or to type in the name of<br />
a sample file or a variable.<br />
538
Positioning the Fields<br />
Field Layout shows you what the <strong>Sound</strong> editor <strong>for</strong> <strong>Sound</strong>s of this class will look like. When you select<br />
a parameter, its field is highlighted in gray.<br />
To change the position of a field, type the coordinates of a new rectangle in the Field Rectangle text<br />
editor and then press Enter.<br />
<strong>The</strong> <strong>for</strong>mat <strong>for</strong> specifying rectangle coordinates is as follows:<br />
upperLeftX @ upperLeftY corner: lowerRightX @ lowerRightY<br />
where the parameter fields are laid out in a square whose corner points are as shown below:<br />
0 @ 0<br />
0 @ 1<br />
539<br />
1 @ 0<br />
1 @ 1<br />
<strong>The</strong> x and y values are not in absolute units like centimeters or pixels; they just indicate a position relative<br />
to a maximum x and y of 1 @ 1.<br />
Whenever you type in a new rectangle, you should adjust each of the other parameter field positions as<br />
necessary to avoid any overlapping fields.<br />
Class Description and Comments<br />
Expand<br />
Each class has a Class Description, a paragraph or two describing how <strong>Sound</strong>s of that class behave.<br />
In addition to an overall class description, each parameter has its own Comment. A parameter comment<br />
provides later users of <strong>Sound</strong>s of this class with instructions <strong>for</strong> how to enter a value <strong>for</strong> the parameter,<br />
any restrictions on its range of legal values, and an indication of how it relates to the other parameters<br />
and to the class as a whole.<br />
<strong>The</strong> Edit menu is active in the class editor <strong>for</strong> editing the class description and the parameter comments.<br />
When the Expand box is checked, the new class will expand be<strong>for</strong>e any trans<strong>for</strong>mations are applied to it<br />
(see Controlling Expansion on page 545 <strong>for</strong> more in<strong>for</strong>mation).<br />
Closing the Class Editor<br />
Debugging<br />
<strong>The</strong> first time you close the editor on a new <strong>Sound</strong> class, you will be asked whether you want to save an<br />
instance of the new class. Click Yes unless you would like to start over from scratch. An instance of the<br />
new class is created using default values <strong>for</strong> each of the parameters. To change those values, double-click<br />
on the <strong>Sound</strong> and edit it.<br />
When you close the class editor window after subsequent editing of that <strong>Sound</strong> class, you will be asked if<br />
you want to save the changes made to the class. Choose Yes to save the changes, No to discard the<br />
changes, or Cancel to return to the class editor without closing.<br />
When a <strong>Sound</strong> that you have constructed has some unexpected behavior, it can be helpful to expand it, so<br />
that you can see how <strong>Kyma</strong> is really interpreting your <strong>Sound</strong>. <strong>The</strong> Expand operation from the Action<br />
menu expands a <strong>Sound</strong> one level only. You can then select specific inputs <strong>for</strong> further expansion.
Organizing the New Classes<br />
To keep track of your custom-designed <strong>Sound</strong> classes, you can keep them all in one <strong>Sound</strong> file that you<br />
can open as a custom prototype strip. You can organize the <strong>Sound</strong>s into categories by placing related<br />
<strong>Sound</strong>s together in collections.<br />
Parameter Types and Ranges<br />
<strong>The</strong> parameter types and their ranges are listed in the table beginning on the next page. In most cases, the<br />
type of the parameter is the same as its name. If you’re not sure of a parameter’s type, you can find it by<br />
editing the class of the <strong>Sound</strong> in which it appears.<br />
540
Type Range<br />
almostOneScale 0.9 to 1.0<br />
array any list of one or more objects<br />
boolean true or false<br />
channelNbr Mono or Stereo<br />
className obsolete<br />
codeString Smalltalk code<br />
complex any complex number<br />
delayed<strong>Sound</strong>Collection obsolete<br />
delayLine wavetable name (see What is a Wavetable? on page 493)<br />
diskFormat SDI, SDII, AIFF, IRCAM or WAVE<br />
doubleScale -2.0 to 2.0<br />
duration 1 to 140737488355327 samp<br />
dynamicsType compressor or expander<br />
envelope a graphical envelope<br />
envelopeSegmentType linear or exponential<br />
feedbackDelayType comb or allpass<br />
fileName any legal file name<br />
filterType obsolete<br />
frequency -25000.0 hz to 25000.0 hz<br />
function obsolete<br />
genericSource Disk, Live, or RAM<br />
grammar see Prototypes Reference <strong>for</strong> ContextFreeGrammar<br />
halfScale 0.0 to 0.5<br />
hotArray any list of one or more objects; each element in the array can be an<br />
Event Value<br />
hotDoubleScale -2.0 to 2.0<br />
hotFrequency -25000.0 hz to 25000.0 hz<br />
hotPositiveScale 0 to 1.0<br />
hotScale -1.0 to 1.0<br />
hotTime 0 samp to 140737488355327 samp<br />
hotValue number or an Event Value<br />
hotValueList obsolete<br />
integer -2147483647 to 2147483647<br />
interpolation none or linear<br />
legalName a letter followed by zero or more letters and numbers<br />
legalName<strong>Sound</strong>Collection one or more <strong>Sound</strong>s with legal names<br />
limeFileName any legal Lime file name<br />
lowestAnalyzedFreq Above 1F (44 hz), Above 4F (345 hz), Above 2F (87 hz), Above 5F<br />
(690 hz), or Above 3F (173 hz)<br />
lowRateRecording obsolete<br />
mapping OnePerHalfStep, EquallySpaced, ByBasePitch, or ByPitchRange<br />
midiChannel 1 to 16<br />
midiControllerNumber 0 to 127<br />
541
midiFileName any legal MIDI file name<br />
midiSource MIDIInput, MIDIFile, or Script<br />
modulation frequency or none<br />
name one or more characters<br />
object any Smalltalk object<br />
optionalMidiChannel 0 to 16, 0 indicates the default MIDI channel<br />
oscillatorBankInputType SpectralShape or SOSAnalysis (obsolete)<br />
panFunction linear or power<br />
polesAndZeroes any list of complex poles and zeroes<br />
positiveFrequency 0.001 hz to 25000.0 hz<br />
positiveInteger 0 to 214748364<br />
positiveScale 0 to 1.0<br />
processor 1 to 8<br />
recording obsolete<br />
response BestFreq, BetterTime, BetterFreq, or BestTime<br />
samplesFileList any list of sample file segments (used in DiskSplicer)<br />
samplesFileName any legal sample file name<br />
scale -1.0 to 1.0<br />
shapeSource wavetable or polynomial<br />
singleWavetableDelay 0 to 4096 samp<br />
sound any <strong>Sound</strong><br />
soundCollection any collection of one or more <strong>Sound</strong>s<br />
spectrumFileName any legal spectrum file name<br />
spectrumWavetable spectrum wavetable name (see What is a Wavetable? on page 493)<br />
string one or more characters<br />
textFileName any legal text file name<br />
time 0 samp to 140737488355327 samp<br />
upScale -16.0 to 16.0<br />
value any Smalltalk value<br />
wavetable wavetable name (see What is a Wavetable? on page 493)<br />
wavetableAccess none, readWrite, readOnly, or writeOnly<br />
wavetableDelay 0 samp to 4096 samp<br />
wavetableIndex 0 to 1044480 (obsolete)<br />
wavetableLength 0 samp to 1044480 samp (obsolete)<br />
wavetableOfStandardLength name of any 4096-sample wavetable (see What is a Wavetable? on<br />
page 493)<br />
wordSize 8, 16, or 24<br />
<strong>The</strong> type called object is the least restrictive of all parameter types and can include any Smalltalk object.<br />
<strong>The</strong> parameter type value includes any number or expression, but it does not include compound structures<br />
such as Sets or Arrays.<br />
542
Parameter Trans<strong>for</strong>mers<br />
Unlike a Script, which can generate any number of events from any number of inputs, a Parameter-<br />
Trans<strong>for</strong>mer takes a single input and creates a single trans<strong>for</strong>med version of it. When you play a<br />
ParameterTrans<strong>for</strong>mer, it resets or changes the specified parameter values of its input be<strong>for</strong>e beginning to<br />
generate sound. Only the initial parameter values are modified; no trans<strong>for</strong>mations take place while the<br />
<strong>Sound</strong> plays.<br />
Because a ParameterTrans<strong>for</strong>mer can alter parameter values throughout the entire sound structure of its<br />
input, its use requires careful attention to the details of how each parameter functions within the <strong>Sound</strong>.<br />
Trans<strong>for</strong>mations<br />
<strong>The</strong> Trans<strong>for</strong>mation field of a ParameterTrans<strong>for</strong>mer takes any number of trans<strong>for</strong>ming statements.<br />
<strong>The</strong> parameters to be trans<strong>for</strong>med are identified by name, and all parameters of that name throughout the<br />
input’s structure are trans<strong>for</strong>med.<br />
Setting Parameters<br />
To set a parameter in the input, ignoring the current value of the parameter, type the following into the<br />
Trans<strong>for</strong>mation field: snd followed by the name of the parameter, a colon, the value <strong>for</strong> that parameter,<br />
and then a period. (Make sure to use the parameter name exactly as it appears above the field in the<br />
<strong>Sound</strong> editor, but without the first letter capitalized.) For example,<br />
snd left: 0.25.<br />
will set all Left parameters to the value 0.25. Any <strong>Sound</strong> that has a Left parameter, wherever it is in<br />
the input’s structure, will be set to 0.25. Any <strong>Sound</strong>s that do not have a left parameter will be unchanged.<br />
(Note that Left is actually the name of the parameter and not the name of a variable or Event<br />
Value within the parameter field.)<br />
Trans<strong>for</strong>ming Parameters<br />
You can use the current value of a parameter in computing a new parameter value. In order to obtain the<br />
current value of any parameter, use snd followed by the parameter name. Trans<strong>for</strong>ming statements can<br />
then use the current value of a parameter in calculating a new value <strong>for</strong> the same parameter. For example,<br />
the statement<br />
snd frequency: snd frequency * 2.<br />
would trans<strong>for</strong>m the input’s frequency up an octave. One parameter can also be a function of another. For<br />
instance, the following trans<strong>for</strong>ming statement makes the input’s duration a function of its frequency:
snd duration: (1.0 / snd frequency hz).<br />
In this case, the duration of the input will be exactly one cycle long.<br />
If a trans<strong>for</strong>ming statement tries to per<strong>for</strong>m arithmetic on a parameter name that is not present in the input<br />
or one of its inputs, <strong>Kyma</strong> will return an error message, in<strong>for</strong>ming you that a message was sent to<br />
nil. For example, suppose the current <strong>Sound</strong> lacks the parameter CmRatio. When <strong>Kyma</strong> encounters the<br />
trans<strong>for</strong>ming statement<br />
snd frequency: snd cmRatio * 0.5.<br />
you will get an error <strong>for</strong> trying to multiply nil by 0.5. To protect against using nil in a calculation, test<br />
the value and only per<strong>for</strong>m the calculation if the value is not nil. For example, the following trans<strong>for</strong>ming<br />
statement is protected against calculating with nil:<br />
snd cmRatio isNil ifFalse: [snd frequency: snd cmRatio * 0.5].<br />
<strong>The</strong> effect is to set the frequency to cmRatio * 0.5 in <strong>Sound</strong>s where CmRatio is present and to skip over<br />
<strong>Sound</strong>s where that parameter is absent.<br />
Time-varying Trans<strong>for</strong>mations<br />
Skipping Levels<br />
Two values, time and totalDuration, are available in ParameterTrans<strong>for</strong>mers. <strong>The</strong> value of time is<br />
the start time in microseconds of the <strong>Sound</strong> being trans<strong>for</strong>med. <strong>The</strong> value of totalDuration is the duration<br />
in microseconds of the ParameterTrans<strong>for</strong>mer’s input. You can use time and totalDuration to<br />
construct trans<strong>for</strong>mations that depend on the start time of a input within the structure.<br />
Suppose the input of a ParameterTrans<strong>for</strong>mer is a Repetition of an Oscillator.<br />
<strong>The</strong> result of the trans<strong>for</strong>mation<br />
snd frequency: snd frequency * (1 + (time / totalDuration)).<br />
is a sequence of <strong>Sound</strong>s with higher and higher frequencies.<br />
Trans<strong>for</strong>mations are made to the initial values of a <strong>Sound</strong>’s parameters; thus, any variation in the trans<strong>for</strong>mation<br />
over time is manifested only at the start time of each <strong>Sound</strong>, not over the course of a <strong>Sound</strong> and<br />
not on a sample-by-sample basis.<br />
In the default case, a trans<strong>for</strong>mation is applied to each level of the input’s structure. If you want to stop<br />
the trans<strong>for</strong>mation from continuing beyond a certain level of the sound structure, use<br />
snd doNotTrans<strong>for</strong>mSub<strong>Sound</strong>s.<br />
To continue applying trans<strong>for</strong>mations to inputs, use<br />
snd trans<strong>for</strong>mSub<strong>Sound</strong>s.<br />
544
Similarly, if you would like to trans<strong>for</strong>m only the inputs (that is, you would like the trans<strong>for</strong>mation to<br />
skip over the current <strong>Sound</strong>), you would use<br />
snd doNotTrans<strong>for</strong>mThis<strong>Sound</strong>.<br />
Controlling Expansion<br />
Most of the system prototypes provided in <strong>Kyma</strong> are actually combinations of several <strong>Sound</strong>s. When one<br />
of these prototype <strong>Sound</strong>s is played, it is first expanded. When you apply a trans<strong>for</strong>mation to the parameters<br />
of a <strong>Sound</strong>, it may make a difference whether you trans<strong>for</strong>m the parameters be<strong>for</strong>e or after the<br />
<strong>Sound</strong> has been fully expanded.<br />
When you create a new <strong>Sound</strong> class from an example (see <strong>The</strong> Class Editor on page 536), you can choose<br />
whether the new kind of <strong>Sound</strong> should expand be<strong>for</strong>e trans<strong>for</strong>mations are applied to its parameters. If<br />
you check the Expand box, the <strong>Sound</strong> will expand be<strong>for</strong>e trans<strong>for</strong>mation; if the box is not checked, parameter<br />
trans<strong>for</strong>mations will be applied to the <strong>Sound</strong> parameters be<strong>for</strong>e the <strong>Sound</strong> expands.<br />
For example, a RhythmicCellularAutomaton takes a single input and repeats it in a rhythmic pattern<br />
generated algorithmically according to the Rule that you supply. (See the Prototypes Reference on page<br />
218 or the on-line help <strong>for</strong> a more detailed explanation of how the Rule is used to generate the pattern.)<br />
A RhythmicCellularAutomaton expands to a Concatenation of TimeOffsets. Each TimeOffset contains a<br />
copy of the RhythmicCellularAutomaton’s input.<br />
545
Suppose you had a ParameterTrans<strong>for</strong>mer of a RhythmicCellularAutomaton, and that the Trans<strong>for</strong>mation<br />
field read<br />
snd duration isNil ifFalse: [<br />
snd duration: snd duration * (1 - (time / totalDuration))].<br />
You might expect the result to be the rhythmic pattern speeding up linearly over time. On the other hand,<br />
you know that a ParameterTrans<strong>for</strong>mer can only affect its input’s initial state — the values of its parameters<br />
at its start time. Since the RhythmicCellularAutomaton has only a single input and since that<br />
input starts at time 0, you might expect the trans<strong>for</strong>mation to be<br />
snd duration: snd duration * (1 - (0.0 / totalDuration)).<br />
that is<br />
snd duration: snd duration * 1.<br />
In other words, you might expect the trans<strong>for</strong>med RhythmicCellularAutomaton to be the same as the<br />
untrans<strong>for</strong>med version.<br />
What happens when you apply a time-dependent trans<strong>for</strong>mation to a RhythmicCellularAutomaton or, in<br />
fact, to any other <strong>Sound</strong> that expands when you play it? Since the ParameterTrans<strong>for</strong>mer first expands<br />
the RhythmicCellularAutomaton and then applies the trans<strong>for</strong>mation to the resulting Concatenation, the<br />
result is a rhythmic pattern that speeds up linearly with time, because each blip has a shorter duration<br />
than the one be<strong>for</strong>e it. On the other hand, the SilentTime parameter in the TimeOffsets remains untouched<br />
because, even though SilentTime is a duration, only the parameter fields named Duration<br />
are affected by the ParameterTrans<strong>for</strong>mer.<br />
Suppose you wanted to be able to change the Rule parameter of the RhythmicCellularAutomaton. If you<br />
use the Trans<strong>for</strong>mation:<br />
snd rule: 183.<br />
the Rule will be unchanged. Why? Because the ParameterTrans<strong>for</strong>mer first expands the RhythmicCellularAutomaton<br />
to a Concatenation and then tries to apply the trans<strong>for</strong>mation. Since there is no Rule<br />
parameter in a Concatenation, the trans<strong>for</strong>mation cannot be applied.<br />
If you wanted to change the Rule parameter, you would have to override the default behavior of the<br />
ParameterTrans<strong>for</strong>mer by adding a line to the Trans<strong>for</strong>mation:<br />
snd doNotExpandFirst.<br />
snd rule: 183.<br />
<strong>The</strong>n the ParameterTrans<strong>for</strong>mer would apply the trans<strong>for</strong>mation be<strong>for</strong>e expanding the RhythmicCellularAutomaton,<br />
and the rule would be modified.<br />
546
What if you wanted to both trans<strong>for</strong>m the rule and cause the rhythmic pattern to speed up over time? In<br />
that case, you would use two nested ParameterTrans<strong>for</strong>mers:<br />
<strong>The</strong> right one would have the Trans<strong>for</strong>mation:<br />
snd doNotExpandFirst.<br />
snd rule: 183.<br />
and its input would have the Trans<strong>for</strong>mation:<br />
snd duration isNil ifFalse: [<br />
snd duration: snd duration * (1 - (time / totalDuration))].<br />
<strong>The</strong> first ParameterTrans<strong>for</strong>mer would change the Rule parameter of the RhythmicCellularAutomaton,<br />
and the next ParameterTrans<strong>for</strong>mer would expand the RhythmicCellularAutomaton using the new rule<br />
and would then apply the duration trans<strong>for</strong>mation.<br />
547
Background Materials<br />
Reference Books and Textbooks<br />
Auditory Display<br />
Acoustics<br />
Blattner, M. & R. B. Dannenberg, editors. 1992. Multimedia Interface <strong>Design</strong>. New York: ACM Press.<br />
Buxton, W., W. Gaver, and S. Bly. Auditory interfaces: <strong>The</strong> Use of Non-Speech Audio at the Interface. Cambridge:<br />
Press of the University of Cambridge, in final preparation.<br />
Kramer, G., editor. 1994. Auditory Display: <strong>The</strong> Proceedings of the First International Conference on Auditory<br />
Display. Addison Wesley. CD in a sleeve.<br />
Pierce, John. R. 1992. <strong>The</strong> Science of Musical <strong>Sound</strong>, Revised Edition. New York, New York: WH Freeman<br />
and Company.<br />
Rossing, T. D. 1992. <strong>The</strong> Science of <strong>Sound</strong>, Second Edition. Reading, MA: Addison-Wesley Publishing Company.<br />
Sundberg, J. 1992. <strong>The</strong> Science of Musical <strong>Sound</strong>s. Academic Press.<br />
<strong>Sound</strong> Perception and Cognition<br />
Begault, D. 1994. 3-D <strong>Sound</strong> <strong>for</strong> Virtual Reality and Multimedia. Cambridge: Academic Press.<br />
Blauert, J. 1983. Spatial Hearing. Cambridge: MIT Press.<br />
Bregman, A. 1990. Auditory Scene Analysis: <strong>The</strong> Perceptual Organization of <strong>Sound</strong>. Cambridge: MIT Press.<br />
Deutsch, D. 1982. <strong>The</strong> Psychology of Music. Academic Press.<br />
Gelfand, S. A. 1990. Hearing: An Introduction to Psychological and Physiological Acoustics, Second Edition.<br />
New York, NY: Marcel Dekker, Inc.<br />
Roederer, J. G. 1975. Introduction to the Physics and Psychophysics of Music, Second Edition. New York:<br />
Springer-Verlag, New York, Heidleberg, and Berlin.<br />
Zwicker, E. and H. Fastl. 1990. Psychoacoustics: Facts and Models. New York: Springer-Verlag.<br />
Representation of Digital Audio Signals<br />
De Poli, G., A. Piccialli, and C. Roads. 1991. Representations of Musical Signals. Cambridge: MIT Press.<br />
Marsden, A. and A. Pople. 1991. Computer Representations and Models in Music. Academic Press.<br />
Software Technology<br />
Pope, S. T., editor. 1991. <strong>The</strong> Well-Tempered Object: Musical Applications of Object-Oriented Software Technology.<br />
Cambridge, MA: MIT Press.<br />
Tarabella, L. 1992. In<strong>for</strong>matica e Musica. Milan: G. E. Jackson.<br />
<strong>Sound</strong> Synthesis Algorithms<br />
Chamberlin, H. 1987. Musical Applications of Microprocessors, Second Edition. Hayden Books, Indianapolis,<br />
IN.<br />
Dodge, C. and T. A. Jerse. 1985. Computer Music: Synthesis, Composition, and Per<strong>for</strong>mance. Schirmer Books:<br />
New York, NY.<br />
Moore, F. R. 1990. Elements of Computer Music. Prentice Hall, Englewood Cliffs, NJ.<br />
Roads, C. 1993. Computer Music Tutorial. <strong>The</strong> M.I.T. Press, Cambridge, MA.
Wells, T. 1981. <strong>The</strong> Technique of Electronic Music. Schirmer Books, New York.<br />
Digital Audio Signal Processing<br />
Oppenheim, A. V. and R. W. Schafer. 1975. Digital Signal Processing. Englewood Cliffs: Prentice-Hall, Inc.<br />
Proakis, J. G. and D. G. Manolakis. 1988. Introduction to Digital Signal Processing. New York: Macmillan.<br />
Strawn, J. ed. 1985. Digital Audio Signal Processing. Los Altos, CA: William Kaufman, Inc.<br />
Digital Audio Engineering<br />
Ballou, G., editor. 1987. Handbook <strong>for</strong> <strong>Sound</strong> Engineers: <strong>The</strong> New Audio Cyclopedia. Indianapolis, IN: Howard<br />
W. Sams & Company.<br />
Benson, K. B., editor. 1988. Audio Engineering Handbook. New York, NY: McGraw-Hill Book Company.<br />
Chamberlin, H. 1987. Musical Applications of Microprocessors, Second Edition. Hayden Books, Indianapolis,<br />
IN.<br />
Olson, H. F. 1957. Acoustical Engineering. Professional Audio Journals.<br />
Pohlmann, K. C. 1989. Principles of Digital Audio, Second Edition. Indianapolis, IN: Howard W. Sams &<br />
Company.<br />
Strawn, J. 1985. Digital Audio Engineering. William Kaufman, Inc.<br />
Watkinson, J. 1989. <strong>The</strong> Art of Digital Audio. Boston, MA: Focal Press.<br />
Algorithmic Music Composition<br />
Balaban, M. K. Ebcioglu, O. Laske. Understanding Music with AI: Perspectives on Music Cognition. Cambridge:<br />
<strong>The</strong> AAAI Press / <strong>The</strong> MIT Press.<br />
Xenakis, I. 1992. Formalized Music: Thought and Mathematics in Composition, Revised Edition. Stuyvesant, NY:<br />
Pendragon Press.<br />
MIDI and Real-time Event Processing<br />
History<br />
Anthologies<br />
Braut, C. 1994. <strong>The</strong> Musician’s Guide to MIDI. Sybex.<br />
Rothstein, J. 1991. MIDI: A Comprehensive Introduction. A-R Editions.<br />
Rowe, R. 1993. Interactive Music Systems. MIT Press. (includes CD-ROM with software and sound examples).<br />
Yavelow, C. 1993. <strong>The</strong> Macintosh Music and <strong>Sound</strong> Bible. IDG Books.<br />
Chadabe, J. 1997. Electric <strong>Sound</strong>: <strong>The</strong> Past and Promise of Electronic Music. Prentice-Hall.<br />
Mathews, M. V., and J. R. Pierce, eds. 1989. Current Directions in Computer Music Research. MIT Press.<br />
Roads, Curtis. 1989. <strong>The</strong> Music Machine. Cambridge, MA: MIT Press.<br />
Roads, C. and J. Strawn. 1985. Foundations of Computer Music. MIT Press.<br />
Proceedings of the 1977-1997 International Computer Music Conferences. International Computer Music Association.<br />
Professional Societies<br />
ACM SIG<strong>Sound</strong>: the special interest group on sound computation<br />
Audio Engineering Society<br />
IEEE Acoustics Speech and Signal Processing<br />
549
Conferences<br />
Journals<br />
Magazines<br />
IEEE Task Force on Computer Music<br />
International Computer Music Association (ICMA)<br />
SEAMUS: Society <strong>for</strong> Electro-Acoustic Music in the United States<br />
Audio Engineering Society Conferences and Conventions<br />
Acoustical Society of America Conferences<br />
International Computer Music Conference<br />
International Conference on Auditory Display<br />
IEEE International Conference on Acoustics, Speech, and Signal Processing<br />
SEAMUS Conference<br />
Computer Music Journal<br />
Journal of the Acoustical Society of America<br />
Journal of the Audio Engineering Society<br />
IEEE Signal Processing Magazine<br />
IEEE Transactions on Signal Processing<br />
IEEE Transactions on Audio<br />
Journal of New Music Research<br />
Leonardo Music Journal<br />
Music Perception<br />
Audio Media<br />
Electronic Musician<br />
EQ<br />
Future Music<br />
Keyboard<br />
Keyboards: Claviers–In<strong>for</strong>matique Musicale–Home Studio<br />
Keys<br />
Mix<br />
Pro <strong>Sound</strong> News<br />
<strong>Sound</strong> on <strong>Sound</strong><br />
Studio <strong>Sound</strong><br />
550