

installation instructions 2-panel vinyl sliding doors - Superior Windows
installation instructions 2-panel vinyl sliding doors - Superior Windows
installation instructions 2-panel vinyl sliding doors - Superior Windows

Create successful ePaper yourself
Turn your PDF publications into a flip-book with our unique Google optimized e-Paper software.
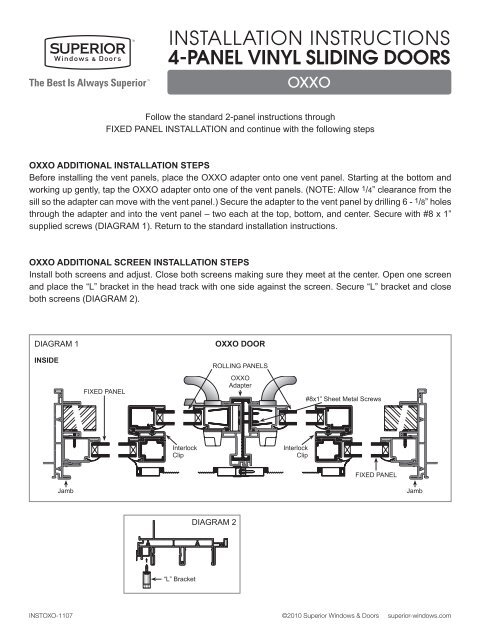
INSTALLATION INSTRUCTIONS4-PANEL VINYL SLIDING DOORSOXXOFollow the standard 2-<strong>panel</strong> <strong>instructions</strong> throughFIXED PANEL INSTALLATION and continue with the following stepsOXXO ADDITIONAL INSTALLATION STEPSBefore installing the vent <strong>panel</strong>s, place the OXXO adapter onto one vent <strong>panel</strong>. Starting at the bottom andworking up gently, tap the OXXO adapter onto one of the vent <strong>panel</strong>s. (NOTE: Allow 1/4” clearance from thesill so the adapter can move with the vent <strong>panel</strong>.) Secure the adapter to the vent <strong>panel</strong> by drilling 6 - 1/8” holesthrough the adapter and into the vent <strong>panel</strong> – two each at the top, bottom, and center. Secure with #8 x 1”supplied screws (DIAGRAM 1). Return to the standard <strong>installation</strong> <strong>instructions</strong>.OXXO ADDITIONAL SCREEN INSTALLATION STEPSInstall both screens and adjust. Close both screens making sure they meet at the center. Open one screenand place the “L” bracket in the head track with one side against the screen. Secure “L” bracket and closeboth screens (DIAGRAM 2).DIAGRAM 1INSIDEFIXED PANELOXXO DOORROLLING PANELSOXXOAdapter#8x1” Sheet Metal ScrewsInterlockClipInterlockClipFIXED PANELJambJambDIAGRAM 2“L” BracketINSTOXO-1107 ©2010 <strong>Superior</strong> <strong>Windows</strong> & Doors superior-windows.com