Neonatal & Paediatric Catheters (4MB) - Vygon (UK)
Neonatal & Paediatric Catheters (4MB) - Vygon (UK)
Neonatal & Paediatric Catheters (4MB) - Vygon (UK)

Create successful ePaper yourself
Turn your PDF publications into a flip-book with our unique Google optimized e-Paper software.
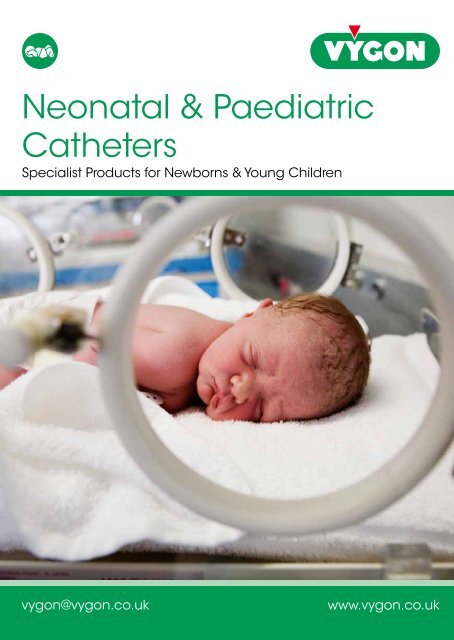
<strong>Neonatal</strong> & <strong>Paediatric</strong><strong>Catheters</strong>Specialist Products for Newborns & Young ChildrenA range of <strong>Neonatal</strong> and <strong>Paediatric</strong>intravenous catheters providing safe andreliable vascular access for all children fromnewborn 1yrvygon@vygon.co.ukwww.vygon.co.uk
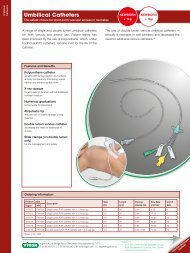
Umbilical <strong>Catheters</strong>The safest choice for short-term vascular access in neonatesNEWBORN< 1kgNEWBORN> 1kgUmbilical<strong>Catheters</strong>Insertion TechniqueGeneral1. Use strict aseptic technique and ensure maximum barrier precautions, suchas using the umbilical placement pack (80.199.695), cleanse the anteriorabdominal wall and cord stump.2. Loosely tie a piece of ribbon gauze around the cord stump to controlbleeding. Cut the umbilical cord at its base, tangentially to the abdomen,remove any clots which may obstruct the vessel lumen.3. Arteries are small, thick-walled spiralling vessels, whilst the vein is largerand thin-walled (see diagram 1).4. Prime the catheter, and if required dilate the vessel using iris forceps(see diagram 1).5. Advance the catheter using short, smooth strokes.Arterial Catheterisation1. Place the catheter tip either at the upper aorta above the diaphragm, X-rayT6-T10 (see table 1 and diagram 2) or in the lower aorta below the renalarteries, X-ray L4-L5 (see table 1 and diagram 2).2. Check the legs and buttocks for pallor or blueness and palpate the femoralpulses.3. Confirm catheter location by X-ray.4. Fixate the catheter.Venous Catheterisation1. Locate the catheter tip into the inferior vena cava via the ductus venosus(see diagram 2).2. Confirm catheter location by X-ray.3. Fixate the catheter.RibbonGauze1Diagram 1 - Catheter insertionPortalVeinIris ForcepsIVCDuctusVenosus2CatheterVeinArteryT6-10L4-5Diagram 2 - Catheter tip locationPlease note: Any resistance to the advancement of the catheter must leadto immediate withdrawal of the catheter by 2-3cm before any new attempt ismade. Do not cover the umbilicus with any dressing as the cord air dries in theincubator.Catheter removal: Withdraw the catheter slowly and gently. If resistance is felt,stop and identify the cause before continuing.Umbilical Artery CatheterPositionsShoulderumbilicuslength (cm)Table 1Umbilicuslower aortalength (cm)Umbilicusupper aortalength (cm)8 4 1010 5-6 1212 6-7 1514 8 1816 10 2018 10-11 22Warnings: Avoid the use of alcohol or acetone to clean the catheter as this may result in catheter damage and premature removal.Avoid the use of small syringes less than 10ml for bolus injections as they generate high pressures which may result in catheter damage.<strong>Vygon</strong> (<strong>UK</strong>) Ltd, The Pierre Simonet Building, V Park, Gateway North, Latham Road, Swindon SN25 4DLT: 01793 748800 | F: 01793 748899 | W: www.vygon.co.uk | E: vygon@vygon.co.uk
28G Premicath<strong>Neonatal</strong> catheter (PUR) with choice of introducerNEWBORN< 1kg28GPremicath28G Premicath has been designed specifically for usewith babies under 1kg who require the smallest catheters.As with our other polyurethane catheters Premicathutilises thin-wall technology to enable optimum flow ratesto be achieved.Clinicians have the choice of either a small breakawayneedle introducer, which is ideal for use in the tiniest ofveins, or the slightly larger Microflash peelable cannulawhich provides the added safety and security of advancingthe catheter through plastic, and the ability to completelyremove the cannula after line insertion.Features and BenefitsPolyurethane catheterremains firm during insertion but softensat body temperature, minimising vesseltrauma and enhancing stay time.X-ray opaquefor accurate tip location without additionalcontrast medium.Catheter graduations every cmaid accurate tip placement.Small 28G catheterfor the smallest veins.One-piece catheter constructionsimplifies insertion.Integral extension with wingpermits secure catheter fixation, reducingthe risk of mechanical phlebitis.Choice of introducer:• Microflash introducerunique split cannula, allows easy removalfrom the PICC line, and eyelet gives rapidvisibility of flashback.• Small 24G breakaway needlefor small veins.Kit Contents1 x Catheter 1 x Microflash introduceror breakaway needle0896 Bionector needle-free access devicesavailable separately.Ordering InformationProduct CodesIntroducer InformationSize Length Priming Flow RateDescription<strong>Vygon</strong> NHSSC (G) (mm) Volume (ml) (ml/min)*SizeType(OD-L-G)1261.21 FSU221 X-ray opaque graduated catheter 28 200 0.07 1.0 Breakaway needle 0.7-18-24 101261.22 FSU220 X-ray opaque graduated catheter 28 200 0.07 1.0 Microflash 1.1-18-20 101261.203 - X-ray opaque graduated pur catheter with stylet 28 200 0.07 1.0 Breakaway needle 0.7-18-24 101261.208 FSU263 X-ray opaque graduated pur catheter with stylet 28 200 0.07 1.0 Microflash 1.1-18-20 107366.510 FTR438 Breakaway needle only 24 18 - - Breakaway needle 0.7-18-24 257370.19 FSP244 Microflash introducer only 20 18 - - Microflash 1.1-18-20 25*Tested at 1bar/14.5psiUnitofSaleInsertion techniqueoverleaf
28G Premicath<strong>Neonatal</strong> catheter (PUR) with choice of introducerNEWBORN< 1kgInsertion TechniquePreparation for Catheter InsertionOpen using aseptic technique. Add any sterile supplementary equipment needed. Ensure maximum barrier precautions,such as using the long line placement pack (80.199.519). Put on sterile gloves and prepare tray contents ready forcatheter insertion:1. Draw-up saline and heparin flushes using a filter needle or straw to remove particulate material.2. Flush catheter prior to insertion.28GPremicathMicroflash Cannula Insertion Technique1. Select, prepare, clean (see diagram 1) and drape site of venepuncture. Apply tourniquet.2. Perform venepuncture with the peelable cannula provided (see diagram 2).3. Advance cannula until venepuncture is confirmed by free flowing blood intothe flashback chamber (see diagram 3). Please note: With Microflash, youmay see flashback from the needle eyelet. The cannula can also besyringe-mounted if preferred.4. Release tourniquet, advance cannula off the introducer needle and advancegently into vessel. Please note: To avoid excessive bleeding or possible airaspiration place a gloved finger over the cannula opening following needlewithdrawal. Insert catheter through cannula using non-toothed forceps andshort, steady strokes (see diagram 4).Should catheter advancement become difficult, infuse a little fluid whilstsimultaneously advancing the catheter. This has the effect of dilating the vesseldistal to the catheter tip.1324Premicath Peelable Cannula Removal1. Secure the catheter by applying light finger pressure on the catheter beyond the cannula, and slowlywithdraw the cannula. Carefully peel the cannula apart whilst maintaining forward pressure on thecatheter, taking care not to dislodge the catheter from the vein. Finally advance the catheter to thedesired position (see diagram 1).1Premicath Catheter Fixation1. Anchor the catheter using adhesive skin strips. Clean the insertion site withgauze swab. Place small swab over insertion site (see diagram 1).2. Loop the extension tube back beside this gauze and apply a transparentdressing (see diagram 2). Light pressure over the insertion site should bemaintained for 24 hours. Change as per hospital protocol.1 2Premicath Breakaway Needle Removal1. Follow the general guidelines as per the peelable cannula insertion technique.Following venepuncture advance the catheter through the breakaway needleand withdraw the needle from the vein. Pinch needle wings firmly together toinitiate breaking of the needle (see diagram 1).2. Peel needle smoothly until the needle halves are held together only at the tip.It is not necessary to entirely separate both halves of the needle (see diagram 2).3. Lift catheter carefully out of needle lumen (see diagram 3).1 2Caution: Do not grip the needle wings tightly as this may cause the needle to break prematurely. At notime should the catheter be withdrawn back through the needle. If it becomes impossible to advance thecatheter to a satisfactory position, the needle and catheter must be withdrawn simultaneously.3Warnings: Avoid the use of alcohol or acetone to clean the catheter as this may result in catheter damage and premature removal.Avoid the use of small syringes less than 10ml for bolus injections as they generate high pressures which may result in catheter damage.<strong>Vygon</strong> (<strong>UK</strong>) Ltd, The Pierre Simonet Building, V Park, Gateway North, Latham Road, Swindon SN25 4DLT: 01793 748800 | F: 01793 748899 | W: www.vygon.co.uk | E: vygon@vygon.co.uk
24G Nutriline Twin-Flo<strong>Neonatal</strong> dual lumen catheter with Microflash introducerNEWBORN< 1kgNEWBORN> 1kg24G NutrilineTwin-Flo24G Nutriline Twin-Flo has been designed specifically foruse with babies who require multiple infusions. As withour other polyurethane catheters Nutriline utilises thin-walltechnology to enable optimum flow rates to be achieved.The Nutriline Twin-Flo dual lumen design offers enhancedfluid management.The kit for catheter insertion includes <strong>Vygon</strong>’s Microflashintroducer. This provides additional safety and security ofadvancing the catheter through plastic and the ability tocompletely remove the cannula after line insertion.Features and BenefitsPolyurethane catheterremains firm during insertion but softens atbody temperature, minimising vessel traumaand enhancing stay time.X-ray opaquefor accurate tip location without additionalcontrast medium.Catheter graduations every cmaid accurate catheter placement.Dual lumen to tipavoids incompatible drugs mixing.One-piece constructionsimplifies insertion.Slide clampsfor easier line management and safety.Integral extension with wingpermits secure catheter fixation, reducingthe risk of mechanical phlebitis.Duallumen to tipMicroflash introducerunique split cannula, allows easy removalfrom the PICC line, and eyelet gives rapidvisibility of flashback.Colour coded hubsfor easy identification of the lumens.Kit Contents1 x Catheter1 x <strong>Neonatal</strong> Grip-Lok TM1 x Microflash introducer 1 x Tape measure0896 Bionector needle-free access devicesavailable separately.Ordering InformationProduct CodesIntroducer InformationSize Length Priming Flow RateDescription<strong>Vygon</strong> NHSSC (G) (mm) Volume (ml) (ml/min)*SizeType(OD-L-G)1252.235 FSU252 X-ray opaque graduated dual lumen pur catheter 24 300 0.2 / 0.2 1.45 / 1.45 Microflash 1.1-18-20 107370.19 FSP244 Microflash introducer 20 18 - - Microflash 1.1-18-20 25*Tested at 1 bar/14.5psiUnitofSaleInsertion techniqueoverleaf
24G Nutriline Twin-Flo<strong>Neonatal</strong> dual lumen catheter with Microflash introducerNEWBORN< 1kgNEWBORN> 1kgInsertion TechniquePreparation for Catheter InsertionOpen using aseptic technique. Add any sterile supplementary equipment needed. Ensure maximum barrier precautions,such as using the long line placement pack (80.199.519). Put on sterile gloves and prepare tray contents ready forcatheter insertion:1. Draw-up saline and heparin flushes using a filter needle or straw to remove particulate material.2. Flush catheter prior to insertion.24G NutrilineTwin-FloMicroflash Peelable Cannula Insertion Technique1. Select, prepare, clean (see diagram 1) and drape site of venepuncture. Apply tourniquet.2. Perform venepuncture with the peelable cannula provided (see diagram 2).3. Advance cannula until venepuncture is confirmed by free flowing blood intothe flashback chamber (see diagram 3). Please note: With Microflash youmay see flashback from the needle eyelet. The cannula can also besyringe-mounted if preferred.4. Release tourniquet, advance cannula off the introducer needle and advancegently into vessel. Please note: To avoid excessive bleeding or possible airaspiration place a gloved finger over the cannula opening, following needlewithdrawal. Insert catheter through cannula using non-toothed forceps andshort, steady strokes (see diagram 4).Should catheter advancement become difficult, infuse a little fluid whilstsimultaneously advancing the catheter. This has the effect of dilating the vesseldistal to the catheter tip.1324Nutriline Twin-Flo Peelable Cannula Removal1. Secure the catheter by applying light finger pressure on the catheter beyondthe cannula and slowly withdraw the cannula. Carefully peel the cannulaapart whilst maintaining forward pressure on the catheter, taking care notto dislodge the catheter from the vein. Finally advance the catheter to thedesired position (see diagram 1).1Nutriline Twin-Flo Catheter Fixation1. Anchor the catheter using adhesive neonatal Grip-Lok TM . Clean the insertionsite with gauze swab. Place small swab over insertion site if necessary(see diagram 1).2. Loop the extension tube back beside this gauze and apply a transparentdressing (see diagram 2). Light pressure over the insertion site should bemaintained for 24 hours. Change as per hospital protocol.1 2Warnings: Avoid the use of alcohol or acetone to clean the catheter as this may result in catheter damage and premature removal.Avoid the use of small syringes less than 10ml for bolus injections as they generate high pressures which may result in catheter damage.<strong>Vygon</strong> (<strong>UK</strong>) Ltd, The Pierre Simonet Building, V Park, Gateway North, Latham Road, Swindon SN25 4DLT: 01793 748800 | F: 01793 748899 | W: www.vygon.co.uk | E: vygon@vygon.co.uk
24G NutrilinePeripherally inserted catheter with Microflash introducerNEWBORN> 1kgCHILD> 1yr24G Nutriline’s one-piece catheter construction providesclinicians with a high degree of safety. The peelableintroducer cannula enables the catheter to be safelyadvanced through plastic. Additional security is providedby a small primary wing to help minimise the risk ofcatheter movement and kinking.thin-wall technology to enable optimum flow rates to beachieved.Clinicians have a choice of different catheter lengths toensure accurate tip placement for most IV access sites.Therapy areas include long-term IV antibiotics and TPN.As with our other polyurethane catheters Nutriline utilisesFeatures and Benefits24GNutrilinePolyurethane catheterremains firm during insertion but softensat body temperature, minimising vesseltrauma and enhancing stay time.X-ray opaquefor accurate tip location without additionalcontrast medium.Catheter graduations every cmaid accurate placement of catheter.One-piece constructionsimplifies insertion.Integral extension with wingpermits secure catheter fixation, reducingthe risk of mechanical phlebitis.Slide clampfor line management and safety.Microflash introducerunique split cannula, allows easy removalfrom the PICC line, and eyelet gives rapidvisibility of flashback.Kit Contents2 x Ball swabs 1 x Filter straw 5µm1 x Gallipot1 x Sterile field/outer1 x Sponge stickwrap1 x Microflash introducer 1 x Fenestrated drape1 x Injection membrane1 x 10ml syringe0896 Bionector needle-free access devicesavailable separately.Ordering InformationProduct Codes<strong>Vygon</strong>NHSSCDescriptionSize(G)Length(mm)PrimingVolume (ml)Flow Rate(ml/min)*ID-OD(mm)IntroducerSize(OD-L-G)UnitofSale1352.152 FSQ337 X-ray opaque graduated polyurethane catheter 24 150 0.18 9.0 0.3-0.6 1.1-18-20 101352.302 FSQ338 X-ray opaque graduated polyurethane catheter 24 300 0.12 5.0 0.3-0.6 1.1-18-20 107370.19 FSP244 Microflash introducer 20 18 1.1-18-20 25*Tested at 1 bar/14.5psiInsertion techniqueoverleaf
24G NutrilinePeripherally inserted catheter with Microflash introducerNEWBORN> 1kgCHILD> 1yrInsertion TechniquePreparation for Catheter InsertionOpen using aseptic technique. Add any sterile supplementary equipment needed. Ensure you are using maximumbarrier precautions. Put on sterile gloves, prepare tray contents ready for catheter insertion:1. Draw-up saline and heparin flushes using a filter needle or straw to remove particulate material..2. Flush catheter prior to insertion.Microflash Cannula Insertion Technique1. Select, prepare, clean (see diagram 1) and drape site of venepuncture. Apply tourniquet.2. Perform venepuncture with the peelable cannula provided (see diagram 2).3. Advance cannula until venepuncture is confirmed by free flowing blood intothe flashback chamber (see diagram 3). Please note: With Microflash youmay see flashback from the needle eyelet. The cannula can also besyringe-mounted if preferred.4. Release tourniquet, advance cannula off the introducer needle and advancegently into vessel. Please note: To avoid excessive bleeding or possible airaspiration place a gloved finger over the cannula opening following needlewithdrawal. Insert catheter through cannula using non-toothed forceps andshort, steady strokes (see diagram 4).Should catheter advancement become difficult, infuse a little fluid whilstsimultaneously advancing the catheter. This has the effect of dilating the vesseldistal to the catheter tip.132424GNutrilineNutriline Peelable Cannula Removal1. Secure the catheter by applying light digital finger pressure on the catheterbeyond the cannula, and slowly withdraw the cannula. Carefully peel thecannula apart whilst maintaining forward pressure on the catheter, taking carenot to dislodge the catheter from the vein. Finally advance the catheter to thedesired position (see diagram 1).1Nutriline Catheter Fixation1. Anchor the catheter using adhesive skin strips. Clean the insertion site withgauze swab. Place small swab over insertion site if necessary(see diagram 1).2. Loop the extension tube back beside this gauze and apply a transparentdressing (see diagram 2). Light pressure over the insertion site should bemaintained for 24 hours. Change as per hospital protocol.1 2Warnings: Avoid the use of alcohol or acetone to clean the catheter as this may result in catheter damage and premature removal.Avoid the use of small syringes less than 10ml for bolus injections as they generate high pressures which may result in catheter damage.<strong>Vygon</strong> (<strong>UK</strong>) Ltd, The Pierre Simonet Building, V Park, Gateway North, Latham Road, Swindon SN25 4DLT: 01793 748800 | F: 01793 748899 | W: www.vygon.co.uk | E: vygon@vygon.co.uk
24G ECCManufactured from soft traditional siliconeNEWBORN> 1kgCHILD> 1yr24G ECC was <strong>Vygon</strong>’s first purpose-designed neonatalPICC line. The soft silicone catheter has depth graduationsto aid insertion, and sits comfortably in the vessel duringuse. Its two-part design allows the use and safe removalof the introducer winged needle.The ECC catheter is probably the most well recognisedpaediatric catheter in the world today, enjoying over 25years of unrivalled success.Features and BenefitsSoft biocompatible siliconeenhances stay time.X-ray opaquefor accurate tip location without additionalcontrast medium.24GECCCatheter graduations every cmaid accurate catheter placement.Integral extensionlimits catheter movement, reducing the riskof mechanical phlebitis.Detachable huballows complete removal of introducingneedle.Different length cathetersensure accurate tip placement.Kit Contents1 x Catheter 1 x Winged needle0896 Bionector needle-free access devicesavailable separately.Ordering InformationProduct CodesSize Needle Length Priming Flow Rate Flow Rate Unit ofDescription<strong>Vygon</strong> NHSSC(G) Size (G) (mm) Volume (ml) (ml/min)* (ml/min)** Sale2184.015 FSY090 X-ray opaque graduated silicone catheter 24 19 150 0.10 0.7 5.8 302184.00 FSY088 X-ray opaque graduated silicone catheter 24 19 300 0.12 0.6 5.0 302184.005 FSY089 X-ray opaque graduated silicone catheter 24 19 500 0.16 0.5 4.0 300812.000 Spare extension and compression hub 25*Tested to ISO 10555**Tested at 14.5psiInsertion techniqueoverleaf
24G ECCManufactured from soft traditional siliconeInsertion TechniqueNote: Only use needle supplied.Check catheter patency by flushing.Unscrew compression hub (do notseparate) and remove catheter readyfor use.NEWBORN> 1kgCHILD> 1yr1. Place child in comfortable andconvenient position. Prepareinsertion site. Drape as required.2. Perform venepuncture using 19Gneedle provided.3. Using fine non-toothed forceps,introduce catheter throughneedle.(Note graduations)1224GECC5cm 10cm 15cm 20cm4. Apply finger pressure on catheterbeyond needle tip and carefullyremove needle from vessel.5. Keeping catheter straight,carefully remove needle fromcatheter.6. Insert proximal end of catheterinto compression hub until blackmarker is fully out of sight. Whilstmaintaining catheter in thisposition, tighten compressionhub.Do not separate compressionhub.3546Please note: Black marking ringmust be within hub and out of view.Catheter is secured by tighteningcompression hub.Warnings: Avoid the use of alcohol or acetoneto clean the catheter as this may result incatheter damage and premature removal.Avoid the use of small syringes less than10ml for bolus injections as they generatehigh pressures which may result in catheterdamage.<strong>Vygon</strong> (<strong>UK</strong>) Ltd, The Pierre Simonet Building, V Park, Gateway North, Latham Road, Swindon SN25 4DLT: 01793 748800 | F: 01793 748899 | W: www.vygon.co.uk | E: vygon@vygon.co.uk
22G LeaderflexArterial and venous applicationsNEWBORN> 1kgCHILD> 1yrThe Leaderflex range of 22G seldinger catheters are foruse in a variety of venous and arterial applications.Leaderflex is manufactured from polyurethane, whichoffers excellent insertion and indwell characteristics. Safetyfeatures include: a slide clamp for safe line changes; a clearintegral extension to reduce phlebitis; and reinforcementof the catheter/wing junction to help minimise the risk ofcatheter kinking. Line management is also enhanced bymoving hub manipulation away from the insertion site,reducing the risk of mechanical phlebitis, which can resultin premature catheter failure.Features and BenefitsPolyurethane catheterremains firm during insertion but softensat body temperature, minimising vesseltrauma and enhancing stay time.X-ray opaquefor accurate tip location without additionalcontrast medium.One-piece catheter constructionsimplifies insertion.22GLeaderflex4, 6 and 8cm lengthsto suit all sizes of patients.Integral extension with wingpermits secure catheter fixation, reducingthe risk of mechanical phlebitis.Slide clampfor line management and safety.Flexible guidewire with soft tipto reduce vessel trauma and aid successfulline placementKit Contents1 x Catheter1 x Needle1 x Guidewire1 x Outer wrap0896 Bionector and 0896.11 Bionector arterialneedle-free access devices available separately.Ordering InformationProduct Codes<strong>Vygon</strong>NHSSCDescriptionSize(G)Length(mm)Flow Rate(ml/min)*ID-OD(mm)GuidewireLength(mm)ExtensionLength(mm)1212.04 FSQ326 Polyurethane catheter with integral extension 22 40 17 0.5 - 0.7 230 45 201212.06 FSQ327 Polyurethane catheter with integral extension 22 60 15 0.5 - 0.7 230 45 201212.08 FSQ328 Polyurethane catheter with integral extension 22 80 12 0.5 - 0.7 260 45 20*Tested to ISO 10555UnitofSaleInsertion techniqueoverleaf
22G LeaderflexArterial and venous applicationsNEWBORN> 1kgCHILD> 1yrInsertion TechniqueThe Idea“I had the polyethylene catheter, the needle and the guidewire, and suddenly in a split second, therecame an attack of common sense. The sequence in which these three items ought to be usedsuddenly became obvious.”Sven-Ivar Seldinger was born in Mora, Sweden in 1921. After studying medicine at the KarolinskaInstitute in Stockholm he began his diagnostic radiology training at the Karolinska Sjukhuset in 1950.Many sensed the great potential of angiography and although methods for introducing a catheter into an artery or veinwere available, they were traumatic and involved considerable blood loss. This was the problem that Dr Seldinger set outto solve. He submitted his initial and most importantpaper on percutaneous catheterisation in 1953.Dr Seldinger’s medical milestoneseems simple now. A needle isintroduced, a guidewire is passed intothe needle lumen and the needle isremoved. The catheter is then fedover the wire, the wire is then removed.The Seldinger technique was,because of its simplicity, adoptedworldwide and since its conceptionhas served millions, permitting safe,simple catheterisation of virtually everyimportant vessel in the body.1222GLeaderflex<strong>Vygon</strong> is proud to produce Leaderflex,a refined product utilising theSeldinger technique and today’stechnologies. A fitting tribute toDr Seldinger.The Technique1. Vessel puncture is performed.2. Effective venepuncture is confirmedby free aspiration of blood.3. The syringe is removed andthe guidewire, soft tip first, isintroduced through the needle.4. The needle is then removed.5. The flexible catheter is passedforward over the guidewire.6. The guidewire is removed.3456Warnings: Avoid the use of alcohol or acetone to clean the catheter as this may result in catheter damage and premature removal.Avoid the use of small syringes less than 10ml for bolus injections as they generate high pressures which may result in catheter damage.<strong>Vygon</strong> (<strong>UK</strong>) Ltd, The Pierre Simonet Building, V Park, Gateway North, Latham Road, Swindon SN25 4DLT: 01793 748800 | F: 01793 748899 | W: www.vygon.co.uk | E: vygon@vygon.co.uk
20G NutrilinePeripherally inserted catheter with peelable cannulaCHILD> 1yrDesigned for children and young adults, Nutriline’s onepiece catheter construction provides clinicians with ahigh degree of safety. The peelable cannula enables thecatheter to be safely advanced through plastic. Additionalsecurity is provided by a small primary wing to helpminimise the risk of catheter movement and kinking.As with our other polyurethane catheters Nutriline utilisesthin-wall technology to enable optimum flow rates to beachieved without compromising the safety of the catheter.Features and BenefitsPolyurethane catheterremains firm during insertion but softensat body temperature, minimising vesseltrauma and enhancing stay time.X-ray opaquefor accurate tip location without additionalcontrast medium.Catheter graduations every cmaid accurate placement of catheter.One-piece constructionsimplifies insertion.Integral extension with wingpermits secure catheter fixation, reducingthe risk of mechanical phlebitis.20GNutrilineSlide clampfor line management and safety.Peelable cannulaunique split cannula, provides theadditional safety and security of advancingthe catheter through plastic.Kit Contents2 x Ball swabs 1 x Filter straw 5µm1 x Gallipot1 x Sterile field/outer1 x Sponge stickwrap1 x Peelable cannula 1 x Fenestrated drape1 x Injection membrane1 x 10ml syringe0896 Bionector needle-free access devicesavailable separately.Ordering InformationProduct Codes<strong>Vygon</strong>NHSSCDescriptionSize(G)Length(mm)PrimingVolume (ml)Flow Rate(ml/min)*ID-OD(mm)IntroducerSize(OD-L-G)1353.302 FSQ340 X-ray opaque graduated polyurethane catheter 20 300 0.16 2.8 0.5-1.0 1.5-45-17 107370.17 FSP243 Spare peelable cannula 17 - - - - - 25*Tested to ISO 10555UnitofSaleInsertion techniqueoverleaf
20G NutrilinePeripherally inserted catheter with peelable cannulaCHILD> 1yrInsertion TechniquePreparation for Catheter InsertionOpen using aseptic technique. Add any sterile supplementary equipment needed. Ensure you are using maximum barrierprecautions. Put on sterile gloves and prepare tray contents ready for catheter insertion:1. Draw-up saline and heparin flushes using a filter needle or straw to remove particulate material.2. Flush catheter prior to insertion.Nutriline Peelable Cannula Insertion Technique1. Select, prepare, clean (see diagram 1) and drape site of venepuncture. Apply tourniquet.2. Perform venepuncture with the peelable cannula provided (see diagram 2).3. Advance cannula until venepuncture is confirmed by free flowing blood into theflashback chamber (see diagram 3). The cannula can be syringe-mounted ifpreferred.4. Release tourniquet, advance cannula off the introducer needle and advancegently into vessel. Insert catheter through cannula using non-toothed forcepsand short, steady strokes (see diagram 4). Please note: To avoid excessivebleeding or possible air aspiration place a gloved finger over the cannulaopening following needle withdrawal.Should catheter advancement become difficult, infuse a little fluid whilstsimultaneously advancing the catheter. This has the effect of dilating the vesseldistal to the catheter tip.1324Nutriline Peelable Cannula Removal1. Secure the catheter by applying light finger pressure on the catheter beyondthe cannula, and slowly withdraw the cannula. Carefully peel the cannulaapart whilst maintaining forward pressure on the catheter, taking care notto dislodge the catheter from the vein. Finally advance the catheter to thedesired position (see diagram 1).120GNutrilineNutriline Catheter Fixation1. Anchor the catheter using adhesive skin strips. Clean the insertion site withgauze swab. Place small swab over insertion site if necessary (see diagram 1).2. Loop the extension tube back beside this gauze and apply a transparent dressing(see diagram 2). Light pressure over the insertion site should be maintained for24 hours. Then change as per hospital protocol.1 2Warnings: Avoid the use of alcohol or acetone to clean the catheter as this may result in catheter damage and premature removal.Avoid the use of small syringes less than 10ml for bolus injections as they generate high pressures which may result in catheter damage.<strong>Vygon</strong> (<strong>UK</strong>) Ltd, The Pierre Simonet Building, V Park, Gateway North, Latham Road, Swindon SN25 4DLT: 01793 748800 | F: 01793 748899 | W: www.vygon.co.uk | E: vygon@vygon.co.uk
Long Line Placement PackNEWBORN< 1kgNEWBORN> 1kgCHILD> 1yrSetting the standard, the long line placement packprovides clinicians with equipment to minimise the risk ofline sepsis during insertion. The components of the packhave been specifically designed for neonates/paediatricsand selected by those who insert IV lines on a daily basis.Sepsis has been sited as one of the most commoncomplications for percutaneous long lines. (2) Having all ofthe required components in one pack makes it easier forclinicians inserting the catheter to use maximum barrierprecautions, thereby increasing the likelihood that thehighest standard of asepsis is maintained by all clinicians.33% of long line complications are due to line infection. (2)Features and BenefitsFenestrated transparent drapeprovides a maximum barrier to infectionwhilst allowing you to see and monitor thebaby during insertion. Also keeps the babywarm during the line placement and theeasy peel allows for easy removal.Choice of neonatal forcepsstraight and curved non-toothed forceps toaid the insertion of your long line.<strong>Neonatal</strong> tourniquetpurpose-designed tourniquet to minimisedamage to delicate skin.Reduced set-up timeall your items available in one pack.Kit ContentsPlacementPacks1 x Opaque tray 1 x Outer wrap1 x Prep forceps, blue 75 x 90cm1 x Pack of Steri-Strips 1 x Fenestrated2 x Tape measures transparent drape2 x Tegaderm dressings with easy peel4 x 4cm50 x 50cm1 x Luer-slip syringe 1 x Pair of neonatal10mlscissors 9cm1 x <strong>Neonatal</strong> tourniquet 1 x Iris forceps straight,4 x Ball swabsnon-toothed 10cm2 x Drape 45 x 75cm 1 x Iris forceps curved,2 x Gallipot 60mlnon-toothed 10cm2 x Hand towels 5 x Swabs 7.5 x 7.5cm,8ply, whiteFenestrated transparentdrape with easy peel.Ordering InformationProduct Codes<strong>Vygon</strong>NHSSCProduct DescriptionUnit of Sale80.199.519 FSU369 Long line placement pack 25Reference2. Dr A. Soe and R. Buckle. SpecialistClinical Audit Programme for London,Kent, Surrey and Sussex. March 2004.Umbilical placementpack overleaf
Umbilical Placement PackNEWBORN< 1kgNEWBORN> 1kgThe umbilical placement pack provides clinicians withhigh quality equipment to minimise the risk of linesepsis and provides convenience during insertion.The components of the pack have been specificallydesigned for neonates and selected by those whoinsert umbilical lines on a daily basis.Sepsis has been sited as one of the most frequentcomplications for umbilical catheters. (3) Having all of therequired components in one pack makes it easier forclinicians inserting the catheter to use maximum barrierprecautions, thereby increasing the likelihood that thehighest standard of asepsis is maintained by all clinicians.Features and BenefitsFenestrated transparent drapeprovides a maximum barrier to infectionwhilst allowing you to see and monitor thebaby during insertion. Also keeps the thebaby warm during the line placement andthe easy peel allows for easy removal.Choice of neonatal forcepsstraight and curved non-toothed forcepsto aid the insertion of your long line.Reduced set-up timeall your items available in one pack.Kit Contents1 x Opaque tray1 x Outer wrap75 x 90cm1 x Hypodermicneedle 18G 1/2”1 x Hypodermicneedle 20G 1/2”1 x Retractablescalpel N o 112 x Drapes 45 x 75cm1 x Fenstrated drapewith easy peel50 x 50cm2 x Hand towels1 x Pair of suture1 x Umbilical cotton1 x Tape measure2 x Mosquito forcepscurved 13cm1 x Mosquito forcepsstraight 13cm1 x Iris forcepscurved 10.5cm1 x Iris forcepscurved 10cm1 x Iris forcepsstraight 10cm1 x Iris forcepsstraight with teeth10.5cmscissors 11cm10 x Swabs1 x Needle holder14cm10 x 10cm, 4ply6 x Swabs5 x 5cm, 4ply1 x Red gallipot60ml1 x Transparentgallipot 60ml1 x Silk suture withcurved cuttingneedle 3.01 x Luer-slipsyringe 1ml2 x Luer-locksyringes 3ml2 x Luer-locksyringes 5ml1 x Vessel dilatorprobe 14cm1 x Adhesive fixationstripsPlacementPacksOrdering InformationProduct Codes<strong>Vygon</strong>NHSSCProduct DescriptionUnit of Sale80.199.695 FSU377 Umbilical placement pack 20<strong>Vygon</strong> (<strong>UK</strong>) Ltd, The Pierre Simonet Building, V Park, Gateway North, Latham Road, Swindon SN25 4DLT: 01793 748800 | F: 01793 748899 | W: www.vygon.co.uk | E: vygon@vygon.co.ukReference3. Dr A. Soe and R. Buckle. SpecialistClinical Audit Programme for London,Kent, Surrey and Sussex. March 2004.
Education and TrainingNEWBORN< 1kgNEWBORN> 1kgCHILD> 1yrAs part of our ongoing commitment to education and training we can offer you the following:Product Specific Workshops<strong>Vygon</strong>’s bespoke <strong>Neonatal</strong> line placement workshops canbe based in the classroom or within the clinical environment.They combine theory and practical training opportunities, usingtraining manikins to practice catheter insertion and care andmaintenance skills. A product selection matrix is provided toassist in choosing the most appropriate device for the patient.Hands-on Training AidsThese aids enable clinicians to practice cathetercare and maintenance skills and areavailable for workshops or short-term loan.Training DVDsThese have been made by clinicians forclinicians and have been designed to guidethe new user through the essential elements ofinsertion, care and maintenance of our products.Education andTraining<strong>Neonatal</strong> PowerPointPresentationChapters in this presentation include:• Why use long lines?• Complications.• Insertion and removal techniques.For further information on any of theabove please contact us on01793 748800 or email us atvygon@vygon.co.uk<strong>Vygon</strong> (<strong>UK</strong>) Ltd, The Pierre Simonet Building, Gateway North, Swindon, SN25 4DLT: 01793 748800 | F: 01793 748899 | W: www.vygon.co.uk | E: vygon@vygon.co.uk
Summary and Measures to Prevent, Detect andTreat Complications of Central Lines for NeonatesNEWBORN< 1kgNEWBORN> 1kgPotential Problems Possible Causes Practice RecommendationsDifficulty in successfullyflushing catheterCatheter damageSepsisMalpositionpericardial tamponade• Clamped or kinked line.• Occluded line.• Flushing with a small syringe againstresistance.• Heat from storage causingdegradation of catheter material.• Accidental damage e.g. stretching orduring taping.• Insertion site infection.• Line sepsis.• Poor site care.• The catheter may migrate eitherinwardly or outwards.• Secure and tape the line carefully after the insertion.• Check integrity of catheter prior to use.• Identify incompatible solutions or blood clot.• Clear clotted or sluggish lines in accordance with hospital policyfor catheter maintenance.• Use 10ml syringes only in order to avoid excessive pressure.However use the volume of flush in accordance with hospitalpolicy.• Store in accordance with manufacturer’s recommendations.• Handle catheter carefully when fixing or taping.• Use a strict aseptic technique during placement.• If dressing changes are needed use a strict aseptic technique.• Limit access to line.• Observe the catheter insertion site for signs of inflammation,phlebitis, erythema, induration.• Treat in accordance with hospital policy.• Confirmation of correct tip positioning into superior vena cava,(upper portion of the distal third) or inferior vena cava prior to use.• An X-ray or ultrasound may be used in accordance with hospitalpolicy, to diagnose the problem before treatment.• Treat in accordance with hospital policy.Extravasation• Catheter tip is not in central positionafter placement.• Damaged catheter.• Thrombosis blocking flow and addingpressure at the terminal tip.• Phlebitis with swelling, creating addedpressure.• Extravasation treatment in accordance with local guideline.• Remove the line or treat in accordance with hospital policy.Difficulty in removing catheter• Venospasm.• Remove slowly and do not apply pressure to the vein wall.• The use of a warm compress may help.Summary ofComplications<strong>Vygon</strong> (<strong>UK</strong>) Ltd, The Pierre Simonet Building, Gateway North, Swindon, SN25 4DLT: 01793 748800 | F: 01793 748899 | W: www.vygon.co.uk | E: vygon@vygon.co.uk
This brochure has been printed using environmentally-friendly processes,on paper from well-managed sources, and can be recycled. If you wouldlike to receive an electronic copy, please contact the <strong>Vygon</strong> CustomerServices team on 01793 748800.CBP0000261702121946<strong>Vygon</strong> (<strong>UK</strong>) LtdThe Pierre Simonet BuildingV ParkGateway NorthLatham RoadSwindonWiltshireSN25 4DLTel: 01793 748800Fax: 01793 748899Web: www.vygon.co.ukEmail: vygon@vygon.co.uk0009.NEO/PAED - Content correct as of 02/2012