HP LaserJet 4345 MFP Swing Plate Removal - ENX Magazine
HP LaserJet 4345 MFP Swing Plate Removal - ENX Magazine
HP LaserJet 4345 MFP Swing Plate Removal - ENX Magazine

You also want an ePaper? Increase the reach of your titles
YUMPU automatically turns print PDFs into web optimized ePapers that Google loves.
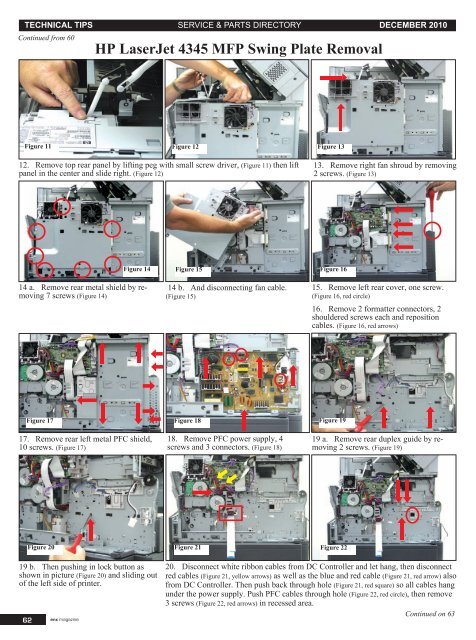
TECHNICAL TIPS SERVICE & PARTS DIRECTORY DECEMBER 2010Continued from 60<strong>HP</strong> <strong>LaserJet</strong> <strong>4345</strong> <strong>MFP</strong> <strong>Swing</strong> <strong>Plate</strong> <strong>Removal</strong>Figure 11 Figure 12 Figure 1312. Remove top rear panel by lifting peg with small screw driver, (Figure 11) then liftpanel in the center and slide right. (Figure 12)13. Remove right fan shroud by removing2 screws. (Figure 13)Figure 14 Figure 15 Figure 1614 a. Remove rear metal shield by removing7 screws (Figure 14)14 b. And disconnecting fan cable.(Figure 15)15. Remove left rear cover, one screw.(Figure 16, red circle)16. Remove 2 formatter connectors, 2shouldered screws each and repositioncables. (Figure 16, red arrows)Figure 17 Figure 18 Figure 1917. Remove rear left metal PFC shield,10 screws. (Figure 17)18. Remove PFC power supply, 4screws and 3 connectors. (Figure 18)19 a. Remove rear duplex guide by removing2 screws. (Figure 19)Figure 20 Figure 21Figure 2219 b. Then pushing in lock button asshown in picture (Figure 20) and sliding outof the left side of printer.62 enx magazine20. Disconnect white ribbon cables from DC Controller and let hang, then disconnectred cables (Figure 21, yellow arrows) as well as the blue and red cable (Figure 21, red arrow) alsofrom DC Controller. Then push back through hole (Figure 21, red square) so all cables hangunder the power supply. Push PFC cables through hole (Figure 22, red circle), then remove3 screws (Figure 22, red arrows) in recessed area.Continued on 63