
You also want an ePaper? Increase the reach of your titles
YUMPU automatically turns print PDFs into web optimized ePapers that Google loves.
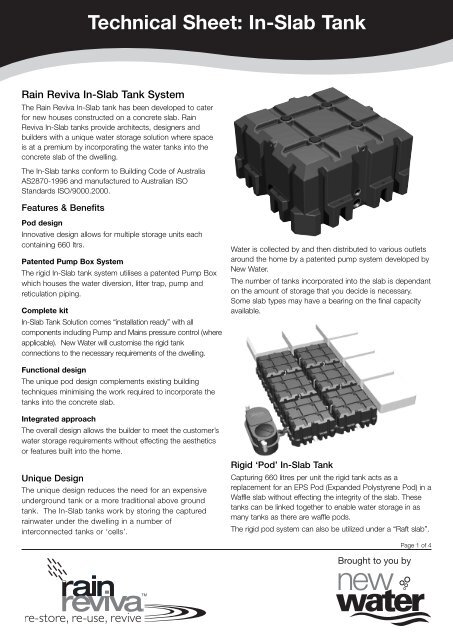
Technical Sheet: <strong>In</strong>-<strong>Slab</strong> <strong>Tank</strong>Rain Reviva <strong>In</strong>-<strong>Slab</strong> <strong>Tank</strong> SystemThe Rain Reviva <strong>In</strong>-<strong>Slab</strong> tank has been developed to caterfor new houses constructed on a concrete slab. RainReviva <strong>In</strong>-<strong>Slab</strong> tanks provide architects, designers andbuilders with a unique water storage solution where spaceis at a premium by incorporating the water tanks into theconcrete slab of the dwelling.The <strong>In</strong>-<strong>Slab</strong> tanks conform to Building Code of AustraliaAS2870-1996 and manufactured to Australian ISOStandards ISO/9000.2000.Features & BenefitsPod design<strong>In</strong>novative design allows for multiple storage units eachcontaining 660 ltrs.Patented Pump Box SystemThe rigid <strong>In</strong>-<strong>Slab</strong> tank system utilises a patented Pump Boxwhich houses the water diversion, litter trap, pump andreticulation piping.Complete kit<strong>In</strong>-<strong>Slab</strong> <strong>Tank</strong> Solution <strong>com</strong>es “installation ready” with all<strong>com</strong>ponents including Pump and Mains pressure control (whereapplicable). New Water will customise the rigid tankconnections to the necessary requirements of the dwelling.Water is collected by and then distributed to various outletsaround the home by a patented pump system developed byNew Water.The number of tanks incorporated into the slab is dependanton the amount of storage that you decide is necessary.Some slab types may have a bearing on the final capacityavailable.Functional designThe unique pod design <strong>com</strong>plements existing buildingtechniques minimising the work required to incorporate thetanks into the concrete slab.<strong>In</strong>tegrated approachThe overall design allows the builder to meet the customer’swater storage requirements without effecting the aestheticsor features built into the home.Unique DesignThe unique design reduces the need for an expensiveunderground tank or a more traditional above groundtank. The <strong>In</strong>-<strong>Slab</strong> tanks work by storing the capturedrainwater under the dwelling in a number ofinterconnected tanks or ‘cells’.Rigid ‘Pod’ <strong>In</strong>-<strong>Slab</strong> <strong>Tank</strong>Capturing 660 litres per unit the rigid tank acts as areplacement for an EPS Pod (Expanded Polystyrene Pod) in aWaffle slab without effecting the integrity of the slab. Thesetanks can be linked together to enable water storage in asmany tanks as there are waffle pods.The rigid pod system can also be utilized under a “Raft slab”.Page 1 of 4
Technical Sheet: <strong>In</strong>-<strong>Slab</strong> <strong>Tank</strong>SpecificationsEach rigid tank is made from rotational-molded Polyethylene.The <strong>In</strong>-<strong>Slab</strong> tank has been tested in accordance withAS3610-1995 relating to the structural capacity of a tank towithstand the applied load of the concrete duringconstruction. The assessment of the tank in accordancewith AS3610-1995 was conducted by Cardno, a leader inFEA (Finite Element Analysis).<strong>Tank</strong> CapacityA single Rain Reviva <strong>In</strong>-<strong>Slab</strong> tank has a 660 litre capacity.The number of rigid tanks that can be incorporated into theslab is limited only by the size and type of slab. The uniquedesign of the rigid tank allows for multiple units to beinstalled in a collective group, increasing the overall capacityof the <strong>com</strong>bined tank system.Dimensions<strong>In</strong>-<strong>Slab</strong> <strong>Tank</strong> DesignThe <strong>In</strong>-<strong>Slab</strong> tank has been designed by engineersincorporating all the relevant requirements relating tostrength, thermal and other related considerations.The patented <strong>In</strong>-<strong>Slab</strong> tank design is <strong>com</strong>pliant with BuildingCode of Australia – Residential <strong>Slab</strong>s and Footings-Construction AS2870-1996. <strong>In</strong>-<strong>Slab</strong> tanks are manufacturedunder strict ISO/9001.2000 Standards.Constructed from polyethylene, the tank is designed in sucha way that it can be used as the formwork within the slab.WarrantyAll Rain Reviva <strong>In</strong>-<strong>Slab</strong> tanks are backed by 10 year moneyback guarantee.Design ProcessUsing the plans from the architect/designer/builder, NewWater will make re<strong>com</strong>mendations as to the positioning ofthe rigid tanks within the dwelling’s slab to optimise thecapture of rainwater.Upon the tank positioning being approved by thearchitect/designer/builder, New Water will then customisethe system package for the dwelling.New Water will supply the tanks with all necessary fittings to<strong>com</strong>plete the installation.Applicable RebateYour clients may be eligible for a rebate from their state orlocal government – check with your New Water consultantto determine which rebates are applicable in utilising the<strong>In</strong>-<strong>Slab</strong> tank solution.Page 2 of 4
Technical Sheet: <strong>In</strong>-<strong>Slab</strong> <strong>Tank</strong><strong>In</strong>stallation overviewThe set-up and installation process en<strong>com</strong>passes thefollowing steps:1. Scoping• Establish quantity of storage – identify the volume ofwater required and divide by 660 giving the number oftanks required. (each tank holds 660ltrs).• New Water will provide ‘foot print’ of plan for builder(including tank orientation).The rigid <strong>In</strong>-<strong>Slab</strong> tanks are supplied ready to install with allnecessary <strong>com</strong>ponents including a pump and mainspressure control (where applicable).2. Prior to pouring the slab:• Excavate slab ‘cut’ by additional 320mm in the planareas identified by New Water.• Place the rigid tanks on a bed (20mm) of sand orsimilar non-<strong>com</strong>pactable material.• Lay the tanks symmetrically within the waffle podpattern as per the foot print plan provided by NewWater (in the already excavated area).• Check that tanks are aligned according to the foot printsupplied by New Water.• Ensure the key seals on the tanks are appropriatelylocated.• Connect each tank together using the 100mm UPVCConnection pipe supplied by New Water. Each UPVCConnection pipe has a ‘shoulder’ to ensure that thepipe is not inadvertently pushed into the tank.• Lightly tap the UPVC Connection pipe into the tankuntil the shoulder located on the connection pipe isresting against the rubber key seal appropriately.• Link the next tank to protruding UPVC Connectionpipe.• Repeat until all tanks are connected together via theUPVC Connection pipe.• Fit the Storm water <strong>In</strong>let pipe and the Pump Outletfitting to the primary tank and extend past the concreteperimeter beam’s space.• <strong>In</strong>stalled correctly on a standard slab the Storm waterConnection Pipe will be below the bottom of the beam.The Pump <strong>In</strong>let pipe may, in some situations passthrough the beam and should be protected accordingly.• Once all tanks are linked together using the UPVCConnection pipe – fit the Breather-bypass tubes to thetanks.• The breather bypass tube is a flexible tube connectedat the top of each tank that extends down below theconcrete beam and up to the next tank. As the namesuggests, the breather bypass tubes allows air tocirculate through the tanks and must be fitted prior tothe concrete pour.• Upon fitting all of the UPVC Connection pipes and theBreather Bypass tubes, test the tanks with water toensure the seals are water tight and the bypass tubesare working correctly.• To test the installation, pump water above the height ofthe connection points.• When the testing is <strong>com</strong>plete cover Storm water, <strong>In</strong>letand Pump Outlet pipes with suitable protectionsleeve(s) and cover(s).• Secure the rigid pods with correct stable back-fill byplacing sand in the void ensuring that the UPVCConnection pipes are protected and not placed understress. <strong>Tank</strong>s may be anchored using the anchorpoints located around the perimeter of the tanks usingsuitable anchor pins.Page 3 of 4
Technical Sheet: <strong>In</strong>-<strong>Slab</strong> <strong>Tank</strong>3. At a later time in the construction that suits the buildingprogram• Align the Pump Box with the Storm water <strong>In</strong>let andPump Outlet on the primary tank.• Remove protection sleeve(s)/cover(s) from <strong>In</strong>let andOutlet pipes on the primary tank• Connect the external Pump Box to the Storm waterdrain line.PUMP BOX• Connect the Storm water <strong>In</strong>let and the Pump outlet tothe necessary fittings in the Pump Box. (<strong>In</strong> someareas a storm-water by-pass may be required).• Connect the Pump Box to the electrical connection• Basic system is now set-upWater to Garden<strong>In</strong> instances where the rainwater is only being used in thegarden and not in the home, the set-up will require a Pumpto distribute the water to the required end points. No Mainsback-up supply required.Water to HomeWater captured and stored in the tanks in can be re-usedfor multiple household purposes including humanconsumption (in some cases), use in the washing machineor to flush toilets. <strong>In</strong> these situations, the system may needto be connected to Mains (back up) water supply to ensurethere is a constant supply of water to the home insituations when there is insufficient rainfall.PUMP BOX INSTALLThe Mains switch connects to the pump and <strong>au</strong>tomaticallyswitches the water supply from the tank to Mains watersupply when it senses insufficient tank water.Waffle <strong>Slab</strong>Regulations dictate that Mains water quality is to not be putat risk when a tank system is connected to the Mainswater supply.<strong>In</strong> situations where the system is connected to the Mainsusing a Mains back-up switch, then the system shouldinclude a ‘check-valve’ designed to protect the mainswater quality.Raft <strong>Slab</strong>• Ensure the box is placed on a bed of free draining,non-<strong>com</strong>pacting material and secure the box adjacentto the edge of concrete slab.A registered plumber will be required to install either optionto ensure that the install meets plumbing regulations.AccessoriesThere is more to a water saving solution than just the tank.New Water has a range of innovative products that aredesigned to improve the utilisation of your rainwater. Theseproducts include First Flush devices, Leaf Diverters, Waterfilters, Pumps and Mains (back up) switches. Your NewWater consultant can assist you in determining whichaccessories are best suited to your project.Page 4 of 4If you are interested in discussing the range of<strong>In</strong>-<strong>Slab</strong> Rain Reviva tanks or any other NewWater solution please call 1300 NEW WATERor 1300 552 695 - or visit our website to formore information.www.newwater.<strong>com</strong>.<strong>au</strong>