Super X3 Milling Machine - Travers Tool Company, Inc.
Super X3 Milling Machine - Travers Tool Company, Inc.
Super X3 Milling Machine - Travers Tool Company, Inc.
Create successful ePaper yourself
Turn your PDF publications into a flip-book with our unique Google optimized e-Paper software.
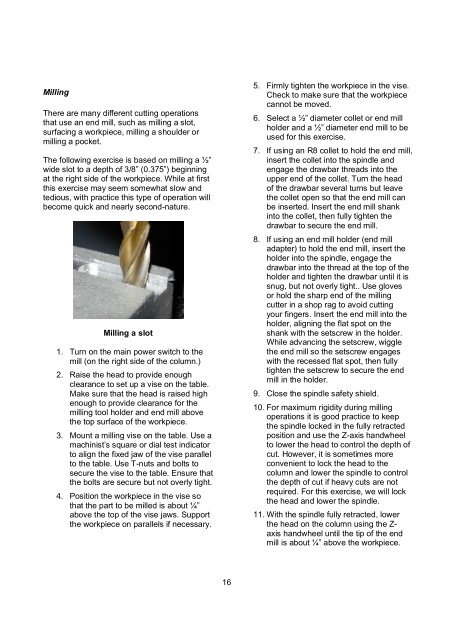
<strong>Milling</strong>There are many different cutting operationsthat use an end mill, such as milling a slot,surfacing a workpiece, milling a shoulder ormilling a pocket.The following exercise is based on milling a ½”wide slot to a depth of 3/8” (0.375”) beginningat the right side of the workpiece. While at firstthis exercise may seem somewhat slow andtedious, with practice this type of operation willbecome quick and nearly second-nature.<strong>Milling</strong> a slot1. Turn on the main power switch to themill (on the right side of the column.)2. Raise the head to provide enoughclearance to set up a vise on the table.Make sure that the head is raised highenough to provide clearance for themilling tool holder and end mill abovethe top surface of the workpiece.3. Mount a milling vise on the table. Use amachinist’s square or dial test indicatorto align the fixed jaw of the vise parallelto the table. Use T-nuts and bolts tosecure the vise to the table. Ensure thatthe bolts are secure but not overly tight.4. Position the workpiece in the vise sothat the part to be milled is about ¼”above the top of the vise jaws. Supportthe workpiece on parallels if necessary.5. Firmly tighten the workpiece in the vise.Check to make sure that the workpiececannot be moved.6. Select a ½” diameter collet or end millholder and a ½” diameter end mill to beused for this exercise.7. If using an R8 collet to hold the end mill,insert the collet into the spindle andengage the drawbar threads into theupper end of the collet. Turn the headof the drawbar several turns but leavethe collet open so that the end mill canbe inserted. Insert the end mill shankinto the collet, then fully tighten thedrawbar to secure the end mill.8. If using an end mill holder (end milladapter) to hold the end mill, insert theholder into the spindle, engage thedrawbar into the thread at the top of theholder and tighten the drawbar until it issnug, but not overly tight.. Use glovesor hold the sharp end of the millingcutter in a shop rag to avoid cuttingyour fingers. Insert the end mill into theholder, aligning the flat spot on theshank with the setscrew in the holder.While advancing the setscrew, wigglethe end mill so the setscrew engageswith the recessed flat spot, then fullytighten the setscrew to secure the endmill in the holder.9. Close the spindle safety shield.10. For maximum rigidity during millingoperations it is good practice to keepthe spindle locked in the fully retractedposition and use the Z-axis handwheelto lower the head to control the depth ofcut. However, it is sometimes moreconvenient to lock the head to thecolumn and lower the spindle to controlthe depth of cut if heavy cuts are notrequired. For this exercise, we will lockthe head and lower the spindle.11. With the spindle fully retracted, lowerthe head on the column using the Z-axis handwheel until the tip of the endmill is about ¼” above the workpiece.16


