REEFING
L S+ LX+ RX+ - Facnor
L S+ LX+ RX+ - Facnor
- No tags were found...

You also want an ePaper? Increase the reach of your titles
YUMPU automatically turns print PDFs into web optimized ePapers that Google loves.
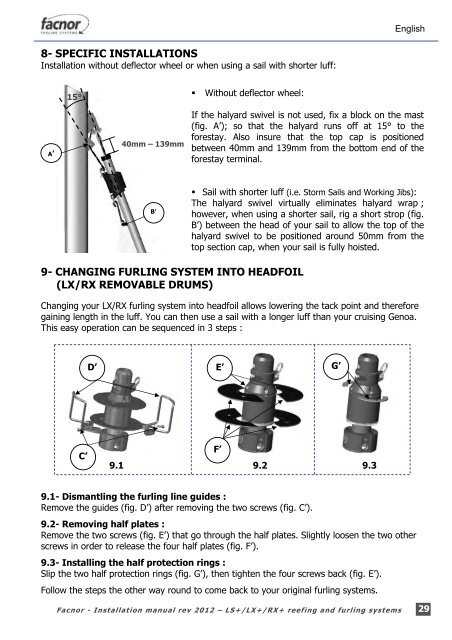
English8- SPECIFIC INSTALLATIONSInstallation without deflector wheel or when using a sail with shorter luff:15°• Without deflector wheel:A’40mm – 139mmIf the halyard swivel is not used, fix a block on the mast(fig. A’); so that the halyard runs off at 15° to theforestay. Also insure that the top cap is positionedbetween 40mm and 139mm from the bottom end of theforestay terminal.B’• Sail with shorter luff (i.e. Storm Sails and Working Jibs):The halyard swivel virtually eliminates halyard wrap ;however, when using a shorter sail, rig a short strop (fig.B’) between the head of your sail to allow the top of thehalyard swivel to be positioned around 50mm from thetop section cap, when your sail is fully hoisted.9- CHANGING FURLING SYSTEM INTO HEADFOIL(LX/RX REMOVABLE DRUMS)Changing your LX/RX furling system into headfoil allows lowering the tack point and thereforegaining length in the luff. You can then use a sail with a longer luff than your cruising Genoa.This easy operation can be sequenced in 3 steps :D’ E’G’C’F’9.1 9.2 9.39.1- Dismantling the furling line guides :Remove the guides (fig. D’) after removing the two screws (fig. C’).9.2- Removing half plates :Remove the two screws (fig. E’) that go through the half plates. Slightly loosen the two otherscrews in order to release the four half plates (fig. F’).9.3- Installing the half protection rings :Slip the two half protection rings (fig. G’), then tighten the four screws back (fig. E’).Follow the steps the other way round to come back to your original furling systems.Facnor - Installation manual rev 2012 – LS+/LX+/RX+ reefing and furling systems29