Welding Contest Rules and Score Sheet 2012 ... - Awssection.org
Welding Contest Rules and Score Sheet 2012 ... - Awssection.org
Welding Contest Rules and Score Sheet 2012 ... - Awssection.org
- No tags were found...
Create successful ePaper yourself
Turn your PDF publications into a flip-book with our unique Google optimized e-Paper software.
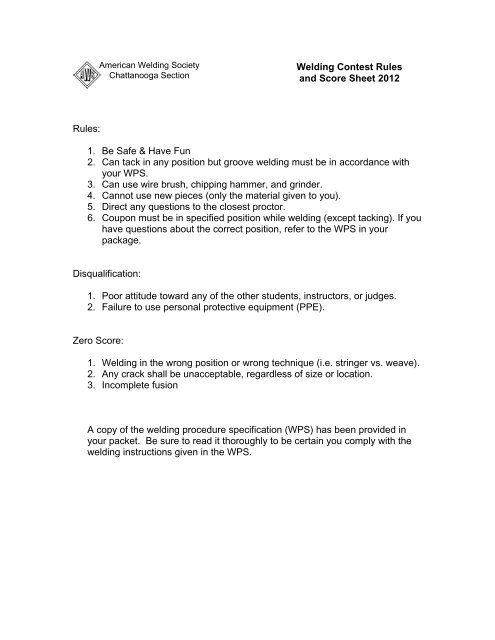
American <strong>Welding</strong> SocietyChattanooga Section<strong>Welding</strong> <strong>Contest</strong> <strong>Rules</strong><strong>and</strong> <strong>Score</strong> <strong>Sheet</strong> <strong>2012</strong><strong>Rules</strong>:1. Be Safe & Have Fun2. Can tack in any position but groove welding must be in accordance withyour WPS.3. Can use wire brush, chipping hammer, <strong>and</strong> grinder.4. Cannot use new pieces (only the material given to you).5. Direct any questions to the closest proctor.6. Coupon must be in specified position while welding (except tacking). If youhave questions about the correct position, refer to the WPS in yourpackage.Disqualification:1. Poor attitude toward any of the other students, instructors, or judges.2. Failure to use personal protective equipment (PPE).Zero <strong>Score</strong>:1. <strong>Welding</strong> in the wrong position or wrong technique (i.e. stringer vs. weave).2. Any crack shall be unacceptable, regardless of size or location.3. Incomplete fusionA copy of the welding procedure specification (WPS) has been provided inyour packet. Be sure to read it thoroughly to be certain you comply with thewelding instructions given in the WPS.
AWS CHATTANOOGA SECTION<strong>Welding</strong> Procedure Specification (WPS)In Accordance with AWS Structural Steel <strong>Welding</strong> Code D1.1-2008WPS Name: CHA-08-1.1-3G Rev 0 March 15, 2010 SMAW-MA___________________________________JOINT DESIGN________________________________POSITIONType: Single V Butt Position of Groove 3GBacking: No Progression: Up OnlyRoot Opening: 1/8” Root Face: 1/8” ________________________________Groove Angle: 75º IncludedELECTRICAL CHARACTERISTICSBack Gouging: NoCurrent:DCEP___________________________________ Amps Root: 75 - 95BASE METAL Amps Fill & Cap: 80 - 100________________________________Material Spec: ASTM A36TECHNIQUEThickness: 3/8”Stringer or Weave: Weave___________________________________ Multi or Single Pass: MultipassFILLER METALNumber of Electrodes: OnePeening:NoneAWS Spec: A5.1 Interpass Cleaning: GrinderAWS Class: E6010 / E7018 Wire BrushDiameter: 1/8” <strong>and</strong> 3/32” Chipping___________________________________________________________________PREHEATPOSTWELD HEAT TREATMENTPreheat Temp: Ambient >32ºFMax Interpass Temp: 350ºF Temperature: NonePass orWeldLayer(s)ProcessFiller MetalClassDia.CurrentType &AmpsPolarityRoot SMAW E6010 1/8” DCEP 75-95Fill & Cap SMAW E7018 3/32” DCEP 80-100Joint DetailsSee <strong>Contest</strong> DrawingTHIS PROCEDURE WAS QUALIFIED IN ACCORDANCE WITH D1.1-2008 FOR THE SOLE PUROPOSE OF PROVIDING A QUALIFIEDPROCEDURE TO THE STUDENTS PARTICIPATING IN THE CHATTANOOGA AWS WELDING CONTEST. THIS DOCUMENT SHALLNOT BE DISTRIBUTED OUTSIDE OF THE AWS DISTRICT 08 CHATTANOOGA SECTION AND SHALL NOT BE USED FOR ACTUALPRODUCTION OR CONSTRUCTION.
AWS CHATTANOOGA SECTIONProcedure Qualification Record (PQR)In Accordance with AWS Structural Steel <strong>Welding</strong> Code D1.1-2008WPS Name: CHA-08-1.1H Revision 0 March 15, 2010 SMAW-MAPQR Name: CHA-08-1.1-3G Rev 0 March 15, 2010 SMAW-MA___________________________________________________________________JOINT DESIGNPOSITIONType: Single V Butt Position of Groove 3GBacking: None Progression: UpRoot Opening: 1/8” Root Face: 1/8” ________________________________Groove Angle: 37.5º (75º Included)ELECTRICAL CHARACTERISTICSBack Gouging: NoCurrent:DCEP___________________________________ Amps Root: 80BASE METAL Amps Fill & Cap: 85________________________________Material Spec: ASTM A36TECHNIQUEThickness: 3/8”Group No.: I Stringer or Weave: Stringer___________________________________ Multi or Single Pass: MultipassFILLER METALNumber of Electrodes: OnePeening:NoneAWS Spec: A5.1 Interpass Cleaning: Grinder <strong>and</strong>/orAWS Class: E6010 / E7018 Wire BrushDiameter: 1/8” / 3/32” Chipping___________________________________PREHEAT________________________________POSTWELD HEAT TREATMENTPreheat Temp:Ambient >32ºFMax Interpass Temp: 350ºF Temperature: NoneTensile TestBend TestStress (KSI) Failure Location Type Number Result75.28 Weld76.03 WeldSide 4 SatisfactoryWe certify that the statements in this record are correct <strong>and</strong> that the test welds were prepared,welded, <strong>and</strong> tested in accordance with the requirements of AWS D1.1-2008.Date: March 15, 2010Dusti JonesChattanooga Section ChairTHIS PROCEDURE WAS QUALIFIED IN ACCORDANCE WITH D1.1-2008 FOR THE SOLE PUROPOSE OF PROVIDING A QUALIFIEDPROCEDURE TO THE STUDENTS PARTICIPATING IN THE CHATTANOOGA AWS WELDING CONTEST. THIS DOCUMENT SHALLNOT BE DISTRIBUTED OUTSIDE OF THE AWS DISTRICT 08 CHATTANOOGA SECTION AND SHALL NOT BE USED FOR ACTUALPRODUCTION OR CONSTRUCTION.
SMAW1/8"≤ 1/8"75°1 – Once coupon is tacked in position it cannot be removed.2 – All welding must be done in vertical up position.3 – Weld reinforcement <strong>and</strong> melt-through must be 1/8" max.4 – Welds should be free of undercut.5 – Clean weld area of millscale, rust & ect.6 – Weld cap <strong>and</strong> bring to inspectors.7 – The root <strong>and</strong> cap surfaces must be inspected beforebend specimen removalAmerican <strong>Welding</strong> SocietyChattanooga Section
FaceBendSpecimenRootBendSpecimenRadius 1/8"max1 1/2"1" 1"1 1/2"1 – All weld reinforcement must be removed flush with surface of the specimen.2 – Edges of the bend samples may have a 1/8" max radius.3 – Identify the root <strong>and</strong> face side of the test plate before removing any reinforcementAmerican <strong>Welding</strong> SocietyChattanooga SectionTest Plate - BendSpecimen Removal
<strong>Score</strong> <strong>Sheet</strong>Name: ______________________ <strong>Contest</strong>ant Number: __________Scoring is based on a scale: zero is the lowest possible score <strong>and</strong> 5, 10, or 20are the highest scores possible depending on category being evaluated.Measurements outside of the code requirements will result in a zero score forthat category.Category Weight <strong>Score</strong> D1.1 Comments / NotesBe sure to get your visual inspection, of the completed plate performedbefore you grind or remove any bends!Crater Fills0 – 10Weld Reinforcement< 1/8” if > 1/8” score = 0Weld Profile(Fig 5.4)Undercut< 1/32” if > 1/32” score = 0Melt ThroughRoot Concavity 1/16” maxallowedMax melt through < 1/8”If outside the limits score = 0PorositySee details belowWeave consistency /stringer bead tie-inOverall Appearance- Uniformity of thickness- Base metal tie-in- Restarts- Overlap (Cold Lap)0 – 100 – 100 – 50 – 100 – 50 – 100 – 20You will need to come back to the judges table for inspection of your bends.Root & Face Bends0 – 20Points will be decided based If your bendson the number of open fail, youdiscontinuities in the bendscannot placeBlue Text summarizes the requirements of AWS D1.1Porosity Details – No visible piping porosity. The sum of the porosity 1/32” or greater shall beless than 3/8” total in any linear inch. Not to exceed 3/4" in the length of the plate.
Judge 2Category Weight <strong>Score</strong> D1.1 Comments / NotesBe sure to get your visual inspection, of the completed plate performedbefore you grind or remove any bends!Crater Fills0 – 10Weld Reinforcement< 1/8” if > 1/8” score = 0Weld Profile(Fig 5.4)Undercut< 1/32” if > 1/32” score = 0Melt ThroughRoot Concavity 1/16” maxallowedMax melt through < 1/8”If outside the limits score = 0PorositySee details belowWeave consistency /stringer bead tie-inOverall Appearance- Uniformity of thickness- Base metal tie-in- Restarts- Overlap (Cold Lap)0 – 100 – 100 – 50 – 100 – 50 – 100 – 20You will need to come back to the judges table for inspection of your bends.Root & Face Bends0 – 20Points will be decided based If your bendson the number of open fail, youdiscontinuities in the bendscannot placeBlue Text summarizes the requirements of AWS D1.1Porosity Details – No visible piping porosity. The sum of the porosity 1/32” or greater shall be lessthan 3/8” total in any linear inch. Not to exceed 3/4" in the length of the plate.
Judge 3Category Weight <strong>Score</strong> D1.1 Comments / NotesBe sure to get your visual inspection, of the completed plate performedbefore you grind or remove any bends!Crater Fills0 – 10Weld Reinforcement< 1/8” if > 1/8” score = 0Weld Profile(Fig 5.4)Undercut< 1/32” if > 1/32” score = 0Melt ThroughRoot Concavity 1/16” maxallowedMax melt through < 1/8”If outside the limits score = 0PorositySee details belowWeave consistency /stringer bead tie-inOverall Appearance- Uniformity of thickness- Base metal tie-in- Restarts- Overlap (Cold Lap)0 – 100 – 100 – 50 – 100 – 50 – 100 – 20You will need to come back to the judges table for inspection of your bends.Root & Face Bends0 – 20Points will be decided based If your bendson the number of open fail, youdiscontinuities in the bendscannot placeBlue Text summarizes the requirements of AWS D1.1Porosity Details – No visible piping porosity. The sum of the porosity 1/32” or greater shall be lessthan 3/8” total in any linear inch. Not to exceed 3/4" in the length of the plate.


