Ocular Sussman Four Mirror Handheld Gonioscope
Product Data Sheet - Optical Marketplace
Product Data Sheet - Optical Marketplace
- No tags were found...

Create successful ePaper yourself
Turn your PDF publications into a flip-book with our unique Google optimized e-Paper software.
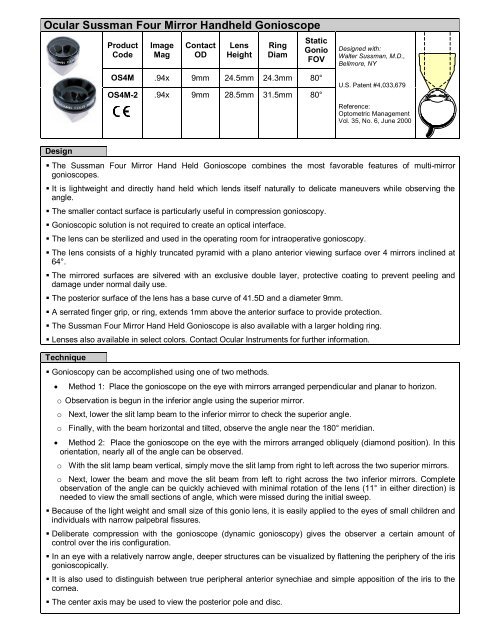
<strong>Ocular</strong> <strong>Sussman</strong> <strong>Four</strong> <strong>Mirror</strong> <strong>Handheld</strong> <strong>Gonioscope</strong>ProductCodeImageMagContactODLensHeightRingDiamStaticGonioFOVOS4M .94x 9mm 24.5mm 24.3mm 80°OS4M-2 .94x 9mm 28.5mm 31.5mm 80°Designed with:Walter <strong>Sussman</strong>, M.D.,Bellmore, NYU.S. Patent #4,033,679Reference:Optometric ManagementVol. 35, No. 6, June 2000Design• The <strong>Sussman</strong> <strong>Four</strong> <strong>Mirror</strong> Hand Held <strong>Gonioscope</strong> combines the most favorable features of multi-mirrorgonioscopes.• It is lightweight and directly hand held which lends itself naturally to delicate maneuvers while observing theangle.• The smaller contact surface is particularly useful in compression gonioscopy.• Gonioscopic solution is not required to create an optical interface.• The lens can be sterilized and used in the operating room for intraoperative gonioscopy.• The lens consists of a highly truncated pyramid with a plano anterior viewing surface over 4 mirrors inclined at64°.• The mirrored surfaces are silvered with an exclusive double layer, protective coating to prevent peeling anddamage under normal daily use.• The posterior surface of the lens has a base curve of 41.5D and a diameter 9mm.• A serrated finger grip, or ring, extends 1mm above the anterior surface to provide protection.• The <strong>Sussman</strong> <strong>Four</strong> <strong>Mirror</strong> Hand Held <strong>Gonioscope</strong> is also available with a larger holding ring.• Lenses also available in select colors. Contact <strong>Ocular</strong> Instruments for further information.Technique• Gonioscopy can be accomplished using one of two methods.• Method 1: Place the gonioscope on the eye with mirrors arranged perpendicular and planar to horizon.o Observation is begun in the inferior angle using the superior mirror.o Next, lower the slit lamp beam to the inferior mirror to check the superior angle.o Finally, with the beam horizontal and tilted, observe the angle near the 180° meridian.• Method 2: Place the gonioscope on the eye with the mirrors arranged obliquely (diamond position). In thisorientation, nearly all of the angle can be observed.o With the slit lamp beam vertical, simply move the slit lamp from right to left across the two superior mirrors.o Next, lower the beam and move the slit beam from left to right across the two inferior mirrors. Completeobservation of the angle can be quickly achieved with minimal rotation of the lens (11° in either direction) isneeded to view the small sections of angle, which were missed during the initial sweep.• Because of the light weight and small size of this gonio lens, it is easily applied to the eyes of small children andindividuals with narrow palpebral fissures.• Deliberate compression with the gonioscope (dynamic gonioscopy) gives the observer a certain amount ofcontrol over the iris configuration.• In an eye with a relatively narrow angle, deeper structures can be visualized by flattening the periphery of the irisgonioscopically.• It is also used to distinguish between true peripheral anterior synechiae and simple apposition of the iris to thecornea.• The center axis may be used to view the posterior pole and disc.
CleaningRinse:Wash:Rinse:Then:Immediately upon removal from patient's eye, thoroughly rinse in cool or tepid water.Place a few drops of mild soap on a moistened cotton ball. Gently clean with a circular motion.Thoroughly rinse in cool or tepid water, then dry carefully with a non-linting tissue.Proceed with either disinfection or sterilization instructions.DisinfectionSoak In:Then:NOTEGLUTARALDEHYDE2% or 3.4% aqueous solutionTemperature permanufacturer instructionsRecommended exposure time = 20 minutesORBLEACH10% solution mixed at:1 part bleach to 9 parts cool tepid waterRecommended exposure time = 10 minutesCaution To avoid damage to the lens, do not exceed recommended exposure time.Rinse lens thoroughly to remove disinfection solution.3 cycles of 1 minute, with cool or tepid water is recommended.Dry carefully and place in a dry storage case.This lens is known to be compatible with: Asepti-Wipe, Cavi-cide, Cidex, Cidex OPA,DisCide Wipe, Enviro-cide, and Opti-CideCaution If used on an ulcerated cornea, lens must be STERILIZED before next procedure.SterilizationAUTOCLAVE STERRAD STERIS SYSTEM 1 ETO ETO ParametersYES Minimum Time Temperature Aeration TimeNO NO NO SeeRight1 hour 130°F (54°C) 12 hoursWARNINGNever Steam Autoclave or Boil listed lenses.Never soak in Alcohol, Acetone or Other Solvents.For information on compatibility with alternative product care methods, contact Customer Service.2255 116th Ave NE, Bellevue, Washington 98004-3039 USAT: 425-455-5200 or 800-888-6616 F: 425-462-6669 © 2001 <strong>Ocular</strong> InstrumentsE: ocular@ocular-instruments.com I: www.ocular-instruments.com 5539I3017