- Page 2 and 3:
Adobe® Muse®classroom in a book
- Page 4 and 5:
pci t sEBOOK READERS: FIND YOUR LES
- Page 6 and 7:
Top-levelpagesChildpagesParent page
- Page 8 and 9:
Moving, cropping, and resizing imag
- Page 10 and 11:
GettInG starteDIf you are a graphic
- Page 12 and 13:
Copying the Classroom in a Book fil
- Page 14 and 15:
Recommended lesson orderAdobe Muse
- Page 16 and 17:
Resources for educators: www.adobe.
- Page 18 and 19:
To make the most of Adobe Muse, you
- Page 20 and 21:
Create your Muse site fileAfter com
- Page 22 and 23:
Alternately, you can start the desi
- Page 24 and 25:
understanding ModesIn the upper-lef
- Page 26 and 27:
5 Click the Preview mode link in th
- Page 28 and 29:
Options displayed in the Control pa
- Page 30 and 31:
8 Click the Swatches panel tab to s
- Page 32 and 33:
14 Click and drag the States panel
- Page 34 and 35:
6 Choose View > Actual Size to disp
- Page 36 and 37:
3 Click any other tool except the T
- Page 38 and 39:
eview questions1 How do you select
- Page 40 and 41:
Parent pageTop LevelpagesChildpages
- Page 42 and 43:
3 Click OK.Muse opens the new site
- Page 44 and 45:
Creating and editing your site mapT
- Page 46 and 47:
adding sibling pagesYou’ll learn
- Page 48 and 49:
Notice that a line now connects the
- Page 50 and 51:
Rearranging child pages is as simpl
- Page 52 and 53:
In Muse, you can add three types of
- Page 54 and 55:
5 In Page Title, type KevinsKoffeeK
- Page 56 and 57:
eview questions1 Describe how the M
- Page 58 and 59:
Working with master pages in Muse a
- Page 60 and 61:
Although you can set certain conten
- Page 62 and 63:
In Plan mode, the masters section,
- Page 64 and 65:
5 Click Browser Fill in the Control
- Page 66 and 67:
If you want to change the color fil
- Page 68 and 69:
ABCDEFGHIHere’s a quick guide to
- Page 70 and 71:
the header and footer areain your d
- Page 72 and 73:
3 Position the Place Gunjust below
- Page 74 and 75: 4 Click the Horizontal menu bar, th
- Page 76 and 77: 6 Choose View > Plan Mode.7 Right-c
- Page 78 and 79: 4 Click the Preview link above the
- Page 80 and 81: 4 Click once more on the word “HO
- Page 82 and 83: 7 Select Gradient, and notice that
- Page 84 and 85: 4 In the Text panel, change the Siz
- Page 86 and 87: 13 With the menu widget still selec
- Page 88 and 89: about the states in the states pane
- Page 90 and 91: Fonts (Exports As Image) menu. On W
- Page 92 and 93: Creating new master pagesAlthough a
- Page 94 and 95: 3 In the Control panel, deselect Ma
- Page 96 and 97: eview questions1 What purpose do ma
- Page 98 and 99: Muse provides numerous tools for cr
- Page 100 and 101: As you create the text frame, if th
- Page 102 and 103: 3 Position the Place Gun cursor bel
- Page 104 and 105: adjusting font sizeIn print work, m
- Page 106 and 107: In the Font menu that appears, you
- Page 108 and 109: E Tip: You can add web fonts to the
- Page 110 and 111: 14 With the header text still selec
- Page 112 and 113: 11 Type Photo by: Karen Koffee in t
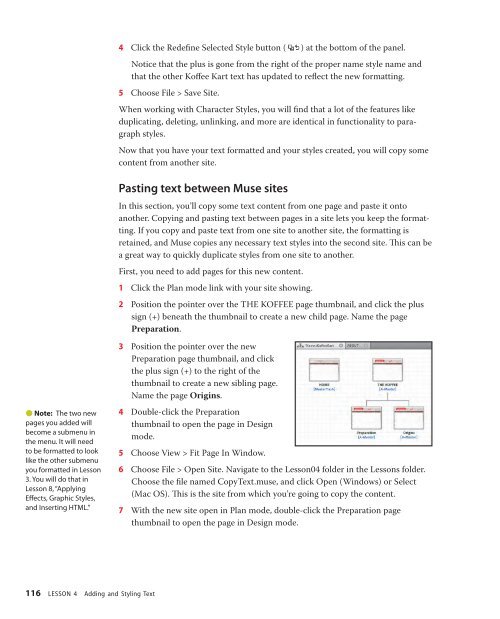
- Page 114 and 115: 6 Select the text frame in the thir
- Page 116 and 117: work. You can access Paragraph Styl
- Page 118 and 119: 7 With the Text tool selected, sele
- Page 120 and 121: 8 Choose File > Save Site and leave
- Page 122 and 123: The last piece of working with para
- Page 126 and 127: 8 Choose Edit > Select All, then Ed
- Page 128 and 129: eview questions1 Name three ways th
- Page 130 and 131: In this information-packed lesson,
- Page 132 and 133: 3 Click the Preview mode link and s
- Page 134 and 135: 7 Drag the footer menuso that it is
- Page 136 and 137: Creating a lineYou can create a lin
- Page 138 and 139: 4 Press the Escape key to hide the
- Page 140 and 141: 1 Click the Fill Color in the Contr
- Page 142 and 143: 6 Change Stroke Weight in the Contr
- Page 144 and 145: 6 Position the pointerover the brow
- Page 146 and 147: Duplicating and deleting a color sw
- Page 148 and 149: 3 Click the second Color option to
- Page 150 and 151: eview questions1 What shape tools a
- Page 152 and 153: Muse allows you to place images you
- Page 154 and 155: .gif, are most useful for interface
- Page 156 and 157: Placing an imageWhether you need to
- Page 158 and 159: To see how the Photoshop-specific o
- Page 160 and 161: 2 Drag the image from its center un
- Page 162 and 163: 9 Position the pointer over the bot
- Page 164 and 165: 8 With the image selected, choose O
- Page 166 and 167: 4 Position the pointer off the lowe
- Page 168 and 169: Once you choose the correct image w
- Page 170 and 171: 3 In the Relink dialog box, navigat
- Page 172 and 173: 6 In the Relink dialog box, navigat
- Page 174 and 175:
You will see a frame appear with a
- Page 176 and 177:
eview questions1 Which image file f
- Page 178 and 179:
Whether you need to link a website,
- Page 180 and 181:
5 Select the phrase “our story,
- Page 182 and 183:
4 Insert the cursor in the Hyperlin
- Page 184 and 185:
P Note: When you click several time
- Page 186 and 187:
Adding links to imagesTo add a link
- Page 188 and 189:
7 In the Create An Anchor dialog bo
- Page 190 and 191:
10 Select the text frame that conta
- Page 192 and 193:
6 Select the Selection tool, and Mu
- Page 194 and 195:
adding a link to a buttonAdding a l
- Page 196 and 197:
Rollover state has the layer named
- Page 198 and 199:
eview questions1 Name and describe
- Page 200 and 201:
Muse has a lot of great options to
- Page 202 and 203:
5 Click the Preview mode link to se
- Page 204 and 205:
Try adjusting the settings to see t
- Page 206 and 207:
6 Click the Effects link in theCont
- Page 208 and 209:
5 Select the Rectangle tool in the
- Page 210 and 211:
3 With the Graphic Styles panel sho
- Page 212 and 213:
7 Select the Active (Normal) state
- Page 214 and 215:
11 Click the Plan mode link, and do
- Page 216 and 217:
7 At the bottom of the page, select
- Page 218 and 219:
More embedding HTML examplesEmbeddi
- Page 220 and 221:
eview questions1 Name the three mai
- Page 222 and 223:
Muse provides an easy way to add po
- Page 224 and 225:
Inserting a composition widgetThe W
- Page 226 and 227:
3 Drag the Lightbox Display widget
- Page 228 and 229:
Adding or deleting a triggerWhen yo
- Page 230 and 231:
the button. The trigger container w
- Page 232 and 233:
2 Click the Fill link in the Contro
- Page 234 and 235:
P Note: Your gapmeasurements may no
- Page 236 and 237:
3 Choose File > Save Site.edit slid
- Page 238 and 239:
editing the appearance of the Blank
- Page 240 and 241:
eview questions1 What are Muse widg
- Page 242 and 243:
Muse offers two methods for publish
- Page 244 and 245:
Publishing your siteUsing Muse, you
- Page 246 and 247:
Muse now generatesthe site files (H
- Page 248 and 249:
them with the current file, but cho
- Page 250 and 251:
At this point, another Business Cat
- Page 252 and 253:
9 After successfully associating a
- Page 254 and 255:
eview questions1 What are the two m
- Page 256 and 257:
ounding pointdouble arrow cursor wh
- Page 258 and 259:
domain namesassociating with websit
- Page 260 and 261:
HTMLembedding on web pages, 206-211
- Page 262 and 263:
formatting text in, 74-77nudging wi
- Page 264 and 265:
placing multiple images with, 149re
- Page 266 and 267:
text frame to Smart Guides, 91Spaci
- Page 268 and 269:
pinning content to, 163-164, 167pre
- Page 270 and 271:
ContributorBrian Wood is an Adobe C
- Page 272 and 273:
The fastest, easiest, mostcomprehen