
You also want an ePaper? Increase the reach of your titles
YUMPU automatically turns print PDFs into web optimized ePapers that Google loves.
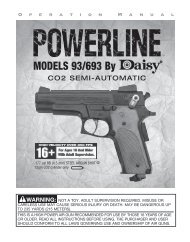
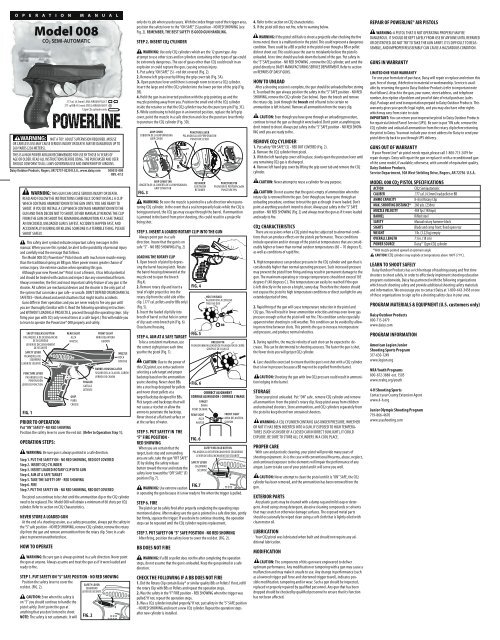
O p e r a t i o n M a n u a l<strong>Model</strong> <strong>008</strong>CO 2 SEMI-AUTOMATICNOT A TOY. ADULT SUPERVISION REQUIRED. MISUSEOR CARELESS USE MAY CAUSE SERIOUS INJURY OR DEATH. MAY BE DANGEROUS UP TO260 YARDS (238 METERS).THIS IS A HIGH POWER AIRGUN RECOMMENDED FOR USE BY THOSE 16 YEARS OFAGE OR OLDER. READ ALL INSTRUCTIONS BEFORE USING. THE PURCHASER AND USERSHOULD CONFORM TO ALL LAWS GOVERNING USE AND OWNERSHIP OF AIRGUNS.Daisy Outdoor Products, Rogers, AR 72757-0220 U.S.A., www.daisy.com 300533-000REV. 4/12WARNING: THIS GUN CAN CAUSE SERIOUS INJURY OR DEATH.READ AND FOLLOW THE INSTRUCTIONS CAREFULLY. DO NOT INSTALL A CLIPWHICH CONTAINS AMMUNITION INTO THE GUN UNTIL YOU ARE READY TOSHOOT. IF YOU DO INSTALL A CLIP WHICH CONTAINS AMMUNITION INTO THEGUN AND THEN DECIDE NOT TO SHOOT, EITHER MANUALLY REMOVE THE CLIPFROM THE GUN OR SHOOT THE REMAINING AMMUNITION AT A SAFE TARGET.AN UNCOCKED, UNLOADED GUN IS SAFEST. ACCIDENTS HAPPEN FAST, ANDACCIDENTALLY INJURING OR KILLING SOMEONE IS A TERRIBLE THING. PLEASESHOOT SAFELY.This safety alert symbol indicates important safety messages in thismanual. When you see this symbol, be alert to the possibility of personal injuryand carefully read the message that follows.The <strong>Model</strong> <strong>008</strong> CO2 PowerLine® Pistol shoots with much more muzzle energythan the traditional spring air BB gun. More power means greater chance ofserious injury. Use extreme caution when operating this gun.Although your new PowerLine® Pistol is not a firearm, it has lethal potentialand should be treated with caution and respect due any conventional firearm.Always remember, the first and most important safety feature of any gun is theshooter. All safeties are mechanical devices and the shooter is the only part ofthe system that can make a gun safe–or unsafe. DON’T DEPEND ON MECHANICALSAFETIES–think ahead and avoid situations that might lead to accidents.Guns differ in their operations and you are never ready to fire any gun untilyou are thoroughly familiar with it. Read the following operating instructionsand WITHOUT LOADING A PROJECTILE, proceed through the operating steps (dryfiring your gun with CO2 only several times at a safe target.) This will enable youto learn to operate the PowerLine® <strong>008</strong> properly and safely.SAFETY RELEASE BUTTONPALANQUILLA DE DESENGANCHEDE SEGURIDADLEVIER DE DÉCLENCHEMENTDE SÉCURITÉSAFETY LEVERPALANQUILLA DESEGURIDADLEVEIR DE SÉCURITÉPUNCTURE LEVERPALANQUILLA DEPERFORACIÓNLEVIER DE PONCTIONFIG. 1PRIOR TO OPERATIONPut “ON” SAFETY–NO RED SHOWINGPosition the safety lever to cover the red dot. (Refer to Operation Step 1).OPERATION STEPS:WARNING: Be sure gun is always pointed in a safe direction.Step 1. PUT THE SAFETY ON - NO RED SHOWING, RED DOT COVEREDStep 2. INSERT CO2 CYLINDERStep 3. INSERT LOADED ROTARY CLIP INTO GUNStep 4. AIM AT A SAFE TARGETStep 5. TAKE THE SAFETY OFF - RED SHOWINGStep 6. FIREStep 7. PUT THE SAFETY ON - NO RED SHOWING, RED DOT COVEREDThe pistol can continue to be shot until the ammunition clip or the CO2 cylinderneed to be replaced. The <strong>Model</strong> <strong>008</strong> will obtain a minimum of 60 shots per CO2cylinder. Refer to section on CO2 Characteristics.NEVER STORE A LOADED GUNAt the end of a shooting session, as a safety precaution, always put the safety inthe “S” safe position - NO RED SHOWING, remove CO2 cylinder, remove the rotaryclip from the gun and remove ammunition from the rotary clip. Store in a safeplace to prevent unauthorized use.HOW TO OPERATE.177cal. (4.5mm) LEAD AIRGUN PELLET.177 cal BB (4.5 mm) STEEL AIRGUN SHOT12gm CO2 cylinder onlyREAR SIGHTALZAHAUSSEGRIPPUÑOCROSSEFRONT SIGHTMIRA DELANTERAGUIDONWARNING: Be sure gun is always pointed in a safe direction. Never pointthe gun at anyone. Always assume and treat the gun as if it were loaded andready to fire.STEP 1. PUT SAFETY ON “S” SAFE POSITION - NO RED SHOWINGPosition the safety lever to cover theSAFETY LEVERred dot. (FIG. 2).SEGURIDADLEVIER DE SÉCURITÉCAUTION: Even when the safety ison “S” you should continue to handle thepistol safely. Don’t point the gun atanything that you don’t intend to shoot.NOTE: The safety is not automatic. It will FIG. 2MUZZLEBOCABOUCHEBARREL HOUSING LATCHSEGURO DE LA CAJA DEL CAÑÓNVERROU DE CANONTRIGGERGATILLODÉTENTEonly do its job when you do yours. With the index finger out of the trigger area,position the safety lever to the “ON SAFE” (S) position - NO RED SHOWING (seeFig. 2). REMEMBER, THE BEST SAFETY IS GOOD GUN HANDLING.STEP 2. INSERT CO2 CYLINDERWARNING: Use only CO2 cylinders which are the 12 gram type. Anyattempt to use other sizes and/or cylinders containing other types of gas couldbe extremely dangerous. The use of gases other than CO2 could result in anexplosion or could rupture the gun, causing serious injury.1. Put safety “ON SAFE” (S) - red dot covered (Fig. 2).2. Remove left grip cover by lifting the grip cover tab (Fig. 3A).3. Open puncture lever until there is enough room to insert a CO2 cylinder.Insert the large end of the CO2 cylinder into the lower portion of the grip (Fig.3B).4. Hold the gun in an inverted position with the grip pointing up and themuzzle pointing away from you. Position the small end of the CO2 cylinderinside the retainer so that the CO2 cylinder touches the puncture pin (Fig. 3C).5. While continuing to hold gun in an inverted position, replace the left gripcover, point the muzzle in a safe direction and close the puncture lever firmlyto puncture the CO2 cylinder (Fig. 3D).GRIP COVERCUBIERTA DE LA EMPUÑADURAGRIP COVERFIG. 3WARNING: Be sure the muzzle is pointed in a safe direction when puncturingCO2 cylinder. In the event that a seal temporarily leaks while the CO2 isbeing punctured, the CO2 gas may escape through the barrel. If ammunitionis jammed in the barrel from prior shooting, this could result in a projectilebeing shot.STEP 3. INSERT A LOADED ROTARY CLIP INTO THE GUNAlways point gun in a safedirection. Insure that the gun is onsafe “S” - NO RED SHOWING (Fig. 2)LOADING THE ROTARY CLIP1. Open breech of pistol by depressingthe barrel housing latch. Rotatethe barrel housing downward at themuzzle end to open the breech(Fig.4).2. Remove rotary clip and insert atotal of eight projectiles into therotary clip from the solid side of theclip. (.177 cal. pellets and/or BBs only)(Fig. 5).3. Insert the loaded clip fully intobreech of barrel so that hole in centerof clip seats onto breech pin (Fig. 6).Close barrel housing.STEP 4. AIM AT A SAFE TARGETTo be a consistent marksman, usethe correct sight picture each timeyou fire the pistol (Fig. 7).CAUTION: Due to the power ofthis CO2 pistol, use extra caution inselecting a safe target and properbackstop based on the ammunitionyou’re shooting. Never shoot BBsinto a steel trap designed for pelletsand never shoot pellets at atarget/backstop designed for BBs.Pick targets and backstops that willnot cause a ricochet or allow theammo to penetrate the backstop.Never shoot at a flat hard surface orat the surface of water.STEP 5. PUT SAFETY IN THE“F” FIRE POSITION -RED SHOWINGWhen you are certain that thetarget, back stop and surroundingarea are safe, take the gun “OFF SAFE”(F) by sliding the safety releasebutton toward the rear and rotate thesafety lever toward the “OFF SAFE” (F)position (Fig. 7).FIG.7WARNING: Use extreme cautionin operating the gun because it is now ready to fire when the trigger is pulled.STEP 6. FIREThe pistol can be safely fired after properly completing the operating stepsmentioned above. After making sure the gun is pointed in a safe direction, gentlybut firmly, squeeze the trigger. If you desire to continue shooting, the operationsteps can be repeated until the CO2 cylinder requires replacement.STEP 7. PUT SAFETY ON “S” SAFE POSITION - NO RED SHOWINGAfter firing, position the safety lever to cover the red dot. (FIG. 2).BB DOES NOT FIREB. D.A. C.GRIP COVER TABLENGÜETA DE LA CUBIERTA DE LA EMPUÑADURAGRIP COVER TABPUNCTURE LEVERPALANQUILLA DE PERFORACIÓNPUNCTURE LEVERRETAINERSUJETADORRETAINERFIG. 4FIG. 5PUNCTURE PINPASADOR DE PERFORACIøONPUNCTURE PINHOLE ON BACKAGUJERO EN LA ESPALDATROU AU DOXBREECH PINPASADOR INMOVILIZADOR DE PALANQUITA DE CIERREGOUPILLE DE CULASSEFIG. 6CORRECT ALIGNMENTCORRIGE ALINEACION / CORRIGE L’IMAGETARGETDIANAPOINT DE MIREREAR SIGHTALZAHAUSSEFIG. 6FRONT SIGHTMIRA DELANTERAGUIDONSAFETY RELEASE BUTTONPALANQUILLA DE DESENGANCHE DE SEGURIDADLEVIER DE DÉCLENCHEMENT DE SÉCURITÉSAFETY LEVERSEGURIDADSÉCURISÉWARNING: If a BB or pellet does not fire after completing the operationsteps, do not assume that the gun is unloaded. Keep the gun pointed in a safedirection.CHECK THE FOLLOWING IF A BB DOES NOT FIRE1. Did the Rotary Clip contain Daisy® or similar quality BBs or Pellets? If not, refillthe rotary Clip with BBs or Pellets and repeat the operation steps.2. Was the safety in the “F” FIRE position - RED SHOWING when the trigger waspulled? If not, repeat the operation steps.3. Was a CO2 cylinder installed properly? If not, put safety in the “S” SAFE position- NO RED SHOWING and insert a new CO2 cylinder. Repeat the operation stepsafter new cylinder is installed.4. Refer to the section on CO2 characteristics.5. If the pistol still does not fire, refer to warning below.WARNING: If the pistol still fails to shoot a projectile after checking the fiveitems noted, there is a malfunction in the pistol. This could represent a dangerouscondition. There could be a BB or pellet in the pistol even though a BB or pelletdid not shoot out. This could cause the user to mistakenly believe the pistol isunloaded. At no time should you look down the barrel of the gun. Put safety inthe “S” SAFE position - NO RED SHOWING , remove the CO2 cylinder, and send thepistol directly to DAISY MANUFACTURING SERVICE DEPARTMENT. Refer to sectionon REPAIRS OF DAISY GUNS.HOW TO UNLOADAfter a shooting session is complete, the gun should be unloaded before storingit. To unload the gun always position the safety in the “S” SAFE position - NO REDSHOWING, remove the CO2 cylinder (See below). Open the breech and removethe rotary clip. Look through the breech end of barrel to be certain noammunition is left in barrel. Remove all ammunition from the rotary clip.CAUTION: Even though you have gone through an unloading procedure,continue to treat the gun as though it were loaded. Don’t point at anything youdon’t intend to shoot. Always put safety in the “S” SAFE position - NO RED SHOW-ING until you are ready to fire.REMOVE CO2 CYLINDER1. Put safety “ON SAFE” (S) - RED DOT COVERED (Fig. 2).2. Remove the CO2 cylinder from pistol.3. With the left hand grip cover still in place, slowly open the puncture lever untilany remaining CO2 gas is discharged.4. Remove left hand grip cover by lifting the grip cover tab and remove the CO2cylinder.CAUTION: Never attempt to reuse a cylinder for any purpose.CAUTION: Do not assume that the gun is empty of ammunition when therotary clip is removed from the gun. Even though you have gone through anunloading procedure, continue to treat the gun as though it were loaded. Don’tpoint at anything you don’t intend to shoot. Always put safety in the “S” SAFEposition - NO RED SHOWING (Fig. 2) and always treat the gun as if it were loadedand ready to fire.CO2 CHARACTERISTICSThere are occasions when a CO2 pistol may be subjected to abnormal conditionsthat can produce effects on the pistols performance. These conditionsinclude operation and/or storage of the pistol at temperatures that are considerablyhigher or lower than normal outdoor temperatures (60 – 70 degrees F),as well as conditions of rapid fire.1. High temperatures can produce pressure in the CO2 cylinder and gun that isconsiderably higher than normal operating pressure. Such increased pressuremay prevent the pistol from firing and may result in permanent damage to thegun. The maximum operating or storage temperatures should not exceed 105degrees F (40 degrees C ). This temperature can easily be reached if the gunis left directly in the sun on a bright, sunny day. Therefore the shooter shouldnot expose the pistol to high temperature conditions or direct sunlight for anyextended period of time.2. Rapid firing of the gun will cause temperature reduction in the pistol andCO2 gas. This will result in lower ammunition velocities and may even lower gaspressure enough so that the pistol will not fire. This condition can be especiallyapparent when shooting in cold weather. This condition can be avoided by allowingmore time between shots. This permits the gas to increase in temperatureand pressure, and produce normal velocities.3. During rapid fire, the muzzle velocity of each shot can be expected to decrease.This can be detrimental to shooting accuracy. The faster the gun is shot,the fewer shots you will get per CO2 cylinder.4. Care should be exercised to ensure that the gun is not shot with a CO2 cylinderthat is low in pressure because a BB may not be expelled from the barrel.CAUTION: Shooting the gun with low CO2 pressure could result in ammunitionlodging in the barrel.STORAGEStore your pistol unloaded. Put “ON” safe , remove CO2 cylinder and removeall ammunition from the pistol’s rotary clip. Keep pistol away from childrenand untrained shooters. Store ammunition, and CO2 cylinders separately fromthe pistol to keep them from untrained shooters.WARNING: A CO2 CYLINDER CONTAINS GAS UNDER PRESSURE, WHETHEROR NOT IT HAS BEEN INSERTED INTO A GUN. IF EXPOSED TO HIGH TEMPERA-TURES (SUCH AS INSIDE OF A CLOSED CAR IN DIRECT SUNLIGHT), IT COULDEXPLODE. BE SURE TO STORE ALL CYLINDERS IN A COOL PLACE.PROPER CAREWith care and periodic cleaning, your pistol will provide many years ofshooting enjoyment. As is the case with conventional firearms, abuse, neglect,and continued exposure to the elements will impair the performance of anyairgun. Learn to take care of your pistol and it will serve you well.CAUTION: Never attempt to clean the pistol until it is “ON” SAFE, the CO2cylinder has been removed, and the ammunition has been removed from thegun.EXTERIOR PARTSAny plastic parts may be cleaned with a damp rag and mild soap or detergent.Avoid using strong detergent, abrasive cleaning compounds or solventsthat may scratch or otherwise damage surfaces. The exposed metal partsshould occasionally be wiped clean using a soft cloth that is lightly oiled withclean motor oil.LUBRICATIONYour CO2 pistol was lubricated when built and should not require any additionallubrication.MODIFICATIONCAUTION: The components of this gun were engineered to deliveroptimum performance. Any modification or tampering with a gun may cause amalfunction and may make it unsafe to use. Any change in performance (suchas a lowered trigger pull force and shortened trigger travel), indicates possiblemodification, tampering and/or wear. Such a gun should be inspected,replaced or properly repaired by qualified personnel. Any gun that has beendropped should be checked by qualified personnel to ensure that its functionhas not been affected.REPAIR OF POWERLINE® AIR PISTOLSWARNING: A PISTOL THAT IS NOT OPERATING PROPERLY MAY BEDANGEROUS. IT SHOULD BE KEPT SAFELY FROM USE BY ANYONE UNTIL REPAIREDOR DESTROYED. DO NOT TRY TO TAKE THE GUN APART. IT IS DIFFICULT TO REAS-SEMBLE, AND IMPROPER REASSEMBLY CAN CAUSE A HAZARDOUS CONDITION.GUNS IN WARRANTYLIMITED ONE-YEAR WARRANTYFor one year from date of purchase, Daisy will repair or replace and return thisgun, free of charge, if defective in material or workmanship. Service is availableby returning the gun to Daisy Outdoor Products (refer to important notethat follows). Attach to the gun, your name, street address, and telephonenumber, description of problem and proof of date of retail purchase (salesslip). Package and send transportation prepaid to Daisy Outdoor Products. Thiswarranty gives you specific legal rights, and you may also have other rightswhich may vary from state to state.IMPORTANT: You can return your inoperative pistol to Daisy Outdoor Productsfor repair via United Parcel Service (UPS). Be sure to put “ON safe, remove theCO2 cylinder and unload all ammunition from the rotary clip before returningthe pistol to Daisy. You must include your street address for Daisy to send yourpistol directly back to you through UPS delivery.GUNS OUT OF WARRANTYIf your PowerLine® air pistol needs repair, please call 1-800-713-2479 forrepair charges. Daisy will repair the gun or replace it with a reconditioned gunof the same model, if available; otherwise, with a model of equivalent quality.Daisy Outdoor Products,Service Department, 308 West Stribling Drive, Rogers, AR 72756 U.S.A.MODEL <strong>008</strong> CO2 PISTOL SPECIFICATIONSACTIONCO2 SemiautomaticCALIBER.177 cal. (4.5mm) lead pellet or BBAMMO CAPACITY8-shot Rotary ClipMAX. SHOOTING DISTANCE* 260 yds. (238m)MUZZLE VELOCITY484 fps (148mps)BARRELRifled steelSAFETYManual rotary hammer blockSIGHTSBlade and ramp front; fixed open rearWEIGHT1 lb. (3.22 kg) emptyOVERALL LENGTH7.1 in. (18 cm)POWER SOURCEDaisy® 12gm CO2 cylinder*With muzzle pointed upward at optimum angleCAUTION: CO2 cylinders may explode at temperatures above 160ºF (71ºC).LEARN TO SHOOT SAFELYDaisy Outdoor Products has a rich heritage of teaching young and first timeshooters to shoot safely. In order to effectively implement shooting educationprograms nationwide, Daisy has partnered with the following organizationswhich teach shooting safety and provide additional shooting safety materialsand information. We encourage you to contact Daisy at 1-800-643-3458 or oneof these organizations to sign up for a shooting safety class in your area.PROGRAM MATERIALS & EQUIPMENT (U.S. customers only)Daisy Outdoor Products800-713-2479www.daisy.comPROGRAM INFORMATIONAmerican Legion JuniorShooting Sports Program317-630-1249www.legion.orgNRA Youth Programs800-672-3888 ext. 1505www.nrahq.org/youth4-H Shooting SportsContact your County Extension Agentwww.4-h.orgJunior Olympic Shooting Program719-866-4670www.usashooting.com
ATTENTION: Ne tentez jamais de nettoyer le pistolet à moins qu’il ne soit pas en position SÉCURITÉACTIVÉE, le cylindre de CO2 a été retiré, et les munitions ont été retirées de l’arme.PIÈCES EXTÉRIEURESToutes les pièces en plastique peuvent être nettoyées avec un chiffon humide et un savon doux ou undétergent. Évitez d’utiliser des détergents puissants, des composés de nettoyants abrasifs ou des solvantsqui peuvent égratigner ou autrement endommager les surfaces. Les parties métalliques exposéesdoivent parfois être essuyées avec un chiffon doux légèrement huilé avec de l’huile de moteur propre.LUBRICATIONVotre pistolet CO2 a été lubrifié après fabrication et il n’a pas besoin d’une lubrificationsupplémentaire.MODIFICATIONATTENTION: Les composants de ce pistolet ont été conçus pour offrir une performance optimale.Toute modification ou altération d’un pistolet peut provoquer un dysfonctionnement et peut rendreson utilisation dangereuse. Tout changement dans la performance (comme une force de traction dedétente réduite et une course de détente raccourcie) indique une modification possible, une altérationet/ou l’usure. Un tel pistolet devrait être inspecté, remplacé ou bien réparé par du personnel qualifié.Tout pistolet qui a été abandonné doit être vérifié par du personnel qualifié afin de s’assurer que sonfonctionnement n’a pas été affecté.RÉPARATION DES PISTOLETS À AIR COMPRIMÉ POWERLINE®AVERTISSEMENT: UN PISTOLET QUI NE FONCTIONNE PAS BIEN PEUT ÊTRE DANGEREUX. IL NE DOIT PASÊTRE UTILISÉ JUSQU’À CE QU’IL SOIT RÉPARÉ OU DÉTRUIT. NE TENTEZ PAS DE DÉMONTER LE PISTOLET. IL ESTDIFFICILE DE LE REMONTER, ET UN REMONTAGE INADEQUAT PEUT CAUSER UNE SITUATION DANGEREUSE.PISTOLETS SOUS GARANTIEGARANTIE LIMITÉE D’UN ANPendant un an à compter de la date d’achat, Daisy réparera ou remplacera et retournera ce pistolet,sans frais, en cas de défauts de matériaux ou de fabrication. Le service est disponible en retournantle pistolet à Daisy Outdoor Products (voir la note importante qui suit). Joignez au pistolet, votre nom,l’adresse de votre domicile et le numéro de téléphone, la description du problème et la preuve de la dated’achat (ticket de caisse). Emballez et retournez en port payé à Daisy Outdoor Products. Cette garantievous donne des droits légaux spécifiques, et vous pouvez également avoir d’autres droits qui peuventvarier d’un État à l’autre.IMPORTANT: Vous pouvez retourner votre pistolet inopérant à Daisy Outdoor Products réparation parUnited Parcel Service (UPS). Rassurez-vous que vous l›avez mis en position Activer Sécurité, retirez lecylindre CO2 et déchargez toutes les munitions du chargeur du magasin rotatif avant de retourner lepistolet à Daisy. Vous devez inclure votre adresse du domicile pour que Daisy vous renvoie votre pistoletdirectement à votre courrier UPS.PISTOLETS HORS GARANTIESi votre pistolet à air comprimé PowerLine® a besoin d’être réparé, veuillez appeler 1-800-713-2479pour des frais de réparation. Daisy réparera le pistolet ou le remplacer par pistolet remis à neuf du mêmemodèle, si disponible, sinon, avec un modèle de qualité équivalente.Daisy Outdoor Products, Service Department, 308 West Stribling Drive, Rogers, AR 72756 U.S.A.MODÈLE <strong>008</strong> CO2 CARACTÉRSTIQUES DU PISTOLETACTIONSemi-automatique CO2CALIBRE.177 cal. (4,5mm) balle de plomb ou BBCAPACITE DES MUNITIONSChargeur du magasin de 8 tirsDISTANCE* DE TIR MAX.260 yds. (238m)VITESSE INITIALE484 pieds (148mps)CANONAcier rayéSECURITEBloc manuel rotatifVISÉELames et avant arrondi; arrière ouvert fixePOIDS1 lb. (3.22 kg) videLONGUEUR TOTALE7.1 pouces. (18 cm)SOURCE DE PUISSANCECylindre de CO2 de 12g Daisy®*Avec bouche du canon pointée vers le haut à un angle optimalATTENTION: Les cylindres de CO2 peuvent exploser à des températures au dessus de 160ºF (71ºC).APPRENEZ À TIRER EN TOUTE SÉCURITÉDaisy Outdoor Products possède un riche patrimoine en matière d’enseignement de jeunes tireurs et desamateurs de tirs en toute sécurité. Afin de mettre les programmes d’éducation nationale de tir en œuvrede façon efficace, Daisy a développé un partenariat avec les organisations suivantes qui enseignent lasécurité en matière de tir et fournissent d’autres documents et informations sur la sécurité en matière detir. Nous vous encourageons à communiquer avec Daisy au 1-800-713-2479.ÉTAPE 1. METTRE LE DISPOSITIF DE SÉCURITÉ EN POSITION DE SÉCURITÉ «S» - AUCUN VOYANT ROUGEPositionnez le levier de sécurité de façon à couvrir le point rouge. (FIG. 2).ATTENTION: Même lorsque le dispositif de sécurité est en position «S», vous devez continuer demanipuler le pistolet en toute sécurité. Ne pointez pas le pistolet à ce sur quoi vous n’avez pas l’intentionde tirer. REMARQUE: La sécurité n’est pas automatique. Elle ne fera son travail que si vous faites levôtre. Avec l’index hors de la zone de déclenchement, mettez le levier de sécurité en position «SÉCURITÉ»(S) - AUCUN VOYANT ROUGE (voir Fig. 2). N’OUBLIEZ PAS QUE LA MEILLEURE SÉCURITÉ CONSISTE EN LAMANIPULATION APPROPRIÉE.ÉTAPE 2. INSÉRER UN CYLINDRE À CO2AVERTISSEMENT: Utilisez uniquement des cylindres CO2 de type 12 grammes. Toute tentatived’utilisation d’autres tailles et/ou des cylindres contenant d’autres types de gaz pourrait être extrêmementdangereuse. L’utilisation de gaz autres que le CO2 pourrait entraîner une explosion ou une rupturedu pistolet, provoquant des blessures graves.1. Mettez le dispositif de sécurité en position «SÉCURITÉ» (S) - point rouge recouvert (Fig. 2).2. Retirez le couvercle boîtier gauche en soulevant l’onglet du couvercle boîtier (Fig. 3A).3.Ouvrez le levier de percussion jusqu’à obtention d’un espace suffisant pour insérer un cylindre de CO2.Insérez le gros bout du cylindre de CO2 dans la partie inférieure de la crosse (Fig. 3B).4. Tenez le pistolet dans une position inversée avec la crosse vers le haut et la bouche du canon éloignéede vous. Placez le petit bout du cylindre de CO2 à l’intérieur du dispositif de retenue de sorte que lecylindre de CO2 soit en contact avec le pinçon (Fig. 3C).5. Tout en continuant de tenir le pistolet dans une position inversée, réinstallez le couvercle boîtiergauche, pointez la bouche du canon vers une direction sûre et fermez le levier de percussion fermementafin de perforer le cylindre de CO2 (Fig. 2D).AVERTISSEMENT: Assurez-vous que la bouche du canon est orientée dans une direction sûre lors dela perforation du cylindre de CO2. au cas où un joint présente une fuite temporaire alors que le CO2 est entrain d’être perforé, le gaz CO2 peut s’échapper à travers le canon. Si des munitions sont coincées dans lecanon dès le tir initial, cela pourrait entraîner un déclenchement de projectile.ÉTAPE 3. INSÉRER UN CHARGEUR DE MAGASIN ROTATIF DANS LE PISTOLETPointez toujours le pistolet vers une direction sûre. Assurez-vous que le pistolet est en position desécurité «S» - PAS DE VOYANT ROUGE (Fig. 2)CHARGEMENT DU CHARGEUR DU MAGASIN ROTATIF1. Ouvrez la culasse du pistolet par la dépression du verrou du boîtier du canon. Tournez le boîtier ducanon vers le bas à l’extrémité de la bouche du canon pour ouvrir la culasse (Fig.4).2. Retirez le chargeur du magasin rotatif et insérez un total de huit projectiles dans le chargeur dumagasin rotatif à partir de la partie solide du chargeur du magasin. (.177 cal. grains et/ou BB uniquement)(Fig. 5).3. Insérez le chargeur du magasin entièrement chargé dans la culasse du canon de sorte que le trou aucentre du chargeur du magasin repose sur la goupille de la culasse (Fig. 6). Fermez le boîtier du canon.ÉTAPE 4. TIRER SUR UN POINT DE MIRE CIBLE SÛRPour être un bon marqueur, utilisez l›image de visée appropriée chaque fois que vous tirez (Fig. 7).ATTENTION: En raison de la puissance de ce pistolet CO2, prenez des précautions supplémentaireslors de la sélection d’une cible sûre et d’un pare-balles approprié sur la base des munitions quevous utilisez. Ne tirez jamais des balles BB dans un piège en acier conçu pour des pellets et ne tirez jamaisdes pellets sur une cible/pare-balles conçu pour des balles BB. Choisissez des objectifs et pare-balles quine causeront pas de ricochet et qui permettront aux munitions de pénétrer le pare-balle. Ne tirez jamaissur une surface plane et dure ou sur la surface de l’eau.ÉTAPE 5. METTEZ LE DISPOSITIF DE SÉCURITÉ EN POSITION TIR «F» - VOYANT ROUGELorsque vous êtes certain que l’objectif, le pare-balle et la zone environnante sont en sécurité, désactivezla sécurité (F) en faisant coulisser le bouton déclencheur de sécurité vers l’arrière et tournez lelevier de sécurité vers la position «DÉSACTIVER LA SÉCURITÉ» (Fig. 7).AVERTISSEMENT: Faites montre d’une extrême prudence lors de la manipulation du pistolet car ilest maintenant prêt se déclencher une fois que la détente est enfoncée.ÉTAPE 6. TIRLe pistolet peut être déclenché en toute sécurité après avoir suivi la procédure d›utilisationmentionnée ci-dessus. Après s›être assuré que le pistolet est pointé dans une direction sûre, appuyezdoucement mais fermement sur la gâchette. Si vous désirez continuer à tirer, la procédure d›utilisationpeut être répétée jusqu›à ce qu›il faille remplacer le cylindre de CO2.ÉTAPE 7. METTRE LE DISPOSITIF DE SÉCURITÉ EN POSITION DE SÉCURITÉ «S» - AUCUN VOYANT ROUGEAprès avoir effectuer des tirs, positionnez le levier de sécurité de façon à recouvrir le point rouge. (FIG. 2).LES BALLES BB NE SE DÉCLENCHENT PASAVERTISSEMENT: Les balles BB ou pellets ne se déclenchent pas à la fin de la procédure d’utilisation,ne présumez pas que le pistolet est déchargé. Maintenez le pistolet pointé dans une direction sûre.VOIR CE QUI SUIT SI UNE BALLE BB NE SE DÉCLENCHE PAS1. Le chargeur du magasin rotatif contenait-il des balles BB ou pellets Daisy®? Si non, remplissez lechargeur du magasin avec des balles BB ou des pellets et répétez la procédure d’utilisation.2. Le dispositif de sécurité était-il en position TIR «F» - VOYANT ROUGE lorsque la détente a été appuyée?Sinon, répétez la procédure d’utilisation.3. Le cylindre CO2 a-t-il été bien installé? Sinon, mettez le dispositif de sécurité en position SECURITÉ «S»- AUCUN VOYANT ROUGE et insérez un nouveau cylindre de CO2. Répétez la procédure d’utilisation aprèsque le nouveau cylindre a été installé.4. Se reporter à la section sur les caractéristiques de CO2.5. Si le pistolet ne se déclenche toujours pas, reportez-vous à la section sur l’avertissement ci-dessous.AVERTISSEMENT: Si le pistolet ne parvient toujours pas à tirer un projectile après avoir vérifié lescinq éléments mentionnés, le pistolet présente un dysfonctionnement. Cela pourrait représenter unecondition dangereuse. Il pourrait y avoir une balle BB ou pellet dans le pistolet, même si une balle BB oupellet ne s’est pas déclenché. Cela pourrait amener l’utilisateur à croire tort que le pistolet est déchargé.Vous ne devez en aucun cas regarder dans le canon du pistolet. Mettez le dispositif de SÉCURITÉ «S» enposition - AUCUN VOYANT ROUGE, retirez le cylindre CO2, et envoyez le pistolet directement à DAISYMANUFACTURING SERVICE DEPARTMENT. Reportez-vous à la section sur les réparations des PISTOLETSDAISY.COMMENT DÉCHARGERÀ la fin d’une séance de tir, le pistolet doit être déchargé avant son rangement. Pour décharger le fusil,mettez toujours le dispositif de sécurité en position SÉCURITÉ «S» - AUCUN VOYANT ROUGE, retirez lecylindre de CO2 (voir ci-dessous). Ouvrez la culasse et retirez le chargeur du magasin rotatif. Regardez àtravers l’extrémité de la culasse du canon pour être sûr qu’aucunemunition n’est restée dans le canon. Retirez toutes les munitions du chargeur du magasin rotatif.ATTENTION: Même si vous avez suivi une procédure de déchargement, continuez de traiter lepistolet comme s’il était chargé. Ne pointez pas sur ce que vous n’avez pas l’intention de tirer. Metteztoujours le dispositif de sécurité en position SÉCURITÉ «S» - AUCUN VOYANT ROUGE jusqu’à ce que voussoyez prêt à tirer.RETIRER LE CYLINDRE CO21. Mettez le dispositif de sécurité en position «SÉCURITÉ» (S) - POINT ROUGE RECOUVERT (Fig. 4).2. Retirez le cylindre de CO2 du pistolet.3. Avec le couvercle boîtier gauche toujours en place, ouvrez lentement le levier de percussion jusqu’à ceque tout reste de CO2 soit déchargé.4. Retirez le couvercle boîtier gauche en soulevant l’onglet du couvercle boîtier et retirez le cylindrede CO2.ATTENTION: Ne tentez jamais de réutiliser un cylindre à une fin quelconque.ATTENTION: Ne supposez pas que le pistolet est vide de munitions lorsque le chargeur du magasinrotatif est retiré du pistolet. Même si vous avez suivi une procédure de déchargement, continuez detraiter le pistolet comme s’il était chargé. Ne pointez pas sur ce que vous n’avez pas l’intention de tirer.Mettez toujours le dispositif de sécurité en position SÉCURITÉ «S» - AUCUN VOYANT ROGE (Fig. 2) ettraitez toujours le pistolet comme s’il était chargé et prêt à se déclencher.CARACTÉRISTIQUES DE CO2Il existe des occasions où un pistolet CO2 peut être soumis à des conditions anormales qui peuventproduire des effets sur les performances des pistolets. Ces conditions comprennent la manipulation et/le stockage du pistolet à des températures qui sont considérablement supérieures ou inférieures à destempératures normales extérieures (60 - 70 degrés F), ainsi que des conditions de tir rapide.1. Des températures élevées peuvent produire une pression dans le cylindre de CO2 et le pistolet qui estconsidérablement supérieure à la pression de manipulation normale. Une telle augmentation de lapression peut empêcher le tir et peut entraîner des dommages permanents au pistolet. Les températuresmaximales de fonctionnement ou de stockage ne doivent pas dépasser 105 degrés F (40 degrés C). Cettetempérature peut être facilement atteinte si le pistolet est abandonné directement sous le soleil en unebelle journée ensoleillée. Par conséquent, le tireur ne doit pas exposer le pistolet à des conditions dehaute température ou directement sous la lumière du soleil pendant une longue période de temps.2. Le déclenchement rapide du pistolet entraînera une réduction de la température etde CO2 dans le pistolet. Cela se traduira par des vitesses plus faibles des munitions et peut mêmediminuer la pression du gaz suffisamment de sorte que le pistolet ne se déclenche pas. Cette conditionpeut être particulièrement apparente lors des tir par temps froid. Cette condition peut être évitée en permettantdavantage de temps entre les tirs. Ce qui permet au gaz d’augmenter en termes de températureet de pression, et de produire des vitesses normales.3. Au cours de tirs rapides, la vitesse initiale de chaque tir peut diminuer. Cela peut être préjudiciable àla précision du tir. Plus rapidement le pistolet est déclenché, moins de tir vous obtiendrez par cylindrede CO2.4. Il convient d’être prudent afin de s’assurer que le pistolet n’est déclenché avec un cylindre de CO2 dontla pression est faible, car une balle BB peut être expulsée du canon.ATTENTION: Le fait de déclencher le pistolet avec une faible pression de CO2 pourrait entraîner lelogement des munitions dans le canon.STOCKAGERangez votre pistolet déchargé. Activez le dispositif de sécurité, retirez le cylindre de CO2 et retireztoutes les munitions du chargeur du magasin du pistolet. Gardez le pistolet loin des enfants et destireurs non qualifiés. Conservez les munitions, et les cylindres de CO2 séparément du pistolet pourprotéger de tireurs inexpérimentés.AVERTISSEMENT: UN CYLINDRE DE CO2 CONTIENT DU GAZ SOUS PRESSION, QU’IL AIT OU NON ÉTÉINSÉRÉ DANS UN PISTOLET. EN CAS D’EXPOSITION À DES TEMPÉRATURES ÉLEVÉES (COMME L’INTERIEURD’UNE VOITURE FERMÉE EN PLEIN SOLEIL), IL POURRAIT EXPLOSER. VEUILLEZ STOCKER TOUS LESCYLINDRES DANS UN ENDROIT FROID.ENTRETIENGrâce à l’entretien et à un nettoyage périodique, votre pistolet vous fournira un plaisir de tir pendantde nombreuses. Comme c’est le cas avec des armes à feu conventionnelles, l’abus, la négligence etl’exposition continue à des éléments peuvent nuire au rendement d’un pistolet à air comprimé. Apprenezà prendre soin de votre pistolet et il vous rendra de bons services.Manuel D’utilisationModèle <strong>008</strong>CO2 SEMI-AUTOMATIQUE.177Cal. (4,5Mm) Pellet De Plomb Pour Pistolet À Air Comprimé.177 Cal Bb (4,5 Mm) Tir À Partir Pistolet À Air Comprimé D’acierCylindre De Co2 De 12Gm UniquementAVERTISSEMENT: IL NE S’AGIT PAS D’UN JOUET. LA SUPERVISION DES ADULTES EST NÉCES-SAIRE. TOUTE MAUVAISE UTILISATION PEUT CAUSER DES BLESSURES GRAVES OU LA MORT. PEUTÊTRE DANGEREUX À UNE PORTÉE DE JUSQU’À 260 YARDS (238 MÈTRES)IL S’AGIT D’UN PISTOLET À AIR COMPRIMÉ DE HAUTE PERFORMANCE RECOMMANDÉ POUR UTILI-SATION PAR DES PERSONNES ÂGÉES DE 16 ANS OU PLUS. LIRE TOUTES LES INSTRUCTIONS AVANTTOUTE UTILISATION. L’ACHETEUR ET L’UTILISATEUR DOIVENT SE CONFORMER À TOUTES LES LOISRÉGISSANT L’UTILISATION ET LA POSSESSION DES PISTOLETS À AIR COMPRIMÉ.AVERTISSEMENT: CE PISTOLET PEUT CAUSER DES BLESSURES GRAVES OU LA MORT. LIREET SUIVRE SCRUPULEUSEMENT TOUTES LES INSRUCTIONS. NE PAS INSTALLER UN CHARGEUR DEMAGASIN QUI CONTIENT DES MUNITIONS DANS LE PISTOLET JUSQU’À CE QUE VOUS SOYEZ PRÊTÀ TIRER. SI VOUS INSTALLEZ UN CHARGEUR DE MAGASIN QUI CONTIENT DES MUNITIONS DANSLE PISTOLET ET QUE VOUS DECIDEZ DE NE PAS TIRER, SOIT RETIREZ LE CHARGEUR DU MAGASINMANUELLEMENT OU TIREZ LES MUNITIONS RESTANTES SUR UNE CIBLE SÛRE. UN PISTOLETDÉSARMÉ, DÉCHARGÉ EST PLUS SÉCURITAIRE. LES ACCIDENTS SE PRODUISENT TRÈS RAPIDE-MENT, ET LE FAIT DE BLESSER OU DE TUER QUELQU’UN DE FAÇON ACCIDENTELLE EST UNE CHOSETERRIBLE. VEUILLEZ TIRER EN TOUTE SÉCURITÉ.Ce symbole d’alerte de sécurité indique des messages de sécurité importants dans ce manuel.Lorsque vous voyez ce symbole, soyez averti de la possibilité de blessure et lisez attentivement lemessage qui suit.Le pistolet PowerLine® Modèle <strong>008</strong> CO2 tire avec beaucoup plus d’énergie initiale que le pistolet à airtraditionnel printemps BB. Plus de puissance implique davantage de chances de blessures graves. Soyezextrêmement prudent lorsque vous utilisez ce pistolet.Bien que votre nouveau pistolet PowerLine® ne soit une arme à feu, il a un potentiel dangereux et doitêtre traité avec prudence et respect dûs à toute arme à feu conventionnelle. Rappelez-vous toujoursque le tout premier et le plus important organe de sécurité en matière de pistolet est le tireur. Toutesles mesures de sécurités sont des dispositifs mécaniques et le tireur est la seule partie du système quipeut faire en sorte qu›un pistolet soit sécuritaire ou dangereux. NE COMPTEZ PAS SUR DES DISPOSITIFS DESÉCURITÉ MÉCANIQUES-réfléchissez et évitez des situations qui pourraient donner lieu à des accidents.La manipulation des pistolets varie selon les pistolets et vous ne serez jamais prêt à tirer un pistoletquelconque à moins d’être très familier avec lui. Lisez les instructions d’exploitation suivantes et SANSCHARGER UN PROJECTILE, suivez la procédure d’utilisation (ne faire le tir à sec avec CO2 à plusieursreprises uniquement sur une cible sûre.) Cela vous permettra d’apprendre à manipuler PowerLine® <strong>008</strong>correctement et en toute sécurité.AVANT TOUTE MANIPULATIONACTIVER LA SECURITÉ-AUCUN VOYANT ROUGEPositionnez le levier de sécurité de façon à couvrir le point rouge. (Reportez-vous à l’Étape 1 de lamanipulation).PROCÉDURES D’UTILISATION:AVERTISSEMENT: Assurez-vous que le pistolet est toujours pointé dans une direction sûre.Étape 1. ACTIVER LA SECURITÉ-AUCUN VOYANT ROUGE, POINT ROUGE COUVERTÉtape 2. INSÉRER UN CYLINDRE DE CO2Étape 3. INSÉRER UN CHARGEUR DE MAGASIN ROTATIF CHARGÉ DANS LE PISTOLETÉtape 4. TIRER SUR UN POINT DE MIRE SÛRÉtape 5. DÉSACTIVER LA SECURITÉ - VOYANT ROUGEÉtape 6. TIRÉtape 7. ACTIVER LA SECURITÉ-AUCUN VOYANT ROUGE, POINT ROUGE COUVERTDes tirs peuvent continuer d›être effectués à partir du pistolet jusqu›à ce qu›il faille remplacer lechargeur de magasin des munitions ou le cylindre de CO2. Le Modèle <strong>008</strong> donnera lieu à un minimum de60 tirs par cylindre de CO2. Se reporter à la section sur les caractéristiques de CO2.NE RANGEZ JAMAIS UN PISTOLET CHARGÉÀ la fin d’une séance de tir, par mesure de précaution, placez toujours le dispositif de sécurité en positionde sécurité «S» - PAS DE VOYANT ROUGE, retirez le cylindre de CO2, retirez le chargeur du magasin rotatifdu du pistolet et retirez les munitions du chargeur du magasin rotatif. Conservez-le en lieu sûr pourempêcher toute utilisation non autorisée.MANIPULATIONAVERTISSEMENT: Assurez-vous que le pistolet est toujours pointé dans une direction sûre. Nepintez jamais le pistolet vers une personne. Présumez et traitez toujours le pistolet comme s’il étaitchargé et prêt à se déclencher.PARTES EXTERIORESCualquier parte de plástico puede ser limpiada con un trapo húmedo y jabón o detergentesuave. Evite el uso de detergentes fuertes, materiales de limpieza o solventes abrasivos quepuedan raspar o de alguna otra manera dañar las superficies. Las partes metálicas expuestasdeben ser limpiadas ocasionalmente usando un trapo suave que está ligeramente engrasado conacetite de automóvil limpio.LUBRICACIÓN:Su pistola de CO2 fue lubricada al ser fabricada y no debe necesitar lubricación adicional.MODIFICACIÓN:PRECAUCIÓN: Los componentes de esta arma fueron fabricados para ofrecer un rendimientoóptimo. Cualquier modificación o alteración con el arma puedo causar un funcionamientodefectuoso y puede rendir al arma no segura de usar. Cualquier cambio en el rendimiento (talcomo una fuerza de jale del gatillo disminuida o una trayectoria disminuida del gatillo), indicanuna posible modificación, alteración y/o gasto. Tal arma necesita ser inspeccionada, reemplazadao apropiadamente reparada por un personal cualificado. Cualquier arma que se ha caído necesitaser revisada por un personal cualificado para asegurar que el funcionamiento no ha sido afectado.REPARACIÓN DE LAS PISTOLAS DE AIRE POWERLINE®PRECAUCIÓN: Una pistola que no esté funcionando apropiadamente puede ser peligrosa.Debe ser almacenada seguramente fuera del alcance de cualquier persona hasta que sea reparadao destruida. No trate de desarmar su arma. Es difícil de volver a ensamblarla y un ensamblajeincorrecto puede causar condiciones peligrosas.ARMAS BAJO GARANTÍAGARANTÍA LIMITADA DE UN AÑOPor un año de la fecha de compra, Daisy reparará o reemplazará y regresará el arma, sin costoalguno, si hay defectos en el material o la fabricación. Servicio es disponible regresando el armaa Daisy Outdoor Products (vea la nota importante siguiente). Fije a su arma, su nombre, direcciónde calle y número telefónico, descripción del problema y comprobante de fecha de compra(recibo de compra). Empaquete y envíe con transporte pre pagado a Daisy Outdoor Products. Estagarantía le da derechos legales específicos y también puede tener otros derechos que puedenvariar de estado a estado. IMPORTANTE: Usted puede regresar su pistola fuera de servicio aDaisy Outdoor Products para reparación por United Parcel Service (UPS). Asegúrese de poner laseguridad en “PUESTO”, quite el cilindro de CO2 y quite toda la munición del cargador antes deregresar la pistola a Daisy. Necesita incluir su dirección de calle para que Daisy le pueda enviar suarma directamente a usted por entrega de UPS.ARMAS FUERA DE GARANTÍASi su arma de aire Powerline® necesita ser reparada, por favor llame al 1-800-713-2479 para loscargos de reparación. Daisy reparará su arma o la reemplazará con un arma reacondicionada delmismo modelo, si hay disponibles; de otra manera, con un modelo de calidad equivalente.Daisy Outdoor Products, Service Department, 308 West Stribling Drive, Rogers, AR 72756 U.S.A.ESPECIFICACIONES DE PISTOLA CO2 MODELO <strong>008</strong>AcciónCO2 SemiautomáticaCalibre.177 Calibre (4.5 mm) Perdigones o Balines de PlomoCapacidad de MunicionesCargador Giratorio de 8-tirosDistancia Máxima de Disparo*260 yardas (238 metros)Velocidad de la Boca484 pps (148mps)CañónÁnima rayadaSeguridadBloque giratorio manual de gatilloMirasMira delantera de alabe y rampa, alza fija abiertaPeso1 libras (3.22kg) vacíaLongitud Total7.1 pulgadas (18 cm)Fuente de EnergíaCilindro de CO2 de 12g de Daisy®*Con la boca apuntando hacia arriba a un ángulo máximoPRECAUCIÓN: el cilindro de CO2 puede estallar a temperaturas arriba de 160° F (71°C).APRENDA A DISPARAR CON SEGURIDADDaisy Outdoor Products tiene grandes antecedentes de enseñar a jóvenes y usuarios primerizos adisparar con seguridad. Para poder implementar eficazmente nuestros programas de educaciónde tiro a nivel nacional, Daisy está asociada con las siguientes organizaciones que enseñan seguridadde tiro y ofrecen materiales de seguridad e información adicional. Le alentamos ponerse encontacto con Daisy al 1-800-713-2479.de instalar un nuevo cilindro.4. Vea la sección en características del CO2.5. Si la pistola todavía no dispara, vea la precaución a continuación.PRECAUCIÓN: Si la pistola todavía no dispara un proyectil después de revisar los cinco pasosanteriores, hay un fallo en el rifle. Esto puede presentar una situación peligrosa. Puede haberun perdigón o balín en la pistola aunque un perdigón o balín no se disparó. Esto puede causarque el tirador crea que el arma esta descargada.. En ninguna ocasión debe ver por la boca delarma. Ponga la seguridad en la posición SEGURA “S” – NO SE VE EL ROJO, quite el cilindro de CO2,y envíe la pistola directamente a DAISY MANUFATURING SERVICE DEPARTMENT. Vea la sección enREPARACIÓN DE ARMAS DAISY.COMO DESCARGARDespués de terminar la sesión de tiro, el arma debe ser descargada antes de guardarla. Paradescargar el arma siempre ponga el seguro en la posición SEGURA “S”-NO SE VE ROJO, quite elcartucho de CO2 (Ver abajo). Mire dentro del cañón por el lado de la recamara para asegurarse deque no haya municiones en el cañón. Quiete todas las municiones del cargador giratorio.PRECAUCIÓN: Aunque haya seguido los pasos de descarga, continúe tratando el arma comosi estuviera cargada, No apunte el arma a nada que no quiera disparar. Siempre coloque el seguroen la posición SEGURA “s” – NO SE VE EL ROJO hasta que esté listo para disparar.QUITE EL CILINDRO DE CO21. Ponga el seguro en “PUESTO” (S) – PUNTO ROJO CUBIERTO (Fig 4).2. Quite el cilindro de CO2 de la pistola.3. Con la cubierta de la empuñadora izquierda todavía está en su lugar, lentamente abra lapalanquilla de perforación hasta que se descargue el gas CO2 restante.4. Quite la cubierta de la empuñadora izquierda levantando la lengüeta de la cubierta de laempuñadora y quite el cilindro de CO2PRECAUCIÓN: Nunca trate de volver a usar un cilindro para cualquier propósito.PRECAUCIÓN: No asuma que el arma está vacía de municiones cuando quite el CargadorGiratorio del arma. Aunque ya haya seguido los pasos para descargar el arma siempre continúetratando el arma como si estuviera cargada. No apunte a nada que no quiera disparar. Siempreponga el seguro en la posición segura “S” NO SE VE ROJO (Fig. 2) y siempre trate el arma como siestuviera cargada y lista para disparar.CARACTERÍSTICAS DEL CO2Hay ocasiones en las cuales la pistola de CO2 puede ser sujeta a condiciones anormales quepueden producir efectos en el rendimiento de la pistola. Estas condiciones incluyen operacióny/o almacenamiento de la pistola en temperaturas que se consideran más altas o bajas que latemperatura exterior normal (60 a 70 grados F), al igual que condiciones de disparo rápido.1. Temperaturas altas pueden producir presión en el cilindro de CO2 y el arma que es considerablementemás alta que la presión de operación normal. Tal aumento de presión puede prevenirque la pistola dispare y puede causar daño permanente al arma. Las temperaturas máximasde operación y almacenamiento no deben exceder 105 grados Fahrenheit (40 grados C). Estatemperatura fácilmente puede ser atenida si el arma se deja bajo el sol directo en un día soleado.Por lo tanto el tirador no debe exponer al arma a condiciones altas de temperatura o la luz solardirecta por un tiempo extendido de tiempo.2. El disparo rápido del arma puede causar que la temperatura baje en la pistola y el gas CO2.Esto resultará en que la velocidad de la munición sea más baja y puede bajar la presión del gas losuficiente para que ya no dispare. Esta condición es especialmente aparente en climas fríos. Estacondición puede ser evitada permitiendo más tiempo entre los disparos. Esto permite que el gassuba en temperatura y presión y produzca velocidades normales.3. Durante el disparo rápido, se espera que la velocidad de boca de cada tiro sea más baja.Esto puede ser perjudicial a la puntería del tirador. Entre más rápido se dispare el arma, ustedobtendrá menos tiros por cilindro.4. Se debe usar cuidado para asegurar que el arma no sea disparada con un cilindro de CO2 quetiene presión baja porque los perdigones no se dispararan del cañón.PRECAUCIÓN. Disparar el arma con presión baja de CO2 puede resultar en que se atore n lasmuniciones en el cañón.ALMACENAMIENTO:Almacene su pistola no cargada. Ponga el seguro en “PUESTO”, quite el cilindro de CO2 y quitetodas las municiones del cargador giratorio de la pistola. Mantenga el arma fuera del alcancede los niños y tiradores no entrenados. Almacene los perdigones y el cilindro de CO2 en un lugarseparado de la pistola para mantenerla lejos de tiradores no entrenados.PRECAUCION: Un cilindro de CO2 contiene gas bajo presión, ya esté insertado en el arma ono. Si está expuesto a temperaturas altas (tales como adentro de un automóvil cerrado bajo luzsolar directa) puede estallar. Asegúrese de almacenar todos los cilindros en un lugar fresco.CUIDADO APROPIADOCon cuidado y limpieza periódica, su pistola le proveerá muchos años de deleite de tiro. Comoes en el caso de armas de fuego convencionales, el abuso, negligencia y exposición a los elementosdañara el rendimiento de cualquier arma de aire. Aprenda a cuidar su pistola y le rendirá bien.PRECAUCIÓN: Nunca trate de limpiar su pistola hasta que el seguro esté en “PUESTO”, elcilindro de CO2 ha sido quitado y las municiones han sido quitadas de la pistola.PASO 1. PONGA LA SEGURIDAD EN “S” - NO SE VE ROJOGire el seguro hacia atrás a la posición “S” – NO SE VE ROJO (Fig. 2).PRECAUCIÓN: Aun cuando el seguro esté en “S” usted necesita seguir manejando el armaseguramente. No apunte el arma a nada que no quiera disparar.NOTA: El seguro no es automático. Solo hará su trabajo si usted hace el suyo. Con el dedo índicefuera del área del gatillo, ponga la palanquilla de seguridad en la posición “S”- NO SE VE EL ROJO(FIG 2). RECUERDE, LA MEJOR SEGURIDAD ES EL BUEN MANEJO DEL ARMA.PASO 2. INSERTAR LOS CILINDROS DE CO2PRECAUCIÓN: Utilice solamente cilindros de CO2 de 12 gramos. Cualquier intento de usarcualquier otros tamaños/ o cilindros con otro tipo de gas puede ser extremamente peligroso.Gases que no sean CO2 pueden resultar en una explosión o en una ruptura del arma, causandolesiones severas.1. Ponga el seguro en “PUESTO” (S) – punto rojo cubierto (Fig. 2).2. Quite la cubierta del puño levantando la lengüeta de la cubierta del puño (Fig. 3A).3. Abra la palanquilla de perforación hasta que haya suficiente espacio para insertar un cilindrode CO2. Inserte el lado grande del cilindro de CO2 en la parte inferior del puño (Fig. 3B).4. Agarre la pistola en una posición invertida con el puño hacia arriba y la boca apuntada endirección opuesta a usted. Posicione el extremo pequeño del cilindro de CO2 dentro del sujetadorpara que el cilindro de CO2 toque el pasador de perforación. (Fig. 3C)5. Mientras continua agarrando el arma en una posición invertida, vuelva a colocar la cubiertaizquierda del puño, apunte la boca en una dirección segura y cierre la planquilla de perforaciónfirmemente para perforar el cilindro de CO2.(Fig. 2D)PRECAUCIÓN: Asegúrese de apuntar la boca en una dirección segura cuando perfore elcilindro de CO2. En evento de que el sello tenga una fuga temporal mientras el cilindro de CO2esté siendo perforado, el gas puede escapar por el cañón. Si hay municiones atoradas en el cañónantes de disparar, esto puede resultar en que la munición se dispare.PASO 3. INSERTAR EL CARGADOR GIRATORIO EN EL ARMASiempre apunte el arma en una dirección segura. Asegúrese que el arma esté en la posiciónsegura “S” - NO SE VE ROJO. (Fig 2)CARGAR EL CARGADOR GIRATORIO1. Abra la recamara de la pistola presionando el fiador del encaje del cañón. Gire el encaje del cañónhacia abajo del lado de la boca para abrir la recamara. (Fig. 4 ocho proyectiles en el cargadorgiratorio del lado solido del cargador (únicamente balines y/o perdigones de calibre .177 ) (Fig. 5).2. Quite el cargador giratorio e inserte un total de ocho proyectiles en el cargador giratorio dellado solido del cargador (únicamente balines y/o perdigones de calibre .177) (Fig. 5).3. Inserte el cargador lleno en la recamara del cañón para que el agujero en el centro del cargadorse siente sobre el pasador de la recamara (Fig. 6). Cierre el encaje del cañon.PASO 4. APUNTAR A UN BLANCO SEGURO.Para ser un disparador consistente, utilice el dibujo de miras correcto cada vez que dispare suarma (Fig. 7.)PRECAUCIÓN: Dado a la potencia de esta Pistola PowerLine CO2, utilice precaución extremaen la selección de un blanco y un cazabalines de blanco seguro basado en el tipo de municionesque vaya a utilizar. Nunca utilice perdigones en una trampa de acero diseñada para balines ynunca dispare balines a un blanco/cazabalines diseñado para perdigones. Escoja blancos y cazabalinesque no permitirán rebotes o que las municiones penetren el cazabalines. Nunca dispare auna superficie plana dura o a la superficie del agua.PASO 5. PONER EL SEGURO EN LA POSICIÓN DE DISPARO “F” – SE VE EL ROJOCuando esté seguro que el blanco, el cazabalines y el área alrededor estén seguros, ponga elarma en “seguro no puesto” deslizando el botón de seguridad hacia atrás y gire la palanquilla deseguridad hacia la posición “seguro no puesto” (F) (Fig.7).PASO 6. DISPARARLa pistola puede ser disparada seguramente después de que los pasos de operaciones anterioreshayan siso seguidos. Después de asegurarse de que el arma esté apuntando a un blancoseguro, lento pero firmemente apriete el gatillo. Si desea continuar disparando, los pasos deoperación se pueden repetir hasta que los cilindros de CO2 necesiten ser cambiados.PASO 7. PONER EL SEGURO EN POSICIÓN SEGURA “S” – NO SE VE ROJO.Después de disparar regrese coloque la palanquilla de seguridad para cubrir el punto rojo(Fig. 2).MUNICIÓN NO DISPARAPRECAUCIÓN: Si un perdigón o balín no dispara después de completar los pasos de operación,no suponga que el arma está descargada. Continúe apuntando el arma en una direcciónsegura.HAGA LAS SIGUIENTES REVISIONES SI LA MUNICIÓN TODAVÍA NO DISPARA.1. El Cargador Giratorio tiene perdigones o balines Daisy® o municiones de calidad similar? Si no,llene el Cargador giratorio con perdigones o balines y repita los pasos de operación.2. La seguridad está en la posición de DISPARO “F” – SE VE EL ROJO- cuando se jaló el gatillo? Sino, repita los pasos de operación.3. Se instaló apropiadamente el cilindro deCO2? Si no, ponga la seguridad en posición SEGURA“S” – NO SE VE EL ROJO e inserte un nuevo cilindro de CO2. Repita los pasos de operación despuésManual de Operación<strong>Model</strong>o <strong>008</strong>PISTOLAS SEMIAUTOMÁTICAS DE C02.177 (4.5mm) calibre Balín de Plomo para Arma de Aire.177 BB calibre Bala de Acero para Arma de AireÚnicamente Cilindro de 12 g de CO2Este símbolo de Alerta indica un mensaje importante de seguridad en este manual. Cuandovea este símbolo, esté alerta a la posibilidad de lesiones personales y cuidadosamente lea elmensaje que le sigue.Esta pistola <strong>Model</strong>o <strong>008</strong> CO2 PowerLine® dispara con mucha más potencia de boca que lamayoría de las armas de perdigones tradicionales de resorte de aire . Use precaución extremacuando use esa arma.Aunque su nueva pistola PowerLine® CO2 no sea un arma de fuego, tiene potencial letal ynecesita ser tratada con la precaución y respeto que se le da a cualquier arma de fuego convencional.Siempre recuerde que la característica de seguridad primera y principal es el tirador. Todas lasseguridades son dispositivos mecánicos y el tirador es la única parte del sistema que puede hacerel arma segura – o no segura. NO DEPENDA EN LOS SEGUROS MECÁNICOS – piense por adelantadoy evite situaciones que pueda llevar a accidentes.Las armas difieren en su operación y usted nunca está listo para dispara cualquier arma hastaque esté completamente familiarizado con él. Lea el manual de instrucciones de operación ySIN CARGAR UN PROYECTIL, proceda por los pasos de operación (disparando su arma en secocon el CO2 varias veces a un blanco seguro.) Esto le permitirá aprender como operar su pistolaPowerline® <strong>008</strong> apropiada y seguramente.ANTES DE LA OPERACIÓNColoque el seguro en “PUESTO” – NO SE VE ROJOColoque la palanquilla de seguridad para cubrir el punto rojo. (Vea Paso 1 de Ope ación).PASOS DE OPERACIÓN:AVISO: Asegúrese de que el arma siempre esté en una dirección segura.PASO 1. PONER EL SEGURO EN “PUESTO” – NO SE VE ROJO, PUNTO ROJO CUBIERTOPASO 2. INSERTE EL CILINDRO DE CO2PASO 3. INSERTAR EL CARGADOR GIRATORIO CARGADO EN EL ARMAPASO 4. APUNTAR A UN BLANCO SEGURO.PASO 5. PONER EL SEGURO EN “NO PUESTO” – SE VE EL ROJO.PASO 6. DISPARARPASO 7. PONER EL SEGURO EN “PUESTO” – NO SE VE ROJO, PUNTO ROJO CUBIERTOEl arma puede seguir siendo disparada hasta que el cargador de municiones o el cilindro de CO2necesiten ser cambiados. El <strong>Model</strong>o <strong>008</strong> puede obtener un mínimo de 60 disparos por cilindro deCO2. Vea la sección de Características del CO2.NUNCA ALMACENE UNA ARMA CARGADAAl final de la sesión de disparo, como una precaución de seguridad, siempre ponga el seguroen la posición “S” – NO SE VE ROJO, quite el cilindro de CO2, quite el cargador giratorio del armay quite los perdigones del cargador giratorio. Almacene en un lugar seguro para prevenir el usono autorizado.COMO OPERARAVISO: Asegúrese de que el arma siempre esté apuntada a una dirección segura. Nuncaapunte el arma hacia nadie. Siempre piense y trate el arma como si estuviera cargada y lista paradisparar.PRECAUCIÓN: No es un juguete. Se requiere supervisión de un adulto. Usoindebido o sin cuidado puede causar lesiones serias o la muerte. Puede ser peligrosahasta una distancia de 260 yardas (238 metros).Esta es un arma de aire de alto poder recomendada para uso por personas de 16 añosde edad y mayores. Lea todas las instrucciones antes de utilizar. El comprador y el usuarionecesitan seguir todas las leyes gobernando el uso y propiedad de armas de aire.PRECAUCIÓN: Esta arma puede causar lesiones serias o la muerte. Lea y sigatodas las instrucciones cuidadosamente. No meta un cargador que contengamuniciones hasta que esté listo para disparar. Si mete un cargador que contienemuniciones en el arma y luego decide no disparar, manualmente quite el cargador delarma o dispare el resto de los perdigones a un blanco seguro. Un arma desamartilladay descargada es la más segura. Los accidentes ocurren rápidamente y el lesionar omatar a alguien accidentalmente es algo terrible. Por favor dispare con seguridad.