Daisy Outdoor Products Rogers AR 72757-0220 U.S.A 800-643-3458 www.daisy.com
Daisy Outdoor Products Rogers, AR 72757-0220 U.S.A. 800-643 ...
Daisy Outdoor Products Rogers, AR 72757-0220 U.S.A. 800-643 ...

You also want an ePaper? Increase the reach of your titles
YUMPU automatically turns print PDFs into web optimized ePapers that Google loves.
PRINTED IN U.S.A.Part No. 138049-000REV 10/16/06<strong>Daisy</strong> <strong>Outdoor</strong> <strong>Products</strong><strong>Rogers</strong>, <strong>AR</strong> <strong>72757</strong>-<strong>0220</strong> U.S.A.<strong>800</strong>-<strong>643</strong>-<strong>3458</strong><strong>www</strong>.<strong>daisy</strong>.<strong>com</strong>
C o m p e t i t i o n P e l l e t R i f l e sO p e r a t i o n M a n u a l888MEDALIST887 GOLDMEDALISTNOT A TOY. THIS AIRGUN IS DESIGNED FOR USE BYW<strong>AR</strong>NING: EXPERIENCED SHOOTERS AND IS INTENDED FOR MATCHCOMPETITION OR T<strong>AR</strong>GET RANGE USE. MISUSE OR C<strong>AR</strong>ELESS USE MAY CAUSESERIOUS INJURY OR DEATH. MAY BE DANGEROUS UP TO 257 Y<strong>AR</strong>DS (235 METERS).THIS IS A SPECIAL CLASS OF NON-POWDERED GUNS AND NOT FOR GENERAL USE. IT IS TO BEUSED FOR TRAINING AND T<strong>AR</strong>GET SHOOTING UNDER SUPERVISION. RECOMMENDED FOR USE BYTHOSE 16 YE<strong>AR</strong>S OF AGE OR OLDER. THIS GUN SHOOTS PELLETS ONLY. THE PURCHASER ANDUSER SHOULD CONFORM TO ALL LAWS GOVERNING THE USE AND OWNERSHIP OF AIRGUNS.Use .177 cal. (4.5mm) LEAD AIRGUN PELLET
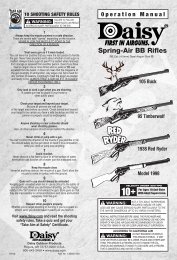
W<strong>AR</strong>NING: THIS GUN CAN CAUSE DEATH. READ AND FOLLOW THEINSTRUCTIONS C<strong>AR</strong>EFULLY. DO NOT LOAD A PELLET INTO THE CHAMBER UNTIL YOU <strong>AR</strong>EREADY TO SHOOT. IF YOU DO LOAD A PELLET AND DECIDE NOT TO SHOOT, REMOVE ITEITHER MANUALLY OR BY SHOOTING IT IN A SAFE DIRECTION. AN UNCOCKED, UNLOADEDGUN IS SAFEST. ACCIDENTS HAPPEN FAST, AND ACCIDENTALLY INJURING OR KILLINGSOMEONE IS A TERRIBLE THING. PLEASE SHOOT SAFELY.This safety alert symbol indicates important safety messages in this manual. When you seethis symbol, be alert to the possibility of personal injury and carefully read the message thatfollows.The Avanti Models 887 and 888, Competition Pellet Rifles shoot with much more muzzle energythan many BB and pellet guns. Use extreme caution when operating these guns. Although yournew Avanti Competition Air Rifle is not a firearm, it has lethal potential and should be treated withthe caution and respect due any conventional firearm. Like a firearm, your Avanti Competition AirRifle, when misused or carelessly used, can kill or seriously injure the shooter or other persons.Always remember, the first and most important safety feature of any gun is the shooter. All safetiesare mechanical devices and the shooter is the only part of the system that can make a gun safe–orunsafe. DON’T DEPEND ON MECHANICAL SAFETIES – think ahead and avoid situations thatmight lead to accidents.Guns differ in their operation, and you are never ready to fire any gun until you are thoroughlyfamiliar with it. Read the following operating instructions and, WITHOUT LOADING ANY PELLETS,proceed through the operating steps, dry firing your gun several times at a safe target. This willenable you to learn to operate this Competition Air Rifle properly and safely.HOW TO OPERATE:W<strong>AR</strong>NING: BE SURE GUN IS ALWAYS POINTED IN A SAFE DIRECTION.NOTE: Models 887 and 888 are identical except for Stock and Sights.MODEL 887 SHOWNFEED TRACKLEFT SIDEMUZZLEPISTOL GRIPB<strong>AR</strong>REL WEIGHTSLING BRACKETSTOCKSLINGRE<strong>AR</strong> SIGHTBOLT HANDLEFRONT SIGHTRIGHT SIDETRIGGERTRIGGERSAFETYFORE<strong>AR</strong>MCO2 BOTTLE(CYLINDER)FIGURE NO. 12
Key Part No. Description1 888-1 888 Stock, butt plate and screws1A 887-1 887 Stock, butt plate and screws2 888-2 Stock spacers (3 each)3 888-3 Trigger housing4 888-4 Safety assembly (includes ball & spring)5 888-5 Trigger assembly6 888-6 Hammer and spring7 888-7 Receiver8 888-8 Bolt handle assembly(includes bolt, bolt handle,and spring9 888-9 Valve body and barrel assembly10 888-10 Right filler11 888-11 Left filler12 888-12 Frame13 888-13 Barrel band14 888-14 888 Front sight and set screws14A 887-14 887 Front sight and set screws15 888-15 888 Sight inserts15A 888-15 887 Sight inserts16 888-16 O-ring17 888-17 Burst disk and relief valve18 888-18 Screw assortment (includes 2 receiverscrews, 1 trigger housing screw, 1 triggeradjustment screw, 1 rear tie down valvebody screw, 2 stock screws, 1 seat screw)19 888-19 O-ring valve group (includes o-ring,spring, valve)20 888-20 Adapter21 888-21 888 Rear sight21A 887-21 887 Rear sight15
AVANTI Models 887 and 888 Parts List14
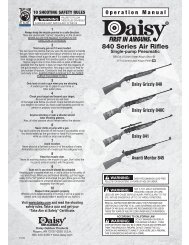
Step 1. PUT “ON” TRIGGER SAFETY(no red showing)Step 2. OPEN BOLTStep 3. INSTALL CO2Step 4. LOAD PELLETStep 5. CLOSE BOLTStep 6. AIM AT SAFE T<strong>AR</strong>GETStep 7. TAKE “OFF” TRIGGER SAFETY(red showing)Step 8. FIREDOVETAIL GROOVESTRACK FEEDTRIGGERSAFETY ONNO. 1ABOLT HANDLETRIGGER SAFETYTRIGGERSAFETY OFFred showing onopposite sideW<strong>AR</strong>NING: BE SURE GUN IS ALWAYS POINTED IN A SAFE DIRECTION.STEP 1. PUT “ON” TRIGGER SAFETYPush the trigger safety from left to right (no redshowing). It is a good practice to get into the habit ofalways keeping the trigger safety “ON” until actually readyto fire the gun. (See Drawing No. 1A.)STEP 2. OPEN BOLTPull the bolt handle fully to the rear. Then, release yourhold on the bolt handle, leaving the bolt open. The guncannot fire with the bolt open. (See Drawing No. 1B.)STEP 3. INSTALL CO2BOLT HANDLENO. 1BFEED TRACKTRIGGER SAFETYThe Model 888 CO2 Pellet Rifle is energized by CO2 only, from a refillable 2.5 ounce removableCO2 bottle (cylinder) designed for use in this model.W<strong>AR</strong>NING: Do not attempt to use <strong>com</strong>pressed air, or any gasses other than CO2 in thismodel.W<strong>AR</strong>NING: Do not attempt to use any type of CO2 bottle, cylinder, or fittings that thismodel is not designed to use.A newly purchased <strong>Daisy</strong> 2.5 ounce refillable CO2 bottle (cylinder) will be empty. It will not haveCO2 in it until it has been filled. These bottles can be filled with CO2 at stores where CO2 paintballmarker cylinders are filled.INSTALLING THE FILLED 2.5 OUNCE REFILLABLE CO2 NO. 2ABOTTLE (CYLINDER) INTO THE GUN: Coat the threads ofthe bottle and the O-ring with 30-weight non-detergentmotor oil.Keep the gun pointed in a safe direction. IT IS VERYIMPORTANT TO ALWAYS KEEP THE GUN POINTED IN ASAFE DIRECTION WHILE INSTALLING OR REMOVING THECO2 BOTTLE (CYLINDER).Insert the threaded fitting end of the CO2 bottle (cylinder)into the forearm of gun. (See Drawing No. 2A)NO. 2B3
Using a 5/8 inch wrench (preferably the shorter handle wrench provided with the gun, to help inpreventing the bottle from being over tightened) screw the bottle (cylinder) inward until it is seated.Do not over tighten. (See Drawing No. 2B.)With the gun pointed in a safe direction, it can then be dryfired, with CO2 only, to find out if theCO2 bottle (cylinder) is installed correctly. If no CO2 shoots from the gun, the shooter shouldretighten the CO2 bottle (cylinder), again being careful not to over tighten it. Never assume any gunis unloaded–follow all safety rules.O-RINGS: The O-ring on the refillable CO2 bottle (cylinder), should be replaced when it is found tobe damaged. The O-ring is an easily replaceable part. These O-rings are available from <strong>Daisy</strong>, andfrom stores where paintball supplies are sold.REMOVING THE CO2 SOURCE FROM THE GUN: Whenever the shooter notices that the CO2pressure is be<strong>com</strong>ing lower in the CO2 bottle (cylinder), it should be removed from the gun. Whenthe CO2 pressure is allowed to be<strong>com</strong>e very low, or <strong>com</strong>pletely used out, it may cause a pellet tofail to shoot out of the gun. The pellet may remain inside the chamber or part way down the barrelof the gun. This remaining pellet may, or may not shoot out of the gun when the gun is shot thefirst time after a full CO2 source has been reinstalled. This can create a very dangerous condition,and can be avoided by not allowing the CO2 source to be<strong>com</strong>e <strong>com</strong>pletely emptied while the gunis being used. The shooter should always assume that a pellet may be in the gun, and the gunshould always be kept pointed in a safe direction, and should NEVER be dryfired unless the gun ispointed in a safe direction.REMOVING THE 2.5 OUNCE REMOVABLE CO2 BOTTLE (CYLINDER) FROM THE GUN: CO2pressure can cause the bottle (cylinder) O-ring to seal very tightly in the gun, and can cause thebottle (cylinder) to be harder to unscrew. To help to keep this from happening, the shooter shouldalways be sure to oil the O-ring and threads of the bottle (cylinder) before installing it, and shouldavoid over tightening it. While the pressurized bottle (cylinder) is being unscrewed from the gun, asmall amount of CO2 can usually be heard escaping. This is normal.Being sure to keep the gun pointed in a safe direction, and when possible, using the shorterhandle 5/8 inch wrench provided, unscrew the bottle (cylinder) and remove it from the gun.NOTE: As the bottle (cylinder) is being unscrewed, the shooter should be observant for anymovement or loosening of the bottle (cylinder) fittings. If this is found, or if the shooter experiencesany problems when they are installing or removing the CO2 source, the gun and CO2 sourceshould be stored in a safe place and the shooter should call the <strong>Daisy</strong> Customer ServiceDepartment for information on handling the problem. Only trained personnel should attempt towork on the refillable bottle (cylinder), or on the gun.Step 4. LOAD PELLETWith the bolt back, lower the muzzle slightly and load a pellet, solid end forward (See DrawingNo. 4A).Step 5. CLOSE BOLTPush the bolt handle fully forward. This will chamber a pellet and lock the bolt. (See DrawingNo. 4B.) The gun will not fire if the bolt is open.CAUTION: The gun is now loaded and ready to fire.Step 6. AIM AT SAFE T<strong>AR</strong>GETAim the gun at a safe target. To be a consistent marksman, use the correct sight picture eachtime you fire your gun. (See Drawing No. 5.)4
MODEL 887/888 SPECIFICATIONSACTIONCALIBERAMMUNITIONFRONT SIGHTRE<strong>AR</strong> SIGHTB<strong>AR</strong>RELMUZZLE VELOCITYMUZZLE ENERGYT<strong>AR</strong>GET DISTANCEMAXIMUM SHOOTINGDISTANCE*ADD ONACCESSORIESCO2, single shot.177 cal. (4.5mm).177 cal. (4.5mm) lead air gun pelletsGlobe type with aperturesPeep sight with micrometer click, screw adjustmentRifled steel with barrel weight500 fps (152mps)4.3 ft. lb. (5.8J)33 ft. (10m)257 yds. (235m)Standard dovetail mount in receiver to accept ascope; nylon web sling*With muzzle pointed upward at optimum angle13
MODIFICATIONW<strong>AR</strong>NING: The <strong>com</strong>ponents of this gun were engineered to deliver optimum performance.Any modification or tampering with a gun may cause a malfunction and may make it unsafe to use.Any change in performance, such as a lowered trigger force and shortened trigger travel, indicatespossible wear and such gun should be inspected, replaced, or properly repaired by qualifiedpersonnel. Any gun that has been dropped should be checked by qualified personnel to insure thatits function has not been affected.W<strong>AR</strong>NING: A GUN THAT IS NOT OPERATING PROPERLY MAY BE DANGEROUS. ITSHOULD BE KEPT SAFELY FROM USE BY ANYONE UNTIL REPAIRED OR DESTROYED. DO NOTTRY TO TAKE THE GUN AP<strong>AR</strong>T. IT IS DIFFICULT TO REASSEMBLE, AND IMPROPERREASSEMBLY CAN CAUSE A HAZ<strong>AR</strong>DOUS CONDITION.GUNS IN W<strong>AR</strong>RANTYLIMITED ONE-YE<strong>AR</strong> W<strong>AR</strong>RANTYFor one year from date of purchase, <strong>Daisy</strong> will repair or replace and return this gun, freeof charge, if defective in material or workmanship. Service is available by returning the gunto <strong>Daisy</strong> <strong>Outdoor</strong> <strong>Products</strong> (refer to important note below). Attach to the gun, your name,address, and telephone number, description of problem and proof of date of purchase.Package and send, transportation prepaid, to <strong>Daisy</strong>. This Warranty gives you specificlegal rights, and you may also have other rights which may vary from state to state.IMPORTANT: You can return your inoperative rifle to <strong>Daisy</strong> for repair via UnitedParcel Service. Be sure to put “ON” safety and unload all ammo before returning the gunto <strong>Daisy</strong>. You must include your street address for <strong>Daisy</strong> to send your rifle directly backto you through UPS delivery.GUNS OUT OF W<strong>AR</strong>RANTYIf your Avanti gun needs repair, please call 1-<strong>800</strong>-713-2479 for repair charges. <strong>Daisy</strong>will repair the gun or replace it with a reconditioned gun of the same model, if available;otherwise, with a model of equivalent quality.<strong>Daisy</strong> <strong>Outdoor</strong> <strong>Products</strong>Service Department11823 Lime Kiln Rd.Neosho, MO 64850 U.S.A.NOTE: AVANTI air guns do not <strong>com</strong>e under the provisions of the “Gun Control Act Of1968” and can be shipped via UPS (not mailed).12
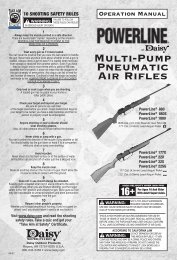
CAUTION: Due to the power of this air gun, use extra caution in selecting a safe targetbackstop. Pellet guns should not be used with BB gun target backstops. Pick targets that cannotFEED TRACKBOLT HANDLEBOLT TIPPELLETNO. 4ANO. 4Bbe penetrated or that will not cause ricochet because of their hard surface. Use only targets andtraps that are designed for use with high-powered pellet guns. Do not shoot at the surface ofwater.Step 7. TAKE “OFF” TRIGGER SAFETYWhen you are certain the target, backstop and surroundingarea are safe, push the trigger safety from the right, fully to theleft (red showing on left). Your gun is now cocked and ready toshoot. In this condition, it should be handled with extreme care.Step 8. FIREAfter making sure the gun is pointed in a safe direction,gently but firmly squeeze the trigger. Repeat steps 1 through 8 to continue shooting.FAILURE TO SHOOT CO2If the gun does not shoot CO2, with the safety “ON” (no red showing), and with the gun pointedin a safe direction, try retightening the 2.5 ounce bottle (cylinder). Do not over tighten.If the gun still does not shoot CO2, the CO2 source may be empty. The 2.5 ounce refillablebottle (cylinder) can be checked for CO2 pressure by, removing it from the gun and pushing inwardon the bottle (cylinder) valve pin. If the valve can be opened and no gas escapes, the CO2 bottle(cylinder) is empty, and should be refilled to operate the gun.FAILURE TO SHOOT A PELLETIf the gun does shoot CO2, but does not shoot the pellet, one or more pellets may be jammedin the barrel of the gun. With the safety “ON” (no red showing), and with the CO2 source removedfrom the gun, a brass or aluminum cleaning rod (a steel cleaning rod will damage the rifling) can berun through the barrel of the gun to dislodge any pellets that may be jammed there.If these steps do not correct the problem, the gun and CO2 source should be stored in a safeplace. The <strong>Daisy</strong> Customer Service Department should be called for information on correcting theproblem, or for information on how to return the gun and CO2 source for repair. Do not return thegun to the retailer.W<strong>AR</strong>NING: If a pellet does not fire after <strong>com</strong>pleting the operating steps, the gun isjammed. KEEP THE GUN POINTED IN A SAFE DIRECTION and perform the following steps:1. Put trigger safety “ON” (no red showing).2. Open bolt.3. Close bolt, and with gun pointed in a safe direction, take the trigger safety “OFF” and fire.5RE<strong>AR</strong>SIGHTNO. 5FRONTSIGHTBULLSEYE
If the pellet still does not fire, follow these steps carefully:1. Put trigger safety “ON” (no red showing).2. Open bolt.3. Remove CO2 source from the gun, with gun pointed in safe direction.4. Invert the gun with the barrel held in the horizontal position.5. Clear barrel by running cleaning rod through from the muzzle end and allow the pellet to fallclear of the receiver through the feed track. Be careful not to damage the bolt tip by pushing therod through too hard. Do not reuse this pellet. Do not allow a pellet to fall into the action of thegun.NOTE: Should you let a pellet fall into the action of the gun, make every effort to shake it freeand get it to fall out. Otherwise, the gun will have to be returned to the <strong>Daisy</strong> Servicedepartment. (See “Repair of <strong>Daisy</strong> Guns” section.)6. Repeat operating Steps 1 through 8. If after following the firing procedure, a pellet is not fired,put safety “ON” (no red showing) and return your gun to the Factory Service Department. (See“Repair of <strong>Daisy</strong> Guns” section.)UNLOAD PELLETThe bolt does not extract a pellet. You must shoot the pellet out if a safe target is available. If asafe target is not available, put trigger safety “ON” (no red showing), open bolt, invert the gun withthe barrel held horizontal, insert a cleaning rod in the muzzle end and push the pellet out of thebarrel. This allows the pellet to fall clear of the action. Do not allow a pellet to fall into the action ofthe gun. DO NOT use a steel cleaning rod. Use brass or aluminum only.CAUTION: Never assume the gun is empty of projectiles. Always point the gun in a safedirection.AMMUNITIONUse only .177 (4.5mm) lead air gun pellets. <strong>Daisy</strong> No. 557 Match Pellets are re<strong>com</strong>mended.6
PROPER C<strong>AR</strong>EWith care, periodic cleaning and lubrication, your 887/888 will provide many years of shootingenjoyment. As is the case with conventional firearms, abuse, neglect and continued exposure tothe elements will impair the performance of any air gun. Learn to take care of your 887/888 and itwill serve you well.CAUTION: Never attempt to clean this gun until you put the trigger safety in the “ON”position (no red showing), have made absolutely certain that the gun is not loaded and have thebolt in the fully open position, and the CO2 source has been removed from the gun.STOCK AND FORE<strong>AR</strong>M: The wooden stock may be wiped clean with a damp rag, and lightlywaxed.EXTERIOR P<strong>AR</strong>TS: Exposed metal parts (i.e., receiver, barrel, etc.) should occasionally be wipedclean using a soft, lightly oiled cloth. Use a clean 30-weight non-detergent motor oil.B<strong>AR</strong>REL: The barrel should be cleaned occasionally to maintain accuracy. We re<strong>com</strong>mend using<strong>Daisy</strong>’s No. 5878 Cleaning Kit. To clean barrel, open bolt and insert cleaning rod and oil saturatedpatches into the muzzle end of the bore. Retract the rod and patch from the barrel. Repeat thisprocedure several times with oiled patches, then switch to dry patches. Continue using drypatches until most of the oil is removed from the boreNOTE: Be careful not to damage the sealing tip on the bolt when the rod tip enters the loadingarea. It may be necessary to clean the barrel approximately every 50 shots to maintain maximumaccuracy. Frequent cleaning may be necessary when the gun is new, and until excess oil isremoved.LUBRICATIONThe easiest and best way to lubricate this model is to place a drop of 30-weight non-detergentmotor oil on the CO2 source before it is installed into the gun. Using the 2.5 ounce refillable CO2bottle (cylinder), the gun can be lubricated each time it is installed into the gun. This can be doneby placing one drop of 30-weight non-detergent motor oil onto the center of the face of the fittingthat screws into the gun. This will be on the valve pin on the 2.5 ounce refillable CO2 bottle(cylinder). Use one drop only, more than that can cause the bottle (cylinder) or adapter to seem tobe <strong>com</strong>pletely screwed into place when it is not. CO2 will not feed into the gun until the bottle(cylinder) has been retightened. Also, too much oil can flood the valve of the gun and cause thegun to shoot low pellet velocities.One drop of oil will lubricate the gun properly.IMPORTANT: The only oils re<strong>com</strong>mended for use in the 887/888 are 30-weight, automotive motoroils. DO NOT use light, household type oils or aerosol type spray lubricants since they may containsubstances or additives harmful to the rubber seals and other <strong>com</strong>ponents.STORAGETo make your 887/888 safe for storage or transporting, proceed through operating Steps 1through 8, omitting Step 4 (Loading), WHILE POINTING THE GUN IN A SAFE DIRECTION FORTHE ENTIRE TIME! Then put the trigger safety “ON” (no red showing). This will ensure that thehammer is fired, that there is not a pellet in the chamber and that the trigger safety is “ON.”Remove CO2 source.Always store pellets in a place separate from the gun to keep them from untrained shooters.Before putting your gun away, make sure it is clean, dry, oiled, unloaded and uncocked. If the gunis to be stored for a long period of time, a light coat of oil in the barrel will help prevent corrosion.11
TRIGGER ADJUSTMENTThe trigger in this model is adjustable for travel. This is aSpecial Purpose Match Precision Gun and is exempt from the 2 lb.(0.9 kg) minimum trigger pull standard.The trigger adjusting screw is located behind the trigger guard(See Drawing No. 11). The adjusting screw can be turned outwarduntil it has no effect and trigger travel is at the maximum, or it canbe turned inward to shorten the trigger travel. To adjust the triggertravel in this model, the gun should be kept pointed in a safedirection, the safety should be at “ON” (no red showing), thereshould be no pellet in the gun, and the CO2 source should beremoved from the gun.TRIGGERADJUSTMENTSCREWNO. 11CAUTION: The trigger should be adjusted by an experienced shooter only.After the trigger has been adjusted the gun should be treated with caution. Shooting coachesand instructors should make sure that inexperienced shooters use this model with the triggeradjustment screw backed out to maximum trigger travel.For target shooting, experienced shooters may find that the best trigger travel setting can beobtained by [with the safety at “ON” (no red showing), no pellet in the gun, and with the CO2source removed] carefully turning the adjusting screw inward until slight resistance is felt.After the trigger has been adjusted, (with the gun pointed in a safe direction, and with no pelletor CO2 in the gun) it should be dryfired several times, and the safety tried several times to makesure that the trigger, sear, and safety are all functioning correctly. If the gun does not seem to befunctioning correctly, the adjusting screw should be turned outward 1/2 turn, and the gun tried forfunction again.As the trigger is being adjusted, the shooter should be careful that the adjusting screw is notforced, because the sear and the safety mechanism can be damaged.If the shooter has questions about the proper way to adjust the trigger, they can call the <strong>Daisy</strong>Customer Service Department for information on doing this.BURST DISK SAFETY PRESSURE RELIEFThe 2.5 ounce refillable CO2 bottle (cylinder) has a burst disk safety pressure relief on the frontfitting of the bottle (cylinder). The disk will burst, or rupture to safely relieve excess CO2 gaspressure, to prevent the pressure from be<strong>com</strong>ing too high.The pressure inside the bottle (cylinder) could be<strong>com</strong>e too high from the bottle (cylinder) beingoverfilled with CO2, or from the bottle (cylinder) be<strong>com</strong>ing heated by being left in direct sunlight orfrom some other source.The burst disk is a replaceable part, but replacing the disk should be done by trained personnelonly. Ruptured burst disks can be replaced by personnel at stores where these CO2 bottle(cylinders) are filled.When a burst disk does rupture to relieve the excess pressure in the CO2 bottle (cylinder), all ofthe CO2 in the bottle (cylinder) will escape rapidly from the bottle (cylinder). The rapidly emptyingCO2 bottle (cylinder) will quickly be<strong>com</strong>e coated with frost. The shooter should avoid contact withthe escaping CO2 and the frosted bottle (cylinder). If the disk bursts inside an automobile, or insome other enclosed area, a window or door should be opened to allow the CO2 to dissipate.10
RE<strong>AR</strong> SIGHT INSTALLATION AND ADJUSTMENT(MODEL 887)This is a universal target sight with a rubber eyepiece, which prevents light reflecting from thesight into your eye.ELEVATIONADJUSTMENTKNOBWINDAGECALIBRATIONWINDAGEADJUSTMENTKNOBMOUNTINGSCREWELEVATIONNO. 6 CALIBRATIONNO. 7Installation Step 1. Loosen the bracket mounting screw and plate, and sliding the sight onto thedovetail grooves of the receiver. Position the sight forward or to the rear until it suits your eye-sightand/or physique.Installation Step 2. Tighten mounting screw securely. (See drawing No. 6)ELEVATION: To lower the point of impact, turn elevation knob to the left(counterclockwise). To raise the point of impact, turn elevation knob to the right (clockwise), perarrow and word “UP” (See drawing No. 7)WINDAGE: To move the point of impact to the left, turn the windage knob counterclockwise. Tomove the point of impact to the right, turn the windage knob clockwise.FRONT SIGHT APERTURE INSERTS (MODEL 887)RINGNO. 8AAPERTUREINSERTNO. 8BYour Model 887, Competition Pellet Rifle <strong>com</strong>es with four aperture inserts, 2.6mm, 3.8mm,4.0mm, 4.4mm (4.4mm already in place). To change inserts, follow this procedure:1. Point the muzzle up and away from you.2. Grip the ring at the muzzle end of the sight and turn counterclockwise. If tight, a coin may beused in the slots. (See drawing No. 8A)3. Unscrew until aperture is free to be removed by using finger and thumb on side of sight tube,engaging ears on aperture to pull back and upwards. (See drawing No. 8B)Note: Apertures have ears of different sizes to ensure the proper positioning when replaced.4. To install, make sure back locking ring is unscrewed far enough for clearance. Have ears toproper side. Insert in groove and push forward. Tighten locking ring. A coin may be used toassure a firm lock.7
RE<strong>AR</strong> SIGHT INSTALLATION AND ADJUSTMENT(MODEL 888)WINDAGEADJUSTMENT KNOBMOUNTINGSCREWSPEEP SIGHTMOUNTING SCREWSWINDAGECALIBRATIONWINDAGEADJUSTMENTKNOBELEVATIONADJUSTMENTKNOBELEVATIONADJUSTMENT KNOB ELEVATIONPEEP SIGHTCALIBRATIONNO. 6 DOVETAIL GROOVES(under knob)NO. 7Installation Step 1. Loosen bracket mounting screws and slide receiver sight onto dovetailgrooves of receiver (See Drawing No. 6). Position the sight forward or to the rear until it suits youreye-sight and/or physique.Installation Step 2. Tighten mounting screws securely.ELEVATION: To lower the point of impact, turn elevation knob to the left (counterclockwise). Toraise the point of impact, turn elevation knob to the right (clockwise), per arrow and word “UP”(See Drawing No. 7).WINDAGE: To move the point of impact to the left, turn the windage knob counterclockwise. Tomove the point of impact to the right, turn the windage knob clockwise, per arrow and letter “R”(See Drawing No. 7).ADJUSTMENT: This precision peep sight is fully adjustable. Each click of the micrometeradjustment results in a .413 minute of angle (.048 inch) shift of pellet impact at 10 meters (33 feet).FRONT SIGHT APERTURE INSERTS (MODEL 888)NO. 8AINSERT TABSAPERTUREINSERTRELEASE PLATERELEASEPLATESLOTSNO. 8BYour Model 888, Competition Pellet Rifle <strong>com</strong>es with additional aperture inserts, one is alreadyin place. To change inserts, follow this procedure.1. Point the muzzle up and away from you.2. Using your index finger (or middle and index fingers if you fingers are slender), push in on the topand bottom of the release plate (See Drawing No. 8A).3. With insert release plate pushed in, lift out the aperture insert with thumb and index finger ofopposite hand (See Drawing No. 8B).4. To replace aperture, depress release plate. Place desired aperture in position with insert tabs inappropriate slots (See Drawing 8B).5. Front sight apertures provided with this airgun measure: .140 inch, .150 inch, .160 inch and.170 inch. Post front sight width measures 1.7526mm (.069 inch)8
SLING ATTACHMENTThe sling is attached by a detachable sling swivel which connects to a sling bracket on the forwardend of the accessory rail. With the sling attached to the swivel and then pulled back along theunderside of the rifle, the tab end of the sling should be hanging down (See Drawing No. 9A).NO. 9ASLING SWIVELNO. 9BSLINGSWIVELSLINGBRACKETRIFLE LOOPTAB ENDOF SLINGLENGTH ADJUSTING KEEPER<strong>AR</strong>MLOOPPUTTING SLING ON <strong>AR</strong>M:1. Open the arm loop.2. Turn loop one quarter turn in the direction of the sling arm (i.e., one quarter turn to the left if thesling is going on the left arm) and slip your arm into the loop (See Drawing 9B).3. Place sling loop on your upper arm either above the biceps near the shoulder or below thebiceps.4. Tighten the sling loop until it is snug enough to remain in place on your arm. it should not be sotight that it restricts the flow of blood in your arm or creates a pulse effect.LENGTHENING SLING:Grasp the tab end of theNO. 9Ckeeper with your trigger handand lift it up while pulling onthe top strand (not the tabend) of the sling (See DrawingNo. 9C).SHORTENING SLING: Pullthe tab end of the sling awayfrom you until sling reachesthe desired length. (See Drawing 9D).STOCK ADJUSTMENTSTo adjust stock, loosen screws in buttplatesufficiently to allow insertion of the desired number ofspacers (See Drawing No. 10). Spacers go betweenstock and buttplate. Each insert will adjust stock length5/8 inch (.625 inch). After stock adjustment insertshave been added, tighten buttplate screws to lockinserts in place. To shorten the stock reverse thisprocedure. Be certain spacers are placed so themolded cleats nest in the molded receptacle.9SPACERBUTTPLATEBUTTPLATESCREWSNO. 10NO. 9DSTOCK