Memory Book Printing Table of Contents 1. Overview 2. Equipment ...
Memory Book Printing Table of Contents 1. Overview 2. Equipment ...
Memory Book Printing Table of Contents 1. Overview 2. Equipment ...

Create successful ePaper yourself
Turn your PDF publications into a flip-book with our unique Google optimized e-Paper software.
<strong>Table</strong> <strong>of</strong> <strong>Contents</strong><br />
<strong>Memory</strong> <strong>Book</strong> <strong>Printing</strong><br />
<strong>1.</strong> <strong>Overview</strong><br />
<strong>2.</strong> <strong>Equipment</strong> and materials needed<br />
3. Costs<br />
4. <strong>Memory</strong> <strong>Book</strong> <strong>Printing</strong> Tips<br />
5. Definitions<br />
6. <strong>Printing</strong> Double-Sided <strong>Memory</strong> <strong>Book</strong> Pages<br />
<strong>1.</strong> <strong>Overview</strong><br />
Understand that printing the <strong>Memory</strong> <strong>Book</strong> pages on a home printer will not be a quick job. Using the<br />
Epson inkjet printer described in the procedure, the complete <strong>Memory</strong> <strong>Book</strong> will take about two hours<br />
<strong>of</strong> actual printing time. There will be additional human (loading and turning the paper over) and<br />
computer communication interface (sending the file to the printer) time.<br />
<strong>2.</strong> <strong>Equipment</strong> and Materials Needed<br />
<strong>1.</strong> <strong>Memory</strong> <strong>Book</strong> Acrobat files<br />
<strong>2.</strong> Computer with CD drive and Adobe Acrobat Reader<br />
3. Printer<br />
4. 3-ring Notebook 1-inch thick (at least 106 sheet capacity)<br />
5. Paper (either 20 or 24 pound). Please see item 4 under <strong>Memory</strong> <strong>Book</strong> <strong>Printing</strong> Tips.<br />
6. 3-Hole paper punch<br />
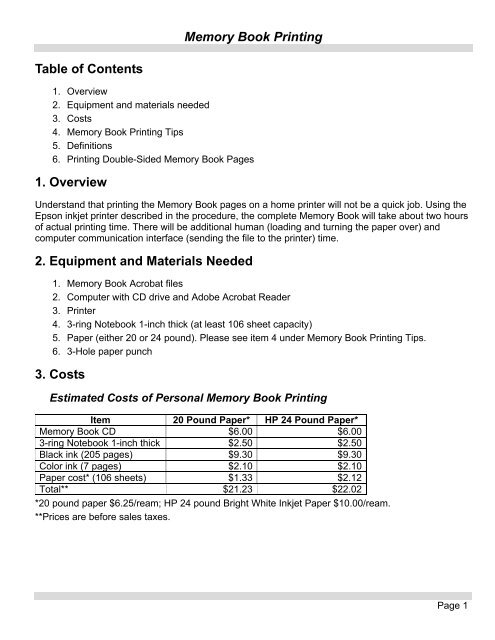
3. Costs<br />
Estimated Costs <strong>of</strong> Personal <strong>Memory</strong> <strong>Book</strong> <strong>Printing</strong><br />
Item 20 Pound Paper* HP 24 Pound Paper*<br />
<strong>Memory</strong> <strong>Book</strong> CD $6.00 $6.00<br />
3-ring Notebook 1-inch thick $<strong>2.</strong>50 $<strong>2.</strong>50<br />
Black ink (205 pages) $9.30 $9.30<br />
Color ink (7 pages) $<strong>2.</strong>10 $<strong>2.</strong>10<br />
Paper cost* (106 sheets) $<strong>1.</strong>33 $<strong>2.</strong>12<br />
Total** $2<strong>1.</strong>23 $2<strong>2.</strong>02<br />
*20 pound paper $6.25/ream; HP 24 pound Bright White Inkjet Paper $10.00/ream.<br />
**Prices are before sales taxes.<br />
Page 1
4. <strong>Memory</strong> <strong>Book</strong> <strong>Printing</strong> Tips<br />
Page 2<br />
<strong>Memory</strong> <strong>Book</strong> <strong>Printing</strong><br />
<strong>1.</strong> Print the individual files. They are small, so if you run out <strong>of</strong> ink or paper the loss will be<br />
minimized.<br />
<strong>2.</strong> If you want to print fewer pages <strong>of</strong> a bio file, just be sure to enter Acrobat page range numbers<br />
with an odd start page number and an even end number to keep the correct double-sided<br />
sequence.<br />
3. Each <strong>Memory</strong> <strong>Book</strong> file starts with an odd page number (1, 3, 11, 21, etc.) and ends with an<br />
even page number (2, 4, 12, 22, etc.) in order to keep the correct double-sided sequence.<br />
4. When viewing the front page <strong>of</strong> the bio section, if you can see the image on the backside <strong>of</strong><br />
the same sheet and it is objectionable, try a paper with higher opacity. Hewlett Packard<br />
manufactures a 24 pound Bright White Inkjet Paper for inkjet printers that has higher opacity.<br />
5. If you are using a photo printer, it may be necessary to select the text or draft quality option (to<br />
reduce the amount <strong>of</strong> ink applied) to prevent over saturating the paper.<br />
5. Definitions<br />
Opacity ― the property <strong>of</strong> paper which minimizes the “show through” <strong>of</strong> printing from the back<br />
side or the next sheet.<br />
Page ― a single side <strong>of</strong> a sheet.<br />
Sheet ― rectangular piece <strong>of</strong> paper manufactured for printing or writing.
<strong>Memory</strong> <strong>Book</strong> <strong>Printing</strong><br />
6. <strong>Printing</strong> Double-Sided <strong>Memory</strong> <strong>Book</strong> Pages<br />
Printers Used to Develop Procedure<br />
<strong>1.</strong> HP Deskjet 990 (this color inkjet printer is automatic with added paper turning accessory)<br />
<strong>2.</strong> Epson Photo R340 (this color inkjet printer can be used in either the semi automatic mode,<br />
double-sided checked, or manual mode double-sided un-checked)<br />
3. HP Deskjet 1220C (manual color inkjet printer)<br />
Home printers will usually perform double-sided or two-sided printing in one <strong>of</strong> three methods:<br />
NOTE<br />
Be sure portrait mode is selected on your printer. See Figure <strong>1.</strong><br />
Figure 1<br />
Page 3
Page 4<br />
<strong>Memory</strong> <strong>Book</strong> <strong>Printing</strong><br />
<strong>1.</strong> Automatic: These printers will automatically turn the paper over to print the second paper side.<br />
Click on the Properties button on the Print screen and check the Flip On Long Edge on the<br />
Page Layout tab screen. See Figure <strong>2.</strong><br />
Figure 2
<strong>Memory</strong> <strong>Book</strong> <strong>Printing</strong><br />
<strong>2.</strong> Semi-automatic: These printers depend on you to turn the paper over and re-insert into the<br />
paper tray with the top <strong>of</strong> the paper set to enter the printer first. Instructions will usually be<br />
displayed on the computer screen as the last page <strong>of</strong> the first side printing is being printed.<br />
See Figure 3A. Click on the Properties button on the Print screen, then check the Double-<br />
Sided setting on the Page Layout tab screen. See Figure 3B.<br />
Figure 3A<br />
Figure 3B<br />
Page 5
Page 6<br />
<strong>Memory</strong> <strong>Book</strong> <strong>Printing</strong><br />
3. Manual: These printers depend on you to know how to turn the paper over and how to reinsert<br />
the paper into the paper tray with the top <strong>of</strong> the paper set to enter the printer first. The<br />
instructions that follow are for manual double-sided or two-sided printing.<br />
Figure 4
<strong>Memory</strong> <strong>Book</strong> <strong>Printing</strong><br />
Determining the Manual Printer Paper Path<br />
NOTE<br />
The following method is applicable to most inkjet printers, laser printers, and copy machines.<br />
<strong>1.</strong> Take two sheets <strong>of</strong> paper and on one side <strong>of</strong> first sheet draw a large “A1”. Also place an arrow<br />
pointing toward the printer (i.e., mark the end <strong>of</strong> the paper (top) that will enter the printer first).<br />
On one side <strong>of</strong> the second sheet draw a large “A2” and again place an arrow pointing toward<br />
the printer to mark the top <strong>of</strong> the paper. See Figure 5.<br />
<strong>2.</strong> On the second side <strong>of</strong> the first sheet <strong>of</strong> paper mark a large “B1” and again place an arrow<br />
indicating which part <strong>of</strong> the paper will enter the printer first. On the second side <strong>of</strong> the second<br />
sheet draw a large “B2” and again place an arrow pointing toward the printer to mark the top<br />
<strong>of</strong> the paper. Be sure arrows on both sides <strong>of</strong> each sheet point to the same end.<br />
3. Place the two sheets <strong>of</strong> paper into the printer’s paper tray so that the “A” sides <strong>of</strong> the stacked<br />
two sheets <strong>of</strong> paper are facing up or toward you and the head <strong>of</strong> the arrow is pointing toward<br />
the printer’s entrance. See Figure 5.<br />
Figure 5<br />
Page 7
Page 8<br />
<strong>Memory</strong> <strong>Book</strong> <strong>Printing</strong><br />
4. Open the <strong>Memory</strong> <strong>Book</strong> file ‘B-Introduction’ with Adobe Acrobat Reader.<br />
5. Click FILE and PRINT. Select a Print Range <strong>of</strong> 1-4 pages (select Odd pages only under<br />
Subset) and check Reverse pages, see Figures 6a and 6b.<br />
6. Click the OK button to print the pages.<br />
Figure 6a (Epson)<br />
Figure 6b (HP)
<strong>Memory</strong> <strong>Book</strong> <strong>Printing</strong><br />
7. After the pages are printed, observe which side <strong>of</strong> the two sheets <strong>of</strong> paper contain the printed<br />
pages. If the “A” side <strong>of</strong> each sheet was printed, go to Step A below. If the “B” side <strong>of</strong> each<br />
sheet was printed, go to Step B below.<br />
Step A: “A” Side <strong>of</strong> the Two-Sheets Printed (Epson)<br />
<strong>1.</strong> Place the sheet containing the “A2” on top <strong>of</strong> the sheet containing “A1”. Place the two-sheet<br />
stack with the “A” sides facing away from you back into the printer’s paper tray.<br />
<strong>2.</strong> Still using the <strong>Memory</strong> <strong>Book</strong> file ‘B-Introduction’ with Adobe Acrobat Reader, click the Adobe<br />
Acrobat FILE and PRINT. Select a Print Range <strong>of</strong> 1-4 pages (Even pages only under<br />
Subset) and check Reverse pages. See Figure 7.<br />
3. Click the OK button to print the pages.<br />
Figure 7<br />
4. After the pages are printed, observe that the “B” side <strong>of</strong> the two-sheets <strong>of</strong> paper contain the<br />
even printed pages. The sheet containing the page marking “A2” should have Introduction<br />
page i, while the sheet side containing “B2” should have Introduction page ii. The sheet<br />
containing the page marking “A1” should have Introduction page iii, while the sheet side<br />
containing “B1” should have Introduction page iv.<br />
Page 9
Page 10<br />
<strong>Memory</strong> <strong>Book</strong> <strong>Printing</strong><br />
Step B: “B” Side <strong>of</strong> the Two-Sheets Printed (HP)<br />
<strong>1.</strong> Place the sheet containing the “B2” on top <strong>of</strong> the sheet containing “B1”. Place the two sheet<br />
stack with the “B” sides facing upward back into the printer’s paper tray.<br />
<strong>2.</strong> Still using the <strong>Memory</strong> <strong>Book</strong> file ‘B-Introduction’ with Adobe Acrobat Reader, click the Adobe<br />
Acrobat FILE and PRINT. Select a Print Range <strong>of</strong> 1-4 pages (select Even pages only under<br />
Subset), and uncheck Reverse pages. See Figure 8.<br />
3. Click the OK button to print the pages.<br />
Figure 8<br />
4. After the pages are printed, observe that the “A” side <strong>of</strong> the two sheets <strong>of</strong> paper contain the<br />
even printed pages. The sheet containing the page marking “B2” should have Introduction<br />
page i, while the sheet side containing “A2” should have Introduction page ii. The sheet<br />
containing the page marking “B1” should have Introduction page iii, while the sheet side<br />
containing “A1” should have Introduction page iv.