ZeZu Twin Pramette
ZeZu Twin Instructions - Obaby
ZeZu Twin Instructions - Obaby
- No tags were found...

You also want an ePaper? Increase the reach of your titles
YUMPU automatically turns print PDFs into web optimized ePapers that Google loves.
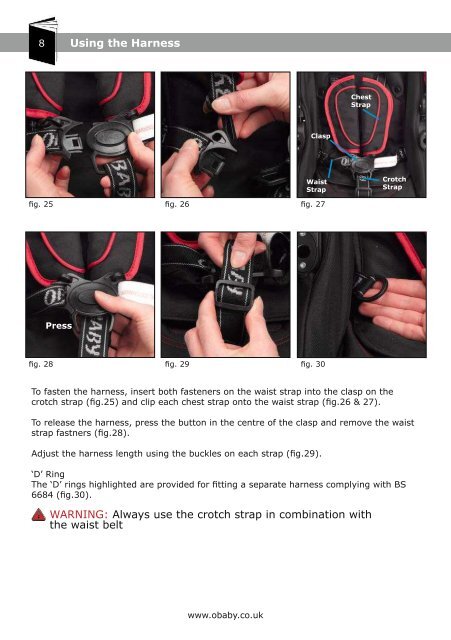
8 Using the Harness<br />
Fitting the Seat Unit 9<br />
Chest<br />
Strap<br />
“Click”<br />
Clasp<br />
Waist<br />
Strap<br />
Crotch<br />
Strap<br />
fig. 25<br />
fig. 26<br />
fig. 27<br />
fig. 31 fig. 32 fig. 33<br />
Press<br />
Lift<br />
Press<br />
fig. 28<br />
fig. 29<br />
fig. 30<br />
fig. 34 fig. 35<br />
To fasten the harness, insert both fasteners on the waist strap into the clasp on the<br />
crotch strap (fig.25) and clip each chest strap onto the waist strap (fig.26 & 27).<br />
To release the harness, press the button in the centre of the clasp and remove the waist<br />
strap fastners (fig.28).<br />
Adjust the harness length using the buckles on each strap (fig.29).<br />
‘D’ Ring<br />
The ‘D’ rings highlighted are provided for fitting a separate harness complying with BS<br />
6684 (fig.30).<br />
WARNING: Always use the crotch strap in combination with<br />
the waist belt<br />
The seat unit can face either forwards or backwards.<br />
To put the seat unit onto the chassis, line up the seat coupler with the chassis fittings on<br />
each side and lower onto the chassis (fig. 31 & 32), ensure it clicks into place on both<br />
sides (fig.33).<br />
To remove the seat from the chassis, press both release buttons on each side of the seat<br />
unit (fig.34) and lift the seat up, away from the chassis (fig.35).<br />
WARNING: Ensure that all locking devices are engaged before use<br />
www.obaby.co.uk<br />
www.obaby.co.uk