

CONFIGURING TALKSWITCH FOR CBEYOND SERVICE
Cbeyond Service Configuration – Talkswitch - TCE Company
Cbeyond Service Configuration – Talkswitch - TCE Company
- No tags were found...

Create successful ePaper yourself
Turn your PDF publications into a flip-book with our unique Google optimized e-Paper software.
<strong>TALKSWITCH</strong> TECH NOTE<br />
<strong>CONFIGURING</strong> <strong>TALKSWITCH</strong> <strong>FOR</strong> <strong>CBEYOND</strong> <strong>SERVICE</strong><br />
<strong>CONFIGURING</strong><br />
<strong>TALKSWITCH</strong> <strong>FOR</strong><br />
<strong>CBEYOND</strong> <strong>SERVICE</strong><br />
CT.TS005.004602<br />
Before proceeding, we recommend that you follow the steps outlined in the Start Guide<br />
included with your TalkSwitch 48-CVA unit. Also ensure you have the configuration<br />
parameters for setting up service with the Cbeyond network.<br />
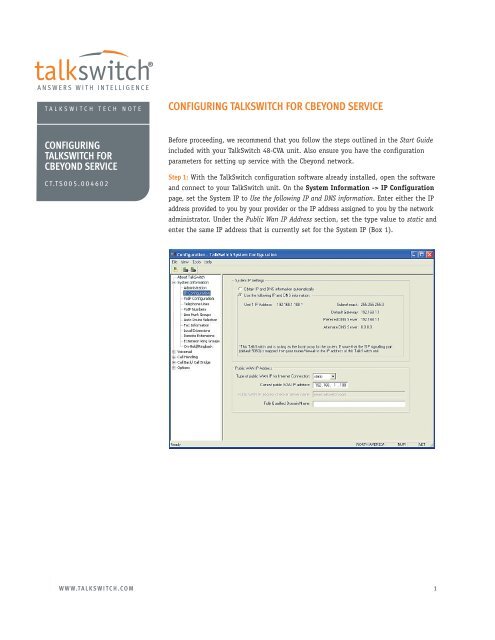
Step 1: With the TalkSwitch configuration software already installed, open the software<br />
and connect to your TalkSwitch unit. On the System Information -> IP Configuration<br />
page, set the System IP to Use the following IP and DNS information. Enter either the IP<br />
address provided to you by your provider or the IP address assigned to you by the network<br />
administrator. Under the Public Wan IP Address section, set the type value to static and<br />
enter the same IP address that is currently set for the System IP (Box 1).<br />
WWW.<strong>TALKSWITCH</strong>.COM 1
<strong>CONFIGURING</strong> <strong>TALKSWITCH</strong> <strong>FOR</strong> <strong>CBEYOND</strong> <strong>SERVICE</strong><br />
Step 2: Proceed to System Information -> VoIP Configuration and fill in the fields<br />
with the information provided by Cbeyond for your account. These include:<br />
a) Service Provider Name: Cbeyond<br />
b) Proxy Server Name: sipconnect.xxx0.cbeyond.net<br />
c) Registrar Server Name: sipconnect.xxx0.cbeyond.net<br />
Where xxx = atl for Atlanta, dal for Dallas, den for Denver, etc. The value for<br />
xxx will be provided by Cbeyond.<br />
d) Outbound Proxy: leave empty<br />
e) Realm/Domain: sipconnect.xxx0.cbeyond.net<br />
Where xxx = atl for Atlanta, dal for Dallas, den for Denver, etc. The value for<br />
xxx will be provided by Cbeyond.<br />
WWW.<strong>TALKSWITCH</strong>.COM 2
<strong>CONFIGURING</strong> <strong>TALKSWITCH</strong> <strong>FOR</strong> <strong>CBEYOND</strong> <strong>SERVICE</strong><br />
Step 3: Proceed to the System Information -> VoIP Numbers page. Select a VoIP<br />
Numbers tab and check the Activate VoIP Number box, then click on the Service Provider<br />
Profile button. Enter the Phone Number, User/Account and Password information for<br />
your accounts.<br />
a) Phone Number: Enter your 10 digit Cbeyond number — Area code, then Number.<br />
Do not enter a Country Code (calls will not work if a Country Code is entered).<br />
b) User/Account: Enter exactly as provided in the Cbeyond Install Profile. This<br />
should be your 10 digit phone number.<br />
c) Password: Enter exactly as provided in the Cbeyond Install Profile.<br />
WWW.<strong>TALKSWITCH</strong>.COM 3
<strong>CONFIGURING</strong> <strong>TALKSWITCH</strong> <strong>FOR</strong> <strong>CBEYOND</strong> <strong>SERVICE</strong><br />
Step 4: Proceed to the System Information -> Line Hunt Groups page. Select a Hunt<br />
Group to use for accessing Cbeyond service and ensure Line Type is set to Cbeyond VoIP<br />
Numbers. In this example, Hunt Group 88 is configured to access all available VoIP lines.<br />
For convenience, you can assign a name to the selected Line Hunt Group (e.g. Cbeyond).<br />
Step 5: Save settings to TalkSwitch by selecting File from the menu and then Save to<br />
TalkSwitch.<br />
Ensure you configure the TalkSwitch Call Handling parameters to handle inbound VoIP<br />
calls. See the TalkSwitch VoIP Configuration Guide for more information on configuring<br />
VoIP Numbers for inbound calls. Be sure to Save to TalkSwitch after making changes.<br />
Step 6: Ensure you have your firewall ports properly mapped to TalkSwitch. In order to<br />
support VoIP calls through a router or firewall, the firewall needs to be configured to allow<br />
VoIP traffic through certain ports. The ports required open by TalkSwitch are as follows:<br />
Port<br />
Type<br />
5060 UDP (Map to IP address of TalkSwitch acting as Local Proxy<br />
— usually Unit ID 1)<br />
6000 – 6006 UDP (Map to IP address of TalkSwitch Unit ID 1)<br />
6010 – 6016 UDP (Map to IP address of TalkSwitch Unit ID 2)<br />
6020 – 6026 UDP (Map to IP address of TalkSwitch Unit ID 3)<br />
6030 – 6036 UDP (Map to IP address of TalkSwitch Unit ID 4)<br />
For additional information on configuring port forwarding for your router, please visit:<br />
http://www.portforward.com/routers.htm<br />
WWW.<strong>TALKSWITCH</strong>.COM 4
<strong>CONFIGURING</strong> <strong>TALKSWITCH</strong> <strong>FOR</strong> <strong>CBEYOND</strong> <strong>SERVICE</strong><br />
Step 7: Confirm that your Cbeyond VoIP Number(s) have registered. Go to the System<br />
Information -> VoIP Numbers menu and select a Cbeyond number tab. At the bottom<br />
of the page, click on the View Registration Status button. The Registration Status window<br />
will open, showing the registration status for each Cbeyond ID number.<br />
Note: If the status shows a “Not Registered” result (e.g. client ID 333-1234567 below),<br />
then there is a problem with the configuration or connection to the network. If so,<br />
double-check that all information entered in Steps 1–6 is correct. For additional help,<br />
refer to the Internet Telephony Service Provider Troubleshooting Guide included in your<br />
TalkSwitch configuration (typically at START -> Programs -> TalkSwitch 3.24 -><br />
Documentation -> Quick Guides).<br />
About TalkSwitch<br />
TalkSwitch® is dedicated to providing small<br />
and multi-location businesses with innovative<br />
telecommunications solutions. Since 1990,<br />
TalkSwitch has delivered rich features, high<br />
functionality and unbeatable value. Ideal for<br />
businesses with up to 32 telephone users per<br />
office, TalkSwitch systems provide users with<br />
options to connect to both the traditional<br />
telephone network (PSTN) and Voice over IP<br />
(VoIP) networks. TalkSwitch is headquartered<br />
in Ottawa, Canada. For more information, visit<br />
us at www.talkswitch.com, or call us toll free<br />
in North America at 1.888.332.9322. In all<br />
other markets call +1.613.725.2980.<br />
Step 8: Place a test call by first dialing the hunt group programmed for Cbeyond.<br />
In this example it’s 88. Next, dial a phone number to confirm the system is properly<br />
configured.<br />
© TalkSwitch 2006<br />
WWW.<strong>TALKSWITCH</strong>.COM 5
