

am..Brew
T'JTJ~~~ - Free and Open Source Software
T'JTJ~~~ - Free and Open Source Software
- No tags were found...

You also want an ePaper? Increase the reach of your titles
YUMPU automatically turns print PDFs into web optimized ePapers that Google loves.
Number 12 on your F~ba ck ca rd<br />
Good Mobile Audio<br />
For Pennies<br />
Conveniently feed rig audio to your car speaker system.<br />
by Paul M. Danzer Nlil<br />
O<br />
nee again. I put a new 2<br />
meter rig in my car. and<br />
once again, I was d isappointed .<br />
There is always a lot of high<br />
mobile <strong>am</strong>bient noise in a car.<br />
Combine this problem with the<br />
small size of the speakers provided<br />
with most 2 meter rigs<br />
and you end up with with a<br />
sound system that just does nor<br />
provide the dean distinct audio<br />
we now routinely expect from<br />
modern h<strong>am</strong> equipment.<br />
Whether this is due to the<br />
speaker or to the small size of<br />
the aud io <strong>am</strong>plifier is debatable.<br />
but the poor results are evident.<br />
Years ago, there was plenty of<br />
room to neatly add an external<br />
speaker to solve the problem.<br />
Today's automobiles are much<br />
more cr<strong>am</strong>ped.<br />
Solution<br />
Fortunately. today's cars also<br />
often h a ve fou r spea ker s<br />
mou nted for the AM/FM radio<br />
and cassette player.<br />
The first thou ght you might<br />
have is to open up one of these<br />
speaker lines and share it with<br />
the two meter rig. On second<br />
thought. the problem of switching<br />
back and fourth between the<br />
h<strong>am</strong> gear and the entertainment<br />
gea r gets quite messy.<br />
The answer to this almost universal<br />
problem is in the cassette<br />
player. Figure I shows how to<br />
do it.<br />
Start out with a standard audio<br />
cassette . If possible. obtaino ne which can<br />
be opened by unscrewing 4 or 5 Phillips-head<br />
screws. If necessary. you can use the glued<br />
units. but this makes opening them up a little<br />
harder.<br />
Next, strip out everything in the cassette.<br />
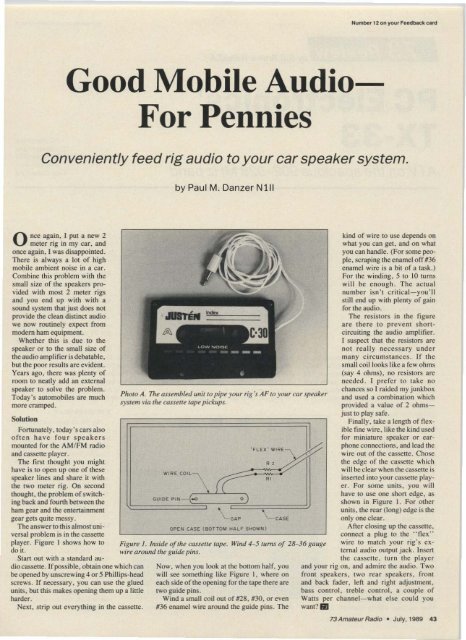
Phoro A. The assembled unit to pipe Jour n"g 's AF to your car speaker<br />
system via the cassette tape pickups.<br />
WIR E COIL \<br />
GUID E P I~~ o )<br />
(<br />
-ec ex- WIRE\<br />
/:<br />
•<br />
•<br />
"<br />
Now , when you look at the bottom half. you<br />
will see something like Figure I, where on<br />
each side ofthe opening for the tape there are<br />
IWO guide pins.<br />
Wind a small coil out of #28 , #30, or even<br />
#36 en<strong>am</strong>el wire around the guide pins. The<br />
"<br />
• •<br />
'-GAP '--CASE<br />
OP EN CASE CBOT To ... HALF SHOWff l<br />
Figure J. Inside ofthe cassette tape. Wind 4-5 turns of 28-36 gauge<br />
wire around the guide pins.<br />
kind of wire to use depends on<br />
what you can get . and on what<br />
you can handle. (For some pe0<br />
pte. scraping the en<strong>am</strong>el off #36<br />
en<strong>am</strong>el wire is a bit of a task.)<br />
For the winding. 5 to JO turns<br />
will be e no ug h. The actual<br />
numbe r isn't c ritical-you' ll<br />
still end up with plenty of gain<br />
for the audio.<br />
The resistors in the figure<br />
a re the re to prevent shortcircuiting<br />
the audio <strong>am</strong>plifier.<br />
I suspect that the resistors are<br />
not re a ll y nece ssa ry under<br />
ma ny c ircumsta nces. If the<br />
small coil looks like a few ohms<br />
(say 4 ohms), no resistors are<br />
needed . I prefer 10 take no<br />
chances so I raided my junkbox<br />
and used a combinatio n which<br />
provided a value of 2 ohmsjust<br />
to play safe.<br />
Finally, take a length of fl exible<br />
fine wire. like the kind used<br />
for miniature speaker or earphone<br />
connections, and lead the<br />
wire out of the cassette. Chose<br />
the edge of the cassette which<br />
will be clear when the cassette is<br />
inserted into your cassette player.<br />
For some units, you will<br />
have to use one short edge. as<br />
shown in Figure I. For other<br />
units, the rear (long) edge is the<br />
only o ne dear.<br />
After dosing up the casscue.<br />
connect a plug to the "f l ex"<br />
wire to match you r rig's external<br />
aud io output jack. Insert<br />
the cassette , turn the player<br />
and your rig on, and admire the audio. Two<br />
front speakers, two rear speakers, front<br />
and back fader, left and right adjustment,<br />
bass control, treble control, a couple of<br />
Watts per cha nnel - what else could you<br />
want ? III<br />
73 Amateur Radio • July,1989 43


