Almost There - Canadian Morgan Horse Association
Almost There - Canadian Morgan Horse Association
Almost There - Canadian Morgan Horse Association

You also want an ePaper? Increase the reach of your titles
YUMPU automatically turns print PDFs into web optimized ePapers that Google loves.
<strong>Almost</strong> <strong>There</strong><br />
The <strong>Canadian</strong> <strong>Morgan</strong> <strong>Horse</strong> <strong>Association</strong> Youth<br />
<strong>Horse</strong>mastership Program<br />
<strong>Almost</strong> <strong>There</strong><br />
This Book Belongs to: .<br />
Youth Club: .<br />
CMHA # .
<strong>Almost</strong> <strong>There</strong><br />
<strong>Canadian</strong> <strong>Morgan</strong> <strong>Horse</strong> <strong>Association</strong> Youth <strong>Horse</strong>mastership Levels<br />
Purpose<br />
The purpose of the CMHAY is to instill in young people, pride in, enjoyment of, and knowledge<br />
about the <strong>Morgan</strong> <strong>Horse</strong> with the ultimate objective of educating future owners and breeders<br />
dedicated to preserving, improving, promoting and cherishing the <strong>Morgan</strong> breed. These<br />
objectives, incorporating the ideals and skills of horsemastership and management,<br />
sportsmanship, responsibility in citizenship, discipline and competence in leadership, will be<br />
pursued through active youth programs.<br />
Rules<br />
1. The program is open to CMHAY members, 21 and under, who are interested in learning<br />
more about the <strong>Morgan</strong> and safe horsemanship.<br />
2. The six levels are:<br />
1. Let’s Begin (10 & under)<br />
2. Up & Coming<br />
3. Stepping Higher<br />
4. <strong>Almost</strong> <strong>There</strong><br />
5. The Sky is the Limit<br />
6. On Your Way<br />
3. Members may work on the levels in their youth clubs or as individual members. All<br />
work must be completed with a <strong>Morgan</strong> <strong>Horse</strong>. All lessons in the level do not need to be<br />
completed at the same time, but members must complete one level before progressing to<br />
the next.<br />
4. The CMHAY will award pins to members who pass each level. If all levels are<br />
completed a certificate will be awarded to the individual. The individual’s names will<br />
also be mentioned in the <strong>Canadian</strong> <strong>Morgan</strong> Magazine.<br />
5. Tests for the levels are to be administered by local club leaders or qualified person(s)<br />
designated by the club. Tests for the top three levels must be administered by CMHA<br />
approved horsemastership examiners. Official examiners must be appointed by the local<br />
club and approved of by the CMHA board and CMHA Youth Committee.<br />
Instruction<br />
Every youth member should have their own copy of the <strong>Horse</strong>mastership level booklet, which<br />
may be obtained through the CMHA Office, Box 286, Port Perry, ON, L9L 1A3.<br />
Individuals are responsible for keeping their own records but leaders should also keep a record<br />
of each member’s progress. When all the lessons for a level have been passed, the youth leader<br />
or examiner should send in the achievement report form to the CMHA office. Upon approval,<br />
pins will be sent to the leader for presentation. It is suggested that the pins be awarded to the<br />
member(s) at an appropriate ceremony.
<strong>Almost</strong> <strong>There</strong><br />
Lesson 1: <strong>Horse</strong> Health<br />
Part A: Give an oral report on the normal<br />
temperature, pulse and respiration ranges<br />
of a mature horse at rest. Discuss factors<br />
that may affect the normal ranges.<br />
A healthy horse is relaxed, moves freely &<br />
easily, is alert, bright and responsive with clear<br />
eyes & nose, shiny coat and firm muscle tone<br />
and pink mucus membranes. They have a good<br />
appetite, good water intake and normal urine<br />
and fecal output. Optimum health is essential<br />
to maintain overall feeling of well-being.<br />
Having good knowledge of what a healthy<br />
horse is will help to detect signs of illness or<br />
disease.<br />
It is good practice to take your horse’s vital<br />
signs at the same time each day over the<br />
course of 3-4 days. Average the data to find<br />
out what their individual normal is.<br />
Do not access your horse on very hot or cold<br />
days, after stressful activity, when on<br />
medications or around feeding time, as these<br />
factors will affect normal vital signs.<br />
BODY TEMPERATURE<br />
Nearly all horses will vary within a normal<br />
range depending on time of day, how recent<br />
they were fed and what the ventilation<br />
effectiveness of the stable might be.<br />
To take a horse’s temperature the thermometer<br />
should be sterilised before use and the bulb<br />
end greased with a little Vaseline. You can use<br />
either mercury or digital. Shake it down and<br />
then stand to the one side of the horse to avoid<br />
being kicked. Hold the tail to one side and<br />
using a gentle rotating movement, insert the<br />
thermometer into the rectum. HOLD it there<br />
for one minute. Remove the thermometer and<br />
read. Clean the thermometer after use.<br />
Most veterinarians give the normal range for a<br />
mature horse from 36.6 – 37.8 degrees C (98-<br />
100.1 F). It may be elevated in the afternoon<br />
or after exercise. Younger horses may have<br />
slightly higher temperatures than mature<br />
horses.<br />
Your vet should be consulted if the<br />
temperature rises above 39 degrees C, as this<br />
could be a sign of grave illness.<br />
PULSE RATES<br />
Pulse rate reflects the heart activity and may<br />
be a useful aid in evaluating the health status<br />
of any horse. Pulse rates also vary due to age,<br />
excitement or stage of gestation. The range<br />
often given for the pulse of mature horses is<br />
36-42 beats/minute. The pulse which you can<br />
feel in an artery is an intermittent wave caused<br />
by the heart forcing blood through it. The<br />
arteries alternate between expansion and<br />
contraction and it is this pulse that we feel and<br />
count.<br />
The following chart indicates where you may<br />
take a horse’s pulse. To determine the rate,<br />
you must press your fingers on the artery in<br />
one of the areas, count for 15 seconds and then<br />
multiply by 4. The pulse may be raised by<br />
exercise, hot weather or alarm.<br />
The most common place for you to take a<br />
pulse reading is at the jugular vein, on the<br />
inner side of the bottom jaw.<br />
RESPIRATION RATE<br />
Respiration rates refer to the number of<br />
breaths per minute. Do not count both in and<br />
out or you will have a rate double what it
<strong>Almost</strong> <strong>There</strong><br />
really is. Each rise and fall of the rib cage is<br />
one breath. The respiration rate can be counted<br />
by observing or feeling the horse’s flank.<br />
Count for 14 seconds and then multiply by 4.<br />
The normal respiratory rate for a mature horse<br />
is between 8-16 breaths per minute. The<br />
respiration rate will increase with hot weather,<br />
work, pregnancy and over eating. Breathing<br />
should be even with the nostrils moving only<br />
slightly.<br />
A horse with a rate of 16 breaths/minute or<br />
higher or who seems to have difficulty<br />
breathing, may be in trouble and your vet<br />
should be consulted.<br />
Part B: Describe supplies & medicines that<br />
should be kept on hand for horse first aid<br />
kit and how they are used.<br />
As with family health care, knowledge is the<br />
first step toward preventing disease. Basic<br />
knowledge will help you avoid conditions<br />
which might bring on sickness for animals in<br />
your care. Good health care will result in a<br />
much happier and healthier horse and when<br />
your animal is in that state he will provide you<br />
greater service and satisfaction. If you ask 20<br />
persons what should be in included in a first<br />
aid kit you would receive 20 different answers.<br />
This list is not comprehensive and you are<br />
encouraged to add your favourite supplies to<br />
it! It is well to remember you will be called on<br />
often to give first aid to horses in your care. So<br />
here are some supplies you should have on<br />
hand:<br />
1. 5 “ Veterinary rectal thermometer<br />
2. Sterile cotton and gauze bandages<br />
3. Antiseptic wound dressing<br />
4. Epsom salts<br />
5. Poultice material<br />
6. Thrush remedy<br />
7. Vaseline<br />
8. Scissors & tweezers<br />
9. Antiseptic soap for washing wounds<br />
10. Rubbing alcohol<br />
11. Mineral Oil<br />
12. Iodine<br />
13. Syringes/needles<br />
14. Stable bandages & wraps<br />
15. Vet wrap or medical tape<br />
16. plastic wrap or brown paper<br />
17. safety pins<br />
18. surgical gloves<br />
Common medications that are kept on hand<br />
include Phenylbutazone, Banamine, Borgal<br />
and Penicillin.<br />
Part C: Describe the causes and symptoms<br />
of colic, founder, azoturia, thrush and<br />
heaves.<br />
COLIC<br />
Colic is simply a “bellyache.” The<br />
gastrointestinal anatomy of the horse<br />
predisposes them to colic as well as<br />
domestication and removing them from their<br />
natural environment and diet. <strong>There</strong> are<br />
multiple types of colic including: gas,<br />
impaction, spasmodic, displacement and<br />
torsion. Colic may also occur in association<br />
with ulcers and abdominal lesions. Among the<br />
primary causes of colic is internal parasite<br />
damage or load. Other causes are stress,<br />
dehydration, irregularities in feeding or sudden<br />
change in diet, poor quality feed, chronic<br />
indigestion, medication-related, eating<br />
bedding, sand in the food or drinking water (as<br />
when watering from a shallow river bed) in<br />
addition to others. When a horse has colic, it is<br />
indicated by general uneasiness, going off<br />
feed, restlessness, looking around at the flanks,<br />
kicking at the belly, pawing, getting up and<br />
down constantly, rolling, sweating, lack of gut<br />
sounds and elevated pulse and respiration.<br />
Colic symptoms may present in a wide variety<br />
of ways. Call your vet at the first sign of colic.<br />
If not treated professionally, colic can be fatal.<br />
While waiting for the vet, walk the animal<br />
slowly for a short period of time. Try to keep<br />
him standing and do not permit him to roll.
<strong>Almost</strong> <strong>There</strong><br />
Rolling can cause a twisted intestine. If it’s<br />
cool you may need to blanket the horse and<br />
remove feed and toys from the stall but<br />
provide fresh water.<br />
LAMINITIS (FOUNDER)<br />
This condition is an inflammation of the<br />
sensitive laminae of the foot where founder is<br />
the rotation of the coffin bone in the hoof.<br />
Laminitis may be acute (sharp, present pain) or<br />
chronic (continuous over a long period of<br />
time). It may involve any foot or all four but<br />
most commonly the forefeet are affected. The<br />
most common cause of acute laminitis seems<br />
to be due to a toxic condition in the<br />
bloodstream. The toxins cause deceased blood<br />
flow to the foot resulting in swelling of the<br />
laminae. If this is prolonged the laminae<br />
begins to die, resulting in a weaker foot,<br />
allowing the coffin bone to rotate downward<br />
causing founder.<br />
Laminitis or Founder has been noted to occur<br />
as a result of the following as well.<br />
1. Water Founder: overheated animal<br />
drinking cold water or cooling out too<br />
quickly.<br />
2. Grain Founder: excessive amounts of<br />
grain ingested causing a toxic situation<br />
in the gastrointestinal system.<br />
3. Road Founder: repeated concussion<br />
during hard, fast road work or standing<br />
for long periods of time on hard<br />
surfaces causing decreased blood flow<br />
to the area.<br />
4. Grass Founder: common among horses<br />
grazing on lush pastures causing a<br />
toxic situation in the gastrointestinal<br />
system<br />
5. Foal Founder: retention of afterbirth<br />
causing a toxic situation.<br />
Predispositions for laminitis include overweight<br />
horses, systemic infection, exercise on<br />
hard surfaces and sudden changes in diet.<br />
The symptoms of founder include a rise in<br />
rectal temperature up to 106F with an<br />
accompanying increase in respiratory and<br />
pulse rates. If standing, the animal resists<br />
movement. The first steps are made with great<br />
pain which subsides slightly as the animal<br />
warms up. Affected feet are warm to the touch.<br />
Mild pressure by hoof testers across the hoof<br />
wall, especially the toe produces great pain.<br />
When the fore feet are involved, the animal<br />
stands with his rear feet under him to take<br />
pressure off the front feet.<br />
AZOTURIA (TYING UP)<br />
This is a condition associated with forced<br />
exercise after a period of rest while on full<br />
high protein diet. Upon resumption of exercise<br />
the animal ties-up and finds it painful to move.<br />
The horse suffers from muscle damage due to<br />
build up of lactic acid. Some minutes after<br />
being put to work, the animal begins to sweat,<br />
increase in pulse and displays stiffness in the<br />
hind quarter muscles. The muscles will be<br />
painful and tense to the touch. The urine may<br />
be dark coloured also. The animal should stop<br />
work immediately and the vet should be<br />
called. The animal should not be moved, and<br />
should be dried and covered. Animals which<br />
have been affected are prone to recurrences.<br />
Attacks may be prevented by regulation of<br />
diet, reduction of feed on days off, gradual<br />
warm up and cool downs.<br />
THRUSH<br />
An ailment of the foot commencing at the<br />
central or sulcus cleft and eventually involving<br />
the entire frog. It is caused by unclean<br />
conditions as when a horse stands in a dirty<br />
and damp stall. Failure to clean hooves at<br />
regular intervals also is a cause. A foul odour<br />
is always present. The affected foot is moist<br />
and there often is a thick black discharge.<br />
Treatment is lengthy and begins with<br />
providing dry, clean bedding and daily<br />
cleaning of feet. Your vet or farrier can advise<br />
on suitable treatment and medication.
<strong>Almost</strong> <strong>There</strong><br />
HEAVES<br />
This respiratory condition is characterized by<br />
difficult breathing, a chronic cough and<br />
generally poor condition. The cause of heaves<br />
(broken wind) is unknown, but there are many<br />
probable causes including: allergic reaction,<br />
exposure to dust or moulds, result of chronic<br />
bronchitis, prolonged feeding of poor quality<br />
roughage and extreme exertion. First common<br />
signs include cough and nasal discharge,<br />
shortness of breath and using abdominal<br />
muscles to breathe after exercise. Respiratory<br />
distress occurs in dusty surrounding or in hot<br />
weather. As disease progresses, the nostrils are<br />
dilated and the abdominal muscles become<br />
mis-shapen. The condition should be<br />
diagnosed by a vet who will recommend<br />
proper treatment and medication. Diet is<br />
usually changed.<br />
Part D: Explain why it is important to<br />
vaccinate and practice parasite control.<br />
It is important to develop a vaccination<br />
program for your horse. <strong>There</strong> are several<br />
preventative inoculations that horses should<br />
have. The vaccination recommendations vary<br />
geographically. Requirements will also depend<br />
on whether your horse competes, breeds or<br />
lives in a closed herd. The most common<br />
vaccines in Canada include:<br />
RABIES<br />
Rabies is a virus that attacks the central<br />
nervous system. It is fatal in horses, so it is<br />
very important that we vaccinate against it.<br />
Rabies is transmitted through an animal bite<br />
when infected saliva comes in contact with<br />
broken skin. Symptoms include change in<br />
behaviour, lameness, self-mutilation and<br />
eventual paralysis of limbs. <strong>There</strong> is no<br />
treatment for rabies. It is extremely important<br />
that if rabies is suspected, isolation of the<br />
affected animal is a must.<br />
TETANUS<br />
Tetanus also known as lockjaw is also fatal in<br />
horses. It is a bacterial infection caused by a<br />
bacteria that lives in the soil as a spore for<br />
years. Infections occur as a result of<br />
contaminated wounds and deep puncture<br />
wounds provide an excellent spot for the<br />
bacterial growth. The toxin that is produced<br />
enters the bloodstream and interferes with<br />
muscle function. Symptoms include head and<br />
neck muscles becoming rigid, jaw doesn’t<br />
open, flared nostrils, prolapse of the 3 rd eyelid<br />
and eventual paralysis of the body. It is<br />
important that wounds be disinfected and if<br />
tetanus vaccine history is unknown or out<br />
dated, a vaccination should be given.<br />
EQUINE INFLUENZA<br />
Equine influenza is a virus infection which<br />
lasts two to four weeks. It is often seen in large<br />
herds. Fever, nasal discharge, lethargy, loss of<br />
appetite and pronounced or prolonged dry<br />
cough are the main symptoms. Treatment is<br />
mainly supportive care and rest. It is important<br />
that a secondary infection be prevented as this<br />
could then become a fatal complication.<br />
WEST NILE<br />
West Nile is a virus that affects the brain and<br />
neurological system of the horse. The disease<br />
is spread by mosquitoes. Symptoms include<br />
depression, loss of coordination, fever and<br />
weakness of the hind end. West Nile can be<br />
fatal so it is important to vaccinate annually.<br />
Treatment includes supportive care. It is<br />
imperative that these horse stay hydrated so IV<br />
fluids may be prescribed.<br />
POTOMAC HORSE FEVER<br />
Potomac horse fever is a bacterial infection<br />
that attacks the gastrointestinal tract.<br />
Symptoms include severe diarrhea, fever,<br />
depression and dehydration. Treatment<br />
includes supportive care and rehydrating.<br />
<strong>Horse</strong>s left untreated have a high fatality rate.
<strong>Almost</strong> <strong>There</strong><br />
STRANGLES (Distemper)<br />
Strangles is a very contagious disease that is<br />
caused by a bacterial infection. Affected<br />
horses should be isolated and quarantined<br />
immediately to contain the spread of this<br />
disease. Even though this disease is very<br />
contagious, most horse will make full<br />
recoveries if treated promptly. Strangles<br />
primarily affects the respiratory system.<br />
Symptoms include fever, increased respiratory<br />
rate, nasal discharge and loss of appetite.<br />
Swelling of lymph nodes in the throat area<br />
follows. These lymph nodes may eventually<br />
abscess and rupture. This discharge is pus-like<br />
and very contagious. Treatment includes<br />
supportive care and antibiotic medications.<br />
Once a horse has had strangles they are<br />
immune for life.<br />
VENEZUELAN, EASTERN & WESTERN<br />
ENCEPHALMYELITIS<br />
(Sleeping sickness or EEE, VEE OR WEE)<br />
Eastern, Venezuelan or Western<br />
Encephalomyelitis is a virus disease that can<br />
be fatal or leave your horse with permanent<br />
brain damage. These virus diseases are also<br />
contagious to man. They affect the central<br />
nervous system of the horse. It is transmitted<br />
into the bloodstream by infected mosquitos or<br />
flies. Symptoms include high fever, blindness,<br />
depression, lack of coordination, dropped lips<br />
and inability to swallow. <strong>There</strong> is no treatment<br />
and recovery is usually poor.<br />
EQUINE INFECTIOUS ANEMIA (EIA,<br />
Swamp fever)<br />
Equine Infectious Anemia may occur as an<br />
acute, rapidly fatal disease, showing a sudden<br />
onset. It is a viral disease that affects horses<br />
for a lifetime, characterized by intermittent<br />
attacks of illness followed by periods of<br />
normalcy. It is spread by the bites of horse<br />
flies, stable flies, mosquitoes and biting lice.<br />
An infected animal may spread it by<br />
secretions, such as milk, semen and blood. It is<br />
wise not to use borrowed equipment unless it<br />
has been thoroughly cleaned and disinfected<br />
first. Symptoms include episodes of fever,<br />
weight loss, depression, weakness, anaemia<br />
and edema. <strong>There</strong> is no cure or vaccine for<br />
swamp fever at the present time. Government<br />
programs require immediate slaughter or<br />
lifetime quarantine of affected horses. The<br />
only way to determine if the animal is affected<br />
is to have the Coggins test done. A sample of<br />
blood is drawn from the animal and sent to a<br />
government approved laboratory for testing.<br />
RHINOPNEUMONITIS<br />
Rhino is also a highly contagious viral disease.<br />
It is characterized by abortion in mares and<br />
respiratory infections in young horses.<br />
Contagious horses should be isolated and<br />
quarantined as the transmission is through<br />
direct contact. Depression, nasal discharge,<br />
congestion, fever and coughing are all seen in<br />
affected horses. Treatment includes supportive<br />
care and sanitation.<br />
PARASITE CONTROL<br />
Intestinal parasites can seriously harm your<br />
horse. They do great damage by interfering<br />
with the growth, development, performance<br />
and resistance to disease. Young horses are<br />
susceptible and suffer the greatest damage.<br />
The most common intestinal parasites in<br />
horses are bloodworms (strongyles),<br />
roundworms (ascarids), pinworms,<br />
threadworms, tapeworms and bots. All these<br />
parasites affect the gastrointestinal system,<br />
especially the small intestine.<br />
Signs of parasitic infection include; poor,<br />
brittle coat, weight loss, dull, depressed, poor<br />
performance, lethargy, mild colic, anaemia,<br />
and a pot-bellied look.<br />
Parasite control includes:<br />
*keeping barn and stalls clean with no horse<br />
access to manure areas<br />
*rotate pastures & pick manure out of them<br />
*regular worming program<br />
*harrow pastures & break up manure piles<br />
*worm new horses
<strong>Almost</strong> <strong>There</strong><br />
*remove bot fly eggs from horses’ hair<br />
Oral pastes, liquid or gel dewormers are most<br />
common. Many factors should be considered<br />
when creating a deworming program for your<br />
horse or barn.<br />
External parasites are a problem to many<br />
horses as well. These are easier to get rid of<br />
than internal parasites. A good fly control<br />
program is helped by removal of waste,<br />
spraying with and using a safe spray or<br />
repellent on the animal daily during fly season.<br />
External parasites also include lice, ticks,<br />
mange and ringworm.<br />
Lesson Two: Bandaging<br />
Bandaging is an important skill that all<br />
equestrians should master. It is a skill that<br />
takes time to master. Incorrect bandaging can<br />
cause permanent damage. Bandaging too tight<br />
or with uneven pressure can cause blood<br />
circulation to be impaired leading to injury of<br />
leg or tail structures. Bandages may be used<br />
for the following reasons: protect wounds,<br />
hold dressings, hot/cold packs or poultices in<br />
place, immobilize structures, reduce/control<br />
swelling or bleeding, support fractures/sprains/<br />
strains and to conserve body heat.<br />
Bandaging materials include: thick padding<br />
such as cottons or quilts, stable bandages or<br />
wraps, masking tape and wound dressings if<br />
needed.<br />
Precautions: Always start with a clean dry leg.<br />
Wash bandaging materials, and have ample<br />
padding. Direction of both the padding and the<br />
bandage should always be “in” or “towards the<br />
tail”. Never pull cling type bandages tighter<br />
than the bandage. Change bandaging daily<br />
and always check for irritations or pinching.<br />
As a general rule, 2 fingers should fit between<br />
the leg and the bandage. If you need to secure<br />
the bandage, use masking tape one turn around<br />
the leg. Bandage either both front or both back<br />
legs to prevent horse from straining “good” leg<br />
by putting more weight on the leg. The same<br />
person should do the all of the bandaging so<br />
that equal tension is applied to each leg.<br />
Demonstrate how to properly apply the<br />
following four bandages:<br />
1. Stable - Used to secure wound<br />
dressings and medications or support<br />
leg structures.<br />
2. Shipping - Used for protection during<br />
shipping.<br />
3. Tail - For protection of tail (ie;<br />
shipping, braiding) and health reasons<br />
(ie; breeding, examinations.)<br />
4. Exercise - Used when exercising<br />
horses to prevent injury.<br />
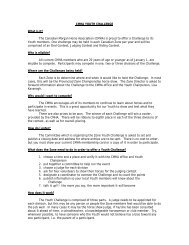
STABLE BANDAGE<br />
Start cottons on the inside splint bone groove<br />
of the leg, not on the tendon. Keep the cotton<br />
smooth. Direction is CLOCKWISE to the right<br />
and COUNTER-CLOCKWISE to the left.<br />
Start the wrap by tucking the end of the wrap<br />
under the last section of your cotton by 3-4<br />
inches, starting in the middle of the cotton.<br />
This forms a lock. The bandage wrap should<br />
be unrolled onto the leg in a manner that each<br />
succeeding layer covers approximately half of<br />
the previous layer, depending on the thickness<br />
of the cotton. Bandage down the leg just to the<br />
ergot unless lower leg support is needed.<br />
Continue bandaging up the leg to finish at the<br />
top of the leg just below the knee or hock,<br />
finishing on the outside of the leg. The entire<br />
bandaged area should have equal pressure.<br />
Avoid wrinkles or folds in the cottons and<br />
bandages. <strong>There</strong> should be 2 centimetres of<br />
cotton showing at the top and the bottom of<br />
the bandage.
<strong>Almost</strong> <strong>There</strong><br />
Stable<br />
Bandage<br />
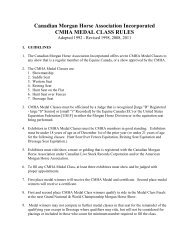
TAIL BANDAGE<br />
Start at the top of the tail and begin unrolling<br />
down the tail. After about 6 inches down the<br />
tail fold a handful of tail hairs up and bandage<br />
over. This will prevent slippage (this does not<br />
apply to a braided tail). Continue down the tail<br />
to within 1 inch of the end of the dock. Secure<br />
the bandage with the fastening.<br />
SHIPPING BANDAGE<br />
A shipping bandage must cover the heel,<br />
coronary band, pastern, fetlock joint, and all<br />
the tendons to the base of the knee or hock.<br />
The bandages will need to be longer as to<br />
cover to the heel. The wrapping of shipping<br />
bandages follows the same principles as the<br />
stable bandage. Many people today prefer to<br />
use synthetic shipping boots over bandages.<br />
Regardless of the bandage applied, as long as<br />
it is done correctly the bandage or boot will<br />
provide the proper protection.<br />
Shipping<br />
Bandage<br />
Tail<br />
Bandage<br />
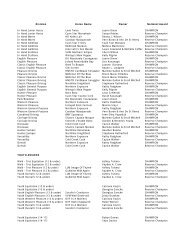
EXERCISE BANDAGE (POLO)<br />
Polo bandages are made of a fleecy material<br />
and are used instead of leather or neoprene<br />
protection boots. They offer some support to<br />
the tendons as they help keep the alignment of<br />
the tendons and ligaments. Polo bandages are<br />
applied the same as a stable bandage. The area<br />
covered includes from below the knee/hock to<br />
the ergot. Tension is extremely important<br />
because a horse that is working in a bandage<br />
that is too loose or too tight may suffer serious<br />
long term damage to their legs.<br />
Synthetic<br />
Shipping<br />
Boots<br />
Exercise/Polo Bandage
<strong>Almost</strong> <strong>There</strong><br />
Lesson Three: Conditioning<br />
Explain what is meant by conditioning<br />
The conditioning of a horse simply refers to<br />
the proper amount of exercise needed for the<br />
performance expected. The horse needs<br />
exercise for good health just as man does. The<br />
exercise should be a part of a well formulated<br />
plan. Different demands are placed upon the<br />
pleasure, competitive and show horse.<br />
Conditioning of a horse refers to physical<br />
development of all body systems. Condition is<br />
indicated by muscle tone, absence of fat, heart<br />
rate, respiratory rate and general health of the<br />
horse.<br />
Conditioning horses for demanding athletic<br />
activities requires an understanding of exercise<br />
physiology and conditioning methods. It<br />
requires experience and good judgement in<br />
order to create an effective conditioning<br />
program for the individual horse.<br />
The horse is built to move and every system<br />
contributes and collaborates with other<br />
systems to produce movement, agility, speed<br />
and endurance.<br />
MUSCLES: Skeletal muscles are the muscles<br />
that produce movement. They work by either<br />
contracting or relaxing to move a specific<br />
joint. Muscle contractions require energy<br />
which is produced by the horse’s metabolism.<br />
<strong>There</strong> are 2 different types of muscles which<br />
are activated depending on the type of exercise<br />
demanded (ie endurance vs. sprinting). Every<br />
horse has a balance of these 2 muscle types but<br />
individual horses will have more than the other<br />
depending on their discipline. With<br />
conditioning, muscles increase in size and<br />
strength. Blood circulation and nerve<br />
innervation are more efficient, making it easier<br />
for the muscle to work. Muscle is the fastest to<br />
condition.<br />
CARDIOVASCULAR SYSTEM: During<br />
exercise, the heart and blood vessels pump<br />
blood at an increased rate to deliver the<br />
nutrients to the muscles therefore increasing<br />
heart rate. With conditioning, the heart<br />
becomes stronger and more efficient, meaning<br />
it can deliver more blood to the muscles in a<br />
faster time. The heart rate will also drop to<br />
normal more quickly with conditioning.<br />
RESPIRATORY SYSTEM: With exercise, the<br />
demand for oxygen is greater. The lungs must<br />
be able to take in fresh air and expel waste<br />
gases. With conditioning, the respiratory<br />
system becomes more efficient at breathing in<br />
oxygen and expelling waste gases.<br />
To keep a horse in good condition, you must<br />
balance feed, exercise and rest. Proper<br />
nutrition is essential to provide fuel for energy,<br />
water for fluid balance and minerals &<br />
vitamins to regulate body processes. During<br />
conditioning, the horse’s nutritional needs will<br />
change. As the workload increases so should<br />
his feed, as the energy needs increase. Rest is<br />
necessary when conditioning to allow the body<br />
to recover and prepare for new work.<br />
Insufficient rest can cause muscle damage. At<br />
a certain point a horse’s condition cannot<br />
continue to increase or remain at a high level<br />
indefinitely. This is called peaking. This is<br />
why it is important to pace the conditioning of<br />
the horse so that they peak at the time of<br />
competition. It will take about six weeks to get<br />
a horse into good condition.<br />
<strong>There</strong> are 4 basic types of conditioning.<br />
1. Long, Slow, Distance Work – This type of<br />
conditioning lays the foundation of all other<br />
conditioning. This is a type of aerobic<br />
conditioning that involves increasing distance<br />
and length rather than speed. This results in<br />
cardiovascular fitness and endurance.<br />
2. Aerobic conditioning – is low intensity<br />
work for long periods of time. This increases<br />
the body’s ability to deliver oxygen to the<br />
muscles efficiently. This results in better<br />
cardiovascular efficiency and greater
<strong>Almost</strong> <strong>There</strong><br />
endurance.<br />
3. Anaerobic conditioning – is very high<br />
intensity work for very short periods of time.<br />
This increases muscle strength and develop<br />
specific skills and speed.<br />
4. Interval training – is when intervals of a set<br />
speed/distance are followed by a rest period.<br />
This is used to develop cardiovascular fitness.<br />
Remember that conditioning a horse also<br />
conditions the rider. You get out of a horse<br />
what you put into him. He is worth the effort<br />
of planned exercise in your management<br />
program. When training and conditioning a<br />
show horse, caution must be taken not to sour<br />
your horse in the ring. Each horse has a limit!<br />
The rider must acquaint himself with the telltale<br />
signs of a “ring sour” horse; pinned back<br />
ears, lolling head, ringing of the tail and balky<br />
commands. Some show horses, when trained,<br />
can be ridden, driven or just ground exercised<br />
once or twice a week; other horses need more.<br />
The clue is in the alert, willing attitude of the<br />
horse and whether his breathing is laboured or<br />
if he sweats an unusual amount. Riders should<br />
condition outside of the work arena taking the<br />
mount on the trails whenever possible.<br />
Exercise and work do not always mean riding;<br />
there is ground work for example.<br />
Conditioning for each horse varies greatly<br />
depending on the discipline and breed of your<br />
horse. Training of a racing Quarter horse will<br />
differ from that of a competitive trail horse or<br />
a <strong>Morgan</strong> show horse. It is important to<br />
develop a program with someone who is<br />
experience and knowledgeable in training and<br />
conditioning. Remember to be flexible in your<br />
schedule and let your horse tell you if you’re<br />
pushing too hard or not enough.<br />
Lesson Four: Ground Training<br />
Demonstrate lunging a bitted horse with<br />
side reins OR long lining.<br />
Ground training is an important part of<br />
horsemanship. It teaches respect, obedience,<br />
trust, cooperation and helps to establish a good<br />
working relationship between horse and rider.<br />
It helps to develop correct muscling and<br />
develop or improve movement. Ground<br />
training is a good form of exercise and<br />
stretching of the back. It also encourages<br />
forward movement, engagement, roundness,<br />
tracking, rhythm and tempo, balance and<br />
transitions, suppleness and straightness. Two<br />
forms of ground training include lunging a<br />
bitted horse (with or without side reins) or<br />
long lining.<br />
LUNGING A BITTED HORSE: Lunging with<br />
a bit is a good way for young/green horses to<br />
learn to accept the bit. Lunging with a bit also<br />
prepares the horse for further training in their<br />
future. Lunging a bitted horse should only be<br />
done by someone with the experience and<br />
knowledge because incorrect lunging with a<br />
bit can harm the horse’s mouth. <strong>There</strong> are 2<br />
methods of attachment of the lunge to the bit.<br />
The first is when the lunge is attached to both<br />
the bit and noseband. This is the safest<br />
method. This allows direct contact with the bit<br />
but also prevents the bit from sliding too much<br />
in the horse’s mouth causing pain. This<br />
attachment must be changed to the opposite<br />
side when changing directions.
<strong>Almost</strong> <strong>There</strong><br />
The second method is when the lunge is put<br />
over the poll. This creates a ‘gag’ affect as it<br />
puts pressure on the poll. The lunge is fed<br />
through the inside bit ring, over the poll and<br />
attaches to the outside bit ring. This<br />
attachment must also be changed when<br />
switching directions. This method is used<br />
when maximum control is wanted.<br />
Once you have decided on a method, continue<br />
lunging your horse as previously learned.<br />
LUNGING A BITTED HORSE WITH SIDE<br />
REINS: Often once your horse has learned to<br />
lunge with a bit comfortably, the next step is to<br />
introduce side reins. Side reins are used for<br />
warm-up exercises, help the horse take contact<br />
with the bit, to influence head set, and to<br />
develop self-carriage. When lunging a bitted<br />
horse with side reins it is best to use a snaffle<br />
bit, a surcingle or saddle and your side reins<br />
along with your lunge line and<br />
cavesson/halter. Correctly fitted side reins<br />
will help keep the horse’s neck and back<br />
properly aligned. Side reins can either be solid<br />
or have elastic in them to provide give. Solid<br />
reins provide a direct line with the bit but can<br />
teach the horse to lean on them if not used<br />
with care. Reins with elastic are used to<br />
provide give and lighter contact, and can be<br />
used on sensitive horses, but they may teach a<br />
horse to pull.<br />
The side reins should be adjusted to the<br />
horse’s training level. The reins should not be<br />
used actively during a warm up so that the<br />
horse is able to stretch as needed. Both side<br />
reins should be of equal length and always<br />
adjust the reins before attaching them to the bit<br />
to discourage leaning or pulling on the bit.<br />
Normal length side reins should be adjusted so<br />
that the horse makes contact with the bit when<br />
his head is in the correct place based on his<br />
conformation and training. His nose should be<br />
slightly ahead of the vertical.<br />
Longer side reins: Longer side reins are used<br />
in the early stages of training so that the horse<br />
may take contact with the bit but still be able<br />
to stretch his neck and back.<br />
Shorter side reins: Shorter side reins should be<br />
used on advanced horses and are used to<br />
maintain contact with the horse’s mouth when<br />
working on collected gaits in a shorter frame.<br />
The position of the head will be near or at<br />
vertical. The shorter reins should be used for<br />
short periods of time.<br />
LONG LINING: It is helpful to know why<br />
long-lining is a good technique. It is<br />
refinement of lunging. It helps to obtain more<br />
control of the animal, to teach him to respond<br />
to the reins before he is mounted, to develop<br />
gaits and natural balance long before he will
<strong>Almost</strong> <strong>There</strong><br />
be able to carry weight on his back. Equipment<br />
needed includes 2 long lines, surcingle (with<br />
crouper), snaffle bit, halter/cavesson to start.<br />
Double lunging is often used in preparation of<br />
long lining. This is where the inner line is<br />
attached directly to the inner bit/cavesson to<br />
the handler. The outside line is attached to the<br />
outer bit/cavesson and passes through a low<br />
ring on the surcingle, passes around the<br />
hindquarters to the handler. (The horse should<br />
be accustomed to having a line around his<br />
hindquarter and on both sides of his body<br />
first). This prevents the horse from swinging<br />
his body around to face you and allows you to<br />
control his hind end. When changing direction<br />
don’t forget to change your lines as well.<br />
Double lunging should be used until the horse<br />
is very comfortable with this procedure at all<br />
gaits and directions. Remember to practice<br />
stopping and standing and backing. Sometimes<br />
it is helpful to use two people during the early<br />
stage; one helper leading the horse both<br />
directions, the other long lining.<br />
the long lines through rings that are placed<br />
higher on the surcingle. This will mean your<br />
outside line will now come over the back of<br />
the horse instead of behind the haunches.<br />
Once you have achieved this step, it is now up<br />
to you to decide what the horse needs<br />
individually as far as his training goes. Various<br />
or subtle adjustments are often needed for the<br />
individual horse. Advanced techniques used in<br />
conjunction with long lining include use of a<br />
draw rein long line, use of a martingale or<br />
adding an over check, etc.<br />
It is important to remember that if you are<br />
unsure or having difficulty with any of these<br />
techniques, consult a professional who knows!<br />
Lesson Five: Aids and Gaits<br />
Name the two categories of aids and what<br />
they are; as well as how they are used.<br />
NATURAL AIDS<br />
The next step is to run both lines from each<br />
side of the bit, through low placed rings on the<br />
surcingle to your hands. The outside line will<br />
still drop behind the haunches. This will allow<br />
you to change directions without changing<br />
your lines around. Turning in long lines is<br />
often a difficult manoeuvre for novice horses<br />
to adjust too. This will take time to develop.<br />
Do not get frustrated! Once your horse is<br />
comfortable with this step, you can now run<br />
1. Voice – assists in controlling the horse.<br />
The voice can check, cue, warn,<br />
encourage, praise, excite, reprimand<br />
and calm the horse. The tone of voice<br />
influences more than what you actually<br />
say.<br />
2. Hands – control all movement created<br />
in the hindquarters and help to bend the<br />
horse in any direction. Outside hand<br />
also helps to balance. Good hands are<br />
gentle and still.<br />
3. Legs – driving aid to engage the hind<br />
quarters, put a horse in motion,<br />
increase speed & collection, to get a
<strong>Almost</strong> <strong>There</strong><br />
horse’s legs underneath himself, help<br />
create a proper turn/circle<br />
a) At the girth – move horse forward,<br />
inside leg to create bend and prevent<br />
cutting in with forehand when circling<br />
b) Behind the girth – bend the horse’s<br />
body and control lateral movement<br />
with the hind quarters<br />
4. Seat (weight) – encourages forward<br />
action when sitting well down in the<br />
saddle. By shifting your weight slightly<br />
to the left or right you reinforce the<br />
signals to turn. Strong upper body<br />
position can help restrain a horse too<br />
strong in the bridle.<br />
ARTIFICIAL AIDS<br />
1. Whip – used to motivate or guide the<br />
horse.<br />
2. Spurs – used to reinforce the leg aid.<br />
3. Martingale – used to reinforce hand<br />
aids. Used to set the horse’s head.<br />
Give a description of the gaits.<br />
GAITS OF THE HORSE<br />
1. Walk – is a natural four beat gait. Four<br />
distinct hoof beats are heard. If the<br />
horse begins with the left hind leg, it is<br />
followed by the left fore leg then the<br />
right hind leg and then the right fore<br />
leg. The horse will use his head and<br />
neck to help balance and their backs<br />
will swing freely. The average speed of<br />
a walk is about 4mph.<br />
2. Trot/jog – is a two beat diagonal gait<br />
with a moment of suspension. Two<br />
distinct beats are heard with an even<br />
rhythm and tempo. The sequence is left<br />
hind & right fore, suspension, right<br />
hind & left fore, suspension. The<br />
moment of suspension gives the trot its<br />
bounce. The average speed of a trot is<br />
between 6-8 mph, racing up to 30mph.<br />
3. Canter/lope –is a natural gait with a<br />
three beat rhythm and a moment of<br />
suspension. Three distinct beats should<br />
be heard. It should be light, active with<br />
good balance. The sequence is outside<br />
hind, inside hind & outside fore<br />
together, inside fore, suspension.<br />
4. Gallop – is a four beat rhythm where<br />
the legs move one at a time with a<br />
period of suspension. The sequence is<br />
outside hind, inside hind, outside fore,<br />
inside fore, suspension. The gallop is<br />
an extended gait with great flexion of<br />
the loins. The average speed of a gallop<br />
is 18mph, racing up to 45mph.<br />
5. Rein-Back – an unnatural diagonal<br />
pattern that creates four distinct beats.<br />
The backup is not a gait a horse<br />
performs often in his natural<br />
environment. The sequence is right<br />
fore, left hind, left fore, right hind.<br />
<strong>Horse</strong>’s should back calmly and<br />
willingly with flexion at the poll and in
<strong>Almost</strong> <strong>There</strong><br />
the mouth.<br />
NEAR SIDE – left side of the horse.<br />
OFF SIDE – right side of the horse<br />
6. Pace – is a two beat lateral gait with<br />
suspension. The sequence is left hind<br />
& left fore, suspension, right hind &<br />
right fore, suspension. The pace is fast<br />
and smooth with a side to side roll. The<br />
average speed of a pace is 18mph,<br />
racing up to 30mph.<br />
7. Amble – is a four beat lateral gait<br />
derived from the pace. The sequence is<br />
the same as the walk but the execution<br />
is different. <strong>There</strong> are various forms of<br />
the amble and it is preferred for long<br />
distance riding because it is smooth<br />
and easy to ride to.<br />
Lesson Six: Terms<br />
Pass a test on the following terms:<br />
GAIT – the pace at which a horse moves (ie;<br />
walking, trotting or cantering)<br />
AIDS – the signals that a rider gives to<br />
communicate with their horse.<br />
TRANSITION – a change of gait, either<br />
upward or downward.<br />
CONTACT – the link between the rider’s<br />
hands and the horse’s mouth through the reins.<br />
OUTSIDE REIN – the rein that is nearer the<br />
outside of the arena.<br />
INSIDE REIN - the rein that is nearer to the<br />
center of the arena.<br />
CHANGING REIN – changing the direction<br />
from the left rein to the right rein or vice versa<br />
in an arena.<br />
IMPULSION – the thrust or power that a horse<br />
creates with his hind quarters which sends a<br />
horse forward. It is controlled energy produced<br />
in the horse by the use of seat and legs.<br />
COLLECTION – a shortening of stride in a<br />
gait without a decrease in tempo. The horse<br />
must engage his hindquarters, shift his balance<br />
to the rear therefore allowing the horse to<br />
become light on the forehand.<br />
EXTENSION – a lengthening of stride in a<br />
gait without an increase in tempo. It is the<br />
driving force from behind created by seat and<br />
legs with reaching in front. <strong>There</strong> is often a<br />
greater moment of suspension.<br />
SUSPENSION – the horizontal floating that<br />
occurs when a limb is extended and the body<br />
continues moving forward. The moment at the<br />
canter when all limbs are flexed beneath the<br />
horse.<br />
RHYTHM – the cadence of foot falls within a<br />
gait along with timing.<br />
TEMPO – the rate of movement and stride<br />
repetition.<br />
SUPPLENESS – The ability of the horse to<br />
shift his balance forward and backward and
<strong>Almost</strong> <strong>There</strong><br />
laterally, especially during transitions. Supple<br />
horses are pliable and bend easily.<br />
BRUSHING – when the foot strikes the<br />
opposite leg.<br />
FORGING – when the toe of the hind foot<br />
strikes the sole of the fore foot when the fore<br />
foot is flexed.<br />
OVER-REACHING – when the toe of the<br />
hind foot strikes the heel of the fore foot.<br />
Lesson Seven: <strong>Canadian</strong> <strong>Morgan</strong><br />
Registration<br />
Prepare a registration application for a<br />
<strong>Morgan</strong> foal using all the acceptable<br />
procedures as outlined by the <strong>Canadian</strong><br />
<strong>Morgan</strong> <strong>Horse</strong> <strong>Association</strong> and be familiar<br />
with the rules of transfer.<br />
1. Name: When choosing the name under<br />
which you want your <strong>Morgan</strong><br />
registered select 3 names in the order<br />
of preference. The complete name<br />
cannot exceed 25 letters including<br />
spaces and punctuation. Names that<br />
have already been used cannot be<br />
repeated. The right is reserved to reject<br />
any name deemed unsuitable.<br />
2. Colour: The following are common<br />
generically accepted colours with their<br />
distinguishing features: CHESTNUT –<br />
shades from golden red to dark reddish<br />
brown. Mane, tail and legs are the<br />
same as the body but may be lighter or<br />
darker. BROWN – black with light<br />
areas around the muzzle, eyes and<br />
inside of legs. BAY – reddish shades to<br />
dark mahogany brown. All bay horses<br />
have black manes & tails and black<br />
legs below the knees and hocks.<br />
BLACK – true black without any<br />
lighter areas. BUCKSKIN – darker<br />
shade of dun with black dorsal stripe,<br />
black mane, tail & legs. GRAY –<br />
mixture of dark & white hairs, with<br />
white hairs predominating as the horse<br />
ages. PALOMINO – pale cream yellow<br />
to golden yellow, flaxen, silver or<br />
white mane & tail. DUN – yellowish<br />
body colour with darker dorsal stripe<br />
and sometimes stripes on legs.<br />
3. Markings: Any white markings on the<br />
face and legs are to be described with<br />
care both in writing and by sketching<br />
them on the diagram on the back of the<br />
form. Include all scars and brands the<br />
horse may have. The location of the<br />
forehead cowlicks (hair whorl) must be<br />
marked with an X.<br />
4. Sire of Foal: The registered name and<br />
number of the sire must be provided.<br />
5. Dam of Foal: The registered name and<br />
number of the dam must be provided.<br />
6. The Breeder: owner or lessee of dam at<br />
time of conception of above described<br />
animal.<br />
7. The Owner of Foal: owner of lessee of<br />
dam when she gave birth of above<br />
described animal.<br />
8. Signature of Owner: Each application<br />
for registration must be executed with<br />
the personal signature and address of
<strong>Almost</strong> <strong>There</strong><br />
the owner at the time of foaling, lessee<br />
or authorized agent.<br />
Carefully check the application for registration<br />
to be certain it is correct and completed in full<br />
(You will be charged for any errors on the<br />
forms). Once the form is completed, send it<br />
together with the appropriate registration fees<br />
to the <strong>Canadian</strong> Livestock Records<br />
Corporation.<br />
DNA Application – this form must be filled<br />
out and submitted for all <strong>Morgan</strong> horses in<br />
order to be registered.<br />
You must provide the application for<br />
registration of the foal.<br />
1. Proposed name of foal<br />
2. Date of Birth of foal<br />
3. Name and number of sire and dam.<br />
4. Name and address of applicant.<br />
5. Name and address of owner.<br />
6. Signature of owner and date signed.<br />
Include appropriate fees and send to the<br />
<strong>Canadian</strong> Livestock Records Corporation.<br />
For more information please contact the<br />
CMHA office directly.<br />
Lesson Eight: Equitation<br />
Demonstrate the following:<br />
SITTING TROT: The sitting trot will help to<br />
supple the rider’s hips and lower back. It also<br />
provides the rider with more seat contact with<br />
their horse and can influence the horse’s<br />
motion and manoeuvre. Learning to sit the trot<br />
will help to develop a more secure but relaxed<br />
and deeper seat position. It is important to<br />
keep your legs relaxed and use your<br />
abdominals and back to absorb the motion.<br />
The rider will want to sit as deeply as possible.<br />
The rider can sit the trot with or without<br />
stirrups and it will be helpful to begin on a<br />
lunge. Sit only a few strides at a time until you<br />
become comfortable and stable with the<br />
exercise. It is important to remember that you<br />
should not bounce to the trot as this will cause<br />
your horse’s back to stiffen and make it even<br />
harder for the rider to sit the trot.<br />
CHANGE OF DIAGONAL: You must<br />
understand the mechanics of the trot. It is a<br />
two beat, diagonal gait in which the diagonal<br />
pair of feet strike the ground followed by the<br />
other diagonal pair. The correct diagonal to<br />
post on in a ring is the one on the rail. To<br />
maintain posting rhythm and a balanced horse<br />
around a turn is by posting on the outside<br />
diagonal. The usual diagonal change is to sit<br />
two strides instead of one so that the rider will<br />
come up on the other diagonal. Change of<br />
diagonal is an exercise often used during<br />
equitation pattern work. As you become more<br />
adept you must be able to perform this<br />
exercise with no change in body position.<br />
RIDE WITHOUT STIRRUPS (walk, trot and<br />
canter): The rider must maintain the exact<br />
same position as when using stirrups. Riding<br />
without stirrups is an efficient way for riders to<br />
achieve a sense of security. This exercise will<br />
lengthen and strengthen the rider’s legs and<br />
also help with balance. Riding without stirrups<br />
will develop and test the rider’s leg and seat<br />
muscles and overall fitness. Any incorrect<br />
position or movements should be adjusted<br />
immediately and frequently at the beginning.<br />
Allow the rider to grasp the pommel of the<br />
saddle or a safety strap that has been provided,<br />
to make their adjustments in their position. As<br />
the rider becomes more experienced they will<br />
no longer to grasp the pommel to make their<br />
corrections.<br />
FIGURE 8: This is an excellent exercising<br />
figure, as it simply joins to identical circles at<br />
a given point. This movement sophisticates the<br />
simple circle by continually having changes of<br />
direction thus changing the bend of the horse<br />
from left to right to left etc. It is important that
<strong>Almost</strong> <strong>There</strong><br />
the figure 8 consists of two round circles of the<br />
same size. It is also important that the rider<br />
develops a focal point in the area before they<br />
begin so that they can line up their point of<br />
intersection. The figure 8 should be done in<br />
large dimensions at first and as the rider/horse<br />
become more skilled, the dimensions can be<br />
gradually reduced. At the trot, the posting<br />
diagonal is changed at the completion of each<br />
full circle so that the rider will post on the<br />
outside shoulder. At the canter, a simple or<br />
flying lead change is required. The figure 8 is<br />
the basic test of collection, reining and control.<br />
It is used in all seats. It also tests the rider’s<br />
ability to change diagonals and leads smoothly<br />
and at the proper time.<br />
SERPINTINE: If you know the basic<br />
principles of the Figure 8 at the 2 gaits, then<br />
the serpentine will not be that difficult. The<br />
serpentine is described as a series of left and<br />
right half circles bisected by an imaginary<br />
centre line. The pattern of the serpentine<br />
should be as precise as possible. The half<br />
circles should all be the same size and divide<br />
the ring evenly. The rider will be judged on<br />
their ability to change diagonals/leads when<br />
the direction changes. The diagonal/lead is<br />
changed on the stride that crosses the center<br />
line. A serpentine is usually made up of 3-5<br />
half circles.<br />
BACK, THAN START OFF IN A LOPE:<br />
This test is asked mainly of western equitation<br />
riders. It tests position, ability to back a horse,<br />
and ability to start off in a lope of the correct<br />
lead. Make certain your horse backs properly,<br />
willing and rounded. The next part of this test<br />
is to ask the horse to lope from a stand still,<br />
after backing. This will take much time and<br />
should not be asked unless the horse is doing<br />
well taking his correct leads. Riders should<br />
never cluck to the horse as he is backing,<br />
should never jerk on his mouth and should use<br />
leg pressure rather than kicking. It is important<br />
that the rider is very clear with their aids so<br />
that they horse does not get confused.<br />
Lesson Nine: Harnessing & Hitching<br />
Demonstrate harnessing and hitching a<br />
horse<br />
In training a young horse to harness, it is<br />
necessary to proceed slowly from the known<br />
to the unknown in a systematic way. It will be
<strong>Almost</strong> <strong>There</strong><br />
assumed in this section that you have taught<br />
your students to lunge the horse both ways of<br />
the ring, have taught the horse to stop and to<br />
back and to carry a light snaffle rein. It will<br />
also be assumed that students have taught their<br />
horses to use a bitting rig and that the horse<br />
has been taught the varying speeds of the trot<br />
and can long-line as outlined in this or other<br />
manuals. Much time should be spent at the<br />
stage of long-lining. Be sure to take the horse<br />
into new areas and show him as many new<br />
things as possible. Work on the stop and<br />
particularly on the halt. Then add the back-up.<br />
All of the transitions from the early work on<br />
the long lines on the halter to actual driving<br />
are gradual. Voice commands and light<br />
touches on the bit should be refined into a<br />
smooth performance of turns, halts and<br />
transitions from one gait to another. At that<br />
point it is time to acquaint the horse with a<br />
driving bridle or a blinker hood. Using the<br />
same calm gradual approach, accustom the<br />
horse to the blinkers. When he is going well in<br />
the blinkers in long lines (ie; walking, trotting,<br />
standing and turning) it is time to introduce<br />
him to a light cart. At this point it is very<br />
important to remember that every horse is<br />
different and that they may require more time<br />
or different training methods/approaches. The<br />
following is only a guideline. Everyone has<br />
slight variations when harnessing and hitching.<br />
Many trainers put the harness on the horse in<br />
the barn a few times before actually working<br />
the horse in it. They often place light snaffle<br />
bits in the horse’s mouth quite early too.<br />
It is important that when harnessing and<br />
hitching a horse that there should be at least 2<br />
people involved for safety reasons. Three to<br />
four people should be involved when first<br />
breaking a horse to the cart, 1 to lead, 1 to<br />
drive and 2 holding the cart/side walkers. It is<br />
also recommended that one person checks over<br />
all the tack and that everything is harnessed<br />
correctly so that nothing is missed.<br />
First, the horse should be shown the cart.<br />
Rattle it a bit, and let the horse sniff and<br />
inspect it. The next time the horse is ground<br />
driving, have someone pull the cart along in<br />
front of him. Over the next few days have the<br />
cart also pulled beside and behind the horse.<br />
Gradually, let your helpers work closer to the<br />
horse until the shaft brushes against his<br />
shoulders. Often it is at this point that a horse<br />
will shy. If this happens, halt the horse and let<br />
the shaft rub against him until he relaxes. The<br />
next step is to have the horse walk in between<br />
the shafts without being hitched. Have the<br />
helpers hold the shafts at the tug loop level as<br />
you ground drive the horse around the ring.<br />
When he will walk quietly in this way and<br />
from each side, he is ready to hitch.<br />
Remember, there are many ways to hitch a<br />
horse for the first time. Every trainer develops<br />
a method which works well for him. Some<br />
trainers hitch to heavy poles or mock shafts<br />
first before using a cart. However it is done,<br />
careful planning is necessary to act ready for<br />
the first hooking up. This can make or break<br />
your horse.<br />
Pick up the cart by the shafts and raise them<br />
over the horse’s back. Pull it forward and then<br />
lower it along the horse’s sides. Place the<br />
shafts into the tug loops. Hook the traces<br />
before wrapping the girths. Wrap the right<br />
wrapstraps medium tight. Return to your left<br />
side and do up the left wrapstraps. From this<br />
step it is up to the driver/trainer to decide how<br />
to proceed. Many will start without getting in<br />
the cart and just drive the horse from behind<br />
the cart with helpers on either side of the horse<br />
and a helper leading the horse also. The driver<br />
will eventually get into the cart; remember that<br />
now the horse will be introduced to pulling<br />
weight. From this point forward it is all about<br />
your horse gaining confidence and trust and
<strong>Almost</strong> <strong>There</strong><br />
you feeling comfortable about the hitching and<br />
driving process.<br />
When you are ready to unhitch, first undo the<br />
wrapstraps on the left side. Then undo the<br />
wraps on the right side. Next, undo the traces.<br />
Push the cart back and both tugs will slide off<br />
the shafts. Lift the shafts over the horse’s<br />
croup and push the cart well back.<br />
Remember not to over do it but to repeat the<br />
steps as many times as necessary until both<br />
horse and driver are confident. For beginner<br />
drivers it is recommended that they begin with<br />
a well schooled driving horse and take lessons<br />
from someone who is knowledgeable.<br />
Lesson Ten: Trailer Loading & Unloading<br />
Demonstrate the proper way to prepare a<br />
horse for travel and show how to safely load<br />
and unload from a trailer.<br />
When shipping a horse it is advisable to use a<br />
head bumper, bandage all 4 legs and wrap the<br />
tail. A head bumper which attaches to the<br />
halter will help prevent injury to the poll if a<br />
horse should bump its head. Bandaging<br />
prevents injury to the legs and tail if wrapped<br />
correctly. Shipping bandages generally cover<br />
from the bottom of the knee or hock down to<br />
the coronary band. The bandages should be<br />
thick enough to avoid damage. Usually cotton<br />
or quilted wraps are used with a polo bandage<br />
or synthetic shipping boots are used. The tail<br />
may also be wrapped for protection while<br />
travelling. It is also common for people to put<br />
bell boots on horses with shoes to prevent<br />
damage to the hoof or shoe. Sometimes it is<br />
advisable to not bandage young or<br />
inexperienced horses for their first trailer<br />
experiences as they may fight the bandages<br />
and injure themselves.<br />
Loading a horse into a trailer should be a<br />
positive and uneventful experience, but not all<br />
horses are easy loaders which can be<br />
frustrating. Practicing loading and unloading<br />
horses at an early age can be very helpful in<br />
the long run. Teaching your horse to load and<br />
unload is just as important as any other part of<br />
his training. Safety is the most important<br />
aspect when loading a horse. You should never<br />
load a horse by yourself. Regardless if the<br />
trailer is a ramp or step-up, the horse should be<br />
lead to the opening in a straight line. Once the<br />
horse is on the trailer, have your assistant<br />
secure the butt bar or close the door/ramp. Tie<br />
the horses head in front only after the horse is<br />
secure in his stall with no chance of escaping.<br />
The horse should be tied to a halter, never a<br />
bridle. Hay may be provided for the ride and<br />
ventilation should be adequate, even in the<br />
colder months.<br />
<strong>Horse</strong>s that are difficult to load may require<br />
special procedures. You need to decide if the<br />
horse is being reluctant, scared, stubborn or<br />
herd bound. The following are some<br />
suggestions.<br />
1. Minimize surrounding distraction<br />
2. Encourage the horse with treats/grain<br />
3. If possible, move the partition in the<br />
trailer to make a bigger space<br />
4. Load another horse first<br />
5. Allow plenty of light in the trailer by<br />
turning on interior lights or opening a door<br />
6. Use a wall as a wing by parking the trailer<br />
next to it
<strong>Almost</strong> <strong>There</strong><br />
7. Lessen the angle of the ramp or decrease<br />
the height of the step up<br />
8. Use a lunge line behind the horse, a whip,<br />
broom or other device to use behind to<br />
encourage forward movement<br />
9. Use a chain over the horses nose or a lip<br />
chain<br />
10. Blindfold the horse and turn it in circles<br />
before loading<br />
sire was Blood’s black hawk, a son of Black<br />
Hawk 20 once called the best harness horse at<br />
the Kentucky State Fair. Maggie earned her<br />
right to Standardbred registration under Rule 5<br />
which provided for the recording of any mare<br />
that produced a trotter with a Standardbred<br />
record. This blood bay mare was endowed<br />
with great style, conformation and<br />
considerable speed for her time – she won at<br />
Lexington in 2:40.<br />
Standardbred experts now agree that all other<br />
influences are extinct except that of Messenger<br />
and Justin <strong>Morgan</strong>. <strong>Morgan</strong> influence is<br />
second only to Messenger in this breed. In<br />
fact, in almost every pedigree of the great<br />
Standardbred performers of the decade, one<br />
encounters its quota of <strong>Morgan</strong> blood.<br />
Unloading a horse from a trailer is often<br />
easier but still needs to be done safely.<br />
Untie the horse’s head. Undo the butt bar<br />
then open the door or put down the ramp.<br />
Stay clear of the opening. Regardless if<br />
you are backing the horse off or leading<br />
the horse off, make sure the horse travels<br />
straight off and slowly.<br />
Preparing the truck & trailer as well as actual<br />
transporting of your horse will be covered in<br />
Level 5.<br />
Lesson Eleven: Breed Influence<br />
How did the <strong>Morgan</strong> horse influence the<br />
following breeds: Standardbred,<br />
Saddlebred, Tennessee Walker and Quarter<br />
<strong>Horse</strong>?<br />
STANDARDBRED – Maggie Gaines made<br />
important contributions and her roots are<br />
firmly imbedded in the fertile soil of<br />
Kentucky. She was foaled about 1856 and her<br />
AMERICAN SADDLEBRED – <strong>There</strong> were<br />
several <strong>Morgan</strong>s of outstanding quality which<br />
infused their blood into the American<br />
Saddlebred. Cabel’s Lexington, Indian Chief<br />
and Peavine all traced back to Justin <strong>Morgan</strong><br />
though the Black Hawks and Shermans.<br />
Coleman’s Eureka descends through another<br />
line; blood of Woodbury, Gifford <strong>Morgan</strong>,<br />
Green Mountain, Russ Batler’s Eureka to<br />
Young’s <strong>Morgan</strong>, sire of Coleman’s Eureka.<br />
It was natural for the fairs and horse shows to<br />
attract the early American Saddlebred horse<br />
(ASH) breeders who realized how much these<br />
<strong>Morgan</strong> horses could contribute with their high<br />
headedness and tractability. These breeders
<strong>Almost</strong> <strong>There</strong><br />
travelled North to find <strong>Morgan</strong>s with beauty,<br />
style and endurance to cross with their horses<br />
and eventually form the ASH – the <strong>Morgan</strong><br />
did not let him down.<br />
Peavine was foaled in Kentucky in 1863. He<br />
was a great grandson of Black Hawk 20. A<br />
glance of the bloodlines of one of the more<br />
renowned modern <strong>Morgan</strong>s, Upwey Ben Don<br />
reveals an infusion of the blood of Peavine 85.<br />
Ben Don like Peavine was a top broodmare<br />
sire. Windcrest Dona Lee was his daughter and<br />
she in turn produced Gallant Lee, Applevale<br />
Red Fox and Aquarian Mary Lee. Very few<br />
pedigrees of the ASH can deny their <strong>Morgan</strong><br />
heritage.<br />
TENNESSEE WALKING HORSE –<br />
Tennessee Walking <strong>Horse</strong> bloodlines show the<br />
<strong>Morgan</strong> horse was important in the foundation<br />
of this breed. A mare by the name of Maggie<br />
Marshall was the dam of the foundation sire of<br />
the breed, Allan F-1. Maggie was sired by<br />
Bradford’s Telegraph, who was a son of Black<br />
Hawk 20. Telegraph had style, speed, beauty<br />
and endurance.<br />
Allan F-1 was bred to a mare named Gertrude.<br />
She through her dam traced to Gifford<br />
<strong>Morgan</strong>. That son was Roan Allen F-38 foaled<br />
in 1906. He was a white stocking red roan with<br />
a light mane and tail. He matured into a 15.3<br />
horse who could do all saddle gaits in addition<br />
to the pace and running walk. He was said to<br />
have a disposition that matched his looks. His<br />
stud services were in such demand that he<br />
dominated over all his contemporaries. <strong>Almost</strong><br />
every breed in Tennessee Walkers seems to be<br />
a descendant of this great sire.<br />
QUARTER HORSE – In the early history of<br />
registered Quarter <strong>Horse</strong>s, bloodlines had<br />
nothing to do with the Quarter horse Registry.<br />
The early horses were inspected for type and if<br />
they proved satisfactory, a nominal fee was<br />
paid and they were registered. In the first 10<br />
year period of registration there were no less<br />
than 30 <strong>Morgan</strong> Stallions listed and a much<br />
greater number of <strong>Morgan</strong> mares. The<br />
Matador Ranch has Rendeau 7214 by<br />
Headlight <strong>Morgan</strong> and a Troubador Of<br />
Willowmore son, Pluto who was foaled at the<br />
U.S. government farm in 1922. The HA Ranch<br />
in Hobait, Texas produced Dan 7095 and<br />
Dixie Da 7096 from the Sellmans in Rochelle,<br />
Texas. Mr. Tom Burnett owner of the Triangle<br />
Ranch near Wichita Falls, TX contributed a<br />
great deal to the formative years of the Quarter<br />
<strong>Horse</strong>. In 1934 he purchased Jubilee King and<br />
the Senator Knox mare, Deena from J.C.<br />
Brunk’s Cotton Hill farm in Illinois. He also<br />
owned the Red Oak stallion, Redolent<br />
purchased from the Sellman estate.<br />
These are only a few of the <strong>Morgan</strong>s known to<br />
have been used in the development of the<br />
Quarter <strong>Horse</strong> as we know it today. Jubilee<br />
King reverted back to Mr. Brunk after the<br />
death of Burnett and ultimately was sold to<br />
Mrs. William J. Bryant in Springfield, VT.
<strong>Almost</strong> <strong>There</strong><br />
Deena in addition to the Quarter <strong>Horse</strong><br />
offspring, claimed fame in the <strong>Morgan</strong> world<br />
as dam of King de Jarnett by Jubilee King who<br />
was National Champion <strong>Morgan</strong> stallion in<br />
1939.<br />
(The International <strong>Horse</strong>’s Mouth information<br />
researched by Jeanne Thomas, Dalhart, TX)
<strong>Almost</strong> <strong>There</strong><br />
BIBLIOGRAPHY<br />
Abbey, Harlan<br />
Showing Your <strong>Horse</strong>, A.S. Barnes and Co., NY, NY<br />
American <strong>Morgan</strong> <strong>Horse</strong> Show Register Rules and Regulations<br />
<strong>Canadian</strong> <strong>Morgan</strong> <strong>Horse</strong> <strong>Association</strong> Register Rules and Regulations<br />
Childs, Marilyn<br />
Crabtree, Helen<br />
Riding Show <strong>Horse</strong>s, Van Nostrand Co. Inc. NY, NY<br />
Saddle Seat Equitation, Doubleday & Co. Garden City, NY<br />
Equine Canada Stable Management Manual<br />
Farnum <strong>Horse</strong> Library How To Recognize <strong>Horse</strong> Health Problems, Know Practical Feeding<br />
<strong>Horse</strong> Feeding, Riding the Show Ring Hunter, Know English Equitation<br />
& Training, Know the Anatomy of the <strong>Horse</strong>, Omaha, NE<br />
Green, Lucinda<br />
Harris, Susan E.<br />
Harper, Frederick<br />
Herrick, Jeanne M.<br />
Kidd, Jane<br />
Lampe, Gayle<br />
Podhajsky, Alois<br />
Self, Margaret C.<br />
Seuing, Waldemar<br />
Thomas, Jean<br />
The Young Rider, Stoddart Publishing Co., Toronto, ON<br />
<strong>Horse</strong> Gaits, Balanace & Movement, MacMillian General Reference, NY,<br />
NY<br />
Top Form Book of <strong>Horse</strong> Care, Popular Library, NY<br />
The <strong>Morgan</strong> <strong>Horse</strong> Handbook, Stephen Green Press, Brattleboro, VT<br />
Learning to Ride, Maxwell Macmillan Publishing, ON<br />
Riding for Success, Saddle & Bridle, Inc, St. Louis, MO<br />
The Complete Training of <strong>Horse</strong> and Rider, Doubledy and Co., Inc.,<br />
Garden City, NY<br />
Riding with Mariles, McGraw-Hill Book Co., Inc., NY<br />
<strong>Horse</strong>manship, Doubleday & Co., Inc., NY<br />
<strong>Morgan</strong> Bloodlines in Texas Quarter <strong>Horse</strong>s, International <strong>Horse</strong>s Mouth<br />
Williamson, Charles Breaking and Training the Stock <strong>Horse</strong>, The caston Printers Ltd.,<br />
Caldwell, Idaho<br />
Wright, Gordon<br />
<strong>Horse</strong>manship and <strong>Horse</strong>mastership, Doubleday & Co., Garden City, NY
<strong>Almost</strong> <strong>There</strong><br />
Young, John R.<br />
The Schooling of the Western horse, University of Oklahoma Press,<br />
Norman, OK<br />
United States Pony Club Manual of <strong>Horse</strong>manship Barron’s, Woodbury, NY
<strong>Almost</strong> <strong>There</strong><br />
Date Passed<br />
Examiner<br />
Lesson One<br />
<strong>Horse</strong> Health<br />
Medicines<br />
Common Diseases<br />
Vaccinations & Parasite Control<br />
Lesson Two<br />
Bandages:<br />
Stable<br />
Shipping<br />
Tail<br />
Exercise<br />
Lesson Three<br />
Conditioning<br />
Lesson Four<br />
Ground Training<br />
Lesson Five<br />
Aids & Gaits<br />
Lesson Six<br />
Equine Terms<br />
Lesson Seven<br />
<strong>Morgan</strong> Foal Registration
<strong>Almost</strong> <strong>There</strong><br />
Lesson Eight<br />
Riding Demo:<br />
No Stirrups<br />
Figure 8<br />
Serpentine<br />
Back, lope<br />
Changing Diagonals<br />
Lesson Nine<br />
Harnessing & Hitching<br />
Lesson Ten<br />
Loading/Unloading<br />
Lesson Eleven<br />
<strong>Morgan</strong> Influence on Other Breeds