You also want an ePaper? Increase the reach of your titles
YUMPU automatically turns print PDFs into web optimized ePapers that Google loves.
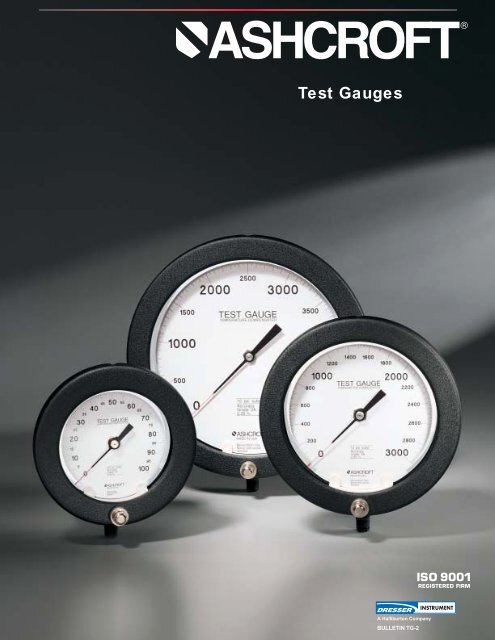
<strong>Test</strong> <strong>Gauges</strong><br />
A Halliburton Company<br />
BULLETIN TG-2
Features & Benefits<br />
Ashcroft ® <strong>Test</strong> <strong>Gauges</strong><br />
2<br />
Dresser engineers have developed<br />
a new generation of test<br />
gauges to meet the exacting needs<br />
of instrument engineers and quality<br />
specialists. The new Ashcroft ® test<br />
gauge can be used as a transfer<br />
standard for periodically checking<br />
the accuracy of pressure instruments<br />
or as a laboratory instrument<br />
for research and test labs. The<br />
wealth of new features make it an<br />
excellent test gauge for process<br />
applications where high accuracy in<br />
pressure measurement is essential.<br />
• External adjustable dial facilitates<br />
compensation for tare or zero<br />
adjustment on standard case style<br />
Type 1082(*)S only.<br />
• Temperature compensated movement<br />
that significantly reduces<br />
temperature error.<br />
Conventional test gauge accuracy<br />
is adversely affected as the ambient<br />
temperature varies from that at<br />
which the gauge was calibrated.<br />
This inaccuracy can be as much as<br />
0.02%/°F or 1 ⁄2% for a 25°F temperature<br />
change. The 4 1 ⁄2˝ and larger<br />
Ashcroft test gauges include a special<br />
bimetallic element which<br />
automatically reduces ambient<br />
temperature errors to less than<br />
0.005% per degree F.<br />
Some manufacturers reduce temperature<br />
error by using NiSpan C ®<br />
for bourdon tubes. This material is<br />
subject to serious corrosion problems<br />
in some applications. The<br />
Ashcroft temperature compensated<br />
movement allows use of Monel ®<br />
bourdon tubes for corrosion resistance<br />
superior to NiSpan C while<br />
still providing excellent temperature<br />
stability.<br />
*Bourdon tube designation (see page 4).<br />
• MicroSpan adjustment for ease in<br />
span calibration. This device permits<br />
precise adjustments to<br />
achieve exact span calibration from<br />
0 to 100% of scale. The micrometer<br />
screw attached to the slide will<br />
vary the span by approximately 1 ⁄2%<br />
per 360° rotation.<br />
• The long life bourdon tube is capable<br />
of sustained accuracy, yet is<br />
suitable for process applications.<br />
The Ashcroft test gauge uses the<br />
Ashcroft Duragauge ® pressure<br />
gauge bourdon tube – perhaps the<br />
most highly developed bourdon<br />
tube in the world. Proven and<br />
refined by years of rugged service<br />
in demanding process applications<br />
around the world, this outstanding<br />
pressure element is standard in all<br />
4 1 ⁄2,˝ 6˝ and 8 1 ⁄2˝ size Ashcroft<br />
test gauges.<br />
• Hydraulically staked movement provides<br />
improved stability.<br />
The movement, with Teflon ® coated<br />
gears and bearings, uses a unique<br />
hydraulic staking operation to<br />
ensure a rigid movement frame that<br />
resists shift due to shock<br />
and vibration.<br />
High and low pressure movement<br />
stops are standard to protect the<br />
gauge against calibration shifts<br />
caused by accidental overpressure,<br />
and to limit pointer rotation.<br />
• Improved dial and pointer results in<br />
excellent readability. Larger numerals,<br />
additional graduations and a<br />
highly polished mirror band<br />
CONTENTS<br />
Introduction . . . . . . . . . . . . . . . . . . . . . 2<br />
Standard Case Styles . . . . . . . . . . . . . 4<br />
Optional Case Styles . . . . . . . . . . . . . 5<br />
Accessories and Optional Features . 6<br />
Product Selection Informtion . . . . . . 7<br />
To Order a Gauge . . . . . . . . . . . . . . . . 8<br />
Standard Ranges . . . . . . . . . . . . . . . . 9<br />
Gauge Case Dimensions . . . . . . . 10-11<br />
Standard Case Style<br />
Type 1082 (*)S<br />
FRONT VIEW
3<br />
combined with a knife edge pointer<br />
with red painted tip to allow precision<br />
readability that eliminates<br />
parallax error.<br />
• <strong>Test</strong> gauges are built in a modern<br />
manufacturing environment.<br />
Assembly, calibration and inspection<br />
are performed in a climate<br />
controlled manufacturing cell to<br />
ensure consistent product quality.<br />
Computer set pressure standards<br />
give accurate calibration that is<br />
traceable to NIST (National<br />
Institute of Standard & Technology<br />
– formerly NBS).<br />
A skilled technician is responsible<br />
for building, calibrating and final<br />
inspection of each test gauge. The<br />
technician’s signature attached to<br />
the gauge guarantees ASME<br />
B40.1, Grade 3A (0.25%) full<br />
scale accuracy.<br />
• The standard test gauges are now<br />
available from stock.<br />
The new standard 4 1 ⁄2,˝ 6˝ and 8 1 ⁄2˝<br />
1082 gauge line is supplied with<br />
solid front case for safety.<br />
Corrosion resistant black epoxy<br />
finish is standard.<br />
Dial Gear<br />
Clamp Screw<br />
Adjustment Knob<br />
Temperature compensator reduces<br />
temperature-caused errors to less than<br />
0.005% per °F temperature change.<br />
Adjustment Gear<br />
High and<br />
low pressure<br />
movement<br />
stops.<br />
The MicroSpan adjustment permits precise<br />
adjustments to achieve zero error in calibration<br />
at zero and 100% of scale.<br />
BACK VIEW<br />
(pressure relief back – removed)
4<br />
Ashcroft ®<br />
<strong>Test</strong><br />
<strong>Gauges</strong><br />
Adjustable tabs can be set<br />
to each cardinal point providing<br />
a higher degree of<br />
accuracy.<br />
SPECIFICATIONS TYPE 1080(*)S TYPE 1084 TYPE 1082(*)S<br />
Accuracy %/Grade ±0.25/ASME B40.1, Grade 3A 0.5/ASME B40.1, Grade 2A 0.25/ASME B40.1, Grade 3A<br />
Dial Size 8 1 ⁄2˝ 3˝ 4 1 ⁄2,˝ 6,˝ 8 1 ⁄2˝<br />
Tube and<br />
(A) Phosphor Bronze Tube,<br />
Socket Material (P) Monel Tube and Socket (S) 316 St. St. Welded Brass Socket<br />
(P) Monel Tube and Socket<br />
Case Material Aluminum, Solid Front, with Handle Polished St. St. - Aluminum, Solid Front,<br />
Black Epoxy Coated Open Front (1) Black Epoxy Coated<br />
Movement 400 Series St. St. Rotary Design 400 Series St. St. Rotary Design<br />
Teflon (2) S Coated Bearings<br />
Teflon<br />
Precision, St. St. with Teflon ˝S˝<br />
S Coated Bearings<br />
Micrometer Span Adjustment –<br />
Micrometer Span Adjustment –<br />
Coated Bearings and Pinion<br />
Bimetallic Temp. Compensator<br />
Bimetallic Temp. Compensator<br />
(.005%/per °F Max. Temp. Error)<br />
(.005%/per °F Max. Temp. Error)<br />
Mounting and<br />
Stem Mounting<br />
NPT Connection<br />
1<br />
Stem or Flush Mounting<br />
⁄4˝ NPT Lower Only<br />
1<br />
⁄4˝ NPT Lower<br />
Location<br />
⁄4˝ Lower or Back (4)<br />
Ranges and<br />
Vac/400 psi – (A) Phosphor Bronze<br />
Bourdon Tube Vac/10,000 psi – (P) K Monel Vac/1000 psi<br />
Vac/10,000 psi – (P) K Monel<br />
Selection<br />
Ring Hinged Steel – Bayonet Cam – Lock Hinged Steel –<br />
Black Wrinkle Finish Polished Stainless Steel Black Wrinkle Finish<br />
Window Glass Polycarbonate Glass<br />
Pointer Balanced Friction Adjustable Black Aluminum with Black Aluminum with<br />
with Red Knife-Edge Tip Red-Painted Knife-Edge Tip Red-Painted Knife-Edge Tip<br />
Dial White Background, Zero Adjustable Aluminum, Externally Adjustable,<br />
Black Graduations White Background, Black Numerals Aluminum, Black Numerals<br />
with Polished Mirror Band with Polished Mirror Band with Polished Mirror Band<br />
Weatherproof No Yes No<br />
Options See Page 6 See Page 6 See Page 6<br />
*Bourdon tube desgnation (1) For optional polished stainless steel pro- (3) Cases supplied with studs for flush<br />
tective cover, specify part. #302B198-01 mounting.<br />
(2) Registered TM of DuPont Co. (4) Optional connection 1 ⁄2˝ NPT
5<br />
These special case types include<br />
all the features of the standard<br />
test gauge with the exception of<br />
the external adjustable dial.<br />
Optional Type1082 Case Styles<br />
CASE TYPE XAY<br />
This is a solid front aluminum case<br />
with a back flange. It has a threaded<br />
black polypropylene ring. This case<br />
is weatherproof and is black epoxy<br />
finished to stand up well under most<br />
environmental conditions. It can be<br />
stem, surface or flush mounted and<br />
is available in 4 1 ⁄2˝ and 6˝ dial sizes<br />
with lower or back connection.<br />
CASE TYPE XAZ<br />
This rugged, solid front aluminum<br />
case has a threaded aluminum front<br />
ring. Both case and ring have a black<br />
epoxy finish. This case style has no<br />
back flange. It is a durable weatherproof<br />
case with an epoxy finish<br />
that stands up well to most environmental<br />
conditions. It is available with<br />
lower or back connection, in 4 1 ⁄2˝ dial<br />
size only.<br />
CASE TYPE XTY<br />
This is a solid front black phenolic<br />
turret case with a threaded black<br />
polypropylene ring. It is lightweight,<br />
weatherproof and offers a high resistance<br />
to corrosion and most<br />
environmental conditions. It can be<br />
stem, surface or flush mounted and<br />
is available with lower or back connection,<br />
in 4 1 ⁄2˝ dial size only.<br />
CASE TYPE XQY<br />
This unique design is a solid front<br />
black polypropylene, fiberglass reinforced<br />
impact resistant case with<br />
bayonet ring. It can be stem, surface<br />
or flush mounted with lower or back<br />
connection, in 6˝ dial size only.
Accessories<br />
Ashcroft ® <strong>Test</strong> <strong>Gauges</strong><br />
6<br />
HAND JACK SET<br />
Gauge pointer remover and a<br />
pointer set, to secure pointer<br />
to the shaft.<br />
TYPE 1278M FLUSH MOUNTING RING<br />
The flush mounting ring is used to flush mount gauge case type XTY and<br />
XAY. Standard finish is black. Polished stainless steel finish is available for an<br />
extra charge.<br />
Gauge Size Ring O.D. A Diameter “B’’ – Three Screws<br />
(Inches) (Inches) (Inches) Size<br />
4 1 ⁄2 6.000 5 37 ⁄64 #10-24 x 7 ⁄8˝<br />
6 7.765 7 1 ⁄4<br />
1<br />
⁄4-20 x 1 1 ⁄2˝<br />
GAUGE TOOL KIT<br />
Complete kit for gauge maintenance.<br />
Includes hand jack, set screw driver,<br />
five reamers, two pin vise holders,<br />
wiggler and tweezer all packed in a<br />
neat carrying case. Ideal for a gauge<br />
maintenance shop.<br />
THROTTLING<br />
DEVICES<br />
The throttling<br />
devices should be<br />
used when a pressure<br />
gauge is<br />
subjected to rapid<br />
pressure fluctuations,<br />
which make<br />
the gauge difficult<br />
to read because of<br />
rapid pointer<br />
movement Such a<br />
device reduces<br />
pressure<br />
impact, slows the<br />
speed and range of pointer movement,<br />
and<br />
OPTIONAL WINDOWS<br />
Acrylic –<br />
Optional for glass window.<br />
Laminated Safety Glass –<br />
Optional for glass window.<br />
Non-Glare Glass –<br />
Optional for glass window.<br />
TIP BLEED<br />
The tip bleed allows trapped air to be<br />
removed from the bourdon tube. It is<br />
also used for back flushing or cleaning<br />
the system. The tip bleed is<br />
limited to 4 1 ⁄2,˝ 6˝ and 8 1 ⁄2˝ solid front<br />
cases with bronze tube systems only<br />
up to 400 psi.
7<br />
Product Selection<br />
Ashcroft ® <strong>Test</strong> <strong>Gauges</strong><br />
STANDARD CASE STYLE TYPE 1082<br />
Consult ASME B40.1 for guidance in<br />
gauge selection<br />
WARNING: Pressure gauges should be<br />
selected considering media and ambient<br />
operating conditions, to prevent misapplication.<br />
Improper application can be<br />
detrimental to the gauge, causing failure<br />
and possibly personal injury or property<br />
damage.<br />
The information contained in this catalog<br />
is offered as a guide to assist in making<br />
the proper selection of a test gauge.<br />
Pressure Ranges: For process applications,<br />
select a gauge with a full scale<br />
pressure range of approximately twice<br />
the normal operating pressure. The maximum<br />
operating pressure should not<br />
normally exceed 75% of the full range.<br />
For laboratory applications, where cycling<br />
is less frequent, the range of the test<br />
gauge may be the same as that of the<br />
instrument under test.<br />
Operating Conditions: To ensure long<br />
life and accurate readings, pressure<br />
gauges should not be exposed to process<br />
or ambient temperatures over 150°F.<br />
This is especially true of gauges with liquid<br />
filled cases due to thermal expansion<br />
of the case fill fluid. Long term exposure<br />
to temperatures in excess of 150°F may<br />
cause discoloration of dials and fill fluids,<br />
as well as hardening of elastomeric case<br />
seals and possible fill leakage. Soft soldered,<br />
silver brazed and welded pressure<br />
joints are rated at 250°F maximum,<br />
450°F maximum and 750°F maximum<br />
respectively. Plastic gauge cases, including<br />
phenolic should not be exposed to<br />
temperatures in excess of 250°F. Accuracy<br />
of temperature compensated Type 1082<br />
gauges will be affected by approximately<br />
0.005% per degree F and accuracy of all<br />
other test gauges will be affected by<br />
approximately 0.015% per degree F.<br />
Cases: Six different case styles and<br />
three different materials are offered – aluminum<br />
alloy, fiberglass reinforced<br />
polypropylene, and phenolic. Two types<br />
are offered, open and solid front. The<br />
open front Type 1084 case is constructed<br />
with the dial between the bourdon tube<br />
and the window, with a pressure relief<br />
opening between the socket and the<br />
case. The solid front cases supplied on<br />
all other test gauges provide increased<br />
safety with a solid wall between the bourdon<br />
tube and the window. The entire rear<br />
of the gauge is covered with a stainless<br />
steel pressure relief back. Should the<br />
Bourdon tube fail due to overpressure,<br />
corrosion or fatigue, the wall directs pressure<br />
buildup through the rear of the case<br />
and away from the dial and the window.<br />
Bourdon Tube Pressure Elements:<br />
Available for a wide variety of media<br />
applications; materials include phosphor<br />
bronze and K-Monel ® .<br />
Movement: All gauges 4 1 ⁄2˝ size and larger<br />
feature a rotary geared movement, the<br />
most efficient and positive method of<br />
transmitting mechanical motion. Moving<br />
parts are designed and protected to<br />
reduce friction and wear. All movements<br />
are ultrasonically cleaned and lubricated<br />
to guarantee smooth operationand to<br />
resist wear associated with high vibration<br />
and/or pulsation. Span, linearity, and zero<br />
adjustments are easily made to assure<br />
continued accuracy of all Ashcroft test<br />
gauges.<br />
Dials: Aluminum dials have highly legible<br />
black markings on a white background.<br />
Each test gauge dial has a mirror band<br />
which eliminates parallax errors when the<br />
pointer and its reflection are aligned.<br />
External adjustable dial available in standard<br />
case style 1082(*)S.<br />
Pointers: Balanced knife-edge tip pointers,<br />
supplied with all test gauges, allow<br />
precise and easy readings. All are lightweight<br />
to maintain a high standard of<br />
accuracy. Type 1082 and 1084 pointers<br />
include a red tip for enhanced readability.<br />
Windows: The standard window for Type<br />
1080 and 1082 test gauges is glass.<br />
Non-glare glass is optional. Acrylic windows,<br />
also optional, are more resistant to<br />
impact breakage than glass windows.<br />
Safety glass, also optional, will not fracture<br />
into many pieces as will ordinary<br />
glass. Window for Type 1084 is polycarbonate.<br />
Rings: The ring, which retains the window,<br />
is threaded, bayonet (cam) or<br />
hinged, depending upon case type. All<br />
Type 1082 windows have a gasket to<br />
protect the internal mechanism from<br />
outside environments.
How to Order<br />
Ashcroft ® <strong>Test</strong> <strong>Gauges</strong><br />
8<br />
Select:<br />
1. Case Type – Table A 4. Connection: Location – Table A: Size – Table B<br />
2. Dial Size – Table A 5. Optional Case Selection – Table A<br />
3. Bourdon System (*) Ordering Code – Table B 6. Pressure Range: – From page 9<br />
Typical Example: 1 2 3 4 5 6<br />
P<br />
1082(*)S 6˝ K Monel Back 1 ⁄4 NPT XAY 0/600 psi<br />
Table A – Case Selections<br />
Dial Case Material Ring Material Mounting an<br />
Case Type Size Case Style and Finish Style and Finish Connection Location<br />
1082(*)S (standard) 4 1 ⁄2˝ Solid Front Aluminum Hinged steel Stem – Lower or back<br />
6˝ Black epoxy Black wrinkle finish Flush – Back (1)<br />
6˝ Black epoxy Black wrinkle finish Flush – Back (1)<br />
8 1 ⁄2˝<br />
1082(*)S 4 1 ⁄2˝ Solid Front Aluminum Threaded aluminum Stem – Lower or back<br />
XAZ (option) Black epoxy Black epoxy<br />
1082 (*)S 4 1 ⁄2˝ Solid Front Aluminum Threaded reinforced Stem – Lower or back<br />
XAY (option) 6˝ Black epoxy polypropylene Surface – Lower or back<br />
Black<br />
4 1 ⁄2˝, 6˝ (order 1278M Ring)<br />
1082(*)S 4 1 ⁄2˝ Solid Front Phenolic Turret Threaded reinforced Stem Lower or back<br />
XTY (option) Black polypropylene Surface – Lower or back<br />
Black<br />
Flush – Back (order<br />
1278M Ring)<br />
1082(*)S 6˝ Solid Front Polypropylene Bayonet lock type Stem – Lower or back<br />
XQY (option) (fiberglass reinforced) polypropylene Surface – Lower or back<br />
Black Black (specify XBF)<br />
Flush – Back<br />
(specify XBQ)<br />
1084(*) 3˝ Open Front (2) Polished Bayonet cam lock Stem – Lower<br />
stainless steel polished stainless steel<br />
1080(*)S 8 1 ⁄2˝ Solid Front Aluminum Black Hinged steel Stem – Lower or back<br />
epoxy with handle Black wrinkle finish<br />
(*) Bourdon Tube designation<br />
(1) Case supplied with studs for flush mounting<br />
(2) 1084 optional cover – specify 302B198-01<br />
Table B – Bourdon Tube Selection<br />
Bourdon Tube<br />
Ordering Tip Material<br />
Range<br />
Available with<br />
Socket Material Tube Type<br />
Code (all joints TIG Selection<br />
Case<br />
welded except “A”) Size Type<br />
NPT<br />
Connection*<br />
Grade A Phospor<br />
A Bronze Tube – Brass Brass C-Tube Vac/400 psi 4 1 ⁄2, 6, 8 1 ⁄2 1082 1<br />
⁄4<br />
Tip, Silver Brazed<br />
S 316 Stainless Steel 316 Stainless Steel C-Tube Vac/1000 psi 3 1084 1<br />
⁄4<br />
P K Monel Monel 400<br />
C-Tube Vac/1500 psi 8 1 ⁄2 1080<br />
Helical 2000/10,000 4 1 ⁄2, 6, 8 1 ⁄2 1082<br />
1<br />
⁄4<br />
*Optional connection 1 ⁄2 NPT. Type 1084 is only available with 1 ⁄4 NPT connection.
9<br />
Range Tables<br />
Ashcroft ® <strong>Test</strong> <strong>Gauges</strong><br />
Standard psi Ranges Standard Metric Ranges (1)<br />
Type 1082 Type 1080<br />
Minor Graduations<br />
Range 4 1 ⁄2 6 8 1 ⁄2<br />
Range<br />
0/15 0.05 0.05 0.02<br />
0/30 0.1 0.1 0.05<br />
0/60 0.2 0.2 0.1<br />
0/100 0.5 0.2 0.2<br />
0/150 0.5 0.5 0.2<br />
0/200 0.5 0.5 0.5<br />
0/300 1 1 0.5<br />
0/400 1 1 1<br />
0/600 2 2 1<br />
0/800 2 2 2<br />
0/1000 5 2 2<br />
0/1500 5 5 2<br />
0/2000 10 5 5<br />
0/3000 10 10 5<br />
0/5000 20 10 10<br />
0/10000 50 20 20<br />
Vacuum<br />
30˝Hg/0 0.1 0.1 0.05 Vacuum<br />
Compound<br />
˝ Hg/psi Vac. Press. Vac. Press. Vac. Press.<br />
30˝Hg/0<br />
Compound<br />
30/0/15 0.2 0.1 0.2 0.1 0.1 0.05 inches<br />
30/0/30 0.5 0.2 0.2 0.1 0.2 0.1<br />
30/0/60 0.5 0.2 0.5 0.2 0.5 0.2<br />
30/0/100 1 0.5 0.5 0.5 0.5 0.2<br />
30/0/150 1 0.5 1 0.5 0.5 0.5<br />
30/0/200 2 1 1 0.5 1 0.5<br />
30/0/300 2 1 2 1 1 0.5<br />
30/0/400 5 2 2 1 2 1<br />
Type 1084<br />
Graduations<br />
Range Figure Minor<br />
Interval Graduatrion<br />
Pressure (psi)<br />
0/15 1 0.1<br />
0/30 2 0.2<br />
0/60 5 0.5<br />
0/100 10 1<br />
0/150 10 1<br />
0/200 20 2<br />
0/300 20 2<br />
0/400 50 2<br />
0/600 50 5<br />
0/1000 100 10<br />
Vacuum<br />
30˝Hg/0 2 2<br />
Compound<br />
inches<br />
mercury psi in. psi in. psi<br />
30 15 5 2 0.5 0.2<br />
30 30 10 5 1 0.5<br />
30 60 10 10 2 1<br />
30 100 30 20 2 1<br />
30 150 30 50 2 1<br />
30 300 30 50 2 1<br />
Figure and<br />
Tab Intervals<br />
Pressure (psi)<br />
0/15 1<br />
0/30 2.5<br />
0/60 5<br />
0/100 5<br />
0/150 10<br />
0/200 10<br />
0/300 25<br />
0/400 25<br />
0/600 50<br />
0/800 50<br />
0/1000 50<br />
0/1500 100<br />
0/2000 100<br />
0/3000 250<br />
0/5000 500<br />
0/10000 500<br />
2.5˝ Hg<br />
inches<br />
mercury psi mercury psi<br />
30 15 5 3<br />
30 30 5 5<br />
Types 1080 and 1082<br />
Range<br />
kg/cm 2 bar kPa<br />
Pressure<br />
0/1 0/1 0/100<br />
0/1.6 0/1.6 0/160<br />
0/2.5 0/2.5 0/250<br />
0/4 0/4 0/400<br />
0/6 0/6 0/600<br />
0/10 0/10 0/1000<br />
0/16 0/16 0/1600<br />
0/25 0/25 0/2500<br />
0/40 0/40 0/4000<br />
0/60 0/60 0/6000<br />
0/100 0/100 0/10000<br />
0/160 0/160 0/16000<br />
0/250 0/250 0/25000<br />
0/400 0/400 0/40000<br />
0/600 0/600 0/60000<br />
Vacuum<br />
–1/0 –1/0 –100/0<br />
Compound<br />
–1/0/1.5 –1/0/1.5 –100/0/150<br />
–1 /0/3 –1 /0/3 –100/0/300<br />
–1/0/5 –1/0/5 –100/0/500<br />
–1/0/9 –1/0/9 –100/0/900<br />
(1) All standard metric ranges are available<br />
with psi dual scales.<br />
Type 1084<br />
kg/cm 2 bar kPa<br />
Pressure<br />
0/1 0/1 0/100<br />
0/2 0/2 0/200<br />
0/3 0/3 0/300<br />
0/4 0/4 0/400<br />
0/7 0/7 0/700<br />
0/11 0/11 0/1100<br />
0/14 0/14 0/1400<br />
0/20 0/20 0/2000<br />
0/28 0/28 0/2800<br />
0/40 0/40 0/4000<br />
0/70 0/70 0/7000<br />
Vacuum<br />
–1/0 –1/0 –100/0<br />
Compound<br />
–1/0/1 –1/0/1 –100/0/100<br />
–1/0/3 –1/0/3 –100/0/300<br />
–1/0/6 –1/0/6 –100/0/600<br />
–1/0/10 –1/0/10 –100/0/1000
Dimensions<br />
Ashcroft ® <strong>Test</strong> <strong>Gauges</strong><br />
10<br />
Case Type 1082(*)S Standard<br />
3 Mounting studs CC threaded<br />
equally spaced on E dia. B.C.<br />
(Back connection only)<br />
A<br />
B<br />
S<br />
U<br />
Nuts & washers<br />
not supplied by<br />
Dresser<br />
T<br />
F<br />
C<br />
M<br />
Hole in<br />
panel<br />
G<br />
1<br />
/4 NPT or 1 /2 NPT<br />
D<br />
K<br />
LL<br />
H<br />
Case Type 1084S<br />
Case Type 1080(*)S<br />
B<br />
V<br />
W<br />
S<br />
B<br />
U<br />
A<br />
C<br />
T<br />
1<br />
/4 NPT<br />
G<br />
1<br />
/4<br />
(6)<br />
D<br />
C<br />
1/4 NPT or<br />
1/2 NPT<br />
A<br />
G<br />
K<br />
D<br />
T<br />
Dial<br />
Model Size A B C D E F G H K M S T U CC LL V W<br />
Inches<br />
1082 4 1 ⁄2<br />
1082 6<br />
1082 8 1 ⁄2<br />
6 3 ⁄32 5 3 ⁄8 3 15 ⁄16 4 7 ⁄8<br />
(155) (137) (100) (124)<br />
7 9 ⁄16 2 7 ⁄8 4 3 ⁄4 1 3 ⁄16 7 1 5 ⁄8 4 1 ⁄2 1 3 ⁄8 1 11 ⁄32 6 1 ⁄2<br />
5 5 3<br />
⁄8 ⁄8 ⁄4<br />
(192) (73) (121) (30) (178) (41) (114) (35) (34) (165) (16) (16) (19)<br />
10 1 ⁄16 9 5 ⁄8 6 9<br />
(257) (244) (152) (229)<br />
#10-24<br />
1<br />
⁄8 to 1 ⁄2<br />
1<br />
⁄4-20 (3) (13)<br />
— —<br />
1<br />
⁄4-20<br />
1080 8 1 ⁄2<br />
10 1 ⁄16 2 7 ⁄8 4 3 ⁄4 1 3 ⁄16 6 1 11 5 5<br />
⁄32 ⁄8 ⁄8 1 29 ⁄32 3 1 7<br />
⁄4 ⁄8<br />
— — — — — —<br />
(257) (73) (121) (30)<br />
(152) (34) (16) (16) (48) (83) (22)<br />
1084 3<br />
*Millimeters shown in ( ).<br />
3 1 ⁄4 1 15 ⁄32 3 3 ⁄16<br />
(83) (37) (81) (10)<br />
13<br />
⁄32 2 21 ⁄32<br />
— — (67)<br />
— — — — (11)<br />
— — — — —<br />
7<br />
⁄16
11<br />
Dimensions<br />
Ashcroft ® <strong>Test</strong> <strong>Gauges</strong><br />
Case Type 1082(*)S (XAZ)<br />
Case Type 1082(*)S (XAY)<br />
A<br />
B<br />
A<br />
B<br />
L<br />
T<br />
1<br />
/4 NPT or<br />
1/2 NPT<br />
C<br />
D<br />
P<br />
H<br />
F<br />
3-J dia. holes<br />
on E dia. B.C.<br />
1<br />
/4 NPT or<br />
1/2 NPT<br />
T<br />
G<br />
C<br />
D<br />
K<br />
W<br />
H<br />
T<br />
F<br />
Case Type 1082(*)S (XTY)<br />
Case Type 1082(*)S (XQY)<br />
A<br />
B<br />
L<br />
A<br />
B<br />
H<br />
3-J dia. holes<br />
on E dia. B.C.<br />
1/4 NPT or<br />
1<br />
/2 NPT<br />
T<br />
G<br />
C<br />
D<br />
K<br />
H<br />
T<br />
F<br />
1<br />
/4 NPT or<br />
1/2 NPT<br />
T<br />
G<br />
C<br />
D<br />
C<br />
T<br />
F<br />
Dial<br />
Model Size A B C D E F G H J K L M P T<br />
Inches Max. Min.<br />
1082 5 13 ⁄16 3 3 ⁄8 5 1 ⁄16 1 5 ⁄8 5 3 ⁄8 1 5 ⁄8 3 11 ⁄16 1 1 ⁄8 1 13 ⁄16 2 5 15<br />
⁄8 ⁄16<br />
4<br />
XTY<br />
1 ⁄2<br />
.218<br />
(48) (86) (129) (41) (137) (41) (94) (29) (21) (67) (24)<br />
1082 5 13 ⁄16 3 7 ⁄16 4 7 ⁄8 1 5 ⁄8 5 3 ⁄8 1 5 ⁄8 3 11 7<br />
⁄16 ⁄8 — 2 5 ⁄8 1 1 ⁄16<br />
4<br />
XAY<br />
1 ⁄2<br />
(48) (87) (124) (41) (137) (41) (94) (20) — .218 (67) (27)<br />
5<br />
⁄8<br />
— — (16)<br />
5<br />
⁄8<br />
— — (16)<br />
1082 7 5 ⁄8 3 1 ⁄2 6 3 ⁄8 1 5 ⁄8 7 1 5 ⁄8 4 7 7<br />
⁄16 ⁄8 — 2 5 ⁄8 1 1 5<br />
⁄16<br />
⁄8<br />
6<br />
XAY (194) (89) (162) (14) (178) (41) (113) (20) — .218 — —<br />
(67) (27)<br />
(16)<br />
1082 5 1 ⁄16 2 37 ⁄64 5 1 15<br />
⁄16 ⁄16 1 5 ⁄8 3 11 ⁄16 1 13 11<br />
⁄16 ⁄16 5 13 5<br />
⁄16 ⁄8<br />
4<br />
XAZ<br />
1 ⁄2<br />
— — — — —<br />
(129) (65) (129) (24) (41) (94) (46) (17) (143) (16)<br />
1082 6 3 ⁄8 2 7 ⁄16 4 3 7<br />
⁄4 ⁄8 1 5 ⁄8 3 11 ⁄16 1 9 7 5<br />
⁄16 ⁄8<br />
⁄8<br />
6<br />
— — — — — —<br />
XQY (162) (67) (121) (22) (41) (94) (40) (22) (16)<br />
*Millimeters shown in ( ).
Instrument Division Sales and<br />
Customer Service Locations<br />
Domestic Headquarters<br />
Stratford, Connecticut<br />
250 E. Main Street<br />
Stratford, CT 06614-5145<br />
Tel: (203) 378-8281<br />
Fax: (203) 385-0499<br />
Domestic Sales Offices<br />
Chicago, Illinois<br />
400 W. Lake Street<br />
Suite 318<br />
Roselle, IL 60172-3573<br />
Tel: (630) 980-9030<br />
Fax: (630) 980-9440<br />
Hartford, Connecticut<br />
1501 East Main Street<br />
Meriden, CT 06450-2860<br />
Tel: (203) 235-0450<br />
Fax: (203) 235-0593<br />
Houston, Texas<br />
3838 North Sam Houston<br />
Parkway East<br />
Suite 120<br />
Houston, TX 77032<br />
Tel: (281) 590-1092<br />
Fax: (281) 590-7100<br />
Los Angeles, California<br />
3931 MacArthur Blvd.<br />
Suite 202<br />
Newport Beach, CA 92660<br />
Tel: (949) 852-8948<br />
Fax: (949) 852-8971<br />
Mobile, Alabama<br />
851 South Beltline Highway<br />
Suite 402, 4th Floor<br />
Mobile, AL 36606<br />
Tel: (334) 473-1692<br />
Fax: (334) 473-1782<br />
International Headquarters<br />
Stratford, Connecticut<br />
250 E. Main Street<br />
Stratford, CT 06614-5145<br />
Tel: (203) 378-8281<br />
Fax: (203) 385-0357<br />
International Operations<br />
Brazil<br />
Dresser Industria e<br />
Comercio Ltda.<br />
Divisao Manometros Willy<br />
Caixa Postal 212<br />
09510 Sao Caetano do Sul<br />
Sao Paulo, Brazil<br />
Tel: 55 -11-453-5477<br />
Fax: 55-11-453-8710<br />
Canada<br />
Dresser Canada, Inc.<br />
2135 Meadowpine Blvd.<br />
Mississauga,<br />
Ontario L5N 6L5<br />
Canada<br />
Tel: 905-826-8411<br />
Fax: 905-826-9106<br />
China<br />
Dresser Trading<br />
Room 2403, 24th Floor<br />
CITIC Bldg.<br />
19 Jianguo Menwai St.<br />
Beijing, P.R.C.<br />
Tel: 86-1-6500-3139<br />
Fax: 86-1-6512-0300<br />
France<br />
Dresser Europe S.A.<br />
Division Instrumentation<br />
Immeuble Helsinki<br />
74, Rue d’ Arceuil<br />
Silic 265, F-94578<br />
Rungis, Cedex<br />
France<br />
Tel: 33-01-49-79-22-59<br />
Fax: 33-01-46-86-25-24<br />
Germany<br />
Dresser Europe S.A.<br />
Instrument Division<br />
Postfach 11 20<br />
Max-Planck-Str. 1<br />
D-52499 Baesweiler<br />
Germany<br />
Tel: 49-2401-8080<br />
Fax: 49-2401-7027<br />
Japan<br />
Dresser Japan Ltd.<br />
Room 318, Shin Tokyo Building<br />
3-1 Marunouchi 3-Chome,<br />
Chiyoda-ku, Tokyo, Japan<br />
Tel: 813-3201-1501/1506<br />
Fax: 813-3213-6567/6673<br />
Korea<br />
Dresser International S.A.<br />
Korea Office<br />
#2015 Kuk Dong Bldg.<br />
60-1, 3-KA, Choongmu-Ro,<br />
Chungku, Seoul, Korea 100-705<br />
Tel: 82-2-274-079-2/3<br />
Fax: 82-2-274-0794<br />
Mexico<br />
Dresser Instrument Division<br />
Henry Ford No. 114,<br />
Esq. Foulton, Fracc<br />
Industrial San Nicolas<br />
54030 Tlalneplantla edo<br />
de Mexico 54030<br />
Tel: 525-310-7217<br />
Fax: 525-310-2608<br />
Saudi Arabia<br />
Dresser Al Rushaid<br />
(DARVICO)<br />
P.O. Box 10145<br />
Jubail Industrial City<br />
Saudi Arabia 31961<br />
Tel: 966-3-341-0278<br />
Fax: 966-3-341-7624<br />
Singapore<br />
Dresser Singapore Pte Ltd.<br />
Instrument Operations<br />
Block 1004 Toa Payoh North<br />
#07-15/17<br />
Singapore 318995<br />
Tel: 65-252-6602<br />
Fax: 65-252-6603<br />
United Kingdom<br />
Dresser U.K. Ltd. Instrument Operation<br />
Rufford Court<br />
Hardwick Grange<br />
Warrington, Cheshire<br />
England WA1 4RF<br />
Tel: 44-1925-814545<br />
Fax: 44-1925-816378<br />
Venezuela<br />
Manufacturas Petroleras<br />
Venezolanas S.A.<br />
Apartado Postal 617<br />
Maracaibo, Venezuela<br />
Tel: 58-61-579-762 or 070<br />
Fax: 58-61-579-461<br />
A Halliburton Company<br />
Visit our web site www.dresser.com/instruments<br />
All specifications are subject to change without notice.<br />
All sales subject to standard terms and conditions.<br />
© Dresser Instrument Division, 3/99 20MCP 3P4/99


