Layout 1 (Page 2)
Layout 1 (Page 2)
Layout 1 (Page 2)

You also want an ePaper? Increase the reach of your titles
YUMPU automatically turns print PDFs into web optimized ePapers that Google loves.
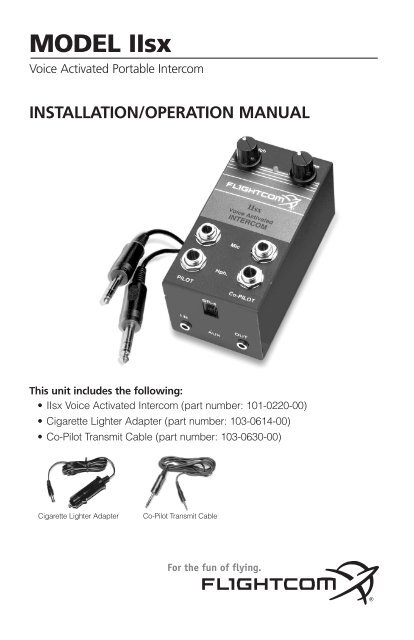
MODEL IIsx<br />
Voice Activated Portable Intercom<br />
INSTALLATION/OPERATION MANUAL<br />
This unit includes the following:<br />
• IIsx Voice Activated Intercom (part number: 101-0220-00)<br />
• Cigarette Lighter Adapter (part number: 103-0614-00)<br />
• Co-Pilot Transmit Cable (part number: 103-0630-00)<br />
Cigarette Lighter Adapter Co-Pilot Transmit Cable
Additional Accessories<br />
You may purchase separately the following accessories:<br />
• SR-4 Expansion Module (part number: 103-0602-20)<br />
• PTT Gold (part number: 103-0604-00)<br />
• FC-06 Mic Y Adapter (part number: 103-0603-00)<br />
SR-4 Expansion Module PTT Gold FC-06 Mic Y Adapter<br />
Set-up and Installation<br />
Mounting the Intercom<br />
Place the intercom in a convenient, easily accessible location out of the way of aircraft controls<br />
and passenger movement. The best location may be on the floor between the seats or under<br />
the panel by the trim wheel. You can fasten the intercom with Velcro tape or mount it permanently<br />
by securing the battery cover/mounting plate to the panel or floor.<br />
NOTE: be sure to secure intercom cables out of the way of the seat rails.<br />
Model IIsx<br />
Installation Diagram<br />
Single<br />
Microphone<br />
Jack<br />
Cigar Lighter<br />
12-32 VDC<br />
Headphone Jack<br />
Microphone Jack<br />
Microphone Jack<br />
Y-ADAPTER<br />
.206<br />
Single Microphone Jack<br />
Diagram<br />
.250<br />
.206<br />
.206<br />
Lighter Plug<br />
.250<br />
Lighter Plug 12-32 VDC<br />
Headphone Plug<br />
CO-PILOT<br />
Push-to-talk Switch<br />
.206<br />
Headphone Plug<br />
Mic Plug<br />
.206<br />
PILOT<br />
Push-to-talk Switch<br />
.206<br />
Mic Plug<br />
.206 Mic Plug<br />
PILOT<br />
Push-to-talk Switch<br />
.206 .206<br />
Mic Plug<br />
CO-PILOT<br />
Push-to-talk Switch<br />
CO-<br />
PILOT<br />
CO-<br />
PILOT<br />
Detachable<br />
Cords<br />
Flightcom IIsx<br />
OUT<br />
IN<br />
Aircraft Power Indicator<br />
"ON" = Aircraft Power<br />
"FLASH" = Battery Power<br />
"OFF" = Low Battery *<br />
White<br />
Band<br />
Earphone<br />
SR-4<br />
(optional)<br />
Tape Recorder<br />
(optional)<br />
Mic<br />
* When operating on battery power.
Connecting the Intercom to a Power Source<br />
To connect the intercom to the aircraft's power source:<br />
1. Insert the smaller end of the Cigarette Lighter Adapter cord (included with the IIsx intercom)<br />
into the intercom POWER 12-32 VDC jack (see Installation Diagram).<br />
2. Insert the larger end of the Cigarette Lighter Adapter cord into the aircraft<br />
cigarette lighter.<br />
NOTE: disconnect the Cigarette Lighter Adapter cord from the aircraft cigarette lighter when it<br />
is not in use.<br />
To connect the intercom to a 9-volt battery when aircraft power is not available:<br />
1. Slide the battery backplate in the direction of the white arrow and remove it.<br />
2. Attach the battery to the connector wires, and carefully insert it into the retention cavity<br />
without pinching the wires, so that the battery is held firmly in the cavity.<br />
3. Replace the backplate and snap it into its locked position.<br />
Power Indicator Light<br />
• When the intercom is on and operating on aircraft power, the green LED power indicator<br />
light will come on and remain on while aircraft power continues.<br />
• When the intercom is on and operating on battery power, the green LED power indicator<br />
light will blink at approximately one-second intervals. If the green LED power indicator light<br />
fails to operate, the battery charge is low.<br />
Connecting the Intercom to the Aircraft Headphone and Microphone Jacks<br />
To connect the intercom directly to the aircraft headphone and microphone jacks when there is<br />
a built-in push-to-talk (PTT) switch in the aircraft or when you are using a hand-held microphone<br />
connected to the aircraft:<br />
1. Insert the .250 inch intercom headphone plug into the aircraft headphone jack.<br />
2. Insert the .206 inch intercom microphone plug into the aircraft microphone jack.<br />
To connect the intercom to the aircraft headphone and microphone jacks using a portable PTT<br />
switch when the aircraft does not have a built-in PTT switch:<br />
1. Insert the .250 inch intercom headphone plug into the aircraft headphone jack.<br />
2. Insert the .206 inch intercom microphone plug into the portable PTT switch<br />
(Flightcom PTT GOLD, or equivalent).<br />
3. Insert the portable PTT switch .206 inch microphone plug into the aircraft microphone<br />
jack (see Installation Diagram).<br />
To connect the intercom to the aircraft microphone jacks to allow for co-pilot transmit capability:<br />
1. Insert the Co-Pilot Transmit Cable (included with the IIsx intercom) into the intercom<br />
CO-PILOT XMIT jack (see Installation Diagram).<br />
2. Insert the .206 inch microphone plug of the co-pilot transmit cable into the microphone<br />
jack in the aircraft.<br />
a. If the aircraft does not have a built-in PTT switch for the co-pilot's side of the aircraft,<br />
connect the .206 inch microphone plug of the co-pilot transmit cable to a portable<br />
PTT switch, and then connect the portable PTT switch plug to the aircraft co-pilot<br />
microphone jack (see Installation Diagram).<br />
1
Connecting the Pilot and Co-Pilot to the Aircraft When There is Only One Aircraft<br />
Microphone Jack<br />
Use a Y-adapter when the aircraft has only one microphone jack and both pilot and co-pilot<br />
need transmit capability (see Installation Diagram).<br />
To connect the pilot to the aircraft with a Y-adapter when the pilot is using a portable<br />
PTT switch:<br />
1. Insert the .250 inch intercom headphone plug into the aircraft headphone jack.<br />
2. Insert the .206 inch intercom microphone plug into the pilot portable PTT switch.<br />
3. Insert the PTT plug into one of the Y-adapter microphone jacks.<br />
To connect the co-pilot to the aircraft with a Y-adapter when the co-pilot is using a portable<br />
PTT switch:<br />
1. Insert the microphone plug of the co-pilot transmit cable into the co-pilot portable<br />
PTT switch.<br />
2. Insert the PTT microphone plug into the other Y-adapter microphone jack.<br />
3. Insert the Y-adapter microphone plug into the aircraft microphone jack.<br />
NOTE: if you are connecting the pilot and co-pilot to the aircraft with a Y-adapter and not<br />
using a push-to-talk switch between the intercom and the Y-adapter, audio from both the pilot<br />
and co-pilot can transmit.<br />
Connecting the Headset(s) to the Intercom<br />
To connect the headset(s) to the intercom:<br />
1. Insert the pilot headset plugs into the intercom PILOT: Mic and Hph. jacks.<br />
2. If a co-pilot or passenger is using the intercom, insert the co-pilot headset plugs into the<br />
intercom CO-PILOT: Mic and Hph. jacks.<br />
NOTE: if you are using a stereo headset, be sure to set it to “Mono” (refer to your headset<br />
operation manual for further instructions).<br />
SR-4 Expansion Module<br />
The IIsx intercom can be expanded to four places to accommodate two passengers with the<br />
addition of an SR-4 Expansion Module (purchased separately) by doing the following:<br />
1. Connect the smaller SR-4 cable plug into the intercom SR-4 jack.<br />
2. Route the cable to the rear seats.<br />
3. Connect the other end of the cable into the SR-4 Expansion Module jack.<br />
4. Connect the passengers’ headset plugs into the SR-4 Expansion Module headphone and<br />
microphone jacks.<br />
NOTE: common 8-ohm consumer headphones can be used with the aircraft's hand microphone<br />
as an economical alternative to buying additional aviation headsets, and will not harm<br />
the intercom or affect the volume of other headsets.<br />
NOTE: always turn off the intercom when it is not in use!<br />
2
Operating Procedures<br />
To operate the intercom:<br />
1. With headsets plugged into the intercom, turn on the aircraft master switch.<br />
2. Turn on the intercom by setting the intercom Volume control knob to the one o'clock<br />
position.<br />
3. Set the intercom Squelch control knob to the three o'clock position.<br />
4. Position the headset with the microphone 1/8” from your lips and centered over the corner<br />
of your mouth (see illustration).<br />
NOTE: noise cancelling microphones will not operate correctly if they are more than 1/8" from<br />
the mouth.<br />
5. While speaking loudly, adjust the intercom Volume control knob to a comfortable listening<br />
level.<br />
6. When no one is talking, turn the Squelch control knob as far clockwise as possible while<br />
still blocking background noise (adjust this setting in flight to compensate for different<br />
background noise levels).<br />
NOTE: if you set the squelch control too high, your voice will be cut out unless you talk very<br />
loudly; if you set the squelch control too low, you may occasionally hear background noise.<br />
Pilot Isolate Switch<br />
Push up the Pilot Isolate switch on the intercom to isolate your (the pilot's) headphones from<br />
audio other than the aircraft radio.<br />
• In the event of a power supply interruption or failure of the intercom, push up the Pilot<br />
Isolate switch to connect your headset directly to the aircraft radio.<br />
• You may also push up the Pilot Isolate switch when flying solo to allow the intercom and<br />
headphone cables to remain in place even while the intercom is not being used.<br />
Push down the Pilot Isolate switch to disengage the pilot isolate function and allow normal<br />
intercom operations.<br />
Intercom and Radio Transmission<br />
NOTE: passengers will be able to hear the aircraft radio sidetone, but use of the intercom will<br />
not affect normal radio transmission and volume.<br />
To transmit on the radio when you are the pilot or co-pilot, push the PTT switch associated with<br />
your headset. Only the person whose PTT switch is pushed will be heard over the radio, so that<br />
an instructor can talk to a student pilot while the student is transmitting to ATC without the<br />
instructor's voice being transmitted.<br />
3
Auxiliary Audio Input<br />
To listen to music or other audio programming:<br />
1. Connect one end of a cable with a 3.5 mm connector to the intercom AUX: IN jack.<br />
2. Connect the other end of the cable to the earphone jack of a tape player or other audio<br />
device.<br />
3. Adjust the volume of the tape player lower than the volume of the aircraft radio. Radio,<br />
intercom, and music signals will be mixed.<br />
Recording Radio and Intercom Conversations<br />
To record radio and/or intercom conversations:<br />
1. Connect one end of a cable with a 3.5 mm connector to the intercom AUX: OUT jack.<br />
2. Connect the other end of the cable to the microphone jack of a tape recorder or other<br />
recording device.<br />
Troubleshooting<br />
Problem: The intercom does not work when plugged in.<br />
Reason: the push-to-talk (PTT) switch may have been incorrectly inserted between the headset and the<br />
intercom.<br />
Remedy: reconnect the PTT switch between the intercom and the aircraft radio.<br />
Reason: the cigarette lighter power source may not be working.<br />
Remedy: verify that the cigarette lighter power source is working by checking to see if the green LED light<br />
on the front panel of the intercom is on when the intercom is turned on and plugged into the<br />
cigarette lighter. If the LED light is not on, the Cigarette Lighter Adapter fuse may need to be<br />
replaced. Replace the fuse, using only a 1/4-Amp fuse to protect the intercom from reverse<br />
polarity damage. If the fuse continually faults, have your aircraft's power supply checked.<br />
Reason: the aircraft's cigarette lighter jack may be too corroded or contaminated with ash deposits to<br />
make a good electrical contact for low current devices like the intercom.<br />
Remedy: replace the corroded or contaminated aircraft cigarette lighter jack.<br />
NOTE: high current devices like spotlights or cigarette lighter elements, when inserted, create an arc that<br />
burns away oxidation, allowing these devices to work in an otherwise faulty jack. If this is the case,<br />
use a different method to obtain power or use the intercom's internal battery.<br />
NOTE: many aircraft do not have an operable cigarette lighter due to an Airworthiness Directive (AD)<br />
requiring disconnection. If this is the case, use a different method to obtain power or use the<br />
intercom's internal battery.<br />
NOTE: if you decide to hardwire the intercom to the aircraft power source, be sure to use a 1/4-Amp fuse<br />
in the power line to protect the intercom from reverse polarity damage.<br />
Reason: the plugs may not be completely connected to the intercom.<br />
Remedy: reconnect the plugs securely.<br />
Reason: the volume may not be turned up.<br />
Remedy: turn up the volume.<br />
Reason: the headphone plugs may be corroded.<br />
Remedy: clean the headphone plugs with steel wool.<br />
Reason: the battery may be worn down.<br />
Remedy: replace the battery.<br />
Problem: A high pitch whine is present only when the engine is running, and varies with RPM.<br />
Reason: the noise is coming from the alternator or generator on the power bus of the aircraft.<br />
Remedy: try connecting the ground lead to another point in the aircraft. If the noise is especially loud, it<br />
may be due to a weak battery or an alternator with defective diode(s). In extreme situations, a<br />
commercial alternator noise filter connected in series with the intercom power lead should help.<br />
4
Problem: As the pilot, you are having difficulty transmitting on the radio.<br />
Reason: your headset microphone plug may not be connected to the pilot side of the intercom and/or<br />
the co-pilot intercom microphone plug may be connected to your PTT switch.<br />
Remedy: correctly reconnect plugs (see Installation Diagram).<br />
Problem: You encounter a distorted sidetone while transmitting.<br />
Reason: the noise is due to improper shielding of the aircraft antenna cable.<br />
Remedy: have a qualified radio shop check all antenna lead connections.<br />
Problem: The co-pilot's transmission is not clear.<br />
Reason: the CO-PILOT XMIT jack on the intercom may be corroded.<br />
Remedy: rotate the plug several times in the jack to clean off any built-up corrosion.<br />
Problem: The unit isn't loud enough or you lose parts of your sentences while speaking.<br />
Reason: the microphone may not be close enough to you.<br />
Remedy: place the microphone as close to your lips as possible.<br />
Reason: the squelch may be adjusted too high.<br />
Remedy: while no one is talking, slowly rotate the squelch control knob clockwise until the background<br />
noise just disappears. Do not turn the knob any further than is necessary. You may find that one<br />
brand of aviation headset puts out a higher signal than another. If this is the case, you may be<br />
able to equalize the sensitivity of your headset by adjusting the microphone preamps (refer to<br />
your headset's operation manual for further instructions).<br />
Problem: You are unable to squelch out all background noise.<br />
Reason: if you are using a David Clark H10-30 headset, the microphone preamp may need to be adjusted.<br />
Remedy: turn down all the way the microphone preamp by rotating completely counterclockwise the<br />
small nylon screw at the front of the microphone. Single earsets or other tubular microphone<br />
type headsets may not have the noise cancelling ability necessary for proper squelch operation.<br />
A full earmuff with a high-quality noise cancelling electret or an amplified microphone is prefer<br />
able, although all aviation headsets will work to some degree.<br />
Problem: The background noise level while speaking is too high.<br />
Reason: the microphone may have limited noise cancelling ability. Only one poor microphone will make<br />
the entire system noisy.<br />
Remedy: switch to a premium headset with a very small electret element, such as the Flightcom 5DX, or<br />
turn down the volume control until the noise is at an acceptable level and speak louder with the<br />
microphone touching your lips. This will increase the signal-to-noise ratio by increasing the<br />
strength of your voice and decreasing the apparent strength of the noise.<br />
Problem: A high pitch whine is always present.<br />
Reason: the noise may be coming from the turn-and-bank indicator or other electric gyro.<br />
Remedy: try connecting your power lead to a different circuit breaker.<br />
Reason: the noise may be coming from your radio or headsets.<br />
Remedy: test your radio and headsets in another aircraft, if possible.<br />
NOTE: if your intercom still does not work properly, do not return it without contacting us first. Call or<br />
write us with a detailed description of the problem, and we should be able to explain how to correct it.<br />
Procedure for Warranty Claim<br />
Call for RMA before sending unit in. Retain a copy of the purchaser's original dated bill of sale as proof<br />
of purchase to present with the unit when you return it for repair. Please enclose a note describing the<br />
problem, the type of aircraft and headsets used with the intercom, and the number of hours the intercom<br />
has been in use. Pack equipment well to avoid damage in shipment. Defective units must be shipped to us<br />
with freight prepaid.<br />
Flightcom Corporation 7340 S.W. Durham Road, Portland, Oregon 97224 • 503-684-8229<br />
5
Two-Year Intercom Limited Warranty to Original Purchaser<br />
Flightcom Corporation warrants to the original purchaser of this product that it will be<br />
free from defects in materials and workmanship, under normal and proper use, for the<br />
period of two years from date of purchase. Flightcom Corporation will repair or<br />
replace, at its sole option, any parts showing factory defects during this warranty period,<br />
subject to the following provisions. This warranty applies only to a new product<br />
which has been sold through authorized channels of distribution. All work under<br />
warranty must be performed by Flightcom Corporation. All returned products must be<br />
shipped to our address, freight prepaid, accompanied by a dated proof of purchase.<br />
SAVE YOUR SALES SLIP! The purchaser voids this warranty if he, she or others attempt<br />
to repair, service or alter the product in any way. This warranty does not apply in<br />
the event of accident, abuse, improper installation, unauthorized repair, tampering,<br />
modification, fire, flood, collision or other damage from external sources, including<br />
damage which is caused by user replaceable parts (leaking batteries, etc.). This warranty<br />
does not extend to any other equipment or aircraft to which this product may be<br />
attached or connected. The foregoing is your sole remedy for failure in service or<br />
defect. Flightcom Corporation shall not be liable under this or any implied warranty<br />
for incidental or consequential damages, nor for any installation or removal costs or<br />
other service fees. This warranty is in lieu of all other warranties, express or implied,<br />
including the warranty of merchantability or fitness for use, which are hereby excluded.<br />
To the extent that this exclusion is not legally enforceable, the duration of such implied<br />
warranties shall be limited to two years from date of purchase. No suit for breach of<br />
express or implied warranty may be brought after two years from date of purchase.<br />
Questions?...Call TOLL-FREE 1-800-432-4342<br />
Flightcom Corporation<br />
7340 SW Durham Road, Portland, OR 97224 USA<br />
www.flightcom.net • Phone: 503-684-8229 • Fax: 503-620-2943<br />
Flightcom is a registered trademark of Flightcom Corporation.<br />
Specifications subject to change without notice. ©2005 Flightcom Corporation.<br />
600-0034-00 Rev D.