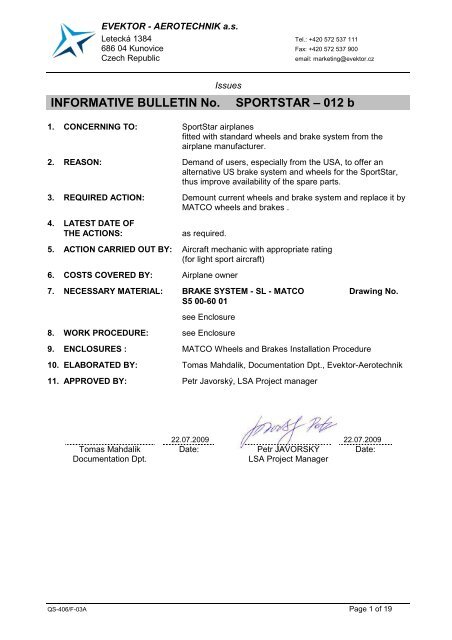
INFORMATIVE BULLETIN No SPORTSTAR – 012 b
INFORMATIVE BULLETIN No. SPORTSTAR â 012 b - Evektor
INFORMATIVE BULLETIN No. SPORTSTAR â 012 b - Evektor

You also want an ePaper? Increase the reach of your titles
YUMPU automatically turns print PDFs into web optimized ePapers that Google loves.
EVEKTOR - AEROTECHNIK a.s.<br />
Letecká 1384 Tel.: +420 572 537 111<br />
686 04 Kunovice Fax: +420 572 537 900<br />
Czech Republic<br />
email: marketing@evektor.cz<br />
<strong>INFORMATIVE</strong> <strong>BULLETIN</strong> <strong>No</strong>.<br />
Issues<br />
<strong>SPORTSTAR</strong> <strong>–</strong> <strong>012</strong> b<br />
1. CONCERNING TO: SportStar airplanes<br />
fitted with standard wheels and brake system from the<br />
airplane manufacturer.<br />
2. REASON: Demand of users, especially from the USA, to offer an<br />
alternative US brake system and wheels for the SportStar,<br />
thus improve availability of the spare parts.<br />
3. REQUIRED ACTION: Demount current wheels and brake system and replace it by<br />
MATCO wheels and brakes .<br />
4. LATEST DATE OF<br />
THE ACTIONS:<br />
as required.<br />
5. ACTION CARRIED OUT BY: Aircraft mechanic with appropriate rating<br />
(for light sport aircraft)<br />
6. COSTS COVERED BY: Airplane owner<br />
7. NECESSARY MATERIAL: BRAKE SYSTEM - SL - MATCO Drawing <strong>No</strong>.<br />
S5 00-60 01<br />
see Enclosure<br />
8. WORK PROCEDURE: see Enclosure<br />
9. ENCLOSURES : MATCO Wheels and Brakes Installation Procedure<br />
10. ELABORATED BY: Tomas Mahdalik, Documentation Dpt., Evektor-Aerotechnik<br />
11. APPROVED BY: Petr Javorský, LSA Project manager<br />
Tomas Mahdalik<br />
Documentation Dpt.<br />
22.07.2009 22.07.2009<br />
Date:<br />
Petr JAVORSKÝ Date:<br />
LSA Project Manager<br />
QS-406/F-03A Page 1 of 19
EVEKTOR - AEROTECHNIK a.s.<br />
Letecká 1384 Tel.: +420 572 537 111<br />
686 04 Kunovice Fax: +420 572 537 900<br />
Czech Republic<br />
email: marketing@evektor.cz<br />
<strong>INFORMATIVE</strong> <strong>BULLETIN</strong> <strong>No</strong>.<br />
Enclosure<br />
<strong>SPORTSTAR</strong> <strong>–</strong> <strong>012</strong> b<br />
MATCO Wheels and Brakes Installation Procedure<br />
Pictures<br />
List of necessary tools:<br />
- 5 mm diam. drill bit<br />
to make a groove<br />
- 10 mm diam. drill bit<br />
to make a groove<br />
- 4.1 mm diam. drill bit<br />
for the CONTROL SYSTEM COVER<br />
LEFT<br />
- 16.5 mm diam. drill bit<br />
for a backplate<br />
- 5.3 mm diam. drill bit<br />
for a brake fluid reservoir<br />
Instructions<br />
- Philips screw driver<br />
- Wire cutters<br />
- Hand electric drill<br />
- M7 nut wrench<br />
- M8 nut wrench<br />
- M12 nut wrench<br />
- M24 nut wrench<br />
- file<br />
- socket wrench size 3 (7/64“ )<br />
- socket wrench size 6<br />
- Contact glue to fix absorbent material to<br />
a non-absorbent<br />
MATCO PARTS SPECIFICATION<br />
6" WEHEEL&BRAKE, E series 1,25 - left MHMHE6B 1.25 EVLE 1 ks<br />
6" WEHEEL&BRAKE, E series 1,25 - right MHMHE6B 1.25 EVRI 1 ks<br />
AXLE ASSEMBLY, A3EV WHLAXLE3EV 2 ks<br />
MASTER CYLINDER, MC-4EV MCMC-4EV 4 ks<br />
REMOTE RESERVOIR KIT MCR-100K 1 ks<br />
TUBE NYLON II .125 (1/8"x0.026") MSCNNR2/026 12 m<br />
TUBE NYLON (1/4"x0.035") MSCNNR4/035 2 m<br />
STRAIGHT FITTING MSC268P 1 ks<br />
BRASS ELBOW, 90 DEGR, 1/8"NPT - 1/4" MSC269P 5 ks<br />
BRASS ELBOW, 90 DEGR, 1/8"NPT - 1/8" MSC169P 12 ks<br />
PARKING BRAKE VALVE PVPV-D 1 ks<br />
QS-406/F-03A Page 2 of 19
EVEKTOR - AEROTECHNIK a.s.<br />
Letecká 1384 Tel.: +420 572 537 111<br />
686 04 Kunovice Fax: +420 572 537 900<br />
Czech Republic<br />
email: marketing@evektor.cz<br />
Pictures<br />
Instructions<br />
Remove upholstery from both seats.<br />
Remove sleeves from both control sticks.<br />
Use Philips screw driver to unscrew<br />
parking brake cover attachment screws .<br />
Use Philips screw driver to unscrew hand<br />
control system left and right cover and<br />
remove both covers.<br />
QS-406/F-03A Page 3 of 19
EVEKTOR - AEROTECHNIK a.s.<br />
Letecká 1384 Tel.: +420 572 537 111<br />
686 04 Kunovice Fax: +420 572 537 900<br />
Czech Republic<br />
email: marketing@evektor.cz<br />
Pictures<br />
Instructions<br />
Carefully remove both cockpit side<br />
panels.<br />
Put an absorbent rag under the wheel<br />
brake and use M12 nut wrench to release<br />
the hose fiting to the brake cylinder.<br />
Do the same on opoosite wheel.<br />
Empty brake fluid into a bottle.<br />
Do the same for opossite wheel brake.<br />
QS-406/F-03A Page 4 of 19
EVEKTOR - AEROTECHNIK a.s.<br />
Letecká 1384 Tel.: +420 572 537 111<br />
686 04 Kunovice Fax: +420 572 537 900<br />
Czech Republic<br />
email: marketing@evektor.cz<br />
Pictures<br />
Instructions<br />
1. Support the fuselage front section as<br />
shown on the picture.<br />
2. Support fuselage aft section as shown<br />
on the picture.<br />
Demount main wheel pants (Philips<br />
screw driver)<br />
1. Cut off safety wire by nippers<br />
2. Screw off four bolts using Allen<br />
wrench size 6)<br />
QS-406/F-03A Page 5 of 19
EVEKTOR - AEROTECHNIK a.s.<br />
Letecká 1384 Tel.: +420 572 537 111<br />
686 04 Kunovice Fax: +420 572 537 900<br />
Czech Republic<br />
email: marketing@evektor.cz<br />
Pictures<br />
Instructions<br />
1. Follow instructions in Technical<br />
Service Bulletin supplied with the<br />
MATCO, to install the tires on the wheels.<br />
Bulletin is supplied with the Matco parts<br />
Follow instructions in the Matco Technical<br />
Service Bulletin to install the wheels.<br />
Screw down butterfly S5 30-02 01.<br />
Suit to wheel trim cap.<br />
QS-406/F-03A Page 6 of 19
EVEKTOR - AEROTECHNIK a.s.<br />
Letecká 1384 Tel.: +420 572 537 111<br />
686 04 Kunovice Fax: +420 572 537 900<br />
Czech Republic<br />
email: marketing@evektor.cz<br />
Pictures<br />
Instructions<br />
1. Release the nuts disconnect the<br />
hoses from the parking brake<br />
valves (M12 nut wrench).<br />
2. Unscrew (Philips screw driver) and<br />
demount parking brake bracket.<br />
1. Demount brake hoses and singleway<br />
valves. Us snippers to cut<br />
tightening strips.<br />
2. Disconnect hoses (M12 nut<br />
wrench).<br />
1. Demount side walls of the fuel<br />
selector box.<br />
2. Make a template.<br />
3. Use a supplied template to mark<br />
out a cut-out on th box front wall.<br />
(drill bit 10 mm, and 5 mm)<br />
QS-406/F-03A Page 7 of 19
EVEKTOR - AEROTECHNIK a.s.<br />
Letecká 1384 Tel.: +420 572 537 111<br />
686 04 Kunovice Fax: +420 572 537 900<br />
Czech Republic<br />
email: marketing@evektor.cz<br />
Pictures<br />
Instructions<br />
Pull the brake hose through a hole in<br />
fuselage side stiffener and then into the<br />
brake cylinder on the main leg.<br />
Attach the hose to the fuselage outer skin<br />
by means of cushion clapms.<br />
Use tightening strip and a polyurethane<br />
sealant (like Emfimastic PU 50) to fix<br />
brake hose to the main leg rear edge.<br />
Connect the hoses to the elbow (M12 nut<br />
wrench).<br />
QS-406/F-03A Page 8 of 19
EVEKTOR - AEROTECHNIK a.s.<br />
Letecká 1384 Tel.: +420 572 537 111<br />
686 04 Kunovice Fax: +420 572 537 900<br />
Czech Republic<br />
email: marketing@evektor.cz<br />
Pictures<br />
Instructions<br />
Connect elbow fitting to the MATCO brake<br />
cylinder.<br />
Demount the original brake pumps.<br />
Insert new MATCO brake pump lower<br />
eye end into the fork on the pedal tube,<br />
insert the bolt, washer, and cotter pin.<br />
Demont a pin from the brake pump upper<br />
fork end, set the fork end on the eye of<br />
the brake pedal and use the pin to<br />
connect together.<br />
QS-406/F-03A Page 9 of 19
EVEKTOR - AEROTECHNIK a.s.<br />
Letecká 1384 Tel.: +420 572 537 111<br />
686 04 Kunovice Fax: +420 572 537 900<br />
Czech Republic<br />
email: marketing@evektor.cz<br />
Pictures<br />
Instructions<br />
Connect hoses to the elbow (M12 nut<br />
wrench).<br />
Connect hoses to the brake pumps.<br />
(graphical enclosure)<br />
1. Drill hole of 16.5 mm diameter<br />
through the fire wall.<br />
according to drawing detail P.<br />
2. Screw on connecting piece<br />
(drawing <strong>No</strong>. S5 00-67 21).<br />
3. Connect hoses to the connecting<br />
piece.<br />
A view on elbow opposite side.<br />
QS-406/F-03A Page 10 of 19
EVEKTOR - AEROTECHNIK a.s.<br />
Letecká 1384 Tel.: +420 572 537 111<br />
686 04 Kunovice Fax: +420 572 537 900<br />
Czech Republic<br />
email: marketing@evektor.cz<br />
Pictures<br />
Instructions<br />
1. Drill 2 holes of 5.3 mm diameter<br />
through the fire wall.<br />
2. Install brake fluid reservoir using<br />
Bolt M5x12, Nut M5, Washer 5.3).<br />
3. Connect hose to the reservoir.<br />
1. Install the elbow fititing into the<br />
parking brake valve and position<br />
the valve to its place of installation.<br />
Mind the proper orientation of the<br />
valve. Directions of the elbows<br />
should be adjusted to avoid<br />
collision with the fuel selector<br />
installations. Mark the directons of<br />
the elbows, remove the parking<br />
brake valve and apply LOCTITE<br />
577 (read General Installation<br />
<strong>No</strong>tes 1) to install the lebow fittings<br />
into the parking brake valve.<br />
2. Attach the parking brake valve to<br />
the fuel selector box by means of<br />
the BOLT M5x30, WASHER 5.3,<br />
NUT M5.<br />
1. Apply LOCTITE 577 (read General<br />
Installation <strong>No</strong>tes 1) on<br />
approximately one half of the<br />
length of THREADED BAR M6x25<br />
and insert the BAR into one of the<br />
parking brake T- lever grips, so that<br />
the length of protruding end is 13<br />
mm.<br />
2. After curing insert this grip into the<br />
parking brake lever (Pos. 1) and<br />
mount opposite grip (Pos. 4) again<br />
using LOCTITE 577.<br />
3. According to a draing at the end of<br />
this Bulleting install the Parking<br />
Brake Lever into the fuel selector<br />
QS-406/F-03A Page 11 of 19
EVEKTOR - AEROTECHNIK a.s.<br />
Letecká 1384 Tel.: +420 572 537 111<br />
686 04 Kunovice Fax: +420 572 537 900<br />
Czech Republic<br />
email: marketing@evektor.cz<br />
Pictures<br />
Instructions<br />
box by means of a BUSHING,<br />
AXIS, WASHERS 4.3 and BOLTS<br />
M4x10 dle detailu D2<br />
4. Use BOLT M5x14, WASHER 5.3,<br />
and NUT M5 to connect installed<br />
parking brake lever with a control<br />
arm on the parking brake.<br />
1. 1. See the Drawing on last page of<br />
this Bulletin, detail A to make a cutout<br />
through the right cover of the<br />
fuel selector box.<br />
2. Fill the system with appropriate<br />
brake fluid (Mil-H-5606 Aircraft<br />
hydraulic fluid. DOT5 can be used<br />
but not DOT3, DOT4, or DOT5.1<br />
Automotive transmission fluid can<br />
also be used.<br />
Then bleed the system <strong>–</strong> follow<br />
General Installation Instructions 2<br />
3. Check all connections for leak.<br />
4. Re-install fuel selector box side<br />
covers<br />
1. The original hand control left cover,<br />
as well as parking brake cover<br />
should be replaced by a new hand<br />
control cover. Utilize the original<br />
covers to mark centers of holes for<br />
the attachment screws on the new<br />
cover. Then drill the holes and<br />
check that they fit<br />
2. Spray the new cover by readily<br />
available paint RAL9005 MAT<br />
QS-406/F-03A Page 12 of 19
EVEKTOR - AEROTECHNIK a.s.<br />
Letecká 1384 Tel.: +420 572 537 111<br />
686 04 Kunovice Fax: +420 572 537 900<br />
Czech Republic<br />
email: marketing@evektor.cz<br />
Pictures<br />
Instructions<br />
1. Position both kleft and right hand<br />
control covers and scew them<br />
down.<br />
2. Tear off the Velcro strip from the<br />
original left cover and use suitable<br />
contact adhesive to attach the<br />
Velcro strip (absorbent material) to<br />
the new hand control cover (nonabsorbent).<br />
Follow the instructions supplied<br />
with the adhesive.<br />
Re-install both left and right control stick<br />
sleeve.<br />
Re-install both left and right cockpit side<br />
panel.<br />
QS-406/F-03A Page 13 of 19
EVEKTOR - AEROTECHNIK a.s.<br />
Letecká 1384 Tel.: +420 572 537 111<br />
686 04 Kunovice Fax: +420 572 537 900<br />
Czech Republic<br />
email: marketing@evektor.cz<br />
Pictures<br />
Instructions<br />
Re-install both left and right seat<br />
upholstery.<br />
Perform brake system test:<br />
Check proper function of the brakes<br />
during taxiing and at turns. Both brakes<br />
should be equaly effective. Otherwise<br />
repeat bleeding. Press and hold pressed<br />
brake pedal. Release bleeding screw on<br />
the brake cylinder. Brake fluid with air<br />
bubbles should run out. Tight the bleeding<br />
screw and release pressure on the pedal.<br />
Repeat this procedure until no bubbles<br />
are visible and just brake fluid runs out.<br />
QS-406/F-03A Page 14 of 19
EVEKTOR - AEROTECHNIK a.s.<br />
Letecká 1384 Tel.: +420 572 537 111<br />
686 04 Kunovice Fax: +420 572 537 900<br />
Czech Republic<br />
email: marketing@evektor.cz<br />
GENERAL INSTALLATION INSTRUCTIONS<br />
1/ LOCTITE 577 sealant:<br />
1. To get best possible results, all surfaces (external as well as internal) should be<br />
cleaned up with the Loctite cleaners and let dry sufficiently.<br />
2. Apply Activator 7471 or 7649 if the material is a non-active like metal or curing<br />
time is too long and let dry..<br />
3. Apply a strip of adhesive all around the screw front threads, just not on the first<br />
thread. Crush adhesive into threads to fill the whole space in threads. For bigger<br />
diameter screws apply more adhesive as necessary to fill the threads and apply<br />
adhesive also into nut inner thread.<br />
4. Ordinarily connect and use a pipe wrench to tight the screw joint as necessary to<br />
get proper position.<br />
5. Properly tightened parts are immediately tight at mild pressure. The joint should<br />
cure at minimum for 24 hours to get maximum strength and resistivity againts<br />
solvents.<br />
2/ MATCO BRAKE SYSTÉM FILLING AND BLEEDING<br />
Release slightly the bleeding screw on the brake cylinder (not fully to avoid drop out<br />
of a sealing ball).<br />
Screw off the reservoir cup. Fill reservoir untill brake fluid starts to run out from the<br />
bleed screw. Pressing of pedal speeds up filling. Filling is complete when brake fluid<br />
with no air bubbles runs out the bleeding screw.<br />
Put suitable bottle under the brake cylinder to catch brake fluid. Be carefull <strong>–</strong> protect<br />
your hands,as well as airplane painted parts, because the brake fluid is aggressive.<br />
Do not re-use run-out fluid. Recommended brake fluid level is about 15-20 mm ( 1/2“-<br />
3/4“) below top edge. Screw down the reservoir cup, and clean it with a rag. Tight the<br />
bleeding screw on the brake cylinder.<br />
QS-406/F-03A Page 15 of 19
EVEKTOR - AEROTECHNIK a.s.<br />
Letecká 1384 Tel.: +420 572 537 111<br />
686 04 Kunovice Fax: +420 572 537 900<br />
Czech Republic<br />
email: marketing@evektor.cz<br />
MATCO BRAKE SYSTEM INSTALLATION DRAWINGS<br />
QS-406/F-03A Page 16 of 19
EVEKTOR - AEROTECHNIK a.s.<br />
Letecká 1384 Tel.: +420 572 537 111<br />
686 04 Kunovice Fax: +420 572 537 900<br />
Czech Republic<br />
email: marketing@evektor.cz<br />
QS-406/F-03A Page 17 of 19
EVEKTOR - AEROTECHNIK a.s.<br />
Letecká 1384 Tel.: +420 572 537 111<br />
686 04 Kunovice Fax: +420 572 537 900<br />
Czech Republic<br />
email: marketing@evektor.cz<br />
QS-406/F-03A Page 18 of 19
EVEKTOR - AEROTECHNIK a.s.<br />
Letecká 1384 Tel.: +420 572 537 111<br />
686 04 Kunovice Fax: +420 572 537 900<br />
Czech Republic<br />
email: marketing@evektor.cz<br />
QS-406/F-03A Page 19 of 19