Incubators - STLCC.edu :: Users - St. Louis Community College
Incubators - STLCC.edu :: Users - St. Louis Community College
Incubators - STLCC.edu :: Users - St. Louis Community College

Create successful ePaper yourself
Turn your PDF publications into a flip-book with our unique Google optimized e-Paper software.
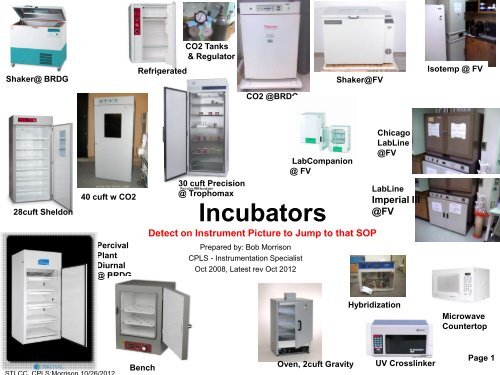
Shaker@ BRDG<br />
28cuft Sheldon<br />
40 cuft w CO2<br />
Percival<br />
Plant<br />
Diurnal<br />
@ BRDG<br />
Refrigerated<br />
Bench<br />
CO2 Tanks<br />
& Regulator<br />
30 cuft Precision<br />
@ Trophomax<br />
CO2 @BRDG<br />
<strong>Incubators</strong><br />
Detect on Instrument Picture to Jump to that SOP<br />
Prepared by: Bob Morrison<br />
CPLS - Instrumentation Specialist<br />
Oct 2008, Latest rev Oct 2012<br />
LabCompanion<br />
@ FV<br />
Oven, 2cuft Gravity<br />
Shaker@FV<br />
Chicago<br />
LabLine<br />
@FV<br />
LabLine<br />
Imperial III<br />
@FV<br />
Hybridization<br />
UV Crosslinker<br />
Isotemp @ FV<br />
Microwave<br />
Countertop<br />
Page 1
<strong>STLCC</strong>_CPLS;Morrison 10/26/2012<br />
Incubator: OVEN, 2 Cu.ft, Gravity Convection,<br />
Quincy Labs via MIDSCI<br />
Model: 30GC, SN: G3-008946<br />
Capacity: 2.0<br />
Max Temp: 450F/232C,<br />
Min: Ambient +25F or ~37C (specs), but tested at 44C<br />
Watts: 1200<br />
Amps: 10.43<br />
W,H, D: 18x16x12 inch<br />
W,H, D; 20x25x14 cm<br />
Weight: 78lbs<br />
Page 2
Incubator: Refrigerated, Shel-Lab, Bench/Floor<br />
<strong>STLCC</strong>_CPLS;Morrison 10/26/2012<br />
Model: LI5, SN 09009810<br />
Microprocessor Control<br />
P.I.D. Temperature Control<br />
LED Display of Setpoint and Chamber Temperature<br />
High and Low Limit Thermostats<br />
Interior Electrical Outlet<br />
Fan Assisted/Forced-Air Circulation<br />
Hermetically Sealed Compressor<br />
Capacity 3.2 cu.ft.<br />
Interior Dimensions WxDxH in. (cm) 16 x 14 x 25 (41 x 36 x 64)<br />
Exterior Dimensions WxDxH in. (cm) 24 x 22 x 33 (61 x 56 x 84)<br />
Temperature Range 0°C to 45°C (at 21°C ambient)<br />
Temperature Uniformity +/- 0.5°C at 20°C Electrical<br />
Specifications Volts: 120V Hertz: 50/60Hz Watts: 400W Amps:<br />
Capacity of <strong>St</strong>andard B.O.D. Bottles 62 Shelving 2 Supplied<br />
Interior Outlet 110V-1<br />
Hot link to Sheldon Incubator User Manual … pdf<br />
Page 3
Incubator: Low Temp, ShelLab, Basic Operations<br />
• Set Main Temperature<br />
– Press either the Up or Down arrow ONE TIME<br />
– While the display is blinking, continue to press the up or<br />
down arrows to reach the desired set point<br />
– Temporarily set the Over-temperature dial to the maximum<br />
position (clockwise) until the desired set point is reach.<br />
– After the set point has stabilized, turn the Over-temperature<br />
dial back (counter-clockwise) until the light goes out, then<br />
clockwise again just past this mark.<br />
<strong>STLCC</strong>_CPLS;Morrison 10/26/2012<br />
Page 4
<strong>STLCC</strong>_CPLS;Morrison 10/26/2012<br />
Incubator;<br />
Refrigerated<br />
Control<br />
Panel<br />
Page 5
<strong>STLCC</strong>_CPLS;Morrison 10/26/2012<br />
Incubator;<br />
Refrigerated,<br />
Sheldon,<br />
Operations<br />
Page 6
UTF-8 91945337<br />
Incubator: 3.7cft, VWR, Gravity Convection<br />
48.5W x 40.9D x 53.6H cm (19 1 / 8 x 16 1 / 8 x 21 1 / 8")<br />
64.5W x 57.7D x 84.1H cm (25 13 / 32 x 22 23 / 32 x 33 1 / 8")<br />
120V, 60Hz,<br />
320W 88 kg (191 lbs.)<br />
69.9W x 65D x 100.1H cm (27 1 / 2 x 25 5 / 8 x 39 13 / 32")<br />
105 L (3.7 cu. ft.) –<br />
14004-622 Each $1,928.56<br />
<strong>STLCC</strong>_CPLS;Morrison 10/26/2012<br />
Seven Segment LED Digital Display<br />
Two-Year Parts and Labor Warranty<br />
VWR® Gravity Convection <strong>Incubators</strong> are ideal for safe<br />
incubation with r<strong>edu</strong>ced air changes, providing a stable<br />
environment while minimizing the potential of drying out samples.<br />
The digital advanced adaptive microprocessor control system<br />
provides superior temperature accuracy. The PT100 temperature<br />
sensor provides the best overall advantages in repeatability and<br />
stability over extended time periods.<br />
All incubator units feature a 3.3cm (1.3") stainless steel<br />
ventilation cap, two doors (one solid, one glass), high<br />
temperature grade foamed silicone rubber door gaskets, overtemperature<br />
and over-current protection, and sensor error<br />
detection. Units are constructed with a durable, powder-coated<br />
steel exterior, stainless steel interior, two stainless steel shelves,<br />
and glass wool insulation. Units are also equipped with an<br />
internal 110V outlet for auxillary equipment.<br />
Page 7
Incubator: Shaker, Floor, LabCompanion, @BRDG<br />
Link to Jeiotech IS_971 User Manual … pdf<br />
Model: IS-971 Incubated Shaker, Cat#AAH23336U :<br />
Link to Jeiotech IS_971 Engineering data … pdf<br />
Digital PID Microprocessor Controller<br />
Patented CLS (Custom Logical Safety) System, exceeding DIN Class 2<br />
Chamber Volume 250L<br />
Temperature Control Range Amb.+ 5.0 ~ 60.0 C (R Type + 4.0 ~ 60.0C)<br />
Auto Tuning and Bias Function (Internal Sensor Calibration)<br />
99h 59m Timer with Time Delay ON-OFF<br />
Door & Over Temperature Alarms<br />
Shaking amplitude 30, 40, 50, 60 and 70mm (30mm standard)<br />
RS 232 with FREE LabTracer Software<br />
10 to 300 rpm Shaking Speed with Opto-Electronic Feedback<br />
999h 59m Shaking Timer<br />
Programmable motion - Clockwise, Anti-Clockwise and Pause<br />
Dimenstions: 44.6x31.9x41.1 inches, Weight 379 lbs<br />
Optional : Flask Clamp, Universal Platform, Spring Wire Rack,<br />
Separate Funnel Clamp, Test Tube Rack, Rubber Mat<br />
Link to Jeiotech IS_971 Calibration Supplement … pdf<br />
<strong>STLCC</strong>_CPLS;Morrison 10/26/2012 Page 8
Temp control<br />
Active/not<br />
Heat On/off<br />
Autotune<br />
On/off<br />
Wait on Timer<br />
Wait off Timer<br />
Door Open<br />
Over Temp<br />
Alarm<br />
SET MAX<br />
TEMP<br />
LIMIT<br />
<strong>STLCC</strong>_CPLS;Morrison 10/26/2012<br />
Incubator: Shaker, Control Panel , @BRDG<br />
Present<br />
Value<br />
SET<br />
Value<br />
SET TEMP SET TIMER ENTER SET SHAKE<br />
MASTER<br />
ON/OFF<br />
“GREEN”<br />
BUTTON<br />
RPM Motion<br />
indicator<br />
Current<br />
RPM<br />
START/STOP<br />
TEMP<br />
ONLY<br />
LED “ on”<br />
if Shake<br />
timers or<br />
special<br />
motion is<br />
set<br />
SHAKER<br />
ON/OFF<br />
Toggle<br />
Page 9
Incubator: Shaker, Basic Controls; Set Temp, Set RPMs<br />
SET and HOLD TEMP<br />
Turn on device with GREEN button<br />
1. Press TEMP once or until SV blinks<br />
(PV LED may cycle thru Sv1, Sv2, SV3 Uni,<br />
0.0) until blink mode is reached<br />
2. Use Up/Down arrows to change value<br />
3. Press ENTER and wait until SV blinking stops<br />
4. Press START button to activate temp control<br />
5. Observe TEMP LED “on”<br />
6. HEAT LED blinks until temp SV is reached<br />
� Three frequently used temps can be saved in<br />
the Sv1, Sv2, Sv3 modes, ENTER to activate.<br />
� Press TEMP until “Uni” is displayed in PV LED<br />
to change units from “C” to “F”<br />
� To Synchronize TEMP with RPM settings you<br />
must cycle SHAKE button to “Snch” and set<br />
mode to “YES”, then ENTER<br />
ENTER<br />
Current RPM<br />
Display “0” if OFF<br />
Shaker I/O<br />
On/Off toggle<br />
SET and HOLD SHAKER RPMs, CHANGE RPMs, TURN OFF RPMs<br />
1. Press SHAKE button until “rPm” is shown in PV LED<br />
2. Use Up/Down arrows to change value<br />
3. Press ENTER to accept value for RMP set point<br />
4. Press START to begin motion immediately<br />
5. Press SHAKER I/O ONCE to start motion<br />
6. Observe RMPs climb and rotating symbol to SV is reached<br />
7. To Change RPM value, press SHAKE until “rPM” is displayed,<br />
up/down arrows to new SV, then press ENTER<br />
� To Turn off Shaker, press SHAKER I/O once only<br />
Observe drop in RPMs, motion symbol at bottom<br />
and finally stopped will display “0”<br />
� To Synchronize TEMP with RPM settings you must<br />
cycle SHAKE button to “Snch” and set mode to “YES”,<br />
then ENTER<br />
Page 10
Incubator: Shaker, Detailed SHAKE Operations<br />
ENTER<br />
SET TIMER for SHAKE Operations<br />
Use RPM set mode (previous slide) to set RPMs for Timed Operations<br />
NOTE: Total time for run = HOUR setting + MINUTES+SECONDS settings<br />
1. For HOUR SETTING:<br />
• Press SHAKE button until “runH” is displayed<br />
• Use Up/Down arrows to change value, Shake LED blinks<br />
• Press ENTER to accept value, press SHAKE I/O to start timer<br />
2. For MINUTES and SECONDS SETTING:<br />
• Press SHAKE button until “runS” is displayed<br />
• Use Up/Down arrows to change value<br />
• Press ENTER to accept value, press SHAKE I/O to start timer<br />
3. For FORWARD Clockwise Time Shaking<br />
• Press SHAKE button until “For.S” is displayed<br />
• Use Up/Down arrows to change value<br />
• Press ENTER to accept value, press SHAKE I/O to start timer<br />
4. For BACKWARD Counter-clockwise Shaking<br />
• Press SHAKE button until “bAC.S” is displayed<br />
• Use Up/Down arrows to change value<br />
• Press ENTER to accept value, press SHAKE I/O to start timer<br />
5. For PAUSE in shaking time<br />
• Press SHAKE button until “Pau.S” is displayed<br />
• Use Up/Down arrows to change value<br />
• Press ENTER to accept value, press SHAKE I/O to start timer<br />
6. To Synchronize TEMP with RPM settings you must cycle SHAKE button<br />
to “Snch” and set mode to “YES”, then ENTER<br />
SHAKE LED<br />
will be lit if<br />
timers are set<br />
Shaker I/O<br />
On/Off toggle<br />
Page 11
<strong>STLCC</strong>_CPLS;Morrison 10/26/2012<br />
Incubator: Floor Shaker, <strong>St</strong>art Issues<br />
If the Shaker does not start<br />
when all setting have been<br />
made, Check the Door/Lid<br />
Open/Close switch on the<br />
right corner.<br />
Cycle this several times to<br />
made sure it is responsive<br />
Page 12
<strong>STLCC</strong>_CPLS;Morrison 10/26/2012<br />
Incubator: Shaker, Temp Calibration<br />
Should be run at initial setup and after any significant relocation or changes in ambient environment.<br />
Page 13
<strong>STLCC</strong>_CPLS;Morrison 10/26/2012<br />
Incubator: Shaker, Auto-tune Function<br />
Should be run at initial setup and after any significant change in operating system environment or extreme run conditions.<br />
During auto-tuning the controller heats to 75% of the set point temperature, where it oscillates above and below the set point as<br />
many as three (3) times before loading the new tuning parameters. After the tuning parameters are loaded it heats to the set point<br />
temperature. Auto-tuning is dependent on the operating conditions and can take up to 45 minutes. It is<br />
best done before any experiment is run.<br />
Page 14
Incubator: Shaker, Racks/Clamps,<br />
MIDSCI LabCompanion<br />
http://shop.midsci.com/productdetail/M50/AAH23336U<br />
Capacities:<br />
Attachment Size IS-971/R<br />
flask clamp 50ml 99<br />
flask clamp 100ml 74<br />
flask clamp 250ml 39<br />
flask clamp 300ml 39<br />
flask clamp 500ml 25<br />
flask clamp 1000ml 14<br />
flask clamp 2000ml 9<br />
flask clamp 2800ml 6<br />
flask clamp 4000ml 4<br />
flask clamp 6000ml 4<br />
test-tube rack n/a 6<br />
funnel clamp 250ml 11<br />
funnel clamp 500ml 9<br />
funnel clamp 1000ml 5<br />
funnel clamp 2000ml 4<br />
microplate rack (tower) n/a 16<br />
microplate rack (4-flat) n/a 3<br />
microplate rack (3-flat) n/a 5<br />
<strong>STLCC</strong>_CPLS;Morrison 10/26/2012 microplate rack (single) n/a 25<br />
Page 15
<strong>STLCC</strong>_CPLS;Morrison 10/26/2012<br />
Incubator: Shaker, Platform Options<br />
http://www.gmi-inc.com/Genlab/Jeiotech%20971%20Series%20Incubator.htm<br />
Page 16
<strong>STLCC</strong>_CPLS;Morrison 10/26/2012<br />
<strong>Incubators</strong>: Floor/Shaker, Parts List<br />
Page 17
Incubator: Shaker; Floor,Belt, Jeiotech Lab Companion<br />
<strong>STLCC</strong>_CPLS;Morrison 10/26/2012<br />
Company: JEIO TECH INC<br />
Reference Number: CW-4468<br />
7/12/12 RGM ordered v. MC<br />
Subtotal: $50.74<br />
Tax: $0.00<br />
Shipping: $0.00<br />
Total: $50.74<br />
Page 18
<strong>STLCC</strong>_CPLS;Morrison 10/26/2012<br />
Incubator : Shaker, Floor, NewBrunswick, @FV<br />
New Brunswick Scientific C25 Incubated Floor Model<br />
Shaker<br />
Part Number: M1246-0000<br />
44” W x 25” D x 34” H<br />
The C-25 Classic Incubator and C-25KC Classic Refrigerated<br />
Incubator Shakers are large capacity shakers utilizing an<br />
eccentric counter balanced drive to provide horizontal plane<br />
rotary motion in a 1" (2.54 cm) circular orbit. A<br />
Proportional/Integral (PI) Microprocessor controller with<br />
instantaneous digital feedback controls the speed over a range<br />
of 50-400 rpm. The C-25 provides temperature control over a<br />
range of 7°C above ambient to 60°C, and the C-25KC provides<br />
temperature control over a range of 15°C below ambient<br />
(minimum 4°C ) to 60°C. Ambient temperature is defined as<br />
the temperature within one meter of the shaker. The shakers<br />
may be operated either continuously or in a timed mode via a<br />
programmable timer for shaking periods of 0.1 hr. to 99.9 hrs.<br />
For safe operation, both the C-25 and C-25KC are designed<br />
with a safety switch that automatically stops the shaker<br />
mechanism when the lid is lifted. In addition, the C-25 and C-<br />
25KC are equipped with visual and audible alarms that alert<br />
the user to the following conditions:<br />
• The end of a timed run<br />
• Deviations of shaking speed<br />
• Deviations of temperature setpoint<br />
• Power failure<br />
• Lid open<br />
A wide variety of platforms can be used with the C-25 or C-<br />
25KC.<br />
Product Family: C-25, C25, C 25, C-25KC, C25KC, C 25KC<br />
Page 19
<strong>STLCC</strong>_CPLS;Morrison 10/26/2012<br />
Incubator: Shaker, Floor, @FV, C-25 Specifications<br />
Page 20
<strong>STLCC</strong>_CPLS;Morrison 10/26/2012<br />
Incubator: Floor, Upright,Reach-in, Sheldon Manf<br />
RI28 28 cu ft Reach-In Incubator (120V), Sheldon Manf.<br />
Reach In The Model RI28 incubator provides extra-large capacities while<br />
minimizing the amount of floor space used. This large space is kept<br />
uniform by intergrating a highly responsive mircoprocessor with the<br />
appropriatly sized heating element. A totally independent secondary<br />
temperature controller offers the added security of over-temperature<br />
protection. Our unique forced air circulation system creates a one-pass<br />
circulation pattern that provides both exceptional temperature uniformity<br />
and rapid heat recovery. The chamber floors are ruggedly reinforced to<br />
support roller apparatus or shakers.<br />
The RI28 is supplied with:<br />
six (6) study shelves that will not sag or bend under heavy loads.<br />
Microprocessor Control<br />
5C to 70C<br />
Power: 120V, 8.5A<br />
28 cuft internal<br />
Viewing Window<br />
Accomodates Roller Bottle Apparatus<br />
Power Coated White Interior<br />
Supplied with 6 Shelves<br />
12 Month Warranty<br />
Hotlink to Shel-Lab RI28 Incubator User Manual … pdf<br />
Page 21
<strong>STLCC</strong>_CPLS;Morrison 10/26/2012<br />
Incubator: Shel-Lab, 28 cuft, Main Controls<br />
Page 22
Incubator: Shel lab 40cuft, Reach-in, CO2 Regulated<br />
<strong>STLCC</strong>_CPLS;Morrison 10/26/2012<br />
• 42”w x 34”deep x 88” high<br />
• Sheldon Model 1927 SN 1200300<br />
• Heat control Tested at Oakland Warehouse 6/8/11<br />
• Moved to BRDG by July 2011<br />
• CO2 Loss rate 1% per hour tested 9/13/11 or about 24<br />
cu ft per day without door openings and at Zero input<br />
pressure (gas off).<br />
Hotlink to Shel-Lab Model 1927 Incubator User Manual … pdf<br />
Page 23
Incubator: Temp and CO2, Control Panel Shel-lab, 40cuft<br />
Power<br />
ON/OFF<br />
<strong>STLCC</strong>_CPLS;Morrison 10/26/2012<br />
37.0<br />
Use up/down to set<br />
Temp, degrees C<br />
Set for max allowed<br />
over set temp value<br />
5.0<br />
Use up/down to set<br />
Desired CO2 level %<br />
Set Regulator on<br />
Supply tank to<br />
about 12 PSI Max<br />
Page 24
<strong>STLCC</strong>_CPLS;Morrison 10/26/2012<br />
<strong>Incubators</strong>: CO2 Tank order, Airgas, continuing<br />
Page 25
1. On/Off<br />
2. Place thermometer and<br />
samples on shelves<br />
4. Note<br />
Heat ON<br />
Light<br />
<strong>STLCC</strong>_CPLS;Morrison 10/26/2012<br />
Incubator: Bench, 2 cft, VWR<br />
3. Set Temp Control<br />
Per Chart for Approx<br />
Temperature C<br />
Model: VWR E1510, 2cuft, from Sheldon Manf.<br />
Weight 71.00 lbs<br />
Incubator Interior Dimensions WxDxH in. (cm) 17 x 12 x 17 in.<br />
Interior Dimensions WxDxH in. (cm) 21.5 x 18 x 25.5 in.<br />
Temperature Range 5°C above ambient to 70°C<br />
www.shellab.com<br />
5. Monitor Actual vs.<br />
Desired Temperature,<br />
Adjust setting as needed<br />
Page 26
Incubator: Benchtop or <strong>St</strong>acked, @FV, LabCompanion,<br />
<strong>STLCC</strong>_CPLS;Morrison 10/26/2012<br />
Lab Companion Air-Jacketed <strong>Incubators</strong> (Jeio Tech Inc, China)<br />
IB-25G Incubator<br />
Present<br />
Temperature<br />
Set<br />
Temperature<br />
CLS - Control System and PID microprocessor controller with enhanced<br />
safety features.<br />
Temperature safety exceeds DIN Class II controller.<br />
Auto-Tuning function & Bias function - internal built in re-calibration<br />
Timer : Time Delay ON / OFF (standard 99hr 59min)<br />
Selectable measuring temperature units C and F<br />
Selectable Auto-run or Manual -run<br />
Audible visual and audio alarm - OT and Door Open<br />
Temperature range : Ambient. 5 to + 70.0 C<br />
Very good uniformity and stability<br />
Incolony sheath heater<br />
Magnetic type door sealing : Easy and convenient door open and close.<br />
Inner door glass : No interference during outer door open.<br />
Tempered safety glass and Sealing chamber perfectly.<br />
Dial type handle for inner door : Solid and Easy open and close.<br />
Shelf bracket can be removed for easy cleaning with disinfectant -<br />
Upgraded<br />
3 set point memories in advance : Save time without AUTO-TUNING<br />
Internal tempered safety glass (5 mm)<br />
Optional : Perforated shelf<br />
Master On/Off<br />
Toggle Switch<br />
Page 27
Incubator: Bench, LabCompanion @FV, Control Panel<br />
HEAT: blinking or<br />
lit when heater is<br />
on<br />
A/T: flickers in<br />
auto-tune mode<br />
W/ON: Lit in wait<br />
mode for timer<br />
W/OFF: Lit<br />
waiting off time<br />
DOOR: Lit if door<br />
is open, alarm if ><br />
1 min. Heat will<br />
turn off.<br />
O/T: Lit if alarm<br />
and overheated<br />
<strong>STLCC</strong>_CPLS;Morrison 10/26/2012<br />
PV: Present Value<br />
of chamber<br />
TEMP: To set<br />
temperature<br />
TIMER: To set<br />
timer mode<br />
SV: Set value of<br />
chamber<br />
ENTER: To<br />
accept values<br />
If Door is open >1min, Alarm will sound<br />
and you must press START to resume<br />
previous settings/temperatures<br />
RUN; lit when unit is<br />
on and monitoring<br />
preset values for<br />
temp<br />
AUTOTUNE:<br />
Special test/tune<br />
operation mode<br />
Lock; hold for 3<br />
sec to lock/protect<br />
other keys; hold<br />
again to release<br />
START/STOP: <strong>St</strong>art or<br />
resume. Note, if inner<br />
door is open > 1min,<br />
press START to resume<br />
heating, look for<br />
blinking heat light.<br />
Page 28
<strong>STLCC</strong>_CPLS;Morrison 10/26/2012<br />
Incubator: 30cuft,<br />
Precision Sci,<br />
Model 30M<br />
Property of:<br />
<strong>St</strong>. <strong>Louis</strong> <strong>Community</strong><br />
<strong>College</strong> CPLS<br />
(Donated by Gallus)<br />
The temperature range is ambient +5C to 65C.<br />
Precision Mechanical Convection Incubator<br />
Model # 30M Glass; S/N # 699050714<br />
Biological Indicator testing (55C – 60C) ~10 -12 years<br />
Unit has been maintained, validated and calibrated on sch<strong>edu</strong>led basis.<br />
Production speeds N/A - 120V; 1450 W; 12.1 Amps<br />
Jean <strong>St</strong>uckey<br />
QC Microbiology Manager<br />
Gallus BioPharmaceuticals, LLC<br />
(314) 733-3107 (office)<br />
(618) 407-3880 (cell)<br />
4766 LaGuardia Drive<br />
<strong>St</strong>. <strong>Louis</strong>, MO 63134-3117<br />
Page 29
Incubator: Precision, 30cuft, Controls, (Donated-Gallus)<br />
Interior light “on” will<br />
illuminate with door<br />
open<br />
<strong>STLCC</strong>_CPLS;Morrison 10/26/2012<br />
Set Over-temp range<br />
adjustment knob/screw<br />
Over-temp range light<br />
indicator, “on” at limit<br />
Heating Master Switch<br />
Set “on” for normal use<br />
Heat Wattage Knob: 350, 700, 1400<br />
Use Higher settings to reach set-point faster,<br />
then set to lower wattage to maintain<br />
Set Temperature,<br />
adjustment knob/screw<br />
Heat on indicator,<br />
lighted when heat<br />
elements are on/active<br />
Temporary tool to adjust<br />
heat/range screws<br />
GENERAL OPERATIONS:<br />
1. Turn temperature set screw/knob clockwise to increase temperature setting<br />
2. Set wattage to highest value (1400) t o reach set point faster<br />
3. Set limit or range for allowance above set point temperature<br />
4. Monitor temperature gage and adjust temperature screw/knob until desired temperature is reached<br />
5. Set wattage to a lower value to maintain temperature, monitor for other changes.<br />
Power connected<br />
indicator light<br />
Page 30
On<br />
Off<br />
<strong>STLCC</strong>_CPLS;Morrison 10/26/2012<br />
Incubator : LabLine Imperial III @FV<br />
Thermostat<br />
Control (dial)<br />
Oven Temperature<br />
Control (dial)<br />
LabLine Imperial III 120V<br />
41” W x 28” D x 35” H<br />
Page 31
Incubator : Chicago Surgical/LabLine @FV, Model Cat 600<br />
Analog Dial<br />
Temp Control 0-9<br />
<strong>STLCC</strong>_CPLS;Morrison 10/26/2012<br />
On/Off<br />
Cat 600, SN 0-69,<br />
120V, 500Watts<br />
41” W x 26” D x 40” H<br />
Page 32
<strong>STLCC</strong>_CPLS;Morrison 10/26/2012<br />
Incubator : Fisher Scientific Isotemp @FV<br />
Woods<br />
-20 C Freezer (ref)<br />
Fisher Scientific<br />
Isotemp Incubator<br />
<strong>STLCC</strong> 001804<br />
25” w x 25” D x 45” H<br />
Fisher Scientific<br />
Isotemp Incubator<br />
<strong>STLCC</strong> 001805<br />
25” w x 25” D x 45”<br />
Set at 36.8C<br />
Page 33
Incubator : Microwave Oven, Countertop, Turntable, @FV<br />
<strong>STLCC</strong>_CPLS;Morrison 10/26/2012<br />
GE .7 cu ft Typical<br />
PN: DE68-40289B<br />
Page 34
<strong>STLCC</strong>_CPLS;Morrison 10/26/2012<br />
Incubator: Microwave, Benchtop, VWR/Argos<br />
Compact Microwave Oven, Argos Technologies<br />
The compact design of this 19.8L capacity oven makes it ideal<br />
for the crowded lab, as it occupies only minimal counter top area.<br />
The control panel is easy to read and use. The Minute Plus*<br />
feature sets the oven at high power with a single touch. An<br />
internal turntable rotates during operation for even heat<br />
distribution. (Argos 111 071)<br />
Note: Unit is not explosion-proof and is not intended for use in<br />
acid digestion applications.<br />
Meets or exceeds all safety performance and sanitation<br />
standards set for Commercial Food Service Microwave Ovens by<br />
HHS, FCC, and NSF. UL listed.<br />
Capacity: 19.8 L (0.7 cu. ft.)<br />
Electrical: 120V, 60Hz, 700W<br />
Interior Dimensions: 32.1W x 33.7D x 20H cm<br />
(125/8 x 131/4 x 77/8")<br />
Shipping Weight: 15 kg (33 lbs.)<br />
Page 35
<strong>STLCC</strong>_CPLS;Morrison 10/26/2012<br />
Incubator : Plant, Percival Upright<br />
Percival Adv Intellus Environment Control<br />
Model: CU36L4.A SN: 9012.01.061<br />
110V, 10amp Refr: 134A, 15oz<br />
Temp Range: (All lights on) 10-44±0.7 ºC Interior Space Volume: 29.6 ft3 (0.84 m3)<br />
Total Shelving Floor Area: 22 ft2 (2.4 m2) Maximum Growing Height: 7 7/8 in. (20 cm)<br />
Exterior Dimensions: inches(cm) Height: 77(195.6) Width: 33.5(85.1) Depth: 33.9(86.1)<br />
Light Intensity:(6" from lamps unless otherwise noted) 140 µmol/m2/s<br />
Link to User Manual … pdf<br />
Link to Installation/Maintenance Manual ..pdf<br />
Link to Intellus Controller Site (Interactive)<br />
Place a pan under the center of the unit to<br />
capture any condensation; dump<br />
periodically<br />
If individual lights in a bay are not “on”, check to ensure that the lamp metal end probes extend into the<br />
plastic end-caps at both ends and make sure the end-caps are securely in place. If this is the case and<br />
the lamp does not light it is probably burned out/bad. Swap a suspected burned out lamp with another<br />
rack spot that is working to validate this.<br />
If an entire bay of lamps are out, one or more lamps may be improperly secured in the plastic end-caps.<br />
Remove each and make sure the lamp metal ends extend into the end-cap and re-secure end caps.<br />
Page 36
On/Off Toggle<br />
Switch (side)<br />
Control Panel<br />
(see other slides)<br />
<strong>STLCC</strong>_CPLS;Morrison 10/26/2012<br />
Incubator: CO2, <strong>St</strong>eri-Cycle, Thermo Electron<br />
CO2<br />
Connection in<br />
Rear<br />
<strong>St</strong>erilizer Cycle<br />
On/Operating<br />
Button<br />
The Model 370 direct heat <strong>St</strong>eri-Cycle CO2<br />
incubator combines the best of both worlds - a<br />
unique in-chamber HEPA air filtration system<br />
providing continuous protection against unwanted<br />
airborne contaminants and an on-demand, high<br />
temperature sterilization cycle, to simplify your<br />
routine cleaning practices. Providing precise CO2<br />
control with choice of TC (thermal conductivity),<br />
excellent temperature uniformity and recovery<br />
characteristics<br />
Specifications:<br />
Temperature Range : +5C above ambient to +50C<br />
Temperature Uniformity : +/-0.3C @ 37C<br />
Humidity System : 3.2 quart (3.0 liter) pan<br />
Humidity Range : Ambient to 95% @ 37C<br />
Interior Volume : 6.5 cu.ft. (184.1 liters)<br />
Interior W x H x F-B : 21.3" x 26.8" x 20.0" (54.1cm<br />
x 68.1cm x 50.8 cm)<br />
Exterior W x H x F-B : 26.3" x 39.5" x 25.0" (66.3cm<br />
x 100.3cm x 63.5cm)<br />
Ship Weight : 315 lbs. (142.9 kg.)<br />
Page 37
<strong>STLCC</strong>_CPLS;Morrison 10/26/2012<br />
Incubator: CO2, Control Panel<br />
Mode Button: Cycles are; Run, Set, Calibrate, Configure<br />
Up/Down: Used<br />
to set values,<br />
Enter when<br />
done<br />
Left/Right :<br />
moves through<br />
options in each<br />
mode<br />
Enter: When an<br />
option and<br />
value has been<br />
set<br />
Page 38
<strong>STLCC</strong>_CPLS;Morrison 10/26/2012<br />
Incubator: CO2; Activating <strong>St</strong>erilizer Cycle<br />
1. Turn on device on left side<br />
2. Use Mode button to select RUN<br />
3. Press and Hold HEAT button > 5<br />
seconds to activate<br />
4. Follow messages; remove HEPA,<br />
remove Water<br />
5. Press ENTER when ready to start<br />
<strong>St</strong>erilization Cycle<br />
6. Cycle runs through four phases,<br />
total about 5 hours.<br />
Page 39
Incubator: CO2 Therma Corp Forma Model 370; HEPA Filter<br />
• Replacing the Filter:<br />
– Open the outer and inner glass door<br />
– Locate the Filter in the center of the chamber at the top.<br />
– Remove the old filter by twisting and pulling downward.<br />
– Locate a replacement filter and write on the upper<br />
surface the date of replacement.<br />
– Install the replacement (see info at right) filter and<br />
make sure it is pushed completely against the mounting<br />
cylinder/ring.<br />
• Setting the HEPA filter reminder<br />
– Press the Mode key until the Config indicator lights<br />
– Press the right arrow until REPL HEPA XX is displayed<br />
– Press the up/down arrow to choose the number of<br />
months desired<br />
– Press ENTE to save the number<br />
– Press the MODE key to return to the RUN mode or<br />
right/left to go to the next parameter<br />
– To check the setting, go to the CONFIG mode, then<br />
right arrow until the NEW HEPA XX displays. This is<br />
the number of days remaining until the replacement<br />
interval runs out.<br />
– A suggested interval of 6 months is the default<br />
setting, however the interval may be adjusted due to<br />
environmental or other considerations.<br />
<strong>STLCC</strong>_CPLS;Morrison 10/26/2012<br />
HEPA Filter Information<br />
ThermoForma, Part number<br />
760175, SN TF0529411316 H<br />
Air Flow 4 CFM, Resistance 99.97<br />
(0.3 microns)<br />
1/18/12 Info:<br />
Main HEPA Filter; For 3110 Series,<br />
310 Series (w/ HEPA option), <strong>St</strong>eri-<br />
Cycle Series incubators<br />
Fisher Sci Cat #15-497-022<br />
Thermo Scientific<br />
No.:760175 Each for $66.03<br />
Page 40
<strong>STLCC</strong>_CPLS;Morrison 10/26/2012<br />
<strong>Incubators</strong>: CO2 Thermo, Warning Messages<br />
Page 41
CO2 Incubator/<strong>St</strong>erilizer ; Model 370 Specifications<br />
<strong>STLCC</strong>_CPLS;Morrison 10/26/2012<br />
Page 42
<strong>STLCC</strong>_CPLS;Morrison 10/26/2012<br />
<strong>Incubators</strong>: CO2 Tank Pressure vs. Volume<br />
Page 43
<strong>STLCC</strong>_CPLS;Morrison 10/26/2012<br />
Incubator CO2: Tank and Regulators<br />
Regulator (Valve) Brass Fixture<br />
and Coupling Nut<br />
SUPPLY TANK PRESSURE:<br />
Raw tank pressure, near 900 psi<br />
when full, stays near this<br />
during use due to evaporation.<br />
When it starts to drop, supply<br />
tanks is near empty.<br />
Spare Tank; Main shut-off valve.<br />
Clockwise CW to shut valve<br />
(off), CCW to open.<br />
Supply Line to CO2 Incubator<br />
Regulator shutoff valve to<br />
Incubator, turn CCW to full<br />
open position for normal<br />
operation. Turn CW to shut off<br />
supply completely.<br />
Regulator Valve, Turn CCW to<br />
decrease pressure to incubator.<br />
Adjust to about 12 psi for<br />
normal operation.<br />
OUTPUT TO INSTRUMENT:<br />
Tank pressure meter to<br />
incubator supply line. Adjust to<br />
about 12 psi pressure<br />
maximum.<br />
Page 44
Incubator CO2: Changing Tanks, transfer regulator<br />
<strong>STLCC</strong>_CPLS;Morrison 10/26/2012<br />
Supply Tank Shut off valve<br />
Regulator Shut off valve<br />
Regulate pressure to<br />
instrument or device<br />
Regulator Coupling Nut<br />
Note: on CO2, do not use washer<br />
Check for leaks using soap bubbles<br />
ON ACTIVE TANK<br />
1. Turn Regulator shutoff valve on active tank Clockwise CW to full off position.<br />
2. Turn Tank shutoff valve on the current active tank Clockwise CW to full off position<br />
3. Loosen the Regulator coupling nut with large pliers or wrench (counter clockwise ,CCW to loosen)<br />
ON SPARE or NEW TANK<br />
4. Add pipe thread teflon tape if available.<br />
5. Transfer the Regulator valve assembly to the spare or secondary full tank and tighten the coupling nut<br />
by turning it CW until resistance is felt. Be careful not to strip the brass coupling nut or over-tighten.<br />
6. Open the Regular shutoff valve by turning CCW to the full open position<br />
7. Open the Tank shutoff valve by turning CCW slowly until a pressure of
Internal Dimensions (cm) 33.7 W x 18.1 D x 16.8 H<br />
External Dimensions (cm) 46.2 W x 22.4 D x 26.7 H<br />
Weight 9.7 kg<br />
UV Bulbs 8 Watts Each<br />
Power Delivered ~3000 µwatts/cm²<br />
<strong>STLCC</strong>_CPLS;Morrison 10/26/2012<br />
Crosslinker: <strong>St</strong>ratalinker 1800 UV<br />
The <strong>St</strong>ratalinker® UV crosslinker is designed to crosslink<br />
DNA or RNA to nylon, nitrocellulose, or nylon-reinforced<br />
nitrocellulose membranes. The process takes only 25–50<br />
seconds, in contrast to the traditional method of baking<br />
filters at 80°C for 2 hours. Additionally, crosslinking has been<br />
shown to significantly increase hybridization signals when<br />
compared to oven-baking. Each UV crosslinker is equipped<br />
with an internal photodetector designed to compensate for<br />
the natural shift in power output of aging ultraviolet bulbs.<br />
The crosslinker may be used for Northern, Southern, dot or<br />
slot blot analysis,1–3 colony or plaque screening, nicking of<br />
DNA in agarose gels prior to blotting,4 dimer formation to<br />
perform partial digests for rapid restriction mapping,5 UV<br />
sensitivity testing for host strain verification,6 and UV<br />
irradiation of PCR samples.<br />
Three independent modes of<br />
operation: Time, Energy, or<br />
Autocross.<br />
Link to <strong>St</strong>ratagene <strong>St</strong>ratalinker Manual ..(pdf)<br />
Page 46
UV Crosslinking: Modes of Operation-<strong>St</strong>ratalinker 1800<br />
<strong>STLCC</strong>_CPLS;Morrison 10/26/2012<br />
Page 47
<strong>STLCC</strong>_CPLS;Morrison 10/26/2012<br />
UV Crosslinking: <strong>St</strong>andard Proc<strong>edu</strong>res<br />
Page 48
Incubator: Hybridization Oven, Rotation, Fisher @BRDG<br />
<strong>STLCC</strong>_CPLS;Morrison 10/26/2012<br />
Fischer Biotech, Model FBH110, 110V<br />
Approx Dim: 14 x 13 x 16 inches<br />
Hybridization Notes from Wikipedia: is the process of establishing a non-covalent, sequence-specific interaction<br />
between two or more complementary strands of nucleic acids into a single hybrid, which in the case of two strands is<br />
referred to as a duplex. Oligonucleotides, DNA, or RNA will bind to their complement under normal conditions, so two<br />
perfectly complementary strands will bind to each other readily. In order to r<strong>edu</strong>ce the diversity and obtain the most<br />
energetically preferred hybrids, a technique called annealing is used in the laboratory practice. However, due to the<br />
different molecular geometries of the nucleotides, a single inconsistency between the two strands will make binding<br />
between them less energetically favorable. Measuring the effects of base incompatibility by quantifying the rate at which<br />
two strands anneal can provide information as to the similarity in base sequence between the two strands being annealed.<br />
The hybrids may be dissociated by thermal denaturation also referred to as melting. Here, the solution of hybrids is heated<br />
to break the hydrogen bonds between nucleic bases, after which the two strands separate. In the absence of external<br />
negative factors, the processes of hybridization and melting may be repeated in succession indefinitely long, which lays the<br />
ground for polymerase chain reaction. Most commonly, the pairs of nucleic bases A=T and G=C are formed, of which the<br />
latter is more stable.<br />
Page 49