

(2) AMPLIFICADOR 2R COMPLETO LYNX-v3-0-QAG
LYNX-v3-0-QAG
LYNX-v3-0-QAG

You also want an ePaper? Increase the reach of your titles
YUMPU automatically turns print PDFs into web optimized ePapers that Google loves.
R122/R123 calculation<br />
This is how you calculate R122 and R123 (2W Zener resistors) @ Iz=20mA<br />
(Rail Voltage–ZV)/0.02A=R (example with +/-55VDC Rail Voltage: (55-15)/0.02 = 40/0.02=2000R = 2K<br />
How to make L101<br />
Take app. 15 to 20 cm. of solid 1.5-2 mm thick insulated copper wire.<br />
Carefully wrap the wire 10 times around a round object app. 8-10 mm in<br />
diameter (e.g. a pencil). Make sure the windings are tight and pressed together.<br />
Then carefully bend the ends to fit the 16mm hole distance on the PCB.<br />
Cut the ends, and carefully remove 5mm of the insulating at each end.<br />
Now carefully pull the coil of the object.<br />
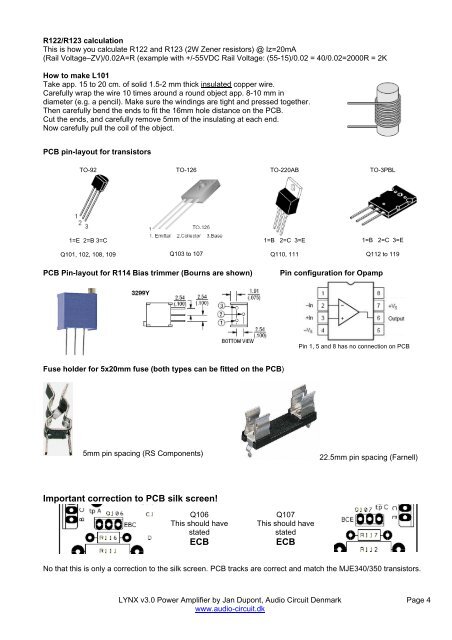
PCB pin-layout for transistors<br />
TO-92<br />
TO-126<br />
TO-220AB<br />
TO-3PBL<br />
1=E 2=B 3=C<br />
1=B 2=C 3=E<br />
1=B 2=C 3=E<br />
Q101, 102, 108, 109<br />
Q103 to 107<br />
Q110, 111<br />
Q112 to 119<br />
PCB Pin-layout for R114 Bias trimmer (Bourns are shown)<br />
Pin configuration for Opamp<br />
Pin 1, 5 and 8 has no connection on PCB<br />
Fuse holder for 5x20mm fuse (both types can be fitted on the PCB)<br />
5mm pin spacing (RS Components)<br />
22.5mm pin spacing (Farnell)<br />
Important correction to PCB silk screen!<br />
Q106<br />
This should have<br />
stated<br />
ECB<br />
Q107<br />
This should have<br />
stated<br />
ECB<br />
No that this is only a correction to the silk screen. PCB tracks are correct and match the MJE340/350 transistors.<br />
<strong>LYNX</strong> <strong>v3</strong>.0 Power Amplifier by Jan Dupont, Audio Circuit Denmark<br />
www.audio-circuit.dk<br />
Page 4