


Create successful ePaper yourself
Turn your PDF publications into a flip-book with our unique Google optimized e-Paper software.
Feature<br />
3.3v<br />
2<br />
5v<br />
5v<br />
3<br />
4<br />
GND<br />
17<br />
GND<br />
14<br />
15<br />
18<br />
Unlike the type used for cutting<br />
bread, an electronic breadboard is a<br />
plastic slab with lots of holes in it.<br />
Wiring a breadboard (or<br />
circuit) directly to the G<strong>PI</strong>O pins<br />
is generally safe, as long as you<br />
avoid circuits with external power<br />
sources. Most tinkerers invest in<br />
a breakout cable to go with the<br />
breadboard (see ‘Breadboards<br />
and breakouts’).<br />
With your circuit set up, you<br />
then control the G<strong>PI</strong>O pins in a<br />
programming environment like<br />
Python or Scratch. G<strong>PI</strong>O pins are<br />
set to input or output mode. G<strong>PI</strong>O<br />
outputs are easy because the pin<br />
is switched on or off (known as<br />
HIGH or LOW in computing terms).<br />
When the G<strong>PI</strong>O pin is HIGH,<br />
voltage flows through the G<strong>PI</strong>O<br />
pin, lighting up an LED or buzzing<br />
a buzzer. Set the pin to LOW and<br />
the LED goes out, or the buzzer<br />
goes quiet.<br />
G<strong>PI</strong>O input is a bit more tricky. In<br />
this case, the G<strong>PI</strong>O pin is set to HIGH<br />
or LOW and responds to a change<br />
from a circuit. A button (or other<br />
electronic component) can change<br />
the circuit from LOW to HIGH, or<br />
HIGH to LOW, with the Raspberry<br />
Pi coded to respond accordingly.<br />
This is often referred to as ‘pull up’<br />
or ‘pull down’. Don’t worry: if this<br />
all sounds complicated, you can get<br />
started by using G<strong>PI</strong>O Zero to make<br />
programming much easier.<br />
Never underestimate the pure fun<br />
you can get from a little computer,<br />
a bunch of pins, and a handful of<br />
electronic components. Discovering<br />
how to use G<strong>PI</strong>O is a great way to<br />
spend your time.<br />
G<strong>PI</strong>O ZERO<br />
ESSENTIALS<br />
Learning to use the G<strong>PI</strong>O pins<br />
is the route to having real fun<br />
with a Raspberry Pi. It’s a big<br />
subject, with lots of tricks and<br />
tinkering to discover. Our G<strong>PI</strong>O<br />
Zero Essentials book teaches<br />
you the basics (and beyond) of<br />
using the G<strong>PI</strong>O port with the<br />
G<strong>PI</strong>O Zero Python library. See<br />
magpi.cc/G<strong>PI</strong>OZero-book for<br />
more information.<br />
27<br />
22<br />
3.3v<br />
10<br />
9<br />
11<br />
GND<br />
5<br />
6<br />
13<br />
19<br />
26<br />
GND<br />
GND<br />
23<br />
24<br />
GND<br />
25<br />
8<br />
7<br />
GND<br />
12<br />
GND<br />
16<br />
20<br />
21<br />
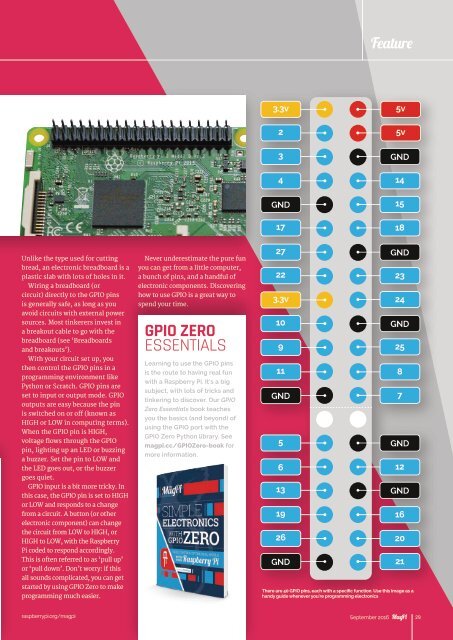
There are 40 G<strong>PI</strong>O pins, each with a specific function. Use this image as a<br />
handy guide whenever you're programming electronics<br />
raspberrypi.org/magpi September 2016 29