MU_STRATOS_ENG_HI

You also want an ePaper? Increase the reach of your titles
YUMPU automatically turns print PDFs into web optimized ePapers that Google loves.
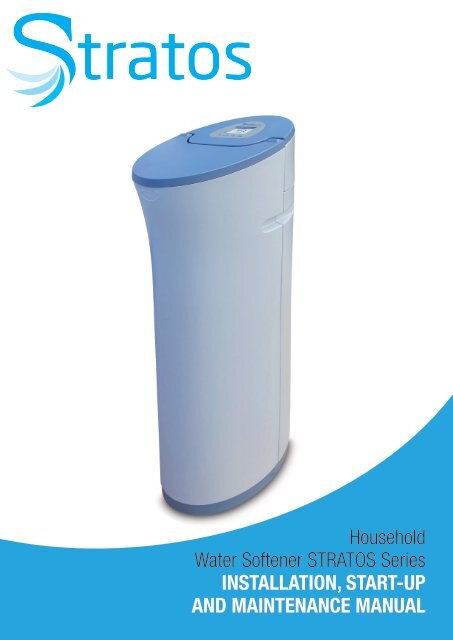
Household<br />
Water Softener <strong>STRATOS</strong> Series<br />
INSTALLATION, START-UP<br />
AND MAINTENANCE MANUAL
MAIN FEATURES OF THE <strong>STRATOS</strong> SERIES<br />
Meter delayed or immediate<br />
Metered regenerations can be programmed.<br />
Mixing valve<br />
Allows the adjustment of the residual hardness degree.<br />
Built-in By-pass<br />
The system can be isolated from the installation.<br />
Transformer<br />
External transformer.<br />
Easy salt refilling<br />
Easy water softener salt refilling.<br />
ESP<br />
FRA<br />
<strong>ENG</strong><br />
Multilingual programmer<br />
The user can select the following languages: English, French and Spanish .<br />
Certified product<br />
Official certificates.<br />
Optimized regeneration<br />
The regeneration process has been adjusted in order<br />
to reduce salt and water consumption (up to 50% of<br />
salt and a 40% of water).<br />
Adjustable regenerating degree<br />
Several regeneration degrees can be adjusted according to the<br />
hardness of water to be treated and the desired efficiency.<br />
State-of-the-art display<br />
Interactive display with multicolour icons.<br />
Functional and smart design<br />
It will fit in your home like any other electrical<br />
appliance.<br />
Holiday Mode<br />
It allows the user to program low consumption<br />
periods in which the system will carry out small<br />
washes.<br />
PLEASE KEEP T<strong>HI</strong>S MANUAL, SINCE IT INCLUDES THE SERVICE BOOK AND THE<br />
WARRANTY, IN ORDER TO BE ABLE TO OFFER YOU A BETTER AFTER-SALES SERVICE.
Content<br />
1. Presentation Page<br />
01. PRESENTATION<br />
01.1 Water Softener Safety<br />
01.2 What To Do Before<br />
02. INTRODUCTION<br />
02.1 What Is Hardness?<br />
02.2 How Does Your System Work?<br />
02.3 Regeneration of the System<br />
02.4 Regeneration Degree and Capacity<br />
02.5 Working flows<br />
02.6 Hardness Leakage<br />
02.7 Residual hardness<br />
02.8 Sodium Increase<br />
03. TECHNICAL SPECIFICATIONS<br />
04. UNPACKING AND VERIFICATION OF THE CONTENTS<br />
05. PREVIOUS WARNINGS<br />
05.1 Conditions for the proper operation of the system<br />
05.2 Installation of the system<br />
05.3 Start-up and maintenance<br />
06. INSTALLATION OF THE SYSTEM<br />
06.1 Required Tools and Pieces<br />
06.2 Step-by-Step Installation<br />
06.3 <strong>STRATOS</strong> Programmer<br />
06.4 How to Program the System<br />
07. START-UP<br />
07.1 Hydraulic Start-up<br />
07.2 Residual Hardness Regulation<br />
07.3 How to check for Hardness<br />
08. MAINTENANCE / HYGIENISATION<br />
09. GUIDE FOR THE IDENTIFICATION AND SOLUTION OF PROBLEMS<br />
10. MAINTENANCE SERVICE BOOK<br />
11. NOTES<br />
12. EC DECLARATION<br />
13. GUARANTEE<br />
6<br />
6<br />
6<br />
7<br />
7<br />
7<br />
8<br />
9<br />
9<br />
9<br />
9<br />
10<br />
11<br />
12<br />
12<br />
12<br />
13<br />
14<br />
14<br />
14<br />
14<br />
16<br />
17<br />
19<br />
19<br />
20<br />
21<br />
21<br />
23<br />
24<br />
26<br />
27<br />
27<br />
5
1. Presentation<br />
1. PRESENTATION<br />
The system you have just bought is a state-of-the-art equipment,<br />
able to deliver softened water to your home.<br />
Developed and designed by IONFILTER, a leading company<br />
from the industry with more than 20 years of experience; this<br />
equipment will deliver softened water without scaling salts,<br />
thus protecting your water supplies, avoiding the obstruction<br />
of all pipes and allowing you to enjoy the benefits of softened<br />
water.<br />
The quality of the water in our environment is getting worse<br />
every day, leading to an increase in water hardness, which<br />
causes problems in pipes and affects the proper operation of<br />
appliances using water, by increasing the maintenance and<br />
reducing their service life.<br />
The reality of this is what has driven us to design this series of<br />
domestic water softeners, in order to provide you with a water<br />
of the highest quality.<br />
Your <strong>STRATOS</strong> H.E. water softener will provide you and your<br />
family the benefits and advantages outlined below:<br />
- ENERGY SAVING<br />
- Greater wellness feeling.<br />
- Soft and smooth skin.<br />
- Increases the service life of electrical appliances and<br />
heaters.<br />
- ECONOMIC SAVING: it reduces the consumption of<br />
soap, fabric softeners and chemical products.<br />
- Low maintenance cost.<br />
- Operation is completely automatic.<br />
It is very important that you read and keep this manual before<br />
installation and start-up of the system. If you have any questions<br />
regarding the use or maintenance of this system, please contact the<br />
Technical Assistance Service (TAS) of your distributor.<br />
1.1 Safety of the Water Softener<br />
Your safety and that of others is very important. We have included<br />
some safety messages in this manual.<br />
This is the symbol for a safety alert. This symbol will<br />
warn you about possible situations in which you or<br />
those around you could be at risk.<br />
All safety messages will have the alert symbol or the words<br />
‘DANGER’ or ‘WARNING’.<br />
USE WIT<strong>HI</strong>N T<strong>HI</strong>S MANUAL<br />
‘DANGER’<br />
Serious or life-threatening risk if the following instructions are not immediately<br />
followed.<br />
‘WARNING’<br />
All safety messages will inform about the possible danger, how to reduce<br />
the injury risk and what might happen if the instructions are not<br />
followed.<br />
1.2 What To Do Before<br />
See section ‘Previous warnings’ before installing the water<br />
softener.<br />
Carefully follow the instructions for the installation.<br />
(Warranty may be considered void, should the installation be<br />
faulty).<br />
Please read the entire manual before undertaking installation.<br />
Then, collect all necessary materials and tools for the installation.<br />
Check the plumbing installations and the electric connectors.<br />
All installations must be done according to the law in force in<br />
each region or country.<br />
Please be careful when handling the water softener. Do not<br />
knock it over, let go of it or place it onto sharp objects.<br />
Under no circumstances should the softener be installed on<br />
the outside, since it must be protected against sunlight and<br />
bad weather conditions.<br />
6
1. Presentation<br />
2. INTRODUCTION<br />
These systems come with a residual hardness regulator as<br />
standard, which allows selecting the appropriate hardness for<br />
your home.<br />
Its friendly-use electronic programmer will allow you to put the<br />
system into operation in an easy and fast manner.<br />
2.1 What Is Hardness?<br />
Hardness is the quantity of scaling salts present in water,<br />
which are mainly composed of low solubility salts of calcium<br />
and magnesium. The main salts causing hardness are listed<br />
below:<br />
Calcium bicarbonate:<br />
Calcium chloride:<br />
Calcium sulphate:<br />
Magnesium bicarbonate:<br />
Magnesium chloride:<br />
Magnesium sulphate:<br />
Ca(CO3H) 2<br />
CaCl2<br />
CaSO4<br />
Mg(CO3H) 2<br />
MgCl2<br />
MgSO4<br />
These salts, due to its chemical properties, have a tendency<br />
to precipitate, producing scale on pipes and obstructing<br />
them as they accumulate. In the same way, hardness has a<br />
high tendency to scale on electrical resistors from heaters<br />
and to precipitate into heaters when temperature increases.<br />
The combination of hard minerals and soap produces a soap<br />
curdling. This soap curdling reduces the cleansing properties<br />
of soap. Hard minerals precipitation builds a layer on cooking<br />
utensils, connections and plumbing fixtures. It may even alter<br />
the taste of food.<br />
MAIN PROBLEMS<br />
Precipitation on pipes, fixtures and appliances.<br />
Precipitation on electrical resistors, increase on energy<br />
consumption due to the generated isolation.<br />
Higher consumption of soap and chemical products.<br />
Reduction of the electrical appliances’ service life and<br />
greater maintenance.<br />
All these problems are solved when using a water softener,<br />
since water obtained after being treated by the system is<br />
completely free of scaling salts.<br />
For the most part of Europe, hardness is indicated in French<br />
hydrometric degrees, but there are also other measuring<br />
units, according to each region.<br />
Below are the most usual equivalences.<br />
UNITS<br />
1 ppm of Calcium<br />
1 ppm of Magnesium<br />
1 ppm of CaCO3<br />
1º French (ºHF)<br />
1º German (ºd)<br />
1º English (ºe)<br />
1 mmol/L<br />
1 mval/L=meq/L<br />
ppm of CaCO3<br />
2,5<br />
4,13<br />
1<br />
10<br />
17,8<br />
14,3<br />
100<br />
50<br />
2.2 How Does Your System Work?<br />
º French<br />
0.25<br />
0.413<br />
0.1<br />
1<br />
1.78<br />
1.43<br />
10<br />
5<br />
Water softening is carried out by means of an ion exchange<br />
process. On this purpose, the system uses resins with the<br />
chemical capacity of capturing Calcium (Ca) and Magnesium<br />
(Mg) ions and removing them from water.<br />
When Calcium and Magnesium ions are captured by the<br />
resin, two Sodium (Na) ions are released which, due to its<br />
chemical properties, produce salts with a higher solubility<br />
avoiding all hardness-related problems.<br />
Therefore, when water gets softened, its sodium level increases.<br />
Further information on this procedure can be found in ‘Section<br />
2.8’.<br />
ION EXCHANGE RESINS:<br />
They are synthetic compounds, usually with an spherical<br />
shape, able to capture certain chemical substances present<br />
in water, which then exchanges for other substances.<br />
Water softening uses strong cation resins, which are composed<br />
of styrene copolymers and divinylbenzene with a<br />
sulphur base.<br />
7
2. Introduction<br />
The exchange resin charge is inside the column of the water<br />
softener and takes up a significant part of the total volume<br />
(between 60 and 75%, according to each model). A part of<br />
the column must remain empty, in order to allow for a proper<br />
regeneration of the resin bed.<br />
During the treatment process, water goes into the multi-way<br />
valve through the inlet connection, flows towards the upper<br />
part of the tank through the top nozzle and goes downwards<br />
through the bed resin, thus producing the ion exchange.<br />
Treated water is collected by the bottom nozzle and led to<br />
the multi-way valve through the inner tube of the tank. Treated<br />
water is sent for consumption using the outlet connection. At<br />
this point, the system has a treated water meter in order to<br />
measure the water volume.<br />
2.3 Regeneration of the System<br />
The quantity of calcium and magnesium ions that the resin<br />
may retain is limited; therefore, the water volume a water softener<br />
can treat is limited as well.<br />
The system must periodically carry out a process known as<br />
regeneration, which allows the resin to recharge with sodium<br />
ions, so it can continue softening water.<br />
In <strong>STRATOS</strong> systems, the regeneration process starts automatically<br />
when the configured water volume is achieved. The<br />
programmer allows the user to set several regeneration start<br />
modes (see ‘Section 6.3’ to obtain further information how to<br />
operate the programmer).<br />
The regeneration of a softener system is composed of several<br />
stages, which are described below:<br />
BACKWASH:<br />
Water comes into the column through the lower manifold,<br />
washing the suspended mater and fluffing the resin bed up,<br />
thus facilitating the subsequent regeneration process.<br />
Water<br />
outlet to<br />
service<br />
Inlet from<br />
supply network<br />
BRINE ASPIRATION:<br />
By means of an aspiration process relying on a Venturi effect,<br />
the system sucks the brine solution, which has previously<br />
been prepared in the regenerating tank. This brine solution is<br />
introduced downwards in the softening column, gets in contact<br />
with the ion exchange resin and regenerates it.<br />
Salida<br />
de agua a<br />
servicio<br />
Salida<br />
de la solución de<br />
salmuera hacia<br />
desagüe<br />
Entrada<br />
de agua de red<br />
Succión<br />
de salmuera por<br />
efecto venturi<br />
SLOW WASH:<br />
In this stage the brine solution, which has been previously<br />
sucked up, goes through the resin bed. Throughout this process,<br />
the contact between the brine and the resin is complete,<br />
which optimizes the regeneration.<br />
Water<br />
outlet to<br />
service<br />
Brine<br />
solution outlet<br />
towards drain<br />
Inlet from<br />
supply network<br />
Brine<br />
suction by a<br />
Venturi effect<br />
QUICK WASH:<br />
Washing water goes downwards through the resin bed, getting<br />
it settled and ensuring the complete removal of the brine,<br />
which might remain inside the bottle.<br />
Water outlet to<br />
service<br />
Tap water inlet<br />
Water<br />
outlet<br />
to drain<br />
Brine removal,<br />
quick wash<br />
8
2. Introduction<br />
TANK FILLING:<br />
The necessary water volume is sent to the brine tank in order<br />
to prepare the same amount of consumed brine for the next<br />
regeneration process. This process is fully automatic, thus it<br />
is not necessary to add any water to the brine tank (except<br />
during the start-up, as indicated in ‘Section 7’).<br />
NOTE: During the regeneration process, the systems may allow<br />
untreated water to go through, in order to guarantee the water<br />
supply.<br />
2.4 Regeneration Degree and Capacity<br />
The exchange capacity is the quantity of hardness that a certain<br />
resin volume can retain before getting exhausted. This value<br />
is usually expressed as ºHFxm3/litre.<br />
The higher the resin volume of the system is, the higher will be<br />
the quantity of hardness that can be retained before the resin<br />
gets exhausted. It is very important to choose the appropriate<br />
system for each type of installation.<br />
Depending on the quantity of sodium chloride used to regenerate<br />
each litre of resin, the exchange capacity of the resin<br />
may change.<br />
<strong>STRATOS</strong> softeners have six different regeneration degrees,<br />
depending on the conditions in which the system must work<br />
(for further information, please read ‘Section 3’).<br />
Systems are supplied as a standard with a regenerating degree<br />
of 80g NaCl/litre of resin, which is appropriate to work up<br />
to the maximum hardness indicated below:<br />
Minimum flow (litres/hour): Resin volume x 4<br />
Maximum flow (litres/hour): Resin volume x 40<br />
Should working ranges be outside the recommended ranges,<br />
the proper operation of the system could be affected (excessive<br />
loss of charge, hardness leakage, etc.)<br />
For further information on the minimum and maximum flows for<br />
each softener, please check the general specifications table.<br />
2.6 Hardness Leakage<br />
The ion exchange process on which water softening is based<br />
may be affected by different factors, which can reduce its efficiency,<br />
thus causing a certain level of hardness leakage.<br />
ELEVADA CONCENTRACIÓN DE SODIO EN EL AGUA A TRATAR<br />
It may interfere in the exchange process.<br />
OVERFLOW<br />
Since there is not enough contact time, some of the hardness<br />
may not be retained by the resin.<br />
REGENERATION DEGREE<br />
The higher the regeneration level is, the lower is the risk of a<br />
hardness leakage.<br />
2.7 Residual Hardness<br />
Depending on the final use of treated water, it may be necessary<br />
to obtain fully softened water or, on the contrary, it may be<br />
desirable to leave some residual hardness.<br />
MODEL<br />
<strong>STRATOS</strong> 15<br />
<strong>STRATOS</strong> 25<br />
Salt consumption Maximum hardness<br />
1.2 Kg (80g/lt)<br />
45ºHF<br />
2 Kg (80g/lt)<br />
70ºHF<br />
These systems have been designed to supply fully softened<br />
water, but the control valve integrates a residual hardness<br />
mixer, which allows for the regulation of the desired hardness<br />
degree in treated water (see ‘Section 7’).<br />
2.5 Working Flows<br />
Water softeners working by means of an ion exchange must<br />
respect certain contact periods between water to be treated<br />
and resin, in order to ensure that the softening process is carried<br />
out properly. For <strong>STRATOS</strong> softeners the working ranges<br />
indicated below must be respected:<br />
Note: In water for human consumption it is recommended<br />
to have a residual hardness between 5 and 8 ºHF if pipes<br />
are made of copper, and between 8 and 10 ºHF if they<br />
are made of iron (for the latter, it is also recommended to<br />
install a silicopolyphosphates filter afterwards).<br />
9
2. Introduction<br />
2.8 Sodium Increase<br />
Most of the sodium we consume on a daily basis comes from<br />
food, specially processed food, since salt is an excellent preservative<br />
and is used as an additive in prepared products.<br />
The table below can be used as a guideline to know the<br />
increase on sodium concentration in treated water depending<br />
on the inlet hardness:<br />
Sodium consumption through the water we drink is rather low<br />
when compared with that obtained from food.<br />
In spite of this, it is very important to bear in mind, as mentioned<br />
above, that water softeners increase the sodium concentration<br />
present in treated water when compared to the concentration<br />
measured on the inlet.<br />
WARNING: The maximum recommended sodium level in water for<br />
human consumption is of 200 ppm. Depending on the sodium concentration<br />
and the hardness of water to be treated, it is possible that softened<br />
water contains a higher concentration of sodium than recommended.<br />
Should this be the case, or if water is to be consumed by persons who<br />
must follow a low sodium diet, it is recommended to install a household<br />
reverse osmosis system in order to be able to drink the water.<br />
INITIAL HARDNESS<br />
IN WATER ºHF)<br />
10<br />
15<br />
25<br />
30<br />
35<br />
40<br />
45<br />
50<br />
60<br />
SODIUM ADDED BY THE SOFTE-<br />
NER (mgNa/litre)<br />
43<br />
65<br />
108<br />
130<br />
152<br />
173<br />
195<br />
217<br />
260<br />
10
3. Technical Specifications<br />
3. TECHNICAL DATA FOR THE <strong>STRATOS</strong> MODEL<br />
Model <strong>STRATOS</strong> 15 <strong>STRATOS</strong> 25<br />
Code 795113 795224<br />
Resin volume 15 Litres 25 Litres<br />
Working flow 1,2 1.8<br />
Maximum flow 1,0 1.6<br />
Regeneration 80 g/L<br />
Salt/regeneration 1.2 Kg 2.0 Kg<br />
Exchange capacity 61ºHFxm 3 102ºHFxm 3<br />
Backwash 3 min 6 min<br />
Counterflow 3.3 min 2.7 min<br />
Quick rinsing 3 min 6 min<br />
Brine Aspiration 40 min 49 min<br />
Regeneration 120 g/L<br />
Salt/regeneration 1.8 Kg 3.0 Kg<br />
Exchange capacity 75ºHFxm 3 122ºHFxm 3<br />
Backwash 3 min 6 min<br />
Counterflow 5 min 4.2 min<br />
Quick rinsing 3 min 6 min<br />
Brine Aspiration 43 min 52 min<br />
Regeneration*<br />
Salt/regeneration *200g/L: 3,0 Kg *250g/L: 6,25 Kg<br />
Exchange capacity 90ºHFxm 3 175ºHFxm 3<br />
Backwash 3 min 6 min<br />
Counterflow 8,3 min 8,7 min<br />
Quick rinsing 3 min 6 min<br />
Brine Aspiration 49 min 64 min<br />
Dimensions<br />
Height: A 900 1130<br />
Width: B 335 335<br />
Depth: C 570 570<br />
VOLUME OF TREATED WATER ACCORDING TO INLET HARDNESS<br />
<strong>STRATOS</strong> 15 (795113)<br />
<strong>STRATOS</strong> 25 (795224)<br />
Inlet<br />
hardness<br />
15ºHF<br />
20ºHF<br />
25ºHF<br />
30ºHF<br />
35ºHF<br />
40ºHF<br />
45ºHF<br />
50ºHF<br />
55ºHF<br />
60ºHF<br />
(61ºHFxm³)<br />
4.06 m³<br />
3.05 m³<br />
2.44 m³<br />
2.03 m³<br />
1.74 m³<br />
1.53 m³<br />
1.36 m³<br />
1.22 m³<br />
1.11 m³<br />
1.02 m³<br />
(75ºHFxm³)<br />
5.00 m³<br />
3.55 m³<br />
3.00 m³<br />
2.50 m³<br />
2.14 m³<br />
1.88 m³<br />
1.67 m³<br />
1.50 m³<br />
1.36 m³<br />
1.25 m³<br />
(90ºHFxm³)<br />
6.00 m³<br />
4.50 m³<br />
3.60 m³<br />
3.00 m³<br />
2.57 m³<br />
2.25 m³<br />
2.00 m³<br />
1.80 m³<br />
1.64 m³<br />
1.50 m³<br />
Inlet<br />
hardness<br />
15ºHF<br />
20ºHF<br />
25ºHF<br />
30ºHF<br />
35ºHF<br />
40ºHF<br />
45ºHF<br />
50ºHF<br />
55ºHF<br />
60ºHF<br />
(102ºHFxm³)<br />
6.80 m³<br />
5.10 m³<br />
4.08 m³<br />
3.40 m³<br />
2.91 m³<br />
2.55 m³<br />
2.27 m³<br />
2.04 m³<br />
1.85 m³<br />
1.70 m³<br />
(122ºHFxm³)<br />
8.13 m³<br />
6.10 m³<br />
4.88 m³<br />
4.06 m³<br />
3.49 m³<br />
3.05 m³<br />
2.71 m³<br />
2.44 m³<br />
2.22 m³<br />
2.03 m³<br />
(175ºHFxm³)<br />
11.66 m³<br />
8.75 m³<br />
7.00 m³<br />
5.83 m³<br />
5.00 m³<br />
4.38 m³<br />
3.89 m³<br />
3.50 m³<br />
3.18 m³<br />
2.92 m³<br />
11
4. Unpacking and verification of the contents<br />
4. UNPACKING AND VERIFICATION OF THE<br />
CONTENTS<br />
It is important that prior to installing and starting the system<br />
you check the received materials, with the aim of guaranteeing<br />
that it has not been damaged during transport.<br />
Any claims for damages during transport must be presented<br />
together with the delivery note or invoice to the distributor,<br />
including the name of the carrier, within a period of<br />
24 hours following the reception of goods.<br />
All systems are supplied fully assembled and are composed<br />
of the elements below:<br />
thrown away into the usual urban rubbish bins. When you<br />
want to throw the machine away, it must be taken to a specific<br />
local centre for the collection of materials, stating that it has<br />
circuits, and electric and electronic components, as well as<br />
ion exchange resin.<br />
In order to obtain more information about how to dispose of<br />
your electrical and electronic machine once they have fulfilled<br />
their use, contact the management of urban waste service or<br />
the establishment in which you acquired the system.<br />
The proper collection and treatment of the machines that can<br />
no longer be used contributes to the preservation of natural<br />
resources and also to avoiding potential public health risks.<br />
• Metered <strong>STRATOS</strong> H.E. valve. It is fully automatic and made<br />
of Noryl. It has a built-in isolation by-pass and a mixing valve<br />
for residual hardness.<br />
• Bottle containing resin made of reinforced polyethylene with<br />
glass fibre.<br />
5. PREVIOUS WARNINGS<br />
<strong>STRATOS</strong> water treatment systems ARE NOT POTABLE WATER<br />
SYSTEMS.<br />
• The strong cation ion exchange resin, specially made for<br />
softening, is supplied inside the bottle.<br />
• Compact <strong>STRATOS</strong> cabinet, made of plastic, which can<br />
contain enough salt for several regenerations.<br />
• Brine suction system.<br />
• Packaging and protections, including a pressurised air balloon<br />
to prevent the bottle from moving.<br />
Before starting the installation of the system, please read this<br />
manual carefully.<br />
The air balloon must be removed before starting the installation.<br />
Should the water to be treated not come from a public water supply,<br />
that is, from an unknown source, a physical-chemical and<br />
bacterial analysis of the water shall be necessary, with the aim of ensuring<br />
its proper purification applying the proper techniques and systems<br />
appropriate to each case, PRIOR TO THE INSTALLATION of the system.<br />
Contact your distributor in order to obtain advice about the most<br />
appropriate treatment for you.<br />
5.1 Conditions for the proper<br />
operation of the system<br />
• Do not use hot water in the system (T
5. Previous warnings<br />
• If inlet pressure is higher than 5.5 bars, a pressure regulator<br />
must be installed.<br />
Drain hose Drain hose Drain hose<br />
• Water to be treated must be properly filtered, therefore, it is<br />
recommended to install a pre-filter to guarantee the removal<br />
of suspended particles, which may be swept along by inlet<br />
water. It is recommended to use FILTERMAX self-cleaning<br />
filters. Please contact your distributor for further information.<br />
4 cm for<br />
aeration<br />
4 cm for<br />
aeration<br />
Failure to install an appropriate filter would result in particles obstructing<br />
the inner holes or injectors of the system, thus affecting its<br />
proper operation. .<br />
5.2 Installation of the system<br />
• If the water softener must treat all the water supply of your<br />
home, connect it to the general supply pipe before connecting<br />
the rest of pipes, except for pipes supplying the outside.<br />
Taps located outside the house must supply hard water. Due<br />
to the sodium increase in softened water, it is not recommended<br />
to use it for watering, since it can negatively affect the<br />
growth of plants and vegetables.<br />
• Should it be necessary to condition the installation of the<br />
home in order to install the system in the foreseen location,<br />
it must be carried out in accordance with the national regulations<br />
in force, concerning internal electric and hydraulic installations.<br />
• The planned location for the installation must have enough<br />
space for the system itself, its accessories, connections, and<br />
to carry out a proper maintenance.<br />
• The system should not be installed next to a heat source or<br />
where it receives a direct flow of hot air.<br />
• The drain connection, where water from regeneration will be<br />
driven, must be underneath the installation if possible. Drain<br />
connection must always have a free outlet. The diameter of<br />
this connection must have a minimum size of 1”. The maximum<br />
distance between the water softener and the drain intake<br />
cannot be placed higher than 6 m.<br />
Underground drain Supply pipe Sink outlet<br />
• The surroundings and the environment where the system<br />
and faucet are to be installed must meet the appropriate hygienic<br />
and sanitary conditions.<br />
• Avoid external drips from pipes, drains, etc. onto the system.<br />
• Under no circumstances must the system be installed on<br />
the outside.<br />
• Should softened water be supplied to a hot water or vapour<br />
generator, it will be necessary to install a dependable check<br />
valve between the water softener and the generator, in order to<br />
prevent hot water from returning to the system and damaging<br />
it.<br />
• It is recommended to install some valves for sample taking<br />
both for treated and untreated water, as close as possible to<br />
the water softener.<br />
• If there are quick-closing valves, it is recommended to install<br />
a device to prevent water hammers.<br />
• The water softener only works with a power supply of 12<br />
volts – 50 herz, which comes from the transformer included<br />
in the system. Please make sure that the transformer is used<br />
and that it is connected to a power supply of 220 – 240 V,<br />
50Hz. Also, it must be ensured that the electrical installation of<br />
the house is properly protected by a circuit breaker or a fuse.<br />
• If daytime pressure is higher than 5.5 bars, night-time pressure<br />
may exceed the maximum. Please use the pressurereducing<br />
valve if necessary. (a pressure-reducing valve may<br />
reduce the flow).<br />
• It is recommended to install a silicopolyphosphates filter in<br />
the system’s outlet to protect the pipes from the corrosion of<br />
softened water.<br />
13
6. Installation of the system<br />
5.3 Start-up and maintenance<br />
• The system must be hygienised periodically. See ‘Section 8’<br />
for further information.<br />
• Maintenance must be carried out by qualified technical<br />
personnel, under the proper hygienic conditions. (For further<br />
information contact the technical service of your distributor.)<br />
6. INSTALLATION OF THE SYSTEM<br />
Clamps<br />
IF ANY OTHER MATERIAL IS USED<br />
Other appropriate pipes and fasteners for drinking water supply,<br />
according to the requirements from the manufacturer<br />
and the local regulations.<br />
6.2 Step-by-Step Installation<br />
1. The system must always be installed with the supplied bypass<br />
valve. Additionally, a three-valve by-pass can be installed.<br />
The by-pass of the <strong>STRATOS</strong> systems has several positions.<br />
The installation of the water softener must be carried out by<br />
skilled technical personnel. Follow the recommendations in<br />
‘Section 5’ Previous warnings of this manual.<br />
Given that the system that you are going to install improves<br />
the quality of the water you consume and is considered<br />
a food, all of the tools that you are going to use for<br />
the assembly and installation must be clean and, under no<br />
circumstances, contaminated or impregnated with grease,<br />
oils or rust. Please be extremely careful when handling<br />
the materials that are going to be in contact with treated<br />
or untreated water. (For further information contact your<br />
distributor.)<br />
6.1 Required Tools and Pieces<br />
Before starting the installation, please take all the necessary<br />
tools and follow the instructions included in ‘Section 6.2’.<br />
IF WELDED COPPER PIPES ARE USED<br />
Tube-cutter<br />
Blowtorch<br />
Clamps<br />
Tin-Silver<br />
Sandpaper or steel wool<br />
IF THREADED PIPES ARE USED<br />
Pipe-cutter or steel saw<br />
Thread rolling machine<br />
Sealing paste for pipes<br />
Clamps<br />
IF CPVC PLASTIC IS USED<br />
Pipe-cutter<br />
Steel saw<br />
Adjustable wrench<br />
Glue for PVC<br />
14<br />
Outlet<br />
Service<br />
Inlet<br />
By-pass
6. Installation of the system<br />
RECOMMENDED INSTALLATION<br />
Service<br />
Valve for by-pass<br />
Valve<br />
Supply network inlet<br />
Valve<br />
Pressure gauge<br />
6. The system is supplied with a set of inlet and outlet connections.<br />
Please make sure that fastening clips are tightened<br />
on the connectors.<br />
Sample taking<br />
point<br />
Sample<br />
taking point<br />
Optional<br />
sediment<br />
filter<br />
Water Softener<br />
Drain<br />
2. Close the general water supply valve, which should be next<br />
to the main pump or the water-meter.<br />
3. Open all taps in order to empty the pipes from all water.<br />
NOTE: Make sure that the heater is not emptied, in order<br />
to prevent any damages on it.<br />
‘DANGER’ There is a danger of injury due to an excess of<br />
weight. It is necessary that at least two persons move and install<br />
the system, as well as move and rise the salt bags. There is a danger of<br />
suffering back injuries and other body injuries.<br />
4. Move the water softener towards the installation place. Place<br />
it on an even surface. If necessary, place it on a plywood<br />
platform at least 2 cm thick. Then, level the platform using a<br />
wedge.<br />
7. The tubes and accessories used to connect the main supply<br />
pipe to the inlet and outlet of the water softener valve<br />
must be loosely measured, cut and assembled.<br />
Please keep all fastenings, joints and tubes centred and<br />
straight. Check that water flows from the pipe towards the<br />
inlet of the water softener.<br />
NOTE: The inlet and outlet are indicated in the valve. Draw<br />
the sense of the flow to be sure.<br />
IMPORTANT: Check that the pipes are fixed, aligned and leaned<br />
on something in order to avoid any pressures on the inlet and<br />
outlet of the water softener. A wrong pressure coming from a misaligned<br />
pipe, or which has not enough place to lean on, could damage the valve.<br />
WELDED COPPER<br />
1. Carefully clean and apply welding paste on all joints.<br />
Plywood<br />
Wedge used to level the platform<br />
Installation ground<br />
Minimum 2 cm<br />
thickness<br />
2. Carry out all the welding.<br />
NOTE: Do not weld to the installation the pipes of the bypass<br />
valve. The heat from the welding could damage the<br />
valve.<br />
IMPORTANT: Do not place the wedges directly underneath the<br />
salt tank. The weight of the tank filled with water and salt may<br />
cause the tank to break against the wedge.<br />
IMPORTANT: In order to install the copper pipes and assemble<br />
the earth-grounding clamp, this must be already fastened. It is<br />
necessary to screw on this piece.<br />
5. First make a visual check and clean the inlet and outlet<br />
connections of the softener to remove any residues.<br />
15
6. Installation of the system<br />
THREADED PIPE<br />
1. Apply a sealing paste for pipes or Teflon tape on all male<br />
threaded pipes.<br />
2. Tighten all threaded connections.<br />
CPVC PLASTIC PIPE<br />
1. Clean, prepare and glue all joints according to the<br />
manufacturer’s instructions.<br />
OTHER<br />
Please follow the instructions from the pipes’ manufacturer<br />
when using other types of pipes and fixtures approved for<br />
drinking water.<br />
INSTALLATION OF THE DRAIN<br />
Measure and cut the necessary length, and then connect the<br />
drain line of ½” to the accessory for the drain connection of<br />
the water softener. Fasten the hose with a clamp.<br />
NOTE: Hook the hose of the drain to the underground drain.<br />
Tighten the drain hose. This will prevent any pipe whip<br />
during regenerations.<br />
HOW TO INSTALL THE ELBOW OF THE OVERFLOW<br />
DRAIN OF THE SALT TANK<br />
This programmers will provide you with information concerning<br />
the operation of the system, as well as allowing you to set up<br />
all parameters.<br />
MAIN FEATURES:<br />
User-friendly and intuitive programming.<br />
Multicolour interactive digital display.<br />
Holiday Mode<br />
Here the desired regeneration can be chosen by time, delayed,<br />
immediate or mixed.<br />
<strong>MU</strong>LTICOLOUR LCD DISPLAY: It shows the information concerning<br />
the state of the system. Depending on each moment, the<br />
display will show different types of messages:<br />
Service: It offers information concerning the operation of the system.<br />
15:57<br />
Last Regen. : jul. 01, 2012<br />
Mode: Meter Override<br />
Capacity<br />
Remaining<br />
Flow<br />
Rate<br />
Regeneration: It shows the regeneration stage of the system and<br />
the remaining time. It shows as well the current time.<br />
21:02<br />
Connect the overflow drain elbow from the system to a near<br />
drain. This drain intake must be at a lower height than the<br />
overflow drain.<br />
Advancing to<br />
Backwash<br />
NOTE: The overflow hose must be installed in such way<br />
that water cannot return from the drain hose.<br />
6.3 <strong>STRATOS</strong> Programmer<br />
Programming: It shows the internal parameters and allows its<br />
modification.<br />
DESCRIPTION OF THE PROGRAMMER<br />
All systems have a built-in state-of-the-art electronic programmer<br />
with a multicolour interactive display. This advanced controller<br />
allows to fully monitor the operation of the system. The<br />
display is installed on the upper part of the compact cabinet.<br />
Time<br />
Holiday<br />
Mode<br />
Region &<br />
Language<br />
Advanced<br />
Settings<br />
Hardness &<br />
People<br />
System<br />
Information<br />
16
6. Installation of the system<br />
Time<br />
Holiday<br />
Mode<br />
Date and Time<br />
Region &<br />
Language<br />
15:57<br />
jul. 22 , 2013<br />
Advanced<br />
Settings<br />
Hardness &<br />
People<br />
System<br />
Information<br />
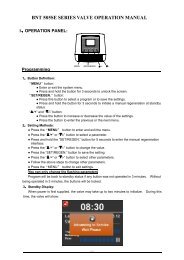
‘MENU’ BUTTON: Press this button to go to the menus and submenus.<br />
Once inside, you can go back through the programming<br />
process.<br />
‘SET/REGEN’ BUTTON: Press this button to trigger immediate or<br />
delayed regenerations. When programming, it allows to select<br />
the parameter as well as to confirm it.<br />
‘+ and -’ BUTTON: Press this button to select and modify the<br />
parameter.<br />
HOW TO LOCK THE PROGRAMMER: : If no button is pressed during<br />
certain time, the programmer gets locked for security reasons,<br />
and shows the message below when any button is pressed.<br />
15:57<br />
Last Regen. : jul. 01, 2012<br />
Mode: Meter Override<br />
Capacity Key Locked, Press and<br />
Remaining Hold “MENU” Key for 3<br />
Flow Seconds to Unlock<br />
Rate<br />
To unlock the programmer, press the ‘MENU’ button during<br />
3 seconds.<br />
IMPORTANT: When connecting the system the following<br />
message may appear:<br />
15:57<br />
Last Regen. : jul. 01, 2012<br />
Mode: Meter Override<br />
Capacity Advancing to Service<br />
RemainingWait Please<br />
Flow<br />
Rate<br />
This means that the system is entering the service mode.<br />
If two minutes have gone by, and this message is still<br />
showing, please contact your distributor.<br />
2. Press the ‘MENU’ button for 3 seconds to get into the internal<br />
program of the system. At this point you may have access<br />
to the following parameters:<br />
Time<br />
Holiday<br />
Mode<br />
Region &<br />
Language<br />
Advanced<br />
Settings<br />
Hardness &<br />
People<br />
System<br />
Information<br />
Time: The current date and time can be configured.<br />
6.4 How to Program the System<br />
<strong>STRATOS</strong> systems are configured to carry out delayed regenerations<br />
at 2 a.m.<br />
USER PROGRAMMING:<br />
1. Connect the supplied transformer with the electrical connector<br />
located on the rear part of the system. The programmer<br />
must be in service and show a message similar to that in<br />
the previous section.<br />
Time<br />
Holiday<br />
Mode<br />
Date and Time<br />
Region &<br />
Language<br />
15:57<br />
jul. 22 , 2013<br />
Advanced<br />
Settings<br />
Hardness &<br />
People<br />
System<br />
Information<br />
17
6. Installation of the system<br />
Miscellany: Here the following parameters can be<br />
selected:<br />
1. Units of measure, in the metric or American system. It is<br />
supplied by default in the metric system.<br />
Time<br />
Holiday<br />
Mode<br />
Region & Language<br />
Region &<br />
Language<br />
Region<br />
Language<br />
Advanced<br />
Settings<br />
Hardness &<br />
People<br />
System<br />
Information<br />
Time<br />
Holiday<br />
Mode<br />
Time<br />
Hardness & People<br />
Region &<br />
Language<br />
Water Hardness<br />
People Number<br />
Advanced<br />
Settings<br />
Water Hardness<br />
Region &<br />
Language<br />
0 1 7 0 PPM<br />
Hardness &<br />
People<br />
System<br />
Information<br />
Hardness &<br />
People<br />
Tiempo Miscelanea Datos De<br />
Entrada<br />
Modo<br />
vacaciones<br />
Region<br />
Metric<br />
US Gallon<br />
Configuración<br />
avanzada<br />
Información<br />
del sistema<br />
2. Language: There are three languages available: Spanish,<br />
English, French, German. It is supplied by default in Spanish.<br />
Time<br />
Holiday<br />
Mode<br />
Language<br />
English<br />
Español<br />
Region &<br />
Language<br />
Advanced<br />
Settings<br />
Français<br />
Deutsch<br />
Hardness &<br />
People<br />
System<br />
Information<br />
Input data: It must be programmed.<br />
1. Hardness: Inlet water hardness in ppm of CaCO3 (ºHFx10).<br />
Holiday<br />
Mode<br />
Advanced<br />
Settings<br />
System<br />
Information<br />
2. Inhabitants: Number of persons who usually live in the home.<br />
Time<br />
Holiday<br />
Mode<br />
People Number<br />
Region &<br />
Language<br />
0 1 Person<br />
Advanced<br />
Settings<br />
Hardness &<br />
People<br />
System<br />
Information<br />
Holiday Mode: Here the user can set when there will<br />
be nobody at home for a long period of time.<br />
During this period, the system will carry out small washes<br />
without consuming salt, in order to prevent water from stagnating<br />
inside the system.<br />
Time<br />
Holiday<br />
Mode<br />
Holiday Mode<br />
ON<br />
Region &<br />
Language<br />
Advanced<br />
Settings<br />
OFF<br />
End Date of Holiday<br />
July 24 , 2013<br />
Hardness &<br />
People<br />
System<br />
Information<br />
18
7. Start-Up<br />
System information: This feature delivers information<br />
on the water softener:<br />
• Total number of regenerations.<br />
• Total volume of treated water.<br />
• Regeneration hour.<br />
• Volume of treated water between each<br />
regeneration.<br />
• Safety regeneration frequency.<br />
• Length of the regeneration stages.<br />
• Current flow.<br />
• Maximum registered peak flow.<br />
• Software version.<br />
ADVANCED PROGRAMMING (ONLY FOR PROFESSIONAL USE):<br />
This internal level is only intended for the Technical Service and<br />
is password protected. Under no circumstances should the<br />
programmed parameters be modified without checking previously<br />
with the Technical Service of the dealer.<br />
HOW TO START A REGENERATION:<br />
<strong>STRATOS</strong> water softeners allow you to program both delayed<br />
or immediate regenerations. On this purpose, press the ‘RE-<br />
GEN’ button for 3 seconds to get into the menu below:<br />
15:57<br />
Manual Regen.<br />
Last Regen. : jul. 01, 2012<br />
Mode: Meter Override<br />
DELAY<br />
Capacity<br />
Remaining IMMEDIAT<br />
Flow<br />
Rate<br />
By pressing the ‘SET/REGEN’ button, the user can select the<br />
type of regeneration and with the ‘MENU’ button, the user<br />
can trigger the regeneration.<br />
HOW TO MOVE THE REGENERATION FORWARD:<br />
Once the regeneration has started, the user can move<br />
forward to the next stage by cancelling the current one. On<br />
this purpose, just press any of the buttons on the programmer.<br />
This function will be disabled during the time in which<br />
the motor is moving forward to the next stage.<br />
7.1 Hydraulic Start-up<br />
Before starting the system up, please check that all steps previous<br />
to installation, assembly and programming have been<br />
properly followed, according to this instructions’ manual, as<br />
well as the regulations in force. To start the system up, please<br />
follow the instructions below:<br />
Do not charge the system with salt until the end of the start-up. In<br />
order to prevent any air pressure on the water softener and the<br />
pipes, please follow these instructions in order.<br />
1. Place the by-pass valve on the ‘service’ mode.<br />
2. Fully open two or more cold and treated water faucets located<br />
near the water softener.<br />
3. Plug the programmer to the power supply using the transformer<br />
included in the system.<br />
4. The program must be in ‘service’, otherwise please check<br />
‘Section 6.3’.<br />
5. Press the ‘REGEN’ button for 3 seconds to start a regeneration.<br />
Now you are inside the regeneration menu. Select the<br />
immediate regeneration. After some minutes, the system will<br />
move to the Backwash stage.<br />
6. Slowly open the water inlet valve to allow the entrance of<br />
water inside the system. At this point, the inlet flow must be<br />
rather low, since in this position water will come in from the<br />
bottom of the bottle and flow upwards to the drain.<br />
7. When water starts flowing continuously through the drain,<br />
fully open the water inlet of the system. At this point, the bottle<br />
will be full of water and so a higher flow will not produce any<br />
damage. Water going out to the drain may be a bit yellowish<br />
or brown. This is completely normal, since it is due to the preservatives<br />
of the resin.<br />
8. Let the water flow through the drain until it runs clear.<br />
9. Close the water supply to the system for five minutes, so<br />
the resin can settle down the bottom of the bottle, and the air<br />
that might be left inside can flow towards the upper part of the<br />
bottle.<br />
7. START-UP<br />
10. Open the inlet valve of the system and wait for some mi-<br />
19
7. Start-Up<br />
nutes in order to make sure that the remaining air has been<br />
purged.<br />
11. Cancel the current regeneration stage and move forward<br />
to the filling stage of the tank. Now the brine tank will automatically<br />
start to fill up with water. Let this stage run the full<br />
process. At the end of the stage, the system will finish the<br />
regeneration which was started in point 6.<br />
12. Start another regeneration according to point 6 and wait<br />
until the system reaches the Backwash stage. Press any button<br />
to mover forward to the Brine suction stage.<br />
13. The system should suck water from the brine tank. Let<br />
the suction work for some minutes just to make sure that it is<br />
working properly.<br />
14. Cancel all the remaining stages of the regeneration.<br />
15. Put the by-pass in the service mode and check that treated<br />
water is properly softened (see ‘Section 7.3’).<br />
16. Charge the brine tank with salt.<br />
17. The system is ready to operate.<br />
’DANGER’ There is a danger of injury due to an excess of weight.<br />
It is necessary that at least two persons move and rise the salt<br />
bags. There is a danger of suffering back injuries and other body injuries.<br />
7.2 Residual Hardness Regulation<br />
As mentioned in ‘Section 2.7’, it is not recommended to supply<br />
completely softened water to household supplies.<br />
In order to modify the residual hardness, lightly open the regulating<br />
valve, as indicated in the image below.<br />
Then measure the water hardness present on the outlet of<br />
the system and check that it fits within the desired values.<br />
Otherwise, adjust the regulator and check again.<br />
WARNING: The hardness regulator is supplied in the closed<br />
position, therefore, if the system is not adjusted, it will supply fully<br />
softened water.<br />
20
8. Maintenance / Hygienisation<br />
7.3 How to Check Hardness<br />
To measure water hardness with the analyser (code 271800)<br />
follow the instructions below:<br />
1. Fill the clear recipient with the water you want to analyse<br />
until the checkmark.<br />
8. MAINTENANCE AND<br />
HYGIENISATION<br />
YEARLY<br />
In order to guarantee the proper operation of the system, the<br />
following verifications must be carried out as frequently as indicated:<br />
VERIFICATION<br />
Check the salt level in the tank:<br />
Check inlet hardness:<br />
Check treated water hardness:<br />
Hygienisation:<br />
Anti-scaling:<br />
Cleaning the salt tank:<br />
Technical Service verification:<br />
FREQUENCY<br />
Monthly.<br />
Monthly.<br />
Monthly.<br />
Yearly.<br />
Yearly.<br />
Yearly.<br />
Yearly.<br />
2. Add two drops of A reagent and shake carefully.<br />
2 A-DROPS<br />
It is very important to carry out the hygienisation and anti-scaling tasks<br />
separately, since the chemical products used for this purpose could have a bad<br />
reaction when mixed. The hygienisation and anti-scaling tasks must be carried<br />
out by turns, according to the indicated frequency.<br />
SALT FILLING<br />
The salt level in the tank must be frequently checked. The minimum<br />
salt level must be kept, which corresponds to a third of<br />
the tank volume. If salt runs down before filling it up again, the<br />
system will produce hard water. After the verification, check<br />
that the salt deck is properly closed.<br />
3. If the sample turns blue, it means that water is fully softened,<br />
but if it keeps a red colour, it means it has some hardness.<br />
4. Slowly add more drops of B reagent until water turns blue.<br />
The quantity of used drops corresponds to the hardness in<br />
ºHF of the sample.<br />
DROPS UNTIL TURNING BLUE<br />
NOTE: For humid areas, it is recommended to keep a lower<br />
salt level, filling it up more frequently.<br />
RECOMMENDED SALT: Thick salt in tablets or balls containing<br />
less than 1% of impurities.<br />
NOT RECOMMENDED SALTS: Salt stones, salt with impurities,<br />
in blocks, granulated, in bars, or that used to cook.<br />
HOW TO BREAK A SALT BRIDGE<br />
Sometimes a salt bridge can get formed inside the salt tank.<br />
This is due to a high level of humidity or to the use of an<br />
inappropriate salt. When there is a salt bridge, there is an<br />
empty space left between water and salt which prevents it<br />
from dissolving. This means that the water softener will not<br />
regenerate properly and supply hard water.<br />
21
8. Maintenance / Hygienisation<br />
If the tank is full of salt it is difficult to know whether there is<br />
a salt bridge, since the salt on the surface may seem loose,<br />
even if the lower part is solid.<br />
In order to check the existence of a salt bridge, take a long<br />
rigid tool (e.g. a broom handle) and keep it next to the water<br />
softener to measure the distance from the floor up to the salt<br />
edge. Then put the tool in the salt. If there is a hard object, it<br />
may be a salt bridge.<br />
Inner<br />
chimney<br />
Apply carefully some pressure on several places until it breaks.<br />
‘WARNING’ Do not use sharp or pointed objects, since they<br />
could damage the water softener tank.<br />
Press<br />
ANTI-SCALING: Once per year it is recommended to clean<br />
the water softener with Clean Softener (611000). This product<br />
has been designed to clean and descale your water softener.<br />
This product, due to its special formula, cleans the resin by<br />
removing iron residues and other metals which might pollute<br />
it. It also removes possible scaling on the inner holes of the<br />
valves.<br />
SINGLE-DOSE<br />
Inner<br />
chimney<br />
Salt<br />
Tool<br />
Salt<br />
Bridge<br />
Water<br />
level<br />
HYGIENISATION: It is recommended to carry out an hygienisation<br />
process once per year, as indicated below:<br />
NOTE: Carefully follow the instructions for use provided on<br />
the labels of the product.<br />
The maintenance and hygienisation of the system must be<br />
carried out by skilled technical personnel under the proper<br />
hygienic conditions and following the specific instructions of<br />
each product.<br />
1. Open the deck of the salt tank and pour between 20 to 30<br />
ml (2 or 3 caps) of Bacwater (652100) inside the brine chimney.<br />
Close it again.<br />
2. Check that the by-pass valve is in service.<br />
3. The disinfection process will be carried out after the regeneration<br />
and the disinfecting solution will be sent to the drain.<br />
22
9. Guide for the identification and solution of problems<br />
9. GUIDE FOR THE IDENTIFICATION AND SOLUTION OF PROBLEMS<br />
PROBLEM<br />
1. The programmer is not<br />
working<br />
POSIBLE CAUSA<br />
1. The transformer is not plugged.<br />
2. Faulty electrical wire.<br />
3. There is no power supply.<br />
4. Transformer is faulty.<br />
SOLUTION<br />
1. Plug the transformer to a power supply.<br />
2. Replace the wire.<br />
3. Check the installation.<br />
4. Replace the transformer.<br />
2. The system does not<br />
regenerate when scheduled<br />
Power interruptions are modifying the schedule.<br />
Follow the instructions provided in this manual to set the clock.<br />
3. Water leaks<br />
Connections are loose.<br />
Tighten the connections.<br />
4. Annoying noises / White<br />
water<br />
Air inside the system.<br />
Carry out an additional backwash to purge the air.<br />
5. High level of hardness in<br />
treated water<br />
1. Hardness in inlet water has increased.<br />
2. Wrong regeneration.<br />
3. Resin is damaged.<br />
4. There is no salt in the tank/salt bridge.<br />
1. Analyse the hardness and program the system again.<br />
2. Check the programming.<br />
3. Replace the resin.<br />
4. Add salt in the system or break the salt bridge.<br />
6. There is no brine suction<br />
1. Not enough pressure at inlet.<br />
2. Brine line is blocked.<br />
3. Injectors are blocked.<br />
4. Internal water leaks.<br />
1. Inlet pressure must be at least 2.5 bars.<br />
2. Clean the brine line.<br />
3. Clean or replace the injector and the filter.<br />
4. Check the piston, joints and separators.<br />
7. The brine tank overflows<br />
1. Forwarding time is not correct.<br />
2. Suction is not correct.<br />
3. Forwarding flow is too high.<br />
1. Please contact your dealer.<br />
2. Check the suction.<br />
3. Check the forwarding pipes.<br />
8. Hardness is not being<br />
removed from water<br />
1. Failure to start a regeneration.<br />
2. There is not enough brine concentration.<br />
3. Suction is not correct.<br />
1. Check the power supply of the system.<br />
2. Keep the brine tank full of salt.<br />
3. Check the suction.<br />
9. Backwash flow is too<br />
high or too low<br />
1. Backwash regulator is not correct.<br />
2. Backwash regulator is blocked.<br />
1. Install an appropriate regulator.<br />
2. Clean the backwash regulator.<br />
10. There are leaks of<br />
untreated water during<br />
service<br />
1. Wrong regeneration.<br />
2. There are leaks in the by-pass valve.<br />
3. O-ring of the nozzle tube damaged.<br />
4. Regeneration cycle is not correct.<br />
1. Carry out a regeneration ensuring that salt is properly adjusted.<br />
2. Check the by-pass valve.<br />
3. Replace the o-ring.<br />
4. Reset the regeneration cycle.<br />
11. Resin leakage from the<br />
system<br />
1. Inner diffusers are damaged.<br />
2. Resin is damaged.<br />
1. Replace inner diffusers.<br />
2. Replace the resin and check the installation.<br />
12. Water flows through the<br />
drain during service<br />
1. Joints and separators are damaged.<br />
2. Piston is damaged.<br />
3. Piston is not properly set.<br />
1. Replace the joints and separators.<br />
2. Replace the piston.<br />
3. Restart the system and repeat the process. If problem persists, please<br />
contact your dealer.<br />
23
10. Maintenance service book<br />
NAME, SIGNATURE AND STAMP OF AUTHORISED TECHNICIAN<br />
/ /<br />
/ /<br />
START-UP<br />
COMPLETE MAINTENANCE<br />
TECHNICIAN<br />
STAMP<br />
ORDINARY<br />
/ /<br />
REPAIR<br />
EXTRAORDINARY<br />
/ /<br />
/ /<br />
HYGIENISATION<br />
OTHER<br />
GUARANTEE<br />
/ /<br />
COMPLETE MAINTENANCE<br />
TECHNICIAN<br />
ORDINARY<br />
/ /<br />
/ /<br />
REPAIR<br />
HYGIENISATION<br />
STAMP<br />
EXTRAORDINARY<br />
/ /<br />
OTHER<br />
GUARANTEE<br />
/ /<br />
COMPLETE MAINTENANCE<br />
TECHNICIAN<br />
ORDINARY<br />
/ /<br />
REPAIR<br />
STAMP<br />
EXTRAORDINARY<br />
/ /<br />
HYGIENISATION<br />
/ /<br />
OTHER<br />
GUARANTEE<br />
/ /<br />
COMPLETE MAINTENANCE<br />
TECHNICIAN<br />
ORDINARY<br />
/ /<br />
REPAIR<br />
STAMP<br />
EXTRAORDINARY<br />
/ /<br />
HYGIENISATION<br />
/ /<br />
OTHER<br />
GUARANTEE<br />
/ /<br />
COMPLETE MAINTENANCE<br />
TECHNICIAN<br />
ORDINARY<br />
/ /<br />
REPAIR<br />
STAMP<br />
EXTRAORDINARY<br />
/ /<br />
HYGIENISATION<br />
/ /<br />
OTHER<br />
GUARANTEE<br />
/ /<br />
COMPLETE MAINTENANCE<br />
TECHNICIAN<br />
ORDINARY<br />
/ /<br />
REPAIR<br />
STAMP<br />
/ /<br />
HYGIENISATION<br />
EXTRAORDINARY<br />
/ /<br />
OTHER<br />
GUARANTEE<br />
24
10. Maintenance service book<br />
NAME, SIGNATURE AND STAMP OF AUTHORISED TECHNICIAN<br />
/ /<br />
START-UP<br />
TECHNICIAN<br />
ORDINARY<br />
/ /<br />
COMPLETE MAINTENANCE<br />
STAMP<br />
/ /<br />
REPAIR<br />
EXTRAORDINARY<br />
/ /<br />
HYGIENISATION<br />
GUARANTEE<br />
/ /<br />
OTHER<br />
/ /<br />
COMPLETE MAINTENANCE<br />
TECHNICIAN<br />
ORDINARY<br />
/ /<br />
REPAIR<br />
STAMP<br />
EXTRAORDINARY<br />
/ /<br />
HYGIENISATION<br />
/ /<br />
OTHER<br />
GUARANTEE<br />
/ /<br />
COMPLETE MAINTENANCE<br />
TECHNICIAN<br />
ORDINARY<br />
/ /<br />
REPAIR<br />
STAMP<br />
EXTRAORDINARY<br />
/ /<br />
HYGIENISATION<br />
/ /<br />
OTHER<br />
/ /<br />
COMPLETE MAINTENANCE<br />
TECHNICIAN<br />
ORDINARY<br />
/ /<br />
/ /<br />
REPAIR<br />
HYGIENISATION<br />
STAMP<br />
EXTRAORDINARY<br />
/ /<br />
OTHER<br />
GUARANTEE<br />
/ /<br />
COMPLETE MAINTENANCE<br />
TECHNICIAN<br />
ORDINARY<br />
/ /<br />
/ /<br />
REPAIR<br />
HYGIENISATION<br />
STAMP<br />
EXTRAORDINARY<br />
/ /<br />
OTHER<br />
GUARANTEE<br />
/ /<br />
COMPLETE MAINTENANCE<br />
TECHNICIAN<br />
ORDINARY<br />
/ /<br />
/ /<br />
REPAIR<br />
HYGIENISATION<br />
STAMP<br />
EXTRAORDINARY<br />
/ /<br />
OTHER<br />
GUARANTEE<br />
25
NOTES: 11. EC Declaration<br />
26
T<strong>HI</strong>S SHEET <strong>MU</strong>ST BE FULFILLED BY THE TECHNICIAN. T<strong>HI</strong>S COPY IS FOR THE SYSTEM’S OWNER.<br />
EC DECLARATION<br />
We DECLARE, hereby assuming our sole responsibility, Name and position of the authorised person:<br />
that the water softening system based on the ion exchange José Antonio Fogued Franco / MANAGER.<br />
process for the treatment of human consumption water, of Date: 20/01/2013. Signature and stamp:<br />
the Watermark brand and with serial no.: according to<br />
manufacture, complies with the following regulations and<br />
standards: EN-12100-1, EN12100-2, EN-55014-1:2000/<br />
A1:2001, EN-61000-3 2:2000/ A1:2001, EN-61000-3-3:<br />
1995/A1:2001, EN-61558-2-6 and fulfils the essential<br />
requirements from directives 98/37/CE, 73/23/CEE, 89/336<br />
/CEE.<br />
Ionfilter· C. Aiguafreda 8 · Pol. Ind. l’Ametlla Park · 08480 L’Ametlla del Vallès · Barcelona · Spain<br />
GUARANTEE CERTIFICATE FOR <strong>STRATOS</strong> SERIES<br />
SYSTEM GUARANTEE FOR THE END USER:<br />
The distributor guarantees its systems for two years against any manufacturing defect, in<br />
accordance with that laid down in Law RD 1/2007, 16 November (Consolidated text on the<br />
General Law for the Defence of Consumers and Users). The guarantee comprises the repair<br />
and replacement of defective parts by authorised personnel from the Distributor or the Official<br />
Technical Service Assistance (TAS), in the place of installation or their workshops. The<br />
guarantee includes the labour and shipment costs that may arise.<br />
Ionfilter shall not offer guarantee for parts suffering usual wear and tear, lack of<br />
maintenance, hits and other faults due to the improper use of the system outside specifications<br />
and operating limitations indicated by the manufacturer. Likewise the guarantee will not be<br />
valid in the event of misuse, or in those cases where it has been modified or repaired by<br />
personnel that do not belong to the distributor or the official TAS.<br />
All the replaced parts under guarantee shall remain the property of Ionfilter.<br />
Ionfilter shall be held responsible for the lack of conformity when this refers to the<br />
origin, identity or compliance of the products, according to its nature and purpose. Taking<br />
into account the technical specifications of the systems, it is essential, for the guarantee to<br />
be valid, that the technical conditions of the installation and operation are fulfilled.<br />
Should this conditions not be fulfilled, the guarantee would remain invalid, taking into account<br />
the importance of the system’s use as well as the conditions and operating limitations in<br />
which it must operate.<br />
The distributor must guarantee that the installed system is appropriate for the improvement<br />
of the quality of water that is going to be treated, according to the technical specifications of<br />
the system and the regulations in force.<br />
The distributor must guarantee the proper installation and start-up of the system, according<br />
to the instructions provided by the manufacturer and the regulations in force. Furthermore, it<br />
shall be held responsible for the lack of conformity due to an inaccurate application, installation<br />
or start-up of the system.<br />
For any claims under guarantee you are required to provide the receipt of purchase. The term<br />
of the 2-year guarantee starts on the date of purchase of the system in your distributor.<br />
Should you suffer any problem with the system while it is under guarantee, contact your<br />
distributor.<br />
AUTHORISED COMPANY AND/OR TECHNICIAN:<br />
Company and/or technician, date and signature:<br />
The system is installed and in operation as required by the<br />
client, and for this to be officially recorded:<br />
*Pre-treatment of the system:<br />
*Input hardness of the system (ºF):<br />
*Treated water hardness (ºF):<br />
*Residual hardness (ºF):<br />
*Input pressure of the system (bar):<br />
*Result of the installation and start-up sheet<br />
CORRECT. OTHERS:<br />
The owner of the system has been properly and clearly informed about the use, manipulation and<br />
maintenance of the system, in order to guarantee a proper operation and the quality of produced<br />
water. To such effect, a maintenance contract has been offered.<br />
*Ref. of the maintenance contract<br />
ACCEPTS the maintenance contract.<br />
DOES NOT ACCEPT the maintenance contract.<br />
For further information, to report a breakdown or that the system is not working properly, and to<br />
request maintenance or the assistance of a technician, previously read the sections on how to<br />
operate the system, and detection and solution of problems, in this manual and contact the distributor<br />
or company where the system was purchased.<br />
AUTHORISED COMPANY AND/OR TECHNICIAN: The information marked with (*) must be<br />
filled in and copied by the technician from the INSTALLATION AND START-UP REGISTRATION<br />
SHEET OF THE SYSTEM.
www.ionfilter.com<br />
comercial@ionfilter.es<br />
T: +34 902 305 310<br />
+34 936 934 300<br />
F: +34 936 934 330<br />
C.Aiguafreda,8<br />
Pol. Ind. L’Ametlla Park<br />
08480 L’Ametlla del Vallès<br />
Barcelona, Spain.<br />
www.puricom.eu<br />
puricom@puricom.eu<br />
T: +34 902 305 310<br />
F: +34 936 934 329<br />
C.Aiguafreda,8<br />
Pol. Ind. L’Ametlla Park<br />
08480 L’Ametlla del Vallès<br />
Barcelona, Spain.<br />
www.puricom.eu<br />
puricom@puricom.eu<br />
T: +34 902 305 310<br />
F: +34 936 934 329<br />
C.Aiguafreda,8<br />
Pol. Ind. L’Ametlla Park<br />
08480 L’Ametlla del Vallès<br />
Barcelona, Spain.