The Physics of LASERs - American Physical Society
The Physics of LASERs - American Physical Society
The Physics of LASERs - American Physical Society

Create successful ePaper yourself
Turn your PDF publications into a flip-book with our unique Google optimized e-Paper software.
Teacher Edition Lesson 1: Properties <strong>of</strong> LASER light<br />
A helpful acronym may be the three c’s or c 3 : color,<br />
collimation, coherence.<br />
Point out that laser light is very bright because <strong>of</strong><br />
the property <strong>of</strong> coherence (constant relative phase<br />
and in-step), as well as for other reasons. Let students<br />
know that laser light can carry enough energy<br />
to burn through objects such as one’s eye and<br />
sheets <strong>of</strong> metal. <strong>The</strong> first lasers (ruby lasers) used<br />
to have their strength discussed in terms <strong>of</strong> how<br />
many razor blades they could burn holes through.<br />
A one-Gillette (type <strong>of</strong> razor blade) laser did not<br />
have as bright a laser beam or deliver as much energy<br />
as a five-Gillette laser.<br />
Optional: Show students the 4.5 minute video <strong>of</strong><br />
<strong>The</strong>odore Maiman explaining the first ruby laser,<br />
located on the LaserFest website found by conducting<br />
an internet search on “laserfest, Maiman video.”<br />
This can be used as a transition to discussing what<br />
is needed for a laser to function (an active medium,<br />
an energy source, and a resonant cavity).<br />
Notes on the kinesthetic model <strong>of</strong> different<br />
light sources<br />
Goal <strong>of</strong> kinesthetic model: For students to have an<br />
experience that deepens their understanding <strong>of</strong> the<br />
special properties laser light.<br />
For this model students represent photons (packets<br />
<strong>of</strong> light energy). Students’ step length represents<br />
the photon’s wavelength. Since the different colors<br />
<strong>of</strong> light have the same speed, the frequency <strong>of</strong> steps<br />
taken increases as the step length (wavelength) decreases.<br />
Simulate light from each light source using<br />
this model. <strong>The</strong>n have students describe how the<br />
model represented the light produced by the light<br />
sources.<br />
Consider having the entire class participate for<br />
each type <strong>of</strong> light or having groups model each<br />
type <strong>of</strong> light.<br />
Trouble-shooting: One issue that may arise is if<br />
the students try to walk with the same frequency<br />
rather than the same speed. If this occurs some students<br />
may say that blue light travels slower than<br />
red light, which is not the case. Remind students<br />
that because the index <strong>of</strong> refraction <strong>of</strong> air is so close<br />
to that <strong>of</strong> a vacuum, we consider that all light in<br />
the visible spectrum travels at the same speed in<br />
air. Consider having students representing different<br />
wavelengths walk side-by-side, holding a rod,<br />
if needed, to keep them side-by-side, while taking<br />
different sized steps so that they have the same<br />
speed. In this case the student representing violet<br />
light might take twice the steps the student representing<br />
red light takes. A suggested table <strong>of</strong> stride<br />
lengths is listed in the Preparation before class section<br />
<strong>of</strong> this lesson.<br />
White LED: Place a red, orange, yellow, green, blue,<br />
16<br />
<strong>The</strong> <strong>Physics</strong> <strong>of</strong> <strong>LASERs</strong>, Teacher Edition<br />
Student Edition Lesson 1: Properties <strong>of</strong> LASER light<br />
6<br />
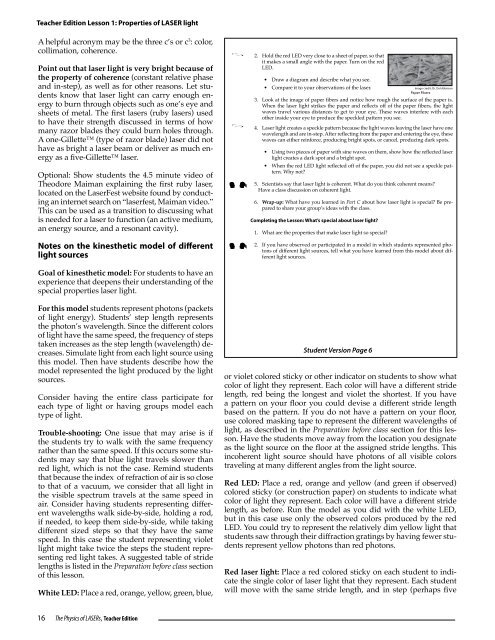
2. Hold the red LED very close to a sheet <strong>of</strong> paper, so that<br />
it makes a small angle with the paper. Turn on the red<br />
LED.<br />
• Draw a diagram and describe what you see.<br />
• Compare it to your observations <strong>of</strong> the laser.<br />
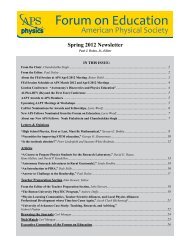
Image credit: Dr. Del Atkinson<br />
Paper Fibers<br />
3. Look at the image <strong>of</strong> paper fibers and notice how rough the surface <strong>of</strong> the paper is.<br />
When the laser light strikes the paper and reflects <strong>of</strong>f <strong>of</strong> the paper fibers, the light<br />
waves travel various distances to get to your eye. <strong>The</strong>se waves interfere with each<br />
other inside your eye to produce the speckled pattern you see.<br />
4. Laser light creates a speckle pattern because the light waves leaving the laser have one<br />
wavelength and are in-step. After reflecting from the paper and entering the eye, these<br />
waves can either reinforce, producing bright spots, or cancel, producing dark spots.<br />
<strong>The</strong> <strong>Physics</strong> <strong>of</strong> <strong>LASERs</strong><br />
• Using two pieces <strong>of</strong> paper with sine waves on them, show how the reflected laser<br />
light creates a dark spot and a bright spot.<br />
• When the red LED light reflected <strong>of</strong>f <strong>of</strong> the paper, you did not see a speckle pattern.<br />
Why not?<br />
5. Scientists say that laser light is coherent. What do you think coherent means?<br />
Have a class discussion on coherent light.<br />
6. Wrap-up: What have you learned in Part C about how laser light is special? Be prepared<br />
to share your group’s ideas with the class.<br />
Completing the Lesson: What’s special about laser light?<br />
1. What are the properties that make laser light so special?<br />
2. If you have observed or participated in a model in which students represented photons<br />
<strong>of</strong> different light sources, tell what you have learned from this model about different<br />
light sources.<br />
Student Version Page 6<br />
or violet colored sticky or other indicator on students to show what<br />
color <strong>of</strong> light they represent. Each color will have a different stride<br />
length, red being the longest and violet the shortest. If you have<br />
a pattern on your floor you could devise a different stride length<br />
based on the pattern. If you do not have a pattern on your floor,<br />
use colored masking tape to represent the different wavelengths <strong>of</strong><br />
light, as described in the Preparation before class section for this lesson.<br />
Have the students move away from the location you designate<br />
as the light source on the floor at the assigned stride lengths. This<br />
incoherent light source should have photons <strong>of</strong> all visible colors<br />
traveling at many different angles from the light source.<br />
Red LED: Place a red, orange and yellow (and green if observed)<br />
colored sticky (or construction paper) on students to indicate what<br />
color <strong>of</strong> light they represent. Each color will have a different stride<br />
length, as before. Run the model as you did with the white LED,<br />
but in this case use only the observed colors produced by the red<br />
LED. You could try to represent the relatively dim yellow light that<br />
students saw through their diffraction gratings by having fewer students<br />
represent yellow photons than red photons.<br />
Red laser light: Place a red colored sticky on each student to indicate<br />
the single color <strong>of</strong> laser light that they represent. Each student<br />
will move with the same stride length, and in step (perhaps five