The Physics of LASERs - American Physical Society
The Physics of LASERs - American Physical Society
The Physics of LASERs - American Physical Society

You also want an ePaper? Increase the reach of your titles
YUMPU automatically turns print PDFs into web optimized ePapers that Google loves.
Preparation before class<br />
Conduct the explorations to become familiar with the apparatus<br />
and the difficulties your students might have.<br />
If you plan on having your students investigate how sound is<br />
carried by light (Part A), then put together the Spectra Sound<br />
kits in advance. In addition to the instructions in the Spectra<br />
Sound kit, we list a set <strong>of</strong> suggestions on how to put together<br />
the circuit.<br />
• Consider using a Class II laser.<br />
• Do not tape down or use a rubber band to hold down<br />
the button <strong>of</strong> the laser. Students can depress the laser<br />
button when they need to turn it on.<br />
• Follow the procedure below and solder the wires in<br />
the B connectors together.<br />
1. Gather the equipment you need to make a transmitter<br />
and a receiver. Note that the photocell has very fragile<br />
connections. Handle it carefully and do not touch it directly<br />
to make sure that no oils from your hands get on<br />
it. Connect the microphone jack with the solar panel (the<br />
receiver) into the AUX input <strong>of</strong> a speaker or stereo system.<br />
<strong>The</strong> photodetector you will be using in the receiver<br />
converts light into electrical energy.<br />
2. Tape the wire leading to the photodetector to a wall below<br />
eye level. Do not put any wire near the photocell as<br />
it is very fragile. Shine the white LED at the solar cell and<br />
turn it on and <strong>of</strong>f. You should hear a clicking sound each<br />
time you turn the white LED light on and <strong>of</strong>f.<br />
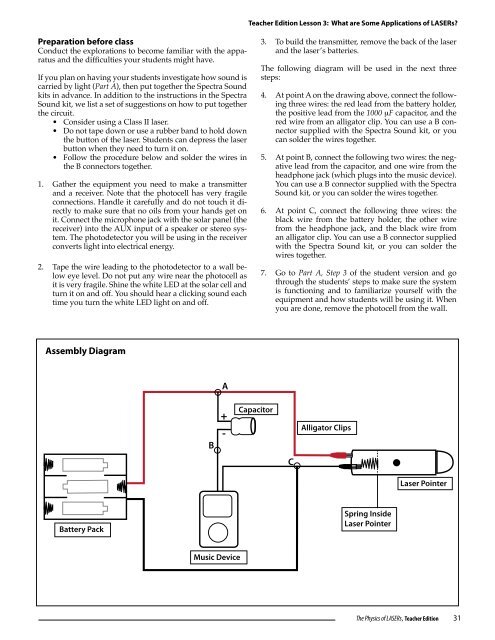
Assembly Diagram<br />
Battery Pack<br />
B<br />
A<br />
+<br />
-<br />
Music Device<br />
Teacher Edition Lesson 3: What are Some Applications <strong>of</strong> <strong>LASERs</strong>?<br />
Capacitor<br />
3. To build the transmitter, remove the back <strong>of</strong> the laser<br />
and the laser’s batteries.<br />
<strong>The</strong> following diagram will be used in the next three<br />
steps:<br />
4. At point A on the drawing above, connect the following<br />
three wires: the red lead from the battery holder,<br />
the positive lead from the 1000 µF capacitor, and the<br />
red wire from an alligator clip. You can use a B connector<br />
supplied with the Spectra Sound kit, or you<br />
can solder the wires together.<br />
5. At point B, connect the following two wires: the negative<br />
lead from the capacitor, and one wire from the<br />
headphone jack (which plugs into the music device).<br />
You can use a B connector supplied with the Spectra<br />
Sound kit, or you can solder the wires together.<br />
6. At point C, connect the following three wires: the<br />
black wire from the battery holder, the other wire<br />
from the headphone jack, and the black wire from<br />
an alligator clip. You can use a B connector supplied<br />
with the Spectra Sound kit, or you can solder the<br />
wires together.<br />
7. Go to Part A, Step 3 <strong>of</strong> the student version and go<br />
through the students’ steps to make sure the system<br />
is functioning and to familiarize yourself with the<br />
equipment and how students will be using it. When<br />
you are done, remove the photocell from the wall.<br />
C<br />
Alligator Clips<br />
Spring Inside<br />
Laser Pointer<br />
Laser Pointer<br />
<strong>The</strong> <strong>Physics</strong> <strong>of</strong> <strong>LASERs</strong>, Teacher Edition<br />
31