4907 Manual - Traxxas
4907 Manual - Traxxas
4907 Manual - Traxxas

You also want an ePaper? Increase the reach of your titles
YUMPU automatically turns print PDFs into web optimized ePapers that Google loves.
MODEL <strong>4907</strong><br />
owner ’s manual
INTRODUCTION<br />
CONTENTS<br />
BEFORE YOU PROCEED ................................................. 2<br />
SAFETY PRECAUTIONS .................................................. 3<br />
TOOLS, SUPPLIES AND REQUIRED EQUIPMENT ........ 4<br />
ANATOMY OF YOUR T-MAXX 3.3 .................................... 5<br />
QUICK START: GETTING UP TO SPEED ........................ 6<br />
GLUING THE TIRES AND DECORATING YOUR T-MAXX 3.3 ... 6<br />
INTRODUCTION<br />
Thank you for purchasing the new T-Maxx 3.3. This T-Maxx is our<br />
biggest and meanest Maxx ever and we are confident it will reward you<br />
with many hours of exciting monster truck action.<br />
We know you’re excited about getting your new T-Maxx 3.3 on the<br />
road, but it’s very important that you take some time to read through<br />
the Owners <strong>Manual</strong>. This manual contains all the necessary set-up,<br />
break-in, tuning, and operating procedures that allow you to unlock<br />
the incredible performance and adjustment potential that <strong>Traxxas</strong><br />
engineers designed into T-Maxx 3.3. Even if you are an experienced<br />
R/C enthusiast, it’s important to read and follow the procedures in<br />
this manual. T-Maxx 3.3 contains new technologies in the engine,<br />
suspension, and transmission operation that you may not be familiar<br />
with. Pay particular attention to the fuel and break-in requirements<br />
for the engine. The advanced design of the TRX 3.3 Racing Engine<br />
has a special break-in procedure that has been developed and<br />
proven to produce the best-performing engine possible. Using<br />
traditional or old-fashioned procedures could reduce engine<br />
performance and longevity.<br />
T-Maxx 3.3 is made to be a complete package that starts with the<br />
highest level of engineering; a professionally produced DVD to<br />
acquaint you with the starting, racing, and maintenance procedures;<br />
and is equipped stock with the most powerful Ready-To-Race®<br />
engine available. We want you to feel confident that you own the<br />
best-performing truck in the market and that it is backed by a team of<br />
professionals who aim to provide the highest level of factory support<br />
possible. T-Maxx 3.3 is about experiencing total performance and<br />
satisfaction, not just with your truck, but also with the company that<br />
stands behind it.<br />
Thank you again for going with <strong>Traxxas</strong>. We work hard every day to<br />
assure you the highest level of customer satisfaction possible. We truly<br />
want you to enjoy your new T-Maxx 3.3!<br />
2 • T-MAXX 3.3 OWNERS MANUAL<br />
THE TRAXXAS TQ 2.4GHz RADIO SYSTEM ................... 7<br />
THE TRX 3.3 RACING ENGINE .....................................11<br />
DRIVING YOUR T-MAXX 3.3 ..........................................22<br />
TUNING ADJUSTMENTS ...............................................23<br />
MAINTAINING AND STORING YOUR T-MAXX 3.3 .......27<br />
TROUBLESHOOTING .....................................................28<br />
TQ 2.4GHz ADVANCED TUNING GUIDE ......................29<br />
<strong>Traxxas</strong> Support<br />
<strong>Traxxas</strong> support is with you every step of the way.<br />
Refer below to find out how to contact us and what<br />
your support options are.<br />
Quick Start<br />
This manual is designed with a Quick Start<br />
path that outlines the necessary procedures<br />
to get your model up and running in<br />
the shortest time possible. If you are an<br />
experienced R/C enthusiast you will find it helpful and fast. Be sure and<br />
read through the rest of the manual to learn about important safety,<br />
maintenance, and adjustment procedures. Turn to page 6 to begin.<br />
BEFORE YOU PROCEED<br />
Carefully read and follow all instructions in this and any accompanying<br />
materials to prevent serious damage to your T-Maxx 3.3. Failure to<br />
follow these instructions will be considered abuse and/or neglect.<br />
Before running your T-Maxx 3.3, look over this entire manual and<br />
examine the truck carefully. If for some reason you decide the T-Maxx<br />
3.3 is not what you wanted, then do not continue any further. Your<br />
hobby dealer absolutely cannot accept a T-Maxx 3.3 for return or<br />
exchange after it has been run.<br />
Warnings, Helpful Hints, & Cross-References<br />
Throughout this manual, you’ll notice warnings and helpful hints<br />
identified by the icons below. Be sure to read them!<br />
An important warning about personal safety or avoiding<br />
damage to your model and related components.<br />
Special advice from <strong>Traxxas</strong> to make things easier<br />
and more fun.<br />
Refers you to a page with a related topic.<br />
SUPPORT<br />
If you have any questions about your T-Maxx 3.3 or its operation,<br />
call the <strong>Traxxas</strong> Technical Support line toll-free at:<br />
1-888-TRAXXAS (1-888-872-9927)*<br />
Technical support is available Monday through Friday from 8:30 am<br />
to 9:00 pm central time. Technical assistance is also available at<br />
www.<strong>Traxxas</strong>.com. You may also e-mail customer support with your<br />
question at support@<strong>Traxxas</strong>.com. Join hundreds of <strong>Traxxas</strong> R/C<br />
enthusiasts in our online community at www.<strong>Traxxas</strong>.com.<br />
<strong>Traxxas</strong> offers a full-service, on-site repair facility to handle any of<br />
your <strong>Traxxas</strong> service needs. Maintenance, replacement parts, and<br />
accessories may be purchased directly from <strong>Traxxas</strong> by phone or online<br />
at www.Buy<strong>Traxxas</strong>.com. You can save time, along with shipping and<br />
handling costs, by purchasing replacement parts from your local dealer.<br />
Do not hesitate to contact us with any of your product support needs.<br />
We want you to be thoroughly satisfied with your new T-Maxx 3.3!
SAFETY PRECAUTIONS<br />
All of us at <strong>Traxxas</strong> want you to safely enjoy your new T-Maxx 3.3. Operate<br />
your T-Maxx 3.3 sensibly and with care, and it will be exciting, safe, and<br />
fun for you and those around you. Failure to operate your T-Maxx 3.3 in a<br />
safe and responsible manner may result in property damage and serious<br />
injury. The precautions outlined in this manual should be strictly followed<br />
to help ensure safe operation. You alone must see that the instructions are<br />
followed and the precautions are adhered to.<br />
Important Points to Remember<br />
• T-Maxx 3.3 is very fast! The T-Maxx 3.3 is intended for experienced<br />
users with a high level of skill. The TRX 3.3 Racing Engine is extremely<br />
powerful and may require skilled driving to maintain control.<br />
• The engine, brakes, and exhaust system may become extremely hot<br />
during use. Be careful not to touch the parts, especially when refueling<br />
or stopping the engine.<br />
• Model engine fuel is dangerous and highly poisonous. Always follow<br />
all directions and precautions printed on the fuel container. Model<br />
engine fuel is poisonous to humans and animals. Drinking the fuel can<br />
cause blindness and death. Handle with care and respect.<br />
• Model engine fuel, especially when in a fuel dispensing bottle, may<br />
look like a cool drink to a child. Keep all fuel out of the reach of<br />
children at all times. Do not place fuel containers on the ground<br />
where children can reach them while you are driving.<br />
• Model engine fuel is flammable. Never allow smoking, sparks, heat<br />
or flame in the presence of fuel or fuel vapors.<br />
• Prolonged exposure to the engine exhaust can be harmful. Avoid<br />
breathing the engine exhaust. Always run your T-Maxx 3.3 outdoors, in<br />
a well-ventilated area. Never run the engine indoors.<br />
• Do not operate your T-Maxx 3.3 at night, or anytime your line of sight<br />
to the model may be obstructed or impaired in any way.<br />
• Never operate your T-Maxx 3.3 in crowds of people or busy pedestrian<br />
areas. T-Maxx 3.3 is very fast and could cause injury to those unaware<br />
of its presence. Keep small children at a safe distance away from the<br />
operating area.<br />
• Because T-Maxx 3.3 is controlled by radio, it is subject to radio<br />
interference from many sources beyond your control. Since radio<br />
interference can cause momentary loss of control, always allow a safety<br />
margin in all directions around your model to prevent collisions.<br />
• The engine can be loud. If the noise makes you uncomfortable, wear<br />
ear protection. Be considerate of your neighbors by not running your<br />
model early in the morning or late in the evening.<br />
• Most importantly, use good common sense at all times.<br />
Children (minors) under 16 years of age and inexperienced<br />
drivers should not operate the T-Maxx 3.3 without the supervision<br />
of a responsible and knowledgeable (experienced) adult.<br />
<strong>Traxxas</strong><br />
1100 Klein Road<br />
Plano, Texas 75074<br />
Phone: 972-265-8000<br />
Toll-free 1-888-TRAXXAS<br />
E-mail: support@<strong>Traxxas</strong>.com<br />
<strong>Traxxas</strong> U.K.<br />
P.O. Box 1128<br />
Winterbourne, Bristol BS36-2SH<br />
England<br />
Phone: 44-117-956-1002<br />
Internet: www.<strong>Traxxas</strong>.com<br />
INTRODUCTION<br />
Batteries and Battery Charging<br />
Your model uses rechargeable batteries that must be handled with<br />
care for safety and long battery life. Make sure to read and follow all<br />
instructions and precautions that were provided with the battery packs<br />
and your charger. It is your responsibility to charge and care for the battery<br />
packs properly. In addition to your battery and charger instructions, here<br />
are some more tips to keep in mind.<br />
• Use the supplied charger to charge the included battery. See “Charging<br />
the EZ-Start Battery” on page 17.<br />
• Never leave batteries to charge unattended.<br />
• Allow the battery pack to cool off before charging.<br />
• Do not use battery packs that have been damaged in any way.<br />
• Do not use battery packs that have damaged wiring, exposed wiring, or<br />
a damaged connector.<br />
• Children should have responsible adult supervision when charging and<br />
handling batteries.<br />
• Only use approved chargers for NiMH battery packs (such as<br />
Part #2921 or the <strong>Traxxas</strong> TRX Power Charger, Part #3030X). Do not<br />
exceed the maximum charge rate of 1 amp.<br />
• Do not short-circuit the battery pack. This may cause burns and severe<br />
damage to the battery pack<br />
• Do not burn or puncture the batteries. Toxic materials could be<br />
released. If eye or skin contact occurs, flush with water.<br />
• Store the battery pack in a dry location, away from heat sources<br />
and direct sunlight.<br />
• Nickel Metal Hydride batteries must be recycled or disposed<br />
of properly.<br />
Recycling Your <strong>Traxxas</strong> Power Cell NiMH Battery<br />
<strong>Traxxas</strong> strongly encourages you to recycle your Power Cell battery<br />
when it has reached the end of its useful life. Do not throw your<br />
battery in the trash. All Power Cell battery packs display the RBRC<br />
(Rechargeable Battery Recycling Corporation) icon, indicating they are<br />
recyclable. To find a recycling center near you, ask your local hobby<br />
dealer or visit www.rbrc.org.<br />
Entire contents ©2009 <strong>Traxxas</strong>. <strong>Traxxas</strong>, Maxx, T-Maxx 3.3, TRX 3.3 Racing Engine, TQ-<br />
3, Top Fuel, EZ-Start, Ready-To-Race, Ready-To-Win, and ProGraphix are trademarks<br />
or registered trademarks of <strong>Traxxas</strong>. Other brand names and marks are the property<br />
of their respective holders and are used only for purposes of identification. No part<br />
of this manual may be reproduced or distributed in print or electronic media without<br />
the express written permission of <strong>Traxxas</strong>.<br />
T-MAXX 3.3 OWNERS MANUAL • 3
TOOLS, SUPPLIES, AND REQUIRED EQUIPMENT<br />
T-Maxx 3.3 comes with a set of specialty metric tools. You’ll need to purchase other items, available from your hobby dealer, to operate and<br />
maintain your model.<br />
SUPPLIED TOOLS AND EQUIPMENT<br />
Extra glow<br />
plug<br />
“L” wrench set:<br />
1.5mm, 2.0mm, 2.5mm<br />
NiMH 7.2V<br />
battery pack *<br />
REQUIRED TOOLS AND EQUIPMENT (sold separately)<br />
10% quart - #5010<br />
20% quart - #5020<br />
33% quart - #5030<br />
10% gallon - #5060<br />
20% gallon - #5070<br />
33% gallon - #5080<br />
<strong>Traxxas</strong> Top Fuel <br />
8 AA alkaline<br />
batteries<br />
ACCESSORY EQUIPMENT (sold separately)<br />
TRX Power Charger<br />
<strong>Traxxas</strong> part #3030X<br />
TRX Charger DC car adapter<br />
<strong>Traxxas</strong> part #3032<br />
Glow plug and<br />
wheel nut wrench<br />
NiMH battery<br />
charger*<br />
4 • T-MAXX 3.3 OWNERS MANUAL<br />
Antenna<br />
nut wrench<br />
Suspension<br />
multi-tool<br />
Pre-load spacers and shock pistons<br />
(on parts tree) see page 23<br />
Air filter oil<br />
<strong>Traxxas</strong> part #5263<br />
RX Power Pack battery<br />
<strong>Traxxas</strong> part #3037<br />
RX wiring harness<br />
<strong>Traxxas</strong> part #3034<br />
Fuel dispensing<br />
bottle<br />
After-run oil to protect the<br />
engine from corrosion<br />
8mm/5mm<br />
wrench<br />
Body clips<br />
Extra oiled air filter set<br />
(pre-filter and primary filter)<br />
*Battery and charger style are subject to change and may vary from images.<br />
Small (1/8 inch) flat-blade screwdriver<br />
for tuning<br />
Recommended Equipment<br />
These items are not required for the operation of your model,<br />
but are a good idea to include in any R/C toolbox:<br />
• Safety glasses<br />
• Thin, hobby-quality cyanoacrylate instant tire glue (CA glue)<br />
• Hobby knife<br />
• Side cutters and/or needle nose pliers<br />
• Philips screwdriver<br />
• Soldering iron
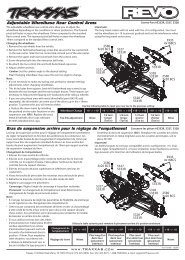
ANATOMY OF YOUR T-MAXX 3.3<br />
Steering Servo<br />
Brake Rod<br />
On/Off Switch<br />
Battery Box<br />
Slipper Clutch<br />
Spur Gear<br />
Fuel Cap<br />
EZ-Start Motor<br />
Fuel Tank<br />
Fuel Line<br />
EZ-Start Plug<br />
Hex Hub<br />
Axle Carrier<br />
Pivot Ball<br />
Driveshaft (Half Shaft)<br />
Engine Shut-off Clamp<br />
Skid Plate<br />
Differential<br />
Front Bumper<br />
Bulkhead<br />
Shock Tower<br />
Ultra Shock <br />
(Oil Damper)<br />
Front<br />
Suspension Arm<br />
Toe Link<br />
(Turnbuckle)<br />
Throttle/Brake Servo<br />
Receiver Box<br />
Antenna Mount<br />
Chassis<br />
Disc Brake<br />
Air Filter<br />
Transmission<br />
Two-Speed Access Plug<br />
Tuned Pipe<br />
Pressure Line<br />
TRX 3.3 Racing Engine<br />
see pg. 13 for details<br />
Body Mount Post<br />
Exhaust Header<br />
Bumper Mount<br />
Wheelie Bar<br />
T-MAXX 3.3 OWNERS MANUAL • 5
QUICK START: GETTING UP TO SPEED<br />
The following guide is an overview of the procedures for getting your model running. Look for the Quick Start logo on Quick<br />
Start entries. The Quick Start Guide is not intended to replace the full operating instructions available in this manual. Please<br />
read this entire manual for complete instructions on the proper use and maintenance of your model.<br />
1. Read the safety precautions on page 3 9. Fill the fuel tank • See page 14<br />
For your own safety, understand where carelessness and misuse could<br />
lead to personal injury.<br />
Use your fuel-dispensing bottle (sold separately) to fill the tank.<br />
2. Charge the EZ-Start battery pack • See page 17 10. Connect the EZ-Start to the model • See page 17<br />
The EZ-Start requires a fully charged 7.2-volt battery pack. Learn the proper way to use the EZ-Start electric starting system.<br />
3. Install batteries • See page 8 11. Start the engine • See page 18<br />
T-Maxx 3.3 requires 8 AA alkaline or rechargeable batteries for the<br />
transmitter (4) and receiver (4) (sold separately).<br />
Learn to use the correct starting procedure for your TRX 3.3.<br />
4. Decal and Install the body • See below 12. Break-in your engine • See page 18<br />
You will need to use the body during break in, so it’s best to apply any<br />
additional decals before you use the body.<br />
Tire Gluing<br />
The factory tires on your T-Maxx 3.3 are already glued to the rims. The<br />
tires must be glued to the rims to prevent the rims from spinning inside<br />
the tires. The instructions here are provided to show you how to glue<br />
replacement tires to the rims in the future. Use CA tire glue available from<br />
your local hobby dealer. You can glue the tires without removing the<br />
wheels from the truck. For clarity, these instructions show the process<br />
with the wheels removed.<br />
1. Remove a wheel from T-Maxx 3.3 using the<br />
larger (8mm) end of the universal (glow<br />
plug) wrench.<br />
2. Use your thumb to push the side of the tire<br />
away from the rim. Place one or two drops<br />
of CA glue into the opening and release<br />
the tire. Capillary action will draw the glue<br />
around the bead of the tire.<br />
3. Repeat step two at four or five points around the rim, until the tire is<br />
completely secured to the rim. Turn the rim over and repeat the process<br />
for the inside of the rim/tire. Repeat for the other three wheels.<br />
4. Reinstall the wheels, make sure none of the axle pins have fallen out from<br />
behind the hex hubs.<br />
6 • T-MAXX 3.3 OWNERS MANUAL<br />
Follow the break-in instructions exactly to ensure the best-performing,<br />
longest-lasting engine.<br />
5. Install the EZ-Start battery • See page 17 13. Tune your engine • See page 20<br />
Install and connect a charged 7.2-volt battery pack in the<br />
EZ-Start controller.<br />
Learn how to set the fuel mixture needles for optimum<br />
engine performance.<br />
6. Turn on the radio system • See page 9 14. Drive your T-Maxx 3.3 • See page 22<br />
Make a habit of turning the transmitter on first, and off last. Learn to use the two-speed functions on your truck,<br />
along with important driving precautions.<br />
7. Check servo operation • See page 10 15. Maintaining your Truck • See page 27<br />
Make sure the throttle and steering servos are<br />
working correctly.<br />
8. Range test the radio system • See page 10<br />
Follow this procedure to make sure your radio system works properly<br />
at a distance and that there is no interference from outside sources.<br />
Follow these critical steps to maintain the performance of your<br />
T-Maxx 3.3 and keep it in excellent running condition.<br />
GLUING TIRES AND DECORATING YOUR T-MAXX 3.3<br />
Applying the Decals<br />
The main decals<br />
have already been<br />
applied to your T-Maxx 3.3. The extra<br />
decals provided are die-cut for easy<br />
removal. Use a hobby knife to lift the<br />
corner of a decal and remove it from<br />
the backing.<br />
Carefully position the decal over the<br />
desired location and press one side on<br />
the body. Pull the decal tight and use a<br />
finger to gradually smooth out any air<br />
bubbles as you apply the decal.<br />
Look at the photos on the box for<br />
typical decal placement.
THE TRAXXAS TQ 2.4GHz RADIO SYSTEM<br />
INTRODUCTION<br />
Your model includes the latest <strong>Traxxas</strong> TQ 2.4GHz transmitter with <strong>Traxxas</strong> Link technology. The transmitter’s easy-to-use design provides instant driving fun for<br />
new R/C enthusiasts, and also offers a full compliment of pro-level tuning features<br />
for advanced users – or anyone interested in experimenting with the performance<br />
of their model. The steering and throttle channels feature adjustable Exponential,<br />
End Points, and Sub-Trims. Steering and braking Dual Rate are also available.<br />
Many of the next-level features are controlled by the Multi-Function knob, which<br />
can be programmed to control a variety functions. The detailed instructions (page<br />
29) and Menu Tree (page 31) included in this manual will help you understand<br />
and operate the advanced functions of the new TQ 2.4GHz radio system. For<br />
additional information and how-to videos, visit <strong>Traxxas</strong>.com.<br />
RADIO SYSTEM TERMINOLOGY<br />
Please take a moment to familiarize yourself with these radio and power system<br />
terms. They will be used throughout this manual. A detailed explanation of the<br />
advanced terminology and features of your new radio system begins on page 29.<br />
2.4GHz Spread Spectrum – This model is equipped with the latest R/C<br />
technology. Unlike AM and FM systems that require frequency crystals<br />
and are prone to frequency conflicts, the TQ 2.4GHz system automatically<br />
selects and locks onto an open frequency, and offers superior resistance to<br />
interference and “glitching.”<br />
Current - Current is a measure of power flow through the electronics, usually<br />
measured in amps. If you think of a wire as a garden hose, current is a<br />
measure of how much water is flowing through the hose.<br />
Frequency band - The radio frequency used by the transmitter to send<br />
signals to your model. This model operates on the 2.4GHz direct-sequence<br />
spread spectrum.<br />
WIRING DIAGRAM<br />
Antenna<br />
On/Off<br />
Switch<br />
Receiver<br />
Channel 1<br />
Steering Servo<br />
4-Cell<br />
Battery Holder<br />
Channel 2<br />
Throttle Servo<br />
Your model is equipped with the newest <strong>Traxxas</strong> 2.4 GHz transmitter<br />
with <strong>Traxxas</strong> Link. The transmitter has three channels for controlling<br />
your throttle, steering as well as an optional channel. The receiver<br />
inside the model has 5 output channels. Your model is equipped<br />
with two servos and a receiver.<br />
mAh – Abbreviation for milliamp hour. A measure of the capacity of the<br />
battery pack. The higher the number, the longer the battery will last<br />
between recharges.<br />
Neutral position - The standing position that the servos seek when the<br />
transmitter controls are at the neutral setting.<br />
NiCad - Abbreviation for nickel-cadmium. The original rechargeable hobby pack,<br />
NiCad batteries have very high current handling, high capacity, and can last up<br />
to 1000 charging cycles. Good charging procedures are required to reduce the<br />
possibility of developing a “memory” effect and shortened run times.<br />
NiMH - Abbreviation for nickel-metal hydride. Rechargeable NiMH batteries<br />
offer high current handling, and much greater resistance to the “memory”<br />
effect. NiMH batteries generally allow higher capacity than NiCad batteries.<br />
They can last up to 500 charge cycles. A peak charger designed for NiMH<br />
batteries is required for optimal performance.<br />
Receiver - The radio unit inside your model that receives signals from the<br />
transmitter and relays them to the servos.<br />
Servo - Small motor unit in your model that operates the steering mechanism.<br />
Transmitter - The hand-held radio unit that sends throttle and steering<br />
instructions to your model.<br />
Trim - The fine-tuning adjustment of the neutral position of the servos,<br />
made by adjusting the throttle and steering trim knobs on the face of the<br />
transmitter. Note: The Multi Function knob must be programmed to serve<br />
as a throttle trim adjustment.<br />
3-channel radio system - The TQ radio system, consisting of the receiver, the<br />
transmitter, and the servos. The system uses three channels: one to operate the<br />
throttle, one to operate the steering and an optional third channel.<br />
TQ 2.4GHz TRANSMITTER<br />
Antenna<br />
Multi-Function Knob<br />
Steering<br />
Trim<br />
Optional Channel-3<br />
Rocker Switch *<br />
Throttle<br />
Trigger<br />
Power<br />
Switch<br />
Battery<br />
Compartment<br />
*Requires optional 4995X reverse kit.<br />
Steering Wheel<br />
Throttle Neutral<br />
Adjust<br />
Set Button<br />
Menu Button<br />
Red/Green Status LED<br />
see page 30 for more info<br />
T-MAXX 3.3 OWNERS MANUAL • 7
THE TQ 2.4GHz RADIO SYSTEM<br />
TQ 2.4GHz RADIO SYSTEM PRECAUTIONS<br />
For maximum range, always hold the transmitter<br />
so the antenna is in a vertical position (pointing<br />
straight up). The transmitter’s antenna can<br />
be swiveled and angled to allow for a vertical<br />
position if necessary.<br />
Do not kink the receiver’s antenna wire. Kinks in<br />
the antenna wire will reduce range.<br />
DO NOT CUT any part of the receiver’s antenna<br />
wire. Cutting the antenna will reduce range.<br />
Extend the antenna wire in the model as far as possible for maximum<br />
range. It is not necessary to extend the antenna wire out of the body,<br />
but wrapping or coiling the antenna wire should be avoided.<br />
Do not allow the antenna wire to extend outside the body without<br />
the protection of an antenna tube, or the antenna wire may get<br />
cut or damaged, reducing range. Always keep the wire protected<br />
(in the antenna tube) to prevent the chance of damage.<br />
INSTALLING TRANSMITTER BATTERIES<br />
Your TQ 2.4GHz transmitter uses 4 AA batteries.<br />
The battery compartment is located in the base<br />
of the transmitter.<br />
1. Remove the battery compartment door by pressing the tab<br />
and lifting the door up. *<br />
2. Install the batteries in the correct orientation as indicated in the<br />
battery compartment.<br />
3. Reinstall the battery door and<br />
snap it closed.<br />
4. Turn on the transmitter and<br />
check the status indicator for a<br />
solid green light.<br />
If the status LED flashes red, the transmitter batteries may be weak,<br />
discharged or possibly installed incorrectly. Replace with new or<br />
freshly charged batteries. The power indicator light does not indicate<br />
the charge level of the battery pack installed in the model. Refer to<br />
the Troubleshooting section on page 30 for more information on the<br />
transmitter’s Status LED codes.<br />
*Always keep your Quick Reference Guide in your transmitter.<br />
Use the Right Batteries<br />
Your transmitter uses AA batteries. Use new alkaline batteries, or<br />
rechargeable batteries such as NiCad or NiMH (Nickel Metal Hydride)<br />
batteries in your transmitter. Make sure rechargeable batteries are fully<br />
charged according to the manufacturer’s instructions.<br />
8 • T-MAXX 3.3 OWNERS MANUAL<br />
INSTALLING RECEIVER BATTERIES<br />
The radio receiver in your model uses 4 AA batteries.<br />
The battery holder for the receiver batteries is located<br />
underneath the battery cover. The battery cover can be identified by<br />
the on/off switch.<br />
1. Remove the battery cover by<br />
removing the two 3x10mm<br />
buttonhead cap screws<br />
from the cover.<br />
2. Remove the battery holder<br />
and install 4 AA alkaline<br />
batteries. Make careful<br />
note of the battery polarity by<br />
comparing against the diagrams<br />
in the battery holder.<br />
3. Insert the battery holder into the<br />
battery cover.<br />
4. Direct the battery wires through the slot<br />
in the battery cover. If the wires are not<br />
properly routed, they may become broken<br />
or shorted, causing radio system failure and<br />
loss of control.<br />
5. Reinstall the battery cover and secure with the screws.<br />
To prevent losing control of your model, it is important to stop at the first<br />
sign of weak receiver batteries to avoid losing control. Visible warning<br />
signals include sluggish steering response and shortened radio range.<br />
If the radio system doesn’t appear to work when the transmitter and<br />
receiver switches are turned on, check for correct battery installation.<br />
<strong>Traxxas</strong> TRX Power System (optional)<br />
The optional <strong>Traxxas</strong> TRX Power System can be purchased<br />
separately to power the radio system in the T-Maxx 3.3.<br />
Benefits include the economy of a rechargeable 5-cell<br />
nickel metal hydride (NiMH) battery pack that replaces AA<br />
alkaline batteries, and increased voltage for dramatically<br />
improved servo performance. The TRX Power Charger<br />
(Part #3030X) is a peak detecting unit that will charge<br />
the RX Power Pack (#3037 hump pack) in about one hour. The peak detection<br />
circuitry automatically shuts off the charger when the maximum charge has<br />
been achieved. The TRX Power Charger also includes a 7.2V adapter for charging<br />
7.2V EZ-Start batteries. The TRX Power Charger can operate on either AC or DC<br />
power. A special wiring harness for T-Maxx (<strong>Traxxas</strong> part #3034) that includes a<br />
handy external charging jack is required.<br />
The optional DC car adapter (Part #3032) features a tangle-free,<br />
extra long wire and integrated fuse. The long charging cord<br />
allows the model to remain outside the car while charging.<br />
Caution! Never charge batteries in an enclosed car interior<br />
or while driving. Never leave charging batteries unattended.<br />
Monitor them closely.<br />
<strong>Traxxas</strong>’ integrated TRX Power System is the easiest way to add the power and<br />
economy of rechargeable batteries to your T-Maxx 3.3. Consult your hobby<br />
dealer for purchasing information.<br />
If you use rechargeable batteries in your transmitter, be aware that<br />
when they begin to lose their charge, they lose power more quickly than<br />
regular alkaline batteries.<br />
Caution: Discontinue running your model at the first sign of weak<br />
batteries (flashing red light) to avoid losing control.
TQ 2.4GHz RADIO SYSTEM CONTROLS<br />
Automatic Fail-Safe<br />
The TQ 2.4GHz transmitter and receiver are equipped with an<br />
automatic fail-safe system that does not require user programming. In<br />
the event of signal loss or interference, the throttle will return to neutral<br />
and the steering will hold its last commanded position. If Fail-Safe<br />
activates while you are operating your model, determine the reason for<br />
signal loss and resolve the problem before operating your model again.<br />
TQ RADIO SYSTEM RULES<br />
Always turn your TQ 2.4GHz transmitter on first and off<br />
last. This procedure will help to prevent your model<br />
from receiving stray signals from another transmitter, or other source,<br />
and running out of control. Your model has electronic fail-safes to<br />
prevent this type of malfunction, but the first, best defense against a<br />
runaway model is to always turn the transmitter on first, and off last.<br />
In order for the transmitter and receiver to bind to one another, the receiver<br />
in the model must be turned on within 20 seconds of turning on the<br />
transmitter. The transmitter LED will flash fast red indicating a failure to link.<br />
If you miss it, simply turn off the transmitter and start over.<br />
Always have the transmitter and receiver turned on before you start<br />
the engine. Never turn the radio system off while the engine is running.<br />
The on/off switch in the model only turns the receiver on and off. It<br />
does not turn off the engine.<br />
Always use new or freshly charged batteries for the radio system.<br />
Weak batteries will limit the radio signal between the receiver<br />
and the transmitter. Loss of the radio signal can cause you to lose<br />
control of your model.<br />
1 2<br />
Always turn your<br />
transmitter on first.<br />
Always turn your<br />
receiver on second.<br />
3<br />
Then start your engine.<br />
THE TQ 2.4GHz RADIO SYSTEM<br />
TQ 2.4GHz RADIO SYSTEM BASIC ADJUSTMENTS<br />
Throttle Neutral Adjustment<br />
The throttle neutral adjustment is located on<br />
the transmitter face and controls the forward/<br />
reverse travel of the throttle trigger. Change<br />
the adjustment by pressing the button and<br />
sliding it to the desired position. There are two<br />
settings available:<br />
50/50: Allows equal travel for both acceleration and reverse.<br />
70/30: Allows more throttle travel (70%) and less reverse travel (30%).<br />
50/50 is required setting for the T-Maxx with TRX 3.3 Racing<br />
Engine installed.<br />
Steering Trim<br />
The electronic steering trim located on the face of the<br />
transmitter adjusts the neutral (center) point of the steering<br />
channel.<br />
Multi-Function Knob<br />
The Multi-Function knob can be programmed to control a<br />
variety of functions. From the factory, the Multi-Function<br />
knob controls steering sensitivity, also known as exponential<br />
or “expo.” When the knob is turned counterclockwise all the way to the<br />
left (default position), expo is off and steering sensitivity will be linear<br />
(the most commonly used setting). Turning the knob clockwise will “add<br />
expo” and decrease the steering sensitivity in the initial range of steering<br />
wheel travel left or right from center. For more detail on steering<br />
exponential, refer to page 10.<br />
00<br />
00<br />
100 100<br />
THROTTLE TRIM<br />
100 100<br />
THROTTLE TRIM<br />
USING THE TQ 2.4GHz RADIO SYSTEM<br />
The TQ 2.4GHz Radio System has been pre-adjusted at<br />
the factory. The adjustment should be checked before<br />
running the model, in case of movement during shipping. Here’s how:<br />
1. Turn the transmitter switch on. The status LED on the transmitter<br />
should be solid green (not flashing).<br />
2. Turn on the receiver switch in the model. The switch is located on<br />
the rear shock tower.<br />
3. Position the T-Maxx so that its front wheels are off the ground.<br />
4. Turn the steering wheel on the transmitter back and forth and<br />
check for rapid operation of the steering servo. Also, check that the<br />
steering mechanism is not loose or binding. If the steering operates<br />
slowly, check for weak receiver batteries.<br />
5. When looking down<br />
at model, the front<br />
wheels should be<br />
pointing straight<br />
ahead. If the wheels<br />
are turned slightly to<br />
the left or right, slowly<br />
adjust the steering<br />
trim control on the<br />
transmitter until they<br />
are pointing straight ahead.<br />
6. Operate the throttle trigger on the transmitter and check for rapid<br />
operation of the throttle servo. When the throttle trigger is pulled<br />
back, the carburetor should open. When the throttle trigger is<br />
pushed all the way forward, the brake should lock.<br />
7. Once adjustments are made, turn off the receiver on your model,<br />
followed by the hand-held transmitter.<br />
Remember, always turn the TQ-3 transmitter on first and off last<br />
to avoid damage to your T-Maxx 3.3. Never turn the radio off<br />
while the engine is running.<br />
T-MAXX 3.3 OWNERS MANUAL • 9
THE TQ 2.4GHz RADIO SYSTEM<br />
Range-Testing the Radio System<br />
Before each<br />
running session<br />
with your model, you should<br />
range-test your radio system to<br />
ensure that it operates properly.<br />
1. Turn on the radio system<br />
and check its operation as<br />
described in the previous<br />
section.<br />
2. Have a friend hold the model<br />
with the engine off.<br />
3. Make sure your transmitter<br />
antenna is straight up, and<br />
then walk away from the<br />
model with the transmitter<br />
until you reach the farthest<br />
distance you plan to operate<br />
the model.<br />
Throttle<br />
4. Operate the controls on the transmitter once again to be sure that<br />
the model responds correctly.<br />
5. Do not attempt to operate the model if there is any problem with<br />
the radio system or any external interference with your radio signal<br />
at your location.<br />
Higher Speeds Require Greater Distance<br />
The faster you drive your model, the more quickly it will near the<br />
limit of radio range. At 60mph, a model can cover 88 feet every<br />
second! It’s a thrill, but use caution to keep your model in range. If<br />
you want to see your model achieve its maximum speed, it is best<br />
to position yourself in the middle of the truck’s running area, not<br />
the far end, so you drive the truck towards and past your position.<br />
In addition to maximizing the radio’s range, this technique will<br />
keep your model closer to you, making it easier to see and control.<br />
No matter how fast you drive your model, always leave adequate<br />
space between you, the model, and others. Never drive directly<br />
toward yourself or others.<br />
TQ 2.4GHz Binding Instructions<br />
For proper operation, the transmitter and receiver must be<br />
electronically ‘bound.’ This has been done for you at the factory.<br />
Should you ever need to re-bind the system or bind to an additional<br />
transmitter or receiver, follow these instructions. Note: the receiver<br />
must be connected to a 4.8-6.0v (nominal) power source for binding<br />
and the transmitter and receiver must be within 5 feet of each other.<br />
1. Press and hold the transmitter’s SET button as you switch<br />
transmitter on. The transmitter’s LED will flash red slowly.<br />
Release the SET button<br />
2. Press and hold the receiver’s LINK button as you switch on the speed<br />
control by pressing the EZ-Set button. Release the LINK button.<br />
3. When the transmitter and receiver’s LEDs turn solid green, the<br />
system is bound and ready for use. Confirm that the steering and<br />
throttle operate properly before driving your model.<br />
Steering Sensitivity (Exponential)<br />
The Multi-Function knob on the TQ2.4GHz transmitter has been<br />
programmed to control Steering Sensitivity (also known as<br />
exponential). The standard setting for Steering Sensitivity is “normal<br />
(zero exponential),” with the dial full left in its range of travel. This<br />
setting provides linear servo response: the steering servo’s movement<br />
will correspond exactly with the input from the transmitter’s steering<br />
wheel. Turning the knob clockwise from center will result in “negative<br />
exponential” and decrease steering sensitivity by making the servo<br />
10 • T-MAXX 3.3 OWNERS MANUAL<br />
Brake<br />
Throttle/Brake<br />
Servo<br />
T-Maxx 3.3<br />
Servo Operation<br />
Steering<br />
Servo<br />
less responsive near neutral, with increasing sensitivity as the servo<br />
nears the limits of its travel range. The farther you turn the knob,<br />
the more pronounced the change in steering servo movement will<br />
be. The term “exponential” comes from this effect; the servo’s travel<br />
changes exponentially relative to the input from the steering wheel.<br />
The exponential effect is indicated as a percentage—the greater the<br />
percentage, the greater the effect. The illustrations below show how<br />
this works.<br />
Normal Steering Sensitivity (0% exponential)<br />
In this illustration, the steering<br />
servo’s travel (and with it,<br />
the steering motion of<br />
the model’s front wheels)<br />
corresponds precisely with the<br />
steering wheel. The ranges are<br />
exaggerated for illustrative purposes.<br />
Decreased Steering Sensitivity (Negative Exponential)<br />
By turning the Multi-Function<br />
knob clockwise, the steering<br />
sensitivity of the model will<br />
be decreased. Note that a<br />
relatively large amount of<br />
steering wheel travel results<br />
in a smaller amount of servo<br />
travel. The farther you turn the<br />
knob, the more pronounced<br />
the effect becomes. Decreased<br />
Turning Range<br />
at Transmitter<br />
steering sensitivity may be helpful when driving on low-traction<br />
surfaces, when driving at high speed, or on tracks that favor sweeping<br />
turns where gentle steering inputs are required. The ranges are<br />
exaggerated for illustrative purposes.<br />
Experiment! Try varying degrees of exponential. It’s easy to go<br />
back to “zero” if you don’t like the effect. There’s no wrong way to adjust<br />
exponential. Any setting that makes you more comfortable with your car’s<br />
handling is the “right setting.”<br />
SETTING UP THE ANTENNA<br />
The receiver antenna has been set up and<br />
installed from the factory.<br />
When reinstalling the antenna, first slide<br />
the antenna wire into bottom of antenna<br />
tube until white tip of antenna is at top<br />
of tube under the black cap. Next insert<br />
the antenna tube into the mount while<br />
making sure that antenna wire is in slot<br />
in the antenna mount. Do not bend or<br />
kink the antenna wire! Do not shorten the<br />
antenna tube.<br />
To prevent loss of radio<br />
range do not kink or cut<br />
the black wire, do not<br />
bend or cut the metal tip,<br />
and do not bend or cut<br />
the white wire at the end<br />
of the metal tip.<br />
Antenna<br />
Wrench<br />
Effective Turning<br />
Range on Model<br />
Antenna<br />
Tip<br />
Antenna<br />
Tube<br />
Antenna<br />
Crimp Nut<br />
Antenna<br />
Post<br />
Correct No No No
THE TRX 3.3 RACING ENGINE<br />
INTRODUCTION<br />
The TRX ® 3.3 Racing Engine is<br />
the next generation of TRX nitro<br />
power. The larger displacement<br />
and advanced porting generate<br />
class-leading horsepower while<br />
still maintaining the TRX Racing<br />
Engine characteristics of broad,<br />
linear power delivery and ease<br />
of tuning. Focused engineering<br />
and rigorous testing have yielded<br />
unprecedented power and<br />
uncompromising performance<br />
that turns ready-to-run into<br />
Ready-To-Race®.<br />
The TRX 3.3 Racing Engine takes a total-system approach. Each part of<br />
the engine, from the air filter to the exhaust tip, is carefully engineered to<br />
work in harmony with other engine components. Each part complements<br />
the next, to extract maximum power. The TRX 3.3 Racing Engine is<br />
designed to be tolerant of variations in tuning, and to run successfully<br />
through a wide range of variable atmospheric conditions such as changes<br />
in temperature, humidity, and altitude.<br />
In order to get the longest engine life and keep the TRX 3.3 Racing<br />
Engine in top running condition, it is very important to perform regular<br />
routine maintenance. The number one cause of premature engine wear<br />
and failure is lack of care and maintenance!<br />
TERMS TO KNOW<br />
You’ll find these Nitro R/C engine terms throughout this section of the manual.<br />
.15 - .15 or “15” refers to the displacement of the engine. The TRX 2.5 Racing<br />
Engine is .15 cubic inches or 2.5 cubic centimeters (cc). The name “TRX<br />
2.5” is derived from the cc measurement.<br />
.20 - .20 or “20” refers to the size of the engine. The TRX 3.3 is .20 cubic<br />
inches or 3.3 cubic centimeters (cc). The name “TRX 3.3” is derived from<br />
the cc measurement.<br />
ABC - Abbreviation for aluminum, brass, and chrome. Refers to engine<br />
construction that consists of an aluminum piston that slides in a chromeplated<br />
brass sleeve. The TRX 3.3 uses ABC construction.<br />
Air filter - The air filter sits atop the carburetor and prevents harmful dust<br />
and dirt from entering the engine. Dirt ingestion is the number one cause<br />
of premature engine failure so the engine should never be run without<br />
the air filter in place.<br />
BDC - Bottom dead center. The bottom-most position of the engine<br />
piston stroke.<br />
Break-in - Break-in is the procedure for running a brand new engine<br />
according to specific instructions. This correctly prepares the engine for<br />
normal running. The break-in procedure can be different for different<br />
makes of engines. Follow the <strong>Traxxas</strong> directions for break-in exactly.<br />
Carburetor - The carburetor atomizes (mixes) the fuel with the air so that<br />
the engine can burn it. There are two types of carburetors; slide carbs and<br />
barrel carbs. The TRX 3.3 uses the superior slide carburetor design.<br />
Carb - Abbreviation for carburetor.<br />
<strong>Traxxas</strong> strongly discourages changing or modifying any part<br />
of the TRX 3.3 Racing Engine. Old tech tips and tricks that may<br />
have boosted the power of other engines could seriously diminish the<br />
performance of the TRX 3.3 Racing Engine.<br />
BREAK-IN<br />
The TRX 3.3 Racing Engine is manufactured to exacting tolerances and<br />
requires a specially-designed break-in procedure to accomplish the final<br />
precision fitting of the internal engine components. It is very important<br />
that you follow the new break-in procedure as closely as possible to<br />
achieve the best performance and longest life from your TRX 3.3 Racing<br />
Engine. Engine break-in will take between one and two hours. Old style<br />
break-in procedures, such as idling the engine on the bench for several<br />
tanks of fuel or simply running the engine with a very rich fuel mixture<br />
for the first 4 tanks of fuel, will not achieve the best results. Follow the<br />
easy steps in this manual.<br />
AIR FILTER MAINTENANCE<br />
Dirt is the worst enemy to your engine. A clean air filter is absolutely<br />
critical for long engine life. Due to the high performance nature of the<br />
TRX 3.3 engine, a tremendous amount of vacuum is created to move a<br />
large volume of high velocity air through the carburetor. This model is<br />
equipped with a two-stage high performance air filter which requires that<br />
the pre-filter stage be cleaned and oiled every hour of operation, and the<br />
primary filter be cleaned and oiled every 3-4 hours. An extra pre-lubed<br />
air filter set has been provided with this model to encourage you to<br />
maintain the engine’s air filter.<br />
AFTER-RUN MAINTENANCE<br />
Perform after-run maintenance on the engine to prevent corrosion<br />
from building up on the internal engine components. The fuel naturally<br />
attracts moisture and corrosion can build up very quickly inside the<br />
engine if it is not prevented.<br />
A few minutes spent before and after each time you run your model will<br />
allow you to enjoy it for a long time to come. Read on for more exciting<br />
details about your new engine.<br />
Clean-out - Cleaning-out is a condition that occurs when the engine is<br />
accelerating and the fuel mixture becomes sufficiently lean to allow<br />
the engine to continue into its upper rpm power band. It is usually<br />
characterized by a noticeable decrease in blue exhaust smoke and a<br />
dramatic increase in engine speed.<br />
Combustion chamber - The combustion chamber is machined into the<br />
bottom of the cylinder head. This is where the glow plug ignites the fuel.<br />
The shape of the combustion chamber is designed to promote more<br />
efficient burning of the fuel.<br />
Connecting rod - The connecting rod transfers the piston motion to the<br />
crankshaft. The TRX 3.3 Racing Engine uses a “knife-edged” connecting<br />
rod. The aerodynamic, sharpened edges allow it to “slice” through the<br />
pressurized air/fuel mixture inside the crankcase.<br />
Crankcase - The engine’s “body” that contains all of the running<br />
mechanical components.<br />
Crankshaft - The main shaft of the engine that holds the<br />
reciprocating assembly.<br />
Cooling fins - The cooling fins are milled into the cylinder head and<br />
crankcase and cause heat to be drawn away from the engine. Heat is<br />
removed when it dissipates into the air passing across the cooling fins.<br />
It is important to keep the fins clean of dirt and debris for maximum<br />
cooling efficiency.<br />
Cylinder head (head) - The finned aluminum part on top of the engine that<br />
is responsible for dissipating most of the engine’s heat. The combustion<br />
chamber is machined into the bottom of the head.<br />
There’s more advanced thinking, development and testing in the<br />
stock parts of your TRX 3.3 Racing Engine than in many aftermarket<br />
manufacturer’s performance parts. The TRX 3.3 Racing Engine is already<br />
the most powerful engine in its class and may not benefit from average,<br />
low-tech, aftermarket bolt on performance items.<br />
T-MAXX 3.3 OWNERS MANUAL • 11
THE TRX 3.3 RACING ENGINE<br />
Dyno - Abbreviation for dynamometer. A precise piece of testing<br />
equipment that accurately measures engine power and torque output<br />
over the engine’s entire rpm range.<br />
EZ-Start - <strong>Traxxas</strong> on-board electric starting system. The system consists of<br />
a hand held starter control unit and an on-board gearbox with an electric<br />
motor to spin the engine.<br />
Filter foam - The oiled foam element inside the air filter housing.<br />
Fit - Usually refers to the fit of the piston and sleeve. If the fit is tight,<br />
the piston will feel very tight at top of the sleeve (top dead center),<br />
and the engine will have good sealing and compression. If the fit is<br />
loose, compression will be low and both the piston and sleeve should<br />
be replaced.<br />
Flame-out - Occurs when the engine stops running at high rpm. Usually the<br />
fault of an excessively lean fuel mixture or glow plug failure.<br />
Fuel - (10%, 20%, 33%) The TRX 3.3 must have model engine fuel to run.<br />
<strong>Traxxas</strong> Top Fuel is recommended. Fuel is sold in quarts and gallons from<br />
hobby dealers. The 10%, 20% and 33% labeling refers to the percentage<br />
of nitromethane contained in the fuel.<br />
Fuel mixture - The ratio of fuel to air as determined by the needle settings<br />
of the carburetor.<br />
Fuel tubing (fuel line) - The thick silicone tubing that carries fuel from the<br />
fuel tank to the carburetor.<br />
Glow plug - The glow plug is located in the cylinder head at the top of the<br />
combustion chamber. It contains an element that glows red hot when<br />
voltage is applied. When the engine is being started, the heat from the<br />
glow plug ignites the fuel mixture and starts the combustion process.<br />
Glow plug driver - This tool clips onto the glow plug and supplies the<br />
required voltage to light the glow plug element. It is also called an igniter.<br />
EZ-Start equipped engines do not require this separate tool.<br />
Header - The aluminum tube that connects the exhaust system to the<br />
engine exhaust port. The length and diameter of the header must be<br />
carefully selected to extract the most power from the engine.<br />
High-speed needle (HSN) - Adjusts the carburetors fuel/air mixture at high<br />
throttle openings.<br />
Idle speed - The speed (rpm) the engine runs at when the transmitter’s<br />
throttle trigger is at neutral.<br />
Idle speed screw (ISS) - Located on the carburetor body. This screw adjusts<br />
the idle rpm of the engine.<br />
Lean - A running condition where the engine is not getting enough fuel (for<br />
the available air). Symptoms include engine overheating, or the engine<br />
runs for a short time and then stalls, particularly at high speed. This is a<br />
dangerous condition that should be corrected immediately or it can ruin<br />
your engine.<br />
Leaning the mixture - Turning either the high-speed and/or low-speed<br />
needle(s) clockwise to decrease the amount of fuel the engine receives.<br />
Low-speed needle (LSN) - Needle valve that controls the fuel mixture at<br />
low throttle openings.<br />
Needle valve - Valve consisting of a tapered needle that closes against a<br />
corresponding seat to regulate fuel flow.<br />
Nitro - Abbreviation for nitromethane, a component of model engine fuel<br />
that improves fuel combustion and power output. Nitro also refers to a<br />
class of R/C powered by model engines instead of electric.<br />
Nitro content - The amount of nitromethane used in the fuel. Usually<br />
measured as a percentage of the total fuel volume. <strong>Traxxas</strong> engines are<br />
optimized to use 10-20% nitro. 33% nitro may be used for racing.<br />
Nitromethane - Nitromethane is a component in the fuel that increases<br />
power from the combustion process up to a point. Engines are generally<br />
optimized to use a range of nitro content for the best power.<br />
12 • T-MAXX 3.3 OWNERS MANUAL<br />
O-ring - Rubber “O”-shaped ring used as a sealing gasket.<br />
Pipe - Abbreviation for the tuned exhaust pipe on a nitro engine. See<br />
“Tuned Pipe”.<br />
Piston - The piston is the internal engine part that is attached to the upper<br />
end of the connecting rod and moves up and down in the cylinder sleeve.<br />
The precise fit between the piston and the sleeve creates a seal that<br />
allows the engine to have the required compression for combustion.<br />
Port - Ports are openings in the sleeve that allow atomized fuel to enter the<br />
combustion chamber and burned exhaust gases to exit. The shape and<br />
location of the ports are a large factor in controlling the engine timing<br />
and power output.<br />
Pre-filter - The outer air filter element in a two-stage air filter. This provides<br />
the first level of air filtration for the engine. The majority of dirt and debris<br />
will be stopped by this filter. Clean, re-oil, and replace this filter after every<br />
hour of run time. Always use both the pre-filter and primary filter.<br />
Primary filter - The inner air filter element in a two-stage air filter. This<br />
provides a second level of air filtration after the pre-filter removes the<br />
majority of dirt and debris. Clean, re-oil, and replace this filter after every<br />
3 - 4 hours of run time. Always use both the pre-filter and primary filter.<br />
Priming - <strong>Manual</strong>ly causing fuel to move from the fuel tank up to the<br />
carburetor. This is sometimes necessary after the engine has been sitting<br />
for a long period of time and all of the fuel has drained back to the tank.<br />
On a <strong>Traxxas</strong> model this is done by holding your finger over the exhaust<br />
tip for one or two seconds while the engine is starting.<br />
Punch - A term that refers to how quickly the model responds to throttle<br />
input or how quickly it accelerates.<br />
Rich - A running condition where the engine is getting too much fuel for<br />
the available air. It is better to run an engine slightly rich to increase<br />
engine life. Excessively rich mixtures cause the engine to have sluggish<br />
performance with exaggerated blue smoke and unburned fuel coming<br />
from the exhaust.<br />
rpm - Abbreviation for revolutions per minute (how many times the engine<br />
crankshaft spins in a minute).<br />
Sleeve - Internal engine part that contains the piston. The precise fit<br />
between the sleeve and the piston creates a seal that allows engine<br />
to have the required compression for combustion. The sleeve in a TRX<br />
engine is made of brass and is then hard-chrome plated.<br />
Slide carburetor - The throttle on a slide carburetor closes and opens by<br />
sliding a barrel in and out of the carburetor body. This type of carburetor<br />
is preferred for performance use because it provides a less restrictive<br />
“straight-through” air path than the barrel carburetor design.<br />
Stall - When the engine stops running, usually due to an incorrect fuel<br />
mixture setting or running out of fuel.<br />
TDC - Top dead center. The top-most position of the engine<br />
piston stroke.<br />
Tuned pipe - The tuned exhaust pipe usually consists of a specially-shaped<br />
metal or composite chamber with baffles that is designed to enhance the<br />
power output of the engine.<br />
Two-stage air filter - An air filter with two separate, oiled foam filter<br />
elements. The outer element, the pre-filter, removes the majority of dirt<br />
and debris. The inner element, the primary filter, then filters the air again<br />
before it enters the engine. The pre-filter should be cleaned, oiled, and<br />
replaced every hour of runtime. The primary filter only requires cleaning<br />
and re-oiling every 3 - 4 hours, depending on running conditions.<br />
Wear-in - Fitment process that occurs during engine break-in where<br />
internal engine parts develop an even more precise matched fit through<br />
actual use under controlled circumstances.<br />
WOT - Abbreviation for wide-open throttle.
TRX 3.3 RACING ENGINE ILLUSTRATED<br />
Two-Stage<br />
Air Filter<br />
High-Speed<br />
Needle<br />
Fuel Intake<br />
Air Intake<br />
Carburetor<br />
Flywheel<br />
Crankshaft<br />
Pressure Line<br />
Tuned Pipe<br />
Exhaust<br />
Tip<br />
Glow Plug Wire<br />
Idle Speed<br />
Screw<br />
Ground Wire<br />
Clutch Bell<br />
EZ-Start ® Plug<br />
Positive Wire<br />
Negative Wire<br />
THE TRX 3.3 RACING ENGINE<br />
Engine<br />
Shut-off<br />
Clamp<br />
Glow Plug<br />
Head Protector<br />
PowerTune Head<br />
(Cylinder Head)<br />
EZ-Start ® Drive Unit<br />
EZ-Start ® Motor<br />
Low-Speed Needle<br />
Engine Mount<br />
Crankcase<br />
Throttle Arm<br />
EZ-Start ®<br />
Controller<br />
Fuel Line<br />
Fuel Tank<br />
T-MAXX 3.3 OWNERS MANUAL • 13
THE TRX 3.3 RACING ENGINE<br />
THE FUEL<br />
Use the Right Fuel<br />
It’s imperative that you use the correct fuel in your<br />
TRX 3.3 Racing Engine for maximum performance and<br />
engine life. <strong>Traxxas</strong> Top Fuel should be used to ensure<br />
correct engine lubrication, performance, and ease of<br />
tuning. <strong>Traxxas</strong> Top Fuel has been proven in thousands<br />
of engines, so you can count on it every day for great<br />
performance.<br />
• Top Fuel is the only fuel which is 100% certified for use in<br />
<strong>Traxxas</strong> engines.<br />
• <strong>Traxxas</strong> Top Fuel is made with just the right balance of the highest<br />
grade natural and synthetic lubricants to allow excellent throttle<br />
response and the best top-end performance, without sacrificing longterm<br />
durability.<br />
• All of the components in the fuel are carefully selected from the<br />
best materials available and then custom blended to match the<br />
metallurgy and temperature characteristics of <strong>Traxxas</strong> engines.<br />
You may use 10%, 20% or 33% nitro-content fuel. Try to use the same<br />
percentage all the time, avoid switching back and forth between fuels.<br />
We recommend that if you break in your engine on 20% fuel that<br />
you stick with that percentage. If you do move to a higher or lower<br />
percentage, make sure you readjust your fuel mixture to compensate.<br />
What about Other Fuels?<br />
Can other brands of fuel be used besides Top Fuel? There are other fuels<br />
that can provide satisfactory performance; however there could be longterm<br />
costs in the form of decreased engine performance, loss of tuning<br />
ease, and shorter engine life. Only use fuels that contain both castor and<br />
synthetic oil.<br />
Everyone has an opinion or a claim to make about fuel. The engineering<br />
team at <strong>Traxxas</strong> has spent years developing TRX Racing Engines. No one<br />
knows more about the specific fuel requirements of <strong>Traxxas</strong> engines,<br />
than <strong>Traxxas</strong> engineers. We strongly urge you not to take chances with<br />
your engine investment and use the <strong>Traxxas</strong> fuel made for the TRX 3.3<br />
Racing Engine.<br />
Choosing a Nitro Percentage<br />
A commonly asked question is “what is the difference between 10%,<br />
20%, and 33% fuels?” Increasing the nitro in the fuel is almost like adding<br />
extra oxygen to the combustion process. It burns more efficiently,<br />
improves combustion, and delivers more power. When increased nitro<br />
is used, more of the other fuel components are then required inside the<br />
combustion chamber to maintain the perfect air/fuel ratio. Therefore,<br />
overall fuel mixtures need to be richened slightly (on the high speed<br />
needle, about 3/4 of a turn counterclockwise when changing from 20%<br />
to 33%, about 1/2 of a turn counterclockwise when changing from 10%<br />
to 20%). This allows greater fuel flow through the engine and promotes<br />
cooler running, even at the maximum lean settings.<br />
If 33% improves power, then it seems that the highest nitro content<br />
available (beyond 33%) should always be used in the engine. In reality,<br />
there are practical limitations. Engines are designed to run best within<br />
a range of nitro percentages. How the engine is ported, the size of the<br />
combustion chamber and other factors determine how much nitro can<br />
be efficiently used in the engine. The TRX 3.3 Racing Engine responds<br />
exceptionally well to a maximum of 33% nitro, returning cooler temps,<br />
more power, and a smoother throttle response. For those who want to<br />
run higher nitro, 33% Top Fuel is the optimum nitro percentage for the<br />
TRX 3.3 Racing Engine. Increasing the nitro beyond 33% can introduce<br />
the need for engine modifications (ports, head shimming, etc.) to avoid<br />
starting and tuning difficulties. There are limits to how much nitro an<br />
14 • T-MAXX 3.3 OWNERS MANUAL<br />
engine can effectively use to make more power. Lower nitro percentages<br />
have their own advantages. Nitro is an expensive component in the<br />
fuel so 10% nitro blend is more economical for the sport user. 10% also<br />
provides greater latitude with the needle settings for easier tuning.<br />
When using <strong>Traxxas</strong> Top Fuel, using higher nitro percentages does not<br />
cause the engine to wear out faster. 33% Top Fuel contains the same<br />
quality lubrication package as 10 and 20% Top Fuel. Some non-<strong>Traxxas</strong><br />
high-percentage nitro racing fuels do sacrifice some lubrication in<br />
attempts to increase performance. We urge you to not take chances with<br />
your engine investment and use Top Fuel for consistent performance and<br />
long engine life.<br />
Handling the Fuel<br />
• Follow all directions and warnings on the fuel can.<br />
• Keep the fuel tightly capped at all times. Some components in the fuel<br />
can evaporate very quickly and upset the balance of the fuel.<br />
• Do not store unused fuel in the fuel dispenser. Immediately return fresh<br />
unused fuel back into the fuel can.<br />
• Do not mix old and new fuel. Never mix different fuel brands together.<br />
• Store the fuel in a cool dry location, away from any source of heat,<br />
ignition, or combustion.<br />
• Read and follow the safety precautions on page 3 in this manual.<br />
DANGER! Model engine fuel is poisonous to humans and animals.<br />
Drinking the fuel can cause blindness and death. Handle with<br />
care and respect. Keep it out of reach of minors at all times! While<br />
driving, do not leave your fuel dispensing bottle on the ground<br />
where a child could have access to it. Follow fuel label warnings.<br />
Fuel is flammable. Only use outdoors. Keep fuel away from all<br />
sources of ignition (flame, sparks, heat, etc.).<br />
FILLING THE FUEL TANK<br />
Use the included fuel dispensing bottle<br />
to put fuel into the T-Maxx’s fuel tank.<br />
To fill the fuel bottle, squeeze the air out, insert the<br />
dispenser tip into the fuel can, and release your grip<br />
on the bottle. As the bottle expands, fuel will be<br />
drawn into it.<br />
To fill your model flip up the spring-loaded<br />
cap on the fuel tank, insert the tip of the<br />
fuel bottle, and squeeze to<br />
dispense the fuel. Fill the tank<br />
until the fuel level reaches the<br />
base of the filler neck. Close<br />
the fuel tank lid, making sure<br />
it closes tightly.<br />
Fuel Tank Seal Adjustment<br />
The rubber seal on the fuel<br />
tank is important to the<br />
function of the engine. The fuel tank is pressurized by the exhaust system<br />
to provide reliable fuel flow. If the tank lid does not seal properly, an air<br />
leak will be created that can cause your engine to run erratically and be<br />
difficult to start. If necessary, the rubber O-ring tank seal can be adjusted for<br />
improved sealing by tightening the screw on the underside of the tank lid.
THE AIR FILTER<br />
The TRX 3.3 Racing Engine in this model is equipped with a specially<br />
designed two-stage air filter to deliver maximum filtering efficiency and<br />
performance while protecting your engine from dust and dirt during<br />
extended operating conditions. Use only the supplied filter. You will not<br />
improve engine performance by switching to an aftermarket filter, and<br />
you may risk engine damage due to poor filtration.<br />
The two-stage TRX Racing Filter consists of the following components:<br />
1. A rubber filter Base<br />
2. A 3-piece plastic housing<br />
3. A “pre-filter” element<br />
4. A “primary” filter element<br />
You must clean the outer pre-filter after every hour of run time, even if the<br />
filter looks clean. The primary filter element inside must be cleaned after<br />
3-4 hours of run time. These intervals include the break-in time. Clean<br />
your air filter after break-in. Dust (which is often too fine to see) and dirt<br />
constantly move through the filter anytime the engine is running. Even if you<br />
can’t see dirt on the filter, it is present inside the foam after any amount of<br />
run time. If you exceed the recommended cleaning intervals, your engine will<br />
be damaged. Engine damage or wear due to dirt ingestion is easy to detect,<br />
and one of the top causes of premature engine failure.<br />
Pre-Filter Cleaning Instructions (every hour of run time)<br />
1. Remove the clip from the air filter<br />
Pull to the side to remove assembly<br />
and remove from the metal hanger.<br />
Remove the air filter assembly from the<br />
carburetor bore by pulling the entire<br />
filter assembly firmly to the side to<br />
release it. Do not pull straight up.<br />
2. Remove the pre-filter element.<br />
3. Clean the pre-filter element by<br />
thoroughly washing the foam element<br />
in hot soapy water (dishwashing detergent works well). Repeat twice.<br />
4. Thoroughly dry the pre-filter element with a clean towel.<br />
5. Oil the foam element with air filter oil. Use <strong>Traxxas</strong> filter oil (part# 5263)<br />
or a high-quality, special-purpose foam filter oil like what is used for<br />
off-road motorcycle and ATV engines. This type of filter oil is available<br />
at motorcycle pro-shops. Apply a total of 24 drops of <strong>Traxxas</strong> air filter<br />
oil, evenly distributed between the top, bottom and sides of the filter<br />
element. Squeeze the filter element repeatedly to help spread the oil<br />
throughout. The filter element should be evenly colored by the oil. Even<br />
color indicates that the oil is spread evenly. Do not squeeze out excess<br />
oil. Note: Do not use the air filter oil for anything other than the air filter.<br />
It is not meant to be a lubricant.<br />
6. Reassemble the filter and install it on the engine, making sure the rubber<br />
filter neck fits securely on the carburetor with no gaps or air leaks.<br />
Primary Filter Cleaning Instructions (every 3 - 4 hours of run time)<br />
1. Remove the clip from the air<br />
Pull to the side to remove assembly<br />
filter and remove from the metal<br />
hanger. Remove the air filter<br />
assembly from the carburetor bore<br />
by pulling the entire filter assembly<br />
firmly to the side to release it. Do<br />
not pull straight up.<br />
2. Remove the pre-filter element.<br />
3. Remove the 3x6mm screw in the end of the filter housing. Remove the<br />
front housing and the primary filter element.<br />
4. Clean the filter parts by thoroughly washing in hot soapy water<br />
(dishwashing detergent works well). Repeat twice for the foam<br />
filter elements.<br />
5. Thoroughly dry the foam pre-filter and primary filter elements with a<br />
clean towel. Dry the remaining filter parts.<br />
THE TRX 3.3 RACING ENGINE<br />
6. Oil the foam pre-filter with 24 drops of air filter oil, and the primary filter<br />
element with 30 drops of air filter oil.<br />
7. Reassemble the filter and install it on the engine, making sure the rubber<br />
filter neck fits securely on the carburetor with no gaps or air leaks.<br />
THE CARBURETOR<br />
Understanding the Carburetor Adjustments<br />
The carburetor performs<br />
several functions. It controls<br />
Air<br />
the engine’s speed by<br />
restricting the intake of air Fuel<br />
and fuel into the engine. It<br />
atomizes the fuel (suspends<br />
the fuel droplets in the air)<br />
and also controls the air/fuel<br />
ratio of the mixture entering<br />
the engine (how much air for<br />
a given amount of fuel).<br />
To help provide a better<br />
understanding of engine tuning and why it’s necessary, the following is<br />
a brief explanation of the air/fuel combustion process that takes place<br />
inside the engine.<br />
In order to create the cylinder pressure that results in power, the engine<br />
burns the air/fuel mixture. Both air and fuel, in correct amounts, are<br />
needed for proper combustion. It is the carburetor’s job to mix the air<br />
and fuel together (atomize the fuel), in the correct proportion for the best<br />
possible combustion. This is the ideal air/fuel ratio. The ideal air/fuel ratio<br />
required for the engine remains roughly constant. Due to variations in<br />
atmospheric conditions (temperature, humidity, altitude etc.) fuel flow<br />
adjustment valves (called fuel mixture needles) are required to meter<br />
the fuel and maintain the ideal air/fuel ratio in these ever-changing<br />
conditions. For example, colder air is more dense (more air molecules)<br />
for a given volume of air and therefore requires more fuel (more fuel<br />
molecules) to maintain the correct air/fuel ratio. Warmer air is less dense<br />
(fewer air molecules) and therefore needs less fuel to maintain the correct<br />
air/fuel ratio. The tuning needles are there to adjust how much fuel is<br />
made available for the carburetor to mix with the available<br />
air (atomization).<br />
Cold Air (More Dense) Warm Air (Less Dense)<br />
See page 21 for more information on how air density affects<br />
engine tuning.<br />
The Fuel Mixture Needles<br />
The amount of fuel metered and atomized by the carburetor is controlled<br />
by the two mixture needles, the high-speed needle and the low-speed<br />
needle. The low-speed needle is used to meter the fuel used by the<br />
engine at idle and low rpm (part-throttle) engine speed. The high-speed<br />
needle is used to meter the fuel when the throttle is open from part<br />
throttle to wide-open throttle (WOT). Two needles on the TRX 3.3 Racing<br />
Engine provide precise control of the air/fuel ratio across the engine’s<br />
entire rpm range.<br />
T-MAXX 3.3 OWNERS MANUAL • 15
THE TRX 3.3 RACING ENGINE<br />
Water Valve<br />
(Controls Overall Flow)<br />
High Speed Needle<br />
Water Nozzle<br />
(Controls Fine Flow)<br />
Low Speed Needle<br />
The maximum possible fuel flow is always controlled by the high-speed<br />
needle. It works like the main water valve on a garden hose. Turn it<br />
clockwise to close the valve, counter-clockwise to open it. When the<br />
throttle is at idle or partially open, the low-speed needle meters the<br />
fuel flow at the outlet (needle seat) where the fuel enters the carburetor<br />
venturi. This second valve acts like the spray nozzle at the end of the<br />
garden hose in our example. When you accelerate from idle, the throttle<br />
opens and the low-speed needle is pulled away from the needle seat.<br />
This allows more fuel to flow with the increased air flow. As the throttle<br />
is increased, the low-speed needle is pulled completely away from the<br />
needle seat leaving it fully open. At that point, fuel metering is entirely<br />
controlled by the high-speed needle. Again, using our water hose example,<br />
when the spray nozzle at the end of our garden hose is fully open, then the<br />
main water valve can be used to adjust how fast the water flows.<br />
• Slightly lean fuel mixtures deliver stronger, more efficient<br />
combustion and more power, but with less lubrication.<br />
• Slightly rich fuel mixtures deliver cooler running and more<br />
lubrication but with slightly less power.<br />
Tuning the engine means finding the perfect balance between the two;<br />
excellent power to meet your needs while maintaining good lubrication<br />
for long engine life. The optimal fuel mixture setting is rich to provide<br />
a safety margin against having a lean condition if some variable changes<br />
(such as the temperature from one day to the next).<br />
16 • T-MAXX 3.3 OWNERS MANUAL<br />
Richen<br />
The engine’s performance is directly linked to the fuel mixture.<br />
Richening the fuel mixture increases the amount of fuel in the<br />
air/fuel mixture ratio and leaning the fuel mixture decreases the<br />
amount of fuel in the air/fuel mixture ratio.<br />
Lean<br />
Rich<br />
Higher nitro requires a richer fuel mixture. When running 33% fuel,<br />
richen your high speed needle 3/4 turn if previously running 20%<br />
nitro and then re-tune the engine for maximum performance.<br />
A “turn” refers to tightening<br />
(“turning in”) or loosening<br />
(“turning out”) mixture needles.<br />
A “full turn” refers to turning<br />
the needle 360°, so a “1/2 turn”<br />
would be 180°, a “1/4 turn”<br />
would be 90°, and so on.<br />
3/4 Turn<br />
270°<br />
General fuel mixture settings are measured by the number of turns the<br />
needles are turned out from fully closed. The fuel mixture settings have<br />
been pre-set from the factory to typical break-in settings. Do not readjust<br />
your carburetor from the factory settings until after the engine is started<br />
and running, and you have been able to observe the engine running to<br />
assess what minor adjustments may be required to compensate for fuel,<br />
temperature, and altitude. Adjustments are usually made in 1/8 or 1/16turn<br />
increments. If the engine sticks at TDC, see page 29 for instructions<br />
on freeing the engine.<br />
The Idle Speed Screw<br />
The idle speed screw controls the closed position of the throttle slide.<br />
When the throttle servo is in its neutral position, the throttle slide should<br />
be stopped against the idle adjustment screw. Always use the idle speed<br />
adjusting screw to control engine idle. Do not use the throttle trim on the<br />
transmitter to adjust idle speed. The idle speed should be set as low as<br />
possible and still maintain reliable running.<br />
See Tuning Your TRX 3.3 Racing Engine on page 20 for complete<br />
information on adjusting the air/fuel mixture and idle speed.<br />
Factory Needle Settings<br />
If your factory preset carburetor adjustments have been tampered with,<br />
use the following settings:<br />
• Set the high-speed needle to 4 turns out<br />
from closed.<br />
• Set the low-speed needle so the screw head<br />
(red in Fig. A) is flush (even) with the end of<br />
the slide (yellow in Fig. A).<br />
Fig. A<br />
Low Speed<br />
Needle Adjustment<br />
Always use the factory settings for initial starting. Only use these settings<br />
when the factory settings have been lost.<br />
Start<br />
Full Turn<br />
360°<br />
1/2 Turn<br />
180°<br />
1/8 Turn<br />
45°<br />
1/4 Turn<br />
90°
The <strong>Traxxas</strong> EZ-Start brings the convenience of push-button electric<br />
engine starting to your T-Maxx. The EZ-Start consists of a hand-held<br />
control unit and an on-board motorized starter.<br />
• Power for the EZ-Start system comes from a 7.2-volt rechargeable<br />
battery pack installed in the hand-held control unit (included).<br />
• The engine glow plug is heated automatically by the EZ-Start system,<br />
eliminating the need to keep up with a separate glow plug igniter.<br />
• The voltage to the glow plug is kept constant, regardless of the load<br />
placed on the starter by the starter motor.<br />
• The “Glow Plug” LED (light emitting diode) on the control unit indicates<br />
the condition of the glow plug.<br />
• The “Motor” LED indicates the status of the EZ-Start electric<br />
starter motor.<br />
• The cush drive mechanism in the drive unit prevents damage to the<br />
gears caused by engine kickback.<br />
• Smart Start protection circuitry prevents damage to the motor by cutting<br />
power if the load on the motor or other electronics exceeds safe limits.<br />
Charging the EZ-Start Battery<br />
The included charger can be used to charge the<br />
included battery pack. Do not leave the battery<br />
unattended while charging.<br />
1. Plug the charger into the wall. The LED on the charger should<br />
glow green.<br />
2. Connect the included EZ-Start battery pack to the charger output cord.<br />
The LED will glow red indicating the battery is charging.<br />
3. The battery should charge for approximately 4 ½ hours. The LED will<br />
turn green when the battery is fully charged.<br />
Installing the EZ-Start Battery<br />
1. Press the tab in the end of the battery compartment door to open (A).<br />
2. Plug a fully charged 7.2-volt battery<br />
pack into the connector inside (B).<br />
3. Twist the battery two or three times to<br />
twirl the battery plug wires. This<br />
helps hold the wire and battery in<br />
place when the battery is installed<br />
in the compartment (C).<br />
B<br />
A<br />
4. Install the battery into the<br />
compartment and press the wires<br />
securely into place.<br />
5. Snap the battery compartment door<br />
back on and lock the end tab (D).<br />
D<br />
C<br />
THE TRX 3.3 RACING ENGINE<br />
THE TRAXXAS Ez-START<br />
Using the EZ-Start<br />
Your EZ-Start controller plugs into a 4-prong receptacle in the center of the<br />
bed on your T-Maxx 3.3. When the red button on the controller is pressed,<br />
the EZ-Start motor begins to spin the engine and power from the control unit<br />
heats the glow plug. Assuming all settings and preparations are correct, the<br />
engine should start almost immediately.<br />
Each of the two status indicator LEDs on the hand-held<br />
control unit, the Motor LED and the Glow Plug LED,<br />
should light green while starting. If either LED fails to light<br />
while starting, there is a fault indicated with that function.<br />
If the Glow Plug LED fails to light, the glow plug may<br />
be bad, or the glow plug wire may be damaged or<br />
disconnected.<br />
If the Motor LED fails to light and the starter fails to<br />
operate, then the EZ-Start is in protection mode.<br />
® ELECTRIC STARTING SYSTEM<br />
1<br />
2 3<br />
Using Other Chargers<br />
Another convenient option for charging the included battery is an<br />
AC peak-detecting charger that plugs directly into an AC wall outlet,<br />
such as the TRX Power Charger, Part #3030X. It contains special peakdetection<br />
circuitry that automatically shuts the charger off when the<br />
battery is fully charged.<br />
Motor<br />
Glow<br />
Plug<br />
Motor<br />
Glow<br />
Plug<br />
Motor<br />
Glow<br />
Plug<br />
It’s normal for your EZ-Start controller to<br />
become warm after repeated use.<br />
Motor<br />
Glow<br />
Plug<br />
Motor<br />
Glow<br />
Plug<br />
Motor<br />
Glow<br />
Plug<br />
Protection Mode<br />
The EZ-Start uses Smart Start technology to monitor the condition of the<br />
system and detect failures. The controller monitors the load being placed<br />
on the EZ-Start motor. If the load becomes excessive, the system shuts<br />
off power to the motor to prevent costly damage to the motor and the<br />
controller. This may occur, for example, if the engine floods with fuel during<br />
starting. The starter spins at first but when excessive fuel in the combustion<br />
chamber begins to lock up the engine, the starter motor slows under the<br />
heavier load. This causes the protection circuit to shut off the power to the<br />
motor. Allow at least 3 minutes for the starter motor to cool and the circuit<br />
to automatically reset before continuing. Use the time to find and eliminate<br />
the condition that caused the excessive load on the starter motor.<br />
When the EZ-Start controller is in protection mode, wait at least<br />
three minutes before attempting to start the engine, to give the<br />
starter motor time to cool.<br />
Use a Strong Starter Battery<br />
A weak starter battery, or one that has not been fully charged, may not<br />
deliver enough power to crank the engine over at the appropriate rpm to<br />
keep the piston from sticking at top dead center (TDC). A new engine will<br />
typically have a tight fit between the piston and the top of the sleeve. This<br />
is a tapered fit, and a tight piston sleeve fit on initial startup is desirable<br />
for those who want the best-performing engine. Make sure you are using<br />
a good quality battery pack that is fully charged (new batteries usually<br />
require several charge cycles to reach peak voltage and full capacity). This<br />
is especially important with a new engine that needs to be broken in. If the<br />
engine sticks at TDC, see page 29 for instructions on freeing the engine.<br />
Shutting Off The Engine<br />
Turning off the switch for the radio will not shut off<br />
the engine. To shut off the engine, use the shut-off<br />
clamp on the fuel line. Squeeze the clamp closed to<br />
shut off the fuel supply to the engine. Don’t forget to<br />
release it when you restart the engine.<br />
Avoid shutting off the engine by placing your finger over the exhaust<br />
outlet, especially if you are through driving for the day. This will leave<br />
more unburned fuel in the engine that could lead to harmful corrosion.<br />
Always be careful not to touch the exhaust pipe after running, it can<br />
become very hot.<br />
Caution: Never use a 15-minute timed charger to recharge your<br />
model’s battery packs. Overcharging may result, causing damage to<br />
the battery packs.<br />
T-MAXX 3.3 OWNERS MANUAL • 17
THE TRX 3.3 RACING ENGINE<br />
BREAKING IN YOUR TRX 3.3 RACING ENGINE<br />
The TRX 3.3 Racing Engine uses a ringless, aluminumbrass-chrome<br />
(ABC) piston/sleeve construction. This<br />
type of engine design relies on a very precise running fit between the<br />
piston and sleeve for cylinder sealing. Engine break-in is necessary to<br />
allow the piston and sleeve to develop an extremely precise fit and<br />
optimum cylinder sealing. Therefore, proper engine break-in is critical to<br />
achieving the fastest, most reliable engine performance.<br />
Allow yourself about 1 to 11 / 2 hours to complete the break-in procedure. The<br />
engine break-in period will take 5 tanks of fuel in a T-Maxx 3.3. The break-in<br />
time is not the time to impress your friends with your new T-Maxx 3.3. You<br />
must wait until the engine is fully broken in before attempting sustained<br />
high speed running. Patience and careful attention during break-in will<br />
reward you with the best-performing TRX 3.3 Racing Engine possible.<br />
During break-in, your engine may appear to malfunction with symptoms<br />
like stalling, inconsistent performance, and fouled glow plugs. These are<br />
simply the normal “break-in pains” engines sometimes go through. They<br />
will disappear once your engine is fully broken in. Many owners report<br />
not experiencing any of these symptoms with TRX Racing Engines. We<br />
recommend to go ahead and replace the glow plug with a new one<br />
(included) after the engine break in procedure.<br />
Engine Break-in Procedure<br />
The focus during break-in is to vary and limit the engine speed. This will<br />
be accomplished by accelerating and stopping at different rates for the first<br />
5 tanks of fuel. As the engine begins to break-in, the duration and intensity<br />
of the acceleration will gradually increase. Sustained high-speed running<br />
is not permitted until the 6th tank of fuel. Perform the initial break-in on a<br />
large, flat, paved surface. T-Maxx 3.3 is very fast and by tanks 4 and 5 you<br />
will need plenty of room for the truck to run in. Apply all throttle and<br />
braking actions gently. Abrupt acceleration or braking could cause the<br />
engine to stall unnecessarily.<br />
• Special break-in fuels are not recommended. Use the same fuel you plan<br />
to use everyday.<br />
• If possible, avoid breaking-in the engine on extremely hot or cold days<br />
(see page 19).<br />
• Pay careful attention to the fuel level. Do not allow the fuel tank to run<br />
completely empty. An extremely low fuel level causes the mixture to<br />
run too lean. This could result in a burned glow plug or extremely high<br />
engine temperatures.<br />
• Do not attempt to break in the TRX 3.3 Racing Engine by idling it on a<br />
stand. This will produce poor results.<br />
• Keep extra <strong>Traxxas</strong> glow plugs handy. The break-in process can cause<br />
deposits to form on the plug leading to plug failure.<br />
• Change or clean your air filter after break-in.<br />
• Follow the instructions exactly for each of the first 5 tanks of fuel.<br />
• Never run your T-Maxx 3.3 indoors. Since the TRX 3.3 Racing Engine<br />
exhaust fumes are harmful, always run your model outdoors, in a wellventilated<br />
area.<br />
See Important Points to Remember on page 3 for other precautions.<br />
Starting Your TRX 3.3 Racing Engine for the First Time<br />
Before you start your TRX 3.3 Racing Engine for the first time, make sure<br />
you have read all instructions and precautions in this manual. Pay close<br />
attention to the tank-by-tank break-in instructions in the next section,<br />
and make sure you have read and understood them before you run<br />
your engine.<br />
Your TRX 3.3 Racing Engine doesn’t usually require priming. If you<br />
do need to prime your engine, watch the fuel line carefully to avoid<br />
flooding your engine. See page 29 for information on clearing a<br />
flooded engine<br />
18 • T-MAXX 3.3 OWNERS MANUAL<br />
Your engine must be at room temperature (70°F or 21° C) or above the<br />
first time you start it. If it’s cooler than room temperature outside, remove<br />
all fuel and keep your T-Maxx 3.3 indoors until you’re ready to start it and<br />
then take it outside. If it’s colder than 45 degrees, special considerations<br />
should be made. See cold weather break-in on page 19. We do not<br />
recommend running the model in temperatures below 35 degrees.<br />
1. Turn on the radio system (see page 9).<br />
2. Make sure the throttle trigger on the<br />
transmitter is in the idle (neutral) position.<br />
3. Connect the EZ-Start controller according to<br />
the instructions on page 17.<br />
4. Press the starter button in short two second<br />
bursts and watch for fuel moving through the<br />
fuel line up to the carburetor. Watch closely!<br />
The fuel moves very fast. If the fuel doesn’t<br />
move through the line within 5 seconds, prime the engine by briefly<br />
(one or two seconds) covering the exhaust outlet with your finger until<br />
the fuel is just visible in the carburetor fuel line. Watch carefully! If the<br />
engine is primed too long, it will flood with fuel and stop turning.<br />
5. Once fuel reaches the carburetor, the engine should<br />
quickly start and idle.<br />
6. Disconnect the EZ-Start controller from the model.<br />
7. Proceed with the engine break-in.<br />
8. Do not rev your engine with no load (wheels off the ground).<br />
If your engine doesn’t start, refer to the troubleshooting tips beginning<br />
on page 28 or go online to www.traxxas.com/support. If your factory<br />
fuel mixture settings have been altered, refer to page 16. If you still<br />
have problems, contact <strong>Traxxas</strong> Customer Support at 1-888-TRAXXAS or<br />
support@traxxas.com.<br />
As you gain experience in the hobby, you may discover that many<br />
people have differing opinions on what is the proper procedure to<br />
break-in a model engine. Only use the <strong>Traxxas</strong> break-in procedure.<br />
Other break-in procedures could result in a weak, damaged, or<br />
otherwise poor performing engine. The procedure outlined here was<br />
extensively tested and proven to yield better performing engines<br />
than other “common” break-in methods. Even if you have years of<br />
experience using model engines, please do not ignore this caution!<br />
Break-in Checklist<br />
Note: The wheelie bar is installed in the “down” position to help keep the<br />
front of the T-Maxx 3.3 down during acceleration. Apply throttle gradually to<br />
prevent wheelies during break-in. See page 26 for wheelie bar adjustment.<br />
Tank 1<br />
1. Drive the model with the body off.<br />
2. Driving procedure: Gently pull the throttle trigger to 1/4 throttle<br />
over a 2-second count. Then gently apply the brake to stop. Count<br />
the two seconds out while accelerating: one thousand one, one<br />
thousand two, and then stop. Operate the throttle trigger as smoothly<br />
as you can. Repeat this starting and stopping procedure until the<br />
first tank of fuel is nearly empty.<br />
3. Look for thick blue smoke exiting the exhaust outlet. If there is<br />
no smoke, richen the high-speed needle 1/4 turn, by turning the<br />
needle counterclockwise.<br />
4. When the fuel tank is nearly empty, shut off the engine by pinching<br />
the fuel line connected to the carburetor (use the installed clamp).<br />
5. Let the engine cool for 15 minutes.<br />
Note: If at any point the engine cuts out or stalls during gentle<br />
acceleration, richen the high-speed needle 1/4 turn by turning the<br />
needle counterclockwise.
TANK THROTTLE TIME COOL BODY NOTES<br />
1 1/4 2 seconds 15 minutes Off Apply throttle gradually.<br />
2 1/2 2 seconds 15 minutes On Apply throttle gradually.<br />
3 1/2 3 seconds - On Reduce idle speed if necessary.<br />
Tank 2<br />
1. From tank 2 forward, T-Maxx 3.3 should be driven with the body on.<br />
2. Driving procedure: Gently pull the throttle trigger to 1/2 throttle<br />
over a 2-second count. Then gently apply the brake to stop. Count<br />
the two seconds out while accelerating: one thousand one, one<br />
thousand two, and then stop. Repeat this starting and stopping<br />
procedure until the second tank of fuel is nearly empty.<br />
3. When the fuel tank is nearly empty, shut off the engine and let it cool<br />
for 15 minutes.<br />
Tank 3<br />
1. Driving procedure: Gently pull the throttle trigger to 1/2 throttle<br />
over a 3-second count. Then gently apply the brake to stop. Count<br />
the three seconds out while accelerating: one thousand one, one<br />
thousand two, one thousand three, and then stop. Repeat this<br />
starting and stopping procedure until the third tank of fuel is nearly<br />
empty.<br />
2. As the engine loosens, the idle speed may increase and cause<br />
the model to try to creep forward when stopped. Reduce the<br />
idle speed by turning the idle adjustment (see page 13) on the<br />
carburetor counterclockwise.<br />
3. When the fuel tank is nearly empty, shut off the engine and refuel.<br />
From here on, you do not need to let the engine cool between tanks.<br />
Tank 4<br />
1. Driving procedure: Gently pull the throttle trigger to full throttle<br />
over a 3-second count. Then gently apply the brake to stop. Count<br />
the three seconds out while accelerating: one thousand one, one<br />
thousand two, one thousand three, and then stop. Repeat this<br />
starting and stopping procedure until the fourth tank of fuel is<br />
nearly empty.<br />
2. Apply the throttle gradually! Your finger should not reach full throttle<br />
until the end of the three-second count. T-Maxx 3.3 may try to shift<br />
into second gear. If it does, reduce the throttle input. Do not let<br />
T-Maxx 3.3 shift out of first gear.<br />
3. Keep your driving smooth and consistent.<br />
4. When the fuel tank is nearly empty, shut off the engine and refuel.<br />
Tank 5<br />
1. Driving procedure: Gently pull the throttle trigger to full throttle<br />
over a 3-second count, hold for 2 more seconds, and then<br />
gently apply the brake to stop. Count the five seconds out while<br />
accelerating. Repeat this starting and stopping procedure until the<br />
fifth tank of fuel is nearly empty.<br />
2. The model should now be shifting into second gear. If it is not, try<br />
turning the high-speed needle clockwise 1/8 turn to lean the fuel<br />
mixture slightly and test for shifting.<br />
3. When the fuel tank is nearly empty, shut off the engine and refuel.<br />
Tank 6<br />
STOP! Clean your air filter before you proceed. Refer to the instructions<br />
on page 15. During the sixth tank of fuel, the engine can be tuned<br />
for general performance use. Proceed to the next section in this manual<br />
(page 20).<br />
THE TRX 3.3 RACING ENGINE<br />
4 Full 3 seconds - On Do not allow shifting to high gear.<br />
5 Full 5 seconds - On Accelerate over 3 second count, hold for 2 seconds.<br />
High Altitude Operation: If you live in a high altitude region (5000<br />
or more feet above sea level), the lower air density may require<br />
you to lean your high-speed fuel mixture slightly from the factory<br />
break in settings. Try this if you are experiencing difficult starting<br />
or extremely sluggish engine performance at high altitude.<br />
Winter Break-in Tips<br />
During the break-in process, the piston<br />
and sleeve wear into each other to form a<br />
precise fit. The engine needs to heat up to a<br />
temperature around 200 to 215 degrees to<br />
allow the piston and sleeve to achieve this<br />
fit properly. A precise fit between these two<br />
components is critical for proper compression,<br />
and optimum performance. If the engine runs<br />
too cold during break-in, the piston and sleeve will not expand to their<br />
appropriate sizes for break-in, and this can lead to premature wear of<br />
these components. This wear may not become apparent until after winter<br />
has past, and the engine is operated under warmer running conditions.<br />
• Warm the engine to approximately room temperature by removing<br />
all fuel and storing the vehicle inside at room temperature until just<br />
before starting the engine. An extremely cold engine can become<br />
difficult to start.<br />
• After the engine is running, it is important to keep the temperature of<br />
the engine up around 200 to 215 degrees during break-in. In weather<br />
below 45 degrees, the TRX 3.3 Racing Engine will tend to run at lower<br />
temperatures between 160 to 180 degrees (when tuned at proper<br />
break-in mixture settings). This is too cool for break-in. Do not lean the<br />
fuel mixture to increase engine temperature! This will also decrease<br />
lubrication and cause your piston/sleeve to wear prematurely.<br />
• Wrap the cooling head with a paper towel, clean rag or sock to help<br />
keep the engine running around the recommended 200 to 215 breakin<br />
temp. If too much heat is contained, the engine can actually run too<br />
hot. Make sure that you monitor the engine’s temp closely for the first<br />
couple of tanks until you get the right amount of cover for the cooling<br />
head. This will, of course, depend on your current weather conditions.<br />
Adjusting the cover up and down, exposing more or fewer cooling fins,<br />
is a convenient way to regulate engine temps.<br />
• For owners that do not have access to a temperature probe, a drop of<br />
water on the cooling head (around the glow plug area) should slowly<br />
sizzle for approximately 6 to 8 seconds around 200 to 210 degrees. If the<br />
water sizzles for only a few seconds, then it is likely that it is over 220<br />
degrees, and needs to cool down. If the water takes a long time or does<br />
not evaporate at all, then the engine is too cool.<br />
• We do not recommend that you operate your engine below 35 degrees<br />
Fahrenheit. If you insist on running your vehicle below 35 degrees,<br />
be aware that nitro engines may be very difficult to start and tune at<br />
extremely cold temperatures. Also, at temperatures below freezing, nitro<br />
fuel can actually begin to gel up, and this can be harmful to the engine.<br />
Follow the remaining break-in procedures as outlined in this Owners<br />
<strong>Manual</strong>. This, along with the steps listed above, will ensure a good breakin<br />
for your new nitro engine, and provide many hours of enjoyment.<br />
T-MAXX 3.3 OWNERS MANUAL • 19
THE TRX 3.3 RACING ENGINE<br />
TUNING YOUR TRX 3.3 RACING ENGINE<br />
The engine’s performance depends on the fuel mixture.<br />
Turn the mixture needles clockwise to lean the fuel<br />
mixture and counterclockwise to richen it. Leaning the fuel mixture will<br />
increase engine power up to the engine’s mechanical limits. Never run<br />
the engine too lean (not enough fuel flow). Never lean the engine<br />
until it begins to cut-out or stall. Leaning the engine beyond the safe<br />
allowable limits will result in poor performance and almost certain<br />
engine damage. Indications of an overly lean mixture include:<br />
• Cutting out or sudden loss of power during acceleration.<br />
• Overheating (temperature beyond 270° F at the glow plug).<br />
• Little or no blue smoke coming from the exhaust.<br />
If any of these conditions are present, stop immediately and richen the<br />
high speed mixture 1/4 turn. The engine will probably be slightly rich at<br />
that setting and you can then retune for performance. Always tune for<br />
performance by starting rich and moving leaner toward the ideal setting.<br />
Never try to tune from the lean side. There should always be a light<br />
stream of blue smoke coming from the exhaust.<br />
Before you begin tuning, the engine should be warmed up to its normal<br />
operating temperature and running slightly rich. All final tuning adjustments<br />
must be made to the engine at its normal operating temperature. You can<br />
tell the engine is running rich by noting any of the following:<br />
• Sluggish acceleration with blue smoke coming from the exhaust.<br />
• T-Maxx 3.3 may not shift into second gear.<br />
• There is unburned fuel spraying from the exhaust tip.<br />
• Leaning the high-speed fuel mixture increases performance.<br />
When tuning for performance, watch closely to notice when there<br />
is no longer any increase in speed or power when the high-speed<br />
mixture is lean. If you lean the high-speed mixture to the point that<br />
the engine cuts-out, hesitates, or stalls, you are well into the danger<br />
zone and engine damage is likely. Richen the high-speed needle 1/4<br />
turn and retune.<br />
High-Speed Fuel Mixture Adjustment<br />
With the engine warm and running at a rich setting, gradually lean<br />
the high-speed fuel mixture in 1/16 turn increments. Make several<br />
high-speed passes after each adjustment to clear out the engine and<br />
note any change in performance. The TRX 3.3 is extremely powerful.<br />
Remember to apply the throttle gradually to prevent wheelies or loss of<br />
control. Continue this procedure until there is no longer any performance<br />
improvement. If any one of the following conditions occurs, the fuel<br />
mixture is already past the maximum safe lean setting:<br />
1. There is no longer any performance improvement.<br />
2. The engine begins to cut out at high speed (Danger!).<br />
3. There is a sudden loss of power during acceleration (Danger!).<br />
4. The engine begins to overheat. Symptoms of overheating include:<br />
• Steam or smoke coming from the engine (not exhaust).<br />
• Hesitation or stalling during acceleration.<br />
• Popping or clattering sound when decelerating (detonation).<br />
• Fluctuating idle speed.<br />
• Temperature measurement above 270° F at the glow plug<br />
(A temperature reading above 270° alone does not necessarily<br />
indicate overheating. Look for other symptoms of overheating<br />
combined with temperature for a more accurate warning).<br />
Richen the fuel mixture to the optimum setting by richening the highspeed<br />
needle at least 1/8 turn counterclockwise and retest. This setting<br />
will extend engine component life.<br />
20 • T-MAXX 3.3 OWNERS MANUAL<br />
For your convenience, the low-speed needle has a positive stop<br />
that prevents it from being over tightened and damaging the<br />
needle and seat. This also provides an easy way to gauge how many<br />
turns out from closed the low-speed needle adjustment is set to.<br />
Low-Speed Fuel Mixture Adjustment<br />
The low-speed mixture is always set after the high-speed needle is<br />
correctly adjusted. The low-speed mixture is set using the “pinch test”.<br />
1. Once the engine is warm, do several high-speed runs to confirm<br />
that the high-speed needle is set correctly.<br />
2. Bring the vehicle in and pinch closed the fuel line going into the<br />
carburetor (use the engine shut-off clamp). The engine should run for<br />
2-3 seconds, speed up, and then shut off.<br />
3. If the engine runs longer than 3 seconds, then lean the low-speed<br />
needle 1/16 turn, make several more high-speed runs, and retest.<br />
4. If the engine shuts off immediately without speeding up, then richen<br />
the low-speed needle 1/8 turn, make several more high-speed runs,<br />
and retest.<br />
When the low-speed needle is set correctly, the engine’s throttle<br />
response should be very quick, even to the point of making it difficult to<br />
keep T-Maxx 3.3 from doing a wheelie when you accelerate!<br />
When adjusting the low speed fuel mixture, it is very important to<br />
make several high-speed runs with T-Maxx 3.3 between adjustments<br />
to clear out any excess fuel. Perform the pinch test immediately<br />
after. If the engine is allowed to idle for a long period of time, it could<br />
“load up” with fuel and give you an inaccurate measurement from<br />
your pinch test.
Idle Speed Adjustment<br />
Once the high and low-speed mixtures have been set, reduce the idle<br />
speed to the minimum reliable idle speed. Remember, this adjustment<br />
should be made while the engine is running at normal operating<br />
temperature.<br />
1. Turn the throttle trim on the transmitter so the brakes are<br />
applied (note its original position). This ensures that the throttle<br />
slide is resting against the idle adjustment screw.<br />
2. Turn the screw counterclockwise to reduce the idle speed, or<br />
clockwise to increase it. The idle speed should be set as low as<br />
possible while still maintaining reliable running characteristics.<br />
3. Reset the throttle trim on the transmitter to its original position.<br />
Fuel Mixture Adjustment Chart<br />
If the... is..<br />
Humidity Lower<br />
Pressure<br />
(barometer)<br />
Temperature<br />
Altitude<br />
Nitro %<br />
Higher<br />
then the air<br />
density is...<br />
Slightly<br />
more dense<br />
Slightly<br />
less dense<br />
Lower Less dense Leaner<br />
Higher More dense Richer<br />
Lower More dense Richer<br />
Higher Less dense Leaner<br />
Lower More dense Richer<br />
Higher Less dense Leaner<br />
Lower - Leaner<br />
Higher - Richer<br />
adjust (correct) the<br />
fuel mixture to be...<br />
Slightly richer<br />
Slightly leaner<br />
Higher nitro requires a richer fuel mixture. When running 33% fuel,<br />
richen your high speed needle 3/4 turn if previously running 20%<br />
nitro and then re-tune the engine for maximum performance. See<br />
page 14 for more information<br />
Fine-Tuning the Carburetor<br />
After fine-tuning your TRX 3.3 Racing Engine at the end of the break-in<br />
procedure, no major adjustments to the fuel mixture are usually necessary.<br />
Make note of the temperature, humidity, and barometric pressure at the<br />
time you finished fine tuning your carburetor. Current weather conditions<br />
can be found online from national websites, local TV news websites, and<br />
television. This information will be considered your baseline setting.<br />
You may need to adjust your carburetor needles to compensate for<br />
changes in temperature and barometric pressure (air density) from day to<br />
day. Generally, you’ll need to richen the fuel mixture when the weather is<br />
colder than your baseline temperature and the air density is higher. Lean<br />
the fuel mixture when weather is warmer than your baseline temperature<br />
and the air density is lower. The chart below provides general guidelines<br />
on how weather conditions affect air density when they move higher or<br />
lower than your baseline setting (see page 15 for detailed info on how air<br />
density affects mixture settings).<br />
THE TRX 3.3 RACING ENGINE<br />
Tuning the Engine by Temperature<br />
The following procedures require an optional<br />
infrared temperature probe or on-board<br />
temperature gauge (<strong>Traxxas</strong> on-board digital<br />
temperature gauge, part #4091). Engine<br />
temperature can be used as an effective<br />
tuning aid when you understand the<br />
relationship between engine temperature<br />
and ambient temperature. The engine operating temperature, when<br />
tuned for maximum performance, will vary according to atmospheric<br />
conditions, engine load, gauge accuracy, and many other factors. The<br />
atmospheric condition that has the most influence on engine temperature<br />
is air temperature. Expect the engine temperature to vary almost in<br />
direct proportion to air temperature. Assuming you tuned the engine<br />
for the same maximum performance each day, the engine will run about<br />
twenty degrees hotter when it’s ninety degrees outside than it would in<br />
seventy-degree weather. For this reason, we cannot give you a definitive<br />
temperature range that indicates the best possible engine tuning.<br />
There is NO optimal temperature that can be used as a target to<br />
deliver the best engine tuning. Do not rely on a temp gauge alone<br />
to tune your engine. Tune the engine by paying very close attention<br />
to how it responds to changes in fuel mixture (more smoke/less<br />
smoke, fast/sluggish, reliable/stalling, smooth sound/ muffled<br />
sound, etc). Once the engine is tuned, then observe the temperature.<br />
The temperature gauge can aid you in tuning by giving you a relative<br />
indication of how your adjustments are affecting the engine and to help<br />
prevent you from reaching excessive engine temperatures. For example,<br />
as you lean the fuel mixture, the engine performance will increase along<br />
with the temperature. If you continue to lean the fuel mixture and the<br />
temperature increases but the engine performance does not change,<br />
then you have exceeded the maximum safe lean setting. Make note of the<br />
engine temperature. Generally, try to keep your engine from exceeding<br />
270°F when measured at the glow plug. If necessary, increase airflow<br />
to the engine by cutting out the rear of the body, windshield, and front<br />
valance. In some situations, the engine may perform very well with no<br />
stalling, lagging, or hesitation at temperatures above 270°F, particularly in<br />
very hot climates. If richening the fuel mixture to bring the temperature<br />
down to 270°F results in poor, sluggish performance (engine never cleans<br />
out) then return the engine back to a satisfactory state of tune based on<br />
how it sounds and performs (always with a visible stream of blue smoke<br />
coming from the exhaust) . If engine temperature is exceeding 270°F with<br />
proper cooling and no signs of abnormal running, then avoid running<br />
the engine at its maximum lean setting. Watch closely for any signs of<br />
overheating. Richen the fuel mixture slightly to provide a safety margin of<br />
additional cooling lubrication. Symptoms of overheating include:<br />
• Steam or smoke coming from the engine (not exhaust).<br />
• Hesitation or stalling during acceleration.<br />
• Popping or clattering sound when decelerating (detonation).<br />
• Fluctuating idle speed.<br />
T-MAXX 3.3 OWNERS MANUAL • 21
DRIVING YOUR T-MAXX 3.3<br />
Your TRX 3.3 Racing Engine is broken in, the fuel mixture<br />
is balanced, and the idle is set…now it’s time to have<br />
some fun! This section contains instructions on making adjustments to<br />
your T-Maxx 3.3. Before you go on, here are some important precautions<br />
to keep in mind.<br />
• Don’t run your T-Maxx 3.3 in water, mud, snow, or wet grass. It’s<br />
tempting, but water and mud are easily drawn through the air filter<br />
and will severely damage the engine. Small amounts of moisture can<br />
cause electronics to fail and loss of control over your T-Maxx 3.3. Snow<br />
is frozen water. Do not drive the T-Maxx 3.3 in snow or the electronics<br />
could be damaged by water.<br />
• The TRX 3.3 Racing Engine is extremely powerful. Remember to apply<br />
the throttle gradually to prevent loss of control. T-Maxx 3.3 is very fast<br />
and responsive and is intended for experienced drivers. Do not drive<br />
over the limits of your reflexes and ability. Drive with caution at all times<br />
and gradually build up your ability to maintain control at<br />
T-Maxx 3.3’s upper performance limits.<br />
• Don’t hold T-Maxx 3.3 off the ground and rev the engine excessively<br />
with no load on the engine. This practice could result in internal engine<br />
damage. Avoid over revving the engine when T-Maxx 3.3 is airborne<br />
after a jump.<br />
• Avoid excessive high-speed running for extended periods of time or<br />
over long distances. This could cause the engine to build up enough<br />
speed to exceed maximum safe rpm limits.<br />
• Don’t drive your T-Maxx 3.3 with drive train damage of any kind. The<br />
engine could be damaged due to overloads caused by drivetrain<br />
friction, or over-revving caused by loose or missing parts.<br />
• If your T-Maxx 3.3 gets stuck, stop driving immediately. Move the<br />
vehicle and then continue driving.<br />
22 • T-MAXX 3.3 OWNERS MANUAL<br />
• Don’t tow anything with your T-Maxx 3.3. The engine is cooled by<br />
airflow created by speed. Towing creates a high load on the engine, and<br />
at the same time limits cooling of the engine due to low vehicle speed.<br />
• Never turn off the radio system while the engine is running. The truck<br />
could run out of control.<br />
Driving Tips<br />
• Monster trucks by design have a high center of gravity that requires<br />
a different driving technique. To prevent roll overs, slow down as you<br />
approach turns and then apply moderate throttle through the turns.<br />
This technique will help T-Maxx 3.3 grab the surface and turn sharper.<br />
The center of gravity can be lowered by lowering the ride height.<br />
Remove the factory installed spring pre-load spacers to reduce the<br />
ride height.<br />
• Do not apply brakes and turn the wheel at the same time. You could tip<br />
the truck over.<br />
• When jumping, apply some throttle while T-Maxx 3.3 is in the air to keep<br />
the truck’s nose up and land level on all 4 wheels. Be careful not to overrev<br />
the engine or land at full throttle. Either could seriously damage<br />
your T-Maxx 3.3. If the nose of the truck is too high, then quickly tap the<br />
brake to level the truck in the air.<br />
• Drive over large obstacles (such as curbs and rocks) at an angle, instead<br />
of head on. This will allow the suspension to articulate and absorb the<br />
impact much easier.<br />
• Change or clean the pre-filter element in your air filter after each hour of<br />
running. Change or clean the primary filter element every 3 - 4 hours of<br />
running. This is critical for the life of your engine. Running time includes<br />
the engine break-in period.
TUNING ADJUSTMENTS<br />
SUSPENSION TUNING<br />
Shock Mounting Positions<br />
Big bumps and rough terrain<br />
require a softer suspension with<br />
the maximum possible suspension<br />
travel and ride height. Racing on<br />
a prepared track or on-road use<br />
requires a lower ride height and<br />
firmer, more progressive suspension<br />
settings. The more progressive<br />
suspension settings help reduce<br />
body roll (increased roll stiffness),<br />
dive during braking, and squat<br />
during acceleration.<br />
Upper shock mounting position (A) should generally be used with lower<br />
shock mounting positions 1 and 2. Upper shock mounting position (B)<br />
should be generally be used with lower shock mounting positions 3 and 4.<br />
The innermost upper shock mounting position (0) can be used for tuning<br />
with the inner pair of lower shock mounting positions on the arm (1,2).<br />
It is not compatible with lower shock mounting positions 3 and 4. Other<br />
combinations may be used to achieve individualized suspension settings.<br />
Upper Shock Mounting Positions<br />
The upper shock mounting positions will have suspension effects<br />
opposite from the lower shock mounting positions.<br />
Spring rate (at the wheel), increases as the upper shock mounting<br />
position is moved from position (A) to position (B).<br />
Ride height is not affected by changes in the upper shock mounting<br />
position.<br />
Use the chart below to see the effect of the various shock mounting<br />
positions. The horizontal length of the lines indicates the amount of<br />
suspension travel. The angle or slope of the lines indicates the spring<br />
rate (at the wheel).<br />
Lower Shock Mounting Positions<br />
In the out-of-the-box configuration, the shocks are installed in position<br />
(A) on the shock tower and position (2) on the lower suspension arm.<br />
Wheel Force (lb)<br />
2.5<br />
2<br />
1.5<br />
1<br />
0.5<br />
0<br />
Lower Mount 1, Upper Mount 0<br />
Lower Mount 2, Upper Mount 0<br />
Lower Mount 1, Upper Mount A<br />
Lower Mount 2, Upper Mount A<br />
Lower Mount 3, Upper Mount A<br />
Lower Mount 4, Upper Mount A<br />
Lower Mount 1, Upper Mount B<br />
Lower Mount 2, Upper Mount B<br />
Lower Mount 3, Upper Mount B<br />
Lower Mount 4, Upper Mount B<br />
This setting allows for firm suspension and low ride height, increasing<br />
the spring force (at the wheel). This setting improves high-speed<br />
cornering on smoother terrain by lowering the center of gravity. Body<br />
roll, brake dive, and squat are also reduced.<br />
The inner pair of holes on the lower suspension arm should<br />
be used to increase the ride height of the T-Maxx 3.3. The more vertical<br />
position of the shocks will allow for lower shock progression and the<br />
soft, plush feel that’s characteristic of a <strong>Traxxas</strong> Maxx Truck.<br />
Spring rate (at the wheel) increases as the lower shock mounting<br />
position is moved from position (1) to position (4). This is equivalent to<br />
using stiffer springs. Use higher spring rate settings for flatter terrain<br />
with smaller and fewer bumps, and lower spring rate settings for<br />
bigger bumps.<br />
Ride height decreases as the lower shock mounting position is moved<br />
from position (1) to position (4). Each pair of lower shock mounting<br />
holes (1,2 and 3,4) has equal ride height. Use lower ride height for highspeed<br />
cornering and flat terrain, and when racing on relatively smooth<br />
tracks. Increase the ride height for rougher terrain and tracks.<br />
Fine Tuning the Shocks<br />
The eight shocks (oil dampers) on your T-Maxx 3.3<br />
have tremendous influence on its handling. Whenever<br />
you rebuild your shocks, or make any changes to the<br />
pistons, springs or oil, always do it carefully and in<br />
sets (front or rear). Piston head selection depends on<br />
the range of oil viscosities that you have available. For<br />
example, using a two-hole piston with lightweight oil<br />
will give you the same damping as a three-hole piston<br />
with heavier oil.<br />
We recommend using two-hole pistons with a range<br />
of oil viscosities from 30W to 50W (available from your<br />
hobby shop). The thinner viscosity oils (30W or less)<br />
flow with less resistance and provide less damping,<br />
Wheel Force vs. Wheel Travel<br />
More Firm<br />
0 10 20 30 40 50<br />
60 70 80 90 100<br />
Wheel Travel (mm)<br />
For easier access to the rear-most shock mounting screw, remove<br />
the one end of the rear turnbuckle. In the front, remove the<br />
suspension pin from the lower front suspension arm to gain easier<br />
access to the lower shock mounting screws.<br />
Less Firm<br />
Lower Mount 4<br />
Lower Mount 3<br />
Lower Mount 2<br />
Lower Mount 1<br />
T-MAXX 3.3 OWNERS MANUAL • 23
TUNING ADJUSTMENTS<br />
while thicker oils provide more dampening. Use only 100% pure silicone<br />
shock oil to prolong seal life. From the factory, the T-Maxx 3.3 uses 40W oil.<br />
The ride height for the T-Maxx 3.3 can be adjusted by adding or removing the<br />
clip-on spring pre-load spacers. Note that changes in ride height will occur<br />
when changes in shock angle or spring rates are made. You can compensate<br />
for ride height changes by changing the pre-load spacers on the shocks.<br />
Adjusting the Pivot Ball Caps<br />
The pivot ball caps should be adjusted<br />
so that the pivot balls operate freely in the axle<br />
carriers with no excess play. Use the provided<br />
four-way suspension multi-tool to tighten or<br />
loosen the pivot ball cap.<br />
Caster Adjustment<br />
The T-Maxx 3.3 offers the ability to adjust the caster angle of the front<br />
suspension. Caster adjustment may be used to influence the understeer/<br />
oversteer handling characteristics of the T-Maxx 3.3. Increasing the caster<br />
angle will increase the tendency of the truck to oversteer (less traction on<br />
the rear tires, more traction on the front tires), while decreasing the caster<br />
angle will cause the truck to have a tendency to understeer (push in the<br />
turns). This effect becomes more pronounced at higher steering angles<br />
and higher spring rates. Caster is adjusted by repositioning the shims on<br />
the pivot point of the upper suspension arms.<br />
Caster adjustment shims (2 Front) Caster adjustment shims (1 Front, 1 Rear)<br />
Caster adjustment shims (2 Rear)<br />
Ground plane<br />
4<br />
Vertical<br />
Ground plane<br />
The stock caster setting is 7-degrees with one shim at each end of the<br />
arm. Reduce the caster angle to 4-degrees by removing the rear shim<br />
and inserting it next to the front shim. The caster angle can be increased<br />
to 10-degrees by removing the front shim and inserting it next to the<br />
rear shim.<br />
ALIGNMENT SETTINGS<br />
Adjusting the Toe-in<br />
Your T-Maxx 3.3 comes from the factory with<br />
zero degrees of toe-in in the front, and one<br />
degree of toe-in in the rear. You can adjust the<br />
toe-in on the front and rear of the truck. Set the<br />
steering trim on your transmitter to neutral.<br />
Next, adjust your steering turnbuckles so that<br />
both front wheels are pointing straight ahead<br />
and are parallel to each other (0 degrees toe-in).<br />
This will ensure the same amount of steering in<br />
both directions. Adjust the rear toe control links<br />
so that the rear wheels have 1˚ of toe-in.<br />
24 • T-MAXX 3.3 OWNERS MANUAL<br />
7<br />
Vertical<br />
10<br />
Ground plane<br />
Vertical<br />
Static Camber Adjustment<br />
The wheels can be set to have either positive or<br />
negative camber (see illustration below). The camber<br />
angle changes as the wheel moves up and down<br />
through its range of travel. Static camber is the<br />
camber angle at the wheel when the vehicle is set at<br />
its normal, stationary ride height.<br />
The suspension pivot balls located in the axle<br />
carriers adjust the static camber. The pivot balls are<br />
protected by blue dust plugs. To adjust your static<br />
camber, insert the supplied 2.5mm hex wrench through the slit in the dust<br />
plug and engage the end of the pivot ball (compressing the suspension<br />
until the arms are parallel to the ground will allow for easier hex wrench<br />
engagement). The upper pivot ball is normally screwed all the way in.<br />
Negative camber is achieved by screwing the pivot ball of the lower control<br />
arm out. Note: When camber is changed, the toe angle of the wheel has to<br />
be reset.<br />
Positive Camber Negative Camber<br />
Static Camber Base<br />
Factory Settings<br />
Front: 1-degree negative<br />
camber each side<br />
Rear: 1-degree negative<br />
camber each side<br />
TRANSMISSION TUNING<br />
Adjusting the Slipper Clutch<br />
Your T-Maxx 3.3 is equipped with an<br />
adjustable Torque Control slipper<br />
clutch. The slipper clutch is integrated<br />
into the main spur gear on the<br />
transmission (see page 5). The slipper<br />
clutch is adjusted using the springloaded<br />
locknut on the slipper shaft.<br />
Use the supplied 8mm open-end<br />
metric wrench. To tighten or loosen<br />
the slipper nut, insert the 2.0mm hex<br />
wrench into the hole in the end of the slipper shaft. This locks the shaft<br />
for adjustments. Turn the adjustment nut clockwise to tighten (less<br />
slippage) and counter-clockwise to loosen (more slippage). The slipper<br />
clutch has two functions:<br />
1. Limiting the engine’s torque output to the wheels to prevent<br />
wheelspin on low traction surfaces and help to prevent damage<br />
to the gears in the transmission during on-throttle landings.<br />
2. Protecting the drivetrain from sudden impact or shock loads (such as<br />
landing from a jump with the engine at full throttle).<br />
From the factory the slipper clutch is set for minimal slippage, just<br />
enough to protect the drivetrain from shock loads. On slippery, low<br />
traction surfaces such as a hard-packed, dry racetrack you may benefit<br />
from loosening the slipper adjustment nut to allow for more clutch<br />
All of the toe links are installed on the truck so that<br />
the left hand thread indicators point to the same<br />
direction. This makes it easier to remember which way to<br />
Front of Truck Front of Truck<br />
Front of Truck Front of Truck<br />
turn the wrench to increase or decrease toe link length (the Left Hand Thread Left Hand Thread<br />
Indicator Indicator<br />
direction is same at all four corners). Note that the groove<br />
in the hex indicates the side of the toe link with the left-<br />
Left Hand Thread Left Hand Thread Threads<br />
Indicator Indicator<br />
hand threads.<br />
Left Side Left Side Right Side Right Side<br />
Right Hand<br />
(Normal) Threads<br />
Left Hand<br />
Decrease<br />
Length<br />
Increase<br />
Length
slippage. This will make the truck easier and more forgiving to drive<br />
by helping to reduce the amount of wheel spin. Loosening the slipper<br />
adjustment can also improve performance on extreme high traction<br />
surfaces by preventing the front end from lifting off of the ground when<br />
accelerating. Make slipper adjustments in small 1/8 turn increments.<br />
The maximum tight setting for the slipper is just at the point where<br />
there is little or no tire slippage on a high traction surface such as<br />
concrete or a prepared racetrack. The slipper should not be tightened<br />
to the point that clutch slippage is completely eliminated. Do not<br />
overtighten the slipper nut or you could damage the slipper bearings,<br />
pressure plates, or other components.<br />
Adjusting the Two-Speed Transmission<br />
T-Maxx 3.3 comes equipped with an adjustable two-speed transmission.<br />
When the shift point on the transmission is adjusted correctly, it will<br />
maximize acceleration and improve drivability. Use a 2mm hex wrench<br />
to adjust the shift point. To make the adjustment, the engine must be off<br />
(not running).<br />
1. Remove the rubber access plug from the<br />
top of the transmission housing.<br />
2. While looking through the opening, rotate<br />
the spur gear to align the cutout (notch)<br />
on the internal 2-speed clutch drum with<br />
the opening.<br />
3. Hold the spur gear and slowly roll the<br />
truck forward until the hex on the black<br />
adjustment set screw becomes visible in<br />
the opening. Note: the truck will only roll<br />
forward (not backwards) when the spur<br />
gear is held stationary.<br />
4. Insert the 2.0mm hex wrench<br />
through the clutch drum and into<br />
the adjustment screw.<br />
5. Turn the adjustment screw 1/8 turn<br />
counter clockwise to lower the shift point<br />
(shifts sooner). Be careful not to loosen<br />
the adjustment screw too much or you<br />
may cause the screw and spring to fall out<br />
(requiring major disassembly and repair).<br />
Turn the adjustment screw clockwise for<br />
later shifts.<br />
Shift<br />
Sooner<br />
Counter-<br />
Clockwise<br />
6. Reinstall the rubber access plug to prevent dirt from entering the<br />
transmission. Do not put oil or other lubricants into the transmission<br />
through the two-speed adjustment access.<br />
7. Check performance by running a test lap after each adjustment. On a<br />
small race track with many tight turns, try setting the shift point later<br />
so that the truck only shifts into second gear on the main straightaway.<br />
This will prevent an unexpected shift in the middle of a turn. On larger<br />
tracks it may be necessary to allow earlier shifts for increased speed.<br />
Changing the Spur Gear<br />
1. Remove the four cap head screws that secure<br />
the engine to the engine mount.<br />
2. Remove the button head screw that secures the<br />
pipe hanger to the rear body mount.<br />
3. Carefully remove the engine and exhaust system<br />
from the spur gear area to allow enough room<br />
to remove the spur gear.<br />
4. Remove the three screws on the slipper clutch assembly using a 2.5mm<br />
hex wrench. Slide the spur gear off of the slipper shaft. If the spur gear<br />
TUNING ADJUSTMENTS<br />
is too tight on the shaft, gently pry on the back of the gear with a flat<br />
screw driver to loosen it.<br />
Repeat the above steps in reverse order to install the new spur gear<br />
Adjusting the Gear Ratio<br />
The gear ratio on T-Maxx 3.3 can be adjusted for different conditions<br />
that may require either increased acceleration or increased top speed.<br />
Adjusting the gear ratio is accomplished by changing the clutch bell on<br />
the engine and/or the spur gear (slipper clutch gear) on the transmission.<br />
From the factory, T-Maxx 3.3 is equipped with a 22-tooth clutch bell<br />
and a 55-tooth spur gear. This combination will provide a good balance<br />
of acceleration and top speed. Optional spur gears and clutch bell<br />
gears are listed on your parts list. Refer to the chart below for possible<br />
gearing combinations.<br />
Adjusting the Spur Gear/Clutch Bell Gear Mesh<br />
The ideal spur gear/clutch bell gear mesh<br />
for T-Maxx 3.3 is 0.1mm. To set the gear<br />
mesh, place a strip of standard letter/A4<br />
size copy or printer paper (about 0.1mm<br />
thick) between the mating teeth. Loosen the<br />
four engine mount screws from the bottom<br />
side of the chassis (see image) and slide the<br />
engine mount up to push the clutch bell gear<br />
against the spur gear so the paper is not too<br />
tight to pull out or too loose that it will fall out.<br />
Tighten the engine mount screws securely.<br />
When the paper is removed, you should feel<br />
only the slightest amount of play between the<br />
gears (almost none) and there should be no<br />
binding or friction.<br />
Adjusting the Two-Speed Ratios<br />
T-Maxx 3.3 is equipped to allow adjustment to the 2-speed by installing<br />
optional close and wide-ratio gearsets. This requires transmission removal<br />
and disassembly (see www.<strong>Traxxas</strong>.com for detailed instructions). The close<br />
ratio gearsets will reduce top speed slightly but will provide more powerful<br />
With 20T Clutch Bell # of Spur Gear Teeth<br />
2nd gear sets Gear 54 56 58<br />
17T/39T 1st 25.42 26.36 27.30<br />
(Standard) 2nd 17.63 18.28 18.94<br />
16T/40T 1st 25.42 26.36 27.30<br />
(Close) 2nd 19.21 19.92 20.63<br />
18T/38T 1st 25.42 26.36 27.30<br />
(Wide) 2nd 16.22 16.82 17.42<br />
With 22T Clutch Bell (standard) # of Spur Gear Teeth<br />
2nd gear sets Gear 54 56 58<br />
17T/39T 1st 23.11 23.96 24.82<br />
(Standard) 2nd 16.03 16.62 17.21<br />
16T/40T 1st 23.11 23.96 24.82<br />
(Close) 2nd 17.47 18.11 18.76<br />
18T/38T 1st 23.11 23.96 24.82*<br />
(Wide) 2nd 14.75 15.29 15.84*<br />
With 24T Clutch Bell # of Spur Gear Teeth<br />
2nd gear sets Gear 54 56 58<br />
17T/39T 1st 21.18 21.97 22.75<br />
(Standard) 2nd 14.69 15.24 15.78<br />
16T/40T 1st 21.18 21.97 22.75<br />
(Close) 2nd 16.01 16.60 17.20<br />
18T/38T 1st 21.18 21.97 22.75<br />
(Wide) 2nd 13.52 14.02 14.52<br />
*stock configuration out of the box<br />
The gear ratio chart above shows the available combinations<br />
with optional spur gears, clutch bells, and two-speed gear sets.<br />
T-MAXX 3.3 OWNERS MANUAL • 25
TUNING ADJUSTMENTS<br />
acceleration by reducing engine rpm loss when shifting from 1st gear to<br />
2nd gear. The wide ratio gear set is designed for wide open areas and will<br />
increase top speed, but reduce acceleration due to greater rpm loss when<br />
shifting gears.<br />
BRAKE SETUP & ADJUSTMENT<br />
T-Maxx 3.3 is equipped with a disc brake that rides on the yoke of the<br />
transmission’s front output shaft. The brake is preset at the factory<br />
and should not require attention. As the brake material wears, future<br />
adjustments may be necessary.<br />
Brake Shoulder Screw Adjustment<br />
The two shoulder bolts that are used to secure the brake pads to the<br />
transmission housing may need to be adjusted periodically as the brake<br />
material wears down. They should be tightened so a 0.50mm (.020”) gap<br />
exists between the disc and the brake pad (on the transmission side).<br />
Adjust in one of the following ways:<br />
1. Use a .50mm feeler gauge between<br />
the brake pad insert and brake disc.<br />
2. Push the outer brake pad firmly<br />
against the inner pad with your<br />
finger, sandwiching the brake disc<br />
between the brake calipers. Tighten<br />
the brake shoulder bolts until they just barely touch the brake pads. Do<br />
not over tighten these fasteners or you could damage the brake calipers.<br />
Loosen each of the shoulder bolts by 1 turn.<br />
Brake Pad Wear and Replacement<br />
During normal use the brake pads should wear at a relatively slow rate.<br />
However, if the brake pads wear down close to the metal pad holders, they<br />
should be replaced. Any more wear than this could cause damage to the<br />
brake parts and improper operation of the brake system.<br />
WHEELIE BAR SETUP & ADJUSTMENT<br />
26 • T-MAXX 3.3 OWNERS MANUAL<br />
0.5mm<br />
gap<br />
Position 4 (no wheelies)<br />
The top position on<br />
cross bars. Offers the<br />
flattest launches with<br />
little or no wheelie.<br />
This is the factory<br />
installed position<br />
to reduce wheelies<br />
during break-in.<br />
Position 3<br />
Position 2<br />
Position 1 (big wheelies)<br />
Bottom position on<br />
cross bars. Allows<br />
the truck to tip back<br />
the furthest during<br />
a wheelie for longer,<br />
high-speed wheelies.<br />
Wheelie Bar Installation<br />
The Maxx Wheelie Bar can be used on any Maxx truck with the<br />
stock rear skid plate, rear bumper, and rear bumper mounts.<br />
It is also compatible with the <strong>Traxxas</strong> accessory aluminum rear<br />
bumper (Part #4935X). The wheelie bar is intended for use on hard,<br />
high-traction surfaces, such as pavement, where controlling wheelies<br />
can be difficult. It is easily removed for off-road racing or jumping.<br />
1. Slowly bend the end of the skid plate downward, and then key the<br />
skid plate into the slot of the wheelie bar.<br />
2. Slide the wheelie bar down to the bottom of the skid plate,<br />
and then snap the clip over the lower bumper tube.<br />
3. Removal is opposite of installation. Snap the wheelie bar off of the<br />
bumper, and then slide the wheelie bar off of the skid plate.<br />
Wheelie Bar Setup Instructions<br />
Changing the position of the wheelie<br />
bar height setting is easier when<br />
the wheelie bar is installed on the<br />
truck. Snap the upper arms off of the<br />
wheelie position cross bars. Move the<br />
upper arms to the desired wheelie<br />
position cross bar and then snap them<br />
in place.<br />
Upper Arms<br />
Position<br />
Cross Bars<br />
Each setting can offer different results based on the individual ride<br />
height and droop settings for a particular truck. Try to avoid riding on<br />
the wheelie bar wheels during normal driving (this can happen in the<br />
lowest setting with lower than stock ride heights).<br />
Remove the wheelie bar when the T-Maxx will be jumped or driven in<br />
harsh off-road conditions.
MAINTAINING AND STORING YOUR T-MAXX 3.3<br />
Your T-Maxx 3.3 requires timely maintenance in order to<br />
stay in top running condition. Neglecting the maintenance<br />
could allow dirt, deposits, and moisture to build up inside the engine<br />
leading to internal engine failure. The following procedures should be<br />
taken very seriously.<br />
After each hour of running:<br />
• Clean and re-oil the pre-filter air filter element. At every 3-4 hours, also<br />
clean and re-oil the primary air filter element. The instructions for these<br />
maintenance procedures are on page 15. We cannot stress enough<br />
the value of cleaning your air filter at the scheduled intervals. The<br />
cleanliness and condition of your air filter directly influences the running<br />
life span or your engine. Do not skip air filter maintenance!<br />
• Clean the outside of the engine of accumulated dirt, oil, and grime.<br />
Accumulated grime will decrease the engine’s ability to cool itself.<br />
• Tighten the wheel nuts (especially on the left side). Use the included<br />
universal wrench.<br />
After each running session:<br />
• Perform after-run maintenance on the engine. This clears the engine<br />
of destructive moisture and other corrosive deposits. This is extremely<br />
important for the life of the engine. See After-run Procedure, right.<br />
• Inspect the gears for wear, broken teeth, or debris lodged between the teeth.<br />
• Inspect the vehicle for obvious damage or wear. Look for:<br />
1. Loose or missing screws<br />
2. Cracked, bent, or damaged parts<br />
3. Cut or loose wiring<br />
4. Cut or kinked fuel lines<br />
5. Signs of fuel leakage<br />
If the engine is worn or damaged enough to require replacing the<br />
piston, sleeve, or connecting rod, consider exchanging your old<br />
engine for a brand new engine under the terms of the <strong>Traxxas</strong><br />
Lifetime Engine Replacement Plan (ERP). It could save you time and<br />
effort. Details are in your model’s documentation package.<br />
Other periodic maintenance:<br />
• Piston/sleeve: The life of the piston and sleeve<br />
will vary greatly with how the engine was used<br />
and maintained. The piston and sleeve should be<br />
replaced when they no longer seal effectively (loss of<br />
compression). Symptoms include the engine being<br />
difficult to start when warm, stalling when warm,<br />
and stalling when throttle is suddenly closed to idle.<br />
Replace the wrist pin and G-clip whenever the piston<br />
and sleeve are replaced.<br />
• Connecting rod: The connecting rod should be<br />
replaced when the piston and sleeve are replaced.<br />
Also replace the piston wrist pin and G-clip whenever<br />
the connecting rod is replaced. As with other internal<br />
engine components, connecting rod life depends<br />
engine’s usage and the quality and frequency of the<br />
engine maintenance. Inspect the connecting rod<br />
after 3-gallons of fuel have been used.<br />
The TRX 3.3 Racing Engine is designed to be easy to rebuild.<br />
Critical engine components such as the crankcase, crankshaft,<br />
and engine bearings are made to extremely high quality standards and<br />
should under normal circumstances outlast multiple sets of pistons,<br />
sleeves, connecting rods, and wrist pins (reciprocating assemblies).<br />
• Slipper clutch pads (friction material):<br />
Under normal use, the friction<br />
material in the slipper clutch should<br />
wear very slowly. If the thickness of<br />
any one of the slipper clutch pads<br />
is 1.8mm or less, the friction disc<br />
should be replaced. Measure the pad<br />
thickness using calipers or measuring<br />
against the diameter of the 1.5 and 2.0mm hex wrenches provided with<br />
the model.<br />
After-run Procedure<br />
You must perform after-run maintenance on your TRX 3.3 Racing Engine<br />
whenever the model will be stored for longer than a few hours. Taking<br />
the time to prepare your engine for storage will reward you with longer<br />
engine life, easier starting, and better performance.<br />
When a nitro engine is shut off, some excess unburned fuel remains in the<br />
engine. The methanol in model engine fuel is hygroscopic, which means<br />
it easily attracts and absorbs moisture. This moisture can cause rust and<br />
corrosion on the steel engine parts (crankshaft, bearings, wrist pin and<br />
starter shaft) if the fuel is not removed from the engine. There are after<br />
run oil products available from your hobby dealer or you can use WD-40 ,<br />
a common household lubricant. To ensure your TRX 3.3 Racing Engine is<br />
protected from internal corrosion, use the following procedure:<br />
1. Shut off the engine by pinching the fuel line closed. This allows most<br />
of the excess fuel to be consumed by the engine. Be sure the throttle<br />
is in the idle position. You may have to pinch the fuel line closed for<br />
several seconds before the engine stops.<br />
2. Completely empty the fuel tank. Use your fuel-dispensing bottle to<br />
suck out the old fuel. Do not mix the old fuel with your fresh fuel<br />
supply. If you leave fuel in the tank, transporting or handling your<br />
T-Maxx 3.3 may cause fuel to run into the engine.<br />
3. With the fuel tank empty and the throttle at the idle position, try to<br />
start the engine. The engine will most likely start and run for a few<br />
seconds as it uses up any fuel remaining in the engine and fuel lines.<br />
4. Once the engine stops, clean the outside of the engine with<br />
compressed air or spray motor cleaner. Once the engine is clean and<br />
dry, remove the glow plug power wire, glow plug, and air filter.<br />
5. Open the throttle fully and spray a one-second burst of WD-40 into the<br />
carburetor and into the glow plug hole (Caution! Wear safety glasses<br />
to prevent spray from getting into your eyes). If you are using after-run<br />
oil, follow the manufacturer’s instructions.<br />
6. Place a rag or paper towel over the engine to catch any WD-40 or<br />
after-run oil that may come out the carburetor or glow plug hole.<br />
7. Connect the EZ-Start controller to the model and spin the engine for<br />
10 seconds.<br />
8. Remove the rag or paper towel and repeat steps 5–7 two more times.<br />
9. Clean and re-oil the air filter so it will be ready for use next time. See<br />
page 15 for air filter maintenance instructions.<br />
10. Replace the glow plug, reconnect the glow plug power wire, and<br />
reinstall the air filter.<br />
It could be more economical for you to continue to use your good<br />
bearings and crankshafts, and simply replace the reciprocating<br />
assembly as needed. Engine assembly is not difficult and replacing the<br />
reciprocating assembly does not require any special tools or skills.<br />
T-MAXX 3.3 OWNERS MANUAL • 27
TROUBLESHOOTING YOUR T-MAXX 3.3<br />
The following section addresses some very basic engine and radio<br />
questions you may have about your T-Maxx 3.3. Most questions arise<br />
from simple user errors or minor adjustments that are easy to correct.<br />
If you can’t find a solution for your T-Maxx 3.3 here, then visit our Web<br />
site at www.<strong>Traxxas</strong>.com/support. There you will find a much more<br />
extensive and detailed online troubleshooting area. In addition, you<br />
may call <strong>Traxxas</strong> Customer Service at 1-888-TRAXXAS (outside the U.S.<br />
call 972-265-8000).<br />
Radio system does not work properly:<br />
• If the power light on the transmitter does not come on, check for<br />
proper battery installation and that the batteries are new and/or fully<br />
charged. If the power light is blinking, then the transmitter batteries<br />
are weak and should be replaced. See page 8 for more details.<br />
• If the transmitter light is on but the radio is still not responding,<br />
check for proper installation of the receiver batteries and that the<br />
batteries are new and/or fully charged. Check to make sure the on/<br />
off switch on the model is in the on position. Finally, if there is still<br />
no response check the red and black wires that connect the battery<br />
pack to the “batt” terminal on the receiver (you will have to remove<br />
the receiver cover). Make sure the wires are not pinched or damaged<br />
and that the plug is secure in the receiver. See page 8 for more<br />
details.<br />
Short radio range:<br />
• If the radio range appears short, then first check to make sure the<br />
transmitter antenna is fully vertical and that the antenna in the<br />
T-Maxx 3.3 is in place and has not been cut or damaged. Next, make<br />
sure the batteries are all fresh or fully charged. Finally, if you are still<br />
experiencing short range, try a different location. Sometimes there<br />
can be interference from various sources that can cause your radio<br />
to malfunction.<br />
Engine will not spin (EZ-Start will not turn the engine):<br />
• If neither LED on the controller lights, the EZ-Start battery could<br />
be discharged or improperly connected. Inspect and recharge if<br />
necessary.<br />
• If the glow plug LED lights and the motor LED does not, then the<br />
EZ-Start controller is in protection mode. Allow the controller to cool<br />
for at least three minutes. The circuitry should automatically reset.<br />
• Check to make sure the wires are connected to the EZ-Start motor<br />
in the T-Maxx 3.3. The red wire should connect to the positive motor<br />
terminal, indicated by a red dot next to the terminal.<br />
• The engine could be flooded. If too much fuel accumulates in the<br />
combustion chamber at start up, the engine will hydraulically lock.<br />
Follow the procedure on page 29 for clearing a flooded engine.<br />
• Check for binding at the engine flywheel. If you are not able to<br />
turn the engine by hand, the engine could be flooded, there could<br />
be binding in the clutch system, or there could be internal engine<br />
damage. (Note: It is normal for the engine to be extremely tight and<br />
hard to turn when the piston reaches the top of the compression<br />
stroke.)<br />
Engine extremely sluggish, hard to start, and will not idle during<br />
tank 1 of the break in:<br />
• It is possible that the factory adjusted break-in settings on your<br />
carburetor are too rich for your geographic location, atmospheric<br />
conditions, or fuel brand. Extremes in temperature, humidity,<br />
barometric pressure, and altitude can’t always be accounted for<br />
with a single high-speed needle setting. The symptoms described<br />
above can occur when the air density is very low such as in high<br />
28 • T-MAXX 3.3 OWNERS MANUAL<br />
mountainous elevations, and extremely cold temperatures. Under<br />
these conditions, lean the fuel mixture slightly, 1/8 turn, to see if<br />
there is any improvement in starting and idling. Only lean the fuel<br />
mixture just until the engine will run and idle reliably and then<br />
proceed with the break in.<br />
• The contents of different brands of fuel (other than <strong>Traxxas</strong> Top Fuel)<br />
in combination with extreme atmospheric conditions can also make<br />
the factory preset break-in settings too rich and cause the symptoms<br />
described above. Again, try leaning the fuel mixture slightly, 1/8 turn,<br />
to see if there is any improvement in starting and idling.<br />
Engine spins but will not start:<br />
• If the engine is spinning but will not start, first check to make sure<br />
that both the motor and glow plug LEDs on the EZ-Start controller<br />
light when the button is depressed. If the glow plug LED does not<br />
light, make sure the blue glow plug wire is tightly connected and is<br />
not damaged in any way. If the wire is good, then replace the glow<br />
plug. It is normal for glow plugs to require periodic replacement.<br />
Only use <strong>Traxxas</strong> heavy-duty long glow plugs (see your parts list).<br />
• Check to make sure the fuel is getting to the carburetor. Remove the<br />
fuel line where it connects to the carburetor to see if there is fuel in<br />
it. If not, you may need to prime the engine. Reconnect the fuel line<br />
and then refer to page 18 for instructions on priming the engine.<br />
• Check your fuel mixture settings. It may be necessary to adjust the<br />
fuel mixture if the outside temperature or barometric pressure has<br />
changed significantly since the last time the engine was run (see Fine<br />
Tuning the Carburetor on page 21). Turn the high-speed needle out<br />
(rich/counterclockwise) 1/4 turn, hold the throttle trigger at about<br />
1/2 throttle and try again to start the engine. Once started, retune<br />
the engine for performance (see page 20).<br />
• The engine could be worn. If the fit between the piston and sleeve<br />
is loose, compression is reduced and the engine will be difficult to<br />
start when it is warm, and may tend to stall when running and when<br />
the throttle is closed suddenly to idle. Engine life depends on many<br />
factors including fuel type, air filter maintenance, needle settings,<br />
and how the engine was used. For example, if the engine was<br />
allowed to ingest dirt from lack of air filter maintenance or running<br />
through water, then the internal engine components could wear out<br />
extremely fast.<br />
• Glow plug may have failed. If using an EZ-Start, check to see if the<br />
glow plug light is on during starting. If not, replace the glow plug. If<br />
using a glow ignitor, remove and check the glow plug.<br />
Engine performance sluggish:<br />
• Engine performance depends mostly on the fuel mixture settings<br />
and how they compensate for the current atmospheric conditions.<br />
Before you suspect other failures with the engine, richen the highspeed<br />
needle at least 1/4 turn and then retune the engine for<br />
performance (see page 20).<br />
• If the fuel mixture seems to be set correctly, make sure the fuel is<br />
fresh. If the fuel is old, or was left uncapped for a long period, then<br />
some of the important fuel components could have evaporated. Try<br />
new, fresh, <strong>Traxxas</strong> Top Fuel.<br />
• Try a new <strong>Traxxas</strong> glow plug. Sometimes a glow plug will work well<br />
enough to start the engine but not be able to deliver the engine’s<br />
full performance potential.<br />
• Check to make sure there is no binding in the driveline that would<br />
cause excessive loads on the engine.
Clearing a Flooded Engine<br />
If the engine is primed for too long during startup, then it can become<br />
flooded with fuel. When the engine is flooded it will no longer turn<br />
due to excess fuel in the combustion chamber preventing upward<br />
movement of the piston. Use the following procedure to clear a<br />
flooded engine:<br />
1. Remove the blue glow plug wire.<br />
2. Remove the glow plug and gasket with the glow plug wrench<br />
supplied with your model. A 5/16 or 8mm nut driver will also work.<br />
3. Turn the model upside down and plug in the EZ-Start controller.<br />
4. Push the EZ-Start button for several seconds to clear the engine<br />
of excess fuel. Do not look into the glow plug hole while the<br />
engine is spinning or you could spray fuel into your face!<br />
5. Turn the model over and reinstall the glow plug and gasket.<br />
6. Reconnect the blue glow plug wire to the glow plug.<br />
7. Reconnect the EZ-Start controller.<br />
8. Do not prime the engine. Pull the throttle to 1/2 throttle and push<br />
the EZ-Start button. The engine should start immediately.<br />
Piston stuck at “top dead center” (TDC)<br />
“Top dead center” is the position where the piston is at the very top<br />
of the tapered sleeve. Occasionally an engine can get “stuck” at this<br />
position. This is most likely to happen on new engines during break-in,<br />
TQ 2.4GHz ADVANCED TUNING GUIDE<br />
Your <strong>Traxxas</strong> transmitter has a programmable Multi-Function knob<br />
that can be set to control various advanced transmitter functions<br />
(set to Steering Sensitivity by default, see page 10). Accessing the<br />
programming menu is done by using the menu and set buttons on the<br />
transmitter and observing signals from the LED. An explanation of the<br />
menu structure follows on page 31. Experiment with the settings and<br />
features to see if they can improve your driving experience.<br />
Throttle Sensitivity (Throttle Exponential)<br />
The Multi-Function knob can be set to control Throttle Sensitivity.<br />
Throttle Sensitivity works the same way as Steering Sensitivity as<br />
described on page 10, but applies the effect to the throttle channel.<br />
Only forward throttle is affected; brake/reverse travel remains linear<br />
regardless of the Throttle Sensitivity setting.<br />
Steering Percentage (Dual Rate)<br />
The Multi-Function knob can be set to control the amount (percentage)<br />
of servo travel applied to steering. Turning the Multi-Function knob<br />
fully clockwise will deliver maximum steering throw; turning the<br />
knob counter-clockwise reduces steering throw (note: turning the<br />
dial counter-clockwise to its stop will eliminate all servo travel). Be<br />
aware that the steering End Point settings define the servo’s maximum<br />
steering throw. If you set Steering Percentage to 100% (by turning the<br />
Multi-Function knob fully clockwise), the servo will travel all the way<br />
to its selected end point, but not past it. Many racers set Dual Rate so<br />
they have only as much steering throw as they need for the track’s<br />
tightest turn, thus making the car easier to drive throughout the rest of<br />
the course. Reducing steering throw can also be useful in making a car<br />
easier to control on high-traction surfaces, and limiting steering output<br />
for oval racing where large amounts of steering travel are not required.<br />
Braking Percentage<br />
The Multi-Function knob may also be set to control the amount of<br />
brake travel applied by the servo in a nitro-powered model. Electric<br />
models do not have a servo-operated brake, but the Braking Percentage<br />
function still operates the same way in electric models. Turning the<br />
Multi-Function knob full clockwise will deliver maximum brake throw;<br />
turning the knob counter-clockwise reduces brake throw (Note: Turning<br />
the dial counter-clockwise to its stop will eliminate all brake action).<br />
TROUBLESHOOTING YOUR T-MAXX 3.3<br />
but can also happen at other times. If the engine<br />
is stuck at TDC, use the following procedure to<br />
release the piston from the sleeve:<br />
1. Remove the glow plug using the included tool<br />
or 8mm (5/16”) nut driver and verify that the<br />
piston is at the top of its stroke.<br />
2. Use a flat blade screwdriver to rotate the<br />
flywheel. Place the blade of the driver into one<br />
of the grooves of the flywheel and push down,<br />
turning the flywheel counter-clockwise when<br />
viewed from the front. The flywheel should<br />
turn, unsticking the piston from the sleeve.<br />
3. Put two or three drops of light machine oil into<br />
the glow plug hole to lubricate the piston and<br />
sleeve. Do not use too much oil. It will hydrolock<br />
the engine. Verify the starter will spin the<br />
engine with the glow plug out.<br />
4. Rotate the flywheel so the piston is at bottom<br />
dead center and replace the glow plug with<br />
gasket. Reconnect the blue glow plug wire.<br />
5. You should now be able to start the engine<br />
with the EZ-Start.<br />
Top Dead Center<br />
Bottom Dead Center<br />
Starting Over: Restoring Factory Defaults<br />
When programming your 2.4GHz transmitter, you may feel the<br />
need to start over with a clean slate. Follow these simple steps to<br />
restore the factory settings:<br />
1. Turn transmitter off.<br />
2. Hold both MENU and SET.<br />
3. Turn transmitter on.<br />
4. Release MENU and SET. The transmitter LED will blink red.<br />
5. Press MENU four times. The transmitter LED will blink red five times.<br />
6. Press SET to clear settings. The LED will turn solid green and the<br />
transmitter is restored to default.<br />
Throttle Trim<br />
Setting the Multi-Function knob to serve as throttle trim will allow you<br />
to adjust the throttle’s neutral position to prevent unwanted brake drag<br />
or throttle application when the transmitter trigger is at neutral. Note:<br />
Your transmitter is equipped with a Throttle Trim Seek mode to prevent<br />
accidental runaways. See below for more information.<br />
Throttle Trim Seek Mode<br />
When the Multi-Function knob is set to throttle trim, the transmitter<br />
remembers the throttle trim setting. If the throttle trim knob is moved<br />
from the original setting while the transmitter is off, or while the<br />
transmitter was used to control another model, the transmitter ignores<br />
the actual position of the trim knob. This prevents the model from<br />
accidentally running away. The LED on the face of the transmitter will<br />
rapidly blink green and the throttle trim knob (Multi-Function knob)<br />
will not adjust the trim until it is moved back to its original position<br />
saved in memory. To restore throttle trim control, simply turn the<br />
multi-function knob either direction until the LED stops blinking.<br />
Steering and Throttle End Points<br />
The TQ 2.4GHz transmitter allows you to choose the limit of the servo’s<br />
travel range (or its “end point”) independently for left and right travel (on<br />
the steering channel) and throttle/brake travel (on the throttle channel).<br />
This allows you to fine-tune the servo settings to prevent binding caused<br />
by the servo moving steering or throttle linkages (in the case of a nitro car)<br />
farther than their mechanical limits. The end point adjustment settings<br />
you select will represent what you wish to be the servo’s maximum travel;<br />
the Steering Percentage or Braking Percentage functions will not override<br />
the End Point settings.<br />
T-MAXX 3.3 OWNERS MANUAL • 29
TQ 2.4GHz ADVANCED TUNING GUIDE<br />
Solid green Normal Driving Mode See page 7 for information on how to use your transmitter controls.<br />
Slow red (0.5 sec on / 0.5 sec off ) Binding See page 10 for more information on binding.<br />
Flashing fast green (0.1 sec on / 0.15 sec off ) Throttle Trim Seek Mode<br />
30 • T-MAXX 3.3 OWNERS MANUAL<br />
Turn the Multi Function knob right or left until the LED stops flashing.<br />
See above for more information.<br />
Flashing medium red (0.25 sec on / 0.25 sec off ) Low Battery Alarm Put new batteries in the transmitter. See page 8 for more information.<br />
Flashing fast red (0.125 sec on / 0.125 sec off ) Link Failure / Error<br />
Programming Patterns<br />
or<br />
Failsafe<br />
Your <strong>Traxxas</strong> radio system is equipped with a built-in failsafe<br />
function that returns the throttle to its last saved neutral position<br />
in the event of a signal loss. The LED on the transmitter and the<br />
receiver will rapidly flash red.<br />
Steering and Throttle Sub-Trim<br />
The Sub-Trim function is used to precisely set the neutral point of the<br />
steering or throttle servo in the event that simply setting the trim knob<br />
to “zero” does not completely center the servo. When selected, Sub-Trim<br />
allows finer adjustment to the servo output shaft’s position for precise<br />
setting of the neutral point. Always set the Steering Trim knob to zero<br />
before making final adjustment (if required) using Sub-Trim. If Throttle<br />
Trim has been previously adjusted, the Throttle Trim will need to be<br />
reprogrammed to “zero” before making final adjustment using Sub-Trim.<br />
Setting Lock<br />
Once you’ve adjusted all of these settings the way you like them, you may<br />
want to disable the Multi-Function knob so none of your settings can be<br />
changed. This is especially handy if you operate multiple vehicles with a<br />
single transmitter via <strong>Traxxas</strong> Link.<br />
x8<br />
x8<br />
Counts out number (green or red) then pauses Current menu position See Menu Tree for more information.<br />
Fast green 8 times Menu setting accepted (on SET)<br />
Transmitter and receiver are no longer bound. Turn the system off and then<br />
back on to resume normal operation. Find source of the link failure (ie out of<br />
range, low batteries, damaged antenna).<br />
Fast red 8 times Menu SET invalid User error such as trying to delete a locked model.<br />
RECEIVER LED CODES<br />
LED Color / Pattern Name Notes<br />
Solid green Normal Driving Mode See page 7 for information on how to use your transmitter controls.<br />
Slow red (0.5 sec on / 0.5 sec off ) Binding See page 10 for more information on binding.<br />
Flashing fast red (0.125 sec on / 0.125 sec off ) Fail-Safe / Low Voltage Detect<br />
model memory entries.<br />
Model Lock<br />
The <strong>Traxxas</strong> Link feature can store up to twenty models (receivers) in its<br />
memory. If you bind a twenty-first receiver, <strong>Traxxas</strong> Link will delete the<br />
“oldest” receiver from its memory (in other words, the model you used<br />
the longest time ago will be deleted). Activating Model Lock will lock<br />
the receiver in memory so it cannot be deleted.<br />
You may also bind multiple <strong>Traxxas</strong> Link transmitters to the same model<br />
making it possible to pick up any transmitter and any previously bound<br />
model in your collection and simply turn them on and drive. With<br />
<strong>Traxxas</strong> Link, there is no need remember which transmitter goes with<br />
which model and there is never a need to have to select any model<br />
from a list of model memory entries. The transmitter and receiver do it<br />
all for you automatically.<br />
To activate Model Lock:<br />
1. Switch on the transmitter and receiver you wish to lock.<br />
2. Press and hold MENU. Release when the status LED blinks green.<br />
3. Press MENU three times. The status LED will blink green four<br />
times repeatedly.<br />
4. Press SET. The status LED will blink green in single-flash intervals.<br />
5. Press SET once. The status LED will blink red once repeatedly.<br />
6. Press MENU once, the LED will blink red twice repeatedly.<br />
7. Press SET, the LED will blink rapidly green. The memory is now locked.<br />
Press MENU and SET to return to driving mode.<br />
Note: To unlock a memory, press SET twice at step 5. The LED will blink<br />
rapidly green to indicate the model is unlocked. To unlock all models,<br />
press MENU twice at step 6 and then press SET.<br />
Multiple Settings and the Multi-Function Knob<br />
It is important to note that settings made with the Multi-Function<br />
knob are “overlaid” on top of each other. For example, if you assign the<br />
Multi-Function to adjust Steering Percentage and set it for 50%, then<br />
reassign the knob to control Steering Sensitivity, the transmitter will<br />
“remember” the Steering Percentage setting. Adjustments you make to<br />
Steering Sensitivity will be applied to the 50% steering throw setting<br />
you selected previously. Likewise, setting the Multi-Function knob to<br />
“disabled” will prevent the knob from making further adjustments, but<br />
the last setting of the Multi-Function knob will still apply.<br />
To delete a model:<br />
At some point, you may wish to delete a model you no-longer drive<br />
from the memory.<br />
TRAXXAS LINK<br />
<strong>Traxxas</strong> Link is an exclusive, patent-pending feature of the TQ 2.4GHz<br />
transmitter. Each time the transmitter is bound to a new receiver, it<br />
saves that receiver in its memory along with all the settings assigned<br />
to that receiver. When the transmitter and any bound receiver are<br />
switched on, the transmitter automatically recalls the settings for that<br />
receiver. There is no need to manually select your vehicle from a list of<br />
TRANSMITTER LED CODES<br />
1. Switch on the transmitter and receiver you wish to delete.<br />
2. Press and hold MENU. Release when the status LED blinks green.<br />
3. Press MENU three times. The status LED will blink green four<br />
times repeatedly.<br />
4. Press SET once. The status LED will blink green once repeatedly.<br />
5. Press MENU once. The status LED will blink green twice repeatedly.<br />
6. Press SET. The memory is now selected to be deleted. Press SET to<br />
delete the model. Press and hold MENU to return to driving mode.<br />
LED Color / Pattern Name Notes<br />
Consistent Low Voltage in the receiver triggers Fail-Safe so there is enough<br />
power to center the throttle servo before it completely loses power.
MENU TREE<br />
The menu tree below shows how to navigate through the<br />
TQ 2.4GHz transmitter’s various settings and functions. Press<br />
and hold MENU to enter the menu tree, and use the following<br />
commands to navigate through the menu and select options.<br />
MENU: When you enter a menu, you always start at the top. Press<br />
MENU to move down the menu tree. When you reach the<br />
bottom of the tree, pressing MENU again will return you<br />
to the top.<br />
SET: Press SET to move across the menu tree and select<br />
options. When an option is committed to the<br />
transmitter’s memory, the status LED will rapidly blink<br />
green.<br />
BACK: Press both MENU and SET to go back one level in the<br />
menu tree.<br />
EXIT: Press and hold MENU to exit programming. Your selected<br />
options will be saved.<br />
ECHO: Press and hold SET to activate the “echo” function. Echo<br />
will “play back” your current position on the Menu Tree,<br />
should you lose your place. For example: If your current<br />
position is Steering Channel End Points, holding SET will<br />
cause the LED to blink green twice, green once, and then<br />
red three times. Echo will not alter your adjustments or<br />
change your position in the programming sequence.<br />
Below is an example of how to access a function in the menu<br />
tree. In the example, the user is setting the Multi-Function knob<br />
to be a steering Dual Rate control.<br />
To set the Multi-Function knob to control STEERING DUAL RATE (%):<br />
1. Switch the transmitter on<br />
2. Press and hold MENU until the green LED lights. It will blink in single intervals.<br />
3. Press SET. The red LED will blink in single intervals to indicate Steering Dual<br />
Rate has been selected.<br />
4. Press MENU twice. The red LED will blink three times repeatedly to indicate<br />
Steering Percentage has been selected.<br />
5. Press SET to select. The green LED will blink 8 times fast to indicate<br />
successful selection.<br />
6. Press and hold MENU to return to driving mode.<br />
Restoring Factory Defaults:<br />
Transmitter<br />
OFF<br />
Set Multi-Function<br />
knob for STEERING<br />
SENSITIVITY (Expo)<br />
Set Multi-Function<br />
knob for THROTTLE<br />
SENSITIVITY (Expo)<br />
Set Multi-Function<br />
knob for STEERING<br />
DUAL RATE (%)<br />
Set Multi-Function<br />
knob for BRAKING<br />
PERCENTAGE (%)<br />
Set Multi-Function<br />
knob for<br />
THROTTLE TRIM<br />
To LOCK the<br />
Multi-Function knob<br />
To REVERSE<br />
the direction of<br />
STEERING servo<br />
To set the SUB TRIM<br />
of the STEERING<br />
servo<br />
To set the END<br />
POINTS of the<br />
STEERING servo<br />
To reset the END<br />
POINTS of STEERING<br />
servo to defaults<br />
To REVERSE<br />
the direction of<br />
THROTTLE servo<br />
To set the SUB TRIM<br />
of the THROTTLE<br />
servo<br />
To set the END<br />
POINTS of the<br />
THROTTLE servo<br />
Hold both<br />
MENU and SET<br />
To reset the END<br />
POINTS of THROTTLE<br />
servo to defaults<br />
Transmitter<br />
ON<br />
Press/hold MENU<br />
green LED blinks<br />
Press/hold MENU<br />
green LED blinks<br />
Press/hold MENU<br />
green LED blinks<br />
Press/hold MENU<br />
green LED blinks<br />
Press/hold MENU<br />
green LED blinks<br />
Press/hold MENU<br />
green LED blinks<br />
Press/hold MENU<br />
green LED blinks<br />
Press/hold MENU<br />
green LED blinks<br />
Press/hold MENU<br />
green LED blinks<br />
Press/hold MENU<br />
green LED blinks<br />
Press/hold MENU<br />
green LED blinks<br />
Press/hold MENU<br />
green LED blinks<br />
Press/hold MENU<br />
green LED blinks<br />
Press/hold MENU<br />
green LED blinks<br />
Release MENU and<br />
SET. Red LED blinks<br />
Press SET<br />
red LED blinks<br />
Press SET<br />
red LED blinks<br />
Press SET<br />
red LED blinks<br />
Press SET<br />
red LED blinks<br />
Press SET<br />
red LED blinks<br />
Press SET<br />
red LED blinks<br />
x2<br />
Press MENU<br />
green LED blinks (x2)<br />
x2<br />
Press MENU<br />
green LED blinks (x2)<br />
x2<br />
Press MENU<br />
green LED blinks (x2)<br />
x2<br />
Press MENU<br />
green LED blinks (x2)<br />
x2<br />
Press MENU<br />
green LED blinks (x2)<br />
x2<br />
Press MENU<br />
green LED blinks (x2)<br />
x2<br />
Press MENU<br />
green LED blinks (x2)<br />
x2<br />
Press MENU<br />
green LED blinks (x2)<br />
Press MENU four<br />
times. Red LED<br />
blinks 5 times<br />
* Optional requires 4995X reverse kit.<br />
x8<br />
Press SET to confi rm<br />
green LED blinks (x8)<br />
x2<br />
Press MENU to confi rm<br />
red LED blinks (x2)<br />
x3<br />
Press MENU twice<br />
red LED blinks (x3)<br />
x4<br />
Press MENU 3 times<br />
red LED blinks (x4)<br />
x5<br />
Press MENU 4 times<br />
red LED blinks (x5)<br />
x6<br />
Press MENU 5 times<br />
red LED blinks (x6)<br />
Press SET<br />
green LED blinks<br />
Press SET<br />
green LED blinks<br />
Press SET<br />
green LED blinks<br />
Press SET<br />
green LED blinks<br />
Press SET<br />
green LED blinks<br />
Press SET<br />
green LED blinks<br />
Press SET<br />
green LED blinks<br />
Press SET<br />
green LED blinks<br />
Enter Programming<br />
Press and hold<br />
MENU for 3 seconds<br />
1<br />
Press<br />
MENU<br />
2<br />
Press<br />
MENU<br />
3<br />
Press<br />
MENU<br />
4<br />
Multi-Function Knob<br />
One Blink Green<br />
Channel Setup<br />
Two Blinks Green<br />
Mode Selection<br />
Three Blinks Green<br />
<strong>Traxxas</strong>-Link<br />
Four Blinks Green<br />
Press SET to clear settings. LED will turn solid<br />
green. Transmitter is restored to default<br />
Press/hold MENU<br />
returns to driving mode<br />
x8<br />
Press SET to select<br />
green LED blinks (x8)<br />
x8<br />
Press SET to select<br />
green LED blinks (x8)<br />
x8<br />
Press SET to select<br />
green LED blinks (x8)<br />
x8<br />
Press SET to select<br />
green LED blinks (x8)<br />
x8<br />
Press SET to lock<br />
green LED blinks (x8)<br />
Press SET<br />
red LED blinks<br />
Press SET<br />
red LED blinks<br />
Press SET<br />
red LED blinks<br />
Press SET<br />
red LED blinks<br />
x2<br />
Press MENU<br />
green LED blinks (x2)<br />
x2<br />
Press MENU<br />
green LED blinks (x2)<br />
x2<br />
Press MENU<br />
green LED blinks (x2)<br />
x2<br />
Press MENU<br />
green LED blinks (x2)<br />
Press/hold MENU<br />
returns to driving mode<br />
Press/hold MENU<br />
returns to driving mode<br />
Press/hold MENU<br />
returns to driving mode<br />
Press/hold MENU<br />
returns to driving mode<br />
Press/hold MENU<br />
returns to driving mode<br />
x8<br />
Press SET to reverse<br />
servo direction<br />
x2<br />
Press MENU<br />
red LED blinks (x2)<br />
x3<br />
Press MENU twice<br />
red LED blinks (x3)<br />
x4<br />
Press MENU 3 times<br />
red LED blinks (x4)<br />
Press SET<br />
red LED blinks<br />
Press SET<br />
red LED blinks<br />
Press SET<br />
red LED blinks<br />
Press SET<br />
red LED blinks<br />
Press<br />
SET<br />
Press<br />
SET<br />
Press<br />
MENU<br />
Press<br />
SET<br />
Press<br />
SET<br />
Adjust the Multi-<br />
Function knob until the<br />
LED turns solid green.<br />
Press/hold MENU<br />
returns to driving mode<br />
100 100<br />
00<br />
100 100<br />
THROTT<br />
Use Multi-Function<br />
knob to set neutral<br />
Turn steering<br />
wheel to desired max<br />
left and right travel<br />
THROTTLE TRIM<br />
Press MENU to move through options.<br />
Press SET to select an option.<br />
1 Steering Sensitivity (Expo)<br />
One Blink Red<br />
2<br />
3<br />
4<br />
5<br />
6<br />
1<br />
2<br />
3<br />
Press SET to select an option.<br />
1 Electric<br />
One Blink Red<br />
Press<br />
MENU<br />
2<br />
1<br />
Press<br />
MENU<br />
2<br />
x8<br />
Press SET<br />
to reset end points<br />
x8<br />
Press SET to reverse<br />
servo direction<br />
x2<br />
Press MENU<br />
red LED blinks (x2)<br />
x3<br />
Press MENU twice<br />
red LED blinks (x3)<br />
x4<br />
Press MENU 3 times<br />
red LED blinks (x4)<br />
Throttle Sensitivity (Expo)<br />
Two Blinks Red<br />
Steering % (Dual Rate)<br />
Three Blinks Red<br />
Braking %<br />
Four Blinks Red<br />
Throttle Trim<br />
Five Blinks Red<br />
Knob Disabled<br />
Six Blinks Red<br />
Steering (Channel 1)<br />
One Blink Green<br />
Throttle (Channel 2)<br />
Two Blinks Green<br />
Shift (Channel 3)*<br />
Three Blinks Green<br />
Nitro<br />
Two Blinks Red<br />
Model Locking<br />
One Blink Green<br />
Delete Model<br />
Two Blinks Green<br />
MENU TREE FORMULAS<br />
To select functions and make adjustments to the TQ 2.4GHz transmitter without<br />
referencing the menu tree, turn your transmitter on, fi nd the function in the left<br />
column you wish to adjust, and simply follow the corresponding steps.<br />
x8<br />
Press SET<br />
to save position<br />
x8<br />
Press SET<br />
to save each position<br />
Press/hold MENU<br />
returns to driving mode<br />
Press/hold MENU<br />
returns to driving mode<br />
00<br />
100 100<br />
THROTT<br />
Use Multi-Function<br />
knob to set neutral<br />
Use throttle<br />
trigger to set desired<br />
max throttle or brake<br />
x8<br />
Press SET<br />
green LED blinks (x8)<br />
Press<br />
SET<br />
Press<br />
SET<br />
Press<br />
SET<br />
Press<br />
SET<br />
Press<br />
SET<br />
Press/hold MENU<br />
returns to driving mode<br />
100 100<br />
THROTTLE TRIM<br />
Note: The transmitter is “live” during programming<br />
so you can test the settings real time without having<br />
to exit the menu tree.<br />
Press MENU to move through options.<br />
Press SET to select an option.<br />
1<br />
2<br />
3<br />
4<br />
1<br />
2<br />
4<br />
1<br />
1<br />
2<br />
3<br />
1<br />
Turn steering wheel<br />
to test settings<br />
x8<br />
Press SET<br />
to save position<br />
Press SET to save<br />
Use trigger to test<br />
Press/hold MENU<br />
returns to driving mode<br />
Servo Reversing<br />
One Blink Red<br />
Sub Trim<br />
Two Blinks Red<br />
End Points<br />
Three Blinks Red<br />
Reset End Points<br />
Four Blinks Red<br />
Servo Reversing<br />
One Blink Red<br />
Sub Trim<br />
Two Blinks Red<br />
Reset End Points<br />
Four Blinks Red<br />
Servo Reversing<br />
One Blink Red<br />
Unlock<br />
One Blink Red<br />
Lock<br />
Two Blinks Red<br />
Unlock All<br />
Three Blinks Red<br />
Confi rm Deletion<br />
One Blink Red<br />
1<br />
Always turn your<br />
transmitter on fi rst.<br />
IF END POINTS<br />
ARE OK:<br />
Press/hold MENU<br />
returns to driving mode<br />
Press/hold MENU<br />
returns to driving mode<br />
IF END POINTS<br />
ARE OK:<br />
Press/hold MENU<br />
returns to driving mode<br />
Press SET to reverse<br />
servo direction.<br />
Use knob to adjust<br />
sub-trim. Press SET to save.<br />
Use steering wheel to<br />
adjust. Turn right to desired<br />
end point, press set to save.<br />
Turn left to desired endpoint and press set to save.<br />
To reset max throw: Let go of controls and press SET.<br />
3<br />
End Points<br />
Three Blinks Red<br />
Press SET to restore<br />
factory default endpoints.<br />
Press SET to reverse<br />
servo direction.<br />
Use knob to adjust<br />
sub-trim. Press SET to save.<br />
Use trigger to adjust. Pull<br />
back to desired end point,<br />
press set to save. Push<br />
forward to desired endpoint and press set to save.<br />
To reset max throw: Let go of controls and press SET.<br />
Press SET to restore<br />
factory default endpoints.<br />
Press SET to reverse<br />
servo direction.<br />
IF END POINTS<br />
NEED TO BE<br />
CHANGED:<br />
Press SET<br />
and repeat steps 6-8<br />
IF END POINTS<br />
NEED TO BE<br />
CHANGED:<br />
Press SET<br />
and repeat steps 7-9<br />
T-MAXX 3.3 31
091221 KC1251-R00<br />
owner ’s manual<br />
MODEL <strong>4907</strong><br />
1100 Klein Road, Plano Texas 75074<br />
1-888-TRAXXAS