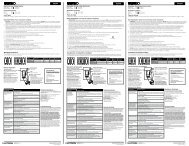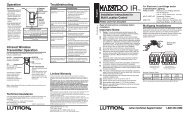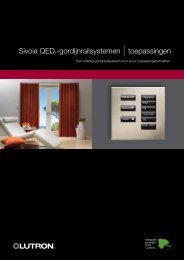
Installation Instructions for Wall-Mounted Master Controls - Lutron
Installation Instructions for Wall-Mounted Master Controls - Lutron
Installation Instructions for Wall-Mounted Master Controls - Lutron

Create successful ePaper yourself
Turn your PDF publications into a flip-book with our unique Google optimized e-Paper software.
Troubleshooting<br />
Symptom<br />
A <strong>Master</strong> Control appears not to<br />
be working.<br />
FCC In<strong>for</strong>mation<br />
NOTE: This equipment has been tested and found to comply with the limits<br />
<strong>for</strong> a Class B digital device, pursuant to part 15 of the FCC rules. These<br />
limits are designed to provide reasonable protection against harmful<br />
interference in a residential installation. This equipment generates, uses and<br />
can radiate radio frequency energy and, if not installed and used in<br />
accordance with the instructions, may cause harmful interference to radio or<br />
television reception, which can be determined by turning the equipment off<br />
and on, the user is encouraged to try to correct the interference by one or<br />
more of the following measures:<br />
• Reorient or relocate the receiving antenna.<br />
• Increase the separation between the equipment and receiver.<br />
• Connect the equipment into an outlet on a circuit different from that<br />
to which the receiver is connected.<br />
• Consult the dealer or an experienced radio/TV technician <strong>for</strong> help.<br />
Caution: Changes or modifications not expressly approved by <strong>Lutron</strong><br />
Electronics Co. could void the user's authority to operate this equipment.<br />
Technical Assistance<br />
Possible Cause<br />
If you have questions concerning the installation or<br />
operation of this product, call the <strong>Lutron</strong> Technical<br />
Support Center. Please provide exact model number<br />
when calling.<br />
(800) 523-9466 (U.S.A., Canada, and the Caribbean)<br />
Other countries call (610) 282-3800<br />
Fax (610) 282-3090<br />
Visit our web site at www.lutron.com<br />
• No power available to unit.<br />
• <strong>Master</strong> Control is not<br />
programmed into the system.<br />
Solution<br />
Limited Warranty<br />
• Ensure power is turned on.<br />
• See Activating <strong>Controls</strong> in the<br />
RadioRA® Setup Guide.<br />
<strong>Lutron</strong> will, at its option, repair or replace any unit that is defective in<br />
materials or manufacture within one year after purchase. For warranty<br />
service, return unit to place of purchase or mail to <strong>Lutron</strong> at 7200 Suter Rd.,<br />
Coopersburg, PA 18036-1299, postage pre-paid.<br />
THIS WARRANTY IS IN LIEU OF ALL OTHER EXPRESS WARRANTIES,<br />
AND THE IMPLIED WARRANTY OF MERCHANTABILITY IS LIMITED TO<br />
ONE YEAR FROM PURCHASE. THIS WARRANTY DOES NOT COVER<br />
THE COST OF INSTALLATION, REMOVAL OR REINSTALLATION, OR<br />
DAMAGE RESULTING FROM MISUSE, ABUSE, OR IMPROPER OR<br />
INCORRECT REPAIR, OR DAMAGE FROM IMPROPER WIRING OR<br />
INSTALLATION. THIS WARRANTY DOES NOT COVER INCIDENTAL OR<br />
CONSEQUENTIAL DAMAGES. LUTRON’S LIABILITY ON ANY CLAIM<br />
FOR DAMAGES ARISING OUT OF OR IN CONNECTION WITH THE<br />
MANUFACTURE, SALE, INSTALLATION, DELIVERY, OR USE OF THE<br />
UNIT SHALL NEVER EXCEED THE PURCHASE PRICE OF THE UNIT.<br />
This warranty gives you specific legal rights, and you may also have other<br />
rights which vary from state to state. Some states do not allow limitations on<br />
how long an implied warranty lasts, so the above limitation may not apply to<br />
you. Some states do not allow the exclusion or limitation of incidental or<br />
consequential damages, so the above limitation or exclusion may not apply<br />
to you.<br />
This product may be covered under one or more of the following U.S. patents:<br />
4,835,343; 4,954,768; 5,248,919; 5,399,940; 5,637,930; 5,736,965; 5,798,581;<br />
5,838,226; 5,848,054; 5,905,442; 5,982,103; DES 353,798; DES 378,814;<br />
DES 389,461; DES 389,805; DES 395,037; DES 404,013; DES 422,969; DES<br />
428,855; DES 436,579, DES 439,220 and corresponding <strong>for</strong>eign patents. U.S.<br />
and <strong>for</strong>eign patents pending. <strong>Lutron</strong> and RadioRA are registered trademarks of<br />
<strong>Lutron</strong> Electronics Co., Inc.<br />
© 2001 <strong>Lutron</strong> Electronics Co., Inc.<br />
<strong>Lutron</strong> Electronics Co., Inc.<br />
7200 Suter Road<br />
Coopersburg, PA 18036-1299, U.S.A.<br />
Made and printed in the U.S.A. 8/01 P/N 044-017 Rev. A<br />
English<br />
P/N 044-017<br />
®<br />
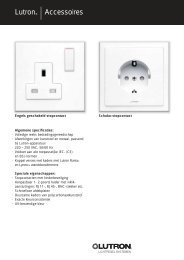
Wireless Home Lighting Control<br />
<strong>Installation</strong> <strong>Instructions</strong> <strong>for</strong><br />
<strong>Wall</strong>-<strong>Mounted</strong> <strong>Master</strong> <strong>Controls</strong><br />
Please Leave <strong>for</strong> Occupant<br />
Read all instructions completely be<strong>for</strong>e<br />
installation.<br />
Important Notes<br />
1. Install in accordance with all national and local<br />
electrical codes.<br />
2. A neutral wire connection is required <strong>for</strong> the<br />
<strong>Wall</strong>-<strong>Mounted</strong> <strong>Master</strong> control.<br />
3. Do not paint controls or wallplates.<br />
4. Clean with a soft damp cloth only. Do not<br />
use any chemical cleaners.<br />
5. Operate in ambient temperatures between 0°C<br />
(32°F) and 40°C (104°F).<br />
6. Recommended wallbox depth is 2 1 /2" minimum.<br />
7. The range and per<strong>for</strong>mance of the RadioRA®<br />
System is highly dependent on a variety of<br />
complex factors such as:<br />
• Distance between system components<br />
• Geometry of the home<br />
• Construction of walls separating system<br />
components<br />
• Electrical equipment located near system<br />
components<br />
8. Do not mix RadioRA® “A” and “B” frequency<br />
products within the same system. Products<br />
with different frequencies are not compatible.<br />
<strong>Wall</strong>-<strong>Mounted</strong> <strong>Master</strong> Control<br />
RAMC-5W, RAMC-10W, RAMC-15W<br />
RBMC-5W, RBMC-10W, RBMC-15W<br />
RAMC-5W-RL, RAMC-10W-RL, RAMC-15W-RL<br />
RBMC-5W-RL, RBMC-10W-RL, RBMC-15W-RL<br />
120/127VAC, 50/60Hz<br />
Table of Contents<br />
<strong>Installation</strong><br />
Operation of the <strong>Master</strong> Control<br />
Note: Request Application Note #41 on how to<br />
retrofit a RadioRA® <strong>Wall</strong>-<strong>Mounted</strong> <strong>Master</strong><br />
Control into an existing home.
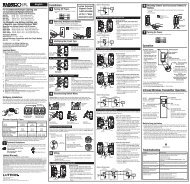
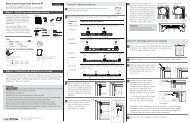
<strong>Installation</strong><br />
Installing a <strong>Wall</strong>-<strong>Mounted</strong> <strong>Master</strong> Control in a newly installed wallbox.<br />
Check off Steps as completed.<br />
Step 1 Turn power off at circuit breaker panel or remove<br />
fuse from fusebox.<br />
Important Wiring In<strong>for</strong>mation<br />
Wiring Diagram<br />
120/127V<br />
50/60Hz<br />
Neutral<br />
ON<br />
ON<br />
ON<br />
OFF<br />
OFF<br />
OFF<br />
When making wire connections, follow the recommended strip lengths and combinations <strong>for</strong> the<br />
supplied wire connectors. Note: Wire connectors provided are suitable <strong>for</strong> copper wire only.<br />
For aluminum wire, consult an electrician.<br />
Small:<br />
Strip insulation 3/8" <strong>for</strong> 14 AWG wire<br />
Strip insulation 1/2” <strong>for</strong> 16 or 18 AWG wire<br />
Use to join one 14 AWG supply wire with one 16 or<br />
18 AWG control wire.<br />
Large:<br />
Strip insulation 1/2" <strong>for</strong> 10, 12 or 14 AWG wire<br />
Strip insulation 5/8" <strong>for</strong> 16 or 18 AWG wire<br />
Use to join one or two 12 or 14 AWG supply wires<br />
with one 10, 12, 14, 16, or 18 AWG control wire.<br />
Step 2 Wire the Control.<br />
Using the wire connectors provided:<br />
• Connect the master control green<br />
ground wire to the green or bare<br />
copper ground wire in the wallbox.<br />
If there is no ground wire in your<br />
wallbox, consult an electrician.<br />
• Connect the black control wire to<br />
the HOT wire coming from the<br />
breaker panel.<br />
• Connect the white control wire to<br />
the NEUTRAL wire coming from the<br />
breaker panel.<br />
Hot<br />
Green<br />
ground wire.<br />
<strong>Master</strong> Control<br />
Black<br />
White<br />
Small<br />
Green<br />
Ground<br />
Large<br />
Neutral<br />
White<br />
Black<br />
Twist wire<br />
connector tight.<br />
Be sure no bare<br />
wire is exposed.<br />
Bare copper<br />
or green<br />
ground wire.<br />
Hot<br />
Step 3 Attach wallplate adapter. Mount and align control.<br />
Snap on Claro® wallplate (purchased separately).<br />
Tighten screws<br />
until snug.<br />
Align Control.<br />
Step 4 Turn power ON.<br />
ON<br />
ON<br />
ON<br />
OFF<br />
OFF<br />
OFF<br />
Snap on wallplate.<br />
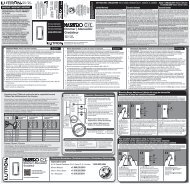
Operation of the <strong>Master</strong> Control<br />
Morning<br />
Brkfast<br />
Dinner<br />
Relax<br />
Goodnite<br />
Den<br />
Dining<br />
Rec Rm<br />
Family<br />
M Bedrm<br />
ALL ON<br />
ALL OFF<br />
Button<br />
Turns lights on/off.<br />
LEDs<br />
Glow when associated<br />
Room or Scene lights<br />
are on.<br />
Labels<br />
Printed and blank<br />
labels provided.<br />
All On<br />
All lights on.<br />
All Off<br />
All lights off.<br />
Raise<br />
Brighten ROOM or SCENE lights*.<br />
Lower<br />
Dim ROOM or SCENE lights*.<br />
* To select the ROOM or SCENE button you<br />
wish to Raise or Lower, quickly tap that button<br />
twice.<br />
NOTE: <strong>Master</strong> <strong>Controls</strong> will not operate until they have been<br />
programmed.<br />
For detailed instructions on programming your <strong>Master</strong><br />
Control, refer to the RadioRA® Setup Guide that is included<br />
with an RF Signal Repeater.