Panasonic SC-HT870 User Guide Manual Download Pdf
Panasonic SC-HT870 User Guide Manual Download Pdf
Panasonic SC-HT870 User Guide Manual Download Pdf

You also want an ePaper? Increase the reach of your titles
YUMPU automatically turns print PDFs into web optimized ePapers that Google loves.
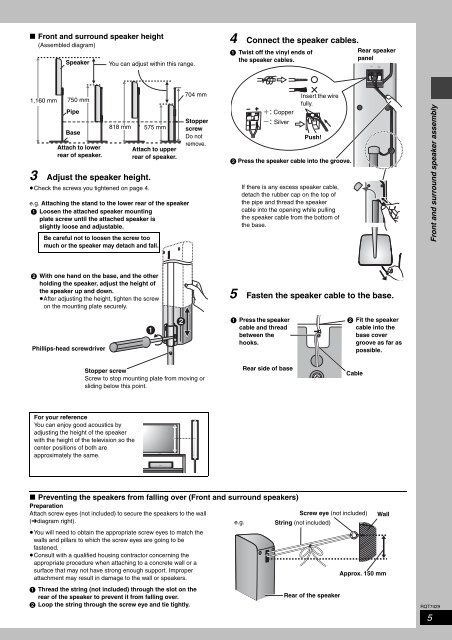
∫ Front and surround speaker height<br />
(Assembled diagram)<br />
1,160 mm<br />
Speaker<br />
750 mm<br />
Pipe<br />
Base<br />
Attach to lower<br />
rear of speaker.<br />
3 Adjust the speaker height.<br />
≥Check the screws you tightened on page 4.<br />
e.g. Attaching the stand to the lower rear of the speaker<br />
1 Loosen the attached speaker mounting<br />
plate screw until the attached speaker is<br />
slightly loose and adjustable.<br />
For your reference<br />
You can enjoy good acoustics by<br />
adjusting the height of the speaker<br />
with the height of the television so the<br />
center positions of both are<br />
approximately the same.<br />
You can adjust within this range.<br />
818 mm 575 mm<br />
Attach to upper<br />
rear of speaker.<br />
Be careful not to loosen the screw too<br />
much or the speaker may detach and fall.<br />
2 With one hand on the base, and the other<br />
holding the speaker, adjust the height of<br />
the speaker up and down.<br />
≥After adjusting the height, tighten the screw<br />
on the mounting plate securely.<br />
Phillips-head screwdriver<br />
704 mm<br />
Stopper<br />
screw<br />
Do not<br />
remove.<br />
Stopper screw<br />
Screw to stop mounting plate from moving or<br />
sliding below this point.<br />
4 Connect the speaker cables.<br />
1 Twist off the vinyl ends of<br />
the speaker cables.<br />
_: Copper<br />
`: Silver<br />
Insert the wire<br />
fully.<br />
5 Fasten the speaker cable to the base.<br />
∫ Preventing the speakers from falling over (Front and surround speakers)<br />
Preparation<br />
Attach screw eyes (not included) to secure the speakers to the wall<br />
Screw eye (not included) Wall<br />
(‹diagram right).<br />
≥You will need to obtain the appropriate screw eyes to match the<br />
walls and pillars to which the screw eyes are going to be<br />
fastened.<br />
≥Consult with a qualified housing contractor concerning the<br />
appropriate procedure when attaching to a concrete wall or a<br />
e.g.<br />
String (not included)<br />
surface that may not have strong enough support. Improper<br />
attachment may result in damage to the wall or speakers.<br />
1 Thread the string (not included) through the slot on the<br />
Approx. 150 mm<br />
rear of the speaker to prevent it from falling over.<br />
2 Loop the string through the screw eye and tie tightly.<br />
Rear of the speaker<br />
Push!<br />
2 Press the speaker cable into the groove.<br />
If there is any excess speaker cable,<br />
detach the rubber cap on the top of<br />
the pipe and thread the speaker<br />
cable into the opening while pulling<br />
the speaker cable from the bottom of<br />
the base.<br />
1 Press the speaker<br />
cable and thread<br />
between the<br />
hooks.<br />
Rear side of base<br />
Cable<br />
Rear speaker<br />
panel<br />
2 Fit the speaker<br />
cable into the<br />
base cover<br />
groove as far as<br />
possible.<br />
Front and surround speaker assembly<br />
RQT7429<br />
5