MR48

Create successful ePaper yourself
Turn your PDF publications into a flip-book with our unique Google optimized e-Paper software.
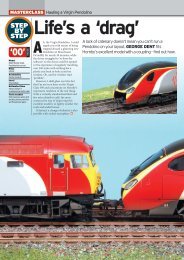
Thunderbirds are<br />
Virgin’s Latest Novelty Locomotives in ‘OO’<br />
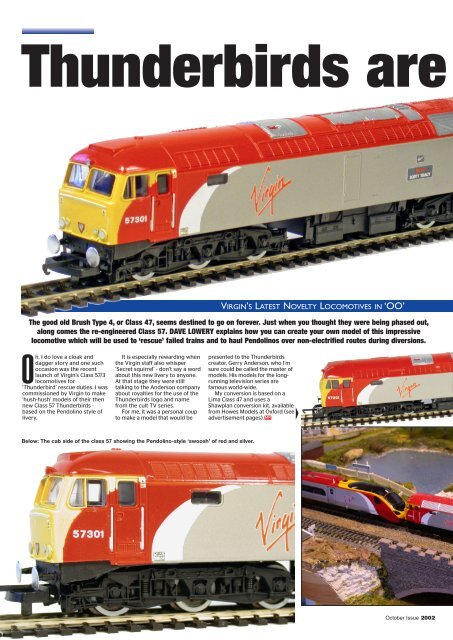
The good old Brush Type 4, or Class 47, seems destined to go on forever. Just when you thought they were being phased out,<br />
along comes the re-engineered Class 57. DAVE LOWERY explains how you can create your own model of this impressive<br />
locomotive which will be used to ‘rescue’ failed trains and to haul Pendolinos over non-electrified routes during diversions.<br />
Oh, I do love a cloak and<br />
dagger story and one such<br />
occasion was the recent<br />
launch of Virgin’s Class 57/3<br />
locomotives for<br />
‘Thunderbird’ rescue duties. I was<br />
commissioned by Virgin to make<br />
‘hush-hush’ models of their then<br />
new Class 57 Thunderbirds -<br />
based on the Pendolino style of<br />
livery.<br />
It is especially rewarding when<br />
the Virgin staff also whisper<br />
‘Secret squirrel’ - don’t say a word<br />
about this new livery to anyone.<br />
At that stage they were still<br />
talking to the Anderson company<br />
about royalties for the use of the<br />
Thunderbirds logo and name<br />
from the cult TV series.<br />
For me, it was a personal coup<br />
to make a model that would be<br />
presented to the Thunderbirds<br />
creator, Gerry Anderson, who I’m<br />
sure could be called the master of<br />
models. His models for the longrunning<br />
television series are<br />
famous world-wide.<br />
My conversion is based on a<br />
Lima Class 47 and uses a<br />
Shawplan conversion kit, available<br />
from Howes Models at Oxford (see<br />
advertisement pages). MR<br />
Below: The cab side of the class 57 showing the Pendolino-style ‘swoosh’ of red and silver.<br />
October Issue 2002
go!<br />
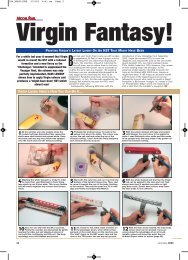
Here’s How You Can Do It...<br />
Carefully remove the handrail detail from the<br />
1front of the locomotive with a craft knife. Always<br />
use a new blade, and take several thin cuts rather<br />
than one large one. Drill holes at the extremes of<br />
the old moulding to take the new wire then finish<br />
off with a fine file.<br />
The next step is to fill in the marker light box<br />
2moulding. As this hole is reasonably large it is<br />
often worth gluing in a piece of Plastikard of an<br />
appropriate thickness first to part-fill the space,<br />
and then add filler, a little at a time, this will avoid<br />
possible shrinkage problems.<br />
The finished model in all its glory. A good gloss<br />
finish has been applied to the paintwork to give it<br />
the ‘new-off-the-shelf’ finish, which the prototypes<br />
exhibit. All final paints used in this conversion are<br />
from the Railmatch range.<br />
The roof modified with Shawplan Class 57 kit. Class<br />
57/3s actually have additional new roof sections but<br />
at present no conversion kit is available so the<br />
model is something of a compromise.<br />
Plastikard will give a solid base on which to<br />
3 apply the filler. This method reduces the amount<br />
of filler needed, therefore reudcing the likelyhood<br />
of shrinkage. The bodyside steps are small so can<br />
simply be filled. Allow the filler to dry and then<br />
smooth with wet-and-dry paper.<br />
It’s always wise to read the instructions<br />
4 thoroughly first. For this conversion, Shawplan<br />
tell you not to cut the buffer beams off the body<br />
until the main holes for the large lights have been<br />
drilled - good advice to avoid having to drill too<br />
close to the edge.<br />
Now you can run a Pendolino even if you don’t<br />
have overhead wires. Virgin’s Class 57s are fitted<br />
with equipment to power lights and air<br />
conditioning when hauling Pendolinos over nonelectrified<br />
routes.<br />
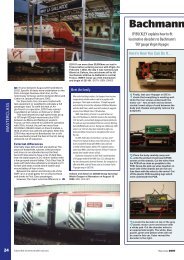
Always step-drill large holes that could weaken<br />
5the structure. Start with a small pilot drill and<br />
work your way up to the finished size, using a<br />
larger drill bit each time. The white metal lights<br />
should be ‘super-glued’ in place from the inside of<br />
the model. Ensure the lights fit square in the holes.<br />
Once the lights are in place and the glue is<br />
6cured, the front buffer beam can be removed<br />
from the model. Take extra care when using a<br />
razor saw, they can bite and it is painful! Cut the<br />
body upwards from the sides first, then cut back<br />
from the front.<br />
Once you have carefully cut off the buffer beam<br />
7take a large flat file and - and keeping it as<br />
square and as flat as possible - file the rest of the<br />
bufferbeam away, up to the lower edge of the front<br />
footsteps. Make a couple of file strokes then check<br />
as you can quickly go off-square.<br />
With the front ends altered, the roof is next.<br />
8 New etchings are required to represent the GM<br />
engine exhaust ports fitted to the ‘47s’ during<br />
conversion to ‘57s’. However, the roof<br />
modifications specific to the 57/3 are not available<br />
in kit form, so the model is a compromise.<br />
2002 October Issue<br />
31
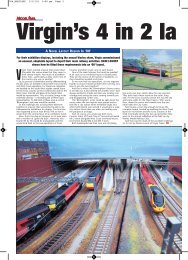
Here’s How You Can Do It... (Continued)<br />
The Shawplan 57/0 kit includes an excellent<br />
9representation of the exhaust box. The etch<br />
needs to be folded and curved to shape. A hole<br />
should to be cut into the roof using a razor saw,<br />
then carefully filed back to accommodate the new<br />
exhaust unit.<br />
When the body conversion complete, and you<br />
10 are happy the filler is smooth, the next step is<br />
to spray the model with Halfords white primer.<br />
Allow eight hours drying time then spray the cab<br />
ends and side using Phoenix paints Railtrack<br />
warning yellow.<br />
Front end details of 57301 in ‘Pendolino’ livery.<br />
Note revised buffer beam jumper connections to<br />
power auxiliaries on Pendolino and Voyager trains.<br />
BEN JONES<br />
When the yellow paint is completely dry, mask<br />
11 off the front. In preparation for the red paint.<br />
Use photographs for livery reference. Patience is<br />
the key to success check and re-check especially<br />
the curved line from the cab front up to the cab<br />
roof.<br />
I am fortunate to have an official colour<br />
12 diagram for the Pendolino style livery to be<br />
applied to the Thunderbird Class 57s. It is very<br />
important to get the same smooth curve at both<br />
ends of the model when applying the masking tape<br />
in preparation for the silver paint.<br />
Thunderbirds creator Gerry Anderson named 57301<br />
Scott Tracy at Euston on June 17. Shortly after<br />
unveiling the distinctive plate and International<br />
Rescue crest, Mr Anderson is joined by Scott<br />
himself. PAUL BIGLAND<br />
When masking off your model, always ensure<br />
13 that you have covered all painted areas. I<br />
decided to spray the silver body-side colour last as<br />
the metalic finish makes it difficlut to apply and<br />
remove masking tape, without damaging the<br />
model.<br />
I use thin RC26 tape (from Howes) to form the<br />
14 initial line to be masked. Then as seen in the<br />
last step a paper mask is cut to the shape of the<br />
painted area to be protected. The edges are sealed<br />
with masking tape and the final gap sealed with<br />
Maskol.<br />
The first of the class 57/3 locomotives at its Euston<br />
naming ceremony. It is possible that other train<br />
operators will also have similar locomotives for<br />
‘rescue’ of failed trains. PAUL BIGLAND<br />
I worked closely with Fox Transfers, who<br />
15 produced a selection of rub-down transfers to<br />
ease production of the models. White ‘Swishes’,<br />
Virgin logos in red, plus numbers and nameplates<br />
were comissioned. These will be availalbe in<br />
waterslide form soon from Fox Transfers.<br />
Finally the chassis end needs to be cut back<br />
16 and the centre gap filled with Plastikard. The<br />
etched brass replacement buffer beam can then be<br />
folded, soldered and glued in place. There are<br />
etched holes for adding pipework and turned brass<br />
buffers.<br />
32 October Issue 2002