- Page 1 and 2:
Learn to Program with Small Basic A
- Page 4 and 5:
Learn to Program with Small Basic A
- Page 6:
Brief Contents Foreword by Vijaye R
- Page 9 and 10:
Exploring Other Features. .........
- Page 11 and 12:
7 Empowering Programs with math 83
- Page 13 and 14:
12 building Graphical User Interfac
- Page 15 and 16:
Storing Records. ..................
- Page 18 and 19:
Foreword Computer programming is ma
- Page 20 and 21:
Acknowledgments This book represent
- Page 22 and 23:
Introduction Have you ever wondered
- Page 24 and 25:
• In Chapter 11: Event-Driven Pro
- Page 26 and 27:
1 Introducing Small Basic Bill Gate
- Page 28 and 29:
BASIC language that would help kids
- Page 30 and 31:
Toolbar Help Area Editor Surface Fi
- Page 32 and 33:
Then click the New button to open a
- Page 34 and 35:
Helping Hands: IntelliSense and Syn
- Page 36:
Programming Challenges If you get s
- Page 39 and 40:
The Parts of a Program Let’s expl
- Page 41 and 42:
The method’s name and a brief des
- Page 43 and 44:
5 + 7 12 Here’s the output of thi
- Page 45 and 46:
For example, to make the TextWindow
- Page 47 and 48:
TRY IT OUT 2-3 Now you have a chanc
- Page 49 and 50:
Programming Errors Just because a p
- Page 51 and 52:
26 Chapter 2 4. Write a program tha
- Page 53 and 54:
In the system you use at school, po
- Page 55 and 56:
Drawing Shapes You can draw lots of
- Page 57 and 58:
Figure 3-6 shows what the output lo
- Page 59 and 60:
22 GraphicsWindow.BrushColor = "Lig
- Page 61 and 62:
DrawText() takes three arguments. T
- Page 63 and 64:
GraphicsWindow provides two methods
- Page 65 and 66:
6. Write a program that draws this
- Page 68 and 69:
4 Using Variables Have you ever wan
- Page 70 and 71:
Try changing the value in karenBear
- Page 72 and 73:
These two ways of updating the scor
- Page 74 and 75:
Figure 4-2: How a variable is added
- Page 76 and 77:
TRY IT OUT 4-3 Write a program that
- Page 78 and 79:
Two Kinds of Data Programs use all
- Page 80 and 81:
5 Drawing Shapes with Turtle Graphi
- Page 82 and 83:
Absolute Motion With absolute motio
- Page 84 and 85:
North 0 (360) 315 (-45) 45 (-315) W
- Page 86 and 87:
GraphicsWindow.PenColor = "Red" Gra
- Page 88 and 89:
The For loop runs Turtle.Move(60) a
- Page 90 and 91:
y 5). For the hexagon (the polygon
- Page 92 and 93:
Creating Polygon Art Using Nested L
- Page 94 and 95:
Endless Graphics In Listing 5-10 yo
- Page 96:
Write a program to have the turtle
- Page 99 and 100:
Talking to the Computer Until now,
- Page 101 and 102:
Figure 6-2: The text window waiting
- Page 103 and 104:
4 C = (5 / 9) * (F - 32) 5 C = Math
- Page 105 and 106:
9 noun = TextWindow.Read() 10 11 Te
- Page 108 and 109:
7 Empowering Programs with Math If
- Page 110 and 111:
Here’s a sample run of our progra
- Page 112 and 113:
Round() -4 -3.5 -3 0 3 3.5 4 Round(
- Page 114 and 115:
This code snippet shows you some ex
- Page 116 and 117:
Let’s walk through this program l
- Page 118 and 119:
Trigonometric Methods Trigonometric
- Page 120:
Programming Challenges If you get s
- Page 123 and 124:
Small Basic uses a few different wa
- Page 125 and 126:
You can test all sorts of condition
- Page 127 and 128:
Small Basic first finds the value o
- Page 129 and 130:
Your mom’s instructions assume th
- Page 131 and 132:
But wait, your mom just realized th
- Page 133 and 134:
This code asks the user to enter a
- Page 136 and 137:
9 Using Decisions to Make Games Som
- Page 138 and 139:
Condition 1 True Statement set 1 If
- Page 140 and 141:
This change to the program means th
- Page 142 and 143:
Door 1 Door 2 Door 3 Figure 9-6: Pe
- Page 144 and 145:
Listing 9-4 shows an example of usi
- Page 146 and 147: Think of the Shapes object as a “
- Page 148 and 149: Background image (Grid.png) Star.pn
- Page 150 and 151: In Figure 9-8, you see that the gri
- Page 152 and 153: This code asks the player to enter
- Page 154 and 155: 10 Solving Problems with Subroutine
- Page 156 and 157: Gulliver later learned that 1 glum-
- Page 158 and 159: TRY IT OUT 10-1 When Gulliver asked
- Page 160 and 161: variables that belong to the main p
- Page 162 and 163: 4 TextWindow.WriteLine("Your turn.
- Page 164 and 165: 1 step away). If the arrow hits the
- Page 166 and 167: Then you set the graphics window’
- Page 168 and 169: 24 Shapes.SetText(msgText, "") 25 T
- Page 170 and 171: Step 8: Shoot Arrows with ShootArro
- Page 172 and 173: Lines 3-7 animate the dragon’s fi
- Page 174 and 175: 11 Event-Driven Programming So far,
- Page 176 and 177: GraphicsWindow Events Let’s start
- Page 178 and 179: 4 5 Sub OnKeyDown 6 GraphicsWindow.
- Page 180 and 181: 13 Else 14 GraphicsWindow.DrawText(
- Page 182 and 183: Useful Tips Before moving on, we’
- Page 184 and 185: 21 GraphicsWindow.BrushColor = "Red
- Page 186 and 187: 4 XG = Math.GetRandomNumber(8) - 1
- Page 188: Programming Challenges If you get s
- Page 191 and 192: Today, most programs use a graphica
- Page 193 and 194: located at (100, 100). By default,
- Page 195: 9 GraphicsWindow.MouseMove = OnMous
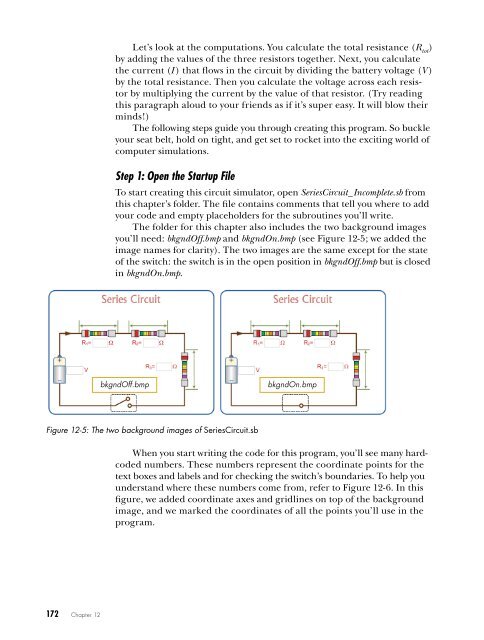
- Page 199 and 200: You start by loading the two backgr
- Page 201 and 202: (line 8). If the total resistance i
- Page 203 and 204: TRY IT OUT 12-4 Write a program to
- Page 206 and 207: 13 Repeating For Loops Have you eve
- Page 208 and 209: Each For loop starts with the keywo
- Page 210 and 211: The program uses a variable named s
- Page 212 and 213: TRY IT OUT 13-5 What does the follo
- Page 214 and 215: Nested Loops The statements in the
- Page 216 and 217: Figure 13-7: The output of Stamp.sb
- Page 218: 2. Although the pizza in the previo
- Page 221 and 222: In this chapter, you’ll learn how
- Page 223 and 224: Note Although it’s not required b
- Page 225 and 226: asks the user for the correct answe
- Page 227 and 228: to become a value other than 0 (thi
- Page 229 and 230: Step 4: Announce the Winner The las
- Page 232 and 233: 15 Grouping Data in One-Dimensional
- Page 234 and 235: One way to think of an array is as
- Page 236 and 237: The string initializer lets you fil
- Page 238 and 239: TextWindow.WriteLine("Enter 5 numbe
- Page 240 and 241: how much money was rescued from eac
- Page 242 and 243: To create this program, we’ll use
- Page 244 and 245: The apples fall from the trees. Usi
- Page 246 and 247:
The subroutine uses a For loop to c
- Page 248 and 249:
9 If ((xdiff < 20) And (ydiff < 20)
- Page 250:
4. Open the file USMapQuiz_Incomple
- Page 253 and 254:
Associative Arrays In the previous
- Page 255 and 256:
The expression If("ernie" = "Ernie"
- Page 257 and 258:
Here’s the output from a sample r
- Page 259 and 260:
The ContainsIndex() method takes tw
- Page 261 and 262:
Figure 16-1 shows the user interfac
- Page 263 and 264:
1 Sub OnButtonClicked 2 GraphicsWin
- Page 266 and 267:
17 Expanding to Higher-Dimension Ar
- Page 268 and 269:
1 ' Random2DArray.sb 2 For r = 1 To
- Page 270 and 271:
Animated Squares Let’s write a pr
- Page 272 and 273:
12 TextWindow.Write("Enter student
- Page 274 and 275:
(line 8). Line 9 displays Scott's M
- Page 276 and 277:
You start by initializing the sum v
- Page 278 and 279:
4 For col = 1 To 4 ' For each colum
- Page 280 and 281:
note If you run into any problems,
- Page 282 and 283:
First, you set all the elements of
- Page 284 and 285:
11 If ((rowP < 1) Or (rowP > 10) Or
- Page 286:
Open the file Okla.sb from this cha
- Page 289 and 290:
(both uppercase and lowercase), dig
- Page 291 and 292:
Taking Strings Apart: Substrings Ju
- Page 293 and 294:
two arguments: the source string th
- Page 295 and 296:
Here’s an output example: Who's y
- Page 297 and 298:
More on Code Points The Unicode cod
- Page 299 and 300:
Line 7 gets the Nth character of th
- Page 301 and 302:
Igpay Atinlay Let’s teach the com
- Page 303 and 304:
17 TextWindow.WriteLine("Good Job!"
- Page 305 and 306:
9 pos = Math.GetRandomNumber(len) '
- Page 307 and 308:
When you continue with the second a
- Page 309 and 310:
TRY IT OUT 18-10 Use the techniques
- Page 312 and 313:
19 Receiving File Input and Output
- Page 314 and 315:
and their meanings. File extensions
- Page 316 and 317:
program’s folder (right-click the
- Page 318 and 319:
in the file would run together in o
- Page 320 and 321:
Let’s experiment with the first p
- Page 322 and 323:
line number. As with the WriteLine(
- Page 324 and 325:
WARNING If the destination path poi
- Page 326 and 327:
6 For N = 1 To count ' Displays the
- Page 328 and 329:
wizard asks the user to perform. Th
- Page 330 and 331:
Figure 19-8 shows a sample run of t
- Page 332 and 333:
Where to Go from Here So you’ve m
- Page 334 and 335:
Index Numbers and Symbols 3DArrayDe
- Page 336 and 337:
squares, 31-32 star, 65-66 triangle
- Page 338 and 339:
integrated development environment
- Page 340 and 341:
parts of, 14-16 publishing, 5-6 run
- Page 342 and 343:
NewGame() subroutine, 255-256 OnBut
- Page 344:
ages 10 and up “Welcome to the ma