Hunter Residential Sprinkler System / Irrigation system design guide - Calgary irrigation
Residential Irrigation Service and Design Guide for underground sprinklers. Learn how to design, install, service, repair and winterize your underground sprinkler system. Irrigation Calgary. Lawn irrigation. Underground sprinklers Calgary
Residential Irrigation Service and Design Guide for underground sprinklers. Learn how to design, install, service, repair and winterize your underground sprinkler system. Irrigation Calgary. Lawn irrigation. Underground sprinklers Calgary

Create successful ePaper yourself
Turn your PDF publications into a flip-book with our unique Google optimized e-Paper software.
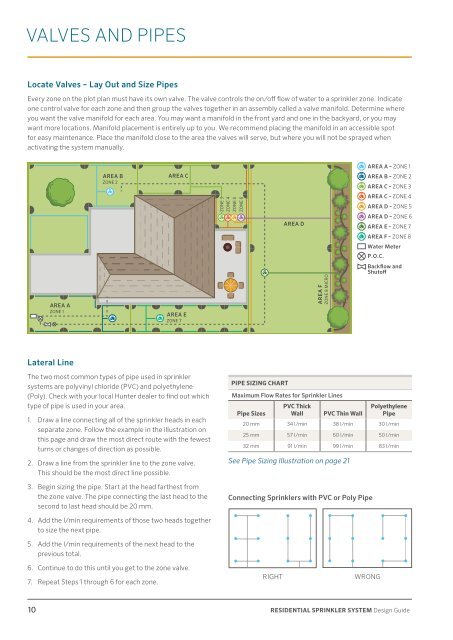
VALVES AND PIPES<br />
Locate Valves – Lay Out and Size Pipes<br />
Every zone on the plot plan must have its own valve. The valve controls the on/off flow of water to a sprinkler zone. Indicate<br />
one control valve for each zone and then group the valves together in an assembly called a valve manifold. Determine where<br />
you want the valve manifold for each area. You may want a manifold in the front yard and one in the backyard, or you may<br />
want more locations. Manifold placement is entirely up to you. We recommend placing the manifold in an accessible spot<br />
for easy maintenance. Place the manifold close to the area the valves will serve, but where you will not be sprayed when<br />
activating the <strong>system</strong> manually.<br />
AREA A<br />
ZONE 1<br />
AREA B<br />
ZONE 2<br />
AREA C<br />
AREA E<br />
ZONE 7<br />
ZONE 3<br />
ZONE 4<br />
ZONE 5<br />
ZONE 6<br />
AREA D<br />
AREA F<br />
ZONE 8 MICRO<br />
AREA A – ZONE 1<br />
AREA B – ZONE 2<br />
AREA C – ZONE 3<br />
AREA C – ZONE 4<br />
AREA D – ZONE 5<br />
AREA D – ZONE 6<br />
AREA E – ZONE 7<br />
AREA F – ZONE 8<br />
Water Meter<br />
P.O.C.<br />
Backflow and<br />
Shutoff<br />
Lateral Line<br />
The two most common types of pipe used in sprinkler<br />
<strong>system</strong>s are polyvinyl chloride (PVC) and polyethylene<br />
(Poly). Check with your local <strong>Hunter</strong> dealer to find out which<br />
type of pipe is used in your area.<br />
1. Draw a line connecting all of the sprinkler heads in each<br />
separate zone. Follow the example in the illustration on<br />
this page and draw the most direct route with the fewest<br />
turns or changes of direction as possible.<br />
2. Draw a line from the sprinkler line to the zone valve.<br />
This should be the most direct line possible.<br />
3. Begin sizing the pipe. Start at the head farthest from<br />
the zone valve. The pipe connecting the last head to the<br />
second to last head should be 20 mm.<br />
PIPE SIZING CHART<br />
Maximum Flow Rates for <strong>Sprinkler</strong> Lines<br />
PVC Thick<br />
Pipe Sizes Wall PVC Thin Wall<br />
Connecting <strong>Sprinkler</strong>s with PVC or Poly Pipe<br />
Polyethylene<br />
Pipe<br />
20 mm 34 l/min 38 l/min 30 l/min<br />
25 mm 57 l/min 60 l/min 50 l/min<br />
32 mm 91 l/min 99 l/min 83 l/min<br />
See Pipe Sizing Illustration on page 21<br />
4. Add the l/min requirements of those two heads together<br />
to size the next pipe.<br />
5. Add the l/min requirements of the next head to the<br />
previous total.<br />
6. Continue to do this until you get to the zone valve.<br />
7. Repeat Steps 1 through 6 for each zone.<br />
RIGHT<br />
WRONG<br />
10 RESIDENTIAL SPRINKLER SYSTEM Design Guide