Potentiostat/Galvanostat/ZRA Quick-Start Guide - Egmont Instruments
Potentiostat/Galvanostat/ZRA Quick-Start Guide - Egmont Instruments
Potentiostat/Galvanostat/ZRA Quick-Start Guide - Egmont Instruments

Create successful ePaper yourself
Turn your PDF publications into a flip-book with our unique Google optimized e-Paper software.
Reference 600 <strong>Potentiostat</strong>/<strong>Galvanostat</strong>/<strong>ZRA</strong> <strong>Quick</strong>-<strong>Start</strong> <strong>Guide</strong><br />
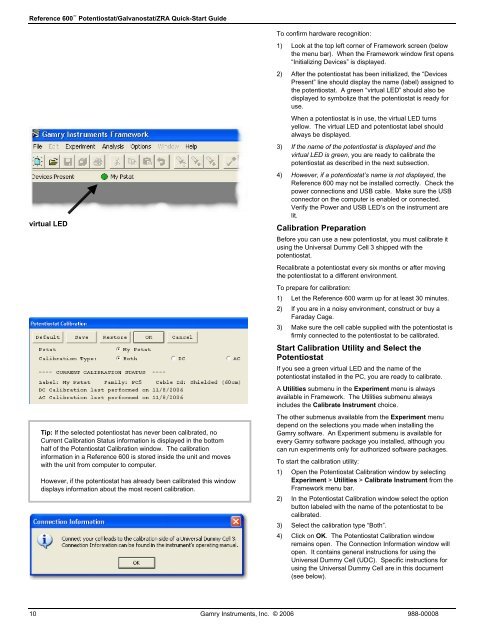
virtual LED<br />
Tip: If the selected potentiostat has never been calibrated, no<br />
Current Calibration Status information is displayed in the bottom<br />
half of the <strong>Potentiostat</strong> Calibration window. The calibration<br />
information in a Reference 600 is stored inside the unit and moves<br />
with the unit from computer to computer.<br />
However, if the potentiostat has already been calibrated this window<br />
displays information about the most recent calibration.<br />
To confirm hardware recognition:<br />
1) Look at the top left corner of Framework screen (below<br />
the menu bar). When the Framework window first opens<br />
“Initializing Devices” is displayed.<br />
2) After the potentiostat has been initialized, the “Devices<br />
Present” line should display the name (label) assigned to<br />
the potentiostat. A green “virtual LED” should also be<br />
displayed to symbolize that the potentiostat is ready for<br />
use.<br />
When a potentiostat is in use, the virtual LED turns<br />
yellow. The virtual LED and potentiostat label should<br />
always be displayed.<br />
3) If the name of the potentiostat is displayed and the<br />
virtual LED is green, you are ready to calibrate the<br />
potentiostat as described in the next subsection.<br />
4) However, if a potentiostat’s name is not displayed, the<br />
Reference 600 may not be installed correctly. Check the<br />
power connections and USB cable. Make sure the USB<br />
connector on the computer is enabled or connected.<br />
Verify the Power and USB LED’s on the instrument are<br />
lit.<br />
Calibration Preparation<br />
Before you can use a new potentiostat, you must calibrate it<br />
using the Universal Dummy Cell 3 shipped with the<br />
potentiostat.<br />
Recalibrate a potentiostat every six months or after moving<br />
the potentiostat to a different environment.<br />
To prepare for calibration:<br />
1) Let the Reference 600 warm up for at least 30 minutes.<br />
2) If you are in a noisy environment, construct or buy a<br />
Faraday Cage.<br />
3) Make sure the cell cable supplied with the potentiostat is<br />
firmly connected to the potentiostat to be calibrated.<br />
<strong>Start</strong> Calibration Utility and Select the<br />
<strong>Potentiostat</strong><br />
If you see a green virtual LED and the name of the<br />
potentiostat installed in the PC, you are ready to calibrate.<br />
A Utilities submenu in the Experiment menu is always<br />
available in Framework. The Utilities submenu always<br />
includes the Calibrate Instrument choice.<br />
The other submenus available from the Experiment menu<br />
depend on the selections you made when installing the<br />
Gamry software. An Experiment submenu is available for<br />
every Gamry software package you installed, although you<br />
can run experiments only for authorized software packages.<br />
To start the calibration utility:<br />
1) Open the <strong>Potentiostat</strong> Calibration window by selecting<br />
Experiment > Utilities > Calibrate Instrument from the<br />
Framework menu bar.<br />
2) In the <strong>Potentiostat</strong> Calibration window select the option<br />
button labeled with the name of the potentiostat to be<br />
calibrated.<br />
3) Select the calibration type “Both”.<br />
4) Click on OK. The <strong>Potentiostat</strong> Calibration window<br />
remains open. The Connection Information window will<br />
open. It contains general instructions for using the<br />
Universal Dummy Cell (UDC). Specific instructions for<br />
using the Universal Dummy Cell are in this document<br />
(see below).<br />
10 Gamry <strong>Instruments</strong>, Inc. © 2006 988-00008