The Journal of Australian Ceramics Vol 51 No 3 November 2012

You also want an ePaper? Increase the reach of your titles
YUMPU automatically turns print PDFs into web optimized ePapers that Google loves.
Focus: Technical<br />
---------- ---------<br />
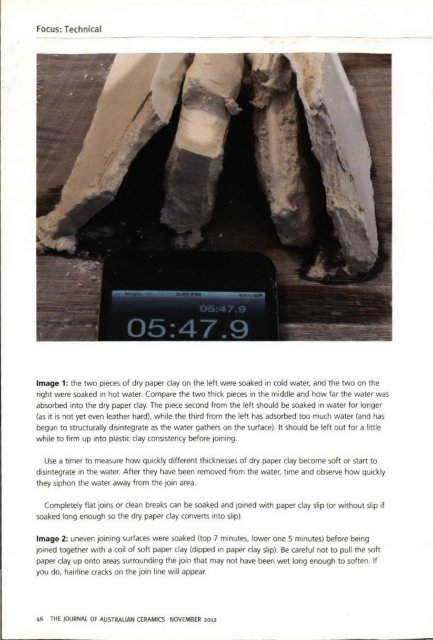
Image 1: the two pieces <strong>of</strong> dry paper clay on the left were soaked in cold water, and the two on the<br />
right were soaked in hot water. Compare the two thick pieces in the middle and how far the water was<br />
absorbed into the dry paper clay. <strong>The</strong> piece second from the left should be soaked in water for longer<br />
(as it is not yet even leather hard), while the third from the left has adsorbed too much water (and has<br />
begun to structurally disintegrate as the water gathers on the surface). It should be left out for a little<br />
while to firm up into plastic clay consistency before joining.<br />
Use a timer to measure how quickly different thicknesses <strong>of</strong> dry paper clay become s<strong>of</strong>t or start to<br />
disintegrate in the water. After they have been removed from the water, time and observe how quickly<br />
they siphon the water away from the join area.<br />
Completely flat joins or clean breaks can be soaked and joined with paper clay slip (or without slip if<br />
soaked long enough so the dry paper clay converts into slip).<br />
Image 2: uneven joining surfaces were soaked (top 7 minutes, lower one 5 minutes) before being<br />
joined together with a coil <strong>of</strong> s<strong>of</strong>t paper clay (dipped in paper clay slip). Be careful not to pull the s<strong>of</strong>t<br />
paper clay up onto areas surrounding the join that may not have been wet long enough to s<strong>of</strong>ten. If<br />
you do, hai rline cracks on the join line will appear.<br />
46 THE JOURNAL OF AUSTRALIAN CERAMICS NOVEMBER <strong>2012</strong>