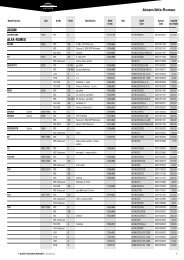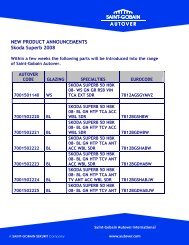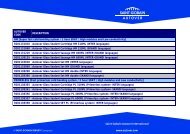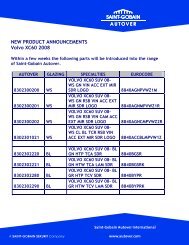
Heating Box Sensor Repair Autover SensorPad
Heating Box Sensor Repair Autover SensorPad
Heating Box Sensor Repair Autover SensorPad

You also want an ePaper? Increase the reach of your titles
YUMPU automatically turns print PDFs into web optimized ePapers that Google loves.
The sensor of vehicles such as the<br />
VW Passat B6, Tiguan and Skoda<br />
Roomster are attached to the glass<br />
using a translucent (milky) silicone<br />
pad. Removing this sensor type<br />
can cause problems as the silicone<br />
pad can become damaged and the<br />
sensor unit’s performance then<br />
becomes impaired.<br />
<strong>Autover</strong> <strong>Sensor</strong>Pad provides a costeffective<br />
way of repairing this type<br />
of sensor. The two-component<br />
silicone gel in combination with<br />
the unique refill moulds enables<br />
the silicone pad to be re-built<br />
exactly like the original.<br />
<strong>Autover</strong> <strong>Sensor</strong>Pad is used to create<br />
translucent (milky) silicone pads.<br />
<strong>Autover</strong><br />
<strong>Sensor</strong>Pad<br />
Benefits<br />
• Saves costs: purchase of<br />
expensive new gel sensors<br />
are no longer required<br />
• Easy to use<br />
• Very short curing time<br />
• Translucent (milky) appearance<br />
just like the original pad<br />
• Constant material properties<br />
between -40°C and +180°C<br />
• Completely safe: contains no<br />
toxic or irritating substances<br />
<strong>Autover</strong> code: 920 113 8150<br />
57 mm<br />
40 mm<br />
<strong>Autover</strong> code: 920 113 8151<br />
Application of <strong>Autover</strong> <strong>Sensor</strong>Pad<br />
1. Remove the rain/light sensor from the windscreen<br />
2. Remove the control unit<br />
3. Remove gel residue from the sensor<br />
4. Clean the sensor surface<br />
5. Grease the refill mould with the silicone grease and applicator provided<br />
Important: greasing is necessary to ensure the cured gel does not<br />
adhere to the mould<br />
6. Place the sensor optical unit into the refill mould and push tightly<br />
7. Place the refill mould on a level and even surface<br />
(we recommend using the <strong>Heating</strong> <strong>Box</strong>)<br />
8. Remove the sealing cap from syringe. Important: before using the<br />
syringe, put it vertically for five minutes to ensure that no air bubbles<br />
are trapped<br />
9. Attach mixer nozzle to syringe and tighten in position<br />
10. Insert the slider into the syringe<br />
11. Apply gel and fill up to the top edge of the refill mould<br />
12. Allow to cure for a few minutes<br />
13. After curing carefully remove the refill mould from the sensor<br />
14. The sensor is now ready to be re-used!<br />
For detailed application advice, please refer to the instruction leaflet in the<br />
packaging.<br />
Refill moulds<br />
<strong>Autover</strong> <strong>Sensor</strong>Pad can only be used in combination with the refill moulds.<br />
The application of the two-component gel needs to be done in the right<br />
positioning and at the correct height. The difference between the refill<br />
moulds is the measurement.<br />
62 mm<br />
40 mm<br />
This refill mould comes with a pin<br />
for the filling of sensors with a<br />
light eye<br />
<strong>Autover</strong> code: 920 113 8339<br />
67 mm<br />
40 mm<br />
<strong>Autover</strong> code: 920 113 8340<br />
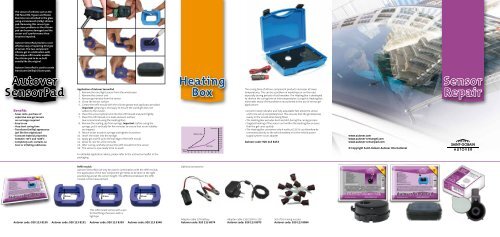
<strong>Heating</strong><br />
<strong>Box</strong><br />
Without box<br />
Ambient<br />
Temp.<br />
25 20 15 10 5 0 -5 -10 -15 ˚C<br />
Optional accessories<br />
With box<br />
Time/min.<br />
Adapter cable 12V battery<br />
<strong>Autover</strong> code: 920 113 8074<br />
60<br />
55<br />
50<br />
45<br />
40<br />
35<br />
30<br />
25<br />
20<br />
15<br />
10<br />
5<br />
The curing time of all two-component products increases at lower<br />
temperatures. This can be a problem in workshops or on the road,<br />
especially during periods of cold weather. The <strong>Heating</strong> <strong>Box</strong> is developed<br />
to shorten the curing time at low temperatures. Using this <strong>Heating</strong> <strong>Box</strong><br />
eliminates many of the problems encountered in the use of sensor gel<br />
applications:<br />
• A built-in level indicator and fully adjustable feet allow the sensor<br />
unit to be set up completely level. This ensures that the gel disperses<br />
evenly in the mould when being filled<br />
• The <strong>Heating</strong> <strong>Box</strong> excludes dust and dirt during the curing process<br />
• Targeted heating of the sensor unit within the <strong>Heating</strong> <strong>Box</strong> ensures<br />
that the gel cures quickly<br />
• The <strong>Heating</strong> <strong>Box</strong> consumes only 4 watts at 12V. It can therefore be<br />
connected directly to the vehicle battery or to the vehicle power<br />
supply system via an adapter<br />
<strong>Autover</strong> code: 920 113 8153<br />
Adapter cable 110/220V to 12V<br />
<strong>Autover</strong> code: 920 113 8075<br />
Set of 10 mixing nozzles<br />
<strong>Autover</strong> code: 920 113 8084<br />
www.autover.com<br />
www.autover-sensorgel.com<br />
www.autover-sensorpad.com<br />
© Copyright Saint-Gobain <strong>Autover</strong> International<br />
<strong>Sensor</strong><br />
<strong>Repair</strong>
This two-component silicone gel<br />
is developed for the repair of the<br />
round type rain and light sensors.<br />
This refill gel eliminates the need<br />
for expensive replacement costs.<br />
<strong>Autover</strong> <strong>Sensor</strong>Gel is extremely<br />
simple to use, and the repaired<br />
sensor can be re-attached to the<br />
windscreen within just a few<br />
minutes.<br />
The optional <strong>Heating</strong> <strong>Box</strong> extends<br />
the working range of the <strong>Autover</strong><br />
<strong>Sensor</strong>Gel in mobile situations up<br />
to -15°C.<br />
<strong>Autover</strong> <strong>Sensor</strong>Gel is used to create<br />
transparant (clear) silicone pads.<br />
<strong>Autover</strong><br />
<strong>Sensor</strong>Gel<br />
Benefits<br />
• Saves costs: purchase of<br />
expensive new gel sensors<br />
are no longer required<br />
• Suitable for all relevant vehicle<br />
models<br />
• Easy to use<br />
• Very short curing time<br />
• Highly transparent (as clear as glass)<br />
• Constant material properties<br />
between -40°C and +180°C<br />
• No gas emission during curing<br />
procedure, stays stable and<br />
does not shrink<br />
• Completely safe: contains no<br />
toxic or irritating substances<br />
<strong>Autover</strong> code: 920 113 8072<br />
Application of <strong>Autover</strong> <strong>Sensor</strong>Gel<br />
1. Detach the rain/light sensor from the windscreen<br />
2. Remove the control unit<br />
3. Clean the sensor surface by removing old gel completely<br />
4. Place sensor on level surface<br />
(we recommend using the <strong>Heating</strong> <strong>Box</strong>)<br />
5. Take the cap off the syringe<br />
6. Fit the mixer jet to the syringe, and lock in position<br />
7. Insert the slider in the syringe<br />
8. Apply gel to the clean optical surface<br />
9. Leave to cure for a few minutes on a level surface<br />
10. The sensor is now ready to be re-used!<br />
For detailed application advice, please refer to the instruction leaflet<br />
in the packaging.<br />
To bring more flexibility and<br />
efficiency to the repair of sensors,<br />
we introduced <strong>Autover</strong> <strong>Sensor</strong><br />
Instant Pad to our range. <strong>Autover</strong><br />
<strong>Sensor</strong> Instant Pad is a pre-formed<br />
silicone pad which is directly ready<br />
to be used.<br />
Previous sensor replacement pads<br />
were based on acrylic, which is<br />
difficult to handle.<br />
<strong>Autover</strong> <strong>Sensor</strong> Instant Pad is made<br />
of silicone, like the original.<br />
<strong>Autover</strong><br />
<strong>Sensor</strong><br />
Instant Pad<br />
Benefits<br />
• Saves costs: purchase of<br />
expensive new gel sensors<br />
are no longer required<br />
• Pads made of silicone<br />
• Non-adhesive<br />
• Resistant against dust, grease,<br />
finger prints etc<br />
• Bubble-free installation of the<br />
sensor<br />
• Highly elastic<br />
• Transparent<br />
• Light refraction similar to glass<br />
for a flawless transmission<br />
• Easy handling and application<br />
The range of <strong>Autover</strong> <strong>Sensor</strong> Instant Pads can be<br />
divided into 2 categories:<br />
Category 1<br />
1. Alternative to<br />
<strong>Autover</strong> <strong>Sensor</strong>Gel / <strong>Autover</strong> <strong>Sensor</strong>Pad<br />
<strong>Autover</strong> code:<br />
920 904 0008 5 pcs<br />
37<br />
27<br />
12<br />
44<br />
<strong>Autover</strong> No.<br />
920 904 0027 5 pcs<br />
50<br />
<strong>Autover</strong> No.<br />
920 904 0029 1 pcs<br />
33.5<br />
27<br />
<strong>Autover</strong> code:<br />
920 904 0022 5 pcs<br />
<strong>Autover</strong> No.<br />
920 904 0028 5 pcs<br />
31<br />
44<br />
45<br />
41<br />
<strong>Autover</strong> No.<br />
920 904 0030 1 pcs<br />
32.4<br />
<strong>Autover</strong> code:<br />
920 904 0025 5 pcs<br />
Category 2<br />
2. Only option for repair.<br />
Category 2 are pads for sensors that do not have a<br />
border and therefore <strong>Autover</strong> <strong>Sensor</strong>Gel or <strong>Autover</strong><br />
<strong>Sensor</strong>Pad can not be used as the gel would fall off.<br />
<strong>Autover</strong> code:<br />
920 904 0012 5 pcs<br />
<strong>Autover</strong> code:<br />
920 904 0016 5 pcs<br />
<strong>Autover</strong> code:<br />
920 904 0024 5 pcs<br />
7<br />
24<br />
25<br />
41<br />
34<br />
27<br />
26<br />
34<br />
<strong>Autover</strong> code:<br />
920 904 0010 5 pcs<br />
24<br />
45<br />
<strong>Autover</strong> code:<br />
920 904 0014 5 pcs<br />
27<br />
46<br />
<strong>Autover</strong> code:<br />
920 904 0018 5 pcs<br />
27<br />
26<br />
<strong>Autover</strong> code:<br />
920 904 0020 5 pcs<br />
Application of <strong>Autover</strong> <strong>Sensor</strong> Instant Pad<br />
1. Remove the rain/light sensor from the windscreen<br />
2. Remove the control unit (if necessary)<br />
3. Remove old silicone pad completely<br />
4. Remove cover liners of new pad<br />
5. Apply silicone pad to sensor optics first<br />
6. Apply sensor unit to the windscreen<br />
7. For bubble-free application, we recommend to moisten the<br />
pad with water or windscreen cleaner<br />
8. The sensor is now ready to be re-used!