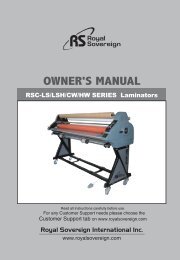
Royal Sovereign RSC6500H Heat Assist Wide Format Laminator 65” - Printfinish.com
Print Finish offers Royal Sovereign RSC6500H Heat Assist Wide Format Laminator 65’ at an affordable price rate. Machine has wide format laminator 65″, top roller heat assist. Machine is ideal for POP displays, trade-show graphics, posters, vehicle graphics. Machine has easy access controls and foot pedal for hands-free operation. For more information about Laminators Machine then visits @ https://printfinish.com/shop/roll_laminators/royal-sovereign-rsc-6500h-heat-assist-laminator/.
Print Finish offers Royal Sovereign RSC6500H Heat Assist Wide Format Laminator 65’ at an affordable price rate. Machine has wide format laminator 65″, top roller heat assist. Machine is ideal for POP displays, trade-show graphics, posters, vehicle graphics. Machine has easy access controls and foot pedal for hands-free operation. For more information about Laminators Machine then visits @ https://printfinish.com/shop/roll_laminators/royal-sovereign-rsc-6500h-heat-assist-laminator/.

You also want an ePaper? Increase the reach of your titles
YUMPU automatically turns print PDFs into web optimized ePapers that Google loves.
DECALING<br />
· Please Adjust the wheel to Change the roller pressure with different Material for the best Laminating quality.<br />
1. Pluged in and turn the power switch on (“I” position). The Power switch is located on the rear right side of the unit<br />
and press the “power” button.<br />
2. Complete the steps as in the “LOADING FILM” section (see page 10).<br />
3. Set the top roller to the desired temperature .<br />
4. Pull the top film down over the table front to the bottom of the craft paper.<br />
5. Align and center the craft paper to the top film.<br />
6. Thread the top film underneath the Upper Idle Bar.<br />
7. Tape the top film on to the Release Liner Take-Up.<br />
8. Cut and separate the release liner and the film.<br />
9. Thread the craft paper over the table front to the top film that is resting on the main roller.<br />
10. Adjust the nip wheel to a appropriate gap.<br />
11. Insert and push the leader board until they reach the front nip point.<br />
12. Push the Run button.<br />
13. Push the leader board into the rollers.<br />
14. Adjust the film system, take up system, feeding and rewinding system tension knob by rotating it clockwise or counter<br />
clockwise. Turn it until the films have some resistance (The tension varies depending on the films thickness). Keep the<br />
film and laminating material transmitting and rewinding smooth the more loose the better.<br />
15. Press the Stop button when the leader board has <strong>com</strong>pletely exited from the rollers.<br />
16. Cut the leader board from the web (see page 9).<br />
17. Set the nip setting to the appropriate position for the Over-lamination / Decaling application.<br />
MOUNTING<br />
· Please Adjust the wheel to Change the roller pressure with different Material for the best Laminating quality.<br />
1. Lay the decaled image face down on a flat surface. Carefully peel back and put a crease along the edge of the release<br />
liner.<br />
2. With the image facing up, align the image onto the board. Press firmly from the center out.<br />
3. Adjust the pressure lever to ensure the proper opening.<br />
4. Flip the image over the upper roller and hold on to the release liner.<br />
5. Press the foot pedal once, and then let it go while slowly pulling the release liner as the board enters the main roller nip.<br />
Press the foot pedal once again when the board has <strong>com</strong>pletely exited from the rear of the unit.<br />
Trim the board if necessary.<br />
12