
Create successful ePaper yourself
Turn your PDF publications into a flip-book with our unique Google optimized e-Paper software.
Published <strong>by</strong> Tuttle Publishing, an imprint of Periplus Editions (HK) Ltd.<br />
www.tuttlepublishin g.com<br />
Copyright @ 2009 <strong>Michael</strong> <strong>LaFosse</strong> <strong>and</strong> <strong>Richard</strong> Alex<strong>and</strong>er.<br />
All rights reseryed. No part of this publication may be reproduced or utilized in any<br />
form or <strong>by</strong> any means, electronic or mechanica[, including photocopying, recording,<br />
or <strong>by</strong> any information storage <strong>and</strong> retrieval system, without prior written permission<br />
from the publisher.,<br />
Library of Congress Cataloging-in-Publication Data<br />
<strong>LaFosse</strong>, <strong>Michael</strong> G,<br />
<strong>Money</strong> origami : make the most of your dollar! / <strong>Michael</strong> G. <strong>LaFosse</strong>,<br />
<strong>Richard</strong> L. Alex<strong>and</strong>er. -- 1st ed.<br />
P.cm.<br />
lncludes bibliographical references <strong>and</strong> index.<br />
ISBN 978-0-8048-4026-2 (kit : alk. paper)<br />
1. <strong>Origami</strong>.2. <strong>Money</strong> in art. l. Alex<strong>and</strong>er; <strong>Richard</strong> L., 1953- ll. Title.<br />
rr870.L234245 2009<br />
736'.982--dc22<br />
2048043s21<br />
tsBN 978-0-8048-4026-2<br />
Distributed <strong>by</strong><br />
North America, Latin America & Europe<br />
Tuttle Publishing<br />
364 lnnovation Drive<br />
North Clarendon, VT 05759-9436 U.S.A.<br />
Tel: 1 (802) 773-8930<br />
Fax: 1 (8OZ) 773-6993<br />
i nfo@tuttlepu blish in g. com<br />
www.tuttlepubl ish i n g. com<br />
First edition<br />
14131211 109876<br />
Printed in Hong Kong<br />
Diagrams <strong>by</strong> <strong>Michael</strong> G. <strong>LaFosse</strong><br />
Photography <strong>by</strong> <strong>Richard</strong> L. Alex<strong>and</strong>er<br />
Asia Pacific<br />
Berkeley Books Pte. Ltd.<br />
61 Tai Seng Avenue, #02-12<br />
Singapore 534167<br />
Tel: (65) 6280-1330<br />
Fax: (65) 6280-6290<br />
inqu iries@periplus.com.sg<br />
www.periplus.com<br />
Video instructicins for folding many other origami projects are available on DVD<br />
from the <strong>Origami</strong>do Studio website, www.origamido.com.<br />
5<br />
s<br />
&<br />
II<br />
l4<br />
I8<br />
,o<br />
)l<br />
)lt<br />
)11<br />
t)<br />
.$l<br />
'5',{<br />
:${*<br />
&{<br />
44,<br />
*'s -&r<br />
{}<br />
55<br />
56<br />
5S<br />
6p<br />
lntrod u ction<br />
X-Wa llet<br />
"Eye" Ring<br />
St<strong>and</strong>-Up Shirt<br />
Angel Ornament<br />
Four-Dollar Tall Box<br />
Haverhill High-Top Shoe<br />
Five-Pointed, Five-Dollar Star<br />
Dollar Bill Butterfly<br />
Cube Box With Lid<br />
Monkey Face Ring<br />
Jumping Frog (With Eyes)<br />
George Napkin Ring<br />
Business Card Holder<br />
Paper Airplane<br />
Rectangular Box With Lid<br />
Lightning Bolt Favor<br />
Chinese Dragon/Sea Serpent<br />
Th istle<br />
Three-Dollar Step Pyramid<br />
Wheel Of Fortune<br />
Mr. Bi!! Green<br />
TUTTLE PUBLISH ING@ is a registered trademark of Tuttle Publishing,<br />
a division of Periplus Editions (HK) Ltd.
i Symbols Key<br />
trodrrction<br />
Obverse (Front)<br />
-<br />
Fold in Front<br />
^<br />
>>tu<br />
Move or Push<br />
-<br />
Fan Fold<br />
Fold & Unfold<br />
Reverse (Back)<br />
- Mountain Fold<br />
Fold to the back<br />
For over ten years, the <strong>Origami</strong>do<br />
Studio in Haverhill, Massachusetts<br />
played host to many who stopped <strong>by</strong><br />
to see the origami works on display.<br />
There was a modest collection of<br />
folded dollar bills on display, mostly<br />
gifts from friends, <strong>and</strong> the regulars<br />
would bring in their friends <strong>and</strong> relatives<br />
specifically to see that case.<br />
For several years, we also demonstrated<br />
origami at the Topsfield Fair,<br />
just north of Boston, <strong>and</strong> despite<br />
magnificent origami works on display,<br />
there would be an inordinate fascination<br />
with origaml from dollar bllls.<br />
There are sevcral reasons dollar bill<br />
origami modcls are so popular:<br />
o Folding ths durable paper is nondcetructlve,<br />
<strong>and</strong> even if you don't<br />
give it as a gift or tip, you can reuse<br />
it or spend it.<br />
. The engraving patterns <strong>and</strong><br />
symbols are intricate, beautiful <strong>and</strong><br />
interesting, <strong>and</strong> can be incorporated<br />
cleverly into hundreds of<br />
designs.<br />
. Of all the paper money in use<br />
around the world, the US Dollar<br />
bills are relatively inexpensive, <strong>and</strong><br />
are readily available.<br />
. Often when you have time to kill,<br />
unexpectedly waiting for something<br />
or someone, there is no other folding<br />
paper available.<br />
o Every project has guaranteed value!<br />
For many people, dollar bill models<br />
were some of the first origami they<br />
learned, thanks to the early work of<br />
Florence Temko, a prolific origami<br />
designer, author, teacher, performer,<br />
<strong>and</strong> mentor to many other origami<br />
professionals in Great Britain <strong>and</strong> the<br />
USA. ln fact, this book began as an<br />
idea for a collection of early models<br />
chosen <strong>by</strong> Joyce Saler, a dear friend,<br />
<strong>and</strong> an advanced origami enthusiast<br />
from Concord, Massachusetts, who<br />
confided that she found the most<br />
enjoyment from a few, simple origami<br />
models she learned many years<br />
ago-models that children could<br />
remember easily.<br />
Your local bank is the source for<br />
crisp, clean, new dollar bills-if you<br />
ask. For hygiene's sake, you will want<br />
to use br<strong>and</strong> new bills whenever<br />
using money to decorate your table<br />
(napkin rings, place holders, etc.).<br />
Since most paper currency is made<br />
from long, strong fibers, you often<br />
can wash, dry, <strong>and</strong> gently iron circulated<br />
bills to make them crisp <strong>and</strong><br />
cJean, but they will never look quite<br />
as nice as newly printed currency.<br />
To delve deeper into the world of<br />
money origami, explore the works<br />
of Stephen Weiss of Florida, John<br />
Montroll of Maryl<strong>and</strong>, Marc Sky of<br />
New Jersey, <strong>and</strong> Won Park, <strong>and</strong> Jodi<br />
Fukumoto of Hawaii.<br />
We trust that this book will help<br />
you to more thoroughly enjoy the<br />
contents of your wallet. These tokens<br />
have inherent value, <strong>and</strong> whether<br />
the recipient cherishes the gift, or<br />
simply unfolds <strong>and</strong> spends it, you<br />
know it won't be thrown away!
x<br />
." Begin obverse side up. Fold<br />
the right edge up to match the top<br />
edge <strong>and</strong> the left edge down to the<br />
bottom edge.<br />
Fold in half. Look ahead<br />
at figure three for the shape.<br />
Designed <strong>by</strong> <strong>Richard</strong> L. Alex<strong>and</strong>er, 2006<br />
This simple, 2-piece design is my h<strong>and</strong>y way to hide the<br />
majority of a generous cash tip, while making a neat,<br />
decorative presentation. Despite its simplicity we are<br />
amazed <strong>by</strong> the number of people who learn it, only to<br />
forget how to place the third fold, so do practice this fold!<br />
You will need two crisp dollar bills for this project.<br />
Make another so that<br />
two identical units.<br />
you<br />
Assemble <strong>by</strong> inserting the<br />
top, back corner of each unit into<br />
the top front corner of each.<br />
You can insert<br />
more cash, a note or<br />
other small item.<br />
Close<br />
completely <strong>and</strong> turn<br />
over.<br />
The X-Wallet.
Begin obverse side up. Fold in<br />
half, long edge to long edge.<br />
Unfold.<br />
Fold the bottom edge up to<br />
the crease.<br />
Fold up along the center<br />
crease.<br />
Fold in the left side top <strong>and</strong><br />
bottom corners to form a square<br />
point.<br />
Based upon a ring design <strong>by</strong> Ranana Benjamin<br />
Modified <strong>by</strong> <strong>Richard</strong> L. Alex<strong>and</strong>er, 2006<br />
This design takes advantage of the mysterious eye atop the<br />
pyramid on the back etching of the dollar. ! adapted this<br />
ring to use a dollar bill from a ring design I learned from<br />
Joyce Saler, who learned it from Ranana Benjamin. This general<br />
design can be used to make belts, interlocked chain<br />
links, <strong>and</strong> earring loops.<br />
Fold the bottom edge up to<br />
the top.<br />
Fold the right, square end<br />
over to the left. Use the letter "1"<br />
in "lN GOD WE TRUSI" as a guide<br />
for the position of the crease.
Fold the top edge of the front<br />
strip down <strong>and</strong> to the right. Align<br />
with the short edge at the right to<br />
form a square corner.<br />
(1) Fold up a small margin<br />
at the bottom of the front strip.<br />
(2) Mountain-fold the front strip<br />
up <strong>and</strong> to the back.<br />
Tuck the folded end of the<br />
strip into the triangle-shaped<br />
pocket in front.<br />
f O rurn over.<br />
Form the b<strong>and</strong> <strong>by</strong> bringing<br />
the pointed end around the back of<br />
the ring <strong>and</strong> tucking it into the<br />
buckle.<br />
The "Eye" Ring.<br />
Based upon a design popularized <strong>by</strong> Florence<br />
Temko<br />
Modified <strong>by</strong> <strong>Richard</strong> L. Alex<strong>and</strong>er, 2006<br />
This is a modification of a classic that many learned from<br />
a book <strong>by</strong> Florence Temko, <strong>and</strong> is a particularly good way<br />
to make a distinctive gift ornament When you are giving<br />
a shirt. You can also use it as a place card, business card<br />
holder, or as a tip for an outst<strong>and</strong>ing dry cleaner.
Begin reverse side up, upside 2<br />
down. Fold in half, long edge to<br />
long edge. Unfold.<br />
Fold the tong edges in to the<br />
center crease.<br />
Fold the wide end up<br />
to the bottom edges of the collar.<br />
Your dollar should look like<br />
this. Fold the top layer down. Use<br />
George's nose as a guide (see<br />
figure eight).<br />
Mountain-fold a small margin<br />
of the right edge to the back. Fold<br />
out the free corners at the left. Use<br />
the letter "N" in "UNITED" as a<br />
guide.<br />
4, Fotd the top <strong>and</strong> bottom risht<br />
corners to meet ln front at the split,<br />
Be sure to leave a gap at the middle<br />
of the rlght edge. Look at figure<br />
five for the shape.<br />
Turn over.<br />
Fold the overlap up. Keep<br />
the layers tightly together to make<br />
an even shape.<br />
Turn over.<br />
Fold the bottom edge up<br />
<strong>and</strong> tuck it under the corners of the<br />
collar.<br />
The St<strong>and</strong>-Up Shirt. Now<br />
see if you can invent some st<strong>and</strong><br />
up pants!
Begin with the obverse side<br />
up. Fold in half, short edge to short<br />
edge. Unfold.<br />
on9<br />
Fold in half, long edge to<br />
edge.<br />
Have the long folded edge<br />
at the bottom. Fold up the bottom<br />
left <strong>and</strong> right corners. Notice that<br />
the creases span from the center<br />
of the folded edge to the upper<br />
outer corners.<br />
this.<br />
Your dollar should look<br />
Unfold.<br />
like<br />
Designed <strong>by</strong> <strong>Richard</strong> L. Alex<strong>and</strong>er, 2006<br />
Angels are welcome gifts any time of year. lncorporate them<br />
into a greeting card, or sprinkle them around the curtains in<br />
a sunny window. They make excellent Christmas tree decorations<br />
<strong>and</strong> this little angel design is a perfect way to transform<br />
a bunch of crisp new bills into a novel gift for your<br />
other little angels around the holidays.<br />
Turn over.<br />
,-O\<br />
You are now looking at the<br />
other side of the folded bill. Use<br />
the creases to fold up the bottom<br />
left <strong>and</strong> right corners. This re-folding<br />
of the creases bends them the<br />
other way, making them flexible<br />
<strong>and</strong> easy to use in the next step.
Open the layers of each<br />
folded triangle shape, forming a<br />
cone, <strong>and</strong> squash-fold flat to form<br />
a narrow kite shape. Try to make<br />
the kites symmetrical.<br />
B Your dollar should look like<br />
this. Turn over.<br />
Fold the topmost layers<br />
up so that the horizontal bottom<br />
edge aligns with the top edge.<br />
Fold out the top corners,<br />
to the left <strong>and</strong> right, to form the<br />
wings.<br />
Spread the bill open, in the<br />
middle at "A" <strong>and</strong> "8." Bring<br />
together the left <strong>and</strong> right ends<br />
<strong>and</strong> flatten the paper to resemble<br />
figure ten.<br />
ro<br />
down. Use<br />
a guide.<br />
Fold the top<br />
corners "A"<br />
corner<br />
<strong>and</strong> "8" as<br />
15 lnside-reverse fold the<br />
top edge as you fold the ange! in<br />
half. This will form a V-shaped<br />
separation between the wings.<br />
the front.<br />
Open the angel to view<br />
Fold the<br />
top corners down<br />
so that they cross<br />
in the middle.<br />
Notice that the<br />
thick area at the<br />
top remains visible. Fold up the<br />
bottom front corners for the feet.<br />
Your dollar should look<br />
like this. Turn over.<br />
Fold out the middle<br />
corners for h<strong>and</strong>s. Lower the feet.<br />
The Angel Ornament.
Begin with the<br />
reverse side up. Fold<br />
in half, long edge to<br />
long edge. Unfold.<br />
..fJ<br />
:-' ' Fold the two top<br />
corners in half. The folds<br />
should touch the long<br />
horizontal crease.<br />
Unfold.<br />
,,',.<br />
'\ri\ i i<br />
"iii Fold the two<br />
bottom corners up<br />
to the crease.<br />
/A.\\\Y'IT;\<br />
\J/-L\ rrrr<br />
,1,,<br />
Fold the left <strong>and</strong><br />
right edges in. Use the<br />
vertical edges of the<br />
lower triangles as<br />
guides. Unfold.<br />
Study the creases<br />
carefully. Form a<br />
box shape <strong>by</strong> folding<br />
the top corners in half<br />
<strong>and</strong> setting the top<br />
<strong>and</strong> bottom halves of<br />
the bill at a right<br />
angle.<br />
Fold the triangular<br />
flaps against the<br />
box sides, left <strong>and</strong><br />
right. Fold the other<br />
bills in the same manner<br />
so that you will<br />
have four units ready<br />
for assembly.<br />
Based upon a box designed for rectangles <strong>by</strong><br />
Tomoko Fuse<br />
Modified for the dollar bill <strong>by</strong> <strong>Richard</strong> L.<br />
Alex<strong>and</strong>er, 2OO5<br />
This four-piece modular container is based upon a common<br />
interlocking feature made famous <strong>by</strong> the boxes designed <strong>by</strong><br />
Tomoko Fuse. The decorative whorls on the dollar bill form<br />
interesting patterns when the ends are interwoven. This box<br />
is perfect for little samples of perfume, special c<strong>and</strong>ies, <strong>and</strong><br />
other favors.<br />
The units fit<br />
together <strong>by</strong> sliding the<br />
bottom edge of one<br />
into the top edge of<br />
another. The triangle<br />
flaps weave together<br />
on the outside.<br />
You may build<br />
two halves <strong>and</strong> put<br />
them together, or you<br />
may add successive<br />
units until all four are<br />
in place.<br />
The<br />
Tall Box.<br />
Four-Dollar
Begin with the<br />
reverse side up,<br />
upside down. Fold<br />
in half, long edge to<br />
long edge. Unfold.<br />
Fold the two<br />
long edges to meet<br />
at the center.<br />
Fold a portion of<br />
the bottom edge up,<br />
perpendicular to itself.<br />
Use the right edge of<br />
the letter "E" in the<br />
word "STATES" as a<br />
guide.<br />
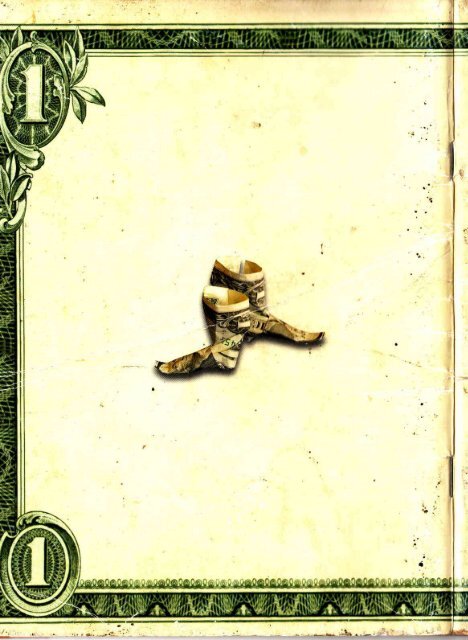
Designed <strong>by</strong> <strong>Richard</strong> L. Alex<strong>and</strong>er, 2006<br />
I derived this design from a simple dollar bill boot that<br />
<strong>Michael</strong> <strong>and</strong> I learned from an Arizona cowboy, during a trip<br />
to teach origami at a Japanese Festival (Matsuri) in Phoenix.<br />
lf you leave a pair of these as a tip, you can also roll other<br />
singles, <strong>and</strong> insert them into each boot. Holiday versions<br />
can be hung on the tree as Santa's Elf's Boots.<br />
t<br />
Fotd the ansted<br />
right-side edge to<br />
match the vertical<br />
edge.<br />
Fold the<br />
bottom left edge to<br />
match the outermost<br />
edge on the right.<br />
Your bill should<br />
look like this. Unfold<br />
the last step.<br />
Fold the<br />
bottom left edge to<br />
match the crease you<br />
made in step five.<br />
Use the crease<br />
to fold the left side<br />
over.<br />
Fold in half.
trr<br />
I<br />
I<br />
I<br />
rhe shorter I<br />
half should be in front.<br />
Fold the top edge of<br />
the short half to match<br />
the left edge, forming<br />
a pointed end.<br />
l2<br />
Fordthetop<br />
half of the front layer<br />
to the left so that it<br />
passes between itself<br />
<strong>and</strong> the pointed layer<br />
behind. Look at step<br />
1 3 for the shape.<br />
,-O\<br />
Tuck the Turn over. f5 openthe<br />
shoe at the top <strong>and</strong><br />
push forward, forming<br />
a crimp at the front of<br />
the ankle. Separate<br />
the heel with a small<br />
dent at the bottom.<br />
Crimp the end of the<br />
toe up.<br />
point flap into the<br />
pocketed layer in<br />
front. This will form<br />
the heel.<br />
Haverhill<br />
Shoe.<br />
The<br />
High-Top<br />
Designed <strong>by</strong> <strong>Richard</strong> L. Alex<strong>and</strong>er, 2006<br />
When you fold the units, be aware that roughly half of the<br />
model will show, while the other half will be tucked inside<br />
an adjacent piece, <strong>and</strong> not show at all. Since the side that<br />
will be tucked in must be smaller, pay particular attention<br />
to stay within the edges <strong>and</strong> margins as you make the folds<br />
on the hidden end.<br />
You will need five crisp dollar bills.
Begin with the<br />
obverse side up. Fold<br />
the short left-side<br />
edge up to the top<br />
long edge. Unfold.<br />
Fold the left <strong>and</strong> 5<br />
Fold the left cor-<br />
ner in half, along the<br />
crease.<br />
the top edges to meet<br />
at the crease.<br />
Use the crease<br />
to collapse the bill into<br />
the shape shown in<br />
figure ten. Notice that<br />
a crirnp is made at the<br />
center, where the<br />
dashed mountain <strong>and</strong><br />
valley lines occur.<br />
Unfold the<br />
front left flap.<br />
m Yourbitt<br />
should look like this.<br />
Fold the other bills<br />
so that you have five<br />
completed units to<br />
assemble.<br />
Mountain-fold<br />
the larger, right-side<br />
portion around the<br />
back. Use the vertical<br />
edge of paper of the<br />
top layer as a guide.<br />
Valley <strong>and</strong><br />
Mountain-fold the<br />
lower triangular flap to<br />
make it fit within the<br />
area of the top flap.<br />
Your bill should<br />
look like this. Unfold<br />
the last step.<br />
Fold in half <strong>by</strong><br />
bringing the left corner<br />
over to the upper<br />
right corner.<br />
Open the paper<br />
so that it resembles<br />
figure nine.<br />
ffi<br />
Rotate one<br />
unit so that the open<br />
flap is at the bottom.<br />
lnsert the kite-shaped<br />
half of another unit<br />
into the pocket of the<br />
first unit.<br />
When the<br />
two units have been<br />
brought together, fold<br />
the free flap over the<br />
point to keep them<br />
together.<br />
Pointed,<br />
Star.<br />
The Five-<br />
Five-Dollar<br />
Your model<br />
should look like this.<br />
Add the other units in<br />
the same way. As you<br />
assemble, be sure to<br />
collapse <strong>and</strong> pinch the<br />
"filled" points, holding<br />
them completely<br />
closed, until you connect<br />
the loose ends to<br />
close the star. You<br />
should fold each star<br />
point in half sharply to<br />
give the model a crisp<br />
appearance. Turn over.
Begin obverse<br />
side up. Fold in half,<br />
short edge to short<br />
edge.<br />
Fold the short<br />
edge of the top layer<br />
over to the right edge.<br />
Unfold.<br />
(A) Fold up the<br />
bottom folded edge<br />
so that the new crease<br />
is at the level of the<br />
bottom end of the<br />
crease formed in the<br />
last step. Unfold. (B)<br />
Open the bill.<br />
Designed <strong>by</strong> <strong>Michael</strong> G. <strong>LaFosse</strong>,<br />
first diagrammed in 1993<br />
Michae! <strong>LaFosse</strong> adapted his Butterfly for Alice Gray to the<br />
dollar bill in the late 1970s. It makes an excellent gift or tip<br />
that looks as elegant when folded from either side of the<br />
bill. The symmetry of the one dollar bill makes it particularly<br />
satisfying.<br />
Look carefully<br />
at the creases in the<br />
middle of the bill.<br />
Mountain-fold the<br />
outermost creases<br />
<strong>and</strong> move them to<br />
meet at the center<br />
crease.<br />
Fold in half.<br />
right<br />
Squash-fold the<br />
half .<br />
Use a single, crisp dollar bill that has the printing well-centered,<br />
with an even border.<br />
Your paper<br />
should look like this.<br />
Turn over.<br />
Squash-fold.<br />
Fold the bottom<br />
corner up along the<br />
line between the white<br />
border <strong>and</strong> the printed<br />
edge. Unfold.
ffi<br />
time, squash-fold the<br />
upper left <strong>and</strong> right<br />
halves of the model.<br />
One side at a Mountain <strong>and</strong> Wing detail:<br />
Be sure that the squash<br />
is firmly made down to<br />
the crease line formed<br />
in the previous step.<br />
valley-fold along the<br />
indicated lines for<br />
each wing. The area of<br />
the bottom wings will<br />
roll over <strong>and</strong> upward<br />
as you do this.<br />
lnside-reverse fold the<br />
indicated corner make<br />
it appear rounded.<br />
Swivel the<br />
middle corner over to<br />
the crease line on the<br />
lower right wing.<br />
wing over to match<br />
the right.<br />
Fold the teft t 5 Fotd in the<br />
indicated corners of<br />
the lower wing to<br />
make it appear rounded.<br />
Narrow the underside<br />
of the body <strong>by</strong><br />
folding the corners in.<br />
Designed <strong>by</strong> <strong>Richard</strong> L. Alex<strong>and</strong>er, 2OO5<br />
By paying attention to the initial orientation, <strong>and</strong> making<br />
one slightly larger, two open cubes make an attractive box<br />
with a telescoping lid.<br />
Open the<br />
The Dollar<br />
Bill Butterfly.
o\<br />
Begin with the reverse side<br />
facing up, upside down. Fold in<br />
half, long edge to long edge.<br />
Unfold.<br />
Fold the long edges to meet<br />
at the center.<br />
Repeat the crimps along the<br />
opposite edge of the bill. Rotate<br />
the paper, right side up.<br />
The narrowest of the five<br />
segments should be on the right<br />
(highlighted). Use the crimps <strong>and</strong><br />
creases to close the box. Tuck the<br />
narrow segment into the box.<br />
With the words "THE UNITED Fold the right edge over,<br />
STATES OF AMERICA" at the bottom,<br />
fold the right edg6 up to the crease touches the bottom edge.<br />
beginning at the point where the<br />
top edge. Unfold.<br />
Fold over <strong>and</strong> over, dividing the bill<br />
into five segments. The first four<br />
segments will be squares, the last<br />
segment will be narrower.<br />
The Cube Box.<br />
Push in the top of a<br />
Cube Box to make an Open Cube.<br />
Unfold the bill completely.<br />
Study the creases carefully.<br />
Crimp the bottom set of creases to<br />
form overlapping square corners.<br />
Follow the crease at the red "A"<br />
to see how it is moved to meet the<br />
long horizontal crease line near<strong>by</strong>.<br />
Do this to each segment.<br />
ne Open Cube can fit<br />
over another, making it a Cube Box<br />
with Lidl
Begin with the<br />
obverse side up. Fold<br />
in half, long edge to<br />
long edge. Unfold.<br />
Fold the long<br />
edges to meet at the<br />
middle.<br />
Turn over.<br />
Designed <strong>by</strong> <strong>Richard</strong> L. Alex<strong>and</strong>er, 2006<br />
This version of the funny face is a crowd pleaser (especially<br />
if your crowd is very young, <strong>and</strong> they are getting wise to the<br />
"l've got your nose!" trick). Use this talking monkey ring to<br />
practice your ventriloquism. (Hint: The farther you hold the<br />
ring from your mouth, the more successful your performance<br />
will be!)<br />
Mountain-fold<br />
along the open edge of<br />
the letter "E" in "ONE."<br />
Move the folded edge<br />
up to the level indicated<br />
<strong>by</strong> the red line in the<br />
drawing, just below the<br />
two eye-like scrolls.<br />
Form the b<strong>and</strong> <strong>by</strong><br />
tucking the bottom end<br />
into the top.<br />
Mountain-fold<br />
along the midline of the<br />
letter "O" in "ONE."<br />
Move the folded edge<br />
up to the level indicated<br />
<strong>by</strong> the red line in the<br />
drawing, just up to the<br />
horizontal line of the<br />
letter " E. "<br />
The Monkey Face Ring.
-o-\<br />
,-c-\<br />
To make best use of the color<br />
<strong>and</strong> to end up with eyes on your<br />
frog, begin with the obverse side<br />
up. Fold a short edge of the bill up<br />
to the top, long edge <strong>and</strong> unfold.<br />
Fold the same short edge down the<br />
bottom Iong edge. Unfold. Repeat<br />
with the other short edge of the<br />
bill. Turn over.<br />
Fold in the left <strong>and</strong> right edges<br />
<strong>by</strong> matching corners marked "A" to<br />
the crease ends at "B." Unfold <strong>and</strong><br />
turn over.<br />
Designed <strong>by</strong> <strong>Michael</strong> G. <strong>LaFosse</strong> <strong>and</strong> <strong>Richard</strong> L.<br />
Alex<strong>and</strong>er, 2OO5<br />
This version of the jumping frog is one that <strong>Michael</strong> <strong>and</strong> l<br />
worked out together. We wanted to make a simple frog that<br />
jumped well, <strong>and</strong> still sported a pair of distinctive eyes. You<br />
can continue to refine the shape, folding more details into<br />
this design to make exquisite renditions that perform better<br />
than the currency from which it's folded.<br />
Using the installed creases<br />
collapse each end of the bill into<br />
triangle shapes.<br />
t<br />
Z-O\<br />
Your bill should look like this.<br />
Turn over.<br />
,-O-\<br />
With the bill positioned<br />
as shown, fold<br />
the bottom point up at<br />
the level of the lower<br />
left <strong>and</strong> right corners.<br />
Your bill should<br />
look like this. Turn<br />
over.<br />
Fold the top<br />
right corner flap over<br />
to the left.
Fold the right<br />
edge in to the center.<br />
Return the top<br />
flap to the right.<br />
1 Repeat<br />
stepsTthrough9on<br />
the left.<br />
fold<br />
ht<br />
of<br />
Fold the<br />
bottom edge up to<br />
the level indicated<br />
<strong>by</strong> the red line in the<br />
drawing.<br />
Georde<br />
Napkin<br />
/-C\<br />
Fold the indicated<br />
edge downward,<br />
but not all the way to<br />
the bottom edge. Leave<br />
a small distance between<br />
these edges.<br />
Turn over.<br />
The Jumping<br />
Frog, with eyes! Press<br />
on the rump with your<br />
finger to make him<br />
jump!<br />
Designed <strong>by</strong> <strong>Richard</strong> L. Alex<strong>and</strong>er, 2006<br />
Use clean new bills to form these easy, secure, napkin rings.<br />
Place George's face toward your guest's. You'll find many<br />
other uses for this useful, yet simple fold.
To ensure that George's face<br />
appears on the outside of the ring,<br />
begin with the reverse side up.<br />
Fold the short right edge up to the<br />
top edge. Fold the left short edge<br />
down to the bottom edge.<br />
Notice the green rectangle in<br />
the middle of the paper. Fold the<br />
short, bottom edge of this rectangle<br />
up to match the left-side long<br />
edge of the green rectangle.<br />
Your bill should look like this.<br />
Fold the long left edge of the paper<br />
over to match the right long edge.<br />
,-O\<br />
You will have a long, narrow<br />
strip like this. Bend the lower end<br />
up toward the opposite end.<br />
Designed <strong>by</strong> <strong>Richard</strong> L. Alex<strong>and</strong>er, 2006<br />
Your business card will st<strong>and</strong> out on the next banquet table<br />
at a fundraiser, mixer, or networking event with this simple<br />
holder folded from a single dollar bill. Combinations of this<br />
clever fold can be stacked when offset 90 degrees to make<br />
distinctive, ornamental holders for a variety of favors, such<br />
as coin or c<strong>and</strong>y holders.<br />
Tuck the narrower corner into<br />
the layers of the wider end. Turn<br />
over to see George's face.<br />
The George Napkin Ring.
Begin with the obverse side<br />
up. Fold in half, edge to edge, each<br />
of both ways. Unfold after each.<br />
Fold each of the four corners<br />
in, matching the short edges to the<br />
long center crease.<br />
Fold each of the four folded<br />
edges to meet at the long center<br />
Notice the square diamond<br />
outlined in the center of the bill.<br />
Valley-fold along each of the four<br />
edges of the outline. Valley-fold the<br />
left <strong>and</strong> right long corners in half<br />
<strong>and</strong> form the bill into a diamondshaped<br />
dish.<br />
Designed <strong>by</strong> Michae! G. LaFossG, 1977<br />
This simple glider <strong>by</strong> <strong>Michael</strong> <strong>LaFosse</strong> is easy to remember<br />
<strong>and</strong> fun to fly, that is, if you're comfortable throwing money<br />
around! There are more detailed planes you can fold from<br />
money, but this mode! has an interesting shape, <strong>and</strong> good<br />
flight characteristics.<br />
The Business<br />
Holder.<br />
For best results, use a crisp bill, <strong>and</strong> sharpen your creases<br />
with the back of a spoon.
Begin with either side of the<br />
bill facing up. Fold the short, right<br />
side up to the top edge. Unfold.<br />
Fold the bottom edge up<br />
to the top edge.<br />
Fold the left half<br />
of the squashed flap<br />
over to the right.<br />
left half of the model.<br />
left folded edge the<br />
center crease. Repeat<br />
behind.<br />
side<br />
end<br />
Fold a portion of the right<br />
over to the left. Use the top<br />
of the crease line as a guide.<br />
Fold the bottom, folded edge<br />
of the front flap up to match the<br />
right edge of the paper.<br />
10 Rearranse I Fordthetop 12 Fordthe<br />
tho flaps so that both<br />
of the shorter ones<br />
are in the front <strong>and</strong><br />
the longer ones are<br />
behind.<br />
edge of the front flap<br />
down to the level<br />
indicated <strong>by</strong> the red<br />
line in the drawing.<br />
indicated flap down,<br />
forming the "Canard"<br />
or front wings.<br />
Replace the layer to the<br />
bottom.<br />
Squash-fold the top flaP.<br />
15 Fordinharr, I eFordthe<br />
lengthwise.<br />
wing sets down on<br />
each side of the body<br />
(fuselage). Set the<br />
wings out to the side<br />
to prepare for flight!<br />
The Paper<br />
Airplane.
Bill "A" begins<br />
obverse side up. Fold<br />
in half each of both<br />
ways, unfolding after<br />
each.<br />
Fold the top <strong>and</strong><br />
bottom long edges to<br />
meet at the center of<br />
the bill.<br />
Bill "A" will look<br />
like this.<br />
Based upon a design popularized <strong>by</strong> Florence<br />
Temko<br />
Modified for the dollar bill <strong>by</strong> <strong>Richard</strong> L.<br />
Alex<strong>and</strong>er, 2006<br />
This h<strong>and</strong>y box is derived from the popular, simple, twopiece<br />
design normally folded from rectangular pieces of<br />
magazine pages, <strong>and</strong> so is often known as the "Magazine<br />
Box." Dollar bills make excellent boxes for giving precious<br />
keepsakes.<br />
You will need two crisp dollar bills. I have Iabeled the bills A<br />
(bottom) <strong>and</strong> B (lid).<br />
Bill "B" begins<br />
reverse side up. Fold<br />
in half, long edge to<br />
long edge. Unfold.<br />
Place bill "A"<br />
over the center of bill<br />
"B." Fold the long<br />
edges of bill "8" over<br />
the long edges of bill<br />
U<br />
4,"<br />
Notice the gap<br />
between the long<br />
edges of bill "8."<br />
Unfold both bills.<br />
Fold the short edges of bill "A"<br />
to meet at the vertical center crease.<br />
Place folded bill "A" over the center<br />
of bill "B." Fold the short edges of<br />
bill "B" over to cover bill "A."
Slide bill "A"<br />
out to separate the<br />
two. Leave both folded.<br />
Perform steps 9<br />
through 13 on both<br />
bills "A" <strong>and</strong> "B."<br />
Fold each of the<br />
four corners in to<br />
nearest crease.<br />
X<br />
Fotd the<br />
innermost edges<br />
outward to match the<br />
vertical edges of the<br />
folded triangles.<br />
Based upon a design <strong>by</strong> <strong>Michael</strong> G. <strong>LaFosse</strong>,<br />
2003<br />
indicated<br />
over.<br />
Fold the<br />
corners<br />
Fold the<br />
innermost edges over<br />
to hold the folded<br />
triangles in place.<br />
t ; open the<br />
box <strong>by</strong> lifting the<br />
short sides up <strong>and</strong><br />
folding the long sides<br />
in. Pinch the corners<br />
square. Box "B"<br />
should fit neatly over<br />
box "A."<br />
Modified for the dollar bill <strong>by</strong> <strong>Richard</strong> L.<br />
Alex<strong>and</strong>er, 2006<br />
Mlchael developed this party favor from four squares several<br />
yearr 690, for an <strong>Origami</strong> Puzzles book for kids, but this<br />
adaptatlon, folded from three dollar bills, makes kids' eyes<br />
light up even before they discover c<strong>and</strong>y inside.<br />
You will need three crisp dollar bills.<br />
Rectangular Box<br />
with Lid.
Begin with the obverse side up in the orientation<br />
shown. Fold in half <strong>by</strong> matching the bottom<br />
left <strong>and</strong> the top right corners of the bill. lt is<br />
important that you use these same two corners<br />
each time for each of the three bills. Otherwise,<br />
you will not be able to assemble the project.<br />
Fold the other bills in the<br />
same manner so that you will have<br />
three units ready to assemble.<br />
Notice the two "Blank" edges<br />
<strong>and</strong> the two "Fan" edges. The Fan<br />
edges of one unit will overlap the<br />
Blank edges of another.<br />
Contrasting, solid colored<br />
papers are used here for the assembly<br />
demonstration. Hold two of the<br />
folded units together so that the<br />
fan-folded edges are overlapping<br />
the blank edges <strong>and</strong> are displayed<br />
on the outside of the model.<br />
z-C\<br />
Fold the left<br />
corner of the back<br />
layer over the front.<br />
Fan-fold the<br />
right edge of the<br />
front flap.<br />
Your bill will<br />
look like this. Turn<br />
over.<br />
I O<br />
Turn the construction over in your h<strong>and</strong> so that it resembles a<br />
boat hull, Hold carefully to keep the two pieces together. You may add<br />
gmall ltemc lnto the favor at this stage. lnsert the third piece to close the<br />
box. Be cure that all of the fan-folded edges show outside of the box.<br />
Fold the left<br />
corner of the back<br />
layer over the front.<br />
right<br />
flap.<br />
Fan-fold the<br />
edge of the front<br />
Open the bill.<br />
The Lightning Bolt Favor.
Begin with the<br />
obverse side up. Fold<br />
in half, long edge to<br />
long edge. Unfold.<br />
Fold the top<br />
<strong>and</strong> bottom right-side<br />
corners to the crease.<br />
Fold the square<br />
corner of each triangle<br />
to touch the middle of<br />
its opposite edge.<br />
Designed <strong>by</strong> <strong>Michael</strong> G. <strong>LaFosse</strong>, 2OO2<br />
One of the twelve characters in the Chinese zodiac is the<br />
dragon. <strong>Michael</strong> <strong>LaFosse</strong> designed this cute little dollar bill<br />
ba<strong>by</strong> dragon for the <strong>Origami</strong> Activities book <strong>by</strong> Tuttle. Too<br />
small to be scary, they look great on greeting cards, place<br />
cards, <strong>and</strong> can make a distinctive tip without a great investment<br />
in time or money.<br />
l;<br />
t, rii<br />
Fold the tip of<br />
the right corner over<br />
for a nose.<br />
Your bill should<br />
look like this. Turn<br />
over, top to bottom.<br />
Fold the top<br />
<strong>and</strong> bottom corners<br />
of the left edge to<br />
the crease.<br />
, Fold the long<br />
edges to meet at the<br />
middle.<br />
Fold the left<br />
edges in to meet at<br />
the middle, making<br />
the corner narrow.<br />
Fold in half,<br />
lengthwise.
lnside-reverse fold<br />
the entire length of paper<br />
behind the head.<br />
11 Usins a series<br />
of inside-reverse folds,<br />
form an undulating<br />
body <strong>and</strong> tail.<br />
Designed <strong>by</strong> <strong>Richard</strong> L. Alex<strong>and</strong>er, 2006<br />
This centerpiece decoration is a fun way to give a bunch of<br />
bills. The cone is structurally rigid, <strong>and</strong> sports several layers<br />
<strong>and</strong> slits for inserting name cards, other bills (folded or not),<br />
etc.<br />
Brins up the Fold up the lt You may<br />
two triangle flaps for<br />
horns.<br />
bottom edges of the<br />
jaw-line for whiskers.<br />
adjust the angle of<br />
the head <strong>and</strong> form<br />
other details, such<br />
as sharper horns.<br />
You will need six do!!ar bills for this project. New, crisp bills<br />
stay together nicely, <strong>and</strong> the tips can be curled to form wild,<br />
funky, almost otherworldly plant blossoms.<br />
Serpent.<br />
The Chinese Dragon / Sea
Begin with the reverse<br />
side up, with the dollar<br />
oriented as shown in the<br />
illustration. Fold in half <strong>by</strong><br />
matching the bottom left<br />
<strong>and</strong> the top right corners of<br />
the bill. lt is important that<br />
you use these same two<br />
corners each time for each<br />
of the six bills. Otherwise,<br />
you will not be able to<br />
assemble the project.<br />
Fold the left<br />
corner of the back<br />
layer over the front.<br />
Pull open the<br />
bft <strong>and</strong> right flaps.<br />
IO Fordthe<br />
other five bills so that<br />
you have a total of six<br />
folded units ready for<br />
assembly. Open one<br />
unit <strong>and</strong> orient it vertically.<br />
11 Ptace another<br />
unit over the upper half<br />
of the first. Be sure that<br />
the proper ceases are<br />
aligned before you close<br />
the bottom layer of the<br />
first unit over the new<br />
unit.<br />
Fold the right<br />
edge of the front flap<br />
to match the left,<br />
folded edge.<br />
,-C\<br />
Fold the indicated<br />
right edge to match<br />
the left side of the<br />
model.<br />
Fold the left<br />
edge of the top layer<br />
to match the right<br />
edge of the model.<br />
Notice the<br />
layer marked with an "X"<br />
in the diagram. Cover<br />
this corner area with<br />
layer "A" <strong>by</strong> swapping<br />
them in place. Look at<br />
flgure 13 for the result.<br />
Layer "A"<br />
covers the corner area<br />
marked "X." Add new<br />
units, one at a time, in<br />
the same manner until<br />
all six bills are in place.<br />
Form a<br />
closed umbrella shape<br />
<strong>by</strong> joining the ends at<br />
the gap. Look ahead<br />
at figure 15. The<br />
model will be tall <strong>and</strong><br />
conical. This is the<br />
closed thistle.<br />
look like this. Turn<br />
over.<br />
Open <strong>and</strong> vtew<br />
the front again.<br />
Gently<br />
pull out the indicated<br />
layers one<br />
at a time to make<br />
the thistle bloom.<br />
Thistle.
Begin with the<br />
reverse side up,<br />
upslde down. Fold<br />
in half, short edge to<br />
short edge. Unfold.<br />
2 Fotd the teft <strong>and</strong> 5 Fotd the top<br />
right halves of the botup<br />
to the<br />
:il::'"<br />
remnant edges down,<br />
flush with the edge<br />
behind.<br />
Turn over. Fold up the bot- Turn over.<br />
tom edge. Use the rectangle<br />
at the back as a<br />
guide.<br />
Based upon a design <strong>by</strong> Ethan Plaut, 1998<br />
Modified <strong>by</strong> <strong>Richard</strong> L. Alex<strong>and</strong>er, 2006<br />
A taller step pyramid from three squares, developed <strong>by</strong><br />
Ethan Plaut, inspired this three-piece, modular construction.<br />
The resulting equilatera! triangles can be joined with others<br />
to make interesting tetrahedra, pyramids, <strong>and</strong> other more<br />
complex polygons.<br />
You will need three crisp dollar bills for this project.<br />
Fold up.<br />
Turn over.
Fold the top edge down to<br />
the level of the top edge of the<br />
rectangle, behind. The red line<br />
indicates the correct level in the<br />
drawing.<br />
Unfold completely.<br />
Study the creases carefully.<br />
Mountain <strong>and</strong> valley fold, as<br />
indicated in the drawing, to form<br />
a fan-pleated unit. Some of the<br />
creases will need to be reversed.<br />
. This is a finished unit.<br />
Notice that it has been adjusted<br />
to approximate one third of an<br />
equilateral triangle. Fold the<br />
remaining bills so that you will have<br />
three units ready to assemble.<br />
Designed <strong>by</strong> <strong>Richard</strong> L. Alex<strong>and</strong>er, 2006<br />
The three units must be<br />
woven together to complete the<br />
puzzle. Notice that the left half of<br />
each unit will overlap the right half<br />
of another.<br />
Pyramid.<br />
The Three-Dollar Step<br />
This shape is familiar to thous<strong>and</strong>s of students of our popular<br />
Classic Cardinal DVD. The flat origami multi-piece rings<br />
designed <strong>by</strong> Mette Peterson formed the inspiration for a<br />
three-dimensional "water wheel" experiment <strong>by</strong> Paulo<br />
Basceta, carried to extremes <strong>by</strong> <strong>Michael</strong> <strong>LaFosse</strong>, Satoshi<br />
Kamiya, <strong>and</strong> Christine Clement at the <strong>Origami</strong>do Studio.<br />
You will need eight crisp dollar bills for this project.
--\-<br />
,,.O\<br />
Begin with the obverse side<br />
up. Fold the bottom edge up to<br />
George Washington's mouth.<br />
Turn over.<br />
Fold in the top corners of<br />
thc back layer as far as they will<br />
go. Look at figure seven for the<br />
shape.<br />
Mountain-fold the left <strong>and</strong><br />
right sides to st<strong>and</strong> perpendicular<br />
to the rectangular area that<br />
displays George's face.<br />
,,-O\<br />
Fold the bottom, folded edge 4<br />
up to the filigree design above the<br />
word "ONE."<br />
Turn over.<br />
This is a finished unit. Fold<br />
the other bills so that you have<br />
eight units ready to assemble.<br />
Units are joined <strong>by</strong> inserting<br />
the rectangular tabs on one piece<br />
into the pockets of another.<br />
Fold the indicated portions<br />
the bottom edge up so that each<br />
frames the word "STATES."<br />
of<br />
t<br />
Two units joined. Eight<br />
units form a nice wheel. You may<br />
use as many as ten units.
,t1l<br />
,iT<br />
Begin with the<br />
obverse side up. Fold<br />
in half, long edge to<br />
long edge. Unfold.<br />
Fold the long<br />
edges to meet at the<br />
middle.<br />
Turn over.<br />
Designed <strong>by</strong> <strong>Richard</strong> L. Alex<strong>and</strong>er, 2006<br />
This face jumped out at me from the symmetry of the<br />
letters when I held the bill sideways. There are many<br />
permutations <strong>and</strong> combinations, <strong>and</strong> even an action<br />
version that appears to talk! These funny faces liven up<br />
mundane items, such as pencil erasers. Slip its mouth<br />
under the rubber b<strong>and</strong> whenever you give something<br />
rolled.<br />
,, Mountain-fold<br />
along the open edge<br />
of the letter "E" in<br />
"ONE." Move the<br />
loleled edge up to the<br />
Iovol indicated <strong>by</strong> the<br />
red line in the drawing,<br />
just below the two<br />
eye-like scrolls.<br />
along the midline of<br />
the letter "O" in "ONE."<br />
Move the folded edge<br />
up to the level indicated<br />
<strong>by</strong> the red line in<br />
the drawing, just up to<br />
the horizontal line of<br />
the letter "E."<br />
':. . l:il I<br />
';,-..:il Unfo d<br />
comp etely.<br />
,'i1: -.5.,,r.
Re-fold along the<br />
horizontal creases.<br />
Re-fold along<br />
the vertical creases.<br />
Fold up the<br />
bottom edge to the<br />
bottom of the "smile."<br />
Fold the two top<br />
corners down to form<br />
a single point at the<br />
top of the head.<br />
Fold the tip<br />
of the head point to<br />
the back. Fold the two<br />
free corners of Bill's<br />
shirt down to form<br />
the collar.<br />
Fold up the<br />
two free corners at<br />
the top of the head<br />
(optional). Try different<br />
"hair styles!"<br />
Green!<br />
Meet Mr. Bill
![[Jeremy_Shafer]_Origami_Ooh_La_La__Action_Origami_opt](https://img.yumpu.com/60057821/1/184x260/jeremy-shafer-origami-ooh-la-la-action-origami-opt.jpg?quality=85)