Noris Medical Dental Implants Product Catalog 2018 3

You also want an ePaper? Increase the reach of your titles
YUMPU automatically turns print PDFs into web optimized ePapers that Google loves.
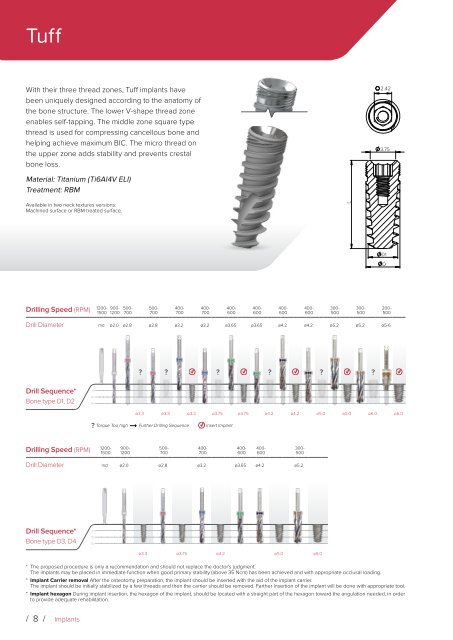
Tuff<br />
L2<br />
2<br />
D<br />
With their three thread zones, Tuff implants have<br />
been uniquely designed according to the anatomy of<br />
the bone structure. The lower V-shape thread zone<br />
enables self-tapping. The middle zone square type<br />
thread is used for compressing cancellous bone and<br />
helping achieve maximum BIC. The micro thread on<br />
the upper zone adds stability and prevents crestal<br />
bone loss.<br />
2.42<br />
Implant Tuff<br />
3.75<br />
Material: Titanium (Ti6Al4V ELI)<br />
Treatment: RBM<br />
Available in two neck textures versions:<br />
Machined surface or RBM treated surface.<br />
L<br />
D1<br />
D<br />
1200-<br />
Drilling Speed (RPM)<br />
1500 1200 900- 500-<br />
700<br />
500-<br />
700<br />
400-<br />
700<br />
400-<br />
700<br />
400-<br />
600<br />
400-<br />
600<br />
400-<br />
600<br />
400-<br />
600<br />
300-<br />
500<br />
300-<br />
500<br />
200-<br />
500<br />
Drill Diameter md ø2.0 ø2.8 ø2.8 ø3.2 ø3.2 ø3.65 ø3.65 ø4.2 ø4.2 ø5.2 ø5.2 ø5-6<br />
? ? ? ?<br />
? ?<br />
Drill Sequence*<br />
Bone type D1, D2<br />
6<br />
10<br />
16<br />
ø3.3 ø3.3 ø3.3 ø3.75 ø3.75 ø4.2 ø4.2 ø5.0 ø5.0 ø6.0 ø6.0<br />
? Torque Too high Further Drilling Sequence Insert Implant<br />
Drilling Speed (RPM)<br />
1200-<br />
1500<br />
900-<br />
1200<br />
500-<br />
700<br />
400-<br />
700<br />
400-<br />
600<br />
400-<br />
600<br />
300-<br />
500<br />
Drill Diameter md ø2.0 ø2.8 ø3.2 ø3.65 ø4.2 ø5.2<br />
Drill Sequence*<br />
Bone type D3, D4<br />
6<br />
10<br />
16<br />
ø3.3 ø3.75 ø4.2 ø5.0 ø6.0<br />
* The proposed procedure is only a recommendation and should not replace the doctor's judgment.<br />
The implants may be placed in immediate function when good primary stability (above 35 Ncm) has been achieved and with appropriate occlusal loading.<br />
* Implant Carrier removal After the osteotomy preparation, the implant should be inserted with the aid of the implant carrier.<br />
The implant should be initially stabilized by a few threads and then the carrier should be removed. Farther insertion of the implant will be done with appropriate tool.<br />
* Implant hexagon During implant insertion, the hexagon of the implant, should be located with a straight part of the hexagon toward the angulation needed, in order<br />
to provide adequate rehabilitation.<br />
/ 8 / <strong>Implants</strong>