
Create successful ePaper yourself
Turn your PDF publications into a flip-book with our unique Google optimized e-Paper software.
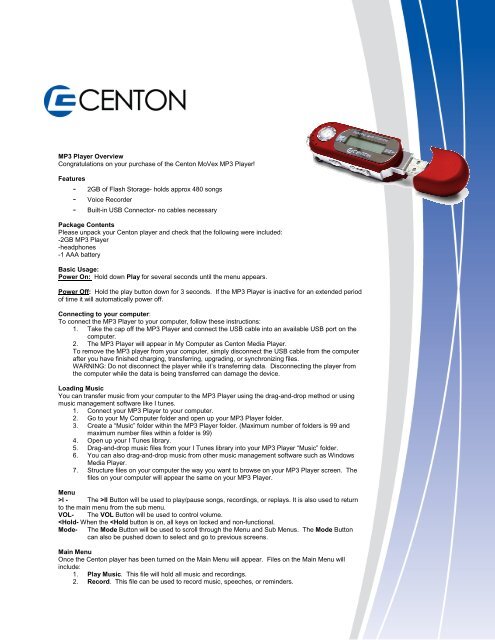
<strong>MP3</strong> Player Overview<br />
Congratulations on your purchase of the Centon <strong>MoVex</strong> <strong>MP3</strong> Player!<br />
Features<br />
- 2GB of Flash Storage- holds approx 480 songs<br />
- Voice Recorder<br />
- Built-in USB Connector- no cables necessary<br />
Package Contents<br />
Please unpack your Centon player and check that the following were included:<br />
-2GB <strong>MP3</strong> Player<br />
-headphones<br />
-1 AAA battery<br />
Basic Usage:<br />
Power On: Hold down Play for several seconds until the menu appears.<br />
Power Off: Hold the play button down for 3 seconds. If the <strong>MP3</strong> Player is inactive for an extended period<br />
of time it will automatically power off.<br />
Connecting to your computer:<br />
To connect the <strong>MP3</strong> Player to your computer, follow these instructions:<br />
1. Take the cap off the <strong>MP3</strong> Player and connect the USB cable into an available USB port on the<br />
computer.<br />
2. The <strong>MP3</strong> Player will appear in My Computer as Centon Media Player.<br />
To remove the <strong>MP3</strong> player from your computer, simply disconnect the USB cable from the computer<br />
after you have finished charging, transferring, upgrading, or synchronizing files.<br />
WARNING: Do not disconnect the player while it’s transferring data. Disconnecting the player from<br />
the computer while the data is being transferred can damage the device.<br />
Loading Music<br />
You can transfer music from your computer to the <strong>MP3</strong> Player using the drag-and-drop method or using<br />
music management software like I tunes.<br />
1. Connect your <strong>MP3</strong> Player to your computer.<br />
2. Go to your My Computer folder and open up your <strong>MP3</strong> Player folder.<br />
3. Create a “Music” folder within the <strong>MP3</strong> Player folder. (Maximum number of folders is 99 and<br />
maximum number files within a folder is 99)<br />
4. Open up your I Tunes library.<br />
5. Drag-and-drop music files from your I Tunes library into your <strong>MP3</strong> Player “Music” folder.<br />
6. You can also drag-and-drop music from other music management software such as Windows<br />
Media Player.<br />
7. Structure files on your computer the way you want to browse on your <strong>MP3</strong> Player screen. The<br />
files on your computer will appear the same on your <strong>MP3</strong> Player.<br />
Menu<br />
>l - The >ll Button will be used to play/pause songs, recordings, or replays. It is also used to return<br />
to the main menu from the sub menu.<br />
VOL- The VOL Button will be used to control volume.<br />
3. Voice. This file can be used to listen to recordings.<br />
4. Settings. This file can be used to switch settings to your preferences based on options<br />
provided.<br />
5. Version. This represents the version in use on the <strong>MP3</strong> Player.<br />
6. Info. This represents the amount of free memory space available on the <strong>MP3</strong> Player.<br />
7. Folder. This file holds the songs and recordings that have been uploaded or recorded on the<br />
<strong>MP3</strong> Player.<br />
8. Exit.<br />
Playing Music:<br />
Follow these steps to play music:<br />
1. Go to Play Music on the main menu and press the >l button.<br />
2. You can scroll through tracks within the Play Music folder by scrolling to the right or left with the<br />
Mode button.<br />
3. Once desired track or recording has been found, press down >l to play. Press again to pause.<br />
4. To get back to Main Menu, hold down the Mode button for 2 seconds.<br />
5. An additional way to find desired song or recording is to scroll with Mode button to Folders on<br />
the main menu and press the Mode button down. Search folders for artists, albums, and songs.<br />
Folders on the <strong>MP3</strong> Player will mirror how your folders are set up on your computer.<br />
6. Once desired track or recording has been found, press the Mode button down. To select the<br />
song, press down on the Mode button a second time. To delete the track or recording, press the<br />
Mode button to the right and press down the Mode button.<br />
7. To get back to main menu from the Folders file, press the >l button until previous screen<br />
appears.<br />
8. Press Mode button to the right to go to next track or recording.<br />
9. Press Mode button to the left to go back to the beginning of the current track or recording or<br />
press Mode button to the right twice to go to the previous track or recording.<br />
10. To adjust the volume use the Volume bar and press the – button to turn the volume down or<br />
press the + button to increase the volume.<br />
Play Mode Options<br />
1. While song is playing, press down the Mode button once. Then press Mode button down a<br />
second time. This will repeat the desired part of any track or recording. To unlock the repeat,<br />
press down the Mode button once.<br />
Deleting Music Files<br />
There are 2 ways to delete music files. You can delete them from the <strong>MP3</strong> Player directly or using<br />
the computer.<br />
To delete music directly from the <strong>MP3</strong> Player, follow these steps:<br />
1. Scroll to Folder and press Mode button down.<br />
2. Select desired track or recording and press down Mode button.<br />
3. Scroll over to highlight delete and press down Mode button.<br />
4. Scroll over to highlight yes and press down Mode button.<br />
To delete music files using the computer, follow these steps:<br />
1. Connect your <strong>MP3</strong> Player to the computer.<br />
2. Open My Computer folder and select <strong>MP3</strong> Player.<br />
3. Local folder where your music files are stored.<br />
4. Right click and delete the music files or folder you desire to delete.<br />
Record<br />
The Centon player has a built-in microphone allowing you to record your own voice, an interview, or a<br />
speech.
To start voice recording, follow these steps:<br />
1. Scroll to Record and press down Mode button.<br />
2. The recording with start after directed to next screen. To pause or begin recording press >l<br />
button.<br />
3. To stop recording, press >l button. To restart recording press >l again. To save the recording,<br />
press down Mode button for several seconds until hourglass icon is displayed on the screen.<br />
The recording will be saved in the Voice folder.<br />
NOTE: For Home and Personal Use:<br />
This product is intended to be used for recording and playback for your home and<br />
personal enjoyment. Copying and commercial use of copyrighted material without<br />
permission of the copyright owner may be prohibited by law. Use of your media player,<br />
in compliance with all copyright and applicable intellectual property laws, remains the<br />
responsibility of the user of the product.<br />
Voice<br />
To listen to voice recording, follow these steps:<br />
1. Scroll to Voice on the Main Menu and press down Mode button.<br />
2. Press >l to listen recording.<br />
3. Scroll with Mode button to select and listen to other recordings.<br />
4. Press down Mode button once other recording has been selected to listen.<br />
5. Hold down Mode button to return to Main Menu.<br />
Settings<br />
To personalize settings on the <strong>MP3</strong> Player, scroll to Settings on Main Menu and press down Mode<br />
button.<br />
Equalizer<br />
1. Scroll to Settings on main menu and press down Mode button.<br />
2. Scroll to Equalizer and press down Mode button.<br />
3. Scroll to the desired Equalizer mode and press down Mode button.<br />
4. Press >l button to return to previous screen.<br />
Repeat Mode<br />
1. Scroll to Repeat Mode and press down Mode button.<br />
2. To repeat a track or recording once scroll to repeat one. To repeat all, scroll to repeat all.<br />
3. To turn off the replay options, scroll to normal and press Mode button.<br />
4. To shuffle between tracks or recording select shuffle repeat.<br />
Contrast<br />
To adjust the display contrast for better viewing in different lighting environment, please execute the<br />
following steps:<br />
1. Scroll to Settings on main menu and press down Mode button.<br />
2. Scroll to Contrast and press down Mode button.<br />
3. Scroll to the desired Contrast by using the Mode button.<br />
Backlight<br />
The Backlight timer program can save power. After having been idled for predefined seconds, the<br />
device will trigger the Backlight timer program automatically and cease the backlight. You can press<br />
any button to wake the backlight up. To set the backlight timer, please execute the following steps:<br />
1. Scroll to Settings on main menu and press down Mode button.<br />
2. Scroll to Backlight and press down Mode button.<br />
3. Scroll to the desired time allotment for the backlight to remain on while <strong>MP3</strong> is inactive.
Backlight Color<br />
Each letter represents a different backlight color and 7 colors represents rainbow mode which will<br />
change the background color each time a button is pressed on the player.:<br />
1. Scroll to Settings on main menu and press down Mode button.<br />
2. Scroll to Backlight Color and press down Mode button.<br />
3. Select color preference by using Mode button.<br />
Language<br />
This shows the language that will be displayed on the <strong>MP3</strong> Player.<br />
1. Scroll to Settings on main menu and press down Mode button.<br />
2. Scroll to Language and press down Mode button.<br />
3. Select a desired language.<br />
Poweset<br />
Set a fixed time, when it’s time to reach it, the <strong>MP3</strong> Player will power off automatically.<br />
1. Scroll to Settings on main menu and press down Mode button.<br />
2. Scroll to Powerset and press down Mode button.<br />
1. Scroll between different time options to select desired power off timer.