Intermatic DT17 timer manual - Water Heater Timers Save Money
Intermatic DT17 timer manual - Water Heater Timers Save Money
Intermatic DT17 timer manual - Water Heater Timers Save Money

Create successful ePaper yourself
Turn your PDF publications into a flip-book with our unique Google optimized e-Paper software.
http://waterheater<strong>timer</strong>.org/<strong>Intermatic</strong>-<strong>timer</strong>s-and-<strong>manual</strong>s.html#digital<br />
<strong>DT17</strong> Digital Timer Installation and<br />
Operating Instructions<br />
Thank you for purchasing the<br />
<strong>DT17</strong> Digital Timer.<br />
Features of this <strong>timer</strong> include<br />
Features<br />
• Automatic or <strong>manual</strong> operation. Push<br />
ON/OFF to switch the plugged in<br />
light(s) on or off any time.<br />
• Program up to 14 on/off time pairs per day<br />
(maximum 98 automatic switch settings).<br />
• Minimum setting interval 1 minute.<br />
•Asetting can be for a particular day of the week,<br />
every day, only weekdays, only weekends, or every<br />
day but Sunday.<br />
• Random feature adjusts the ON/OFF times within 15<br />
minutes of each programmed setting.<br />
• Batteries (replaceable) save the time and program<br />
settings when the unit is unplugged or there is a<br />
power outage.<br />
Please read the instructions before programming your<br />
<strong>timer</strong>.<br />
Battery Installation<br />
Using a small flat screwdriver or coin,<br />
pry the battery<br />
holder open. Position the 2 batteries,<br />
supplied with the <strong>timer</strong>, so the flat part<br />
of the batteries are facing the +<br />
terminal. When the batteries are in<br />
place, press the battery holder back<br />
into its original position.<br />
NOTE: For battery replacement use SR44 or LR44<br />
Model <strong>DT17</strong><br />
7-DAY<br />
DIGITAL PROGRAMMABLE<br />
PLUG-IN LAMP AND APPLIANCE TIMER<br />
15 Amp. Resitive and Inductive 500 Watts<br />
Tungsten 1/3 H.P. 120 Volts 60 Hz.<br />
INTERMATIC INCORPORATED<br />
SPRING GROVE, ILLINOIS 60081<br />
MANUFACTURED IN CHINA<br />
Notes:<br />
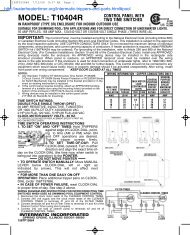
(1) WARNING DO NOT USE THE TIMER TO TURN OFF<br />
POWER FOR MAINTENANCE (repairs, removing broken<br />
bulbs, etc.). ALWAYS TURN POWER OFF AT THE<br />
SERVICE PANEL BY REMOVING A FUSE OR CIRCUIT<br />
BREAKER BEFORE DOING ANY CIRCUIT REPAIRS.<br />
(2) In case of a conflict (for example you have programmed<br />
the <strong>timer</strong> to be on at 4 pm every day of the week and also<br />
programmed the <strong>timer</strong> to be off at 4 pm on saturdays) the<br />
higher program number is followed. In case of a conflict<br />
within a program number Off is followed rather than On.<br />
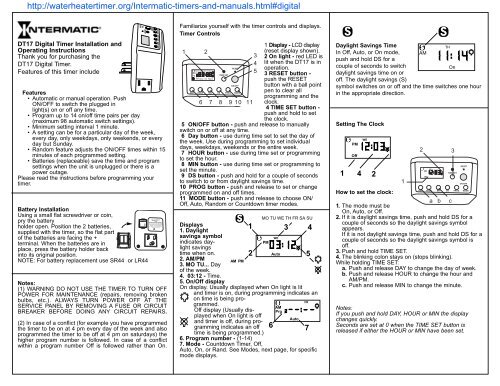
Familiarize yourself with the <strong>timer</strong> controls and displays.<br />
Timer Controls<br />
1<br />
2<br />
MO TU WE TH FR SA SU<br />
AM PM<br />
Prg<br />
Off Auto On Rand<br />
TIME SET<br />
6 7 8 9 10 11<br />
1 Display - LCD display<br />
(reset display shown).<br />
2 On light - red LED is<br />
lit when the <strong>DT17</strong> is in<br />
operation.<br />
3 RESET button -<br />
push the RESET<br />
button with a ball point<br />
pen to clear all<br />
programming and the<br />
clock.<br />
4 TIME SET button -<br />
push and hold to set<br />
the clock.<br />
5 ON/OFF button - push and release to <strong>manual</strong>ly<br />
switch on or off at any time.<br />
6 Day button - use during time set to set the day of<br />
the week. Use during programming to set individual<br />
days, weekdays, weekends or the entire week.<br />
7 HOUR button - use during time set or programming<br />
to set the hour.<br />
8 MIN button - use during time set or programming to<br />
set the minute.<br />
9 DS button - push and hold for a couple of seconds<br />
to switch to or from daylight savings time.<br />
10 PROG button - push and release to set or change<br />
programmed on and off times.<br />
11 MODE button - push and release to choose ON/<br />
Off, Auto, Random or Countdown <strong>timer</strong> modes.<br />
Displays<br />
1. Daylight<br />
savings symbol<br />
indicates daylight<br />
savings<br />
time when on.<br />
2. AM/PM<br />
3. MO TU... Day<br />
of the week.<br />
4. 03:12 - Time.<br />
5. On/Off display<br />
RESET<br />
ON/OFF<br />
DAY HOUR MIN DS PROG MODE<br />
AM PM<br />
On display. Usually displayed when On light is lit<br />
and <strong>timer</strong> is on, during programming indicates an<br />
on time is being programmed.<br />
Off display (Usually displayed<br />
when On light is off<br />
and <strong>timer</strong> is off, during programming<br />
indicates an off<br />
time is being programmed.)<br />
6. Program number - (1-14)<br />
7. Mode - Countdown Timer, Off,<br />
Auto, On, or Rand. See Modes, next page, for specific<br />
mode displays.<br />
2<br />
3<br />
4<br />
5<br />
MO TU WE TH FR SA SU<br />
1 3 4<br />
PM<br />
WE<br />
Auto<br />
AM<br />
Prg<br />
Auto<br />
5<br />
FR<br />
6 7<br />
Daylight Savings Time<br />
TH<br />
In Off, Auto, or On mode, AM<br />
push and hold DS for a<br />
couple of seconds to switch<br />
On<br />
daylight savings time on or<br />
off. The daylight savings (S)<br />
symbol switches on or off and the time switches one hour<br />
in the appropriate direction.<br />
Setting The Clock<br />
PM<br />
Off<br />
WE<br />
1 4 2<br />
1<br />
DAY HOUR MIN DS PROG MODE<br />
How to set the clock:<br />
a b c<br />
1. The mode must be<br />
On, Auto, or Off.<br />
2. If it is daylight savings time, push and hold DS for a<br />
couple of seconds so the daylight savings symbol<br />
appears.<br />
If it is not daylight savings time, push and hold DS for a<br />
couple of seconds so the daylight savings symbol is<br />
off.<br />
3. Push and hold TIME SET.<br />
4. The blinking colon stays on (stops blinking).<br />
While holding TIME SET:<br />
a. Push and release DAY to change the day of week.<br />
b. Push and release HOUR to change the hour and<br />
AM/PM.<br />
c. Push and release MIN to change the minute.<br />
Notes:<br />
If you push and hold DAY, HOUR or MIN the display<br />
changes quickly.<br />
Seconds are set at 0 when the TIME SET button is<br />
released if either the HOUR or MIN have been set.<br />
2<br />
WE<br />
PM<br />
Off<br />
3<br />
TIME SET<br />
RESET<br />
ON/OFF
Timer Modes<br />
MODE<br />
Push and release MODE to<br />
change the mode.<br />
The modes are Countdown<br />
<strong>timer</strong>, Off, Auto, On, and Rand.<br />
Countdown <strong>timer</strong> mode<br />
In countdown <strong>timer</strong> mode the<br />
clock symbol is displayed (a).<br />
When countdown <strong>timer</strong> mode is<br />
entered the countdown time is set<br />
to 75 minutes (b).<br />
And the plugged in light(s) are<br />
turned on (c).<br />
The countdown <strong>timer</strong> can be set to turn the plugged in<br />
light(s) on or off after 75, 60, 45, 30 or 15 minutes. That<br />
lets you, for example, set the <strong>timer</strong> to turn the plugged in<br />
light(s) off an hour after you have left the room. The flashing<br />
alarm clock symbol indicates the <strong>DT17</strong> is in countdown<br />
<strong>timer</strong> mode.<br />
To set the countdown <strong>timer</strong>:<br />
Push and release MODE until the countdown <strong>timer</strong> clock is<br />
displayed. (75 minutes is selected.)<br />
If desired, push and release MIN to switch change the<br />
countdown to 60, 45, 30, 15 or 0 minutes.<br />
If desired, push and release PROG ON/OFF to switch the<br />
initial state of the plugged in light(s).<br />
Wait ten seconds or push and release TIME SET to start<br />
the countdown.<br />
While counting down the countdown<br />
<strong>timer</strong> clock symbol flashes, and you<br />
can push TIME SET to switch<br />
between the countdown the current<br />
time.<br />
When the countdown reaches 00:00<br />
the connected light(s) are switched<br />
and the clock display remains 00:00 (d).<br />
Off Mode<br />
In the Off mode the plugged in<br />
light(s) are off. You can push PROG<br />
ON/OFF to switch to ON mode and<br />
turn the plugged in light(s) on.<br />
TIME SET<br />
MODE<br />
Auto Mode<br />
In auto mode the programmed on<br />
TH<br />
and off times automatically switch the<br />
AM<br />
plugged in light(s) on and off. See<br />
how to program the <strong>timer</strong>, below for<br />
Auto<br />
how to enter or change the automatic<br />
program times.<br />
You can push PROG ON/OFF while in Auto mode to<br />
<strong>manual</strong>ly override the program and turn the plugged in<br />
light(s) on or off. The programmed switching times remain.<br />
The <strong>timer</strong> stays in auto mode.<br />
a<br />
RESET<br />
ON/OFF<br />
DAY HOUR MIN DS PROG MODE<br />
AM<br />
Off<br />
d<br />
b c<br />
TH<br />
On Mode<br />
In the On mode the plugged in<br />
light(s) are on. Push PROG<br />
ON/OFF to turn the plugged in<br />
light(s) off and switch the mode to<br />
Off.<br />
Rand Mode<br />
In Random mode the <strong>DT17</strong><br />
randomly switches the connected<br />
light(s) on and off. A random on<br />
period is + 15 minutes from the<br />
programmed times.<br />
How to program the <strong>timer</strong>:<br />
You can program the <strong>timer</strong> in Auto, ON or Off modes.<br />
The program is followed in Auto<br />
mode.<br />
1. Push and release PROG to start<br />
the programming.<br />
Prg 1 is displayed and the display<br />
shows --:-- or the programmed time<br />
for Prg 1. <strong>timer</strong> on (lit light bulb symbol on).<br />
--:-- display means there is nothing programmed for that<br />
Prg number and on/off time.<br />
Note: You can push and<br />
release ON/OFF to switch<br />
between the Prg # on<br />
time and the Prg # off<br />
time. The light bulb<br />
symbol switches on or off<br />
but the plugged in light(s)<br />
do not.<br />
2. Push and release DAY<br />
to choose the day*.<br />
*Push and release DAY several times to set: a single<br />
day MO, TU, WE, TH, FR, SA, OR SU; or all week (all<br />
days of week displayed); or weekdays (MO TU WE TH<br />
FR displayed); or weekends (SA SU displayed); or all<br />
days but sunday (MO TU WE TH FR SA displayed).<br />
3. Push and release HOUR to choose the hour.<br />
4. Push and release MIN to choose the minute.<br />
5. When correct, push ON/OFF to switch between<br />
programming on time and off time for that Prg number.<br />
6. Repeat steps 2, 3, and 4 to set the Off program.<br />
7. Push PROG to Prg 2, Prg 3,... up to Prg 14, to<br />
program additional on and /or off times.<br />
8. Push TIME SET or wail 15 seconds to exit<br />
programming.<br />
After the program is set, turn lamp or appliance ON and<br />
plug it into the <strong>timer</strong>. Plug the <strong>timer</strong> into a wall<br />
receptacle.<br />
AM<br />
Prg<br />
Auto<br />
AM<br />
AM<br />
AM<br />
Prg<br />
Auto<br />
TIME SET<br />
TH<br />
TH<br />
On<br />
RESET<br />
ON/OFF<br />
DAY HOUR MIN DS PROG MODE<br />
2 3 4 1, 6<br />
Rand<br />
7<br />
5<br />
ART195B<br />
Battery replacement<br />
Batteries retain the program during power outages.<br />
Batteries should last 3 years or more if the <strong>timer</strong> is left<br />
plugged in. If the display is dim, weak or<br />
unreadable when the <strong>timer</strong> is unplugged from<br />
the outlet replace the batteries. After removing<br />
the batteries from the unit, you have a minimum<br />
of 15 seconds to<br />
insert new batteries<br />
without losing<br />
existing program.<br />
The <strong>DT17</strong> uses<br />
two SR44 or LR44<br />
alkaline batteries.<br />
Purchase fresh<br />
batteries. Unplug<br />
the <strong>DT17</strong>. Follow<br />
the directions outlined<br />
in Battery Installation.<br />
+<br />
ALKALINE<br />
CELL<br />
FULL ONE YEAR WARRANTY<br />
If within one (1) year from the date of purchase, this product fails due to a<br />
defect in material or workmanship, <strong>Intermatic</strong> Incorporated will repair or<br />
replace it, at its sole option, free of charge. This warranty is extended to the<br />
original household purchaser only and is not transferable. This warranty<br />
does not apply to: (a) damage to units caused by accident, dropping or<br />
abuse in handling, acts of God or any negligent use; (b) units which have<br />
been subject to unauthorized repair, opened, taken apart or otherwise<br />
modified; (c) units not used in accordance with instructions; (d) damages<br />
exceeding the cost of the product; (e) sealed lamps and/or lamp bulbs,<br />
LED’s and batteries; (f) the finish on any portion of the product, such as<br />
surface and/or weathering, as this is considered normal wear and tear; (g)<br />
transit damage,initial installation costs, removal costs, or reinstallation<br />
costs.<br />
INTERMATIC INCORPORATED WILL NOT BE LIABLE FOR INCIDENTAL<br />
OR CONSEQUENTIAL DAMAGES. SOME STATES DO NOT ALLOW THE<br />
EXCLUSION OR LIMITATION OF INCIDENTAL OR CONSEQUENTIAL<br />
DAMAGES, SO THE ABOVE LIMITATION OR EXCLUSION MAY NOT<br />
APPLY TO YOU. THIS WARRANTY IS IN LIEU OF ALL OTHER EXPRESS<br />
OR IMPLIED WARRANTIES. ALL IMPLIED WARRANTIES, INCLUDING<br />
THE WARRANTY OF MERCHANTABILITY AND THE WARRANTY OF<br />
FITNESS FOR A PARTICULAR PURPOSE, ARE HEREBY MODIFIED TO<br />
EXIST ONLY AS CONTAINED IN THIS LIMITED WARRANTY, AND SHALL<br />
BE OF THE SAME DURATION AS THE WARRANTY PERIOD STATED<br />
ABOVE. SOME STATES DO NOT ALLOW LIMITATIONS ON THE<br />
DURATION OF AN IMPLIED WARRANTY, SO THE ABOVE LIMITATION<br />
MAY NOT APPLY TO YOU.<br />
This warranty gives you specific legal rights and you may also have other<br />
rights which vary from state to state. Warranty service is available by<br />
mailing postage prepaid to: <strong>Intermatic</strong> Incorporated/After Sales<br />
Service/7777 Winn Rd., Spring Grove, IL 60081-9698/815-675-7000<br />
http://www.intermatic.com Please be sure to wrap the product securely to<br />
avoid shipping damage.