

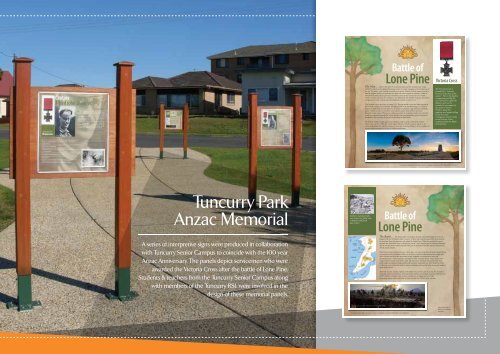
Interpretive & Wayfinding

Create successful ePaper yourself
Turn your PDF publications into a flip-book with our unique Google optimized e-Paper software.
Battle of<br />
Lone Pine Victoria Cross<br />
The Plan..... On the 25th April 1915, the Australian and New Zealand Army Corps<br />
(ANZAC) landed on the Gallipoli Peninsula, as part of a larger c<strong>amp</strong>aign to force Turkey out of<br />
the war. This attack, while initially successful, was quickly halted by Turkish troops a few days<br />
after the original landing occurred and soon both sides were resigned to stalemate. Unable to<br />
move forward, both sides dug trenches and neither advanced nor retreated for five months.<br />
Unable to sustain inactivity and a defensive war indefinitely, the ANZAC troops became part of<br />
a larger plan to break out from the entrenched areas centred on Anzac Cove.<br />
This breakout was to take place in August 1915. The plan aimed to seize the higher ground on<br />
the left flank, leading to Chunuk Bair, the highest point of the Sari Bair Range. As a feint to<br />
distract the Turks from the main objective, an attack was planned, using Australian battalions,<br />
against Turkish trenches at Lone Pine in the southern sector of the ANZAC perimeter.<br />
Should the main August Offensive have been successful, the Australians fighting at Lone Pine<br />
would have pushed on through the Turkish defences and continued further inland towards the<br />
Dardanelles, thus securing vital ground overlooking the Dardanelles.<br />
The ANZAC soldiers fought against overwhelming odds to capture and hold the Turkish<br />
trenches at Lone Pine. While the overall August Offensive failed to reach its objectives, the<br />
victory at the Battle of Lone Pine remains as one of the Australian Military’s finest ex<strong>amp</strong>les of<br />
courage and perseverance in the face of a determined enemy.<br />
The Victoria Cross is<br />
awarded for “extreme<br />
bravery in the face of the<br />
enemy”. This is the highest<br />
recognition possible for<br />
acts of bravery within the<br />
military and can be<br />
awarded to personnel of<br />
any rank or station.<br />
Further along this<br />
pathway are boards telling<br />
of the lives and<br />
courageous actions of the<br />
seven Victoria Cross<br />
recipients from the Battle<br />
of Lone Pine.<br />
Present Day Australian Lone Pine War Memorial, Gallipoli<br />
It is situated where “ No Mans Land” once stood during the<br />
Battle of Lone Pine, 1915<br />
"Lone Pine Battlefield" by Steven Johnson Photography www.stevenjohnsonphoto.com<br />
No known Copyright restrictions. Source of images: Australian War Memorial Collection<br />
Tuncurry Park<br />
Anzac Memorial<br />
A series of interpretive signs were produced in collaboration<br />
with Tuncurry Senior C<strong>amp</strong>us to coincide with the 100 year<br />
Anzac Anniversary. The panels depict servicemen who were<br />
awarded the Victoria Cross after the battle of Lone Pine.<br />
Students & teachers from the Tuncurry Senior C<strong>amp</strong>us along<br />
with members of the Tuncurry RSL were involved in the<br />
design of these memorial panels.<br />
Soldiers making bombs<br />
out of jam tins filled with<br />
schrapnel and fused<br />
gun-cotton.<br />
Battle of<br />
Lone Pine<br />
The Battle..... The initial attack was made by the 2nd, 3rd and 4th Battalions of the 1st<br />
Brigade with the 1st Battalion held in reserve. At 5pm, after an hour long artillery bombardment,<br />
the men leapt from their positions and rushed the Turkish lines. When they reached the enemy<br />
trenches they found them to be covered by log “roofs”. Some men tore up the roofing and plunged<br />
into the trenches below. Others stormed to the rear of the Turkish trenches and forced themselves<br />
into the tunnel complex.<br />
What followed, and continued for four vicious days, was some of the fiercest hand to hand fighting<br />
ever experienced by Australian soldiers. In the narrow confines of the trenches men fought with<br />
rifles, bayonets and even their bare hands as they struggled to overcome their brave and<br />
determined enemy. Turkish grenades rained down on the Australian troops. Many of these were<br />
caught and thrown back as the battle raged. The Australians retaliated with bombs made from<br />
metal scraps, an explosive charge and fuse all encased in empty jam tins. More battalions of the<br />
1st Division were led into the battle to relieve exhausted soldiers as the Turks desperately fought to<br />
retake their trenches.<br />
After four days the ceaseless fighting of the Battle of Lone Pine came to an end. The Australian<br />
troops had captured and held the Turkish positions, but the cost was high. Australia suffered losses<br />
of 2277 killed or wounded while Turkish casualties are estimated to be over 5000.<br />
It was from actions such as the Battle of Lone Pine that the ANZAC spirit was born.<br />
Diarama of the atack on the Turkish trenches at Lone Pine. (AWM)<br />
No known Copyright restrictions. Source of images: Australian War Memorial Collection<br />
Pinus Halepensis as<br />
found on the Gallipoli<br />
Peninsula