RIC-20950 Early years Fantasy - Witches

You also want an ePaper? Increase the reach of your titles
YUMPU automatically turns print PDFs into web optimized ePapers that Google loves.
<strong>Witches</strong> – 2<br />
Visual arts<br />
• Make black bats by cutting out a line of three egg carton cups. Turn the<br />
two end cups into wings by cutting away part of the front and back to form<br />
scallop shapes. Paint black and allow to dry before gluing some eyes on<br />
the middle cup. Make two small holes on the top of this section. Thread<br />
black wool or elastic through the holes and hang up.<br />
• Weave a web by fi rst punching 20 holes around a paper plate, all about two centimetres from the edge. Weave a random<br />
pattern from one hole to another, using dark-coloured wool or string. Use adhesive tape to attach the beginning and end to the<br />
back of the plate. Add some ‘fl ies’ by twisting small rectangles of black crepe paper and placing them in the web.<br />
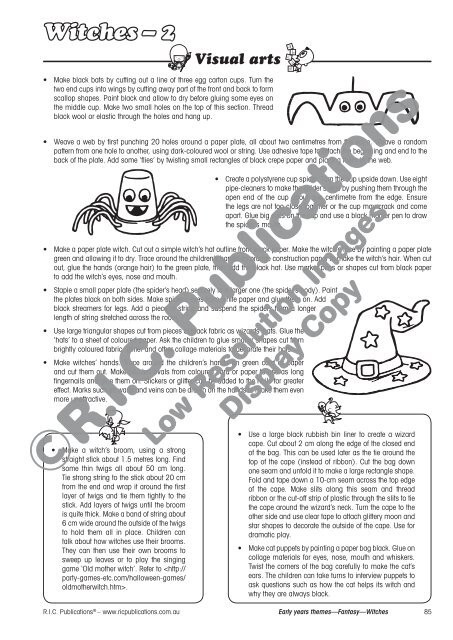
• Create a polystyrene cup spider. Turn the cup upside down. Use eight<br />
pipe-cleaners to make the spider’s legs by pushing them through the<br />
open end of the cup about one centimetre from the edge. Ensure<br />
the legs are not too close together or the cup may crack and come<br />
apart. Glue big eyes on the cup and use a black marker pen to draw<br />
the spider’s mouth.<br />
• Make a paper plate witch. Cut out a simple witch’s hat outline from black paper. Make the witch’s face by painting a paper plate<br />
green and allowing it to dry. Trace around the children’s hands on orange construction paper to make the witch’s hair. When cut<br />
out, glue the hands (orange hair) to the green plate, then add the black hat. Use marker pens or shapes cut from black paper<br />
to add the witch’s eyes, nose and mouth.<br />
• Staple a small paper plate (the spider’s head) securely to a larger one (the spider’s body). Paint<br />
the plates black on both sides. Make spider’s eyes from white paper and glue them on. Add<br />
black streamers for legs. Add a piece of string and suspend the spiders from a longer<br />
length of string stretched across the room.<br />
• Use large triangular shapes cut from pieces of black fabric as wizards’ hats. Glue the<br />
‘hats’ to a sheet of coloured paper. Ask the children to glue smaller shapes cut from<br />
brightly coloured fabric, glitter and other collage materials to decorate their hats.<br />
• Make witches’ hands. Trace around the children’s hands on green card or paper<br />
and cut them out. Make pointed ovals from coloured card or paper to use as long<br />
fi ngernails and glue them on. Stickers or glitter can be added to the nails for greater<br />
effect. Marks such as warts and veins can be drawn on the hands to make them even<br />
more unattractive.<br />
• Make a witch’s broom, using a strong<br />
straight stick about 1.5 metres long. Find<br />
some thin twigs all about 50 cm long.<br />
Tie strong string to the stick about 20 cm<br />
from the end and wrap it around the fi rst<br />
layer of twigs and tie them tightly to the<br />
stick. Add layers of twigs until the broom<br />
is quite thick. Make a band of string about<br />
6 cm wide around the outside of the twigs<br />
to hold them all in place. Children can<br />
talk about how witches use their brooms.<br />
They can then use their own brooms to<br />
sweep up leaves or to play the singing<br />
game ‘Old mother witch’. Refer to .<br />
• Use a large black rubbish bin liner to create a wizard<br />
cape. Cut about 2 cm along the edge of the closed end<br />
of the bag. This can be used later as the tie around the<br />
top of the cape (instead of ribbon). Cut the bag down<br />
one seam and unfold it to make a large rectangle shape.<br />
Fold and tape down a 10-cm seam across the top edge<br />
of the cape. Make slits along this seam and thread<br />
ribbon or the cut-off strip of plastic through the slits to tie<br />
the cape around the wizard’s neck. Turn the cape to the<br />
other side and use clear tape to attach glittery moon and<br />
star shapes to decorate the outside of the cape. Use for<br />
dramatic play.<br />
• Make cat puppets by painting a paper bag black. Glue on<br />
collage materials for eyes, nose, mouth and whiskers.<br />
Twist the corners of the bag carefully to make the cat’s<br />
ears. The children can take turns to interview puppets to<br />
ask questions such as how the cat helps its witch and<br />
why they are always black.<br />
R.I.C. Publications ® – www.ricpublications.com.au <strong>Early</strong> <strong>years</strong> themes—<strong>Fantasy</strong>—<strong>Witches</strong> 85