AL2-xx/MER - Meconet
AL2-xx/MER - Meconet
AL2-xx/MER - Meconet

You also want an ePaper? Increase the reach of your titles
YUMPU automatically turns print PDFs into web optimized ePapers that Google loves.
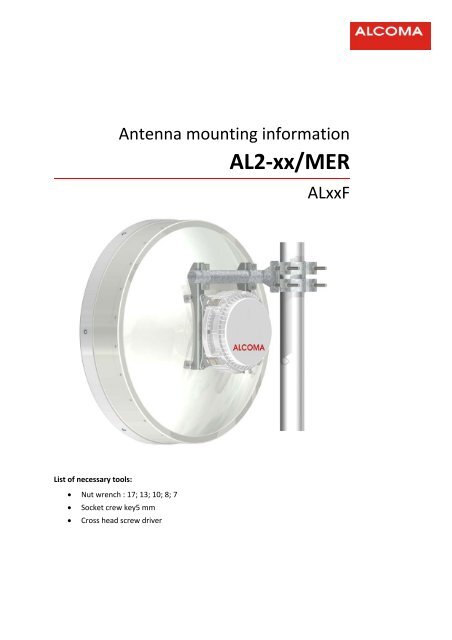
List of necessary tools:<br />
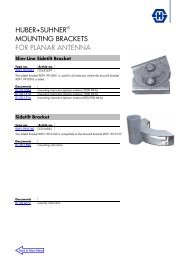
Antenna mounting information<br />
<strong>AL2</strong>‐<strong>xx</strong>/<strong>MER</strong><br />
� Nut wrench : 17; 13; 10; 8; 7<br />
� Socket crew key5 mm<br />
� Cross head screw driver<br />
AL<strong>xx</strong>F
Content page<br />
1. PREFACE....................................................................................................CHYBA! ZÁLOŽKA NENÍ DEFINOVÁNA.<br />
2. TECHNICAL DATA ............................................................................................................................................ 2<br />
3. RADIO LINK CONTENT (1 RRL)..................................................................3CHYBA! ZÁLOŽKA NENÍ DEFINOVÁNA.<br />
4. LIST OF NECESSARY TOOLS .............................................................................................................................. 3<br />
5. POLARISATION SELECTION .............................................................................................................................. 4<br />
6. MOUNTING OF ODU SUPPORT PLATE AND PARABOLA ON HINGS ................................................................. 4<br />
7. HING SPRINGS MOUNTING ............................................................................................................................. 5<br />
8. REFLECTOR MOUNTING...........................................................................6CHYBA! ZÁLOŽKA NENÍ DEFINOVÁNA.<br />
9. REFLECTOR RADIATOR INSERTING ................................................................................................................... 6<br />
10. RADOM MOUNTING.................................................................................................................................... 7<br />
11. JIB MOUNTING ON ANTENNA ..................................................................................................................... 8<br />
12. ODU DEMOUNTING..................................................................................................................................... 9
1. PREFACE<br />
ALCOMA offers for all installation scenarios the right products:<br />
Radio integrated with antenna<br />
The radio unit is directly mounted onto the back of the antenna. This is a very common type of installation<br />
providing a quick and cost effective solution. This mounting instruction is intended to assembling of ALCOMA<br />
antennas <strong>AL2</strong>‐<strong>xx</strong> in decompoused variant in transport packing.<br />
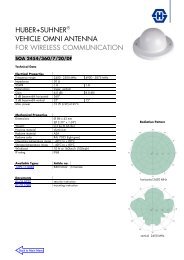
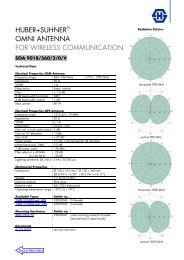
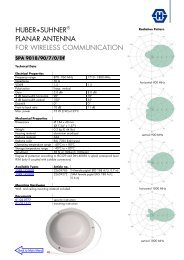
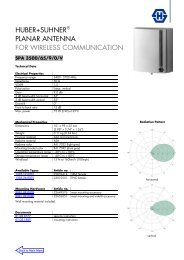
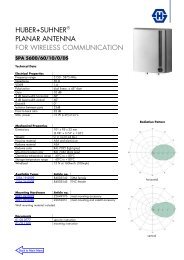
2. TECHNICAL DATA<br />
2.1.1 Antenna ALCOMA <strong>AL2</strong>‐<strong>xx</strong><br />
Antenna diameter 65 cm<br />
Antenna gain Gant 33,6 dB<br />
Main beam ± 1,7°<br />
Horizontal adjustment ± 180°<br />
Vertical adjustment ± 20°<br />
Antenna weight 7,8 kg<br />
ODU weight 5,5 kg
Antenna mounting information <strong>AL2</strong>‐<strong>xx</strong>/<strong>MER</strong><br />
3. RADIO‐RELAY LINK CONTENT<br />
2× ODU 2× SD‐IDU 1 2× ANT radiator <strong>AL2</strong>‐18<br />
2× radom 2× reflector 2× jib <strong>AL2</strong>‐<strong>MER</strong><br />
2× left hing 2× right hing 4× complete hing spring<br />
With bolt M8×45 DIN 933<br />
2x ODU support plate 8× bolt M4×10 8× bolt M6×16 with nut 12× bolt ST4,9×9,5<br />
DIN 933 DIN 613 DIN 7049<br />
4. LIST OF NECESSARY TOOLS<br />
� Nut wrench: 17; 13; 10; 7<br />
� Socket screw key 5 mm<br />
� Cross head screw driver PZ č. 2<br />
3
Antenna mounting information <strong>AL2</strong>‐<strong>xx</strong>/<strong>MER</strong><br />
5. POLARIZATION SELECTION<br />
VERTICAL HORIZONTAL Horizontal<br />
POLARIZATION POLARIZATION POLARIZATION<br />
(Leftside mounting) (Rightside mounting)<br />
6. MOUNTING OF ODU SUPPORT PLATE AND PARABOLA ON HINGS<br />
ODU support plate is mounted to hings via bolt M6. Parabola is mounted to Hind via 4 bolts M6x16<br />
Antenna assembly<br />
1, To screw ODU support plate to hings (don’t draw up the bolts)<br />
2, To screw parabola to hingspřišroubit (don’t draw up the bolts)<br />
3, Draw up the bolts holding ODU support plate and parabola.<br />
4, ODU is attached to ODU support plate via 4 clips.<br />
4
Antenna mounting information <strong>AL2</strong>‐<strong>xx</strong>/<strong>MER</strong><br />
7. HING SPRINGS MOUNTING<br />
Before attaching of reflector and ODU is recommended to put spring on Hind. Please, pay the attention of nut<br />
position below:<br />
Hing spring nuts have faced tolls skewed. Skewing has to fit tighly<br />
to inside hing folds.<br />
Correct nut position check before antenna mounting on jib<br />
and springs drawing up.<br />
5
Antenna mounting information <strong>AL2</strong>‐<strong>xx</strong>/<strong>MER</strong><br />
8. REFLECTOR MOUNTING<br />
10 mm<br />
Reflector is mounted on ODU flange . Bolt heads M6x16are arranged into parabola and and self‐locking nuts<br />
with washer out of parabola.<br />
Head bolt square has to fit in openning in order the parabola is properly drawn up and bolts don’t turn around.<br />
Before bolts inserting, check out whether openings are<br />
down.<br />
9. ANTENNA RADIATOR INSERTING<br />
Antenna radiator is mounted on ODU support plate via bolts M4x10. Pay the attention to drawing up of bolts.<br />
Handle antenna radiator with care , because any damaging has the direct influence to antenna parameters.<br />
6
Antenna mounting information <strong>AL2</strong>‐<strong>xx</strong>/<strong>MER</strong><br />
10. RADOM MOUNTING<br />
Radom – protects reflector against accumulation of snow, ice and dirt, and have to be mounted on para‐<br />
bola with proper oriented ALCOMA logo. Thus is correctly ensured proper water outlet. Radom is mounted<br />
by bolts ST 4.9x9 with washer. We recommend to draw up all bolts after clamping all bolts into parabola.<br />
7
Antenna mounting information <strong>AL2</strong>‐<strong>xx</strong>/<strong>MER</strong><br />
11. JIB MOUNTING ON ANTENNA<br />
13 mm<br />
There is necesery to keep uniform drawing up of of spring on jibs!<br />
Jib clear pipe end has to overreach at least 20 mm!<br />
8
Antenna mounting information <strong>AL2</strong>‐<strong>xx</strong>/<strong>MER</strong><br />
12. ODU DEMOUNTING<br />
8 mm<br />
In case of necessity of service procedure or polarization changing there is necessery to remove ODU by relea‐<br />
sing 4 clips that holds ODU on ODU support plate. During ODU removing is not changed antenna pointing. Nut<br />
wrench is used for bolt grounding.<br />
9