PE-Design 5.0 Advanced Techniques - Brother
PE-Design 5.0 Advanced Techniques - Brother
PE-Design 5.0 Advanced Techniques - Brother

You also want an ePaper? Increase the reach of your titles
YUMPU automatically turns print PDFs into web optimized ePapers that Google loves.
<strong>PE</strong>-<strong>Design</strong> <strong>5.0</strong> <strong>Advanced</strong> <strong>Techniques</strong><br />
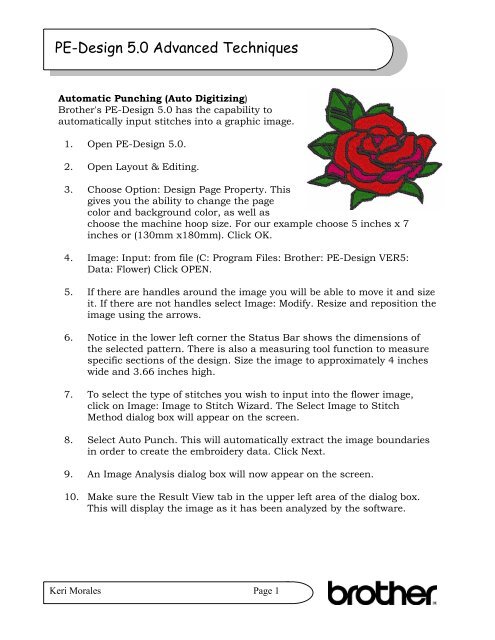
Automatic Punching (Auto Digitizing)<br />
<strong>Brother</strong>'s <strong>PE</strong>-<strong>Design</strong> <strong>5.0</strong> has the capability to<br />
automatically input stitches into a graphic image.<br />
1. Open <strong>PE</strong>-<strong>Design</strong> <strong>5.0</strong>.<br />
2. Open Layout & Editing.<br />
3. Choose Option: <strong>Design</strong> Page Property. This<br />
gives you the ability to change the page<br />
color and background color, as well as<br />
choose the machine hoop size. For our example choose 5 inches x 7<br />
inches or (130mm x180mm). Click OK.<br />
4. Image: Input: from file (C: Program Files: <strong>Brother</strong>: <strong>PE</strong>-<strong>Design</strong> VER5:<br />
Data: Flower) Click O<strong>PE</strong>N.<br />
5. If there are handles around the image you will be able to move it and size<br />
it. If there are not handles select Image: Modify. Resize and reposition the<br />
image using the arrows.<br />
6. Notice in the lower left corner the Status Bar shows the dimensions of<br />
the selected pattern. There is also a measuring tool function to measure<br />
specific sections of the design. Size the image to approximately 4 inches<br />
wide and 3.66 inches high.<br />
7. To select the type of stitches you wish to input into the flower image,<br />
click on Image: Image to Stitch Wizard. The Select Image to Stitch<br />
Method dialog box will appear on the screen.<br />
8. Select Auto Punch. This will automatically extract the image boundaries<br />
in order to create the embroidery data. Click Next.<br />
9. An Image Analysis dialog box will now appear on the screen.<br />
10. Make sure the Result View tab in the upper left area of the dialog box.<br />
This will display the image as it has been analyzed by the software.<br />
Keri Morales Page 1
<strong>PE</strong>-<strong>Design</strong> <strong>5.0</strong> <strong>Advanced</strong> <strong>Techniques</strong><br />
Let's cover a few of the options in the Result View tab:<br />
11. You can zoom in and out of areas of the image by dragging the zoom<br />
slider up or down.<br />
12. By selecting the Show Outline box the outline extracted from the<br />
analyzed image will be shown.<br />
13. Omit colors: You can select the areas you don't wish to embroider. An X<br />
through the color box means that color segment will not have any<br />
stitches input into it.<br />
The image can be fine tuned by using the Analysis Parameters functions:<br />
14. Noise Reduction: Noise reduction is the reduction of extraneous and<br />
excessive data or information. Translation: It will get rid of lines and<br />
marks that may not be needed in the photo or design such as light<br />
veining in leaves, or if it is a printed fabric, it will define the design of the<br />
print in the picture more clearly.<br />
15. Segmentation Sensitivity: Will help set the color areas to be defined. It<br />
gives segments more definition. It will bring more colors into an area.<br />
Let's used a leaf segment for an example. If the sensitivity is set for low,<br />
the leaf will be one color. If it set for high, the leaf may be broken into 3<br />
colors. It gives the picture more color options<br />
16. Outline Smoothness: Will help define the limits of the design area colors.<br />
For example, let’s say the image is a black and white cow; it will help<br />
define how smooth the black or white spots are on the cow. If it's set for<br />
high, the area around the black spots will be smooth. If it set for low,<br />
they color area may be a bit jagged.<br />
17. Max. Number of colors: Sets the number of colors used.<br />
18. After the necessary settings are selected, click Retry. This refreshes the<br />
screen and re-analyzes the image. If Retry is not clicked, the new settings<br />
are not applied.<br />
19. Thread Chart: This allows you to select from numerous thread charts,<br />
depending on the brand of thread you wish to use. You can also<br />
customize your own thread chart.<br />
Keri Morales Page 2
<strong>PE</strong>-<strong>Design</strong> <strong>5.0</strong> <strong>Advanced</strong> <strong>Techniques</strong><br />
20. In the image on the Result View tab, areas not set to be sewn are shown<br />
filled with a crosshatch pattern.<br />
21. After the desired settings are selected, click Finish.<br />
22. Embroidery stitches will be created and input into the image. The<br />
appropriate thread colors and stitch settings are applied, and then the<br />
data is pasted into the <strong>Design</strong> Page. The stitch settings of the created<br />
embroidery data can later be changed in the same way as the settings for<br />
other shape objects are.<br />
23. Click on Display: Realistic Preview. This gives you a realistic picture of<br />
what the embroidery design will look like when you stitch it out.<br />
24. Click on the Zoom icon located on the left tool bar. Click on the + icon<br />
then click on the design to create a larger realistic preview of the design.<br />
25. Click on Zoom and 1:1 to return to the regular view.<br />
26. Click on Display: Realistic Preview to exit out of the function.<br />
27. To preview the order in which the color blocks of the design will be sewn,<br />
click on Sew: Sewing Order. The sewing order of each color block will be<br />
displayed. Notice when you click on a block the area is highlighted on<br />
the design.<br />
28. To change the sewing order, click and hold down the left mouse. When<br />
you hold the mouse down you will capture the block. Drag the block to<br />
the desired sewing position. The destination location is indicated by the<br />
red line while the block is being dragged. There are many other functions<br />
of this feature too!<br />
29. After you have previewed the design in Realistic Preview and have made<br />
any Sewing Order changes, you can then watch a simulation of the<br />
machine stitching by utilizing the Stitch Simulator.<br />
30. Hide the image by going to Image: Display Image: Off.<br />
31. Click on Display: Stitch Simulator.<br />
Keri Morales Page 3
<strong>PE</strong>-<strong>Design</strong> <strong>5.0</strong> <strong>Advanced</strong> <strong>Techniques</strong><br />
32. Click on the needle to begin the simulation. You can see the design fill in<br />
on screen. The stitch count is displayed in the upper left corner.<br />
You may pause the stitch simulator, jump ahead a color or go back a<br />
color. The speed of the simulator can be adjusted by moving the bar on<br />
the left.<br />
Lettering<br />
Adding lettering to the rose design is fast and easy.<br />
There are numerous creative lettering functions built-into the <strong>Brother</strong> <strong>PE</strong>-<br />
<strong>Design</strong> <strong>5.0</strong> software. One of these functions is the ability to fit text to any<br />
shape. To create a shape as a guide, follow these easy steps.<br />
1. Click on the Circle or Arc icon in the left tool bar. The shape of the curser<br />
changes to a + sign and displays together with a small ellipse. The arc shape<br />
selector allows you to select the shape of the pattern.<br />
2. The Sewing Attributes bar now offers arc shape, line stitch, and region<br />
stitch. The shape that will be drawn is just for text placement not for<br />
sewing, so turn off the Line Sew and Region Sew options. Click on each icon<br />
to turn off these functions.<br />
TIP: To create a perfect circle, hold down the Shift key on the keyboard as you<br />
drag your mouse.<br />
3. To create the circle shape click and hold down the left mouse button as you<br />
move the mouse across the screen. Start from the upper left corner of the<br />
rose and drag the mouse to the lower right corner of the rose. A circle will be<br />
created.<br />
4. To size or reposition the circle click on the Select Object icon on the left tool<br />
bar. Handles will appear around the circle. Move or resize the shape.<br />
5. Click the large "A" icon on the Tool Box to select lettering. Notice the shape<br />
of the cursor changes.<br />
6. A new set of options appears on the Sewing Attributes bar at the top of the<br />
screen. These tools are for customizing the text. The style of font, text size,<br />
text color and text stitch type all can be chosen at this time.<br />
7. Let's choose style 08, 5mm, satin stitch.<br />
Keri Morales Page 4
<strong>PE</strong>-<strong>Design</strong> <strong>5.0</strong> <strong>Advanced</strong> <strong>Techniques</strong><br />
8. Once the attributes of the lettering have been chosen you can now select the<br />
letters. Click the left mouse anywhere on the screen. The text dialog box will<br />
open.<br />
9. Let's type in "R e d R o s e" six times in the top text box. Click OK. (You can<br />
also select the letters one by one in the letters table.)<br />
10. The words "Red Rose" will appear above the embroidery design.<br />
11. To edit the text click on the Select Object icon on the left tool bar, then click<br />
on the text to select it. Then click Text: Edit Text Letters on the menu bar to<br />
open the Edit Text dialog. You may then edit your text as necessary. Click<br />
OK when finished.<br />
12. If you want to edit the text color, font style, or size, click the Select Object<br />
icon on the left tool bar. The Sewing Attributes bar for the text pattern will<br />
show the current settings and allow you to change them. Let's leave these<br />
settings as they are.<br />
13. The letters in "Red Rose" could be space a little farther apart to encase the<br />
circle more. To do this select Text: Text Attribute Setting. Then select<br />
2mm/.08 inches for Character Spacing. Click Apply. The letters will be<br />
space farther apart on the circle. Click Close.<br />
14. To form the text to the circle, make sure the select objects is highlighted.<br />
Hold down the CTRL key on the keyboard while using your left mouse to<br />
click on the circle and lettering.<br />
15. A large boxed area will surround both the letters and circle.<br />
16. Click on Text: Fit Text to Path setting.<br />
17. A Fit Text to Path Attribute Setting dialog box will appear. Click on OK. The<br />
text will form around the circle.<br />
18. Click on Edit: Select all to lock the lettering and design together.<br />
19. The rose design and lettering is now ready to be sewn.<br />
Keri Morales Page 5
<strong>PE</strong>-<strong>Design</strong> <strong>5.0</strong> <strong>Advanced</strong> <strong>Techniques</strong><br />
Digitizing True Type Fonts<br />
2. Select the text icon on the left vertical tool bar.<br />
1. Open Layout & Editing in <strong>PE</strong>-<br />
<strong>Design</strong> <strong>5.0</strong>.<br />
NOTE: When Layout and Editing<br />
is initially opened both the Line<br />
Sew Type function and the<br />
Region Sew Type functions are<br />
so called “open” or “on”.<br />
3. Select any True Type Font from the top font drop-down menu.<br />
4. Select the text size from the menu option beside the True Type Font<br />
menu option.<br />
True Type Font<br />
List<br />
Font Size Line Sew<br />
Type<br />
Region Sew<br />
Type<br />
5. Decide what Line Sew Type and Region Sew Type to be used. [Thread<br />
colors can also be selected at this time.]<br />
Keri Morales Page 6
<strong>PE</strong>-<strong>Design</strong> <strong>5.0</strong> <strong>Advanced</strong> <strong>Techniques</strong><br />
6. Click the left mouse anywhere on the screen to open the Edit Text dialog<br />
box.<br />
Keri Morales Page 7<br />
7. Click the mouse on the desired<br />
letter and click Insert or type the<br />
letter in the text box area.<br />
8. Click OK.<br />
11. Then click on the letter on the screen to<br />
select it. Boxes will now appear around the<br />
letter. Click and drag the letter to move it<br />
into the desired position.<br />
9. The letter or letters now appear<br />
on the screen with the stitches.<br />
10. To change the Line Sew Type,<br />
Region Sew Type or thread color;<br />
click the Select Object icon,<br />
the first icon in the left<br />
vertical tool bar.<br />
12. Changes can now be made to the True Type Font stitches, such as<br />
changing stitch type.<br />
Cutting and pasting a duplicate will give you two sets of lettering, one on<br />
top of the other. Set the bottom set of lettering to Black and fill stitch.<br />
Set the top lettering for Blue<br />
coloring and satin stitch.<br />
Then off set the lettering to<br />
create a showed font.