Operating and Safety Instructions - Sauer
Operating and Safety Instructions - Sauer
Operating and Safety Instructions - Sauer

Create successful ePaper yourself
Turn your PDF publications into a flip-book with our unique Google optimized e-Paper software.
H<strong>and</strong> cocking<br />
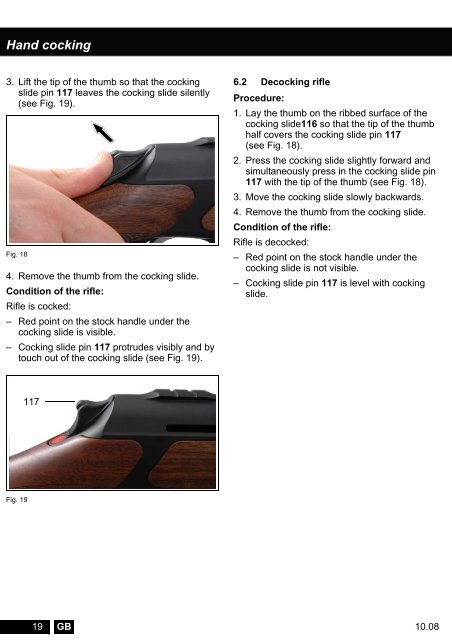
3. Lift the tip of the thumb so that the cocking<br />
slide pin 117 leaves the cocking slide silently<br />
(see Fig. 19).<br />
Fig. 18<br />
4. Remove the thumb from the cocking slide.<br />
Condition of the rifle:<br />
Rifle is cocked:<br />
– Red point on the stock h<strong>and</strong>le under the<br />
cocking slide is visible.<br />
– Cocking slide pin 117 protrudes visibly <strong>and</strong> by<br />
touch out of the cocking slide (see Fig. 19).<br />
Fig. 19<br />
117<br />
6.2 Decocking rifle<br />
Procedure:<br />
1. Lay the thumb on the ribbed surface of the<br />
cocking slide116 so that the tip of the thumb<br />
half covers the cocking slide pin 117<br />
(see Fig. 18).<br />
2. Press the cocking slide slightly forward <strong>and</strong><br />
simultaneously press in the cocking slide pin<br />
117 with the tip of the thumb (see Fig. 18).<br />
3. Move the cocking slide slowly backwards.<br />
4. Remove the thumb from the cocking slide.<br />
Condition of the rifle:<br />
Rifle is decocked:<br />
– Red point on the stock h<strong>and</strong>le under the<br />
cocking slide is not visible.<br />
– Cocking slide pin 117 is level with cocking<br />
slide.<br />
19 GB<br />
10.08